

Copy Export
This chapter explains Copy Export and Copy Export Recovery and how to use them. This chapter covers the following topics:
•Copy Export overview
•Copy Export considerations
•Copy Export process messages
•Reclaim process for Copy Export physical volumes
•Copy Export usage
•Copy Export Recovery usage
11.1 Copy Export overview and Considerations
Copy Export provides a function to enable a copy of selected logical volumes written to the IBM TS7700 Virtualization Engine to be removed and taken offsite for disaster recovery purposes. In addition, because the data is a copy of the logical volumes, the volumes remain intact and are still accessible by the production system.
Control of Copy Export
Storage Group and Management Class constructs are defined to use separate pools for the primary and secondary copies of the logical volume. The existing Management Class construct, which is part of Advanced Policy Management (APM), is used to create a secondary copy of the data to be Copy Exported. The Management Class actions are configured through the TS7700 Virtualization Engine Management Interface (MI).
An option on the MI window enables designation of a secondary pool as a Copy Export pool. As logical volumes are written, the secondary copy of the data is written to stacked volumes in the Copy Export pool.
Workflow of a Copy Export process
Typically, you run the Copy Export operation on a periodic basis. Because the purpose is to get a copy of the data offsite for disaster recovery (DR) purposes, performing it soon after the data is created minimizes the time for the recovery point objective (RPO). When the time comes to initiate a Copy Export, a Copy Export job is run from the production host.
The TS7700 Virtualization Engine pre-migrates any logical volumes in the Copy Export pool that have not been pre-migrated. Any new logical volumes written after the Copy Export operation is initiated is not included in the Copy Export set of physical volumes. The TS7700 Virtualization Engine then writes a complete TS7700 Virtualization Engine database to each of the physical volumes in the Copy Export set. It is possible to select to write the database backup to all of the physical volumes, or to limited number of physical volumes.
During a Copy Export operation, all of the physical volumes with active data on them in a specified secondary pool are candidates to be exported. Only the logical volumes that are valid on that TS7700 Virtualization Engine are considered during the execution of the operation. Logical volumes currently mounted during a Copy Export operation are excluded from the export set, as are any volumes that are not currently in the TVC of the export cluster.
The host that initiates the Copy Export operation first creates a dedicated export list volume on the TS7700 Virtualization Engine that runs the operation. The export list volume contains instructions regarding the execution of the operation, and a reserved file that the TS7700 Virtualization Engine uses to provide completion status and export operation information.
As part of the Copy Export operation, the TS7700 Virtualization Engine creates response records in the reserved file. These records list the logical volumes exported and the physical volumes on which they reside. This information can be used as a record for the data that is offsite. The TS7700 Virtualization Engine also writes records in the reserved file on the export list volume that provide the status for all physical volumes with a state of Copy Exported.
The Copy Export job can specify whether the stacked volumes in the Copy Export set must be ejected immediately or placed into the export-hold category. When Copy Export is used with the export-hold category, you need to manually request that the export-hold volumes
be ejected.
be ejected.
The choice to eject as part of the Copy Export job or to eject them later from the export-hold category is based on your operational procedures. The ejected Copy Export set is then transported to a disaster recovery site or vault. Your RPO determines the frequency of the Copy Export operation.
11.1.1 General considerations for Copy Export
Consider the following information when you are planning to use the Copy Export function for disaster recovery:
•Both TS7740 and TS7720T support the Copy Export function. At Copy Export Recovery, the Copy Export sets can be used to restore data at a location that has equal or newer physical tape drives, and equal or newer TS7700 microcode. TS7720T Copy Export set can be restored into both TS7740 and TS7720T. TS7740 Copy Export set can also be restored into both TS7740 and TS7720T.
•When using the Copy Export acceleration (LMTDBPVL) option, the database backup is appended only to the first two and the last two volumes that are exported. These corresponding tapes with the database backup are selected and listed in the alphabetical order of the physical tape VOLSER. If the export acceleration (LMTDBPVL) option was set, and there is a failure appending the DB backup, a different physical volume is selected to contain the database backup, so that four physical volumes have the DB backup.
•Specific logical volumes are not specified as part of a Copy Export operation. Instead, all valid logical volumes on the physical volumes in the specified secondary pool are considered for export. After the first time that Copy Export is performed for a pool, the logical volumes that will be exported are the ones for that pool that have been newly written or modified since the last export began.
Previously exported volumes that have not been changed are not exported. For recovery, all exported physical volumes that still contain active data from a source TS7700 need to be included, because not all of the logical volumes that are created are going to be on the last set exported.
•The primary copy of the logical volumes exported remains in the inventory of the TS7700 grid. Exported volumes are always copies of volumes still in the TS7700.
•Only those logical volumes assigned to the secondary pool specified in the export list file volume that are resident on a physical volume of the pool or in the cache of the TS7700 performing the export operation are considered for export. For a grid configuration, if a logical volume is to be copied to the TS7700 that is performing the Copy Export operation, but that copy had not yet completed when the export is initiated, it is not included in the current export operation.
•Logical volumes to be exported that are resident only in the cache, and not mounted when the Copy Export operation is initiated, are copied to stacked volumes in the secondary pool as part of the Copy Export operation.
•If the logical volumes are assigned to CP0 in TS7720T, they are resident only and never copied to any physical volumes. Therefore, logical volumes in CP0 cannot be exported.
•Any logical volume assigned to the specified secondary pool in the TS7700 after the Copy Export operation is initiated is not part of the export, and is written to a physical volume in the pool but is not exported. This includes host-sourced and copy-sourced data.
•Volumes that are currently mounted cannot be Copy Exported.
•Only one Copy Export operation can be performed at a time.
•Only one secondary physical volume pool can be specified per export operation, and it must have been previously defined as a Copy Export pool.
•The export list file volume cannot be assigned to the secondary pool that is specified for the operation. If it is, the Copy Export operation fails.
•During the execution of a Copy Export operation, If the TS7700 cannot access the primary copy and the secondary copy exists in a pool defined for the Copy Export, that secondary version is made inaccessible and the mount fails. This occurs regardless of whether that secondary pool is involved in the current Copy Export operation.
The library associated with the TS7700 running the Copy Export operation must have an I/O station feature for the operation to be accepted. Empty the I/O station before running Copy Export and prevent it from going to the full state.
•A minimum of four physical tape drives must be available to the TS7700 for the Copy Export operation to be performed. The operation is terminated by the TS7700 when fewer than four physical tape drives are available. Processing for the physical stacked volume in progress when the condition occurred is completed, and the status file records reflect what was completed before the operation was terminated.
•Copy Export and the insertion of logical volumes are mutually exclusive functions in a TS7700 or grid.
•If a scratch physical volume is needed during a Copy Export operation, the secondary physical volume pool must have an available scratch volume or access to borrow one for the operation to continue. If a scratch volume is not available, the TS7700 indicates this through a console message, and waits for up to 60 minutes. If a scratch volume is not made available to the secondary physical volume pool within 60 minutes, the Copy Export operation is ended.
•During execution, if the TS7700 determines that a physical volume assigned to the specified secondary pool contains one or more primary logical volumes, that physical volume and any secondary logical volumes on it are excluded from the Copy Export operation.
•To minimize the number of physical volumes used for Copy Export, use the highest capacity media and physical drive format that is compatible with the recovery TS7700. You might also want to reduce the number of concurrent tape devices that the TS7700 uses when copying data from cache to the physical volumes in secondary pool used for Copy Export. You can change it using the Maximum Devices in Pool Properties in the MI.
•All copy-exported volumes that are exported from a source TS7700 must be placed in a library for recovery. The source TS7700 limits the number of physical volumes that can be Copy Exported. The default limit is 2000 per TS7700, to ensure that they all fit into the receiving library. This value can be adjusted to a maximum of 10,000 volumes using Copy Export Settings in MI.
•The recovery TS7700 must have physical tape drives that can read the physical volumes from a source TS7700. If a source TS7700 writes the volumes using the native E07 format, the recovery TS7700 must also have 3592-E07 drives running in native format mode. If a source TS7700 writes the volumes using the native E06 format, the recovery TS7700 must also have 3592-E06 drives or 3592-E07 drives.
If the exporting pool on the source TS7700 is set up to encrypt the data, the recovery TS7700 must also be set up to handle encrypted volumes and have access to the encryption key manager with replicated keys from the production site. If the source TS7700 writes the volumes in J1A or emulated J1A mode, any 3592 model drive in the recovery TS7700 can read the data.
•There is an available service offering where a customer can merge data from more than one source TS7700 Copy Export backup. However, basically, the recovery TS7700 cannot contain any previous data, and a client-initiated recovery process cannot merge data from more than one source TS7700 together. As a part of the Copy Export Recovery, an option is provided to erase any previous data on the TS7700. This enables a TS7700 that is used for disaster recovery testing to be reused for testing of a different source TS7700’s data.
•For the secondary pool used for Copy Export, the designated reclaim pool must not be the same pool as the primary pool or its reclaim pool.
|
Note: If the reclaim pool for the Copy Export pool is the same as either the Copy Export primary pool or its reclaim pool, the primary and backup copies of a logical volume can exist on the same physical tape.
|
11.1.2 Copy Export grid considerations
Copy Export is supported in both grid and stand-alone environments. You need to remember several considerations that are unique to the grid environment.
Performing Copy Export
The first consideration relates to performing Copy Export. In a grid configuration, a Copy Export operation is performed against an individual TS7700, not across all TS7700 Virtualization Engines. Set up Copy Export in a grid plan based on the following guidelines:
•Decide which TS7700 in a grid configuration is going to be used to export a specific set of data. Although you can set up more than one TS7700 to export data, only the data from a single source TS7700 can be used in the recovery process. You cannot merge copy-exported volumes from more than one source TS7700 in the recovery TS7700.
•For each specific set of data to export, define a Management Class name. On the TS7700 that is used to export that data, define a secondary physical volume pool for that Management Class name and also ensure that you indicate that it is an export pool. Although you need to define the Management Class name on all TS7700s in the grid configuration, only specify the secondary physical volume pool on the one TS7700 that is to perform the export operation.
Specifying it on the other TS7700s in the grid configuration does not interfere with the Copy Export operation, but it is a waste of physical volumes. The exceptional useful case of this approach is if you want one of the TS7700s in the grid configuration to have a secondary copy of the data for the case the primary copies on other TS7700s are inaccessible.
•While you are defining the Management Class name for the data, also ensure that the TS7700 to perform the export operation has a copy policy specifying that it is to have a copy.
•When the Copy Export operation is run, the export list file volume must be valid only on the TS7700 that is performing the operation. You need to define a unique Management Class name to be used for the export list file volume. For that Management Class name, you need to define its copy policy so that a copy is only on the TS7700 that is to perform the export operation. If the VOLSER specified for the export list file volume when the export operation is initiated is resident on more than one TS7700, the Copy Export operation fails.
|
Tip: If the Management Class specified for the Copy Export operation is defined to more than one cluster, the Copy Export fails and the following CBR message is displayed:
CBR3726I FUNCTION INCOMPATIBLE ERROR CODE 32 FROM LIBRARY XXX FOR VOLUME xxxxxx.
X'32' There is more than one valid copy of the specified export list volume in the TS7700 grid configuration.
|
Consider this Copy Export example:
a. A Copy Export with the export list volume EXP000 is initiated from a host connected to the C0, and the Copy Export runs on the C2.
b. The copy mode of EXP000 must be [N,N,D] or [N,N,R], indicating that the only copy of EXP000 exists on C2.
c. If Copy Policy Override is activated on the C0 and the Copy Export is initiated from the host attached to C0, a copy of EXP000 is created both on the C0 and C1.
d. The grid detects that a copy of EXP000 exists on two clusters (C0 and C2) and does not start the Copy Export.
e. Copy Export fails.
For example, assume that the TS7700 that is to perform the Copy Export operation is Cluster 1. The pool on that cluster to export is pool 8. You need to set up a Management Class for the data that is to be exported so that it has a copy on Cluster 1 and a secondary copy in pool 8. To ensure that the data is on that cluster and is consistent with the close of the logical volume, you want to have a copy policy of Rewind Unload (RUN). You define the following information:
•Define a Management Class, for example, MCCEDATA, on Cluster 1:
Secondary Pool 8
Cluster 0 Copy Policy RUN
Cluster 1 Copy Policy RUN
•Define this same Management Class on Cluster 0 without specifying a secondary pool.
•To ensure that the export list file volume gets written to Cluster 1 and only exists there, define a Management Class, for example, MCELFVOL, on Cluster 1:
Cluster 0 Copy Policy No Copy
Cluster 1 Copy Policy RUN
•Define this Management Class on Cluster 0:
Cluster 0 Copy Policy No Copy
Cluster 1 Copy Policy RUN
A Copy Export operation can be initiated through any virtual tape drive in the TS7700 grid configuration. It does not have to be initiated on a virtual drive address in the TS7700 that is to perform the Copy Export operation. The operation is internally routed to the TS7700 that has the valid copy of the specified export list file volume. Operational and completion status is broadcast to all hosts attached to all of the TS7700s in the grid configuration.
It is assumed that Copy Export is performed regularly, and logical volumes whose copies were not complete when a Copy Export was initiated will be exported the next time that Copy Export is initiated. You can check the copy status of the logical volumes on the TS7700 that is to perform the Copy Export operation before initiating the operation by using the Volume Status function of the BVIR facility. You can then be sure that all critical volumes are exported during the operation.
Performing Copy Export Recovery
The next consideration relates to how Copy Export Recovery is performed. Although there is an available service offering where a customer can merge data from more than one source TS7700 Copy Export backup, Copy Export Recovery is basically to a stand-alone TS7700. As part of a client-initiated recovery process, the recovery TS7700 processes all grid-related information in the database, converting it to look like a single TS7700. This conversion means that the recovery TS7700 has volume ownership of all volumes.
It is possible that one or more logical volumes might become inaccessible because they were modified on a TS7700 other than the one that performed the Copy Export operation, and the copy did not complete before the start of the operation. Remember that each copy-exported physical volume remains under the management of the TS7700 from which it was exported.
Normally, you return the empty physical volumes to the library I/O station that associated with the source TS7700. They are then reused by that TS7700. If you want to move them to another TS7700, whether in the same grid configuration or another, consider two important points:
•Ensure that the VOLSER ranges you define for that TS7700 match the VOLSERs of the physical volumes that you want to move.
•To have the original TS7700 stop managing the copy-exported volumes, enter the following command from the host:
LIBRARY REQUEST,libname,COPYEXP,volser,DELETE
11.1.3 Reclaim process for Copy Export physical volumes
The physical volumes exported during a Copy Export operation continue to be managed by the source TS7700 Virtualization Engine regarding space management. As logical volumes that are resident on the exported physical volumes expire, are rewritten, or otherwise invalidated, the amount of valid data on a physical volume decreases until the physical volume becomes eligible for reclamation based on your provided criteria for its pool.
Figure 11-1 on page 704 shows how the Reclaim Threshold Percentage is set in Physical Volume Pool Properties. If the ratio between active data size and total bytes written to the physical volume is lower than the Reclaim Threshold Percentage, the physical volume becomes eligible for reclamation. Remember that the ratio between active data size and media capacity is not used for the comparison with Reclaim Threshold Percentage.
Exported physical volumes that are to be reclaimed are not brought back to the source TS7700 Virtualization Engine for processing. Instead, a new secondary copy of the remaining valid logical volumes is made using the primary logical volume copy as a source. It is called Offsite Reclaim. Offsite Reclaim does not start while Copy Export is running, and follows Inhibit Reclaim Schedule. If there is more than one volume eligible for Offsite Reclaim, it tries to make the exported physical volumes EMPTY one by one in the ascending order of their active data size.
There is another kind of Offsite Reclaim called Priority Offsite Reclaim. It is Offsite Reclaim for user-specified exported physical volumes. Users can make an exported physical volume eligible for Priority Offsite Reclaim by issuing the following library request from the host: LIBRARY REQUEST,libname,COPYEXP,volser,RECLAIM. Priority Offsite Reclaim processing is the same as for normal Offsite Reclaim, but it runs in priority over normal Offsite Reclaim, and does not follow Inhibit Offsite Reclaim Schedule.
Figure 11-1 shows the Reclaim Threshold Percentage for a normal Offsite Reclaim.
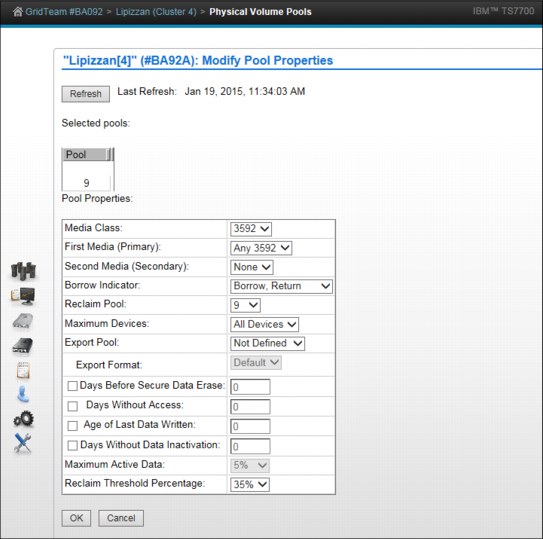
Figure 11-1 Reclaim Threshold Percentage is set in Physical Volume Pool Properties
The next time that the Copy Export operation is performed, the physical volumes with the new copies are also exported. After the Copy Export completes, the physical volumes that were reclaimed (which are offsite) are no longer considered to have valid data (empty), and can be returned to the source TS7700 Virtualization Engine to be used as new scratch volumes.
|
Tip: If a physical volume is in Copy Export hold state and becomes empty, it is automatically moved back to the common scratch pool (or the defined reclamation pool) when the next Copy Export operation completes.
|
Monitoring for Copy Export data
The Bulk Volume Information Retrieval (BVIR) function can also be used to obtain a current list of exported physical volumes for a secondary pool. For each exported physical volume, information is available on the amount of active data that each cartridge contains.
11.1.4 Copy Export process messages
During the execution of the Copy Export operation, the TS7700 sends informational messages to its attached hosts. These messages are in the syslog and are shown in Table 11-1.
|
Note: All messages are prefaced with CBR3750I
|
Table 11-1 SYSLOG messages from the library
|
Message description
|
Action needed
|
|
E0000 EXPORT OPERATION STARTED FOR EXPORT LIST VOLUME XXXXXX
This message is generated when the TS7700 begins the Copy Export operation.
|
None.
|
|
E0002 OPENING EXPORT LIST VOLUME XXXXXX FAILED
This message is generated when opening Export List Volume failed during Copy Export operation
|
Check if the Export List Volume or cache file system is in a bad state.
|
|
E0005 ALL EXPORT PROCESSING COMPLETED FOR EXPORT LIST VOLUME XXXXXX
This message is generated when the TS7700 completes an export operation.
|
None.
|
|
E0006 STACKED VOLUME YYYYYY FROM LLLLLLLL IN EXPORT-HOLD
This message is generated during Copy Export operations when an exported stacked volume ‘YYYYYY’ has been assigned to the export-hold category. The ‘LLLLLLLL’ field is replaced with the distributed library name of the TS7700 performing the export operation.
|
None.
|
|
E0006 STACKED VOLUME YYYYYY FROM LLLLLLLL IN EJECT
This message is generated during Copy Export operations when an exported stacked volume ‘YYYYYY’ has been assigned to the eject category. The physical volume is placed in the convenience I/O station. The ‘LLLLLLLL’ field is replaced with the distributed library name of the TS7700 performing the export operation.
|
Remove ejected volumes from the convenience I/O station.
|
|
E0013 EXPORT PROCESSING SUSPENDED, WAITING FOR SCRATCH VOLUME
This message is generated every 5 minutes when the TS7700 needs a scratch stacked volume to continue export processing and there are none available.
|
Make one or more physical scratch volumes available to the TS7700 performing the export operation. If the TS7700 does not get access to a scratch stacked volume in 60 minutes, the operation is ended.
|
|
E0014 EXPORT PROCESSING RESUMED, SCRATCH VOLUME MADE AVAILABLE
This message is generated when, after the export operation was suspended because no scratch stacked volumes were available, scratch stacked volumes are again available and the export operation can continue.
|
None.
|
|
E0015 EXPORT PROCESSING TERMINATED, WAITING FOR SCRATCH VOLUME
This message is generated when the TS7700 ends the export operation because scratch stacked volumes were not made available to the TS7700 within 60 minutes of the first E0013 message.
|
Operator must make more TS7700 stacked volumes available, perform analysis of the Status file on the export list file volume, and reissue the export operation.
|
|
E0016 COPYING LOGICAL EXPORT VOLUMES FROM CACHE TO STACKED VOLUMES
This message is generated when the TS7700 begins, and every 10 minutes during, the process of copying logical volumes that are only resident in the Tape Volume Cache to physical volumes in the specified secondary physical volume pool.
|
None.
|
|
E0017 COMPLETED COPY OF LOGICAL EXPORT VOLUMES TO STACKED VOLUMES
This message is generated when the TS7700 completes the copy of all needed logical volumes from cache to physical volumes in the specified secondary physical volume pool.
|
None.
|
|
E0018 EXPORT TERMINATED, EXCESSIVE TIME FOR COPY TO STACKED VOLUMES
The export process has been ended because one or more cache resident-only logical volumes needed for the export were unable to be copied to physical volumes in the specified secondary physical volume pool within a 10-hour period from the beginning of the export operation.
|
Call for IBM support.
|
|
E0019 EXPORT PROCESSING STARTED FOR POOL XX
This message is generated when the TS7700 export processing for the specified secondary physical volume pool XX.
|
None.
|
|
E0020 EXPORT PROCESSING COMPLETED FOR POOL XX
This message is generated when the TS7700 completes processing for the specified secondary physical volume pool XX.
|
None.
|
|
E0021 DB BACKUP WRITTEN TO STACKED VOLUMES, PVOL01, PVOL02, PVOL03, PVOL04
(Where PVOL01, PVOL02, PVOL03, and PVOL04 are the physical volumes to which the database backup was appended).
This message is generated if the Copy Export acceleration (LMTDBPVL) option was selected on the export.
|
None.
|
|
E0022 EXPORT RECOVERY STARTED
The export operation has been interrupted by a TS7700 error or a power off condition. When the TS7700 is restarted, it attempts recovery of the operation.
|
None.
|
|
E0023 EXPORT RECOVERY COMPLETED
The recovery attempt for interruption of an export operation has been completed.
|
Perform analysis of the Status file on the export list file volume and reissue the export operation, if necessary.
|
|
E0024 XXXXXX LOGICAL VOLUME WITH INVALID COPY ON LLLLLLLL
This message is generated when the TS7700 performing the export operation has determined that one or more (XXXXXX) logical volumes that are associated with the auxiliary storage pool specified in the export list file do not have a valid copy resident on the TS7700. The ‘LLLLLLLL’ field is replaced by the distributed library name of the TS7700 performing the export operation. The export operation continues with the valid copies.
|
When the export operation completes, perform analysis of the Status file on the Export List File volume to determine the logical volumes that were not exported. Ensure that they have completed their copy operations and then perform another export operation.
|
|
E0025 PHYSICAL VOLUME XXXXXX NOT EXPORTED, PRIMARY COPY FOR YYYYYY UNAVAILABLE
This message is generated when the TS7700 detected a migrated-state logical volume ‘YYYYYY’ with an unavailable primary copy. The physical volume ‘XXXXXX’ on which the secondary copy of the logical volume ‘YYYYYY’ is stored was not exported.
This message is added at code level R1.7.
|
The logical volume and the physical volume will be eligible for the next Copy Export operation after the logical volume is mounted and unmounted from the host. An operator intervention is also posted.
|
|
E0026 DB BACKUP WRITTEN TO ALL OF STACKED VOLUMES
This message is generated when Copy Export acceleration (LMTDBPVL) option is not selected.
|
None.
|
|
R0000 RECLAIM SUCCESSFUL FOR EXPORTED STACKED VOLUME YYYYYY
This message is generated when the TS7700 has successfully completed reclaim processing for an exported stacked volume exported during a previous copy export operation.
Note: A copy exported physical volume can become eligible for reclaim based on the reclaim policies defined for its secondary physical volume pool, or through the host console request command.
|
The exported physical volume no longer contains active data and can be returned from its offsite location for reuse. If it is placed in export-hold, it should be returned when the next copy export is completed.
|
When a stacked volume associated with a Copy Export operation is ejected from a library (placed in export-hold or is physically ejected from the library), you see status message E0006, which is sent by the library (see Table 11-1 on page 705). Removable Media Management (RMM) intercepts this message and performs one of these actions:
•If the stacked volume is predefined to RMM, RMM marks the volume as ejected or in-transit and sets the movement/store date associated with the stacked volume.
•If the stacked volume is not predefined to RMM and the STACKEDVOLUME(YES) option in RMM is specified, RMM automatically adds the stacked volume to its control data set (CDS).
To have DFSMSrmm policy management manage the retention and movement for volumes created by Copy Export processing, you must define one or more volume vital record specifications (VRS). For example, assume that all Copy Exports are targeted to a range of volumes STE000 - STE999. You can define a VRS as shown in Example 11-1.
Example 11-1 VRS definition
RMM AS VOLUME(STE*) COUNT(99999) LOCATION(location)
As a result, all matching stacked volumes that are set in AUTOMOVE have their destination set to the required location, and your existing movement procedures can be used to move and track them.
In addition to the support listed, a copy-exported stacked volume can become eligible for reclamation based on the reclaim policies defined for its secondary physical volume pool or through the Host Console Request function (LIBRARY REQUEST). When it becomes eligible for reclamation, the exported stacked volume no longer contains active data and can be returned from its offsite location for reuse.
For users that use DFSMSrmm, when you have stacked volume support enabled, DFSMSrmm automatically handles and tracks the stacked volumes created by Copy Export. However, there is no way to track which logical volume copies are on the stacked volume. Retain the updated export list file, which you created and the library updated, so that you have a record of the logical volumes that were exported, and on what exported stacked volume they are.
For more information and error messages related to the Copy Export function in RMM, see the z/OS DFSMSrmm Implementation and Customization Guide, SC23-6874.
11.2 Implementing and running Copy Export
Implementing and running Copy Export are described. For more information and error messages that relate to the Copy Export function, see the IBM Virtualization Engine TS7700 Series Copy Export Function User’s Guide, which is available at:
11.2.1 Setting up data management definitions
To set up the data management definitions, perform the following steps:
1. Decide the Management Class construct name (or names).
As part of the plan for using the Copy Export function, you must decide on at least one Management Class construct name. A preferred practice is to make the name meaningful and relate to the type of data to be on the pool or the location where the data is sent.
For example, if the pool is used to send data to the primary disaster recovery site in Atlanta, a name like MCPRIATL can be used. “MC” indicates Management Class, “PRI” indicates that it is for the primary recovery site, and “ATL” indicates Atlanta. Up to an eight-character name can be defined.
2. Define the Management Class names to DFSMS.
After the Management Class names are selected, the names must be defined to DFSMS and to the TS7700. For details about defining the Management Class in DFSMS, see z/OS DFSMSdfp Storage Administration, SC23-6868.
None of the settings are used for system-managed tape. All settings associated with a Management Class name are defined through the TS7700, not the DFSMS windows.
3. Define the Management Class names to the TS7700.
You must also define the Management Class names on the TS7700 because you are not using the Default Management Class settings for Copy Export volumes. Define a Secondary Pool for the copies to be exported.
See “Management Classes window” on page 406 for details about how to add a Management Class.
4. Define the VOLSER ranges for the 3592 media.
You must define the VOLSER range (or ranges) for the physical volumes to use for Copy Export if you plan to use a specific VOLSER range. Ensure that you define the same pool that you used in the Management Class definition as the Home Pool for this VOLSER range.
|
Tip: For the physical volumes that you use for Copy Export, defining a specific VOLSER range to be associated with a secondary pool on a source TS7700 can simplify the task of knowing the volumes to use in recovery, and of returning a volume that no longer has active data on it to the TS7700 that manages it.
|
See“Defining VOLSER ranges for physical volumes” on page 498 for details about how to define the VOLSER ranges.
5. Define the characteristics of the physical volume pools used for Copy Export.
For the pool or pools that you plan to use for Copy Export and that you have specified previously in the Management Class definition, and, optionally, in the VOLSER range definition, select Copy Export in the Export Pool field.
See “Defining physical volume pools in the TS7740 or TS7720T” on page 500 for more information about how to change the physical volume pool properties.
6. Code or modify the Management Class ACS routine.
Add selection logic to the Management Class ACS routine to assign the new Management Class name, or names, as appropriate.
7. Activate the new construct names and ACS routines.
Before new allocations are assigned to the new Management Class, the Source Control Data Set (SCDS) with the new Management Class definitions and ACS routines must be activated by using the SETSMS SCDS command.
11.2.2 Validating before activating the Copy Export function
Before the logical volumes are exported, you must perform several general validations. Before you initiate the operation, check that the TS7700 Virtualization Engine has the required physical drives and scratch physical volume resources. Verify that the TS7700 Virtualization Engine is not near the limit of the number of physical volumes that can have a status of Copy Exported and modify the value, if required. Depending on your production environment, you might want to automate these validation steps.
Follow these validation steps:
1. Check whether data is in an older format. If you migrated from a B10 or B20 VTS to the TS7700 Virtualization Engine by using the outboard migration method, you might have data that is still in the older VTS format. The TS7700 Virtualization Engine cannot export data in the old format, so you must check whether any of the data to export was written with the old format.
2. Validate that the TS7700 Virtualization Engine has at least four available physical tape drives. You can use the Library Request host console command that specifies the PDRIVE request. This returns the status of all physical drives attached to the TS7700 Virtualization Engine. If fewer than the required numbers of physical drives are available, you must call for service to repair drives before you perform the Copy Export operation.
See Example 11-2 for the output of the PDRIVE request. This command is only valid when run against a distributed library.
Example 11-2 Data returned by the PDRIVE request
LI REQ,BARR03A,PDRIVE
CBR1020I PROCESSING LIBRARY COMMAND: REQ,BARR03A,PDRIVE.
CBR1280I LIBRARY BARR03A REQUEST. 768
KEYWORDS: PDRIVE
---------------------------------------------------------------
PHYSICAL DRIVES V2
SERIAL NUM TYPE MODE AVAIL ROLE POOL PVOL LVOL
0000013D0531 3592E07 E07E Y MIGR 03 JBB829 635219
0000013D0507 3592E07 E07E Y IDLE 02 JBB839
0000013D0530 3592E07 E07E Y IDLE 01 JBB841
0000013D0534 3592E07 E07E Y MIGR 03 JBB825 635083
0000013D0511 3592E07 E07E Y IDLE 03 JBB836
0000013D0551 3592E07 E07E Y MIGR 02 JBB813 624305
0000013D0527 3592E07 E07E Y MIGR 02 JBB840 635166
0000013D0515 3592E07 E07E Y IDLE 01 JBB835
0000013D0510 3592E07 E07E Y IDLE 03 JBB826
In the response shown in Example 11-2, you can see the following information:
– Nine drives are defined.
– All nine drives are available (AVAIL=Y).
– The ROLE column describes which drive is performing. The following values can
be indicated:
be indicated:
• IDLE: The drive is not in use for another role or is not mounted.
• SECE: The drive is being used to erase a physical volume.
• MIGR: The drive is being used to copy a logical volume from the TVC to a physical volume. In this display, logical volume 635219 is being copied to physical volume JBB829.
• RECA: The drive is being used to recall a logical volume from a physical volume to the TVC.
• RCLS: The drive is being used as the source of a reclaim operation.
• RCLT: The drive is being used as the target of a reclaim operation.
3. Check that the pool to be exported has sufficient scratch physical volumes and that the TS7700 Virtualization Engine is under the volume limit for copy-exported volumes in all pools. The limit by default is a total of 2,000 volumes but this limit can be modified in the SETTINGS option of the TS7000 MI with a maximum of 10,000 volumes. You can use the Library Request host console command that specifies the POOLCNT request. See Example 11-3 for the response to the LI REQ, <library-ID>, POOLCNT command.
Example 11-3 Data returned from POOLCNT command
LI REQ,BARR68A,POOLCNT
CBR1020I PROCESSING LIBRARY COMMAND: REQ,BARR68A,POOLCNT.
CBR1280I LIBRARY BARR68A REQUEST. 919
KEYWORDS: POOLCNT
--------------------------------------------------------------------
PHYSICAL MEDIA COUNTS V2
POOL MEDIA EMPTY FILLING FULL ERASE ROR UNAVAIL CXPT
0 JA 164
0 JJ 38
1 JA 2 6 12 0 0 1 0
9 JJ 0 4 22 0 0 0 45
Pool 0 is the Common Scratch Pool. Pool 9 is the pool that is used for Copy Export in this example. Example 11-3 on page 710 shows the command POOLCNT. The response is listed per pool:
– The media type used for each pool
– The number of empty physical volumes that are available for Scratch processing
– The number of physical volumes in the filling state
– The number of full volumes
– The number of physical volumes that have been reclaimed, but need to be erased
– The number of physical volumes in read-only recovery state
– The number of volumes unavailable or in a destroyed state (1 in Pool 1)
– The number of physical volumes in the copy-exported state (45 in Pool 9)
Use the MI to modify the maximum-allowed number of volumes in the copy-exported state (Figure 11-2).

Figure 11-2 Maximum allowable number of volumes in copy-exported state
You must determine when you usually want to start the Copy Export operation. Thresholds might be the number of physical scratch volumes or other values that you define. These thresholds can even be automated by creating a program that interprets the output from the Library Request commands PDRIVE and POOLCNT, and acts based on the required numbers.
For more information about the Library Request command, see 9.1.3, “Host Console Request function” on page 572.
11.2.3 Running the Copy Export operation
To begin the Copy Export process, create an export list volume that provides the TS7700 Virtualization Engine with information about which data to export and the options to use during the operation (Figure 11-3 on page 714).
If you use a multicluster grid, be sure to create the export list volume only on the same TS7700 Virtualization Engine that is used for Copy Export, but not on the same physical volume pool that is used for Copy Export. If more than one TS7700 Virtualization Engine in a multicluster grid configuration contains the export list volume, the Copy Export operation fails.
Ensure that all volumes that are subject for copy export are in the TVC of the TS7700 where the copy export will be run. If there are copies from other clusters that have not been processed, you can promote them in the copy queue. Use an HCR command with the COPY,KICK option to do so:
LI REQ,distributed library,LVOL,A08760,COPY,KICK
Complete these steps to run the Copy Export operation:
1. Create the export list volume JCL (Example 11-4).
Example 11-4 Sample JCL to create an export list volume of Pool 9
//****************************************
//* FILE 1: EXPORT LIST
//****************************************
//STEP1 EXEC PGM=IEBGENER
//SYSPRINT DD SYSOUT=*
//SYSIN DD DUMMY
//SYSUT2 DD DSN=HILEVELQ.EXPLIST,
// UNIT=VTS1,DISP=(NEW,KEEP),LABEL=(1,SL),
// VOL=(,RETAIN),
// DCB=(RECFM=FB,BLKSIZE=80,LRECL=80,TRTCH=NOCOMP)
//SYSUT1 DD *
EXPORT LIST 03
EXPORT PARAMETERS PHYSICAL POOL TO EXPORT:09
OPTIONS1,COPY,EJECT
/*
//****************************************
//* FILE 2: RESERVED FILE
//****************************************
//STEP2 EXEC PGM=IEBGENER,COND=(4,LT)
//SYSPRINT DD SYSOUT=*
//SYSIN DD DUMMY
//SYSUT2 DD DSN=HILEVELQ.RESERVED,MGMTCLAS=MCNOCOPY,
// UNIT=VTS1,DISP=(NEW,KEEP),LABEL=(2,SL),
// VOL=(,RETAIN,REF=*.STEP1.SYSUT2),
// DCB=*.STEP1.SYSUT2
//SYSUT1 DD *
RESERVED FILE
/*
//****************************************
//* FILE 3: EXPORT STATUS FILE
//****************************************
//STEP3 EXEC PGM=IEBGENER,COND=(4,LT)
//SYSPRINT DD SYSOUT=*
//SYSIN DD DUMMY
//SYSUT2 DD DSN=HILEVELQ.EXPSTATS,
// UNIT=VTS1,DISP=(NEW,CATLG),LABEL=(3,SL),
// VOL=(,,REF=*.STEP1.SYSUT2),
// DCB=*.STEP1.SYSUT2
//SYSUT1 DD *
EXPORT STATUS 01
/*
The information required in the Export List file is, as for BVIR, provided by writing a logical volume that fulfills the following requirements:
– That logical volume must have a standard label and contain three files:
• An Export List file, as created in step 1 in Example 11-4 on page 712. In this example, you are exporting Pool 09. Option EJECT in record 2 tells the TS7700 Virtualization Engine to eject the stacked volumes upon completion. With only OPTIONS1,COPY (without EJECT), the physical volumes are placed in the export-hold category for later handling and left in the library by an operator.
• A Reserved file, as created in step 2 in Example 11-4 on page 712. This file is reserved for future use.
• An Export Status file, as created in step 3 in Example 11-4 on page 712. In this file, the information is stored from the Copy Export operation. You must keep this file because it contains information related to the result of the Export process and must be reviewed carefully.
– All records must be 80 bytes in length.
– The Export List file must be written without compression. Therefore, you must assign a Data Class that specifies COMPACTION=NO or you can overwrite the Data Class specification by coding TRTCH=NOCOMP in the JCL.
|
Important: Ensure that the files are assigned a Management Class that specifies that only the local TS7700 Virtualization Engine has a copy of the logical volume. You can either have the ACS routines assign this Management Class, or you can specify it in the JCL. These files need to have the same expiration dates as the longest of the logical volumes you export because they must be kept for reference.
|
Figure 11-3 shows the setting of a Management Class on the MI for the export list volume in a multicluster grid configuration. RN means one copy locally at RUN (R) and no copy (NN) on the other cluster.

Figure 11-3 Management Class settings for the export list volume
2. The Copy Export operation is initiated by running the LIBRARY EXPORT command. In this command, logical VOLSER is a variable, and is the logical volume used in creating the Export List file volume. The command syntax is shown in Example 11-5.
Example 11-5 Library export command
LIBRARY EXPORT,logical VOLSER
3. The host sends a command to the composite library. From there, it is routed to the TS7700 Virtualization Engine where the Export List VOLSER is.
4. The running TS7700 Virtualization Engine validates the request, checking for required resources, and if all is acceptable, the Copy Export continues.
5. Logical volumes related to the exported pool that still are only in cache can delay the process. They are copied to physical volumes in the pool as part of the Copy Export run.
6. Messages about the progress are sent to the system console. All messages are in the format shown in Example 11-6. See Table 11-1 on page 705 for an explanation of Library Message Text.
Example 11-6 Library message format
CBR3750I Message from library library-name: message text.
After a successful completion, all physical tapes related to the export pool are ejected if the EJECT option was specified. The operator can empty the I/O station and transport the tapes to another location.
To obtain a list of the virtual volumes that were exported during the COPY EXPORT operation, use the Physical Volumes Details selection in the MI. Specify the volume or volumes that were written to during the EXPORT. Those VOLSERs are listed in the CBR3750I messages on the syslog. Click Download List of Virtual Volumes.
Figure 11-4 shows the physical volume details.

Figure 11-4 Physical Volume Details selection for list of exported volumes
11.2.4 Canceling a Copy Export operation
Examine the export status file records to see what has been processed before the cancellation request. Any physical volumes that completed the export process must be processed as though the export operation had completed.
Many reasons exist for canceling a Copy Export operation:
•After initiating a Copy Export operation, you might realize that the pool being processed for export is incorrect.
•Other, more critical workloads must be run on the TS7700 Virtualization Engine and the extra effect of running the export operation is undesirable.
•A problem is encountered with the export that cannot be quickly resolved, for example, there are no physical scratch volumes available to add to the library.
•A problem is encountered with the library that requires it to be taken offline for service.
A request to cancel an export operation can be initiated from any host attached to the TS7700 Virtualization Engine subsystem by using one of the following methods:
•Use the host console command LIBRARY EXPORT,XXXXXX,CANCEL, where XXXXXX is the volume serial number of the Export List File Volume.
•Use the Program Interface of the Library Control System (LCS) external services CBRXLCS.
If an export operation must be canceled and there is no host attached to the TS7700 Virtualization Engine that can run the CANCEL command, you can cancel the operation through the TS7700 Virtualization Engine MI. After confirming the selection, a cancel request is sent to the TS7700 Virtualization Engine that is processing the Copy Export operation.
Regardless of whether the cancellation originates from a host or the MI, the TS7700 Virtualization Engine can process it in the following manner:
•If the processing of a physical volume has reached the point where it has been mounted to receive a database backup, the backup completes and the volume is placed in the export-hold or eject category before the cancel processing can continue. Status file records are written for all logical and physical volumes that completed export processing.
•All physical resources (drives, stacked volumes, and exported stacked volumes) are made available for normal TS7700 Virtualization Engine subsystem processing.
•A completion message is sent to all hosts attached to the TS7700 Virtualization Engine indicating that the export was canceled by a host request. The message contains information about how much export processing completed before the execution of the cancellation request.
11.2.5 Host completion message
At the completion of the Copy Export operation, a completion message is broadcast to all hosts attached to the TS7700 Virtualization Engine. For z/OS, console messages are generated that provide information about the overall execution status of the operation.
Messages differ depending on what the TS7700 Virtualization Engine encountered during the execution of the operation:
•If no errors or exceptions were encountered during the operation, message CBR3855I is generated. The message has the format shown in Example 11-7.
Example 11-7 CBR3855I message format
CBR3855I Export operation for logical list volume ‘volser’ in library ‘library-name’ completed successfully. Requested: ‘requested-number’ Exportable: ‘exportable-number’ Exported: ‘exported-number’ Stacked volumes: ‘stacked-number’ MBytes Exported: ‘MBytes-exported’ MBytes Moved: ‘MBytes-moved’
•If error or exceptions were encountered during the operation, message CBR3856I is generated. The message has the format shown in Example 11-8.
Example 11-8 CBR3856I message format
CBR3856I Export operation for logical list volume ‘volser’ in library ‘library-name’ completed with exceptions or errors. Requested: ‘requested-number’ Exportable: ‘exportable-number’ Exported: ‘exported-number’ Stacked volumes: ‘stacked-number’ MBytes Exported: ‘MBytes-exported’ MBytes Moved: ‘MBytes-moved’
If message CBR3856I is generated, examine the Export Status file to determine what errors or exceptions were encountered.
Either of the completion messages provides statistics about what was processed during the operation. The following statistics are reported:
•Requested-number: This is the number of logical volumes associated with the secondary volume pool specified in the export list file. Logical volumes associated with the specified secondary volume pool that were previously exported are not considered part of this count.
•Exportable-number: This is the number of logical volumes that are considered exportable. A logical volume is exportable if it is associated with the secondary volume pool specified in the export list file and it has a valid copy resident on the TS7700 Virtualization Engine performing the export. Logical volumes associated with the specified secondary volume pool that were previously exported are not considered to be resident in the TS7700 Virtualization Engine.
•Exported-number: This is the number of logical volumes that were successfully exported.
•Stacked-number: This is the number of physical volumes that were successfully exported.
•MBytes Exported: This is the number of MB contained in the logical volumes that were successfully exported. If the data on the logical volumes is compressed, the number includes the effect of compression.
|
Clarification: The number of megabytes (MB) exported is the sum of the MB integer values of the data stored on each Exported Stacked Volume. The MB integer value for each Exported Stacked Volume is the full count by bytes divided by 1,048,576 bytes. If the result is less than 1, the MB integer becomes 1, and if greater than 1 MB, the result is truncated to the integer value (rounded down).
|
•MBytes Moved: For Copy Export at code release level R1.4 and later, this value is 0.
It is possible that multiple physical cartridges are written to during the COPY EXPORT even if a small amount of data was exported. This is primarily due to the optimization of the operation by using multiple available drives configured for the Copy Export pool.
11.3 Using Copy Export Recovery
The recovery process can be done in a test mode for DR testing purposes. This enables a test restore without compromising the contents of the Copy Export sets. An example of how to use a Copy Export Recovery process is provided.
|
Restriction: Clients can run a Copy Export Recovery process only in a stand-alone cluster. After the recovery process completes, you can create a multicluster grid by joining the grid with another stand-alone cluster. However, there is an IBM service offering to recover to an existing grid.
|
The following instructions for how to implement and run Copy Export Recovery also apply if you are running a DR test. If it is a test, it is specified in each step.
11.3.1 Planning and considerations for testing Copy Export Recovery
You must consider several factors when you prepare a recovery TS7700 Virtualization Engine for the Copy Export volumes. Copy Export Recovery can be run in various ways. The planning considerations for Copy Export Recovery are described.
Copy Export Recovery can be used to restore previously created and copy-exported tapes to a new, empty TS7700 cluster. The same subset of tapes can be used to restore a TS7700 in an existing grid if the new empty restore cluster replaces the source cluster that is no longer present.
This enables data that might have existed only within a TS7740 or TS7720T in a hybrid configuration to be restored while maintaining access to the still existing TS7720 clusters. This form of extended recovery must be carried out by IBM support personnel.
Client-initiated Copy Export Recovery
Client-initiated recovery restores copy-exported tapes to a stand-alone TS7700 for DR testing or as a recovery site. The considerations for Copy Export Recovery to a stand-alone TS7700 cluster, which can be prepared in advance, are described. The TS7700 Virtualization Engine and associated library that are to be used for recovery of the copy-exported logical volumes must meet the following requirements:
•The recovery TS7700 Virtualization Engine must have physical tape drives that match the capabilities of the source TS7700 Virtualization Engine, including encryption capability if the copy-exported physical volumes have been encrypted.
•If the source copy-exported volumes have been encrypted, the recovery TS7700 Virtualization Engine must have access to a key manager that has the encryption keys for the data.
•There must be enough library storage slots in the library associated with the recovery TS7700 Virtualization Engine to hold all of the copy-exported physical volumes from the source TS7700 Virtualization Engine.
•Only the copy-exported volumes from a single source TS7700 Virtualization Engine can be used in the recovery process.
•The recovery TS7700 Virtualization Engine cannot be part of a grid configuration.
•The recovery TS7700 Virtualization Engine must be configured as Cluster 0.
•The recovery TS7700 Virtualization Engine and its associated MI must be configured, have code loaded, and be in an online state to start the recovery.
•The code levels on the recovery TS7700 must be at the same or later code level as the source TS7700.
•If the recovery TS7700 Virtualization Engine is not empty of data (in the cache or the database), the Copy Export volumes must not be loaded into the attached library until the system has been emptied of data.
•If another TS7700 Virtualization Engine or native drives are on another partition of the TS3500 Tape Library, the other partition must not have any VOLSERs that overlap with the VOLSERs to be recovered (including both logical and physical volumes). If any conflicts are encountered during the recovery process, the following results occur:
– The VOLSERs that conflict cannot be recovered.
– A warning message is displayed in the recovery status window on the recovery TS7700 Virtualization Engine MI.
– You cannot use the same library for both the source and recovery TS7700 Virtualization Engine.
•Other than the physical drive compatibility requirements listed, the source and recovery TS7700 Virtualization Engines can have different configuration features, such as different cache capabilities, performance enablement features, and so on.
•You must add scratch physical volumes to the recovery TS7700 Virtualization Engine even if you are only going to be reading data. A minimum of two scratch volumes per defined pool in the recovery TS7700 are needed to prevent the recovery TS7700 from entering the out-of-scratch state. In the out-of-scratch state, logical volume mounts are not allowed.
When adding scratch physical volumes to the recovery TS7700, do so only after the recovery has been run and the recovery TS7700 is ready to be brought online to its attached hosts. Otherwise, their inventory records are erased during the recovery process.
Physical volumes that are part of the Copy Export set and are now empty cannot be counted as scratch. After the Copy Export Recovery is complete, and the recovery TS7700 Virtualization Engine is online to its hosts, you must insert logical volumes to be used as scratch volumes before you can write new data.
•If the recovery is for a real disaster (rather than only a test), verify that the actions defined for the storage management constructs that were restored during the recovery are the actions that you want to continue to use.
11.3.2 Performing Copy Export Recovery
Perform the following steps:
1. With the TS7700 and library in an online state, log in to the MI and select Service → Copy Export Recovery.
You only see the Copy Export Recovery menu item if you have been given Administrator-level or Manager-level access by the overall system administrator on the TS7700. The Copy Export Recovery menu item is not displayed if the TS7700 is configured in a grid configuration. Contact your IBM service support representative (SSR) if you must recover a TS7700 that is a member of a grid.
2. If the TS7700 determines that data or database entries exist in the cache, Copy Export Recovery cannot be performed until the TS7700 is empty. Figure 11-5 shows the window that opens to inform you that the TS7700 contains data that must be erased.

Figure 11-5 Copy Export Recovery window with erase volume option
3. Ensure that you are logged in to the correct TS7700. Then, select Erase all existing volumes before the recovery and click Submit. A window opens that provides you with the option to confirm and continue the erasure of data on the recovery TS7700 or to abandon the recovery process. It describes the data records that are going to be erased and informs you of the next action to be taken.
To erase the data, enter your login password and click Yes. The TS7700 begins the process of erasing the data and all database records. As part of this step, you are logged off from the MI.
4. After waiting about 1 minute, log in to the MI. Select Settings → Copy Export Recovery Status to follow the progress of the Copy Export Recovery.
The following tasks are listed in the task detail window as the erasure steps are being performed:
a. Taking the TS7700 offline.
b. The existing data in the TS7700 database is being removed.
c. The existing data in the TS7700 cache is being removed.
d. Cleanup (removal) of existing data.
e. Requesting the TS7700 go online.
f. Copy Export Recovery database cleanup is complete. After the erasure process is complete, the TS7700 returns to its online state.
|
Note: If an error occurs during the erasure process, the task detail window provides a list of errors that occurred and indicates the reason and any action that needs to be taken.
|
5. Starting with an empty TS7700, you must perform several setup tasks by using the MI that is associated with the recovery TS7700. For many of these tasks, you might only have to verify that the settings are correct because the settings are not deleted as part of the erasure step:
a. Verify or define the VOLSER range or ranges for the physical volumes that are to be used for and after the recovery. The recovery TS7700 must know the VOLSER ranges that it owns. This step is done through the MI that is associated with the recovery TS7700.
b. If the copy-exported physical volumes were encrypted, set up the recovery TS7700 for encryption support and have it connected to an external key manager that has access to the keys used to encrypt the physical volumes. If you write data to the recovery TS7700, you must also define the pools to be encrypted and set up their key label or labels or define to use default keys.
c. If you are running the Copy Export Recovery operations to be used as a test of your disaster recovery plans and have kept the Disaster Recovery Test Mode check box selected, the recovery TS7700 does not perform reclamation.
If you are running Copy Export Recovery because of a real disaster, verify or define the reclamation policies through the MI.
6. With the TS7700 in its online state, but with all virtual tape drives varied offline to any attached hosts, log in to the MI and select Service → Copy Export Recovery.
The TS7700 determines that it is empty and enables the operation to proceed. Load the copy-exported physical volumes into the library. Multiple sets of physical volumes have likely been exported from the source TS7700 over time. All of the exported stacked volumes from the source TS7700 must be loaded into the library. If multiple pools were exported and you want to recover with the volumes from these pools, load all sets of the volumes from these pools.
|
Important:
•Before continuing the recovery process, be sure that all of the copy-exported physical volumes have been added. Any volumes that are not known to the TS7700 when the recovery process continues will not be included, and can lead to errors or problems. You can use the Physical Volume Search window from the MI to verify that all inserted physical volumes are known to the TS7700.
•Do not add any physical scratch cartridges at this time. You can do that after the Copy Export Recovery operation has completed and you are ready to bring the recovery TS7700 online to the hosts.
|
7. After you add all of the physical volumes into the library and they are now known to the TS7700, enter the volume serial number of one of the copy-exported volumes from the last set exported from the source TS7700. It contains the last database backup copy, which is used to restore the recovery TS7700 Virtualization Engine database. The easiest place to find a volume to enter is from the Export List File Volume Status file from the latest Copy Export operation.
|
Remember: If you specified the Copy Export accelerator option (LMTDBPVL) when performing the export, only a subset of the tapes that were exported have a valid database backup that can be used for recovery. If a tape that is selected for recovery does not have the backup, the user gets the following error: “The database backup could not be found on the specified recovery volume”.
|
If you are using the Copy Export Recovery operation to perform a disaster recovery test, keep the Disaster Recovery Test Mode check box selected. The normal behavior of the TS7700 storage management function, when a logical volume in the cache is unloaded, is to examine the definitions of the storage management constructs associated with the volume. If the volume was written to while it was mounted, the actions defined by the storage management constructs are taken.
If the volume was not modified, actions are only taken if there has been a change in the definition of the storage management constructs since the last time that the volume was unloaded. For example, suppose that a logical volume is assigned to a Storage Group, which had last had the volume written to pool 4. Furthermore, either the Storage Group was not explicitly defined on the recovery TS7700 or it specified a different pool.
In this case, on the unload of the volume, a new copy of it is written to the pool determined by the new Storage Group definition, even though the volume was only read. If you are merely accessing the data on the recovery TS7700 for a test, you do not want the TS7700 to recopy the data. Keeping the check box selected causes the TS7700 to bypass its checking for a change in storage management constructs.
Another consideration with merely running a test is reclamation. Running reclamation while performing a test will require scratch physical volumes and enable the copy-exported volumes to being reused after they are reclaimed. By keeping the Disaster Recovery Test Mode check box selected, the reclaim operation is not performed.
With the Disaster Recovery Test Mode check box selected, the physical volumes used for recovery maintain their status of Copy Exported so that they cannot be reused or used in a subsequent Copy Export operation. If you are using Copy Export Recovery because of a real disaster, clear the check box.
Enter the volume serial number, select the check box, and then click Submit.
8. A window opens and indicates the volume that will be used to restore the database. If you want to continue with the recovery process, click Yes. To abandon the recovery process, click No.
9. The TS7700 begins the recovery process. As part of this step, you are logged off from the MI.
10. After waiting about 1 minute, log in to the MI and select Settings → Copy Export Recovery Status to follow the progress of the recovery process.
The window provides information about the process, including the total number of steps required, the current step, when the operation was initiated, the run duration, and the overall status.
The following tasks are listed in the task detail window as the Copy Export Recovery steps are performed:
a. The TS7700 is taken offline.
b. The requested recovery tape XXXXXX is being mounted on device YYY.
c. The database backup is being retrieved from the specified recovery tape XXXXXX.
d. The requested recovery tape is being unmounted following the retrieval of the database backup.
e. The database backup retrieved from tape is being restored on the TS7700.
f. The restored database is being updated for this hardware.
g. The restored database volumes are being filtered to contain the set of logical volumes that were Copy Exported.
h. Token ownership is being set to this cluster from the previous cluster.
i. The restored database is being reconciled with the contents of cache, XX of YY complete.
j. Logical volumes are being restored on the Library Manager, XX of YY complete.
k. Copy Export Recovery is complete.
l. Copy Export Recovery from physical volume XXXXXX.
m. The request is made for the TS7700 to go online.
n. The recovered data is loaded into the active database.
o. The process is in progress.
After the Copy Export Recovery process completes successfully, the MI returns to its full selection of tasks.
11. Now, add scratch physical volumes to the library. At least two scratch volumes are required for each active pool. Define the VOLSER range (or ranges) for the physical scratch volumes that are to be used for and after the recovery. The recovery TS7700 must know the VOLSER ranges that it owns. The steps are described in“Defining VOLSER ranges for physical volumes” on page 498.
12. If you ran Copy Export Recovery because of a real disaster (you cleared the Disaster Recovery Test Mode check box), verify that the defined storage management construct actions will manage the logical and physical volumes in the manner that is needed.
During Copy Export Recovery, the storage management constructs and their actions are restored to the storage management constructs, and their actions are defined on the source TS7700. If you want the actions to be different, change them through the MI that is associated with the recovery TS7700.
You can now view the completed results of the Copy Export Recovery in Figure 11-6.
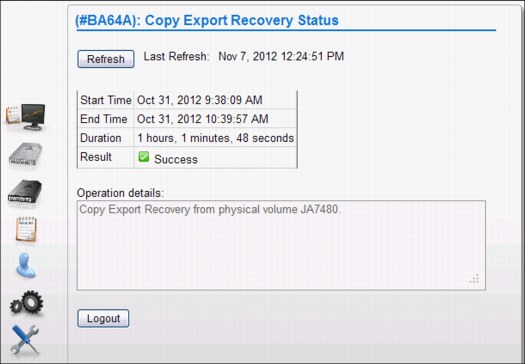
Figure 11-6 Copy Export Recovery Status
If an error occurs, various possible error texts with detailed error descriptions can help you solve the problem. For more information and error messages related to the Copy Export Recovery function, see the IBM Virtualization Engine TS7700 Series Copy Export Function User’s Guide white paper, which is available at the following URL:
If everything is completed, you can vary the virtual devices online, and the tapes are ready
to read.
to read.
|
Tip: For more general considerations about DR testing, see 12.6, “Disaster recovery testing basics” on page 754.
|
11.3.3 Restoring the host and library environments
Before you can use the recovered logical volumes, you must restore the host environment also. The following steps are the minimum steps that you need to continue the recovery process of your applications:
1. Restore the tape management system (TMS) CDS.
2. Restore the DFSMS data catalogs, including the tape configuration database (TCDB).
3. Define the I/O gen using the Library ID of the recovery TS7700.
4. Update the library definitions in the source control data set (SCDS) with the Library IDs for the recovery TS7700 in the composite library and distributed library definition windows.
5. Activate the I/O gen and the SCDS.
You might also want to update the library nicknames that are defined through the MI for the grid and cluster to match the library names defined to DFSMS. That way, the names shown on the MI windows match those names used at the host for the composite library and distributed library.
To set up the composite name used by the host to be the grid name, complete the following steps:
1. Select Configuration → Grid Identification Properties.
2. In the window that opens, enter the composite library name used by the host in the grid nickname field.
3. You can optionally provide a description.
Similarly, to set up the distributed name, complete the following steps:
1. Select Configuration → Cluster Identification Properties.
2. In the window that opens, enter the distributed library name used by the host in the Cluster nickname field.
3. You can optionally provide a description.
These names can be updated at any time.
..................Content has been hidden....................
You can't read the all page of ebook, please click here login for view all page.