

I/O Autoconfiguration on IBM zEnterprise EC12 processors
This chapter addresses how to use the I/O Autoconfiguration function that is available for IBM zEnterprise EC12 processors and IBM z/OS V1.13 and V1.12 with Program Temporary Fixes (PTFs). I/O Autoconfiguration is also known as z/OS Discovery and AutoConfiguration (zDAC). Using the I/O Autoconfiguration function and HCD/HCM, you can discover undefined FICON storage devices (DASD and tape) that connected to the processor through a switch.
According to user-defined policies or HCD/HCM-provided defaults, HCD/HCM can automatically define the control units and devices of discovered controllers. You can either accept the proposed definitions without changes, or update the proposed definitions before you commit them to the specified target work input/output definition file (IODF).
HCD/HCM provides these functions:
•A dialog to define autoconfiguration policies
•A dialog to run the discovery and definition process
This function is only available on z196 and zEC12 processors.
This chapter includes the following sections:
3.1 Description of I/O Autoconfiguration
You can use the Hardware Configuration Definition (HCD) I/O Autoconfiguration function to run automatic configuration tasks to define switched FICON connected DASD and tape control units and devices. These must not be defined in either the active or currently accessed IODF. HCD can start the I/O subsystem to discover I/O hardware in the current configuration that is accessible to the system. Proposed definitions are automatically written into a specified target work IODF that is created as a copy of the active or accessed IODF.
During I/O Autoconfiguration processing, HCD presents the discovered controllers, control units, and devices to the user and offers proposals about how to configure them. You can accept or change these definition proposals. The configuration definitions are then written into the specified target IODF.
HCD provides a series of panels to run the automatic I/O configuration. These discovery panels are scoped by policies, and the parameters for these policies are accessed with HCD Option 0 or HCM. You must have an HCD profile data set (HCDPROF) allocated to your HCD session or HCM session for these policy parameters to take effect and be retained for future discoveries.
I/O Autoconfiguration is available starting with IBM zEnterprise 196 processors. It requires the same access authorization as used for dynamic reconfiguration.
3.2 Prerequisites and operational considerations for using I/O Autoconfiguration
Consider the following information when you are using the I/O Autoconfiguration function of HCD:
•The I/O Autoconfiguration process minimally requires that the LPAR (LP) groups that are used for autoconfiguration are running on IBM zEnterprise 196 or zEC12 processors with z/OS V1.12 or V1.13.
•Create the target work IODF from the active IODF. This process is not required, but do so to facilitate consistent discovery of devices. If devices must be added to do discovery, failures might occur because of inconsistent IODFs. Hardware definitions of this active IODF will remain consistent.
•All active IODFs for the systems in a sysplex should be the same. This restriction is not enforced. Consistent active IODFs allows IOS to avoid running some phases of discovery on every system. Tokens should be in sync and prior activates should be completed.
•Without indicating force full mode discovery, there is a limit on the number of successive failures. Unless force full mode discovery is requested, processing assumes that CUADD (logical address for a control unit) values start at 00 and continue through nn, with no missing CUADDs. Discovery for a controller ends after several successive failures occur and force full mode discovery is not indicated.
•For DASD, all newly discovered devices are assumed to be 3390 type devices (either 3390B or 3390A types).
•If port restrictions (zoning or Prohibit Dynamic Connectivity Mask (PDCM)) exist within a switch (that is, they limit the ability of a CHPID to connect to a destination port for a control unit interface), I/O Autoconfiguration might configure paths that cannot be used. If a port is discovered on a controller, it is assumed that it has access to all configured logical control units on that controller.
•All CHPIDs, switches, and ports should be configured online and be accessible when discovery is attempted.
•At least one system per CPC must be able to run dynamic I/O configuration changes and be part of the current sysplex. It must be able to make I/O configuration changes on behalf of the LP group systems on the CPC. This system does not have to be in the target LP group.
•A logical control unit that contains only secondary devices in an active peer-to-peer remote copy (PPRC) relationship might not be able to be discovered. The I/O used to determine the devices that are configured on a logical control unit cannot be run on secondary devices.
•I/O Autoconfiguration is a configuration tool that configures for availability. You can use Dynamic CHPID Management (DCM) for performance management. CHPID/path selection is run to minimize or even eliminate single points of failure to newly discovered logical control units. DCM manages for performance by adding CHPIDs and managing paths to the logical control units as needed.
•Within a target LPAR Group, I/O Autoconfiguration allows only controllers that are consistently defined (or absent) for the target LP group systems in the target IODF. If a controller is partially defined in the LP group (some systems have logical control units and devices configured that others do not have), I/O Autoconfiguration does not attempt to propose definitions for the systems within the LP group that do not have the definitions. You should control the discovery scope using LP groups with systems requiring the definition. That is, group systems in LP groups that share similar I/O requirements.
•If candidate access lists exclude an LPAR from accessing a control unit that is already defined on a CSS, I/O Autoconfiguration cannot discover and add that control unit. Therefore, all systems in the participating LP groups should have a homogeneous view of the devices and control units. If not, update the device candidate lists in HCD to add devices and control units to the LPARs.
•If switches are connected such that you can have three or more switches in a path to a control unit, this path can be chosen if no viable alternative exists.
•Run discovery attempts during times where changes are minimal. Do not make dynamic I/O configuration changes using HCD/HCM or the ACTIVATE MVS command during the discovery process. ACTIVATE processing and CONFIGURE CHP commands will likely affect discovery processing.
3.2.1 Overview of the autoconfiguration process
This section provides an overview of the I/O Autoconfiguration process.
The Fabric discovery process
The I/O Autoconfiguration function is started from the HCD Primary Task Selection panel. This action causes HCD to start IOS to run the Fabric discovery process. You can define the scope of discovery by searching all controllers, new controllers only, or search for the controller that contain a specific control unit.
|
Remember: The scope of the discovery is limited to the active sysplex.
|
The controller discovery
From the discovered controllers, HCD retrieves and proposes control unit and device types and numbers, channel path assignments, partition access, and OS device parameters. You can choose whether HCD runs the definition without user interaction, or whether the panel displays the proposed definitions so that you can confirm or change these values.
I/O Autoconfiguration makes temporary changes to the I/O configuration by adding devices that are used exclusively for discovery on the targeted systems to search for attached devices.
3.2.2 Defining autoconfiguration policies
Before you have HCD discover and define control units and I/O devices, specify your autoconfiguration policies. This task contains the following subtasks, which can be accessed from the HCD Primary Task menu, Option 0 as shown in Figure 3-1:
•Option 0.1: Setting your HCD profile options
•Option 0.2: Setting keywords for autoconfiguration policies
•Option 0.3: Defining logical partition groups for autoconfiguration
•Option 0.4: Defining OS groups for autoconfiguration
|
z/OS V1.13 HCD
+--------------- Profile Options and Policies ----------------+ ___
| |
| |
| Select type of data to define. |
| |
| __ 1. HCD profile options |
| 2. Autoconfiguration policies |
| 3. LP groups for autoconfiguration |
| 4. OS groups for autoconfiguration |
| |
| |
| |
+-------------------------------------------------------------+
|
Figure 3-1 Profile Options and Policies
|
Tip: If you want to restrict your discovery to a particular logical partition or group of logical partitions, define a Logical Partition Group first.
Similarly, with OS configurations define an OS Group first.
|
3.2.3 Specifying profile options that are related to the zDAC process
When I/O Autoconfiguration discovers and adds new device numbers to an OS configuration, HCD uses the default OS config parameter values as per the device’s unit information module (UIM). These parameter default values can be overridden and set to your own preferences by selecting HCD Option 1. HCD profile options from the Profiles and Policies menu.
Figure 3-2 shows the parameter default values for device type 3390B
|
------------------- Define Device Parameters / Features -------------------
Row 1 of 6
Command ===> ___________________________________________ Scroll ===> CSR
Specify or revise the values below.
Configuration ID . : MVSW1 Production systems
Device number . . : 1000 Number of devices : 16
Device type . . . : 3390B
Parameter/
Feature Value + R Description
OFFLINE No Device considered online or offline at IPL
DYNAMIC Yes Device supports dynamic configuration
LOCANY No UCB can reside in 31 bit storage
WLMPAV Yes Device supports work load manager
SHARED Yes Device shared with other systems
SHAREDUP No Shared when system physically partitioned
***************************** Bottom of data ******************************
|
Figure 3-2 Default UIM values for device type 3390B
You might prefer to define your 3390B devices with LOCANY=Yes or WLMPAV=No, for example. To set these definitions, complete the following steps:
1. Select HCD Option 0.1. HCD Profile Options.
|
---------------------------- HCD Profile Options ---------------------------
Row 25 of 39 More: >
Command ===> ___________________________________________ Scroll ===> CSR
Edit or revise profile option values.
HCD Profile : HDWCFG1.HCD.PROFILE
/ Profile keyword A Value +
_ MAP_CUTYPE Y ____________________________________________
# MCF_EXTENSION Y 30
# MCF_VOL Y ____________________________________________
# MIGRATE_EXTENDED Y NO
# MIXED_ESOTERIC Y NO
_ OS_PARM_DEFAULT Y ____________________________________________
# SHOW_IO_CHANGES Y YES
# SHOW_CONFIG_ALL Y NO
# SHOW_IOCP_DEFAULTS N NO
# TSO_NOPREFIX Y NO
# UNCOND_GENERATE_DROS Y NO
# UIM_LIBNAME N SYS1.NUCLEUS
# UIM_VOLSER N ____________________________________________
# UPPERCASE_ONLY Y NO *
|
Figure 3-3 HCD Profile Options: OS_PARM_DEFAULT not set
3. To enter an overriding value, enter the OS parm you want to override (Figure 3-4) and press Enter.
|
HCD Profile : HDWCFG1.HCD.PROFILE
/ Profile keyword A Value +
_ MAP_CUTYPE Y ____________________________________________
# MCF_EXTENSION Y 30
# MCF_VOL Y ____________________________________________
# MIGRATE_EXTENDED Y NO
# MIXED_ESOTERIC Y NO
_ OS_PARM_DEFAULT Y LOCANY,YES
# SHOW_IO_CHANGES Y YES
# SHOW_CONFIG_ALL Y NO
# SHOW_IOCP_DEFAULTS N NO
# TSO_NOPREFIX Y NO
|
Figure 3-4 HCD Profile Options: OS_PARM_DEFAULT set
4. If you want to add more OS_PARM_DEFAULT changes, enter a next to the existing OS_PARM_DEFAULT keyword entry and press Enter. An extra entry is added. Figure 3-5 shows entering WLMPAV,NO.
|
Edit or revise profile option values.
HCD Profile : HDWCFG1.HCD.PROFILE
/ Profile keyword A Value +
_ OS_PARM_DEFAULT Y LOCANY,YES
_ OS_PARM_DEFAULT Y WLMPAV,NO
# SHOW_IO_CHANGES Y YES
# SHOW_CONFIG_ALL Y NO
# SHOW_IOCP_DEFAULTS N NO
# TSO_NOPREFIX Y NO
# UNCOND_GENERATE_DROS Y NO
# UIM_LIBNAME N SYS1.NUCLEUS
# UIM_VOLSER N ____________________________________________
# UPPERCASE_ONLY Y NO
# VM_UIM N YES
***************************** Bottom of data ******************************
|
Figure 3-5 HCD Profile Options: Extra OS_PARM_DEFAULT set
5. If you define new 3390B devices, the OS parameter defaults are overridden with what you specified in the HCD Profile Options (Figure 3-6).
|
------------------- Define Device Parameters / Features -------------------
Row 1 of 6
Command ===> ___________________________________________ Scroll ===> CSR
Specify or revise the values below.
Configuration ID . : MVSW1 Production systems
Device number . . : 1000 Number of devices : 1
Device type . . . : 3390B
Parameter/
Feature Value + R Description
OFFLINE No Device considered online or offline at IPL
DYNAMIC Yes Device supports dynamic configuration
LOCANY Yes UCB can reside in 31 bit storage
WLMPAV No Device supports work load manager
SHARED Yes Device shared with other systems
SHAREDUP No Shared when system physically partitioned
***************************** Bottom of data ******************************
|
Figure 3-6 HCD: Default UIM values for device type 3390B overridden
|
Restriction: Default values cannot be set differently for different device types. Additionally, the assignment of devices to esoteric names cannot currently be controlled with an I/O Autoconfiguration (zDAC) dialog.
|
3.2.4 Defining logical partition groups for autoconfiguration
A logical partition group (LP group) is a collection of logical partitions of the same sysplex used by I/O Autoconfiguration to determine which partitions the discovered devices are assigned to.
To define LP groups for autoconfiguration, complete the following steps:
1. Select Option 3. LP groups for autoconfiguration from the Profile Options and Policies menu. This action starts the Autoconfiguration LP Group List, which displays a list of LP groups. In this example, no lists are defined.
|
z/OS V1.13 HCD
------------- Autoconfiguration LP Group List -------------
Command ===> add________________________ Scroll ===> CSR
To view assigned partitions, select one or more LP groups,
then press Enter. To add an LP group, use F11.
/ LP group name Description
********************* Bottom of data **********************
|
Figure 3-7 Adding a LP group for autoconfiguration
Use the Autoconfiguration LP Group List to define or delete LP groups, to assign logical partitions to a group, or unassign partitions from a group.
3. Enter your group name and description, and press Enter (Figure 3-8).
|
------------- Add Autoconfiguration LP Group ----------
Specify name and description for new LP group.
LP group name . . . . . P401LPGP
Description . . . . . . Test LP Group for SCZ401________
|
Figure 3-8 Add Autoconfiguration LP Group panel
4. Enter s next to the LP group name to add processors and partitions, and press Enter (Figure 3-9).
|
------------- Autoconfiguration LP Group List -------------
Row 1 of 1
Command ===> ___________________________ Scroll ===> CSR
To view assigned partitions, select one or more LP groups,
then press Enter. To add an LP group, use F11.
/ LP group name Description
s P401LPGP Test LP Group for SCZ401
********************* Bottom of data **********************
|
Figure 3-9 Select an autoconfiguration LP group to add partitions
|
--------- Autoconfiguration LP Group Assignment List ----------
Command ===> add____________________________ Scroll ===> CSR
Select one or more logical partitions, then press Enter. To
add, use F11.
LP group name : P401LPGP Test LP Group for SCZ401
/ Partition Name Description
*********************** Bottom of data ************************
|
Figure 3-10 Add processors and partitions to an autoconfiguration LP group
6. Enter the Processor ID and Partition Name and press Enter. You can press PF4 in the data fields for a list of Processor IDs and Partitions that are defined in the IODF (Figure 3-11).
|
----------------------- Add Partition to LP Group --------------------
Specify the following values.
LP group name . . . . . : P401LPGP Test LP Group for SCZ401
Processor ID . . . . . . . SCZP401 +
Partition Name . . . . . . A01_____ +
|
Figure 3-11 Specifying a Processor ID and Partition Name for an LP group
Processor SCZP401 and LPAR A01 of CSS.0 have been added to the LP Group (Figure 3-12).
|
--------- Autoconfiguration LP Group Assignment List -----------
Row 1 of 1
Command ===> _______________________________ Scroll ===> CSR
Select one or more logical partitions, then press Enter. To
add, use F11.
LP group name : P401LPGP Test LP Group for SCZP401
/ Partition Name Description
_ SCZP401.0.A01 WTSCPLX8 SC80
*********************** Bottom of data ************************
|
Figure 3-12 Processor and partition added to an LP group
7. More processors and partitions for this sysplex can be added by entering add in the command line or by entering a next to an existing entry (Figure 3-13).
|
--------- Autoconfiguration LP Group Assignment List ----------
Row 1 of 2
Command ===> _______________________________ Scroll ===> CSR
Select one or more logical partitions, then press Enter. To
add, use F11.
LP group name : P401LPGP Test LP Group of SCZP401
/ Partition Name Description
_ SCZP301.0.A05 TESTPLEX SC74
_ SCZP401.0.A01 TESTPLEX SC74
*********************** Bottom of data ************************
|
Figure 3-13 Adding more processors and partitions to an LP group
You can now return to the Profile Options and Policies menu.
3.2.5 Defining OS configuration groups for autoconfiguration
An OS group is a collection of OS configurations. It is used by I/O Autoconfiguration to determine to which operating systems of type MVS the auto-defined devices are assigned.
To define OS configuration groups for autoconfiguration, complete the following steps:
1. Select Option 4. OS groups for autoconfiguration from the Profile Options and Policies menu (Figure 3-14). This action starts the Autoconfiguration OS Group List, which displays a list of operating system groups (OS groups).
2. Type add in the command line and press Enter or press PF11.
|
z/OS V1.13 HCD
------------- Autoconfiguration OS Group List -------------
Command ===> add________________________ Scroll ===> CSR
To view assigned OS configurations, select one or more OS
groups, then press Enter. To add an OS group, use F11.
/ OS group Description
********************* Bottom of data **********************
|
Figure 3-14 Adding a OS group for autoconfiguration
Use the Autoconfiguration OS Group List to view, add, or delete OS groups, or to assign autoconfigured devices to operating systems.
3. Type your group name and description, and press Enter (Figure 3-15).
|
------------- Add Autoconfiguration OS Group -------------
Specify name and description for new OS group.
OS group name . . . . . P401OSGP
Description . . . . . . Test OS Group for SCZP401_______
|
Figure 3-15 Add an autoconfiguration OS group
|
------------- Autoconfiguration OS Group List -------------
Row 1 of 1
Command ===> ___________________________ Scroll ===> CSR
To view assigned OS configurations, select one or more OS
groups, then press Enter. To add an OS group, use F11.
/ OS group Description
s P4010SGP Test OS Group for SCZP401
********************* Bottom of data **********************
|
Figure 3-16 Select an autoconfiguration OS group to add OS configurations
|
--------- Autoconfiguration OS Group Assignment List ----------
Command ===> add____________________________ Scroll ===> CSR
Select one or more OS configurations, then press Enter. To
add, use F11.
OS group name : P4010SGP Test OS Group for SCZP401
/ OS Configuration ID Description
*********************** Bottom of data ************************
|
Figure 3-17 Add OS configurations to an autoconfiguration OS group
6. Enter your OS config ID, or press PF4 in the OS configuration ID data field to be prompted for the OS configurations that are defined in the IODF (Figure 3-18).
|
------------ Add Operating System Configuration to OS Group ----
Specify the following values.
OS group name . . . . : P4010SGP Test OS Group for SCZP401
OS configuration ID . . L06RMVS1+
|
Figure 3-18 Specifying OS configuration ID for OS groups
The OS configuration ID L06RMVS1 has been added to the OS group (Figure 3-19).
|
--------- Autoconfiguration OS Group Assignment List ----------
Row 1 of 1
Command ===> _______________________________ Scroll ===> CSR
Select one or more OS configurations, then press Enter. To
add, use F11.
OS group name : P4010SGP Test OS Group for SCZP401
/ OS Configuration ID Description
_ L06RMVS1 Sysplex systems
*********************** Bottom of data ************************
|
Figure 3-19 OS configuration ID added to OS group
7. More OS configuration IDs for this sysplex can be added by entering add on the command line or entering a next to the existing entry.
You can now return to the Profile Options and Policies menu.
3.2.6 Setting keywords for autoconfiguration policies
To set the autoconfiguration policies by using keywords, select Option 2. Autoconfiguration policies from the Profile Options and Policies menu (Figure 3-20). This action opens the Autoconfiguration Policies panel. This panel displays the current value settings for autoconfiguration policy keywords as they are either explicitly set in the HCD profile data set or defaulted by HCD. Use this panel to revise or change the displayed keyword values.
|
----------------------- Autoconfiguration Policies ------------------------
Row 1 of 9 More: >
Command ===> ___________________________________________ Scroll ===> CSR
Edit or revise autoconfiguration policies.
HCD Profile : HDWCFG1.HCD.PROFILE
Policy keyword Value +
AUTO_MATCH_CU_DEVNUM YES
AUTO_SS_ALTERNATE 0
AUTO_SS_DEVNUM_SCHEME PAIRING
AUTO_SUG_CU_RANGE 0001-FFFE
AUTO_SUG_DEV_RANGE 0001-FFFF
AUTO_SUG_DYN_CHPIDS 2
AUTO_SUG_LPGROUP P401LPGP
AUTO_SUG_OSGROUP P401OSGP
AUTO_SUG_STAT_CHPIDS 4
***************************** Bottom of data ******************************
|
Figure 3-20 Autoconfiguration policies
You must set the following policy keywords:
•AUTO_MATCH_CU_DEVNUM: This policy specifies whether, for autoconfiguration definitions, a control unit number must match the starting base device number.
If you specify YES (which is the default), the first base device is set to the same number as the control unit. If NO is specified, the device number of the first base device and the control unit number do not necessarily need to match.
•AUTO_SS_ALTERNATE: This policy specifies the ID of the subchannel set in which newly discovered parallel access volume (PAV) alias devices are defined during an auto-definition process. Free device numbers must be available in this subchannel set, and processors that have access to the device range must support alternate subchannels.
The default subchannel set ID is 1.
•AUTO_SS_DEVNUM_SCHEME: This policy defines the schema for assigning device numbers to PAV alias devices in an alternate subchannel set. The following schemes are supported:
– CONSECUTIVE: The alias device numbers in an alternate subchannel set are consecutive to the base device numbers.
– DENSE: The device numbers in an alternate subchannel set are densely assigned, that is, the next free device numbers in the assigned device number range are used.
– PAIRING: Base and alias device numbers are assigned alternatively starting with, for example, device numbers xx00 and xx80 versus xx80 and xx00.
PAIRING is the default.
•AUTO_SUG_CU_RANGE: This policy specifies the range of control unit numbers from which numbers for auto-defined control units are taken. If no value is specified, the range 0001-FFFE is taken as default. Specify the range according to the following syntax:
nnnn-mmmm
Where:
– nnnn is the lower range boundary.
– mmmm is the upper range boundary.
•AUTO_SUG_DEV_RANGE: This policy specifies the range of device numbers from which device numbers for auto-defined devices are taken. If no value is specified, the range 0001-FFFF is taken as default.
|
Consideration: I/O Autoconfiguration avoids using device and control unit numbers in the 0000-00FF range in Subchannel set 0. If you have no alternative number ranges available, you must configure the CUs or devices manually in this range.
|
•AUTO_SUG_DYN_CHPIDS: This policy specifies the number of dynamically managed channel paths that are allowed on a control unit definition, if it is auto-defined. A maximum number of seven dynamic channel paths is allowed. The default is six.
•AUTO_SUG_LPGROUP: This policy specifies the name of a group of logical partitions to which discovered devices are assigned. If no name is set, devices are assigned to all eligible partitions of the active sysplex. The reserved group name ALL signals this setting during the autoconfiguration processing.
•AUTO_SUG_OSGROUP: This policy specifies the name of a group of OS configurations to which discovered devices are assigned. If no name is set, devices are assigned to all OS configurations that correspond to the active LP group.
•AUTO_SUG_STAT_CHPIDS: This policy specifies the number of static channel paths to be assigned to a control unit definition, if it is auto-defined. At least one and not more than eight static channel paths can be defined.
The default is two.
3.2.7 Running the automatic I/O discovery process
After you specify the policies, start the I/O Autoconfiguration process for HCD to discover and automatically define control units and I/O devices into a specified target IODF.
Start the I/O Autoconfiguration process from the HCD by completing the following steps:
1. Select Option 1. Define, modify, or view configuration data from the Primary Task Selection menu.
2. Select Option 6. Discovered new and changed control units and I/O devices.
These steps open the Discovery and Autoconfiguration Options panel shown in Figure 3-21. This panel allows you to select processing options for discovery and autoconfiguration. Input to all fields is required, and the initial defaults are supplied.
|
z/OS V1.12 HCD
----------------- Discovery and Autoconfiguration Options --------------
Specify autoconfiguration options. Then, press Enter to start the
discovery process.
Autoconfiguration is based on 2 1. Active IODF
2. Currently accessed IODF
Show proposed definitions . . 1 1. Yes
2. No
Scope of discovery . . . . . 1 1. New controllers only
2. All controllers
3. Controller containing CU ____ +
Force full mode discovery . . 2 1. Yes
2. No
Target IODF name . . . 'SYS6.IODF8E.WORK' +
|
Figure 3-21 Discovery and Autoconfiguration Options
You must set the following autoconfiguration options:
•Autoconfiguration is based on
Choose whether the active production IODF or the currently accessed IODF is used as the base for new configuration definitions that result from the discovery process.
HCD checks the discovered devices accessible to the system against this selected IODF, whether they are already defined or not. If they are found to be new or changed, the resulting configuration proposals are also adopted to fit into this IODF.
HCD copies this IODF to the selected target IODF, which receives all changes that are made to the configuration during autoconfiguration processing.
|
Remember: Any IODF that you select as the base for I/O autoconfiguration must be enabled for full dynamic activation. If you select a work IODF that is not enabled, base it on a production IODF.
|
•Show proposed definitions
You can decide whether the panel displays proposed definitions for possible configuration changes. Select Yes if you want to work in an attended operation mode. In this mode, HCD starts a subsequent series of panels in which you can revise and change the proposed settings.
Select No if you want to run the unattended fast path of I/O Autoconfiguration. In this case, HCD does not offer a possibility to revise the proposals, or to update or add definitions. Instead, the HCD definitions are saved in the target IODF immediately.
•Scope of discovery
In this selection, you decide which controllers are discovered:
– New controllers only: HCD discovers and returns only new controllers that are not yet known in the chosen target IODF.
– All controllers: HCD discovers and returns all new controllers and all changed controllers (a full discovery).
– Controller containing CU ____: HCD runs a discovery that is limited to the controller containing the control unit with the specified number. The referenced control unit must be a DASD or tape CU, and must be defined in the target IODF.
•Force full mode discovery
Decide when discovery processing should stop. If set to No, which is the default, processing stops after several consecutive unused CUADD values that do not exist on the target controller. With this option set to Yes, for each discovered controller, all unused logical control unit addresses (CUADD values) and unit addresses are checked for changes.
•Target IODF name
Type the name of a work IODF to receive the configuration definitions for all discovered new or changed controllers, according to your selected scope of discovery.
This input is required. The specified IODF can either be an existing work IODF, or created by HCD. In any case, the IODF specified in the Autoconfiguration is based on field is copied to the specified target IODF.
The target IODF must not be enabled for multi-user access.
|
Tip: As soon as you accepted any proposals into your target IODF, it becomes the new currently accessed IODF.
|
3. Press Enter and observe the status message at the bottom of the panel (Figure 3-22).
|
+------------------------------------------------+
| FABRIC discovery in progress - please wait ... |
+------------------------------------------------+
|
Figure 3-22 Fabric Discovery in progress
3.2.8 Applying updates to the autoconfiguration proposals
After a successful discovery, HCD displays the result in the Discovered New or Changed Controller List (Figure 3-23). Only discovered controllers are returned, which are reachable from all target systems that have partitions that are defined in the LP group referenced by the AUTO_SUG_LPGROUP policy keyword.
|
--------- Discovered New or Changed Controller List ---------
Backup Query Help
----------------------------------------------------------
Row 1 of 5
Command ===> ___________________________ Scroll ===> CSR
Select one or more controllers to be defined, then press
Enter.
Manufacturer
/ Type Model Name Plant Serial-# New Processed
_ 2105 F20 IBM 13 FCA37 Yes No
/ 2105 F20 IBM 98 FCA60 Yes No
_ 2105 800 IBM 13 FC132 Yes No
_ 3590 J70 IBM 78 C4146 Yes No
_ 3590 C06 IBM 78 C5367 Yes No
********************* Bottom of data **********************
|
Figure 3-23 Discovered New or Changed Controller List
This panel lists all discovered controllers that are either not yet defined in the IODF, or whose definition in the IODF is different from discovered controller characteristics.
To apply updates to the autoconfiguration proposals, complete the following steps:
1. Enter the action code “/” next to one or multiple controllers that you want to be defined or changed in the target IODF. HCD then processes each selected controller in the way that is described in the remainder of this chapter.
2. Press Enter and note the status message at the bottom of the panel (Figure 3-24).
|
+----------------------------------------------------+
| CONTROLLER discovery in progress - please wait ... |
+----------------------------------------------------+
|
Figure 3-24 Controller discovery in progress
3. In this example, HCD issued msg CBDG721I, indicating that the serial number field for the following control units has been updated in the IODF with the serial number that was discovered (Figure 3-25). Press PF3 to continue.
|
----------------------- Proposed Control Unit List ------------------------
------------------------------ Message List -------------------------------
Save Query Help
--------------------------------------------------------------------------
Row 1 of 3
Command ===> ___________________________________________ Scroll ===> CSR
Messages are sorted by severity. Select one or more, then press Enter.
/ Sev Msg. ID Message Text
_ I CBDG721I Discovery provided serial number FCA60 for controller.
# The serial numbers of the following control units are
# changed accordingly: 1800, 1900, 1A00, 1B00, 1C00, 1D00,
# 1E00, 1F00
***************************** Bottom of data ******************************
|
Figure 3-25 CBDG721I message for serial number changes
4. As a result of the discovery process, the Proposed Control Unit List offers definition proposals for the control units that are found in the currently processed controller (Figure 3-26).
|
----------------------- Proposed Control Unit List ------------------------
Row 1 of 8
Command ===> ___________________________________________ Scroll ===> CSR
Control unit type . . : 2105-F20 Serial number : FCA60
Proposed switch.ports : 63.15 62.11 64.15 61.11
To accept the proposed values, press Enter. To modify them, edit the
fields, or select one or more control units to change, exclude or include
the corresponding definitions, then press Enter.
CU CU # of LPAR
/ ADD number+ devices Access+ New Description I
_ 00 1800 256 P401LPGP No YP CUA 0 Y
_ 01 1900 256 P401LPGP No YP CUA 1 Y
_ 02 1A00 256 P401LPGP No YP CUA 2 Y
_ 03 1B00 256 P401LPGP No YP CUA 3 Y
_ 04 1C00 256 P401LPGP No YP CUA 4 Y
_ 05 1D00 256 P401LPGP No YP CUA 5 Y
_ 06 1E00 256 P401LPGP No YP CUA 6 Y
_ 07 1F00 256 P401LPGP No YP CUA 7 Y
|
Figure 3-26 Proposed Control Unit List
You can accept the proposed control unit definitions, or make the following modifications:
– For control units that showing Yes in column New (which indicates whether the control unit is not yet defined in the IODF), you can overwrite the values in column CU number.
– Also, you can overwrite the LPAR Access and Description fields by entering values in the panel.
– With action code /, you get an overview of available actions on the selected control units (i, e, or c):
• With action code i, you can include the corresponding control unit definition in the IODF.
• With action code e, you can exclude the control unit from being defined in the IODF.
Your selection is reflected in column I. Y denotes included and N denotes excluded control units.
• Action code c leads you to the Select Processor / CU panel. On this panel, HCD displays a list of all defined processors. You can define how the control unit is to be attached to one or more processors.
Rules for discovered control units:
– For each discovered control unit that is already defined with the same CUADD value, the existing control unit definition is checked for the same serial number. If the serial numbers match, or the IODF definition does not contain a serial number, the control unit number of the existing control unit is used. If the serial numbers do not match, a warning message is given, and the discovered control unit is proposed with a new number.
– For each discovered control unit that is not yet defined in the IODF, a new serial number is proposed.
– When a new control unit number is proposed, its value is taken from the preferred range that is specified by the AUTO_SUG_CU_RANGE policy. If there is no free control unit number in the IODF within that range, a warning message indicates that the policy cannot be followed. A free control unit number outside of the range is then proposed.
– Proposed existing control units are updated with the discovered serial number. If the type of a discovered control unit differs from its definition in the IODF, the definition is updated.
Rules for discovered devices:
– For each discovered device that is already defined with the same unit address on an existing control unit, the existing device number is proposed. For non-existing devices on the control unit, the existing device numbering scheme is applied if possible.
– For new devices on new or existing control units where the existing device number scheme cannot be applied, the device numbers are determined based on the AUTO_SUG_DEV_RANGE and AUTO_MATCH_CU_DEVNUM policies. For PAV alias devices, the numbers are additionally determined based on the AUTO_SS_ALTERNATE and AUTO_SS_DEVNUM_SCHEME policies. If a policy cannot be applied because no free numbers are available for the active LP group and OS groups, a warning message is given. Free device numbers outside the policies can then be used.
5. Apply the modifications and press Enter when you are finished, or you can accept the proposed definitions without changes and press Enter. In both cases, HCD displays the Proposed Control Unit / Device List (Figure 3-27).
|
Proposed Control Unit / Device List Row 1 of 13
Command ===> _______________________________________________ Scroll ===> CSR
Control unit type . . : 2105-F20 Serial number : FCA60
To accept the proposed values, press Enter. To modify them, edit the
fields, or select one or more device ranges to change, exclude or include
the corresponding definitions, then press Enter.
------Device----- S CU UA OS
/ Number Type+ S Num Range Access+ N Description I
_ 1800,74 3390B 0 1800 00-49 P401OSGP N ________________________________ Y
_ 184A,182 3390A 0 1800 4A-FF P401OSGP N ________________________________ Y
_ 1900,74 3390B 0 1900 00-49 P401OSGP N ________________________________ Y
_ 194A,182 3390A 0 1900 4A-FF P401OSGP N ________________________________ Y
_ 1A00,74 3390B 0 1A00 00-49 P401OSGP N ________________________________ Y
_ 1A4A,182 3390A 0 1A00 4A-FF P401OSGP N ________________________________ Y
_ 1B00,74 3390B 0 1B00 00-49 P401OSGP N ________________________________ Y
_ 1B4A,182 3390A 0 1B00 4A-FF P401OSGP N ________________________________ Y
_ 1C00,74 3390B 0 1C00 00-49 P401OSGP N ________________________________ Y
_ 1C4A,182 3390A 0 1C00 4A-FF P401OSGP N ________________________________ Y
_ 1D00,74 3390B 0 1D00 00-49 P401OSGP N ________________________________ Y
_ 1D4A,182 3390A 0 1D00 4A-FF P401OSGP N ________________________________ Y
_ 1E00,74 3390B 0 1E00 00-49 P401OSGP N ________________________________ Y
_ 1E4A,182 3390A 0 1E00 4A-FF P401OSGP N ________________________________ Y
_ 1F00,74 3390B 0 1F00 00-49 P401OSGP N ________________________________ Y
_ 1F4A,182 3390A 0 1F00 4A-FF P401OSGP N ________________________________ Y
******************************* Bottom of data ********************************
|
Figure 3-27 Proposed Control Unit / Device List
This list proposes definition details for existing or new devices accessible by the currently processed discovered control units (in the example, 1800 - 1F00). In the header of this panel, you can see the control unit type and serial number of the discovered controller.
You can accept the proposed device definitions without changes by pressing Enter. Also, you can narrow the proposed device definitions by overwriting one or more of the device ranges. You can only overwrite devices with a Y in column N (abbreviation for New), which indicates that the device range is not yet defined in the IODF.
Furthermore, for one or more of the listed device ranges with Y in column N, you can change the OS Access and the Description fields by overwriting the values in the panel. Again, a changed OS group must be a subset of the initial OS group.
For further available actions on devices, select one or more devices using action code /:
– Selecting action code i includes the corresponding devices from autoconfiguration, Similarly, action code e excludes them.
– Using action code c leads you to the Device / Processor Definition panel. This panel displays a list of all defined processors that have one or more channel paths to the control unit to which the device being added or changed is attached. Here you can select the processor/channel subsystem CSS(s) for which you want to change the device-to-processor definition.
In both cases, either with modifications applied or with accepting the unchanged propositions, pressing Enter returns you to the Discovered New or Changed Controller List.
6. In the example, accept the discovered devices and press Enter.
For each successfully processed controller, its Processed field is now turned to Yes (Figure 3-28).
|
-------- Discovered New or Changed Controller List --------
Backup Query Help
----------------------------------------------------------
Row 1 of 5
Command ===> ___________________________ Scroll ===> CSR
Select one or more controllers to be defined, then press
Enter.
Manufacturer
/ Type Model Name Plant Serial-# New Processed
_ 2105 F20 IBM 13 FCA37 Yes No
_ 2105 F20 IBM 98 FCA60 Yes Yes
_ 2105 800 IBM 13 FC132 Yes No
_ 3590 J70 IBM 78 C4146 Yes No
_ 3590 C06 IBM 78 C5367 Yes No
********************* Bottom of data **********************
|
Figure 3-28 Discovered controller processed
You can select the next controller to be autoconfigured, or exit the panel.
3.2.9 Before and after captures of the example
The following are panels of the control unit list (Figure 3-29 on page 134) and definition (Figure 3-30 on page 134) used in the example before the I/O Autoconfiguration process. They show the Control Unit definitions that are currently connected to processors other than the processor in the LP Group.
Note the following items:
•The CSS column indicates 4.
•The MC column is blank.
•The Serial # is blank.
Figure 3-29 shows the control unit list before the changes.
|
Control Unit List Row 25 of 673
Command ===> _______________________________________________ Scroll ===> CSR
Select one or more control units, then press Enter. To add, use F11.
---#---
/ CU Type + CUADD CSS MC Serial-# + Description
_ 1800 2105 0 4 __________ YP CUA 0
_ 1900 2105 1 4 __________ YP CUA 1
_ 1A00 2105 2 4 __________ YP CUA 2
_ 1B00 2105 3 4 __________ YP CUA 3
_ 1C00 2105 4 4 __________ YP CUA 4
_ 1D00 2105 5 4 __________ YP CUA 5
_ 1E00 2105 6 4 __________ YP CUA 6
_ 1F00 2105 7 4 __________ YP CUA 7
|
Figure 3-29 Control Unit example before I/O Autoconfiguration
Figure 3-30 shows the definition before the changes.
|
----------------------- View Control Unit Definition -----------------------
Row 1 of 6 More: >
Command ===> ____________________________________________ Scroll ===> CSR
Control unit number . : 1800 YP CUA 0
Control unit type . . : 2105 Serial number . . . :
Connected switch.ports: 61.11 62.11 63.15 64.15
ENTER to continue.
----------------Channel Path ID . Link Address-----------------
Proc.CSSID 1------ 2------ 3------ 4------ 5------ 6------ 7------ 8------
SCZP101.0 98.15 89.11 99.15 8B.11
SCZP201.0 52.11 56.11 5A.15 5E.15
SCZP201.1 52.11 56.11 5A.15 5E.15
SCZP201.2 52.11 56.11 5A.15 5E.15
SCZP901.0 9D.15 81.11 A1.15 85.11
SCZP901.1 9D.15 81.11 A1.15 85.11
****************************** Bottom of data ******************************
|
Figure 3-30 Control Unit definition example before I/O Autoconfiguration
Figure 3-31 on page 135 shows the panel of the control unit list used in the example after the I/O Autoconfiguration process that shows the CU definitions.
Note the following changes:
•The CSS column now indicates 6.
•The MC column now indicates 2.
•The Serial # now indicates the Serial Number of the controller.
|
Control Unit List Row 25 of 673
Select one or more control units, then press Enter. To add, use F11.
---#---
/ CU Type + CUADD CSS MC Serial-# + Description
_ 1800 2105 0 6 2 FCA60 YP CUA 0
_ 1900 2105 1 6 2 FCA60 YP CUA 1
_ 1A00 2105 2 6 2 FCA60 YP CUA 2
_ 1B00 2105 3 6 2 FCA60 YP CUA 3
_ 1C00 2105 4 6 2 FCA60 YP CUA 4
_ 1D00 2105 5 6 2 FCA60 YP CUA 5
_ 1E00 2105 6 6 2 FCA60 YP CUA 6
_ 1F00 2105 7 6 2 FCA60 YP CUA 7
|
Figure 3-31 Control Unit example after I/O Autoconfiguration
In the View Control Unit Definition panel (Figure 3-32), note the following changes:
•The Serial # now indicates the Serial Number of the controller.
•Processors SCZP301 and SCZP401 are now connected with for static CHPIDs and two dynamic CHPIDs.
|
----------------------- View Control Unit Definition -----------------------
Row 1 of 7 More: >
Command ===> ____________________________________________ Scroll ===> CSR
Control unit number . : 1800 YP CUA 0
Control unit type . . : 2105 Serial number . . . : FCA60
Connected switch.ports: 61.11 62.11 63.15 64.15
ENTER to continue.
----------------Channel Path ID . Link Address-----------------
Proc.CSSID 1------ 2------ 3------ 4------ 5------ 6------ 7------ 8------
SCZP101.0 98.15 89.11 99.15 8B.11
SCZP201.0 52.11 56.11 5A.15 5E.15
SCZP201.1 52.11 56.11 5A.15 5E.15
SCZP201.2 52.11 56.11 5A.15 5E.15
SCZP301.0 45.11 60.15 5D.15 51.11 * *
SCZP401.0 58.15 4E.11 5D.15 51.11 * *
|
Figure 3-32 Control Unit definition example after I/O Autoconfiguration
3.2.10 I/O Autoconfiguration using HCM
This section addresses running I/O Autoconfiguration by using HCM. These instruction assume that you have a working knowledge of HCM.
3.2.11 Defining autoconfiguration policies
To define the autoconfiguration policies, complete the following steps:

Figure 3-33 Utilities Autoconfiguration window
This action opens the first window of the Autoconfiguration wizard (Figure 3-34).

Figure 3-34 Autoconfiguration wizard

Figure 3-35 Autoconfiguration options
3. As described in the HCD examples, set up the LP groups and OS groups. Click Policies (Figure 3-36).

Figure 3-36 Autoconfiguration policies defaults
The default settings are shown in some of the fields for Profile Options:
– If this is the first time you are setting your Profile Options and Policies, the defaults are displayed.
– If you have previously made updates to your Profile Options and Policies, they stored in and retrieved from your userid.HCD.PROFILE data set. This example uses the HDWCFG1.HCD.PROFILE data set.
3.2.12 Defining logical partition groups for autoconfiguration
To define logical partition group for autoconfiguration, complete the following steps:

Figure 3-37 LP Groups: None defined
This window shows that there are currently no LP groups that are defined in this IODF.
2. Click Add. In the example, enter an LP Group Name and Description and select the Processor ID menu to show a list of all defined processors in this IODF (Figure 3-38).

Figure 3-38 LP Groups: Processor list
This option is set to ‘*’ by default to show all defined processors and partitions in the box in the lower left corner. You can filter this list by selecting a processor in the Processor ID window. Alternatively, scroll down the list of processors and partitions.
3. Highlight the processor and partition that you want to add to the LP Group and click Add. In the example, select processor SCZP401 and partition A01 (Figure 3-39).
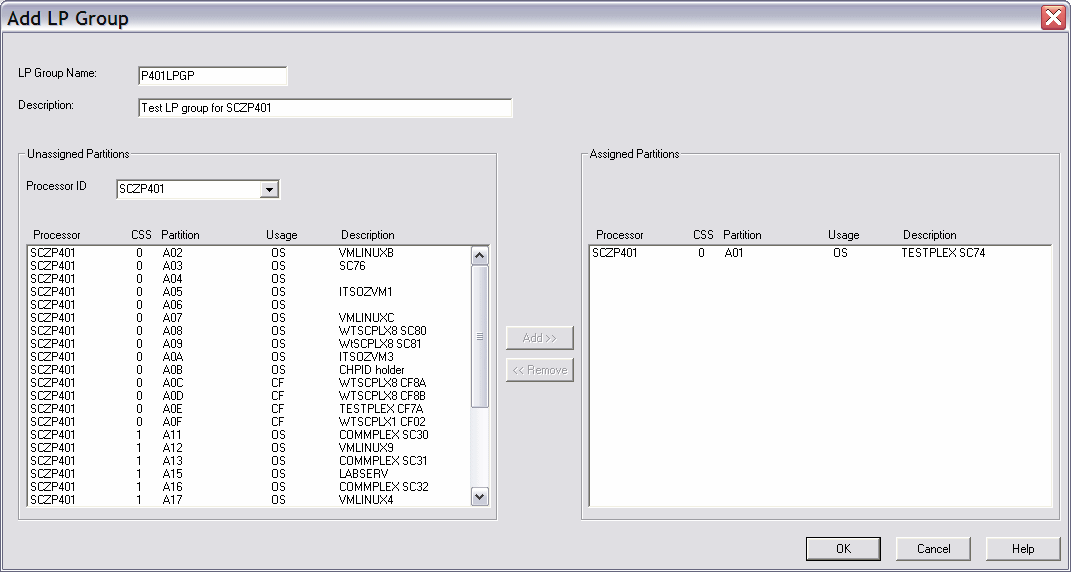
Figure 3-39 LP Groups: Select processor and partition
4. Click OK or add more processors and partitions to the LP Group. In the example, also add processor SCZP301 and partition A05 and then click OK (Figure 3-40).

Figure 3-40 LP Groups: Processor and partitions added
3.2.13 Defining OS configuration groups for autoconfiguration
To define OS configuration groups for autoconfiguration, complete the following steps:

Figure 3-41 OS Groups: None defined
There are currently no OS Groups defined in this IODF.
2. Click Add. In the example, enter an OS Group Name and Description and highlight the OS configuration that you want to add to your OS Group (Figure 3-42).

Figure 3-42 OS Groups: OS configuration list
3. Click Add to add the unassigned OS configuration to the assigned OS configuration list and to the OS Group.
4. Click OK or add more OS configurations. In the example, only add the L06RMVS1 OS configuration and click OK (Figure 3-43).

Figure 3-43 OS Groups: OS configuration added
3.2.14 Setting keywords for autoconfiguration policies
To set keywords for autoconfiguration policies, complete the following steps:
Figure 3-44 Autoconfiguration policies defaults
2. For the example, set the following keywords (Figure 3-45):
– AUTO_SS_ALTERNATE: Set to 0 (SS0).
– AUTO_SUG_DYN_CHPIDS: Set to 2 (dynamic CHPIDs).
– AUTO_SUG_LPGROUP: Set to P401LPGP (LP Group).
– AUTO_SUG_OSGROUP: Set to P401OSGP (OS Group).
– AUTO_SUG_STAT_CHPIDS: Set to 4 (static CHPIDs).

Figure 3-45 Autoconfiguration policies set
3. These values can also be found in the menus next to each data box. Click OK.
3.2.15 Completing the automatic I/O discovery process
Now that the profile options and policies are set, start the automatic I/O discovery process. In this example, you search for ‘New controllers only’.
In the Autoconfiguration - Options window, click Next (Figure 3-46).
Figure 3-46 Autoconfiguration options
The Fabric discovery process is started. After this process is complete, the window that is shown in Figure 3-47 opens.

Figure 3-47 Fabric discovery results
3.2.16 Applying updates to the autoconfiguration proposals
To apply updates to the autoconfiguration proposals, complete the following steps:
1. Highlight the controller and click Include to include that controller for the Controller discovery process. Note the check mark in the Include column (Figure 3-48).

Figure 3-48 Controller selection for discovery
2. Click Next to start the Controller discovery process.
In the example, HCM issues the CBDG721I message, indicating that the serial number field for the control units has been updated in the IODF with the serial number that was discovered (Figure 3-49).

Figure 3-49 CBDG721I message for serial number changes
Click OK to continue.
As a result of the discovery process, the Proposed Control Unit List offers definition proposals for the control units found in the currently processed controller. All eight Control Unit entries are selected as ‘Include’ by default (Figure 3-50).

Figure 3-50 Proposed control unit list
3. If you want to edit the proposed control units, highlight the control unit entry and click Edit. You can change the Control Unit Number, LPAR Access, and Description. In the example, leave the discovered definitions unchanged (Figure 3-51).

Figure 3-51 Edit proposed control unit list
Click Next to continue to the Proposed Control Unit / Device List (Figure 3-52).

Figure 3-52 Proposed control unit device list
4. Again, all entries are selected as ‘Include’ by default. If there are any device numbers that you do not want to add to the discovery proposal, highlight them and click Exclude.
In the example, include all the device numbers there were discovered. Click Next.
5. HCM issues an Autoconfiguration - Summary report that can be saved to your workstation. Click Accept to include these discovered control unit and device definitions into the IODF, or Reject if you want to cancel the inclusions (Figure 3-53).

Figure 3-53 Autoconfiguration summary report
In the example, click Accept.
Each successfully handled controller’s Processed field now has a Yes entry (Figure 3-54).

Figure 3-54 Discovered controller processed
6. Click Close to complete this process or highlight and ‘Include’ one or more unprocessed controllers.
Figure 3-55 shows the updated serial number FCA60 and discovered paths (four static and two dynamic) added to the control unit definitions.

Figure 3-55 Controller with discovered paths added
..................Content has been hidden....................
You can't read the all page of ebook, please click here login for view all page.