3The REXX commands
In the following chapters, I would like to present the key REXX commands as they are available under TSO. In addition, I will be less responsive to the formal syntax. You can always read this in the brochure. Rather more, I will make you acquainted with the aid of examples of the application of the REXX commands. I programmed these examples separately for illustrating the application of them, but sometimes I also use examples from my programs used in practice.
3.1ADDRESS – Connection to the subsystems
If you are concerned about the practical usability of a programming language, you will very quickly recognize that in the practical operation of the IT you cannot do very much with the functions of the language alone. You could write a program to calculate prime numbers or to issue a winning lottery numbers. However, when you want to expand the view of your program, e.g. to read a file or display a panel, you need the help of ministering angels, namely the support of the subsystems of the z/OS in general and of the TSO/ISPF in particular.
Generally, there are several ways to use services from environmental systems:
–By the use of subroutine calls, such as for GDDM (Graphical Data Display Manager).
–Due to special instructions that are included in the source code of a program but not directly understood by the language. A pre-compiler that converts the special instructions in subroutine calling for the subsystems must process these programs. For example, EXEC SQL, EXEC CICS.
In REXX a method was developed that is unrivaled and best in my opinion. You can call this method a window or channel method. In order to understand this method, we first need to look at a concept that plays a decisive role. These are the external system environments. The correct name is Host Command Environment.
3.1.1The host command environments
The host command environments are nothing more than subsystems within our TSO/ISPF environment that allow us to provide services available and to which we can establish a connection from the REXX to use these services. These include the TSO, the ISPF, the ISPF editor, MVS, the LINK service etc. The ADDRESS command establishes the connection. This command has the following form:
| subsys | SUBSYS is the name of a host command environment. This name has a maximum of 8 characters and must designate a host command environment which is addressable in our TSO/ISPF environment. SUBSYS can be specified as either a literal as well as just a name. |
| variable | This variable contains the name of a host command environment. |
![]() Note:
Note:
If the ADDRESS command is specified without operands, the system returns to the one host command environment which was active before the ADDRESS command. However, this command cannot switch back by several steps; it only works like a FLIP FLOP process. The following example demonstrates this effect in the rows 13 and 15.
Example:
The following sample program shows a comprehensive application of the ADDRESS command.
Program 3.1: Examples of ADDRESS command

The SAY commands in the above program produced the following output:
![]()
I hope that this example can answer all questions related to the application of the ADDRESS command exhaustive. Now the question arises: How the commands come to the right subsystems. The following chapter explains this.
3.1.2The active host command environment
Rules:
–Whenever in a REXX program sequence a command appears that consists only of a literal, this text is passed to the active host command environment. Whether the currently active host command environment can do something with the text will be decided by itself.
–A specific host command environment is activated with the command ADDRESS subsys which shall be a single command in REXX. This selected host command environment remains active until another individual ADDRESS command is executed to another environment. Nesting of host command environments is not possible. There is also no redemption command. This means that when you run REXX procedures under TSO/ISPF one host command environment is always active.
–If a REXX program starts under TSO/E, the TSO host command environment is always automatically active. This means that all external commands, which are not explicitly directly addressed to another subsystem are passed to the TSO for execution.
3.1.3The temporary addressing of external commands
Whichever host command environment is currently active, with an ADDRESS subsys command immediately followed by the external command, an external command can be sent to each other host command environment. However, the active host command environment is not changed in this case.
Example:
The program section shown below indicates the beginning of one of my programs. The special feature of this is that the program can be online directly under ISPF or in TSO batch and without ISPF run. Since when running in batch the STEPLIB DD statement for the load library is contained in the job, the ISPF command LIBDEF ISPLLIB is not necessary in this case. Therefore, I use a temporary ADDRESS command to run each LIBDEF ISPLLIB. Note the continuation comma that is behind each address “ISPEXEC”, characterizing the next line is still part of the address ISPEXEC and forms a complete REXX command. I deliberately chose this example to make you familiar with the intricacies of continuation lines related to ADDRESS.

The commands in lines 9 to 12 only apply when the program runs online executed in ISPF. Lines 17 through 19 are TSO commands. Because I have not changed the active host command environment since starting the program, TSO is still active. Therefore, these external commands are sent to TSO. For description of the LIBDEF command, see section 7.4 LIBDEF – Dynamic linking of ISPF libraries on page 123.
![]() Remark:
Remark:
In many REXX program examples, you can see the following use of the ADDRESS commands:
![]()
The value after address is a fixed value, not a variable. When you assign the variables TSO or ISPEXEC a value, then has this no effect on the execution of ADDRESS commands. You can put the name of the environment in quotes. However, this is not required! If one has an environment using the ADDRESS () function stored in a variable, then you have to use the version address (remaddr) to restore the environment. remaddr is the variable that was assigned by the function ADDRESS().
Here is another example from one of my programs:

The program sends its external commands up to line 84 to TSO. If OUTIND is then = 1, the two commands TSO ALLOC and EXECIO are performed initially. Thereafter, the environment is switched to the ISPF as recipients for external commands. Lines 88 to 91 contain only ISPF commands. In line, 92 the active environment is switched back to the TSO. Thus, the FREE command in line 95 is executable.
![]() Rule:
Rule:
When you want to execute the instruction address “TSO” “alloc ...” then you must not write “TSO alloc ...”. Because in this case, the text “TSO alloc ...” would be understood by the REXX interpreter as a name for a host command environment. This name must not be longer than 8 characters. The REXX interpreter then responds with the error message: “Environment name too long”. Therefore, you must always disconnect the name of the host command environment from the text to be passed to the environment by typing both texts as individual one or put the name of the environment in quotation marks and put the literal behind with the external command.
3.1.4Special case ISPEXEC and ISREDIT
If the active host command environment is TSO, you can issue commands to the ISPF with the prefix “ISPEXEC and enter those to the ISPF editor when executing edit macros with the prefix “ISREDIT without a corresponding ADDRESS. Note that behind the environment name, no quotation mark may be set and the command to be sent to the host command environment follows immediately.
Examples:
![]()
![]() Note:
Note:
This technique works only if the actual host command environment is TSO. Within all other permanently active host command environments, you cannot work with this method.
![]() Tip:
Tip:
I have been accustomed for a long time, in principle; always keep in REXX programs in which I use the three host command environments TSO, ISPEXEC and ISREDIT the TSO as an active environment. In addition, use for the two environments ISPEXEC and IRSEDIT the corresponding prefix. That makes a little more work on the keyboard, but it makes me free from the obligation of constantly having to remember the currently active environment. However, this procedure is a matter of taste. Look for your own style!
3.1.5The main host command environments
The following table shows the most important host command environments that are usable under TSO/E. I copied this table from the IBM z/OS TSO/E REXX User's Guide.
Table 3.1: REXX host command environments
| Environment | Function | |
| TSO | the environment in which TSO/E commands and TSO/E REXX commands execute in the TSO/E address space. | |
| MVS | the environment in which TSO/E REXX commands execute in a non-TSO/E address space. | |
| LINK | an environment that links to modules on the same task level. | |
| LINKMVS | an environment that links to modules on the same task level. This environment allows you to pass multiple parameters to an invoked module, and allows the invoked module to update the parameters. The parameters you pass to the module include a length identifier. | |
| LINKPGM | an environment that links to modules on the same task level. This environment allows you to pass multiple parameters to an invoked module, and allows the invoked module to update the parameters. The parameters you pass to the module do not include a length identifier. | |
| ATTACH | an environment that attaches modules on a different task level. | |
| ATTCHMVS | an environment that attaches modules on a different task lev l. This environment allows you to pass multiple parameters to an invoked module, and allows the invoked module to update the parameters. The parameters you pass to the module include a length identifier. | |
| ATTCHPGM | an environment that attaches modules on a different task level. This environment allows you to pass multiple parameters to an invoked module, and allows the invoked module to update the parameters. The parameters you pass to the module do not include a length identifier. | |
| ISPEXEC | the environment in which ISPF commands execute. | |
| ISREDIT | the environment in which ISPF/PDF EDIT commands execute. | |
| CONSOLE | the environment in which MVS system and subsystem commands execute. To use the CONSOLE environment, you must have TSO/E CONSOLE command authority and an extended MCS console session must be active. You use the TSO/E CONSOLE command to activate an extended MCS console session. See z/OS TSO/E System Programming Command Reference, for more information about using the CONSOLE command. | |
| CPICOMM | the environment that allows you to invoke the SAA common programming interface (CPI) Communications calls. | |
| LU62 | the environment that allows you to invoke the APPC/MVS calls that are based on the SNA LU 6.2 architecture. These calls are referred to as APPC/MVS calls throughout the book. | |
| APPCMVS | the environment that allows you to access MVS/APPC callable services related to server facilities and for the testing of transaction programs. |
![]() Notes:
Notes:
I will cover only the grey marked environments in this book. There are many other host command environments available. One example is the environment to DB2. You find information on this environment at the following URL: http://mainframe-tips-and-tricks.blogspot.de/2011/12/sample-db2-rexx-program.html.
3.2ARG – Retrieve the parameter string
![]() Tip:
Tip:
If you want to pass multiple parameters to REXX programs at their call, separate them with BLANKS. Of course, this is only good if in the individual parameter values themselves no blanks must be included. It does not matter how many blanks are between the individual parameter values.
The following program contains several examples of how you can pass in and take over the parameters:
Program 3.2: ARGTEST – Example of the parameter handling in REXX

This program contains two internal procedures. These fulfill the following tasks:
| Procedure | Task |
| SUBR | Acquisition of call parameters and disassemble them with different methods. Calling the subprogram OUT to show the results of decompositions. |
| OUT | Outputting the results by SAY |
Here is a brief description of the important lines of ARGTEST program:
| Line | Description | |
| 5 | Zeroing the line counter for outputting the results | |
| 8 | CALL of subroutine SUBR with one parameter | |
| 11 | FUNCTION call of subroutine SUBR with two parameters. | |
| 17 | Label and entry point of subroutine SUBR. | |
| 18 | Print the number of parameters entered by using the ARG function. | |
| 19 | Take the first parameter in the variable IP1. In this type of taking over, the parameter values are translated in upper case. | |
| 23 | This statement divides the text of the first parameter into up to four parts when at least four terms separated by blank are present in the text. The dot at the end means that all parts of the text that lie behind the four words are ignored. During the transfer, with “PARSE ARG” the texts are not set in upper case. | |
| 27 | Here IP1 is divided so that all the texts that are between commas are written in the corresponding tags. If no comma is found in IP1, the entire contents of IP1 is contained in variable A1. | |
| 29 | Asks whether more than one parameter is passed. If so, then a PARSE ARG executes processing two parameters. | |
| 31 | Separation of two parameters into five variables. The comma between the variables x2 and x3 signals the PARSE command that two parameters are passed. |
I admit that this example is somewhat complicated and complex. However, it also contains all types of variations on the topic parameter passing in REXX programs.
![]() Remark:
Remark:
The number of parameters passed is determined by the number of commas in the transferred parameters that are included in the CALL instruction. When transferring the parameters, you can query the number of incoming parameters using the function ARG(). If the parameter values do not contain blanks, you can always work with only one parameter text and disassemble this in the subroutine using PARSE ARG.
Example for the takeover of keyword parameters
The following example shows how to take over keyword parameters. This type of parameters is wise if you want to keep order of the parameters in the transfer variable and if not all parameters must be entered or some parameters may be specified alternatively. For a better understand, you should look at the comments at the beginning of the procedure.
Program 3.3: LMGREAD read a data set using ISPF LM functions


![]() Remarks:
Remarks:
The host command environment is at the beginning of LMGREAD set to ISPEXEC because the whole procedure exclusively uses the ISPEXEC environment. In the SELECT group immediately after the takeover of the parameters, the plausibility check of parameters takes place. The parameter name DD and DSN must alternatively be used. This is queried in the plausibility check. The STEM parameter is mandatory.
3.3CALL – Call other programs
The CALL instruction calls internal subroutines and external programs. The syntax is as follows:
![]()
| name | Specifies the name of the internal or external program which is called. If the name is literally specified, then the program is only externally searched. | |
| parameter | This information includes the transfer parameters. Commas must separate several parameters. The parameters must not be in brackets. |
Example:

![]() Active:
Active:
When the name SUB is in apostrophes, the system searches SUB in external libraries only.
Rules:
–Internal subroutines must use RETURN to jump back to the command after the CALL statement. With EXIT, the main program would leave.
–In external REXX subroutines is the command EXIT usable for return.
–If a subroutine is called with CALL and this program returns a value using the command RETURN(value), this value is stored in the REXX special variable RESULT. The calling program can use the variable RESULT to take over the return value.
–When calling external programs no stems are transferrable. To solve this problem, take advantage of the data stack of the TSO. See section 3.11 QUEUE – Working with the TSO stack on page 53.
For examples of calling subroutines, See Program 3.2: ARGTEST – Example of the parameter handling in REXX on page 31.
Functions
Internal and external programs can also be executed using a function call. This happens because you use instead of the CALL statement the function call as follows:
![]()
Name is the name of an internal or external program. In principle, you can call any program as a function. Of course, this only makes sense for such a program, which also returns a value. Note that this also may be a text string. This return value can contain many different parts because it may be up to 16MB long! For a technique how to divide the individual values of a return text that you can easily determine this in the calling program, REXX provides elegant ways.
3.4DO groups and DO loops
The DO command is one of the most important commands in REXX. In connection with this command there are the commands END, ITERATE and LEAVE. This is considered in this context as well. A program sequence that started with a DO command must always be terminated with an END command. The nesting of DO commands is not limited to my knowledge. As the title suggests, there is the DO command in two basic versions:
3.4.1The DO group
The DO group occurs most often in connection with the commands IF and WHEN to execute a series of commands when the requested condition is met. When used as a DO group the DO command has no further operands.
Example:

![]() Notes:
Notes:
The command LEAVE is not usable to leave a DO group! Note also that for each DO, an END must belong. This means: DO and END must always occur in pairs. This pairing is easy to control with the editors Colored Code facility (HILITE command!).
3.4.2The DO loop
The DO loop has a very wide scope for design. I would like to present some basic examples here:
3.4.2.1DO FOREVER
Here a never-ending loop is started. This variant is rare. The risk of program loops is relatively high, because you have to safely exit the loop. You can leave this DO loop using LEAVE or link them to a WHILE or UNTIL condition to leave them in this way.

3.4.2.2DO I = A TO B BY C
Explanation of values:
I is the loop index
A is the start value
B is the end value
C is the incremental step value
All these four values must be of type NUM. The values A, B and C can be the result of a calculation expression.
Variations:
a) With a loop index without increment and end value
![]()
This version is strongly preferred to against the version with DO FOREVER. It has two advantages:
–You can use the loop index I for indexing.
–Due to the designation of a loop index, this loop can be specifically exited with LEAVE I. This is especially important for nested DO loops and DO groups.
b) With a loop index, negative initial value, increment and end value
![]()
c) With a loop index and UNTIL or WHILE condition
![]()
This loop is exited at the END I command when during the processing the variable INPUT is set to the text END.
3.4.2.3DO WHILE and DO UNTIL Rules:
–The WHILE condition is checked when a new loop iteration is started. Thus, if the WHILE condition is not met at the beginning of the DO sequence already, the sequence is not run through.
–The UNTIL condition is checked when the END command is reached and before the loop index is recalculated. This means that the DO sequence runs at least once.
WHILE example of a program to issue system information:
![]()
Example of UNTIL from a program to print error text:

Mnemonics to the DO command
–The loop index, the incremental value and the final value can have negative contents and decimal numbers such as 0.3, 12.5 and so on.
–The LEAVE command is not applicable within DO groups. Therefore, if you want to leave a DO group with LEAVE, you should then create it as a DO loop, even if you do not need the loop index.
–You should get into the habit to always specify the loop index name in the END statement of a DO loop. This increases the overview immensely.
–The ITERATE command jumps to the end of the loop, calculates a new value for the loop index and then continues the DO loop. This makes it possible to jump from an inner level nested loop directly to the end of an outer level.
–Depending on the manner in which the loop is exited, the content of the loop index is as follows:
–If the loop ends normally by reaching the final value and the calculation of the loop index variable has exactly the final value, the loop index contains the value: end value + increment. In all other cases, the loop index contains the value: Content on the last run + increment.
–If the loop is exited due to the WHILE condition, the loop index contains the value: Content on the last run + increment.
–If the loop is exited due to the UNTIL condition or a LEAVE statement, the loop index contains the current value.
3.5EXIT and RETURN – leaving the REXX procedure
Command syntax:
EXIT expression
Use EXIT to leave a main program. If the EXIT command used is in an internal subroutine, the main program is exited. If there is an external procedure called, then only this will exited, but not the calling program.
| expression | This value is returned to the calling program. If the calling program is the TSO, then this value must be an integer number in the range of -2**31 to 2**31-1, because in this case the value is set in the register 15 and then to the TSO returned. If the REXX program was called in a TSO batch job, this return code is by the TSO as a step return code returned to the MVS. |
Example:
The following example illustrates this technique: I have written an external subroutine called TEXIT, which consists only of the EXIT 999 command. In the following program, this routine is once as a function and once called with CALL:

When called, the program prints the following lines:
![]()
As you can see when TEXIT is called as a function, the return value is returned in XXX and when called using CALL the return value is returned in the special variable RESULT.
Command syntax:
RETURN expression
If one wants to jump out of an internal subprogram to the parent program, RETURN must be used. The handling of the return code is the same as the EXIT command.
Example
The following internal procedure returns a 1 if the YEAR variable contains the number of a leap year. Otherwise, 0 is returned.
Program 3.4: Function LEAPYEAR
![]()
Return codes at program start under ISPF batch:
When you invoke a REXX program under ISPF batch, then the return code from the RETURN or EXIT command is not returned to the operating system. In this case, you have to use a special technique to make the ISPF return the desired return code to the TSO and so to the calling operating system. This technique is to store the return code into the ISPF variable ZISPFRC and write this variable in the ISPF function pool before leaving the REXX program.
Program example statements:
![]()
In this case, the ISPF step ends in a batch job with the RC = 16. See also section 6.1 Execution of programs in a TSO/ISPF environment on page 105.
3.6IF and WHEN – check conditions
The commands IF and WHEN have the same structure. The WHEN command, however, can only within a SELECT sequence used. The basic structure of these commands is:
![]()
| expression | Any numeric or logical expression whose result can only be 0 or 1. |
| instruction | Each REXX command. |
The operation and diversity of IF commands can best explained with examples. So here are some examples of IF queries from some of my programs:
First example

Second example

Third example
![]()
In this example, you can see that in an IF command not only a DO group, but also a DO loop can start.
3.7INTERPRET – generate REXX commands dynamically
The INTERPRET command generates a REXX command using constants and variables and executes it immediately. This allows you to generate and execute REXX commands dynamically.
Command syntax
INTERPRETexpression
| expression | The content of expression dissolves and the resulting REXX command executes immediately. The expression is usually composed of literals and variables that make up the command to execute. |
![]() Note:
Note:
A beginner in REXX programming may have some difficulties in defining INTERPRET commands correctly. So I am going to show the operation of the INTERPRET instruction using a few examples. As usual in this book, I take these examples from some of my practice programs.
First example for the INTERPRET command:
The SMART ISPF utilities contain the edit macro #IMACRO1. For control purposes, some variables must be dynamically assembled to contain in its name the number of the logical ISPF screen where the program is running. This technique assures that the program can run parallel in some logical screens. The following statements show how this is realizable using the INTERPRET command:

As you can see, original REXX commands as well as ISPF commands are assembled. Since the latter have to be set in single quotes, the two delimiters (') and (") are alternately used for literals so that useful statements are developed. When the INTERPRET command translates and we assume that the ZSCREEN variable has the value 4, then the following command sequence would run:
![]()
Second example for the INTERPRET command:
This example also comes from one of my applications. It is somewhat complex. Therefore, it is so beautiful! To help you understand the following example, I will explain the environment under which the program is running. This REXX program reads DB2 tables using an assembler subroutine and prints them. The operator enters the necessary SQL statements using an ISPF panel. These statements are passed to the assembler program. The assembler program stores the DB2 read results into stems that are in the REXX at return from the assembler program known.

Explanation:
Suppose, the loop index ROW is 5 and the loop index COL is 3. Then the following situation arises after the replacement of the control variables COL and ROW:
SQL_CN.3 contains the text PRI_DATE. Thus, the following statement executes:
![]()
PRI_DATE.5 contains, as shown in the printout below, the text: 20040421.

I hope I have been successful inspiring you for the INTERPRET instruction! You can use it when necessary to produce very elegant solutions. In addition, in some cases it is simply essential! You can find such a solution in the REXX program SPROFVAR – Load user ISPF variables on page 270.
3.8NUMERIC – set computing options
In this chapter, I deal will with the following two commands:
![]()
Before I turn to this issue, I have to tell you how the REXX data and here especially figures are internally stored. If you have ever programmed in a programming language other than REXX, you know the effort you have to do there to define your variables containing figures. Since there is binary data which may be stored in fields of 16, 32 or 64 bits, there is decimal data with up to 31 decimal digits. Add the different variants of the floating point data. Let alone the different variants of the floating-point numbers. Fortunately, you can forget it all in REXX.
![]() How REXX figures internally stores:
How REXX figures internally stores:
REXX puts all the data in EBCDIC text strings. So also the data that contain numbers. The numbers before they participate in arithmetic operations are converted to an appropriate format that the underlying system can handle and are converted back into text strings after completion of the arithmetic operation. This happens for each arithmetic operation within a command.
For this very simple rule, of course there must be a defined width for the figures so that the numerical representation remains manageable.
Example:
If the command X = 2/3 is executed then an infinite fraction occurs.
As in the REXX fractional numbers are not stored in words such as Short Floating Point or Long Floating Point, where the number automatically by the word length is limited, but as unpacked figures in EBCDIC format, an infinitely long number would need to be stored here. This means, it must be set somewhere how many significant digits are to be stored in such a number. If the default width of NUMERIC DIGITS 9 were active, the number X would be stored as EBCDIC characters in: 0.666666667. That is, for the storage of X, 11 bytes are occupied internally. The NUMERIC command is available with three main functions, of which I will discuss only two.
| number | specifies how many significant digits are used to store numbers. This definition is always immediately active until a change with a new NUMERIC DIGITS is made or the program ends. Number must be a whole number. Of course, the specification using a variable is possible. The default value is. 9 |
![]() Note:
Note:
As long as the numbers remain in a program below ABS(999999999), you do not need to change the value of NUMERIC DIGITS. However, as soon as a number generated during the program runs and goes beyond this number space, you have the NUMERIC DIGITS to increase accordingly, or you get a program abort. If you read all of this, one might be tempted, at the beginning of each REXX program simply to enter the command NUMERIC DIGITS 50. This would be likely to be on the safe side. However, here we must remember that then all fractional numbers that have as many places stored after the decimal point with 50 significant digits, and even worse, of course, also be calculated using this width.
Example:
The following commands produce this result:

![]()
| number | determines how many digits of a number to be rounded by decimal from the right before a comparison operation performs. This definition is always performed immediately and valid until a change with a new NUMERIC FUZZ statement is or the program ends. This must be a whole number. Of course, the specification using a variable is possible. The default value is 0. The number must always be less than the current number value of the NUMERIC DIGITS command. |
The impact of NUMERIC FUZZ on the logical operations is better understand when we look at an example:

In order to understand this example, you have to realize that REXX normal comparison operations (not the exact with the double operator symbol) between two is performed such a way that first the second number is subtracted from the first and then the result is compared with zero. If we view the results shown in the above IF statements that are behind the NUMERIC FUZZ 1, then this is due to the following effect: Because FUZZ is less than DIGITS, the takes place before subtraction. From 4.9999 the integer is 5.
![]() Tip:
Tip:
If you ever need to perform extensive calculations with REXX for which comparisons of fractional numbers happen to fail due to differences in the rear decimal places that you do not expect, then you remember NUMERIC FUZZ.
The currently active values for NUMERIC can be displayed as follows:
![]()
The display of these two commands is here:
![]()
3.9PARSE – text fragmentation
The PARSE command is one of the strongest commands of the REXX language. You can use it to perform in an elegant way decompositions of texts, data read from the stack or from the terminal and get information about the currently running program. You have one of its variants already in the discussion of the ARG instruction in the section 3.2 ARG – Retrieve the parameter string seen on page 31. We will now look at other forms. Again, I would like to present a few examples from practice. First, here is an overview of the different variants of the parse command in the following table:
Table 3.2: Table of PARSE types
| PARSE type | Functions |
| PARSE ARG | Disassembles transfer input parameters at program calls. |
| PARSE EXTERNAL | Reads data from the terminal when programs execute online. In batch processing data are from DD SYSTSIN. If no data is available, then a null-string will be returned. |
| ARSE NUMERIC | Returns the currently active values for the three NUMERIC options DIGITS, FUZZ and FORM. |
| PARSE PULL | Reads the TSO data stack. If it is empty, this command works like PARSE EXTERNAL. |
| PARSE SOURCE | Returns information about the source code of the currently running program. |
| PARSE VALUE | Parses an expression. |
| PARSE VAR | Parses a variable. |
| PARSE VERSION | Returns information about the REXX interpreter, under which the program is running. |
Rules:
–In all PARSE commands, UPPER can be specified as the second word. Thus, the results are returned in uppercase. Just like the ARG instruction, too.
–In the data to be fractionized, the blank plays a special role: If no separator or placement points are given in the variable list, the separation is on the blanks in the performed text.
–In the variable list, the point (dot) can be as placeholders for variables used. For safety reasons, I always use the dot as the last variable position. This collects everything possibly in the text that is still behind the positions I need. Otherwise, this part would additionally be in the last assigned variable.
–Variables that have no values could be assigned during the fractionizing contain null strings.
Design possibilities of parse templates:
There are several ways to control the fractionize process in PARSE commands. Use the following templates to control the fractionizing process of the PARSE command:
–The Blank.
–A string.
–Variables containing delimiters.
–Numbers that indicate the absolute or relative character position in the text.
Let us now look at the different variants of the PARSE command in detail:
3.9.1PARSE ARG
I have already dealt with this command in the ARG command. See section 3.2 ARG – Retrieve the parameter string on page 31. The PARSE ARG command is the only PARSE command, wherein a plurality of input variables can be resolved. This is necessary to permit the transfer of parameters to single variables in a subroutine or function.
3.9.2PARSE VALUE.... WITH
The fractionized text can be an expression here. The default separator is a blank. Several blanks can stand between the individual words.
Example:
![]()
The results of this command are:
![]()
Now the question comes up: Why does the variable W4 not only contain the word Hugo, but one blank before and four blanks behind while W3 includes only the text is, but also the three blanks before the word is? To answer this question we have to look at a special rule in the application of PARSE command now:
![]() Rule:
Rule:
The last variable in the template of a PARSE command contains all characters that are still present after the assignment of the value of the penultimate variable. This rule applies to all versions of the parse command.
Why we have this rule?
Based on the realization that you should have the opportunity in fractionizing texts, this rule has been created to proceed in several steps in order to completely fraction- ize differently structured texts. As a consequence, it may be well useful to always assign the last variable throughout the rest of the text without any compromises. You can then decompose this last variable in the next PARSE step.
How do you get around this rule?
This rule can be bypassed by inserting a dot as a dummy variable after the last regular variable. This would look like this:
![]()
The value in v4 is then only Hugo without the trailing blanks.
Example of the use of PARSE VALUE .... WITH
This example shows different variations for the dissection of DATA and TIME values.
Program 3.5: Example showing variations for the dissection of DATA and TIME values

Here, the printout of the above program:

The numbers in the left column on the list refer to the respective PARSE command line in the program. In the following text, I will explain the functioning of each PARSE command of the program in detail
The function DATE provides the expression 28 Mar 2015. Here, since the individual values are separated by a single space, you can use the blank as a delimiter. This frac- tionizing would produce the same results if several blanks were between the values
![]()
The command DATE("S") returns a value of the form YYYYMMDD. From this expression, the values YYYY, MM and DD should separate. The touchdown 5 means that from there the allocation for the MM variable begins and 7 defines the position where DD begins.
![]()
The value to be resolved is the same as in statement 12. The positioning of the variables are with relative positions. The counting of the relative positions starts at one. The touchdown +4 means that from there the allocation for the MM variable begins. Because before no touchdown was defined, the characters 1 to 4 are to the variable YYYY assigned. +2 means that it is incremented to the previously mentioned setting position, namely +4 to two positions, to determine the variable dd.
![]()
The parsed value is in the form HH:MM:SS. The hours, minutes and seconds shall be separated. In this example, I will use the specification of an absolute position for the three values. This results in a kind of SUBSTRING selection. Here, the start and end are specified for each variable. The definition for the extraction is as follows: <start> variable name. The second value always addresses the position behind the extracted value.
![]()
The parsed value is in the form HH:MM:SS. I work with absolute start positions for the individual values. Dummy points (:) eliminate the colons.
![]()
The parsed value is in the form HH:MM:SS. Here the colons are as separators used.
![]()
The parsed value is in the form HH:MM:SS. This is where the colons are used as separators, wherein the separator is in a variable (assignment in line 34).
3.9.3PARSE VAR
This type of Parse command is most often used. It differs from the PARSE VALUE type where the parsed text needs to be in a variable. The PARSE VALUE command from above now can be done like this:
![]()
3.9.4PARSE SOURCE
The PARSE SOURCE command is to get information on the currently running program used. It returns up to nine values. To illustrate this command, I wrote the following procedure. The meanings of the individual values are included as comments in the program.
Program 3.6: PARSE2 – Example for PARSE SOURCE

When running this program, the following list is printed:

3.10PROCEDURE – Option for internal subroutines
Internal subprograms can be set up in two kinds:
–With a PROCEDURE statement
–Without a PROCEDURE statement
3.10.1Internal subroutines with PROCEDURE statement
In this type of subroutines, the option PROCEDURE must be inserted after the subroutine name. This option makes all variables that occur in the subroutine segregate from those of the main program and even those with the same name. This means that the variables between the two programs are mutually unknown. If you want to make some variables in both programs still known, you have to use the EXPOSE option. Variables listed behind EXPOSE are then known all in both programs.
Advantage of this method:
You do not have to worry about whether the same variable when contained in both program parts are accidentally overwritten in the subprogram. Unless this is intentional.
Disadvantage of this method:
You have all the variables that are needed in the main program and the subprogram, specify either using the EXPOSE option, or make the contents thru parameter passing known.
Example of EXPOSE:
![]()
As you can see in this example from practice, not only simple variables are contained in the EXPOSE option but also stems.
3.10.2Internal subroutines without PROCEDURE statement
When the input point of a program contains no PROCEDURE option, all variables used in this subroutine are in all program parts known except such, which have a PROCEDURE option.
Advantage of this method:
There are all the variables available in both parts of the program. If you define a new variable in the subroutine, this is in the main program after return known.
Disadvantage of this method:
You must take care that you do not accidentally change main program variables in the subroutine. Very dramatic effects may arise when using the control variable of a DO loop in both the main and the subprogram and carry out the subroutine call from the corresponding DO loop of the main program.
![]() Rule:
Rule:
In external subprograms, the option PROCEDURE is unusable, because the variables are in the calling program anyway not known. If you copy an external subprogram in a main program to improve the performance, you must always make sure that the variables does not overwrite each other. In this case, you should insert the PROCEDURE option behind the name of the inserted subroutine.
3.11QUEUE – Working with the TSO stack
In this chapter, I will show you how to elegantly store data in an internal buffer and read again. The area of the DATA STACKS is very extensive. I will describe here only the part that deals with the QUEUE command.
3.11.1The TSO/E data stack
Before I turn to the QUEUE command, I will introduce the technique of TSO/E data Stack:
The TSO/E data stack is an area in virtual memory which you could use for temporary storage of any kind of data. All REXX programs that run in a task have access to the data stack. As a result, the data stack is ideal for exchanging data between internal and external REXX subroutines. The data are written into the data stack record by record. A single record can be up to 16 MB long. The brochure TSO/E REXX Reference mentions that an entry in the stack can be up to 16 MB in length. The brochure TSO/E REXX User's Guide says that only the amount of available memory sets the length limit of an entry (data item). I have checked the matter. The brochure TSO/EREXX Reference is right: 16 MB is the maximum length of one entry! There are two commands available that write data into the TSO/E data stack:
![]()
This command always writes the records to the end of the stack. This means that the last written record will also read as the last one when the stack is read completely. This technique is referred to as first in first out (FIFO). If you create a stack to create a file, then FIFO is always right. Namely, when a data set is read, it is normally expected that the first read data record is the first in the data set. A QUEUE command with no expression produces a blank entry in the stack. This empty entry is required for various commands (e.g. the EXECIO command) to recognize the end of data in the stack.
![]()
This command always writes the records before the first record in stack. This means that the last written record is read first on reading. This technique is also referred to as last in, first out (LIFO).
The following commands can read data from the stack:
–PULL
–EXECIO
–SUBMIT
–DSN (for execution of DB2 utility functions)
There are probably many more programs and systems that can be read from the stack data. However, I have even used these.
3.11.2Use options for the TSO/E Data Stack
In REXX, you can use the TSO/E data stack for the following purposes:
–Dynamically create a batch job with subsequent SUBMIT.
–Sending and reading files using EXECIO.
–Exchange of large amounts of data between internal and external programs.
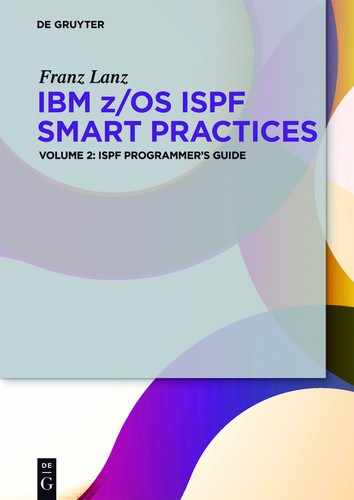
Example 1: Submit a batch job.
The procedure COMPRESS submits a job to compress a partitioned data set. Call the COMPRESS procedure by entering its name in menu 3.4 in front of the DSN of the data set to be compressed.
Program 3.7: Assemble and submit a COMPRESS job
Example 2: Exchange of data with an external subroutine
In the following example, a file containing names will be read in a REXX main program. These names will be sorted in an external subprogram. The sorted names are returned to the main program. Here the main program is NAMSORT. The greyed lines are important:
Program 3.8: Program NAMESORT to sort names

Here the subroutine NSORT:
Program 3.9: Subroutine NSORT

Tips:
–If the data stack is to be read by a command that expects this null string, never forget the final QUEUE command with no operands. See the last QUEUE command in Program 3.7: Assemble and submit a COMPRESS job on page 55. This error can make very unpleasantly: If you run the procedure online and an EXECIO or SUBMIT command reads the data stack, then the attempt to read the appropriate command terminates only upon reaching a null string entry. If this null entry is not found, then the command tries to read more data from the terminal, namely your screen. You realize this because that on the screen nothing moves anymore after you have invoked the procedure which is a surprise. In this case, your screen will just stand and wait for an input. Because you do not know what is going on, you think that the system hangs. Only when you press ENTER, the read command gets its long-awaited null string and it continues.
–In the EXECIO command, you can omit the terminating null string if you write the command like this: ![]()
–This trick does not work on the SUBMIT command, because there is only the asterisk (*) specified in that command indicating that the data are read from the stack. However, you can mark the end of the data stream with a special end line that contains exactly two characters when using the SUBMIT command. The two characters in the last row are then specified when running the SUBMIT command:
![]()
3.12SAY – Print texts
With the SAY command, you can output any text from a REXX program. This command is very well suited as a debugging aid and for the issue of control information. If a REXX program runs in a batch job, the output of SAY messages happens via the DD statement SYSTSPRT. In the previous shown programs a number of SAY commands are contained. Therefore, I will refrain from giving more SAY examples.
3.13SELECT – Conditionally call alternative instructions
The SELECT statement can build very efficient condition controls. This command executes program parts selectively under certain conditions. In addition to the DO group, the SELECT statement is the most important element to generate GOTO free REXX code.
Rules:
–The SELECT statement opens a set of condition queries. It must be terminated with an END.
–The condition queries can consist of any number of WHEN statements that run from top to bottom in sequence until one of the WHEN conditions is true.
–If the first WHEN condition is detected as true, then the following REXX command will be executed. The SELECT sequence is at the END left belonging to the SELECT statement.
–If none of the WHEN conditions are true, then the REXX command in the OTHERWISE statements is executed.
–The OTHERWISE statement is mandatory. It must be inserted immediately before the END statement belonging to the SELECT.
–Behind OTHERWISE any number of statements can follow without requiring them to be included in a DO group.
–The interpreter only notices the absence of the OTHERWISE condition, if for any current program run none of the WHEN conditions is true. In this case, a program termination occurs. This means on this way you can install a time bomb in your program. Therefore, you should never forget the OTHERWISE statement before the END of a SELECT sequence.
–Once one of the WHEN conditions meets, then the following conditions are ignored and their program code will no longer go through. If these skipped commands errors contain such as wrong contents in numerical operations, these errors are only recognized when these commands are actually be executed.
–Behind the WHEN keyword all possibilities that the IF statement knows can be used.
Example 1: Simple SELECT structure
This example shows a simple SELECT structure.

Example 2: A slightly more complex SELECT structure:
Here are the commands to execute in DO groups arranged.

Example 3: A complex SELECT sequence:
Depending on the result of the SYSDSN function, various actions will be performed.

![]() Tip:
Tip:
I set behind END of the SELECT structure always the comment /* Select */. Sometimes I number the SELECT – END sequences within a program. This increases the overview in very long and nested sequences. Never forget the OTHERWISE statement!
3.14NOP – No operation
This is a very simple statement. NOP stands for “NO OPERATION”, meaning that nothing is running. NOP is very often in OTHERWISE statements used. See the example in the previous tip.
3.15PULL – Enter data on the screen
The only reason why I am mentioning this command here is to warn you of the pitfalls of this command. This is a very rarely needed command in fact. The command operates as follows:
–If the data stack contains data, then the PULL reads from the data stack.
–Only when there is nothing in the data stack, then PULL reads from the terminal.
If you want to read something from the terminal, you have two options:
–You can define a small panel for the input of data. I always use this way when I want to enter the user data on the screen. This offers much better ways of setting of texts and the plausibility check of the entered values.
–You tell the user using the command SAY what to enter now and then issue the command PULL.
![]() Tip:
Tip:
If you believe that you must always use the PULL command, then I urge you to insert a query previously that determines whether the data stack is actually empty. If necessary, you can clear the data stack before you use the PULL command. It could look like this:
![]()
3.16TRACE – The strong debugging aid
If you are involved in application development, you certainly know the various debugging aids. As REXX is an interpreted language, of course, the test aids can be very elegantly defined and used here. For a detailed description of the TRACE command, refer to the brochure TSO/E REXX Reference. I use in practice mostly the commands trace?i and trace ?r. By specifying the question mark (?), the interpreter stops after each executed command and you can then enter your own commands manually. These commands will be executed immediately. The possibility of direct entry of commands can also be used to disable a running TRACE with TRACE O. The program runs then so long without TRACE until another TRACE statement is executed in the program, or until the program ends.
Program 3.10: POWER2 – Trace example

When I run this procedure online, I get the following messages on the screen:


I turned off tracing by the direct input of the command TRACE O. Thereafter, the program runs normally to the end. How you see the VALUE = ... TRACE from the calculation in the line, the individual calculation steps are listed in detail.
![]() Tip:
Tip:
I strongly recommend to practice intensively the TRACE command, because it is a powerful aid in creating REXX applications.
3.17SIGNAL – Jumping when errors
There are three main forms of the SIGNAL command:
SIGNAL label
SIGNAL ON errortype NAME label
SIGNAL VALUE expression
Using the first way you can jump directly to a label in the program. This use of the SIGNAL instruction corresponds to a GOTO in other programming languages.
![]() Note:
Note:
I cannot remember having ever used the SIGNAL command to jump to another location in the program, because I develop in REXX just GOTO free program code.
With the second type, at the beginning of the program traps can be set to cause the interpreter to jump there in the event of an error. The third type of command can be specified as an internal branch address of a program in expression. There is then jumped after EXPRESSION is resolved.