In this chapter, we will develop a DSL with Xtext and learn how the Xtext grammar language works. We will see the typical development workflow of programming with Xtext when we modify the grammar of the DSL. The chapter will also provide a small introduction to EMF (Eclipse Modeling Framework) a framework that Xtext relies on to build the AST of a program.
This chapter will cover the following topics:
- A DSL for entities
- The Xtext generator
- The Eclipse Modeling Framework
- Improvements to the DSL
We will now implement a simple DSL to model entities, which can be seen as simple Java classes. Each entity can have a super type entity (you can think of it as a Java superclass) and some attributes (similar to Java fields). This example is a variant of the domain model example that can be found in the Xtext documentation.
First of all, we will use the Xtext project wizard to create the projects for our DSL. We have already experimented with this at the end of Chapter 1, Implementing a DSL.
- Start Eclipse and navigate to File | New | Project.... In the dialog, navigate to the Xtext category and select Xtext Project.
- In the next dialog, you should specify the following names:
- Project name:
org.example.entities - Name:
org.example.entities.Entities - Extensions:
entities
- Project name:
- Press Finish.
The wizard will create several projects and it will open the file Entities.xtext, which is the grammar definition.
The main dialog of the wizard is shown in the following screenshot:

The Xtext wizard generates several projects (with a name based on the Project name you specified in the wizard). In our example we have the following:
org.example.entities: This is the main project that contains the grammar definition and all the runtime components that are independent from the UI.org.example.entities.ide: This contains the components related to the UI that are independent from Eclipse (as we will see in Chapter 11, Continuous Integration, this is useful for targeting IntelliJ and web integration).org.example.entities.tests: This contains the JUnit tests that do not depend on any UI.org.example.entities.ui.tests: This contains the JUnit tests that depend on the Eclipse UI.org.example.entities.ui: This contains the components related to the Eclipse UI (the Eclipse editor and features related to the Eclipse tooling).
We will describe UI mechanisms in Chapter 6, Customizing Xtext Components, and unit tests in Chapter 7, Testing.
As you may recall from Chapter 1, Implementing a DSL, a default grammar is generated by Xtext. In this section, you will learn what this generated grammar contains, and we will modify it to contain the grammar for our Entities DSL. The default generated grammar looks like the following:
grammar org.example.entities.Entities with org.eclipse.xtext.common.Terminals

generate entities "http://www.example.org/entities/Entities"

Model:
  greetings+=Greeting*;

Greeting:
  'Hello' name = ID '!';
The first line declares the name of the language and of the grammar. This corresponds to the fully qualified name of the .xtext file; the file is called Entities.xtext, and it is in the org.example.entities package.
The declaration of the grammar also states that it reuses the grammar Terminals, which defines the grammar rules for common things such as quoted strings, numbers, and comments, so that in our language we will not have to define such rules. The grammar Terminals is part of the Xtext library. In Chapter 12, Xbase we will see another example of Xtext library grammar—the Xbase grammar.
The generate declaration defines some generation rules for EMF, and we will discuss this later.
After the first two declarations, the actual rules of the grammar will be specified. For the complete syntax of the rules, you should refer to the official Xtext documentation (https://www.eclipse.org/Xtext/documentation). For the moment, all the rules we will write will have a name, a colon, the actual syntactic form accepted by that rule, and are terminated by a semicolon.
Now we modify our grammar, as follows:
grammar org.example.entities.Entities with
  org.eclipse.xtext.common.Terminals

generate entities "http://www.example.org/entities/Entities"

Model: entities += Entity*;

Entity:
  'entity' name = ID ('extends' superType=[Entity])? '{'
    attributes += Attribute*
  '}'
;

Attribute:
  type=[Entity] array?=('[]')? name=ID ';' ;
The first rule in every grammar defines where the parser starts and the type of the root element of the model of the DSL, that is, of the AST. In this example, we declare that an Entities DSL program is a collection of Entity elements. This collection is stored in a Model object, in particular in a feature called entities. As we will see later, the collection is implemented as a list. The fact that it is a collection is implied by the += operator. The star operator, *, states that the number of the elements (in this case Entity) is arbitrary. In particular, it can be any number >= 0. Therefore, a valid Entities program can also be empty and contain no Entity.
The shape of Entity elements is expressed in its own rule:
Entity:
  'entity' name = ID ('extends' superType=[Entity])? '{'
    attributes += Attribute*
  '}'
;
First of all, string literals, which in Xtext can be expressed with either single or double quotes, define keywords of the DSL. In this rule, we have the keywords entity, extends, '{', and '}'.
Therefore, a valid entity declaration statement starts with the 'entity' keyword followed by an ID. There is no rule defining ID in our grammar because that is one of the rules that we inherit from the
Terminals.
The parsed ID will be assigned to the feature name of the parsed Entity model element.
Tip
If you are curious to know how an ID is defined, you can Ctrl + click or press F3, on the ID in the Xtext editor, and that will bring you to the grammar Terminals, where you can see that an ID starts with an optional '^' character, followed by a letter ('a'..'z'|'A'..'Z'), a '$' character, or an underscore '_' followed by any number of letters, '$' characters, underscores, and numbers ('0'..'9'):
'^'? ('a'..'z'|'A'..'Z'|'$'|'_') ('a'..'z'|'A'..'Z'|'$'|'_'|'0'..'9')*;The optional '^' character is used to escape an identifier if there are conflicts with existing keywords.
The ( )? operator declares an optional part. Therefore, after the ID, you can write the keyword extends and the name of an Entity. This illustrates one of the powerful features of Xtext, that is, cross-references. In fact, what we want after the keyword extends is not just a name, but the name of an existing Entity. This is expressed in the grammar using square brackets and the type we want to refer to. Xtext will automatically resolve the cross-reference by searching in the program for an element of that type (in our case, an Entity) with the given name. If it cannot find it, it will automatically issue an error. Note that, in order for this mechanism to work, the referred element must have a feature called name. As we will see in the following section, the automatic code completion mechanism will also take into consideration cross-references, thus proposing elements to refer to.
Note
By default, cross-references and their resolutions are based on the feature name and on an ID. This behavior can be customized as we will see in Chapter 10, Scoping.
Then, the curly brackets '{' '}' are expected and within them Attribute elements can be specified (recall the meaning of += and *). These Attribute elements will be stored in the attributes feature of the corresponding Entity object.
The shape of Attribute elements is expressed in its own rule:
Attribute:
  type=[Entity] array?=('[]')? name=ID ';';
The rule for Attribute requires an Entity name (as explained previously, this is a cross-reference) that will be stored in the type feature and an ID that will be stored in the name feature of the attribute. It must also be terminated with ;. Note that, after the type, an optional '[]' can be specified. In this case, the type of the attribute is considered an array type, and the feature array will be true. This feature is boolean since we used the ?= assign operator, and after such an operator, we specify an optional part.
At the end of Chapter 1, Implementing a DSL, we saw how to run the Xtext generator. You should follow the same steps, but instead of right-clicking on the.xtext file and navigating to Run As | Generate Xtext Artifacts, we right-click on the .mwe2 file (in our example it is GenerateEntities.mwe2) and navigate to Run As | MWE2 Workflow. (Refer to Chapter 1, Implementing a DSL, concerning the additional downloaded JAR file, and for the tip to avoid that).
After the generation has finished and after Eclipse has built the entire workspace, we can run a new Eclipse instance to try our DSL (refer to Chapter 1, Implementing a DSL, for the procedure to run a new Eclipse instance).
A new Eclipse instance will be run and a new workbench will appear. In this instance, our Entities DSL implementation is available. So, let's create a new general project (call it, for instance, sample). Inside this project, create a new file. The name of the file is not important, but the file extension must be entities (remember that this was the extension we chose in the Xtext Project wizard). As soon as the file is created, it will also be opened in a text editor, and you will be asked to convert the project to an Xtext project. You should accept that to make your DSL editor work correctly in Eclipse.
The editor is empty, but there is no error since an empty program is a valid Entities program (remember how the Model rule was defined with the cardinality *). If you access content assist, with Ctrl + Space, you will get no proposal. Instead, the entity keyword is inserted for you. This is because the generated content assist is smart enough to know that in that particular program context there is only one valid thing to do—start with the keyword entity.
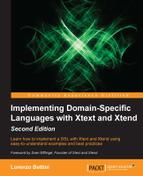
After that you get an error (refer to the following screenshot), since the entity definition is still incomplete. You can see that the syntax error tells you that an identifier is expected instead of the end of file:
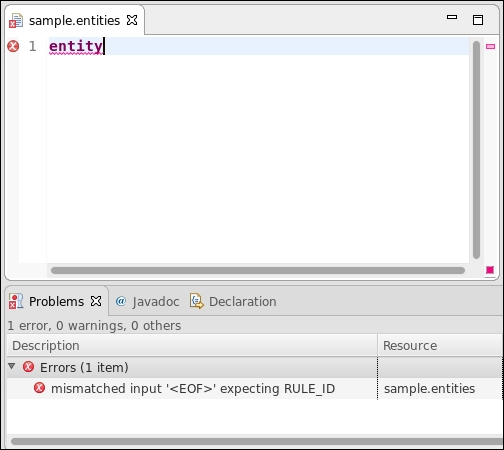
If you access the content assist again, you will get a hint that an identifier is expected (refer to the following screenshot), so let's write an identifier:
If you access the content assist after the identifier, you will see that you get two proposals (refer to the following screenshot). Again, the generated content assist knows that, in that program context, you can continue either with an extends specification or with an open curly bracket. Refer to the following screenshot:

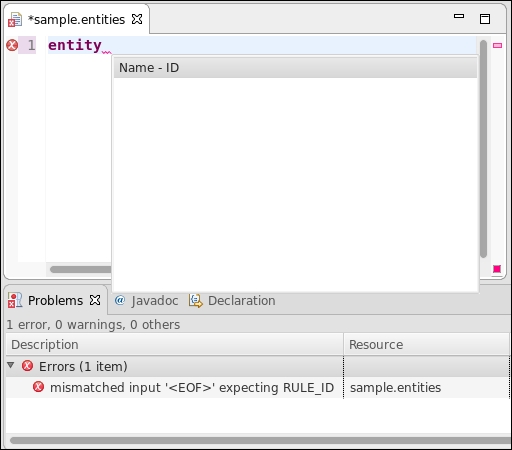
If you choose the open curly bracket, {, and press ENTER, you will note some interesting things in the generated editor (refer to the following screenshot):
- The editor automatically inserts the corresponding closing curly bracket.
- Inserting a newline between the brackets correctly performs indentation and moves the cursor to the right position.
- The folding on the left of the editor is automatically handled.
- The error marker turned gray, meaning that the problems in the current program are solved, but it has not been saved yet. Saving the file makes the error marker go away and the Problems view becomes empty.
Continue experimenting with the editor. In particular, in the context where an entity reference is expected, that is, after the extends keyword or when declaring an attribute, you will see that the content assist will provide you with all the Entity elements defined in the current program.
Note
We should not allow an entity to extend itself. Moreover, the hierarchy should be acyclic. However, there is no way to express these constraints in the grammar. These issues have to be dealt with by implementing a custom Validator (Chapter 4, Validation) or a custom Scoping mechanism (Chapter 10, Scoping).
We would also like to stress that all these mechanisms, which are quite hard to implement manually, have been automatically generated by Xtext starting from the grammar definition of our DSL.