We will now write an interpreter for our Expressions DSL. The idea is that this interpreter, given an AbstractElement, returns a Java object, which represents the evaluation of that element. Of course, we want the object with the result of the evaluation to be of the correct Java type; that is, if we evaluate a boolean expression, the corresponding object should be a Java boolean object.
Such an interpreter will be recursive, since to evaluate an expression, we must first evaluate its sub-expressions and then compute the result.
When implementing the interpreter we make the assumption that the passed AbstractElement is valid. Therefore, we will not check for null sub-expressions. We will assume that all variable references are resolved, and we will assume that all the sub-expressions are well-typed. For example, if we evaluate an And expression, we assume that the objects resulting from the evaluation of its sub-expressions are Java Boolean objects.
For constants, the implementation of the evaluation is straightforward:
class ExpressionsInterpreter {

  def dispatch Object interpret(Expression e) {
    switch (e) {
      IntConstant: e.value
      BoolConstant: Boolean.parseBoolean(e.value)
      StringConstant: e.value
Note that the feature value for an IntConstant object is of Java type int and for a StringConstant object, it is of Java type String, and thus we do not need any conversion. For a BoolConstant object the feature value is also of Java type String, and thus we perform an explicit conversion using the static method of the Java class Boolean.
As usual, we immediately start to test our interpreter, and the actual assertions are all delegated to a reusable method:
class ExpressionsInterpreterTest {
  @Inject extension ParseHelper<ExpressionsModel>
  @Inject extension ValidationTestHelper
  @Inject extension ExpressionsInterpreter

  @Test def void intConstant() { "eval 1".assertInterpret(1)}
  @Test def void boolConstant() { "eval true".assertInterpret(true)}
  @Test def void stringConstant() {"eval 'abc'".assertInterpret("abc")}

  def assertInterpret(CharSequence input, Object expected) {
    input.parse => [
      assertNoErrors
      expected.assertEquals(elements.last.expression.interpret)
    ]
  }...
Note that in order to correctly test the interpreter, we check that there are no errors in the input (since that is the assumption of the interpreter itself) and we compare the actual objects, not their string representation. This way, we are sure that the object returned by the interpreter is of the expected Java type.
Then, we write a case for each expression. We recursively evaluate the sub-expressions and then apply the appropriate Xtend operator to the result of the evaluation of the sub-expressions. For example, for And:
switch (e) {
...
  And: {
    (e.left.interpret as Boolean) && (e.right.interpret as Boolean)
}
Note that the method interpret returns an Object, and thus we need to cast the result of the invocation on sub-expressions to the right Java type. We do not perform an instanceof check because, as hinted previously, the interpreter assumes that the input is well-typed.
With the same strategy, we implement all the other cases. We show here only the most interesting ones. For MulOrDiv, we will need to check the actual operator, stored in the feature op:
switch (e) {
...
 MulOrDiv: {
  val left = e.left.interpret as Integer
  val right = e.right.interpret as Integer
  if (e.op == '*')
    left * right
  else
    left / right
}
For Plus, we need to perform some additional operations; since we use + both as the arithmetic sum and as string concatenation, we must know the type of the sub-expressions. We use the type computer and write the following:
class ExpressionsInterpreter {
  @Inject extension ExpressionsTypeComputer

  def dispatch Object interpret(Expression e) {
    switch (e) {
    ...
    Plus: {
      if (e.left.typeFor.isStringType || e.right.typeFor.isStringType)
        e.left.interpret.toString + e.right.interpret.toString
      else
        (e.left.interpret as Integer) +
            (e.right.interpret as Integer)
    }...
Finally, we deal with the case of variable reference, variable declaration and evaluation statement. We handle variable declaration and evaluation statement in a single method, using their common superclass AbstractElement:
def dispatch Object interpret(Expression e) {
  switch (e) {
    ...
    VariableRef: e.variable.interpret
    ...
}

def dispatch Object interpret(AbstractElement e) {
  e.expression.interpret
}
Xtext allows us to customize all UI aspects, as we saw in Chapter 6, Customizing Xtext Components. We can provide a custom implementation of text hovering (that is, the pop-up window that comes up when we hover for some time on a specific editor region) so that it shows the type of the expression and its evaluation. We refer to the Xtext documentation for the details of the customization of text hovering; here, we only show our implementation (note that we create a multiline string using HTML syntax):
import static extension org.eclipse.emf.ecore.util.EcoreUtil.*

class ExpressionsEObjectHoverProvider extends
    DefaultEObjectHoverProvider {
  @Inject extension ExpressionsTypeComputer
  @Inject extension ExpressionsInterpreter
  override getHoverInfoAsHtml(EObject o) {
    if (o instanceof Expression && o.programHasNoError) {
      val exp = o as Expression
      return '''
      <p>
      type  : <b>«exp.typeFor.toString»</b> <br>
      value : <b>«exp.interpret.toString»</b>
      </p>
      '''
    } else
      return
 super.getHoverInfoAsHtml(o)
  }

  def programHasNoError(EObject o) {
    Diagnostician.INSTANCE.validate(o.rootContainer).
      children.empty
  }
}
Remember that our interpreter is based on the assumption that it is invoked only on an EMF model that contains no error. We invoke our validator programmatically using the EMF API that is, the Diagnostician class. We must validate the entire AST, thus, we retrieve the root of the EMF model using the method EcoreUtil.getRootContainer and check that the list of validation issues is empty. We need to write an explicit bind method for our custom implementation of text hovering in the ExpressionsUiModule:
def
Class<? extends IEObjectHoverProvider>
    bindIEObjectHoverProvider() {
  return ExpressionsEObjectHoverProvider
}
In the following screenshot, we can see our implementation when we place the mouse over the * operator of the expression 2 * (3 + 5); the pop-up window shows the type and the evaluation of the corresponding multiplication expression:

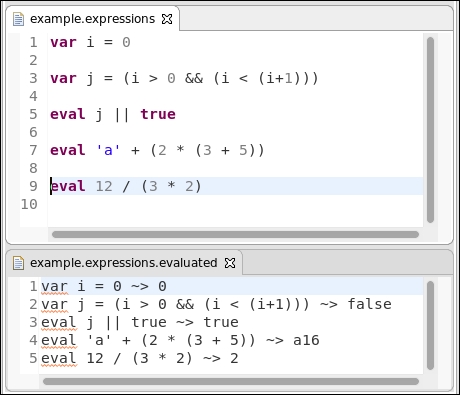
Finally, we can write a code generator which creates a text file (by default, it will be created in the src-gen directory):
import static
 extension
  org.eclipse.xtext.nodemodel.util.NodeModelUtils.*

class ExpressionsGenerator implements IGenerator {
  @Inject extension ExpressionsInterpreter

  override void doGenerate(Resource resource,
                          IFileSystemAccess2 fsa, IGeneratorContext context) {
    resource.allContents.toIterable.
      filter(ExpressionsModel).forEach[
        fsa.generateFile
          ('''«resource.URI.lastSegment».evaluated''',
           interpretExpressions)
      ]
  }

  def interpretExpressions(ExpressionsModel model) {
    model.elements.map[
      '''«getNode.getTokenText» ~> «interpret»'''
    ].join("
")
  }
}
Differently from the code generator we saw in Chapter 5, Code Generation, here we generate a single text file for each input file (an input file is represented by an EMF Resource); the name of the output file is the same as the input file (retrieved by taking the last part of the URI of the resource), with an additional evaluated file extension.
Instead of simply generating the result of the evaluation in the output file, we also generate the original expression. This can be retrieved using the Xtext class NodeModelUtils. The static utility methods of this class allow us to easily access the elements of the node model corresponding to the elements of the AST model. (Recall from Chapter 6, Customizing Xtext Components that the node model carries the syntactical information, for example, offsets and spaces of the textual input.) The method NodeModelUtils.getNode(EObject) returns the node in the node model corresponding to the passed EObject. From the node of the node model, we retrieve the original text in the program corresponding to the EObject.
An example input file and the corresponding generated text file are shown in the following screenshot: