Navigation
Intuitive navigation is the goal of every DVD author. Every button should link to an asset on the DVD. This link may be to another menu, such as an Audio/Subtitle selection menu, or to a chapter point along the major timeline of the DVD.
How the viewer of the finished DVD navigates from button to button is addressed, managed, and changed by the DVD author. Even the Title, Menu and number buttons on the viewer’s remote control can be assigned functions.
Link Buttons to Chapter Points
Many DVD’s have submenus that allow the viewer to directly access chapters in a timeline. This way the viewer doesn’t have to skip through the chapters while viewing the timeline.

While this may not be a feature in some DVD’s, the Play or Play All button nearly always exists. This is linked to the first chapter point of a timeline. Also any buttons for slideshow presentations are linked to the first chapter point.
Encore offers many ways to link buttons to chapter points.
To link a button in the Menu Editor:

Right click on the button
Select Link To…
This will open the Link To dialog
From the list of selections, open the Timeline this button will link to.
All the chapter points on that particular timeline are now displayed.
Select the desired chapter point.
Click OK.
The button, when pressed, will link to this chapter point.
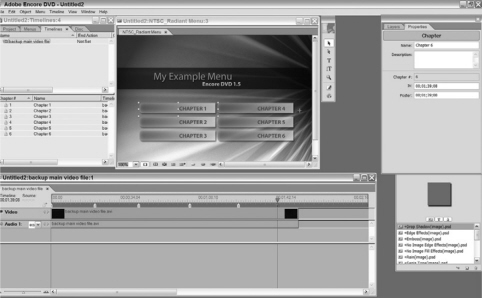
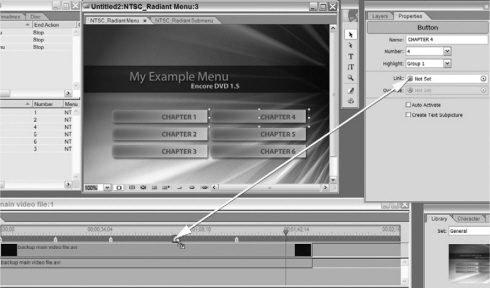
If the Timelines Window and Menu Editor are open, chapter points can be dragged and dropped onto the desired buttons.
To Drag and Drop Chapter Points onto Buttons:

In the Timelines Window, select the chapter point.
Left click and hold on the chapter point.
Drag the cursor up to the button.
Release the mouse button once the lighter box appears around the button.
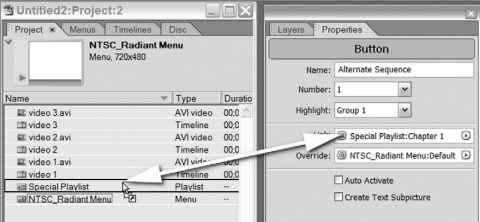
And of course the Properties Palette offers another way to link buttons creatively.

To link buttons using the Properties Palette:
With the button selected, go to the Properties Palette
Click on the arrow in the Link To field.
Go to the desired Timeline and click on the appropriate chapter point.
Menus to menus; who’s got the hook-up?
When multiple menus are used in a project, then buttons must be used to link the various menus together. All the methods specified in the previous section will work when linking menus (except of course, the use of the Time-lines Window), but there is one difference that could be potentially confusing. When linking a button to another menu, Encore asks for a button on that destination menu.
Encore allows the author to specify which button is highlighted when navigating to that menu, potentially making it faster for the viewer to locate the appropriate button. In most cases the default button is the better choice, but having this level of flexibility remains useful.
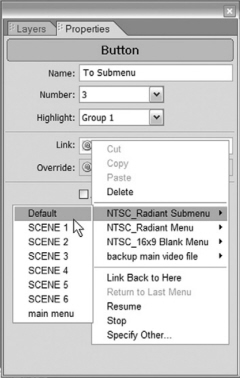
To link a button to another menu using the Properties Palette:
With the button selected in the Menu Editor, go to the Properties Palette
In the Link To field, click on the arrow to display the choices.
Choose the menu you wish to link to.
Choose the button that should be highlighted first when the viewer navigates to that menu.
A new addition to Encore 1.5 is the Resume Link. Now you can set a “Back” button that will link the viewer back to the menu from which they accessed the current menu. So if one menu can be accessed from several other menus, this link will take them back to the previous menu.
Use Pickwhips for Button Linking
Pickwhips offer yet another great way to link buttons. If you have never used a pickwhip before, now is a good time to start. A pickwhip allows you to create a link by simply dragging it to what you want it to link to, instead of dealing with pull down menus or dialogs.
The pickwhip icon appears on the left hand side of the Link To field in a button’s Properties Palette. (It looks like a coiled up whip or a snail.) If you can see the item you wish to link to, you can use the pickwhip. This is why good workspace organization is essential; making another great argument for a dual monitor setup.
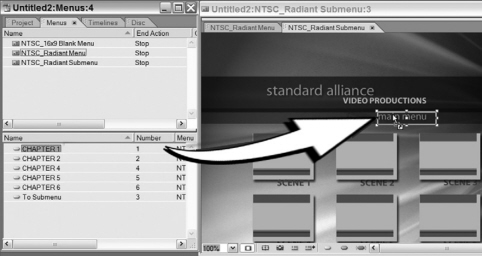
To use the Pickwhip to link to a chapter point:
With the button’s Properties Palette open and the Timeline Window open, click and hold on the pickwhip icon in the Link to field
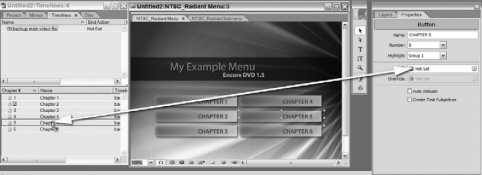
Drag the cursor to the appropriate chapter point in the Timeline.
Once the item is selected, let go of the left mouse button.
And just like that, the button’s link is set to that chapter point. This method of linking chapter points works in the Timelines Tab as well.
This works for menu in the same way. Just drag the pickwhip to the appropriate menu in the Menus Tab and it’s automatically set to the default button in that menu.

Encore will not allow you to link to something that cannot be linked. If what you’re trying to link to is not allowed, the pickwhip simply withdraws and the Link field remains unchanged.
Set an Override Action of a Button
Override is a tricky and potentially confusing aspect of DVD creation, therefore this is an advanced feature and should be used by experienced authors. Put simply, Button Override allows you to change the end action of whatever that button links to. For example, a timeline is set to return to the main menu after it is done playing, but you want the viewer to return to the chapter selection menu, if they accessed the timeline through the buttons on that menu. By using button override this is not only possible but easy to do.
To set the Override Action of a button:
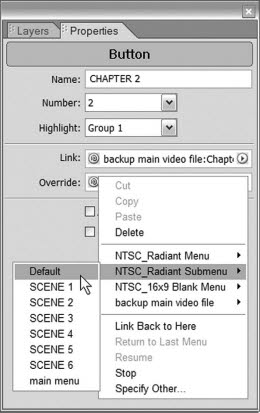
In the button’s Properties Palette, click the arrow next to the Override Action Field
Select the timeline or menu you want the LINKED item to return to when it is done playing.
Play One, Play All and Play One
If your project uses multiple timelines, you might want the user to have more control over the way the timelines are played. For example, if you have a DVD with three music videos. You may want the viewer to be able to watch the videos in sequence, but if they desire they can select one video and return to the menu after it is done playing.
The solution is to create individual timelines for each clip, simply using Button Override and Timeline End Actions to create multiple navigation paths.
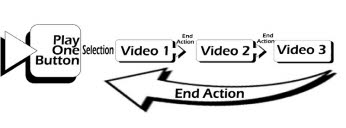
First, you’ll want to set up the timelines for Play All. This means that when the Play All button is set, it plays all three timelines then returns to the main menu once the third timeline is finished.
Link the Play all button to the first timeline. Link the first timeline’s End action to the second timeline. Link the second timeline’s End action to the last timeline.
And then link the last timeline’s End action to the menu.
Now set up the Play One, Play Two and Play Three buttons. With these items selected, the DVD player will show only one timeline, then return to the menu.
Now all that’s needed is to link the Play One button to the first chapter point of the first timeline.
Then set the Play One button to override the End Action of the first timeline.
You would repeat this process with all the buttons, except the button linking to the last timeline. Its timeline is already heading back to the main menu when it is done. So all you have to do is link the button to the timeline. No override needed.


Use Playlists in Encore 1.5
One of Encore’s most awaited features, Playlists, allows you to skip the complicated routing outlined in the previous section. Think of playlists as Override on steroids. With Playlists, you can program a button to play a series of timelines in any order you choose. Plus you can start those timelines at any chapter point. For example, you can program a playlist to play the second chapter of one timeline, the first chapter of the second timeline, and the last chapter of the last timeline. You can even have the playlist play the last timeline, then the first, then the second and go back to the menu at the end of the second timeline.

To create a playlist:
In the Project tab, choose File > New Playlist.

Enter a name for the Playlist and click OK.
Select the playlist in the Project tab and open the Properties palette.

Drag the pick whip from the Timeline section of the Playlist Inspector to a timeline in the Project tab.
Encore adds the specified timeline to the playlist.
If desired, set an end action to link to a timeline or a menu using the pick whip.
Now all you must do is link a button to that playlist.

Change the Automatic Routing of Buttons
Authors new to DVD creation don’t always realize that they control the viewer’s navigational experience Encore takes most of the guesswork out of button routing by handling it automatically. Yet the method in which Encore automatically routes those buttons can be adjusted.
To change the Automatic Routing of Buttons in Encore:
Go to Edit>Preferences>Menu
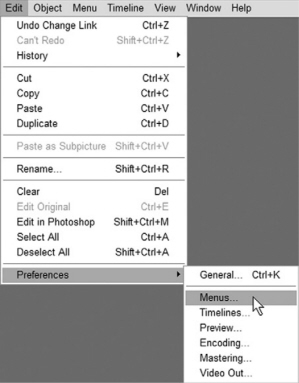
This opens the preferences dialog for menu button routing.
Route Buttons up/down: Unchecking this box disables the feature’s ability to route buttons for the up and down arrows on a DVD remote control, limiting routing to the left and right.

Wrap Around Up/Down: Unchecking this box disables the automatic wrap from the bottom or top button to another button. In other words pressing down on the bottom button in a column does nothing. When checked it offers the option of wrapping to the same column or an adjacent column.

Route Buttons Left/Right: Unchecking this box disables the use of the left or right keys to move the selection left or right.
Wrap Around Left/Right: Unchecking this box disables the automatic wrap from the leftmost or rightmost button to another button. If the box is checked it offers the option of wrapping to the same row, or wrapping to an adjacent row.

Let Me Do It: Change the Routing of Buttons
While Encore’s Automatic Button Routing feature is reliable there are times a unique button routing is required. When your buttons are in a novel layout, sometimes Encore doesn’t route them in an intuitive manner.
First, Automatic Routing must be disabled, then the buttons can be assigned new routes.
To manually change the routing of buttons:
Go to the Properties Palette of the menu.
Uncheck the Automatically Route Buttons box.
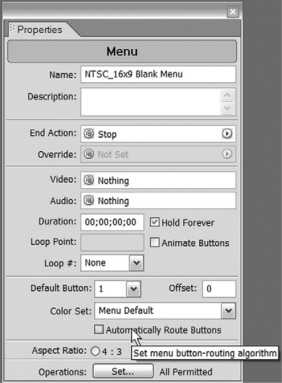
Now the Menu Editor will allow you to change the routing of buttons.
Go to the Menu Editor and click on the Show Button Routing Icon at the bottom of the window.
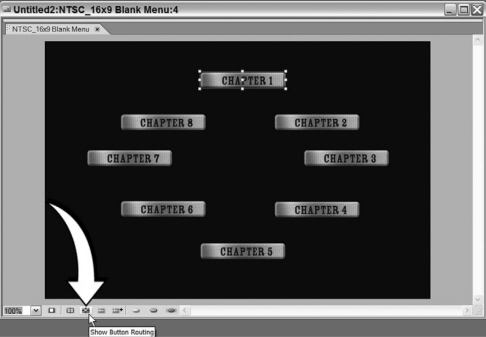
Now the buttons have numbered crosses in their centers. These represent the directional buttons on a DVD player’s remote control. In the center of each cross is the button’s number. The numbers in each direction indicate exactly to which button, pressing in this direction, will move the selection. If you want the directional key to take the selection to another button instead of the one indicated, you must drag it to select the different button.
Click and hold on the direction and drag the line to the desired button.

You’ll notice as you drag the line away from the button a pickwhip-like line draws out. If you drag this line to another button it will change the routing of this direction to that button, BUT if you drag the line to the center of the button itself, it will disable the routing of that direction altogether.
Once the desired button is selected, release the mouse button.

If the pickwhip was dragged to its own button, a zero will appear in that arrow, meaning routing in this direction has been disabled.
Many viewers like to watch DVD’s on their computers. For this reason, buttons have mouse selection areas so when the mouse is in this area clicking will activate the button. To prevent glitches when a viewer uses a mouse, the selection area of the buttons must be checked.
By using the Show Routing of Buttons feature in the Menu Editor, the selection area can be viewed. The borders of the area are shown as a solid box. These boxes should never overlap, or problems will occur when viewing the DVD on a computer. Also this is a good time to check the size of these selection areas. If one button’s selection area is bigger than every other button, it is probably because there is a blank text layer in the button’s layer set. Deleting these blank text layers will usually reduce the size.


Set the Default Button
The default button is the first button highlighted when a menu is displayed. Usually this button is button number one, but the default button can be any button on the menu.
To Change the Default Button of a Menu:
Select the menu and open its Properties Palette
Click the arrow on the Default button field and select the desired button number.
Now when this menu opens, this button will be highlighted.
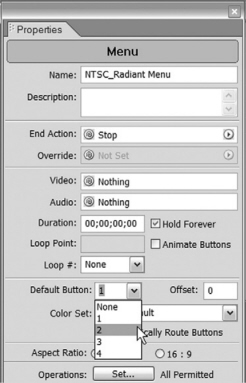
Offset the Button Numbers
Many DVD viewers use the number keys on their remotes to select and activate buttons. For the sake of consistency it is sometimes best to offset the button numbers to account for navigating between menus. For example, a menu has three chapter selection buttons and the next menu has three buttons also. You would want to offset the second menu’s button numbers by three to account for the change. So, instead of the buttons being numbered 1, 2, and 3 an offset of 3 would change the values to 4, 5 and 6.
To offset the button numbers:

Select the Menu and open the Properties Palette
Click inside the Offset field and enter the offset number.
Set the Remote Control Title Button of a Disc
On most DVD remote controls, there is a Title button. This button allows the viewer to go to a default menu or timeline on the disc, from any location on the disc. Normally, this is set to the main menu. But it may be set to any menu or timeline on the disc.
To set the Remote Control Title button:
Go to the Disc Tab in the Project Window.
Open the Properties Palette for the Disc

In the Title Button Field click on the arrow to open the drop down menu
Select the menu or timeline you want this button to link to.
Title Button vs Menu Button
Most DVD player remote controls offer the Title button and Menu button. And the vast majority of people cannot tell the difference between the functions of the two. Unfortunately many DVD authors have not taken creative advantage of their respective functions.
Regarding functionality, the Menu and Title buttons do the same thing. Whenever the button is pressed, the DVD player pauses whatever it is doing and goes to the menu. If it is pressed again, it returns the viewer to their previous place. This allows the viewer to stop the feature, return to a menu and adjust something (such as subtitles or languages) then return right back to when they first pushed the button.

As far as scope and adjustability, the Title and Menu buttons are very different. The Title button is a constant; it doesn’t matter where the button is pressed it returns to the same menu every time. The Menu button, however, can be set specifically to suit the needs of every timeline. So in essence, you can give your viewers two menu options while watching a DVD. They can watch a Timeline from the Chapter Selection Menu, and return to the Chapter Selection menu by pressing the Menu button. Or they can hit the Title button and return to the main menu.