Burn Baby Burn!
Burning the Project to Disk
Once the menus are built, the timelines are asssembled and everything is linked together, it’s time to tie up all the loose ends. This can include adding DVD ROM content for use on a computer or setting up copy protection and region codes.
At this point you can save yourself a few dollars in blank DVDs and or a few hundred dollars in duplication costs by checking and rechecking your disc. Just because it works on your computer doesn’t mean it will work on all set top players. And one seemingly insignificant detail can ruin the entire project.

Use the Disc Tab to Name a Disc
When you started your new project, the project name became the disc name. If you didn’t give your project a name, and you burned the disc, the disc volume would be named Untitled. Not the best name for a disc. Check the Disc Tab to see if the name is suitable for the disc.
To Name a Disc:
In the Project Window, click on the Disc Tab
Click in the top field next to the disc
Enter a name for the disc
Now when the disc is inserted into computer that can read volume labels this will be the name displayed.
The disc name is displayed when a disc is inserted into computers and some set top DVD players.
Set the First Play of a Disc (Intro Video or Menu)
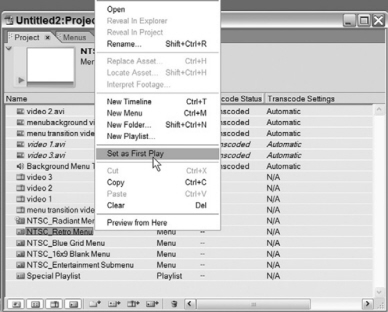
By default the first menu or timeline created or imported into Encore is set as the First Play. This means when the DVD is inserted into a player this menu or timeline is played first. But don’t rely on this! During the course of a project First Play might accidentally be assigned to a different timeline or menu. If the related timeline is deleted, the first play is not reassigned. In this case, when the disc is inserted, nothing will happen. The disc will await instructions from the viewer.
![]()
To Set the First Play of a Disc:
In the Project Tab, right click on the Menu or Timeline that should be set as First Play
Select Set as First Play
Now when the disc is inserted, this menu or timeline will begin playing.
Add DVD-ROM Content to a Disc
A good number of people enjoy watching DVDs on their computers, and they have the advantage of viewing or using DVD ROM content. Among other things, DVD-ROM content can include PC software, sample files, screensavers, and any extra content related to the DVD. For instance, if the disc is a software training DVD, you might include an executable file and content for the software being trained on in the DVD.

First, organize all the DVD-ROM content you wish to use into one folder. Encore allows you to use one master folder for DVD ROM content.
To add DVD-ROM Content to a project:
In the Disc Tab, Go to the DVD-ROM Content Section
Click Browse
Locate and Select the folder from your hard drive.
Click Ok
The file folder is now set. When the disc is built, these files will be included in the DVD Volume and will be accessible to computer users.
Check Links/Check Project
Nothing is worse than getting your DVD back from the replication house, popping it into your DVD player and finding one button or menu that just doesn’t link. Every project should be double and triple checked on several different players to insure that the master copy is problem free.

Encore’s Check Links feature scans the project and looks for:
Orphaned Buttons: Buttons that can’t be navigated to..
Orphaned Menus: Menus that can’t be navigated to..
Broken Links: Buttons that don’t link to anything.
Orphaned Timelines: Timelines that have not been linked to.
Encore allows you to customize the search so you can look for just one or all of these snags
In Encore 1.5 the Check Links feature is now the Check Project feature. It has been expanded to include:
Overrides: Override property links that are not set or broken.
First Play: Whether the project’s First Play property is not set.
Title/Menu Remote: Whether the project’s Title/Menu Remote properties are not set.
Playlists: Playlists with broken or missing end actions, or empty playlists.
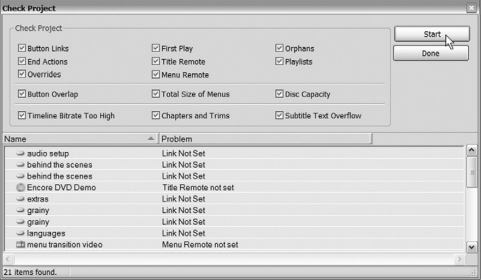
Button Overlap: Buttons whose overlap that may lead to browsing errors.
Total Size of Menus: Checks the size of all menus and warns if it exceeds the DVD limit of 1 GB.
Disc Capacity: Warns if project size is larger than the chosen disk media.
Timeline Bitrate too high: Bitrates that exceed the DVD-legal limit of 9 Mbps.

Chapters and Trims: Timelines in which chapter and trim locations were adjusted due to transcoding.
Subtitle Text Overflow: Subtitle text that is off screen because it has overflowed the text boundary.
Even the more organized DVD Authors accidentally drop a link from time to time. Always check your links to be sure they are correct.
To scan for broken or orphaned content:
Go to the Disc Tab in the Project Window
Click on Check Links

Check the boxes for the type of broken content you’d like to search for.
Click Start.
When the search is complete, the dialog will display all the content that displays troublesome navigation. You can click on the item in the window, and the appropriate window will open to allow you to fix the problem.

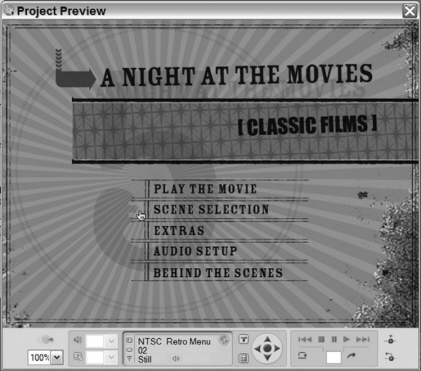
What’s it Gonna Look Like? Preview an Entire Disc
Encore allows you to preview an entire disc before it is burned. This function uses the Preview Window to read the project like a disc. Instead of reading the particular timeline or menu in the window, the Preview command will read the project from first play. (Read Use the Preview Window in the previous chapter for more information.)
To preview an entire project:
With the project open, Go to File>Preview
Check every link and every asset to assure that all the menus work and all the timelines are displayed properly.

Set the Media Size and Type
DVD’s come in various media sizes and the way Encore will create the disc is directly related to how much size it has. If a project will fit on a normal single-sided, single layer disc, the default setting is perfect. If you need a bigger disc for the project, then you will need to provide Encore with the media size you intend to use.
To set media size:
In the Project Window, open the Disc Tab
Click on Project Settings
In the field at the top, select the appropriate media size of the final disc
Choose One or Two Sided
If your project uses dual-layered, dual sided discs, then you must create four projects, one for each layer on the disc. Encore will set the layer break point at an appropriate chapter point. Remember, dual layered or dual sided discs cannot be burned, they must be stamped.
Once you have selected the appropri ate media, Encore will base its transcoding and file structure for the size of the project.
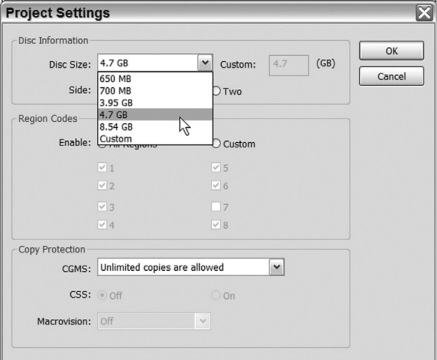
Encore provides a setting that allows a 600 - 700 megabyte project to be burned on a SVCD. The SVCD disc will function similar to a DVD but should only be used for very small projects. These SVCD’s work best when played back in a computer and should not be relied upon for reliable set-top playback
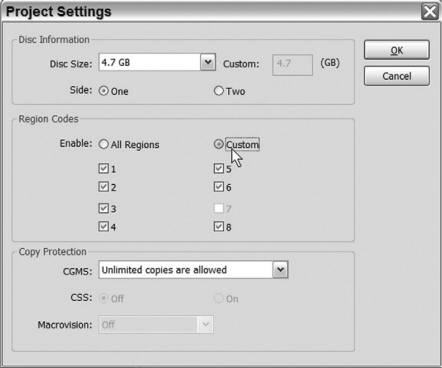
Set Region Codes
Most professionaly produced DVD titles display a region code on the packaging of the disc. This region code specifies in which country the DVD can be played. DVD players are region specific and will only play DVDs coded for their region. This is a first level of copy protection, limiting the global distribution/piracy in other countries. This doesn’t guarantee that DVD’s cannot be played in another country but it does indeed help. Region coding only works for replicated discs, so discs burned on your DVD burner won’t demonstrate this safety process.
1: U.S., Canada, U.S. Territories
2: Japan, Europe, South Africa, and Middle East (including Egypt)
3: Southeast Asia and East Asia (including Hong Kong)
4: Australia, New Zealand, Pacific Islands, Central America, Mexico, South America, and the Caribbean
5: Eastern Europe (Former Soviet Union), Indian subcontinent, Africa, North Korea, and Mongolia

6: China
7: Reserved
8: Special international venues (airplanes, cruise ships, etc.)}
By default, Encore specifies that the disc will play in all regions. Only adjust these settings if you have a need to specify region coding.
To set the Region Code of a project:
In the Project Window, go to the Disc Tab
Click on Project Settings
This opens the Project Settings Dialog. Here you can customize the region codes so discs can play in just one region, or perhaps in all but one region.
Click on Custom in the Enable row
Check all the desired regions, and uncheck the regions you wish to “block.”
Once all the required regions are selected, click OK
Now when the disc is produced in a replication/stamping house, the disc will only play in those regions specified.
Specify Copy Protection
In the quest to stop DVD piracy, multiple copy protection schemes have been invented. In reality no disc is safe from piracy. A determined “pirate” can circumvent all of these protections. Regardless, copy protection is still a deterrent and whether it is worth the extra time and expense will vary depending on many factors.
Copy Generation Management System(CGMS): A system that can allow the user to create a specified number of copies of the disc. A single copy can be created that cannot be duplicated as well. You can set it so that no copies can be made from this disc, or so that copies can be made only from this disc. Unlimited copying can also be enabled.
Content Scrambling System or CSS: Basically an encrypted code written onto a disc that prevents the DVD from functioning in a Non CSS compliant device. CSS compliant companies do not manufacture players that allow the copying of Video DVD content, and support the technology that makes it harder to copy from the device.
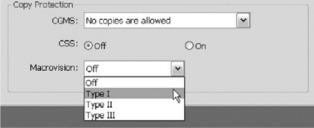
Macrovision: Embeds a signal also known as a “flag” into the video and audio stream that interferes with the copying of a DVD to certain devices such as a VCR.
To set copy protection:
In the Project Window, select the Disc Tab
Click on Project Settings
Select all or none of the copy protection features available.
Click OK
Using any of the above copy-protection schemes requires a license from Macrovision. The replicator will report the number of discs replicated containing the protection flags to Macrovision, and Macrovision will bill the author/content owner for the licensing. A Macrovision license is required before the replicator is allowed to deliver the discs to the content owner. See www.macrovision.com for more information.

Write to the Hard Drive/DVD Folder
At times it is best to write your DVD to the hard disc to give the project a final check in a different application (see sidebar.) By doing this, you create a DVD volume on your drive that can only be read by a computer.
To build a disc to the hard drive:
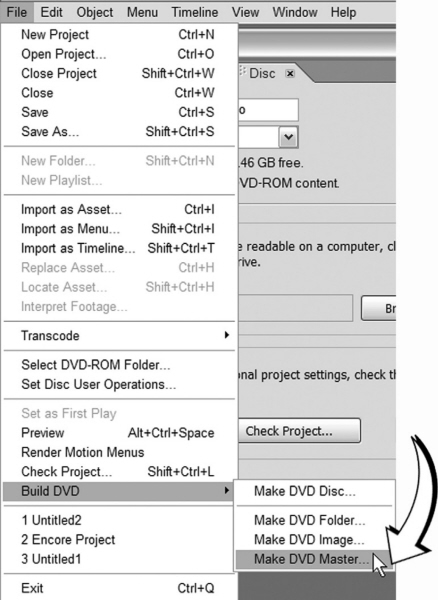
Go to File > Build DVD > Make DVD Folder
A dialogue will open providing options to save the project.
Click Save.
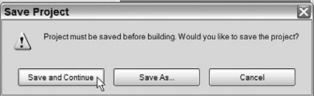
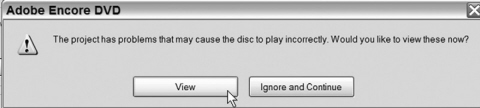
If there are any errors or playblack issues, Encore will give you a warning stating just that. You may view these errors or ignore them and continue. It is highly recommened that you view and fix these errors.
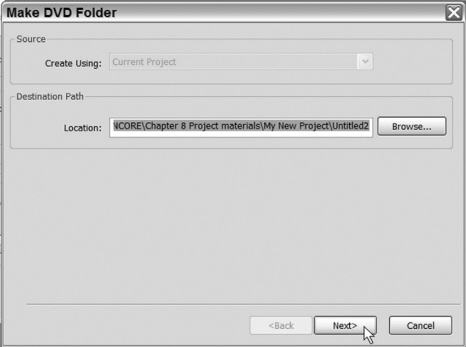
Now that the project is saved and all errors are fixed or accounted for, it is time to select the folder in which you wish to save the DVD information.
Choose a destination of the DVD folder and click Next
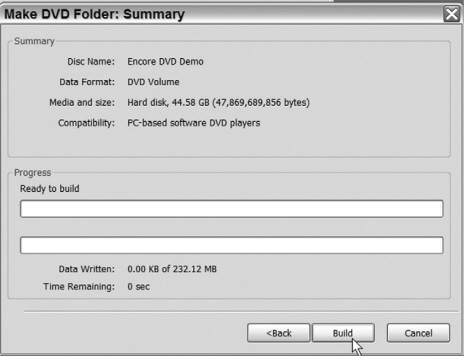
The Make DVD Folder Summary Dialog will appear and will await your command to build. Check the information in the summary.
Click Build
As the DVD is built to your hard disc it will show the progress towards the bottom of the dialogue box.
Preview a Disc with an External Software DVD Player
Many new DVD authors go through stacks of blank DVD’s and hours of wasted time checking their projects by burning. This can be avoided by using the Preview option in Encore.Encore’s preview window is a great tool, however a slight lag or pause between menus and timelines doesn’t give you an accurate feel for how the final disc will behave.
Encore allows you to write a DVD folder, or create an ISO disc image. If you have a software DVD player (WinDVD 5, for example) you can load the folder into the DVD player software and the player will treat the file as it would a DVD disc. (Check your DVD player software for instructions.)
When previewing the disc in the external DVD player application, make sure you are not running any other high priorty or video intensive applications. You want your DVD software to have almost full control over the hard drive and video card. This will give you an accurate playback.
Make a DVD Image/ISO
Similar to a DVD folder, a disc image can be created on a hard drive. Once an image is created, it’s ready to be burned to disc. Images are great be-cause they work in many software DVD players and provide flawless playback and preview. They are also effective for archival and testing purposes.

To build a DVD disc image to the hard drive:
Go to File > Build DVD > Make DVD Image
Encore will need you to save the current project and a dialog will instruct you and let you save.
Click Save
If there are any errors or playblack issues, Encore will give you a warning stating just that. You may view these errors or ignore them and continue. It is highly recommened that you view and fix those errors.
Choose a destination of the DVD image and click Next
The Make DVD Image Summary Dialog will appear and will await your command to build. Check the information in the summary..
Click Build
As the DVD disc image is built to your hard disc it will show the progress at the bottom.


Make a DVD Master/Export to DLT
If you’re planning to have your DVD replicated, then you must create a DVD Master. A DLT DVD Master is a versions of the DVD that replication houses use for stamping DVDs. Unlike burned DVD’s, a DLT master may include codes for copy protection, region codes and/or other advanced DVD features. DLT is a magnetic tape system, providing solid reliability and impressive data fidelity.
If you have a DLT tape drive Encore will recognize it when creating the DVD Master.
To export a Master:
Make sure to throughly check your project for errors before writing a Master.

Go to File> Build DVD > Make DVD Master
Encore will need you to save the current project and a dialog will instruct you and let you save.
Click Save
If there are any errors or playblack issues, Encore will give you a warning stating just that. You may view these errors or ignore them and continue. It is highly recommened that you view and fix those errors.
Encore will now detect any devices and media that support Mastering. If it cannot detect your device, check your hardware documentation and load the most recent drivers.
Click Next.
Encore will check to see if the device and media are ready to build the project on to DLT. Once the check is complete a new dialog will open and give the specifics of the build and the progress.
Click Build.
Encore will now build and export the project to the Master tape.

The majority of Encore users will likely burn their DVD’s to a DVD disc. If the project is small enough, it might fit onto a typical writable CD. In either case you will need blank media in the drive, ready to be burned.
To burn a DVD disc:
Go to File > Build DVD > Make DVD Disc
Encore will need you to save the current project and a dialog will instruct you and let you save.
Click Save


If there are any errors or playblack issues, Encore will give you a warning stating just that. You may view these errors or ignore them and continue. It is highly recommened that you view and fix those errors.
Now that the project is saved and all errors are fixed or accounted for, it is time to select set up the burn. You can chose to write the disc at the speeds indicated or set up the drive to do a test burn before writing the disc.
Choose the write speed and number of copies
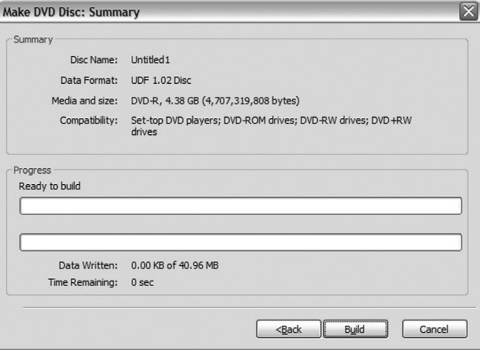
The Make DVD Disc Summary Dialog will appear and will await your command to build. Check the information in the summary..
Click Build
As the DVD disc is burned it will show the progress at the bottom.

Check Player Compatibility
Just because a DVD plays in your computer doesn’t necessarily mean it will play in every set top player in the world. In fact, recordable media sometimes doesn’t play at all in older set top players. The only way to see if your disc will play in set top players, is to check it in as many players as you can.
If your budget and scope require it, have the DVD replicated by a duplication house. This will all but guarantee that the DVD will be readable in every computer and set top player. It’s costly, but if quality and a wide audience is your goal, there isn’t a better alternative.
The best advice for assuring best compatability is often the hardest for some to swallow; buy quality recordable media. Spend the extra buck or two on the better DVD-R/DVD+R media. There is a significant difference between the high grade DVD-R/+R recordable media and the cheapest discs available.
While it is cost prohibitive, some authors still try to distribute rewritable DVD media. Not only does this cost a fortune, it’s shooting yourself in the foot as far as compatibility. Keep your RW discs for data storage or for burning test projects.
There has been a lot of talk involving 2 rival DVD formats, DVD-R and DVD+R. DVD-R was the first blank DVD media recording standard. DVD+R was introduced later and is marketed as a better solution.
So which is better? Of course both sides say their format is superior, but from a DVD Author’s standpoint it is comparing apples to apples. They perform comparably in terms of speed and reliability. For now, at least, there is no clear winner. DVD-R seems to have a slight compatibility advantage when it comes to older players. DVD+R appears to be technically superior and should eventually establish itself as a superior format.
Most importantly, make sure you choose the proper media format for your particular burner. If you use a DVD-R burner, then you should use DVD-R recordable media, and vice versa if you use a DVD+R burner. If you have a combo drive that can write both DVD-R/DVD+R then you have nothing to worry about.