
C H A P T E R 10
![]()
Windows Azure
In this chapter, you will be introduced to Microsoft’s cloud platform—Windows Azure—and how you can create applications that run in this platform. After a brief introduction to the cloud, you first learn about Web Sites, Cloud Services, and Virtual Machines. You then learn about table storage and blobs, which are used to store data in Azure. You finish off the chapter by learning about Windows Azure’s SQL Database, which is the Azure version of Microsoft SQL Server.
The Cloud
So, what is the cloud? To understand it, you need to take a step back and think about how the Internet is represented in a lot of design and architecture documents. That’s right—it is drawn as a cloud. And that is precisely what the cloud is—the Internet. Aside from being a metaphor for the Internet, the cloud is used as a shortened form for cloud computing. And cloud computing is nothing but computing power/services available on the Internet.
Cloud providers, such as Microsoft and Amazon, provide the customer the ability to store large amounts of data, run web applications, and do heaps of other things in the cloud. These providers run their infrastructure in their datacenters.
So, what is the difference between a regular datacenter and a cloud offering? Typically, cloud offerings are run out of very large datacenters and provide the following advantages that smaller datacenters find hard to match:
- No upfront cost to set up the services
- Low running cost, some of it charged by the hour
- Elasticity on demand (in other words, the ability to scale up and down easily and quickly)
- High availability and reliability
- Maintenance, upgrades, patches, and so forth are automatically taken care of in lots of cases
- Seemingly infinite computing power and resources at your disposal
CLOUD MODELS
The Windows Azure Platform
As I mentioned earlier, Windows Azure is Microsoft’s cloud platform. If you are running an application in Microsoft Azure, it means that your application is running in one of Microsoft’s six datacenters around the world—Microsoft has two in the United States, two in Europe, and two in Asia. These datacenters are extremely big and host tens of thousands of servers, have multiple levels of redundancy, and are extremely secure (physically).
Execution Models
One of the main uses of Azure is to host applications in the cloud and execute them. The Azure platform provides three ways in which you can execute applications (what Microsoft refers to as execution models):
- Virtual machines
- Web Sites
- Cloud Services
Virtual Machines
Windows Azure allows you to create virtual machines (VMs) based on images you’ve created (or ones readily available from Microsoft) as and when you need them. This is Microsoft’s IaaS offering, and not only can you create these VMs on demand, you only pay for what you use—cost is calculated on an hourly basis, and if you don’t need any VMs, you can just shut them down and not pay for them. VMs hosted in the cloud allow you to set up machines the way you want them—with the right configuration and software.
Web Sites
You can use the cloud to do a variety of things such as store large amounts of data or leverage the highly scalable nature of the cloud to do massive number crunching, but one of the most common uses is to simply move your existing web site to it. By moving your web site to the cloud, you not only make the web site highly scalable and available, you also bring down your hosting costs. The Web Site offering from Windows Azure fills this basic need—to host your web application. Windows Azure will automatically take care of things such as running multiple instances of the site on different servers (if you want to) and taking care of load balancing. Think of it as your web farm in the cloud.
Web sites offer a much simpler solution to run your web site compared to creating a VM, configuring IIS, and worrying about infrastructure details.
Cloud Services
Web sites are great to run simple web applications that currently run on IIS but that don’t require additional software or configuration. Sometimes, however, your needs could be a lot more complex—such as the need to have administrative privilege or the desire to run tasks in the background in a scalable way. In such cases, Web Sites may just not cut it and your VM role may be an overkill. This is where Cloud Services come in to play. Currently, Cloud Services provide two roles under which your application can run—a web role and a worker role.
A web role is used to run a web application. You can think of it as being similar to the Web Sites’ offering, but something with a lot more control—and like a web site, you can also run multiple instances of a web role to make it highly scalable. A worker role is used to run code in the background, and you can think of it as being similar to a Windows service—but running in the cloud— and again, you can run multiple instances of it, which makes it highly scalable.
Data Management in Azure
The execution models—VMs, Web Sites, and worker/web roles—are used to run code in Azure, but most applications also need to persist data to be useful. The main ways to work with data in Azure include the following:
- Table storage
- Blobs
- SQL Database
![]() Note Apart from using these built-in ways to store and retrieve data, you can also create a VM that provides other mechanisms to handling data such as running an instance of database (this is not limited to just SQL Server—you can also run something like MySQL on it) or running a NoSQL database such as Raven DB or Mongo DB.
Note Apart from using these built-in ways to store and retrieve data, you can also create a VM that provides other mechanisms to handling data such as running an instance of database (this is not limited to just SQL Server—you can also run something like MySQL on it) or running a NoSQL database such as Raven DB or Mongo DB.
Storage in Azure is highly redundant—Microsoft keeps three copies of the same data in a single datacenter, and you can choose to do geo-replication of tables and blobs. What this means is that if you have geo-replication enabled, Microsoft will automatically replicate the data to another datacenter in the same region. So, if your data is stored in the north central datacenter in the United States, Azure will automatically copy it to the south central datacenter.
Table Storage
Windows Azure Table Storage Service, or Tables for short, is used to store structured data. If you have been doing programming for a while or have studied computer science, you immediately think, “Oh, relational database!” at the mention of table storage, but you couldn’t be more wrong. A relational database contains a database schema, which defines how the data is stored, and the data itself is stored in rows and columns within a table. Each entity in a Relation Database System (RDBMS) has its own table, and there are concepts such as indexes, joins, and SQL queries.
Apart from the reuse of the word table, Windows Azure Table Storage Service and relational databases are quite different. So different that it is referred to as a NoSQL database. In table storage, a single table can contain multiple entities. You still have the concept of rows, but instead of fixed columns for a table, you have a set of properties. You can think of these properties as nothing more than name-value pairs. Like an RDBMS, tables also provide basic CRUD (Create, Read, Update, and Delete) functionality, which is available via RESTful web services. A much easier way to work with tables is using WCF Data Services. With WCF Data Services, you can query the data using LINQ and perform inserts, updates, and deletes just like you would do with entities stored in a relational DB.
Each Windows Azure account can have any number of tables in it, and each table can contain any number of entities in the form of rows. Each row is, however, limited to 255 properties. Some of these properties are mandatory and need to exist for each entity:
- Partition Key: This identifies how the data is partitioned. How you decide what the unit of partition is depends on your application. It is not uncommon to partition the same data in several ways.
- Row Key: This identifies the unique key for the entity within the partition.
- Timestamp: This is used to determine when the entity was created and updated. This is used mainly for concurrency locking.
WHY DO YOU NEED PARTITION KEYS?
Blobs
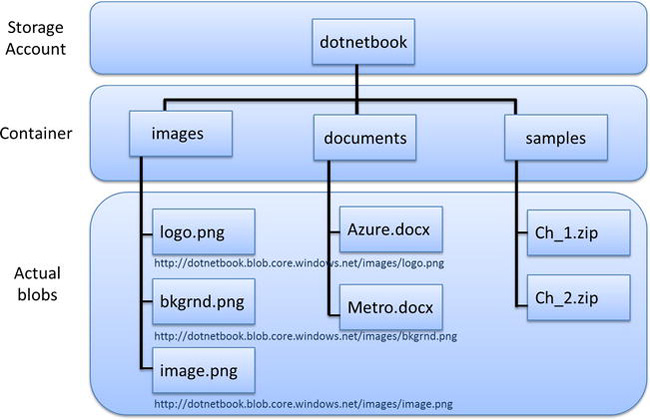
Blobs are nothing more than files that are needed by your application—the only difference is that instead of being stored in the local file system, they are stored in a central place. Blobs, whose name stands for binary large objects, are accessed through a URL, and if the name of the storage account is called dotnetbook, the blobs stored in that account can be found in the URL http://dotnetbook.blob.core.windows.net. Windows Azure provides facilities to upload and read whole blobs or even parts of these blobs.
So, why not just use files stored locally, like you do currently? In other words, why use blobs? You have to remember that when you are working with Web Sites or Cloud Services, you have multiple instances running, which means you are running these on different VMs. If you create a file locally in one VM, it may not be available in the other VM, which is not very useful. By creating it as a blob, it is centrally available to all roles.
There are two types of blobs in Azure—block blobs and page blobs. Block blobs are made up of a sequence of blocks (<= 4MB in size). Breaking it up into these smaller chunks makes reading and writing of blobs easier. Currently, block blobs have a maximum size of 200GB.
Page blobs can be as large as 1TB, and they are made up of pages. You can do random read/writes to these pages. If you are dealing with smaller files, such as text files or images, you will end up working with just block blobs.
You can also have as many blobs as you want per account. Each blob is actually held in a container, which is nothing more than a logical grouping. So, effectively, each account can contain any number of containers and each container contains any number of blobs.
For example, you may have an account called dotnetbook, which holds containers called images and documents and samples, and under images you may store blobs with the name logo.png, bkgrnd.jpg, and image.png. The document container may contain document blobs under the names Azure.docx and Metro.docx. Figure 10-1 shows how the URL for the blob is created for the image blobs in this example.
As blobs are nothing more than standard URLs, they can be quite useful for storing application files such as images, CSS files, and JS files. One advantage of doing it this way rather than being deployed with the other project files is that these files can be exposed via the Azure Content Delivery Network (CDN). CDNs are servers placed closer to your own networks that help in caching content closer to where you are accessing it.
To delve into it a bit further, there are currently only six Azure datacenters around the world where your blob can be stored. But Azure also has 24+ datacenters, which spread across the world hosting CDNs where the content of these blobs can be cached. To understand CDNs better, let’s take the example of trying to access an image from, say, Sydney, Australia, with the image being hosted in Singapore. If you were using a CDN to cache the image, the content would be served out of a CDN node in Sydney, but the traffic doesn’t have to make a round-trip all the way to Singapore.
SLOBS VS. BLOBS
SQL Database
If you have an existing application, chances are you have a relational database of some sort where your data is stored. If you are using a Microsoft stack, chances are this database is SQL Server. The Azure platform’s equivalent of SQL Server in the cloud is SQL Database, which was formerly known as SQL Azure. This database makes migrating an existing relational database to the cloud easy.
SQL Database may be similar to its SQL Server counterpart, but you will find that there are a lot of differences between SQL Server and SQL Database running on Azure, some of which are included in the following list:
- Database size in SQL Database cannot be greater than 150GB.
- Some query commands do not work in SQL Database.
- SQL Database will terminate long-running query operations.
- You need to have a clustered index in SQL Database.
- SQL Database does not support .NET CLR data types, encrypted columns, FILESTREAM, distributed transactions, full text search, and so on.
A comprehensive list of all the differences can be found at http://msdn.microsoft.com/en-us/library/windowsazure/ff394115.aspx.
In spite of these differences, working on SQL Database is quite easy if you are already working with SQL Server. You will be able to use familiar API from ADO.NET, run queries in SQL, and create entities using Entity Framework. In fact, switching over to SQL Database running on Azure from SQL Server in some cases is all about just changing the connection string!
TABLES VS. SQL DATABASE
Messaging
Applications sometimes need to communicate with each other. The Windows Azure platform provides a couple of ways to facilitate this communication:
Queues
A queue is a place where messages are held, and queues are used to exchange information between different applications. When one application needs to communicate with another, it creates a message and places it in a queue. The other application keeps looking at the queue for new messages and when one arrives, it picks it up to do some processing.
The best way to explain queues is through an example. If you’ve got a web application that uploads large images as blobs and a worker role that creates thumbnails from these images, you need to signal the worker role as soon as the image is loaded from the web application. You also need to tell the worker role the name of the image and where it is located. The web application puts this information in a message and posts it to a queue. The worker role keeps polling the queue for messages and as soon as it sees the message, it gets the message from the queue and starts working on creating the thumbnails. Once completed, the worker role should delete the message from the queue. If something goes wrong before the message is deleted, Azure restores the message to the queue. The worker role can then process it again.
Queue sizes are currently limited to 64K, and as with table storage and blobs, Azure provides a RESTful API and an SDK to work with queues.
Service Bus
Service Bus is another mechanism provided by Azure to help applications communicate. Service Bus also provides a queuing mechanism, but unlike the queues mentioned in the previous section, a single message in a queue can be consumed by multiple applications. This is achieved via a Publish/Subscribe mechanism. Service Bus also provides a relay service that allows a service to be made available even when a firewall is present.
Wait, There Is More …
We’ve discussed execution models, data management, and messaging in Windows Azure. The platform is not limited to just these features. It contains a lot more elements—things to help with caching, identity management, networking, media services, and many more. The site http://www.windowsazure.com/ is a good starting point to learn more about these additional services.
However, the things discussed in the previous sections are most likely to be the most commonly used elements in Windows Azure and the ones you would use to get started on the platform. Therefore, these are the only components covered in this book. We also don’t cover Service Bus apart from the introduction in the previous section.
Getting Started with Azure
Now that we’ve covered the basics of Windows Azure, let’s see what you need to begin coding. The Azure SDK, at the time of writing, is ver 1.7, and you can download it from https://www.windowsazure.com/en-us/develop/net/. NuGet packages for the Azure SDK bits are also available (see http://nuget.org/profiles/azure-sdk). Windows Azure Tools for Microsoft Visual Studio will install everything you need to develop applications in Windows Azure.
In addition, the Azure SDK also provides you with emulators, which, although not the same as the real environment, can help you run and debug applications locally.
Alternatively, you can open Visual Studio 2012 and select File ![]() New
New ![]() Project… This will bring up the New Project dialog box as shown in Figure 10-2. Select Cloud from the left panel in the dialog box, choose Get Windows Azure SDK for .NET, and press OK. If you have already installed the Windows Azure SDK, you will see the available project types instead of the Get Windows Azure SDK for .NET option.
Project… This will bring up the New Project dialog box as shown in Figure 10-2. Select Cloud from the left panel in the dialog box, choose Get Windows Azure SDK for .NET, and press OK. If you have already installed the Windows Azure SDK, you will see the available project types instead of the Get Windows Azure SDK for .NET option.
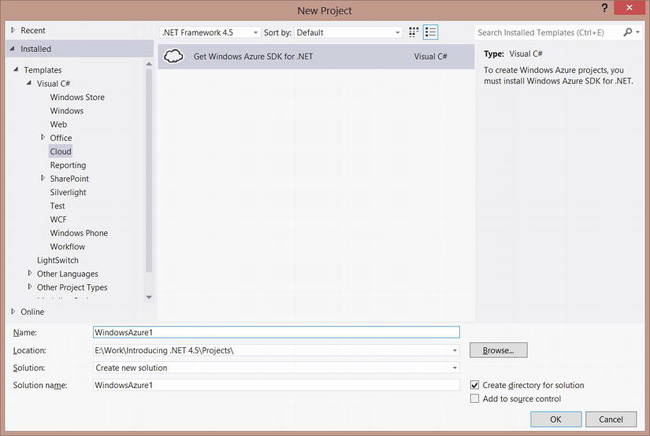
Figure 10-2. New project dialog box
This action will open up the necessary page to download and install the right tools as shown in Figure 10-3. The tools will be installed using the Web Platform Installer. The Windows Azure SDK for .NET contains the Windows Azure Tools for Microsoft Visual Studio, which allow you to do the following things right out of Visual Studio:
- Create new Windows Azure projects from the newly installed project templates
- Start the Compute and Storage Emulator from Visual Studio and run your projects there
- Use the Server Explorer to explore Azure compute and storage instances (and the emulators)
- Deploy your application directly to Azure from new menus
In addition, the SDK also installs Windows Azure Client Libraries for .NET, which contains libraries to talk to Windows Azure.
Figure 10-3. Download page for Windows Azure
Web Sites
If you currently have a simple web site that doesn’t have too many dependencies (not even a database), then deploying it to a web site in Windows Azure is quite straightforward. Having databases does not make it too complex—it just means that there are a few more steps to go through, such as setting up the database in the cloud and changing connection strings. But for the sake of simplicity, let’s try to move a simple ASP.NET MVC application across to Azure.
Before you jump into Visual Studio to deploy your application, you need to create a web site using the Windows Azure Management Portal. To do that, navigate to http://manage.windowsazure.com using a browser. The management portal has had a refresh at the same time SDK 1.7 was released. While the old version was written in Silverlight, the new version is in plain HTML—what this means is that you can even access it from your iPad or mobile phone if you want to. If you don’t have an account on Windows Azure, you can go through the steps of creating a new account using your Windows Live ID. (Don’t worry if you don’t have a Windows Live ID—you can create one for free.)
At the time of writing, Microsoft provided users with a 90-day trial to try Windows Azure without having to pay for it. If you have an MSDN subscription, you can use that too as it has a certain amount of free Azure credits per month. Once you’ve created an account, you can go to http://manage.windowsazure.com to start creating web sites, services, and databases in the cloud. Figure 10-4 shows the Windows Azure Portal.
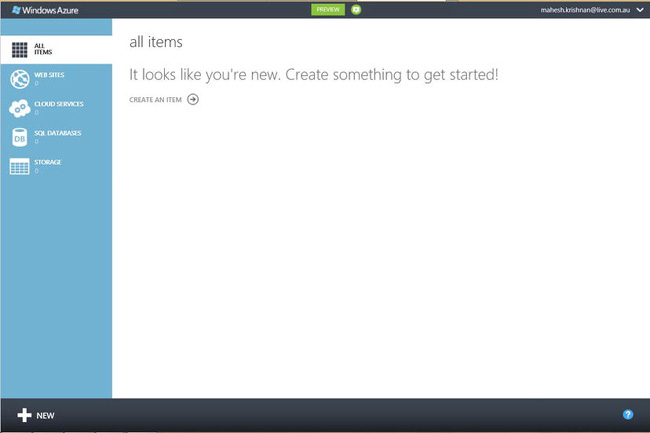
Figure 10-4. The Windows Azure Management Portal
To create a new web site, click CREATE AN ITEM under ALL ITEMS, and then choose WEB SITE from the options provided in the NEW panel when it slides up. You will be prompted with options to do a QUICK CREATE, CREATE WITH DATABASE, or FROM GALLERY. Choose QUICK CREATE and type in a unique URL, as shown in Figure 10-5. Then press CREATE WEB SITE to create a new web site—this web site is actually a placeholder where you can deploy your ASP.NET application.
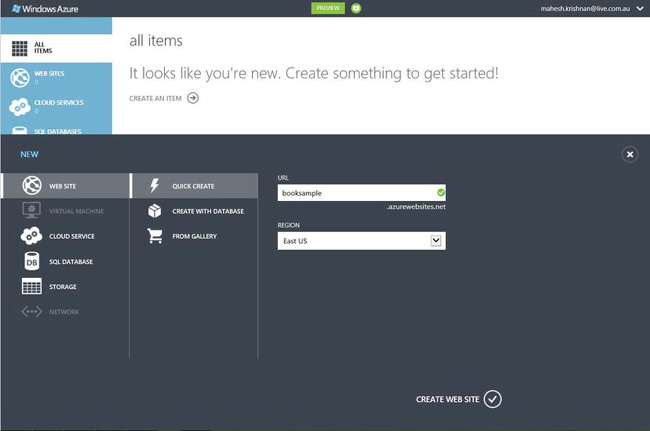
Figure 10-5. The NEW panel for creating items such as a web site
Deploying Your ASP.NET Application to an Azure Web Site
To deploy your ASP.NET application to Windows Azure, follow these steps:
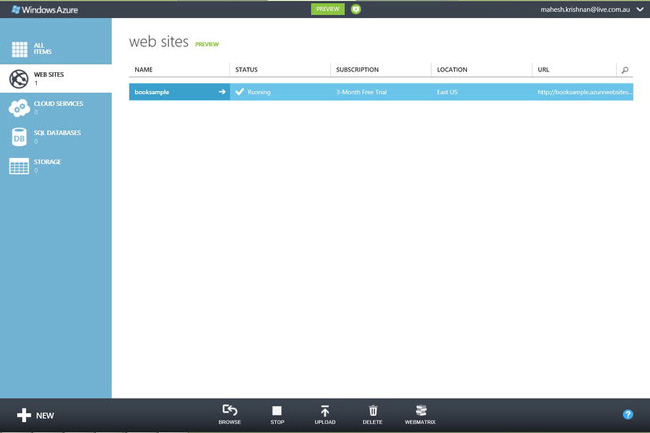
- Open up Windows Azure Portal to bring up the list of Web Sites that are available. You should see the web site created from the previous section, as shown in Figure 10-6.
- Click the name of the web site that you want to install your ASP.NET application on. This will take you to a detailed view of the web site. This screen allows you to configure the web site in a number of ways.
- From the Dashboard tab, click Download publish profile to download the
.publishsettingsfile that can be used from Visual Studio. - From Visual Studio, open the ASP.NET project that you want to deploy to the Azure web site.
 Note At the time of writing, Windows Azure web sites do not support .NET 4.5, but this should be fixed eventually. You can change the framework version from the Configure tab in the portal.
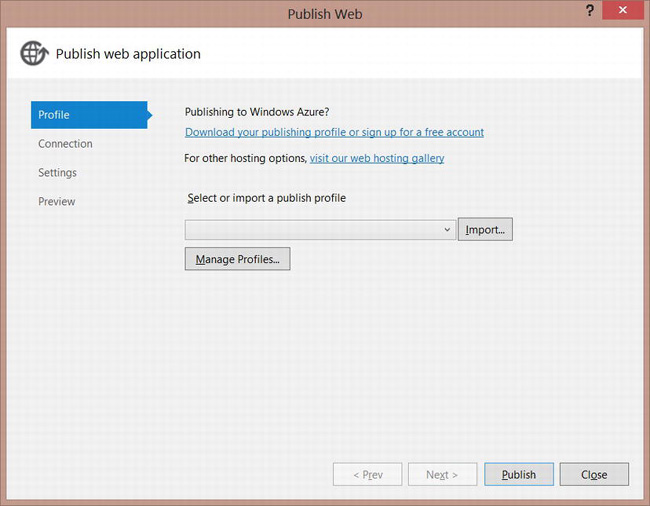
 - Right-click the project from the Solution Explorer and choose Publish… from the drop-down menu. This brings up the Publish Web dialog box as shown in Figure 10-7.
- Press Import… button and from the File Open dialog box choose the
.publishsettingsfile that you just saved from the Windows Azure Portal. This will automatically import all the settings that you need to publish to Azure as shown in Figure 10-8. (If you haven’t previously downloaded a.publishsettingsfile, you can click the link Download your publishing profile or sign up for a free account to download it.)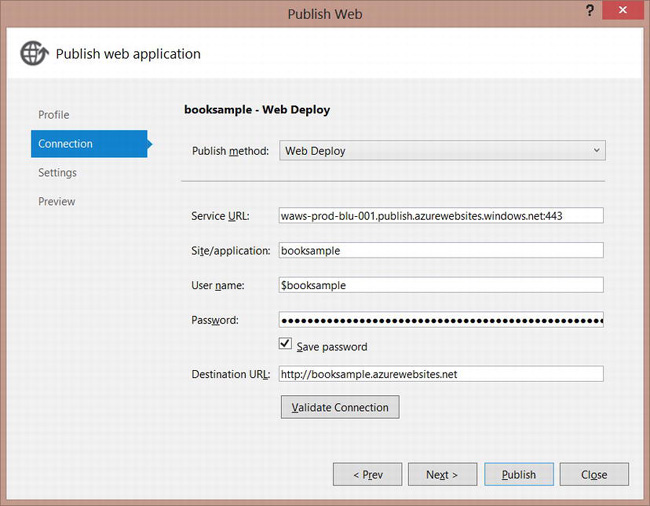
Figure 10-8. Dialog box showing the imported settings from the .publishsettings file
- Press Publish in the dialog box to publish the application to Windows Azure and also to launch it in your browser.
Deploying Other Web Sites such as WordPress to Azure
Windows Azure is not limited to just hosting ASP.NET web sites. In fact, you can host sites created using even non-Microsoft technologies such as PHP—Drupal and WordPress being two popular content management systems written using PHP. To create a WordPress blog in your site, follow these steps:
- From the Windows Azure Management Portal, go to the WEB SITES section and click CREATE A WEB SITE.
- From the options, choose FROM GALLERY. This brings up the Find Apps for Azure window as shown in Figure 10-9.
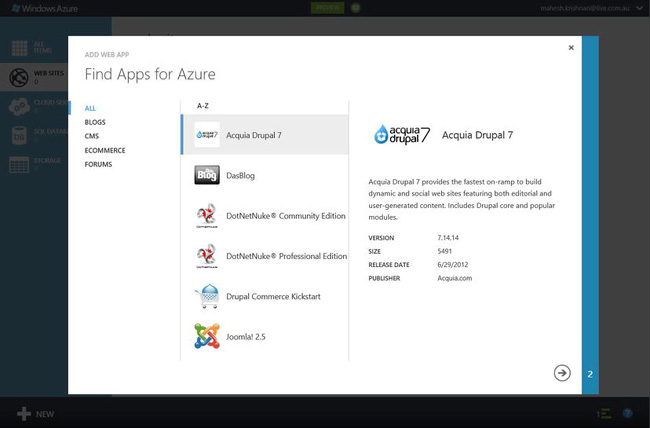
- Click on BLOGS option on the side. This should list WordPress as one of the options. Click on WordPress and press the next arrow. This takes you to the Configure Your App step as shown in Figure 10-10.
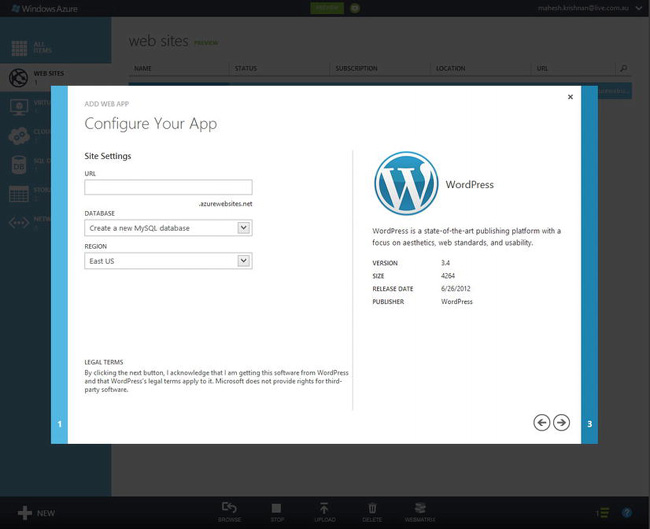
- Type in a unique URL for the site and press the next arrow.
- This takes you to CREATE NEW DATABASE step. Leave the defaults as they are, check the option to agree to the terms and conditions, and press the check mark button. This deploys a new WordPress site to the newly created web site on Windows Azure.
- Once the application is deployed, you can click on the URL to take you to the newly created WordPress site, as shown in Figure 10-11. As you are entering the site for the first time, you will be prompted to enter a few pieces of information (such as site title and password) before you create an actual WordPress site.
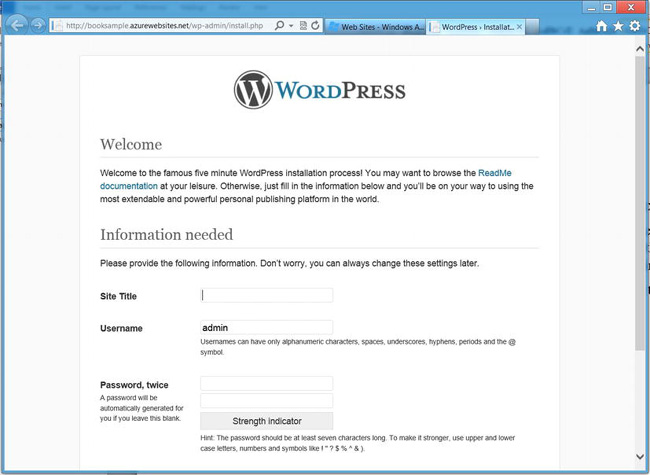
Figure 10-11. The last step in setting up a WordPress site on Azure
Cloud Services
When you want more control over your cloud projects, you need to start using Cloud Services to deploy your application. To see how it works, let’s start by creating a simple project by following these steps:
- Select File
 New Project… from the menu or press Ctrl+Shift+N. This will bring up the New Project dialog box. Set the type of template to Cloud and select Windows Azure Cloud Service as the project template. Set the name of the project to HelloCloud and press OK. The New Windows Azure Cloud Service dialog box will be displayed, as shown in Figure 10-12.
Note At the time of writing, only .NET Framework 4 is supported. Make sure that you select the right framework version for the project template to show up.
New Project… from the menu or press Ctrl+Shift+N. This will bring up the New Project dialog box. Set the type of template to Cloud and select Windows Azure Cloud Service as the project template. Set the name of the project to HelloCloud and press OK. The New Windows Azure Cloud Service dialog box will be displayed, as shown in Figure 10-12.
Note At the time of writing, only .NET Framework 4 is supported. Make sure that you select the right framework version for the project template to show up.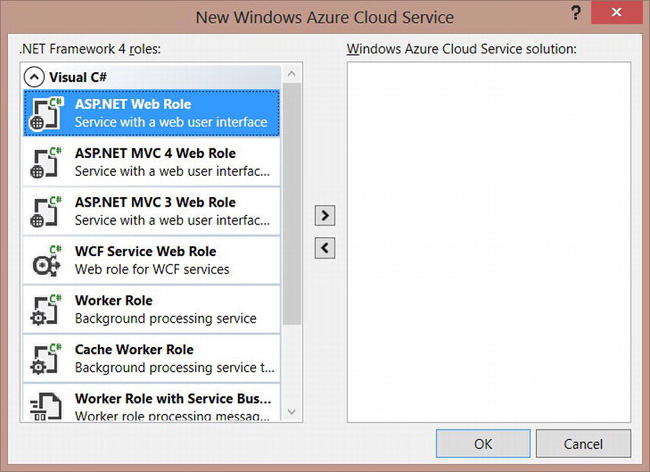
Figure 10-12. Adding new roles in the New Windows Azure Cloud Service dialog box
- Double-click ASP.NET Web Role from the list of roles displayed. This will add an item to the Windows Azure cloud service solution list.
- Right-click the
WebRole1item from the Windows Azure cloud service solution list and select Rename from the menu. RenameWebRole1to something more meaningful such asHelloAzureWebApp. - Press OK to create the solution and all the projects in it.
- Press F5 to run the application. You will notice a window displaying that the application is being run in the local Windows Azure Debugging environment, followed by the actual web application being displayed in a browser. That’s it—you’ve created and run your first Windows Azure application!
![]() Note The Windows Emulator needs to run with elevated privilege. You might have to restart Visual Studio and run it as Administrator if you don’t have the right permissions.
Note The Windows Emulator needs to run with elevated privilege. You might have to restart Visual Studio and run it as Administrator if you don’t have the right permissions.
Looking into the Azure Solution
If you expand all the projects in the solution you just created, the solution in the Solution Explorer will show up as shown in Figure 10-13.
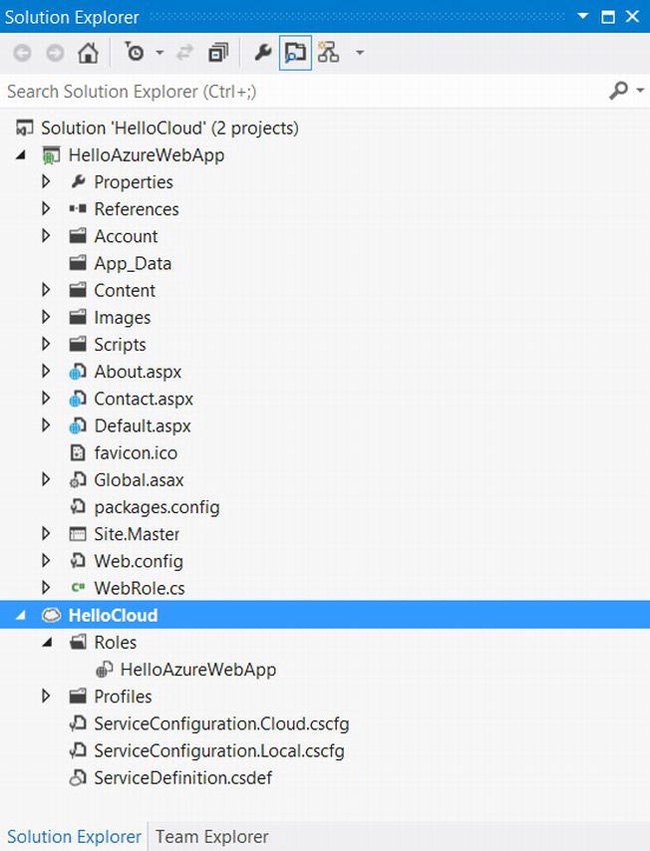
Figure 10-13. Solution Explorer showing the Azure project HelloCloud
You will notice that there are actually two projects in the solution—the HelloAzureWebApp and HelloCloud. The HelloAzureWebApp is nothing but a standard ASP.NET Web Forms application. It contains nothing that is specific to Azure. (Actually, I lie. There is some Azure specific stuff in there, such as the WebRole.cs file, but more about that later.)
The second project HelloCloud is the project that gets deployed into the cloud. Notice that this project has a folder called Roles. The ASP.NET project that needs to be deployed into the cloud exists here as a role. In addition, you will see three separate files:
ServiceConfiguration.Cloud.cscfg: This file contains configuration information needed to run the web role in the cloud (in other words, in the actual Azure datacenter).ServiceConfiguration.Local.cscfg: This file contains configuration information needed to run the web role in the local Azure debugging environment.ServiceDefinition.csdef: This file contains service configuration definition, such as what the service configuration file contains and the endpoints under which the different roles in your cloud application run.
You do not have to worry too much about these files because they get modified automatically when you set things up interactively. Right-click the HelloAzureWebApp role in the Solution Explorer and select Properties. A properties window will open up as shown in Figure 10-14.
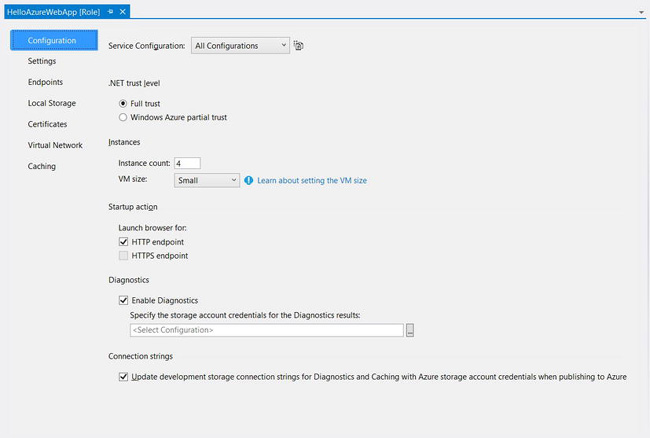
Figure 10-14. Properties window for a role
You will notice how you can set various options including how many instances of the role you want to run and what VM size to use. If you click the Settings tab, you will see existing settings used by the application. You can add any number of properties over here that you would want to configure at runtime, such as time-out values or environment-specific values.
Storage and Compute Emulators
It is not practical for you to deploy your application to the Azure datacenter and test it over there every time you make a change, no matter how small. The solution offered by Microsoft to solve this problem is an emulator environment that simulates the production Windows Azure and storage environments.
In fact, there are two emulators—one for Azure Compute and one for Azure Storage. These emulators mimic their Azure counterparts and allow you to run your applications on your own desktop. As a bonus, you also get to set breakpoints, step through code, inspect variables, and all those nice things you do when you debug your application from Visual Studio.
To see the emulators in action, open the HelloAzureWebApp role’s property window. (Select the role from Solution Explorer and press Alt+Enter.) Change the instance count in the properties window to 4 and press F5.
When the application starts up, the emulator is automatically started, and it ends up as an icon in the system tray. Right-click the emulator icon in the status bar (shown in Figure 10-15) and select Show Compute Emulator UI.
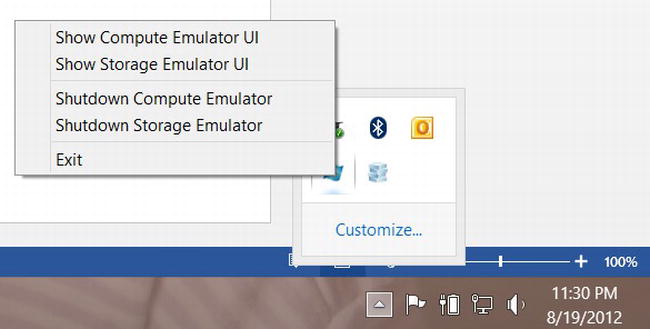
Figure 10-15. Emulator icon in the system tray
This will open the Windows Azure Compute Emulator window, as shown in Figure 10-16. Notice that under the HelloCloud application, the HelloAzureWebApp is shown, and under it four instances are shown. Similarly, you can also open the storage emulator by right-clicking the emulator icon from the Windows system tray and selecting Show Storage Emulator UI. The storage emulator window is shown in Figure 10-17.
![]() Note The storage emulator actually stores data in a SQL Server Express instance in your local machine. You can open up your database using a tool such as SQL Server Management Studio and have a look at how the data is stored. You can also start modifying data stored in the tables directly, but I wouldn’t recommend it. There are other ways to do it, which are covered later in this chapter.
Note The storage emulator actually stores data in a SQL Server Express instance in your local machine. You can open up your database using a tool such as SQL Server Management Studio and have a look at how the data is stored. You can also start modifying data stored in the tables directly, but I wouldn’t recommend it. There are other ways to do it, which are covered later in this chapter.
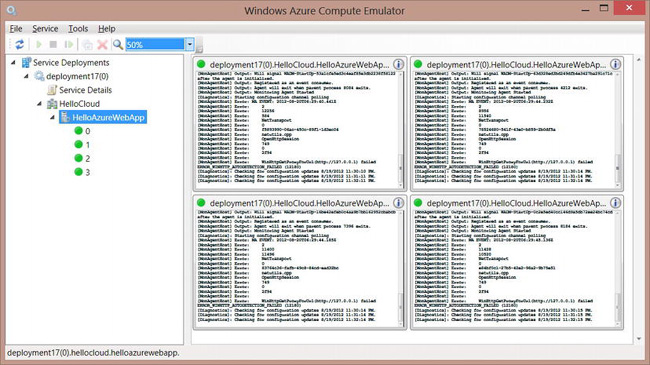
Figure 10-16. Compute Emulator running multiple instances of an application
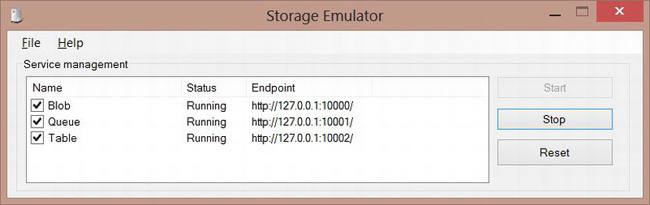
Figure 10-17. Storage Emulator
Deploying Your Cloud Service to Azure
Now that you’ve created a simple loud service, your next step would be to deploy it in an actual Azure datacenter. To do that, you need to first create a cloud service under your Windows Azure subscription. In order to create a cloud service, navigate to http://manage.windowsazure.com from your browser and create a cloud service similar to the way you created web sites in the previous section. Once you’ve created a cloud service in Azure, you can deploy your application in one of two ways:
- Create the deployment package from Visual Studio and upload it from the portal
- Publish the application directly from Visual Studio
Creating and Deploying a Cloud Package
In this section, you will first learn how to create a deployment package. Once the package is created, you will learn how to deploy it to the cloud.
Creating a Deployment Package
To create a deployment package, follow these steps:
- Right-click the
HelloCloudproject from the Solution Explorer and select Package. A Package Windows Azure Application dialog box, as shown in Figure 10-18, is displayed. The dialog box allows you to pick the service configuration file and the build configuration you wish to use to create the package. If you are going to deploy to production, your choices would be Cloud and Release, respectively. The dialog box also allows you to enable remote desktop access to the instances you create by checking the Enable Remote Desktop for all roles check box and a Settings… link for further options. You do not have to alter these settings to create a package. - Press Package to create the package. Visual Studio will create a file with the extension cspkg (
HelloCloud.cspkgin this case) and aServiceConfiguration.Cloud.cscfg, and it will place this in thebinReleaseapp.publishdirectory of the cloud project. Visual Studio will also open the location of the file in Windows Explorer for you to look at.
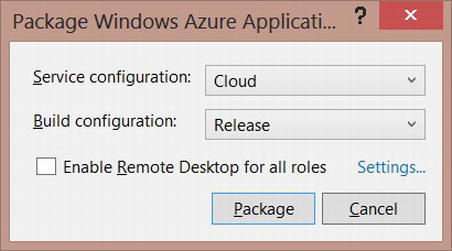
Figure 10-18. Package Windows Azure Application dialog box
![]() Tip The cspkg file is nothing but a zip file. You can rename the file with a zip extension and unzip it to look at its contents. Be aware that the contents are encrypted, though. If you create a system variable called
Tip The cspkg file is nothing but a zip file. You can rename the file with a zip extension and unzip it to look at its contents. Be aware that the contents are encrypted, though. If you create a system variable called _CSPACK_FORCE_NOENCRYPT_ with the value set to true, the contents will not be encrypted. You wouldn’t normally need to do this unless you hit an issue during deployment and want to check the contents manually on your machine.
Deploying the Package
To deploy this package, follow these steps:
- Log in to
http://manage.windowsazure.comand select Cloud Services on the left side pane. A list of cloud services that you have created as part of your Azure subscription will be displayed. - Click the name of the cloud service on which you wish to deploy your application. If you do not have any previously installed applications, you will see a screen similar to Figure 10-19.
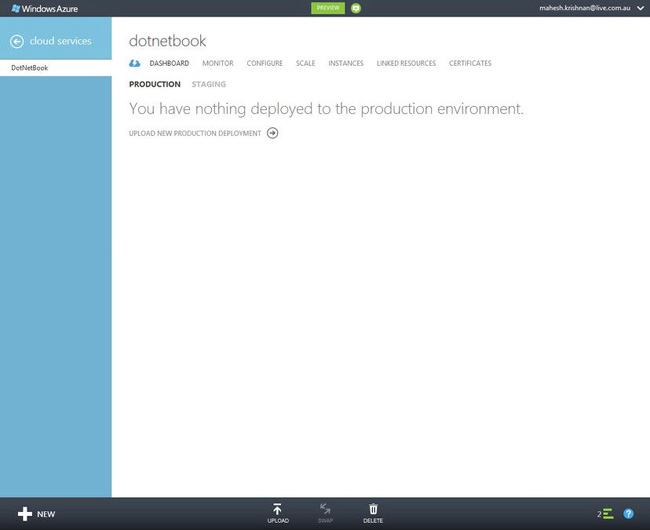
Figure 10-19. Cloud service with nothing deployed in production
- Click the UPLOAD A NEW PRODUCTION DEPLOYMENT link. This will bring up in the Upload a package window as shown in Figure 10-20.
- Set the DEPLOYMENT NAME to
HelloCloud; then click the BROWSE YOUR COMPUTER button under PACKAGE. This opens up the File open dialog box. Browse to the directory where theHellocloud.cspkgfile was created and select it. - Next, click the BROWSE YOUR COMPUTER button under CONFIGURATION and choose the
ServiceConfiguration.Cloud.cscfgfile - Press the tick button to deploy the application.
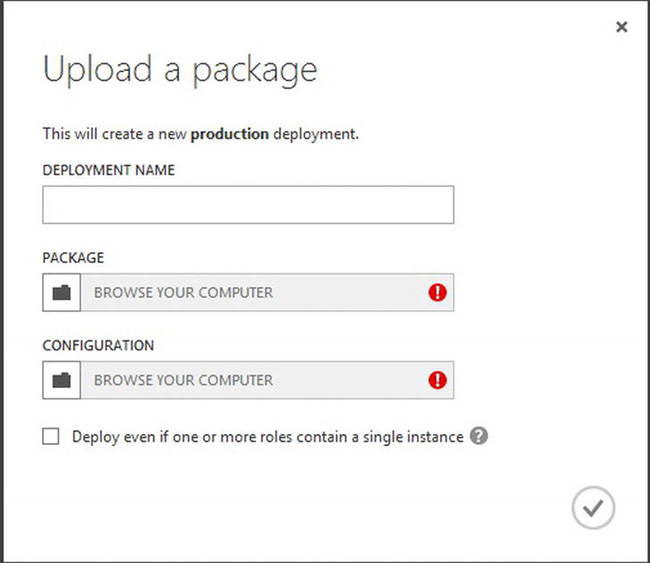
Figure 10-20. Upload a package dialog to deploy a package to Windows Azure
Deploying the application takes a while to finish. Once your application has finished deploying, the portal shows a whole load of information about the deployed service and tabs to monitor, configure, scale, and so forth as shown in Figure 10-21. You can click these tabs to explore these features further. You should also be able to browse the URL http://yourname-hellocloud.cloudapp.net and be able to see the application running.
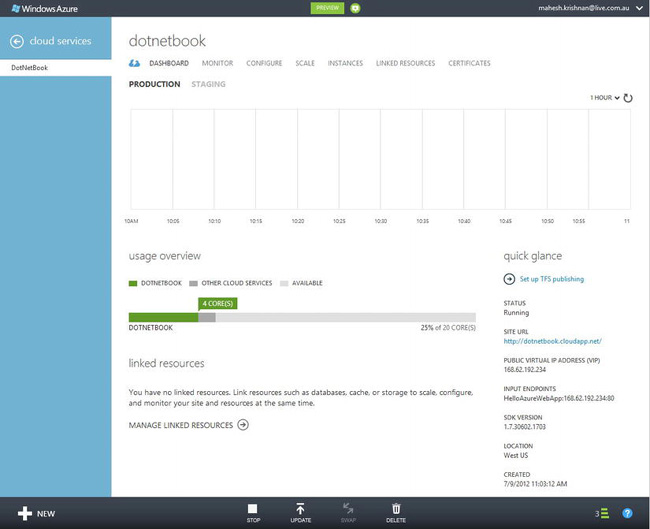
Figure 10-21. Dashboard and other tabs for a cloud service
Deploying the Cloud Application from Visual Studio
Deploying the application directly from within Visual Studio automates the multiple steps of creating a package, logging into the Azure Management Portal, and manually uploading the package with all the various options.
Deploying it for the first time involves a few extra steps, though. But let’s do the same deployment that we did in the previous section from within Visual Studio by following these steps:
- Right-click the cloud project and select Publish… from the menu. A Publish Windows Azure Application dialog box will be shown.
- Click the link Sign in to download credentials. This will automatically open a browser and download a
.publishsettingsfile that has all the details you need to deploy your application, as shown in Figure 10-22. (You may be prompted to sign into to your Windows Azure account first.) Save the file into your project directory so you can find it easily.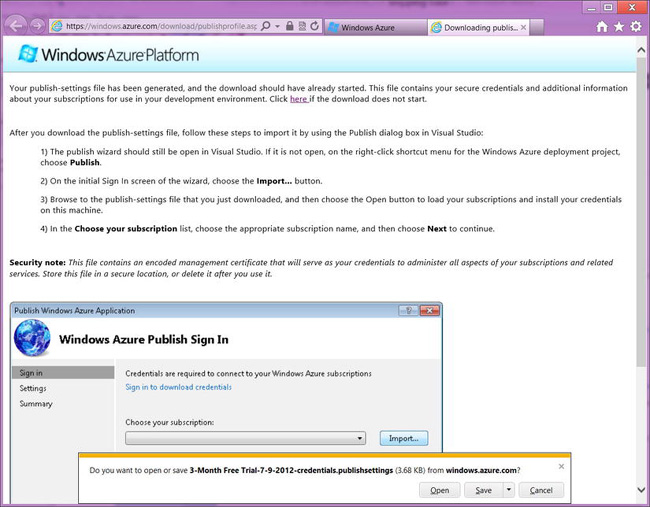
Figure 10-22. Downloading the .publishsettings file from Azure subscription
- In the Publish Windows Azure Application dialog box, press the
Import…button and pick the.publishsetttingsfile you just downloaded. The subscription name will then appear in the Choose your subscription field. - You can press the
Nextbutton to display options to change deployment settings, but instead press the Publish button. (If you already have instances running in your environment, you will be prompted to replace them.)Note There is some pretty cool stuff in the Advanced tab. You can enable IntelliTrace and Profiling, which allows you to track problems and performance issues in your deployed application. There is also an option to delete deployment on failure, which is useful when an error occurs during deployment. - Visual Studio will display a Windows Azure activity log that shows the logs of the actual deployment as shown in Figure 10-23.
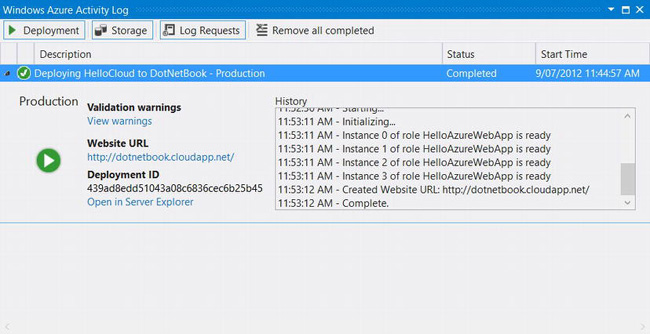
Figure 10-23. Windows Azure activity log in Visual Studio
Windows Azure Virtual Machines
As you saw in the cloud section earlier in this chapter, VMs in Windows Azure are the Infrastructure as a Service offering from Microsoft. These VMs can run an operating system of your choice (yes, even Linux if you wanted to) and there are some preconfigured VMs available for you to choose from. Strictly speaking, VMs should be considered an out-of-scope topic for this book as it has nothing to do with Visual Studio, but having covered so much on Windows Azure, it would be a shame not to touch on it.
To get it to work, follow these steps from the management portal:
- Click on the NEW button at the bottom of the screen. This slides up the NEW panel.
- Click on the VIRTUAL MACHINES option, and choose QUICK CREATE. You will be prompted to enter a DNS name and a few other fields as shown in Figure 10-24.

Figure 10-24. Using the NEW panel to create a virtual machine
- Fill in the form and click CREATE VIRTUAL MACHINE. This creates a new VM image on Windows Azure and displays a screen as shown in Figure 10-25.
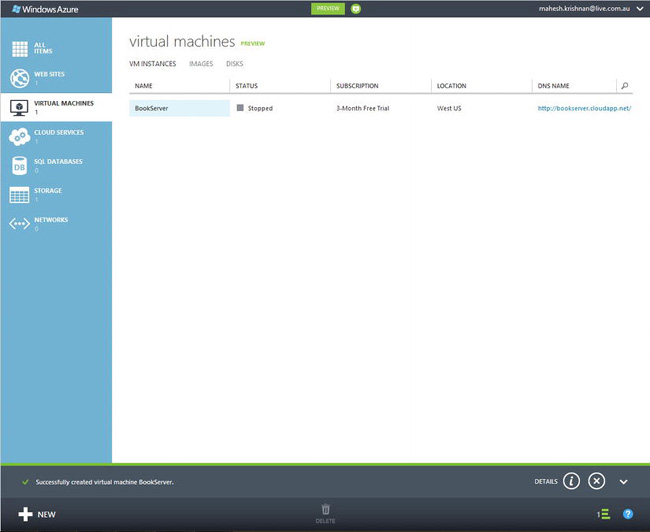
Figure 10-25. Virtual machines tab showing all the virtual machines under the subscription
Once you’ve created the server, you can plug a remote desktop into the machine and configure different server components or install server software.
![]() Note At the time of writing, VMs were only available if you signed up to the preview program and will be grayed out if you haven’t.
Note At the time of writing, VMs were only available if you signed up to the preview program and will be grayed out if you haven’t.
Data Management Using Tables and Blobs
Now that you’ve seen different ways to create and deploy applications in Windows Azure, let’s see how you can make use of Azure storage to store tables and blobs.
The first step is to create a Windows Azure storage account from Windows Azure Management Portal. If you followed the steps from the previous section to create a VM, then you would have already created a storage account as the VM resides in a blob, and the blob needs a storage account to live in.
Creating a new storage account from the portal is quite easy, and it is very similar to the way you created Web Sites, Cloud Services, and Virtual Machines:
- Log in to the Windows Azure Management Portal at
http://manage.windowsazure.comand click on the NEW button at the left bottom of the screen. - From the NEW panel that slides up, click the Storage link. You will be provided with an option to QUICK CREATE a storage account. All you have to do is type in a unique URL where storage data will be stored, choose a region or affinity group where your data will be stored, and click CREATE STORAGE ACCOUNT. This will create the storage account for you.
- You can then click on the name of the storage account from the list of accounts belonging to your subscription to see details of your accounts, monitor them, and configure them, as shown in Figure 10-26.
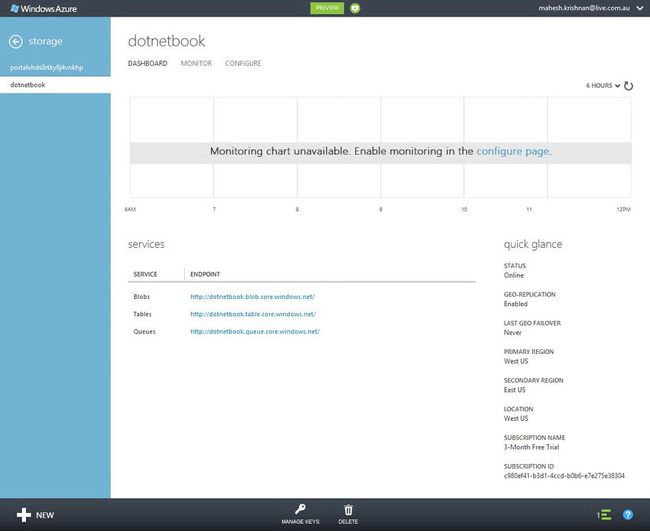
Figure 10-26. Dashboard of a storage account
If you look at the page, you will see that there are three separate endpoints (URLs) for the three services—blobs, tables, and queues—that are stored in Azure Storage. You are probably thinking, What are queues doing in Azure storage? Aren’t they used for messaging between applications? Yes, but queues need to be stored somewhere too so that different applications can access them—what better place to put them than Azure storage, which is highly scalable, redundant, and available.
To access the storage account from your application, you need the name of the storage account (which is the name you typed into the URL field), followed by an access key. The access key can be obtained by clicking the MANAGE KEYS link at the bottom of the screen—this brings up the Manage Access Keys window as shown in Figure 10-27.
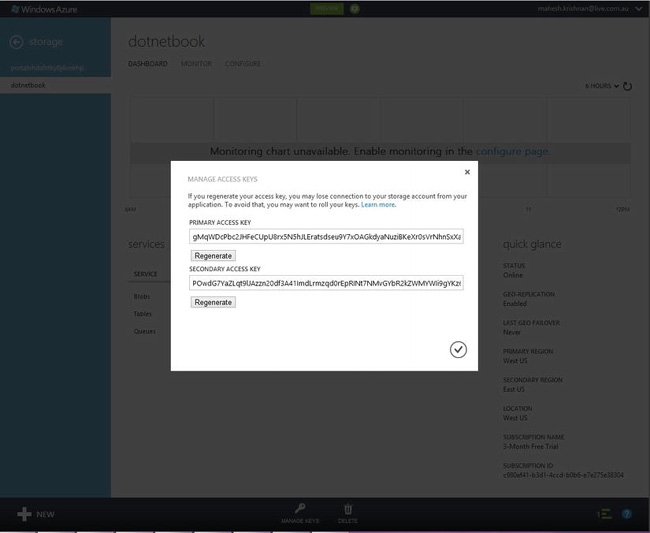
Figure 10-27. Access keys needed to access storage accounts
You can copy the primary access key from the text field present in the window. A connection string for a storage account will be in this format: DefaultEndpointsProtocol=https;AccountName={storage name};AccountKey={primary access key}
Accessing Entities Stored in Table Storage
Table storage stores data as entities. An entity is nothing but an object with a collection of properties. The best way of accessing these entities is by using WCF Data Services.
To create a simple entity class in C#, you need to extend the TableServiceEntity class that is present in the Microsoft.WindowsAzure.StorageClient namespace. A Customer class may look something like this:
public class Customer : TableServiceEntity

{

     public string FirstName { get; set; }

     public string LastName { get; set; }

     public string CompanyName { get; set; }

     public string PhoneNumber { get; set; }

     public string Email { get; set; }

}
An entity being stored in table storage also needs to have a Partition key, Row key, and a Timestamp field. These fields are already available in the TableServiceEntity class and do not have to be added to your Customer class.
Creating a Data Context Class
To use the WCF Data Service, you need to create a DataContext class. To create one for the Customer entity, you need to add code as follows:
  public class CustomerServiceDataContext : TableServiceContext

  {

    public CustomerServiceDataContext(CloudStorageAccount account)

        : base(account.TableEndpoint.AbsoluteUri, account.Credentials)

    {

        var tableStorage = new CloudTableClient(account.TableEndpoint.AbsoluteUri,

                                               account.Credentials);

        tableStorage.CreateTableIfNotExist("Customer");

   }

  }
This code not only initializes the DataContext class, it also creates a table called Customer in Azure storage if it does not exist.
![]() Caution Although this example shows the creation of the table if it doesn’t exist during the creation of the class, this is generally not considered best practice, as you make a call to the service frequently. It is better to create it in your deployment script and just assume that the table exists in your code. The same logic applies when you are using the
Caution Although this example shows the creation of the table if it doesn’t exist during the creation of the class, this is generally not considered best practice, as you make a call to the service frequently. It is better to create it in your deployment script and just assume that the table exists in your code. The same logic applies when you are using the CreateIfNotExist call for queues and blobs, which is used in the following sections.
Querying Data from Table Storage
To run a LINQ query to get data from the Customer table in table storage, you can use the following code:
    public List<Customer> Load()

   {

      var context = new CustomerServiceDataContext(

CloudStorageAccount.FromConfigurationSetting("StorageAccount"));
      var customers = from customer in context.CreateQuery<Customer>("Customer")

                                  select customer;


      return customers.ToList();


   }
![]() Note You need to set up a configuration setting called
Note You need to set up a configuration setting called StorageAccount for this to work. Select your web role from the cloud project in the Solution Explorer and press Alt+Enter to bring up the properties. Then go to the Settings tab and press the Add Setting button. In the settings list, add a property called StorageAccount, set the Type to Connection String, and press the ellipses button to bring up the Storage Account Connection String dialog box. If you are working with the storage emulator, you can just press the OK button. Alternatively, you can click the Enter Storage account credentials radio button and enter the account name and account key values from the management portal.
Updating and Inserting Data into Table Storage
Updating and inserting data also can be done using LINQ as seen in this example where the CompanyName for a whole bunch of entities are queried and updated:
     public void UpdateCompanyName(string oldCompanyName, string newCompanyName)

     {

          var context = new CustomerServiceDataContext(

                            CloudStorageAccount.FromConfigurationSetting("StorageAccount"));


          var customers = from customer in context.CreateQuery<Customer>("Customer")

                          where customer.CompanyName == oldCompanyName

                          select customer;


          foreach (var customer in customers)

          {

             customer.CompanyName = newCompanyName;

             context.UpdateObject(customer);

          }

          context.SaveChangesWithRetries();


          return customers.ToList();

      }
Accessing Blobs from Azure Storage
The Microsoft.WindowsAzure.StorageClient namespace contains a class called CloudBlob that contains all the methods you need to work with blobs in Azure Storage. You can get access to a CloudBlob object that represents the photo.jpg stored in a container called images by using the following code:
       var account = CloudStorageAccount.FromConfigurationSetting("StorageAccount");


       var client = account.CreateCloudBlobClient();

       var cloudContainer = client.GetContainerReference("images");

       cloudContainer.CreateIfNotExist();

       var cloudBlob = cloudContainer.GetBlobReference("photo.jpg");
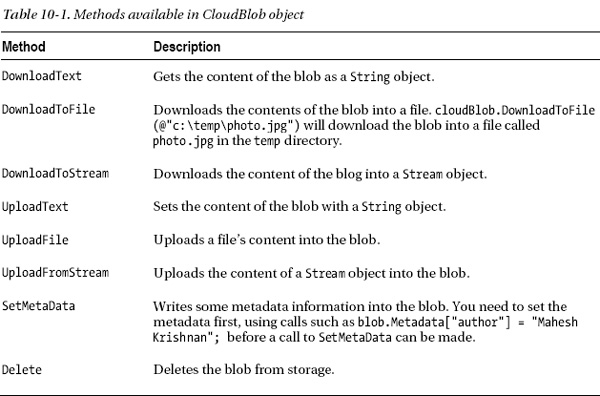
Once you’ve create a CloudBlob object, you can do a number of things using the methods in the class, a cross section of which is shown in Table 10-1.
Working with Queues
Queues provide an asynchronous way for roles running in Windows Azure to communicate with each other. Each account can have any number of uniquely named queues and each queue can have any number of messages. Queues provide a reliable way of message delivery.
Messages get enqueued to the queue from one role, and another role dequeues the message from the same queue. Once the message is dequeued, the message becomes invisible for a specified amount of time. The role that dequeues the message needs to delete the message from the queue within this specified amount of time. If, for some reason, the role crashed before the message was processed, the item becomes visible again.
![]() Note Although I said that each queue has to be uniquely named, each one needs to have a unique name only within the same account.
Note Although I said that each queue has to be uniquely named, each one needs to have a unique name only within the same account.
To start working with queues, you first need to get a CloudQueue object. You can do that by using the following code:
      public CloudQueue GetQueue()

      {

         var account = CloudStorageAccount.FromConfigurationSetting("StorageAccount");


         var client = account.CreateCloudQueueClient();


         var queue = client.GetQueueReference("my-queue");


         queue.CreateIfNotExist();

         return queue;

     }
Putting a Message into the Queue
Once you’ve obtained a CloudQueue object, you can add a message to it by using the AddMessage method. The message takes a CloudQueueMessage object as parameter, and the following code shows how to use the method:
   public void PostToQueue(string message)

   {

      var queue = GetQueue();

      queue.AddMessage(new CloudQueueMessage(message));

   }
Reading the Message from the Queue
To read the message from the queue, you need to call the GetMessage method on the CloudQueue object. If no messages are present in the queue, the method returns a null value. Once you’ve processed the message, you need to call the DeleteMessage function to permanently remove the message from the queue as shown in the following code:
   public string ReadFromQueue()

   {

      var queue = GetQueue();

      var message = queue.GetMessage();
      if (message != null)

      {

         var returnValue = message.AsString;

         //remove the message from the queue once read

         queue.DeleteMessage(message);

          return returnValue;

      }

      else

      {

          return null; //return null if no messages found

      }

  }
Accessing Azure Storage from within Visual Studio
You can access Azure storage table, blob, and queue data directly from Visual Studio via the Server Explorer panel. From the menu, select View Server Explorer to open the Server Explorer from within Visual Studio. The Server Explorer will look like the image shown in Figure 10-28.
You can add the various accounts that you want to work on directly from the Server Explorer.
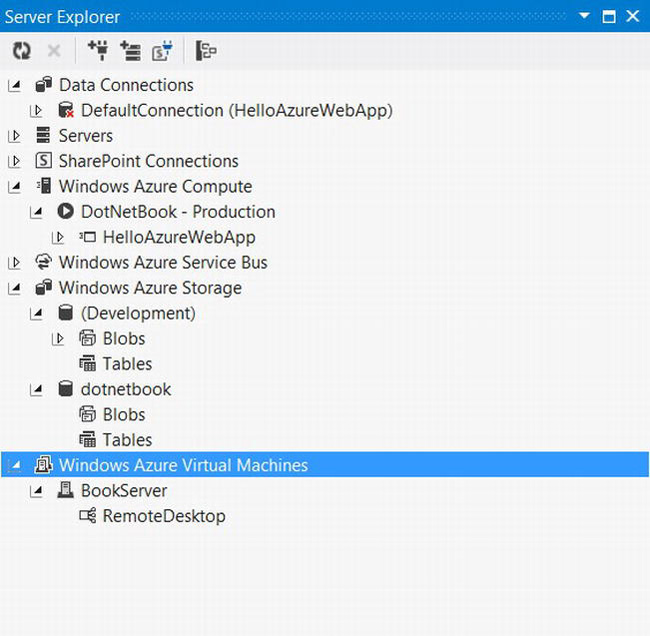
Figure 10-28. Server Explorer showing Windows Azure options
Working with the data from the Server Explorer is really easy. For instance, to look up the table data for Customer, all you need to do is double-click the table name and data will open up in a new window.
The Server Explorer also allows you to look at other Azure components such as virtual machines, service buses, and cloud services directly from within Visual Studio.
SQL Database
SQL Database, as mentioned earlier in this chapter, is the equivalent of SQL Server running in the cloud. To work with SQL Database in the cloud, all you have to change is the Connection string that you use to connect to the database. SQL Database has two components to it—the actual SQL Database instance and the server that this database lives on.
Quick Creating a New Database
To create a new SQL Database, you first need to log in to the management portal at http://manage.windowsazure.com. Once you’ve logged in, click the NEW button at the bottom left of the screen. This brings up the NEW panel.
Choose SQL Database and select QUICK CREATE from the options. You will be prompted to enter a few fields, as shown in Figure 10-29. Fill in the fields in the form and press the CREATE button. This creates a new SQL Database.
If you have a previously created server, the SERVER field shows the names of the servers for you to choose from.
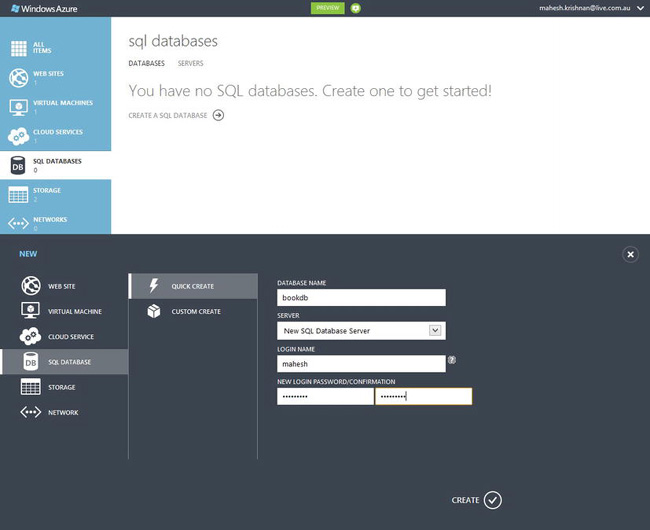
Figure 10-29. Creating a new SQL database in Azure
Custom Creating a SQL Database
Alternatively, if you choose the CUSTOM CREATE option, you will be shown a NEW SQL DATABASE CUSTOM CREATE window (as shown in Figure 10-30), which gives you more options while creating the database. As in the previous example, you can type in a name for the database, choose the database edition (Business or Web), the maximum size of the database, the type of collation to use, and the server to create the database in.
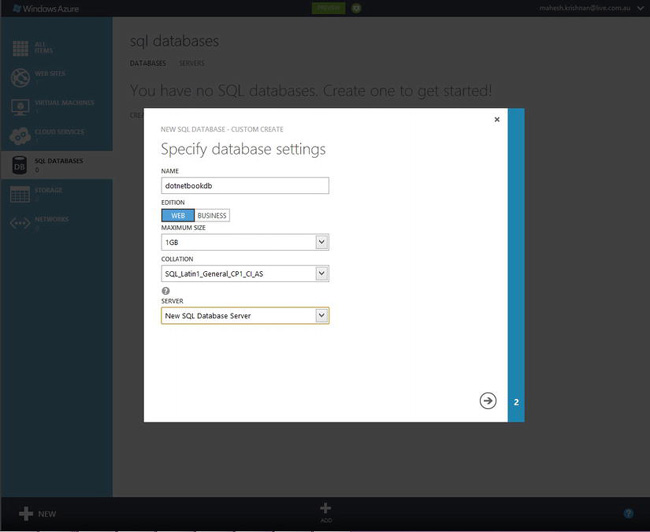
Figure 10-30. First step in custom creating a database
Click the right arrow icon (Next) to go to the next screen and fill in the remaining fields (as shown in Figure 10-31). Ensure that the Allow Windows Azure services to access the server check box is ticked. Applications running on Azure will not be able to connect to the database if this box is not ticked.
Click the check mark button to finish creating the database. Once the database is created, it will show up on the database list on the screen. You can click on the name of the database to take you to a detailed screen for the database.
Click the Show Connection strings link on the quick glance section in the dashboard—this brings up a pop-up dialog box showing the connection strings you can use to connect to the database.

Figure 10-31. Second step in custom creating a database
Connecting to the SQL Database Management Portal
The SQL Database Management Portal allows you to manage the SQL Database and do things such as create tables, run queries, profile the database, and look at query plans. To connect to the portal, follow these steps:
- Click the name of the database in the SQL Databases tab in the Windows Azure Management Portal. This takes you to the database’s dashboard.
- Click Manage in the application bar at the bottom of the screen. This should take you to the SQL Database Management Portal, but as your machine’s IP may not be configured to access the database, you will be prompted with a message asking whether you would want to add your machine’s IP address to allow access.
- Once you are in the management portal, you will be prompted to enter username and password.
![]() Tip You don’t need to use the SQL Database Management Portal to create tables and manage the database—you can do that straight out of SQL Server Management Studio, which is a lot easier to use.
Tip You don’t need to use the SQL Database Management Portal to create tables and manage the database—you can do that straight out of SQL Server Management Studio, which is a lot easier to use.
Conclusion
This chapter has given you an introduction to Windows Azure and taught you the basics of its various components—primarily Web Sites, Cloud Services, and Virtual Machines. In addition, we also looked at data storage options in Azure. The Windows Azure platform is not limited to just the components covered in this chapter. It has heaps of other offerings such as Caching, Service Bus, Content Delivery Network, Access Control Service, and many, many more. However, we hope this introduction to Azure has given you enough for you to start exploring some of these other offerings.