
Each project has design elements that are repeated or reused: a hotel has guest rooms, medical facilities have exam rooms, and so on. It isn't practical to model each and every one of these as unique elements. Not only is it inefficient to do so, but it increases the likelihood for errors and omissions. Groups provide yet another way to manage repetition within your building models.
This chapter will cover the following:
Group organization
Creating and editing a group
Placing a group
Special changes to a group
Saving, loading, and reloading groups
Practical considerations
Groups provide you with a way to combine component and system families into a coherent repeatable named entity. Easily identifiable examples are a hotel room, apartment unit, or hospital patient room. Groups are also useful to help create consistent annotation and documentation.
Note
A Revit component family provides a reliable and efficient way to manage repetition as long as the elements you need to manage are not system families (hosts), such as walls, floors, or ceilings. System families are excluded from the scope of component families (as discussed in Chapter 6, "Introduction to Families"). A component (loadable) family will provide better results when considering pure file performance. Groups excel when using a component family isn't possible.
There is a bit of a paradox, however, because Revit treats model elements differently than annotation elements. Model elements appear in nearly all views automatically. Annotation elements do not, on the other hand, appear in all views by design. Annotations appear only in the views they are deliberately placed within. Each view has a purpose, and the annotation that is included helps serve this purpose. This segregation and behavior means that a group cannot include both model and annotation elements. For this reason, there are three kinds of groups: Model, Detail, and Attached Detail.
- Model groups
These are reserved for model elements only, such as walls, doors, windows, floors, model lines, rooms, and other 3D elements that are visible in all views.
- Detail groups
These contain only the annotation elements that are view-specific such as tags, symbols, dimensions, text, filled regions, detail components, and detail lines.
- Attached Detail groups
These are Detail groups that have an inherent relationship with a Model group. These are created when you use the Create Group tool with both model and annotation elements selected.
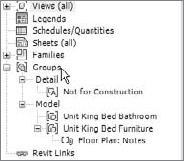
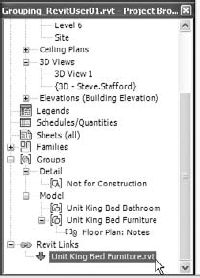
Groups have their own branch at the bottom of the listed nodes within the Project Browser (see Figure 8.1). Detail groups appear first in the list followed by Model groups. Each Attached Detail group, if any exist, is listed and nested beneath its own related Model group.
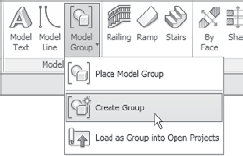
Creating a group is as easy as going to the Home tab, selecting the Model panel, clicking the Model Group button, and selecting the Create Group tool in the drop-down menu (see Figure 8.2). You can start with nothing selected in advance or carefully select everything you want to include in the group first. Regardless of the approach you take, Revit will ask you to name your group. Choosing a descriptive name is helpful later when you are working with other people and they have only the names listed in the Project Browser to help them decide which to use. Please don't use names like Group 1 or Group 2 because they aren't very effective.
When you start without a selection set, Revit will prompt you to choose which kind of group you'd like make (see Figure 8.3). Starting with a selection set will change the ribbon to a contextual tab (Modify | Multi-Select) and will display a new Create Group button (see Figure 8.4). Once you click Create Group in the Create panel, Revit will offer you one of two different dialog boxes depending upon whether your selection set includes model elements, annotation elements, or a combination of both. You also have an option to open the Group Editor as soon as the group is defined. It is most useful when you start without a selection first. You might find it useful when you realize that you've neglected to include something or need to remove something that is part of your selection set.


Figure 8.4. Click the Create Group button. The Create Group dialog box then differs based on what you had previously selected.
If you elect to use the Group Editor immediately, then you'll find that the interface changes a little. A slight color change, reminiscent of the beige tracing paper many of us have used for sketching, is applied to the view. Revit also provides an Edit Group toolbar, which appears within the drawing area just below the Options bar (see Figure 8.5). It has the following tools: Add, Remove, Attach, Finish, and Cancel. The toolbar is a panel that can be returned to the ribbon if you prefer. Just click the small control in the upper-right corner.
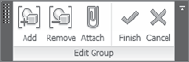
- Add
Click this tool to add new elements that are already present in the model to your group. You can also create new elements while in the Group Editor, and these new elements are added to the group. You don't have to add them with this tool.
- Remove
Click this tool to remove elements from your group. This does not delete them from the project; the removed element is left in place but is no longer part of the group. If you really want to remove the element from the project as well as from the group, then you need to delete the element instead while in the Group Editor.
- Attach
Click this tool to attach a Detail group to your Model group. This feature doesn't apply when editing a Detail group, so you'll find it is disabled. If you select this tool when there are no Detail groups to attach, you'll be prompted to create one and then to add/remove or create new elements to include in the group.
- Finish and Cancel
Click these tools when you are either done editing the group or decide to abandon your work during the Group Editor session.
When you finish creating or editing a group, it remains selected, and an origin icon appears (see Figure 8.6). This is located at the center of the overall extent of the group initially, but you can move it to another location as well as rotate it if necessary. You just click the icon control grips to reposition it. Click the X or Y grip to rotate, and where the X and Y lines meet, click to move the origin location. This serves to define a common point and rotation for this group and any other that might get exchanged for it later. Imagine a king-bed hotel room design that might be swapped out for queen-bed configuration. If these two rooms did not share the same origin location, you wouldn't be able to swap one for the other without having them move out of position.

There are three ways to place a group:
On the Home tab's Model panel, click the Model Group drop-down. Choose from Place Model Group, Create Group, and Load As Group Into Open Projects (see Figure 8.7).
You can right-click a group in the Project Browser and select Create Instance (refer to Figure 8.8).
You can just drag and drop the group from the Project Browser.
Regardless of the method you choose, you place a group the same way you place a component family—by clicking the appropriate location in the drawing area. The group's origin is at your mouse pointer's tip to help you place it accurately. If you see a group in the view and want to place another just like it, you can also take advantage of the Create Similar tool via the context (right-click) menu or via the Create Similar button on the Modify tab that appears when you select the existing group.


The third option listed under the Model Group tool—Load As Group Into Open Projects—is a bit obscure. This tool is intended to provide a way to create repetitive design elements outside the project in a separate project file, each in its own "sandbox" so to speak. Let's say you created a design for a typical hotel room in a separate project file. You use this option to place this new design in the hotel building project file, but instead of individual elements, it is created as a group that can be placed repeatedly. It can be edited externally and reloaded, and it can be edited locally, choosing to abandon the external original. It can also be altered internally and then saved to a separate file.
Earlier we described the simple add and remove functions for editing a group. Two additional features, called Exclude and Move To Project, provide a different kind of control over the elements of a group.
The Exclude feature allows you to create a complete assembly that represents the worst/best-case scenario of a design. Take a classroom, for example. You can create a desk and chair arrangement that satisfies all but a few room conditions. For the few rooms where a desk or chair won't work, you can use the Exclude Elements feature to remove them from a specific group instance or groups. These excluded elements won't appear in the model or be included in schedules.

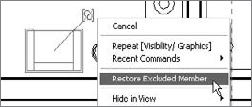
Once an element is excluded, it is easy to restore it. Just hover over the location where an element used to be, and you'll see that it highlights as if it were still there (it is still there technically). You need to use the Tab key to select it and then click the Icon that appears. Alternatively, you can use the same context (right-click) menu technique to access Restore Excluded Member. The icon and the context menu are both visible in Figure 8.10.
As you work with groups and the project's design evolves, it wouldn't be surprising to us if you decide that something doesn't belong in a particular group instance. Move To Project is available only from the context (right-click) menu (Figure 8.11). To move elements out of a group instance and into the project, hover over the element and use the Tab key to highlight it. Right-click and select Move To Project. The selected element(s) are still part of the group instance but are excluded. Revit adds a new entity in the same place that is not part of the group; it has been moved to the project. This allows you to deal with some variation by changing this new element. If you choose to abandon the change later, the group still has the original member, and you can use the Restore Excluded Member tool. Other copies of the group are unaffected by the action.

As you work on your project and remove elements from groups, there are two more questions to consider. Do you want to remove the element from just the group, or do you want to remove the element from the group and the project too?
- Removing an element from the group
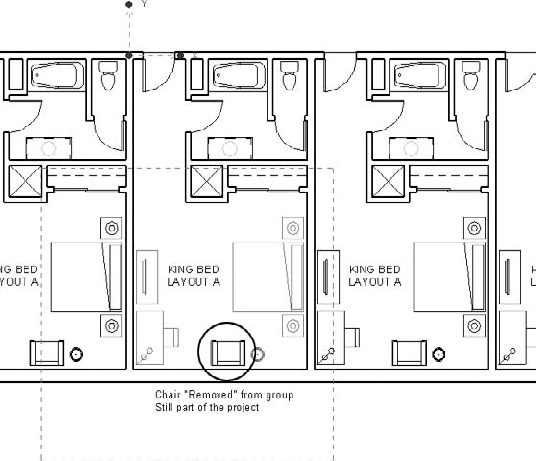
This isn't a named tool; it's a desired result. In this case, you don't want the element in the group, but you do want to keep it in the project and even in its current location. To accomplish this, you need to edit the group, use Remove, and then finish the group. The element will remain in place, but it is no longer part of the group's definition (refer to Figure 8.12).
- Removing an element from the group and the project
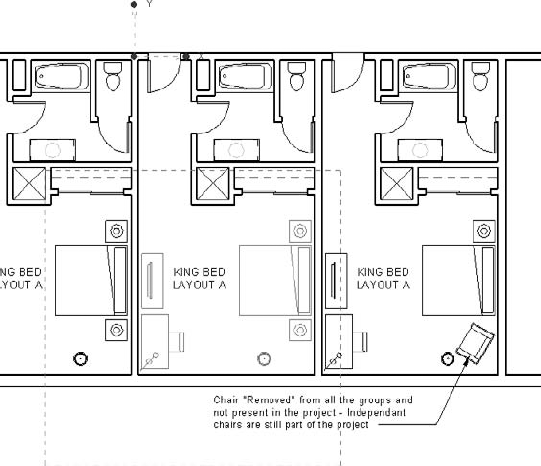
This means you don't want the element at all, not in the group and not in its current location as part of the project, outside of the group. This has nothing to do with removing it from other locations in the project that are not using groups, only in the context of a group and the elements it contains. To take this approach, you need to edit the group, select the element(s), and use Delete instead. This will remove the element from the group as well as in any other copies of the group. The element is also no longer present in the model either (refer to Figure 8.13).
Groups are defined inside a project file, and most are created within the context of your active project. As mentioned earlier, it is possible to create a group in a separate project file and then load it into a project to use as needed. You can choose to save a group to an external file so that it can be altered by someone else or shared with another project. If you work on a group outside the project in its own file (it also uses the RVT file format), you can load and, if necessary, reload it into your project. These three concepts are called saving, loading as a group, and reloading.
- Saving
The Save feature will save a group as a Revit project file (
.rvt). This will allow you to share it with other projects and to edit the group in its own file. The file will not be a group or require you to edit a group as you would in the project it came from. The primary method to save a group is found on the application menu; select Save As
Revit will choose to use the group's name as the name for the new RVT file. In fact, the value you'll see for File Name in the Save Group dialog box is Same As Group Name. You can browse through the groups listed in the Group To Save drop-down. If you have attached details associated with your group, the check box for Include Attached Detail Groups As Views will generate a view that can show them when the new project file is created. This is subtle but necessary since attached details are visible only in the views you intentionally add them to.
You will briefly see the group open in a view but close quickly as Revit creates the new file from the group, opens it, and then finishes the process with a save and close. If you want to work on the group or let someone else know it is ready, you just need to open the file like any other project file.
- Loading
The Load feature starts with the Load From Library panel on the Insert tab on the ribbon. Click the Load As Group button to open the Load File As Group dialog box. You need to browse to the folder in which your project file (group) is located. Three options—Include Attached Details, Include Levels, and Include Grids—are displayed as check boxes to use if necessary. Assuming this external file is meant to be subservient to the project file you are loading it into, the Include Levels and Include Grids options are probably not necessary. It makes sense to include attached details if there are any.
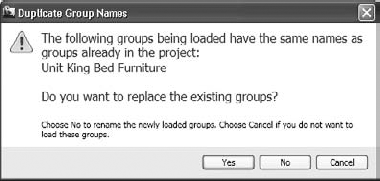
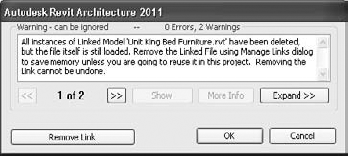
If you use this feature to load a file that is already in your project file, you'll get a warning message (see Figure 8.15). Revit is just trying to protect your existing work. You may also see a message about duplicate types. This means that you have content in the external file that is using the same family name and type names. Revit will just reuse those that are already in the current project in order to protect them from any differences that may exist in the external file.
- Reloading
Maybe it is obvious, but you can reload a file using the previous feature if you just select a file that you previously saved as a group. There is also a deliberate method available when you use the context menu on the group name in the Project Browser. Keep in mind that reloading a group will generate similar warning messages, as mentioned in the previous section.
- Linking

When you select a group, you'll find that the Link button will appear on the contextual tab Modify | Model Groups on the ribbon. It is on the Group panel. When you click Link, Revit will display the Convert To Link dialog box, as shown in Figure 8.16. You have two choices: Replace With a New Project File and Replace With an Existing Project File. The first choice is similar to Save As Group because you have to create a file to use as your link. If you already saved a group as a file, then you can use the second choice. You do have a third choice; you can choose to cancel.
After Revit completes the command, you'll find that the group you selected to create the link has been replaced with a linked file instead. The Project Browser will show a linked file, as shown in Figure 8.17. It is important to understand that only the selected group(s) will be replaced with the linked file. You'll have to remove and replace the other groups or use the Link tool on them as well; then you repeat the command but use the second choice to replace with an existing project file (the one you already used/created).
- Bind


In past years and versions, seasoned users habitually avoided the group feature because it was often either unreliable or too quirky. This was unfortunate. In recent releases, the Revit product team has devoted quite a bit of research and effort to rectify this situation. Groups are still a bit quirky, and this section delves into some slightly arcane things you should know.

Note
Keep in mind that the Purge Unused tool can help remove unused groups quickly. Just make sure you click the Uncheck All button before you cavalierly use Purge Unused. If something isn't used now, it doesn't mean that you won't want to use it later. Too often users purge things they don't realize they'll need sooner rather than later.
As with anything, the more complicated you choose to make something, the more difficult it becomes for all concerned, including Revit. A group that includes everything on an entire floor of your building is much more likely to become a problem for you and the project team than more discreet groups used to compile the same entire floor's design. Seek to build smaller reusable groups that focus on the aspect of the design that really differentiates one solution from another. For example, a multifamily apartment project might have a pretty consistent unit design, while the kitchen and bathroom configurations are where variety becomes apparent. The units might be best described using groups that don't include the bathroom and kitchen elements. Use additional groups for the bathroom and kitchen concepts. This means a bit more planning, but the groups will be much more likely to work well for you.
You might consider rereading the previous section about complexity; nevertheless, the fact remains that you can nest one group inside another. This approach to using groups provides yet another way to manage repetition despite the obvious complexity it implies. A hotel room unit plan can include a nested group for the bathroom configuration. One designer can adjust the bathroom group design while another is focused on some other aspect of the room or project. The nested group is still altered by editing the original either within the host or where it is placed elsewhere on its own.
Mirroring groups isn't recommended. Model groups are fairly tolerant when you mirror them. Attached Detail groups, however, aren't very stable when applied to a mirrored group. In particular, dimensions may not reference the same part of an element or generate error messages. Mirroring some model elements in the group may not be appropriate; for example, furniture, equipment, or plumbing fixtures may have specific right or left versions. It is more predictable to create a mirrored version to ensure that groups are as effective as possible.
When you create a group that has elements assigned to more than one workset, Revit will reassign them to the active workset. For this reason, it is a good habit to establish a group workset or worksets to help manage them apart from other workset items. If you choose to use Ungroup later, the elements will remain assigned to the workset to which the group was assigned.
Groups don't tolerate different floor-to-floor elevation changes well. It isn't a good idea to constrain walls to a Top Level setting other than Unconnected. If you choose to do so, Revit won't object until a level elevation changes, and you'll be presented with a fairly scary dialog box, shown in Figure 8.21. Your choices at this point are Fix Groups and Cancel. Choosing Fix Groups will present you with another dialog box (Figure 8.22). You can choose to ungroup the inconsistent groups, create new group types, or cancel.

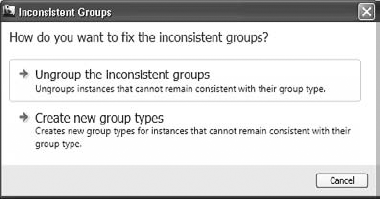
The Ungroup choice defeats the purpose of using the group in the first place. The second choice, creating a new group based on the variance Revit is concerned with, at least provides a solution that lets you continue to use groups. The last choice, canceling, means you've let Revit scare you away for now.
File size is a bit of a distraction. People tend to get overly concerned about Revit files when compared with other CAD files because by comparison they seem much bigger. In a simple experiment, we created two separate files that had just four walls in each, and we eliminated everything else Revit would let us remove by using the Purge Unused tool. The first file with four walls came in at 696 KB. We created a total of 10 sets of four walls for a total of 40 walls, and this file came in at 744 KB, an increase of 48 KB.
For groups we used another set of four walls that we used to create a group. This file came in at 720 KB. This resulted in a difference of 24 KB to create and have one instance of a group. We created nine more instances of the group to replicate the same 40 walls we used in the file without groups. The resulting file with 10 instances of one group to reach the same total of 40 walls came in at 748 KB, just 4 KB larger than the file with the same number of walls but no groups.
Even placing 90 more copies of the group for a total of 400 walls increased the file size only by 356 KB (file size 1104 KB). This translates to a little less than 1 KB for each wall. Our conclusion is that file size isn't as serious a concern with groups as is the way that Revit ponders the existence of a group when elements are changed.
Revit must evaluate all the instances of a group whenever an element that touches a single instance of the group is altered. Changing a single wall that touches a member of a group will likely take longer to process than for relationships that don't involve a group. This isn't an argument to cast groups aside. It is something to consider as you choose to take advantage of groups.