
Mudbox 2011 painting tools, paired with an image-editing application such as Photoshop, give you limitless possibilities to paint your digital sculptures. Some of the basics of 3D painting and texturing were covered in Chapter 4, "Painting and Texturing an Imported Model."
This chapter includes the following topics:
Painting your sculpture
Generating UVs on subdivision levels and painting directly on UVs
Painting on layers and using blend modes
Using color, stamps, and stencils
Workflow to Adobe Photoshop and back
Loading textures into Maya
At a recent exhibit at the Getty Villa in Malibu, California called The Color of Life: Polychromy in Sculpture from Antiquity to the Present, featuring polychrome (multicolored) statues and the uses of color in figural sculpture, it was interesting to see examples of historical sculpture that we are used to seeing in their innate rock or stone finish, represented in the original vivid colors in which they were painted.
One particular statue caught my attention because at first sight I thought it was a live person lying on the ground. It was a human-sized statue of a naked male figure called the Dying Gaul by John De Andrea. This contemporary work is based on an older Roman statue, which in turn was based on a lost Hellenistic statue to commemorate Attalus of Pergamon's victory over the Celtic Galatians. The form of the sculpture, which was made of casts of molds of human body parts, was perfect, but what made the statue stand out for me was how realistic it looked in the way it was painstakingly painted with acrylic to complement the form.
Painting a three-dimensional object has many similarities to two-dimensional painting and some significant differences, too. The overall color theory, balance, and application might be the same as two-dimensional painting, but you do not have to concern yourself with painting light and shadows because that is taken care of by lighting and rendering your model. What you need to be mostly concerned with is representing the material properties, and the appropriate hue, saturation, and value of the applied paint and textures. Your 3D paint and texture should complement the form and shadows of your sculpture, add the intended realistic or stylistic look, and bring out its beauty. Painted 3D sculpture is all around us in the form of cars, toys, scale models, movie props, and many other objects. Look around to find out what works and what doesn't in painted sculpture.
As you have already seen in Chapter 4, in Mudbox models need to have UVs before they can be painted. This applies to any subdivision level you intend to paint, and Mudbox, by default, does not generate UVs for every subdivision level you create. Mudbox can, however, generate UVs based on the UVs you have on the root subdivision level at any point in time, or generate them as you are creating the subdivision level.
Ideally, you should paint your models at the highest subdivision level, because unlike sculpting, there are no visual benefits to painting your model at lower subdivision levels, and there is a huge benefit to painting your model in its most detailed subdivision level. However, if you notice that painting your model at the highest subdivision level is sluggish and slow because of the complexity of your model or if you need to reduce graphics processing unit (GPU) memory usage, then you would need to paint it at a lower subdivision level. In that case, you need to make sure that UVs exist at the particular subdivision level you are intending to paint.
Even if your base mesh or model starts out with UVs, by default, Mudbox does not create the UVs for every subdivision level because they increase the overall RAM and GPU memory requirements and might limit your ability to work on your model because of memory constraints. To find out if the subdivision level you are in has UVs, select the model and click the UV View. If no UVs appear, there are no UVs for that particular subdivision level, even if they exist at the base level or other subdivision levels of the model. If that's the case, you need to create UVs for the current subdivision level in one of three ways:
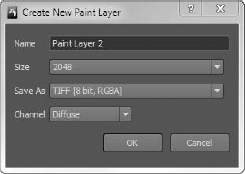
If the model has UVs on the base or lower levels and you paint on a subdivision level that has no UVs, upon your first stroke Mudbox will automatically create subdivided UVs of the mesh and come up with the Create New Paint Layer dialog box (Figure 8.1).
Select the mesh at that specific subdivision level by selecting your model, pressing the Pg Up or Pg Dn keys, and then clicking Mesh → Recreate Level UVs. Note that if you need to step up and down in subdivision level after the initial selection, you can either reselect the mesh and press the Pg Up or Pg Dn keys, or hover your cursor on the mesh and press Pg Up or Pg Dn.
You can also generate UVs at the same time you subdivide the model by selecting the Subdivide UVs option in the Mesh → Add New Subdivision Level dialog box on Windows (Figure 8.2), or the Mesh → Add New Subdivision Level Options on the Mac. Note that turning this option on will automatically subdivide UVs every subsequent time the model is subdivided, so it is best to leave it deselected to save memory and to check it only when you intend to create UVs for that particular subdivision level. Keep this option selected as a default only if you know you need UVs at every subdivision level of your model.

High-resolution textures spread out over multiple UV tiles will quickly use up limited graphics memory if all textures are set to display simultaneously. If you have a model with multiple UV tiles with at least one paint layer, only one texture tile will show in 3D View, the default being the first quadrant tile. You can selectively and manually load the remaining texture tiles to display them. Before you do that, the tiles are assigned a random color to indicate their unloaded state in 3D View. This enables you to see the location of each of the tiles, and know which texture tiles are currently loaded or unloaded on the model.
To toggle the display of a texture tile and all its paint channels on a model, place the cursor over the texture tile region and click the up arrow key. To show all texture tiles on a model, press Ctrl+up arrow key, and to hide them, press Ctrl+down arrow key.
When you subdivide your model, UVs are not smoothed by default; however, when you do need the UVs smoothed, you can select the Smooth UVs check box in the Mesh → Add New Subdivision Level dialog box (Figure 8.2). You would want UVs smoothed if your model is eventually to be rendered as a subdivision surface in a target application that supports UV smoothing, similar to Mudbox.
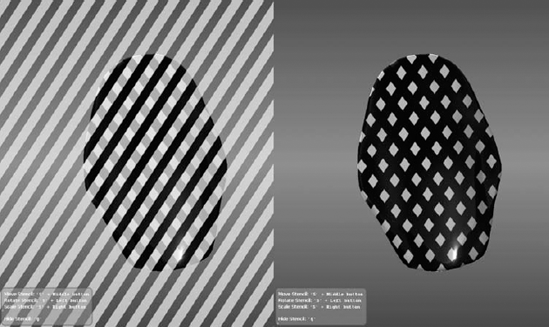
As of Mudbox 2011, you can use Mesh → Flatten to UV Space, or press Alt+T to have the flattened UVs appear in 3D view, so if needed, you can paint on them in a flattened view. This creates a copy of the model with vertex positions that are identical to the UVs on the model, and the original model is made temporarily invisible to let you paint on the 2D UVs. After you are finished painting on the flattened UV view, click Mesh → Unflatten from UV Space, or press Alt+T to display the model in 3D.
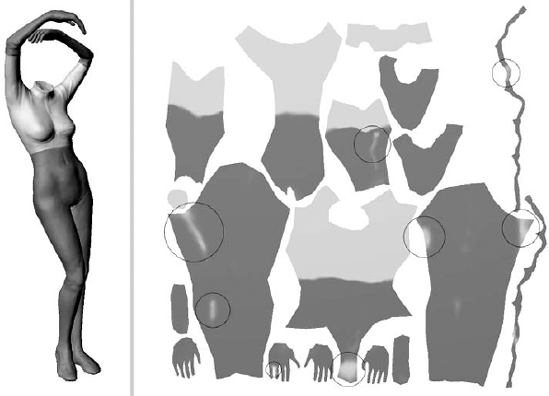
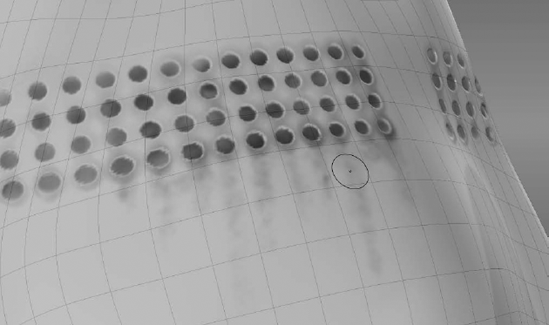
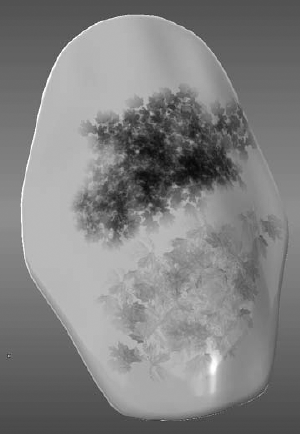
Painting on flat UVs was something you had to do external to Mudbox in an image-editing program, but now you can do it right in Mudbox and use all the sculpting and painting tools on a flattened version of the UVs. This is extremely useful for making minor topology adjustments to resolve stretching issues by using the Grab tool. One of the most useful implementations for this capability is to paint areas that are not visible or are in an occluded area on the 3D sculpture. An example of this is Figure 8.3, in which the model's pants and gloves were painted with the Paint Brush tool in the 3D view. Even though the parts we want painted look like they are covered completely by paint, when we go into flattened UV view, we see that all the areas I have circled do not have paint on them. This would be an issue if the model were to be animated and those parts appeared unpainted in a different pose of the model. You will go through an example of this in the following steps, in which you will color the bottom half of the body and the gloves in one color, and the rest in a different color.
The following steps go through the process of painting a model in flattened UV space:
Start Mudbox, and from the Chapter 8 folder of the DVD load the
body.mudfile. If it is not at subdivision level 5, move your cursor on the mesh and press Pg Up until it is.From the Paint Tools tray, choose the Paint Brush and click on the model. Click OK to create a new paint layer, and then click OK to accept the defaults for the Create New Paint Layer dialog box.
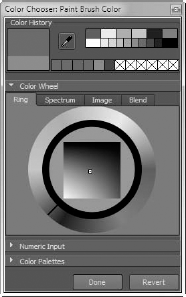
In the properties of the Paint Brush tool, click Color and choose a bluish-gray color, or any other color of your choice (Figure 8.4). Make sure the strength of the tool is at 100, and adjust the size on the model to get a large and comfortable setting to paint the model with the least number of strokes.
Paint the pants in the blue color by spinning the model around, making sure you apply paint to all the parts of the pants that are visible. Adjust the brush to a smaller size to paint the edges. Do the same with the gloves. When you are finished, your result should look like the image on the left of Figure 8.3. Use the Paint Erase tool to remove paint from areas that you crossed over but did not wish to paint on.
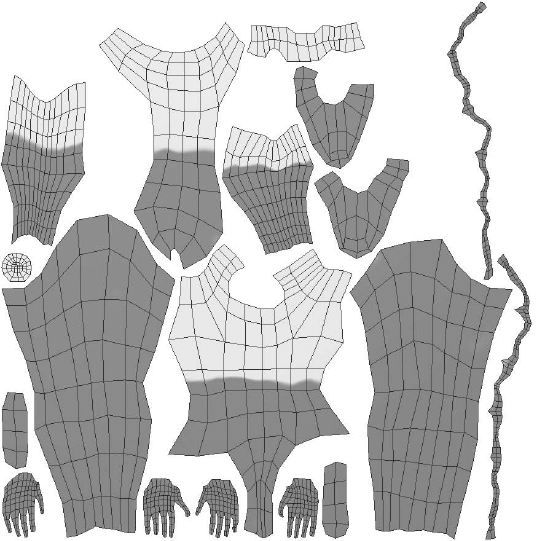
Either click Mesh → Flatten to UV Space, or press Alt+T to view your model in flattened UV mode. Notice the unpainted areas within the boundary of what you painted, as you can see in the left side of Figure 8.3.
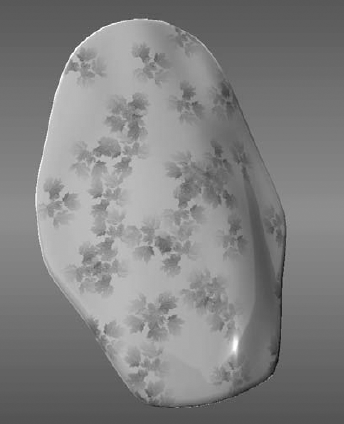
Press the W key to show the wireframe on the flattened UVs, and using the Paint Brush tool, fill in those areas to ensure that you have complete coverage of paint for the areas you need to have painted (Figure 8.5).
What you want to do next is color the remaining parts of the model orange. Still in flattened UV mode, choose orange as your color and paint on the unpainted parts of your model. After you are finished, click Mesh → Unflatten from UV Space, or click Alt+T again to view your model in 3D view. Notice that you might need to do some painting on the seams of the UVs on the 3D model and make some minor corrections between the edges where the two colors meet. However, for the most part, flattening to UV space is a nice quick way to paint your model and make sure the color covers all the areas within the boundaries of the areas you are painting.
You can also manipulate the vertices on the flattened 2D view of the model's UVs by using sculpting tools such as the Grab tool to adjust the UV positions and have your adjustments affect your model.
Being able to paint your model by using layers is one of the most useful capabilities in Mudbox. It gives you the capability to combine and composite your layers to get your intended final image. You can use paint layers for separating disparate features of your texture, as we did with Bertie in Chapter 4, where we separated the base coat, the weathering, and the decals on separate layers. You can also use them for separating channels such as Diffuse, Specular, Gloss, Bump Map, Normal Map, or Reflection Mask.
Each layer acts like a painted acetate transparency, and the layers stack up to form the final image. You can adjust the order of the layers, which determines what part of each map carries through to the next. You can also specify the opacity of each layer, and a blend mode that works similar to blend modes in Photoshop.
As already mentioned, paint layers need to belong to one of seven paint channels that get composited into the final look of the texture on the model. When you create a new paint layer, you are asked to specify which channel type it is. The default is Diffuse, and the rest are Specular, Gloss, Incandescence, Bump Map, Normal Map, and Reflection Mask. Note that the Channel menu will list which channels are available, depending on the material type currently assigned to your model. You can choose from the following types of channels:
Diffuse: The flat color of the layer.
Specular: The areas on the layer that indicate the color and intensity of specular highlights.
Gloss: The areas of the layer that indicate the size of the gloss reflection highlights on the specular map.
Incandescence: The areas on the layer that simulate the emission of color from a material independent of lighting in the scene.
Bump Map: Bump values on the model.
Normal Map: RGB values that indicate the normals on the model.
Reflection Mask: A layer for painting a mask to allow or restrict the application of the reflection map.
Note that the Mudbox Material used in the 2009 and 2010 versions of Mudbox had some additional channels such as Specular 2 and Gloss 2, and did not have others such as Incandescence and Normal Map. It also had some naming differences such as Bump Value instead of Bump Map. The channels in the older Mudbox Material are still supported with later versions of Mudbox to maintain compatibility; however, they are not available to you when you are creating materials.
Paint layers are grouped in their respective channels, and each channel can have several layers. Even though that's the case, chances are you will have multiple paint layers in only the Diffuse channel because most of what you need in the other channels will likely be satisfied with a single layer. One reason that you would need different layers for the other channels is to have different variations of the channel that you can turn on and off—for example, if you were to test two specularity maps that add shine to different areas on the model.
The order of visibility of layers in a channel is top to bottom. The topmost layer is the outermost layer, and the rest stack inward like layers in an onion. If you have a fully opaque layer and it is the topmost layer, you will not be able to see the inner layers. The only way to see the inner layers is either to have an alpha channel in the image that controls its areas of transparency, or to change the opacity of a layer by adjusting the opacity slider.
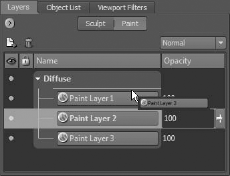
Paint layers can be rearranged, merged, duplicated, or deleted as needed. To rearrange a layer, simply click on the layer you intend to move, and drag and drop it in its new slot in the Layers window (Figure 8.6).
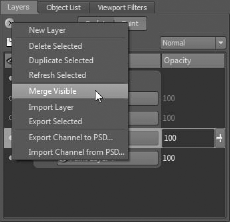
To merge layers, first turn off the visibility to all the paint layers that you do not wish to merge by clicking the circle in front of the name of the paint layer so it is an empty circle. Then click Merge Visible from the Layers window drop-down menu to merge all the paint layers that are visible and have a filled circle in front of the paint layer name (Figure 8.7).
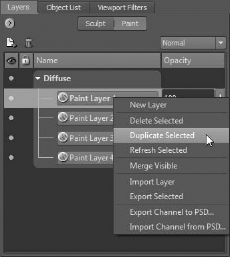
To delete or duplicate a paint layer, first select it by clicking on it, and then right-click and select Delete Selected or Duplicate Selected, respectively, to perform the desired operation (Figure 8.8).
Individual paint layers can be exported in a variety of file formats for processing in external applications, such as 3D applications, game engines, and image-processing software. This can be done by clicking to select the paint layer you want to export and then right-clicking and choosing Export Selected.
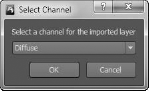
You can also individually import an image to be a new paint layer from a variety of file formats. To do this, select the paint layer on top of which you want to create a new paint layer, right-click, and choose Import Layer from the drop-down menu. After you navigate to and select the file you intend to import as a paint layer, you will be asked to choose which channel it goes into by the Select Channel dialog box (Figure 8.9).
You can also import or export multiple paint layers grouped as a channel in and out of Photoshop as a .psd file. The layers, their order, and blend mode will be preserved as you do the import and export operation.
Follow these steps to walk through an example of working with multiple paint layers within Mudbox and Adobe Photoshop.
Start Mudbox, and from the Chapter 8 folder of the DVD load the
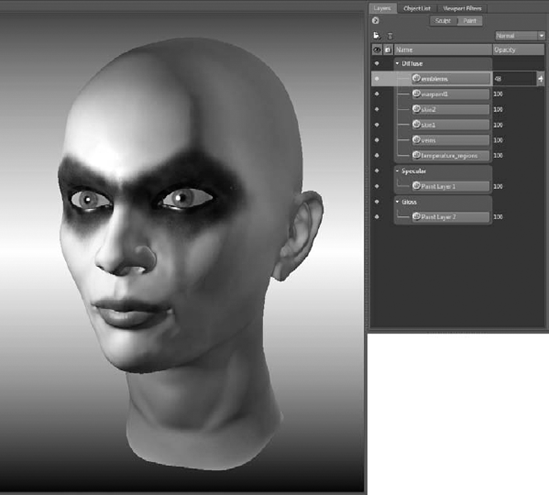
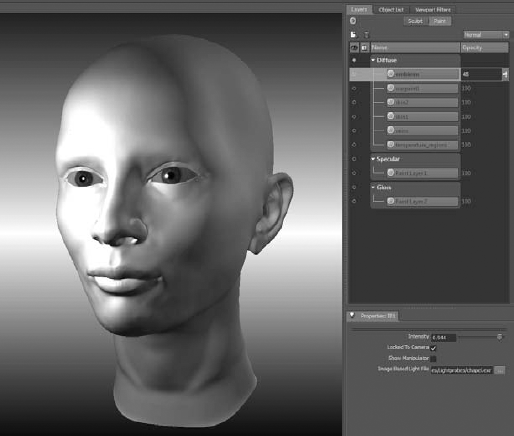
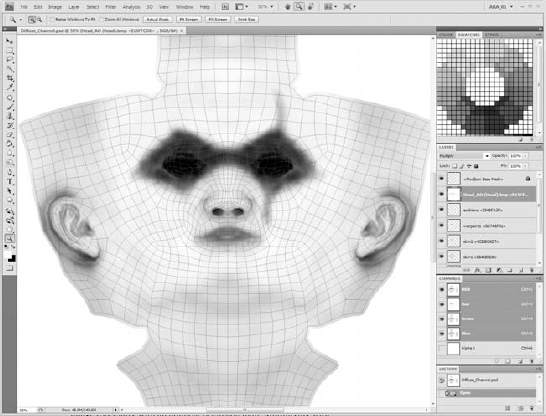
head.mudfile. Select the Layers menu and click Paint to view the paint layers. If you see none, click once on the head in the 3D viewport, which will then bring up six Diffuse layers, a single Specular, and a single Gloss layer (Figure 8.10).Click layer visibility circles to the left of the paint layer names to hide all the paint layers. Note that you can show or hide an entire channel by clicking its layer visibility circle. As you hide each layer, you can see the layers beneath. Figure out how each layer affects the others and the overall view by showing and hiding the layers. You can also adjust the opacity of each layer to see its effect. Note that setting the opacity of a layer to 0 is the same as hiding it. Spend as much time as needed to see the effects of the layers and their interaction with each other and the material of the head. Click on the eyes and notice that each eye has its own diffuse and specular layer.
Turn all the paint layers back on, and change their opacity to 100, or reload the file from the DVD. Click on the head and press Pg Dn five times to get to subdivision level 0. Press the W key to show the wireframe on the head. Click the UV View tab to take your image into UV view. Click on each of the paint layers to view it in UV view (Figure 8.11). Note that the layer visibility circles for the channel and the layer have to be full for this to work. The UV view will show only individual paint layers.
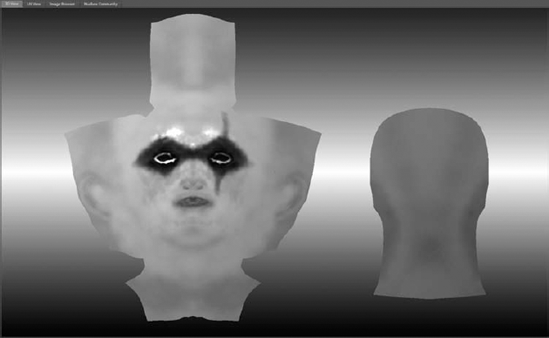
Click the 3D View tab, press Pg Up five times to get the head to subdivision level 5, and press the W key to hide the wireframe. Press Alt+T or click Mesh → Flatten to UV Space; this displays the UVs. Note that even though the face flattened out to its UVs, the eyeballs are not flattened to UV space. In the Object List, click the visibility circles of
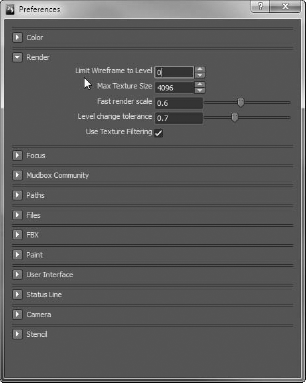
Eye_lfandEye_rtmeshes to hide them. Note that the visibility of the Head mesh is also turned off. Right-click on the Front camera and select Look Through from the drop-down menu. Zoom and pan your model until the two UV shells of the face fill the 3D view. Now click the Layers tab and notice that you can view and hide the individual layers (Figure 8.12).Click Windows → Preferences (or Mudbox → Preferences on the Mac) and expand the Render section. Type 0 in the Limit Wireframe to Level text box (Figure 8.13). This limits the wireframe displayed on the model to level 0 and closes the preferences dialog box.
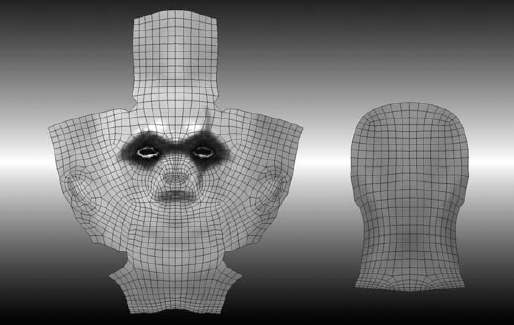
Press the W key to display the wireframe (Figure 8.14). In this view, in essence, you are able to paint on a flattened UV view of the model by using all the painting tools of Mudbox exactly as you would if you were working on the UVs in an image-editing program. The advantage here is that you can show and hide the different layers to see how they composite, and also flip out of flattened UV space by the simple toggle of pressing Alt+T. Experiment typing in 1, 2, and 3 in the Limit Wireframe to Level text box in the preferences to see the wireframe detail on both the flattened-to-UV-space and 3D-space version of the model.
Experiment using the Mudbox painting tools on the flattened-to-UV-space model. Note that you can use stencils to projection-paint on the surface as well as use stamps and all of the various tools available to you in Mudbox.
Go back to the perspective view by right-clicking on the Perspective camera in the Object List and choosing Look Through Selected from the drop-down menu.
Click on the head, and turn off all the paint layers by clicking their layer visibility circles to view the base material (Figure 8.15).
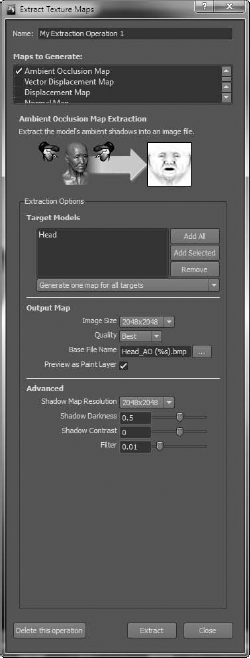
Click Maps → Extract Texture Maps → New Operation, and select the Ambient Occlusion Map check box. For the Target Models, click the Add All button, and then individually select all the added meshes except Head and click the Remove button. You can select multiple objects by holding down the Ctrl key and clicking on them. For the Output Map, select an Image Size of 2048 × 2048. Select Best for the Quality. Type
Head_AOin the Base File Name text box. Make sure the Preview as Paint Layer option is selected because you want to have the generated Ambient Occlusion map added to your list of layers. It will be added in the Diffuse channel. Choose a shadow map resolution of 2048 × 2048, and click Extract to generate the Ambient Occlusion map (Figure 8.16).After the map is extracted, rename it
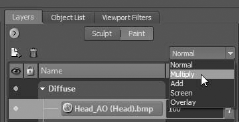
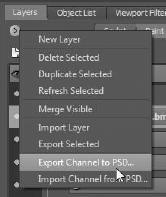
Head_AO. Notice that as you turn the visibility on, the Ambient Occlusion paint layer will obstruct all layers beneath it to show only the Ambient Occlusion map, in which the occluded areas are darker than the ones that are not. You will apply the darkening of the occluded areas to your original composition but not completely cover it with the white areas of the Ambient Occlusion map. To do this, use a blend mode for your layer composition. The blend operation that shows the darkened areas through while hiding the light areas is called Multiply and is available from the blend mode menu in the Layers window(Figure 8.17). Choose the Multiply blend mode for the Ambient Occlusion paint layer. Notice that the occluded areas get darkened and the rest of the model shows through.As powerful as the painting and compositing features are in Mudbox, they are by no means as extensive as those of Adobe Photoshop, and all its image processing features and ecosystem of third-party plug-ins, filters, brushes, actions, and other extensions. However, you can export channels with all their layers and blend modes into Photoshop if you need to use those capabilities. To do that, click Export Channel to PSD in the Layers window drop-down menu (Figure 8.18).
After you specify where to save the PSD file and name it, Mudbox will export all the layers with their opacity and blend modes into a PSD file. If you have Photoshop installed on your machine, this command will even open up Photoshop for you and load the PSD. After the export is done and Photoshop is loaded with your composited layers, if you minimize Photoshop or switch back to Mudbox, you will notice a dialog box (Figure 8.19) that is waiting for you to update the PSD so Mudbox can re-import the PSD and place your Photoshop edits back into your paint layer structure.
If you look at your image in Photoshop (Figure 8.20), you will notice that all the layers are available to you to paint on except the top and bottom layers, which are locked. The top layer has the wireframe guide, and the bottom layer has the diffuse color of the material. You can now individually work on all the layers and then re-import them into Mudbox by clicking the Re-Import Diffuse_Channel.psd button in the dialog box. If you dismissed the dialog box by clicking Close, you can use the Import Channel from PSD menu item in the Layers window drop-down menu (shown previously in Figure 8.18). Also note that each of the layers has an RGB and alpha channel in the Photoshop channels list.
Experiment adding some elements and processing the various layers, and then save your PSD file. Re-import your changes into Mudbox to see the results of your edits.

As you briefly saw in the preceding exercise, blend modes are extremely useful for compositing layers of 3D textures. Note that the Ambient Occlusion, or AO, layer needs to be the topmost layer, and you need to use the Multiply blend mode to get the needed result. Including Multiply, Mudbox 2011 has five blend modes:
Normal This is the default blend mode for a paint layer. With this blend mode, the composite of all the layers will result in only the top paint layer in the layer stack unless you change the opacity setting to a number less than 100, or it has some transparent regions due to the image having an alpha channel that indicates what parts of it are transparent.
Multiply The value of each pixel in the layer is darkened by a value greater than or equal to the value of pixels occupying the same location on layers on top of it in the layer stack. This blend mode is useful for darkening an image, especially with an Ambient Occlusion map. Multiplying with white does nothing, while screening with black produces black.
Add The value of each pixel in the layer is brightened by a value less than or equal to the value of pixels occupying the same location on layers on top of it in the layer stack. Although Screen seems to do the same thing as the Add blend mode, the lightening effect produces no change in contrast because the mode is applied in a linear fashion, producing a more extreme lightening result than Screening.
Screen The value of each pixel in the layer is brightened by a value less than or equal to the value of pixels occupying the same location on layers on top of it in the layer stack. The resulting effect is the opposite of the Multiply blend mode. Screening with black does nothing, while screening with white produces white.
Overlay This is a combination of Multiply and Screen: The value of each pixel is multiplied if the layer on which the mode is set is in the bottom 50 percent of the overall brightness of the image, and uses the Screen blend mode if the layer on which the mode is applied to is in the top 50 percent of the overall brightness. The base color on the layer is not replaced but is mixed with the blend color to reflect the lightness or darkness of the original color. This mode is useful for replacing patterns and colors while preserving the highlights and shadows of the base color.
The way we see anything we are working on is by the arrangement of color elements on a plane. Many factors go into that arrangement, be it atmosphere, light, scale, proportion, gesture, balance, weight, reflections, refractions, material, surface, or of course, color. In most cases, the colors in your image can range from generated/synthesized to inherited or somewhere in between.
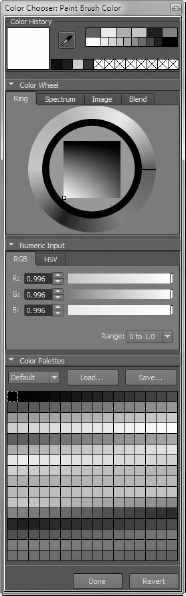
To generate or synthesize a color in Mudbox, use the Color Chooser (Figure 8.21).
The color of your model in Mudbox is determined by the properties of your material and its relationship with the lighting in your scene. The color is affected by the reflectivity, specularity, gloss, and incandescence properties of the material and how they interact with the color, intensity, and direction of the light. The incandescence property of a material is independent of the lighting in the scene; it is determined by the light emitted by the object itself. Note that the incandescent light emitted by an object does not affect the lighting of the scene or light other areas. The lighting in the scene could be user-created, such as point or directional lights, or image-based lighting (IBL), which emulates the lighting in a high dynamic range (HDR) image.
There are extremely flexible methods of choosing colors in Mudbox. You can select and specify colors for a property or material by using either the color wheel or color palette.
You can choose colors in Mudbox by any of the following methods:
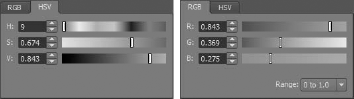
Visually dialing in the color by using Hue Saturation and Value (HSV) or Red GreenBlue (RGB) sliders (see Figure 8.22). You can select colors from any location within the 3D view. You can also numerically enter color by typing in values for HSV and RGB if you have specific colors that are passed to you numerically.
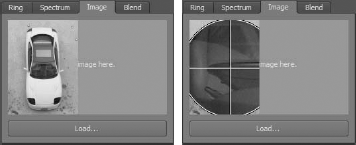
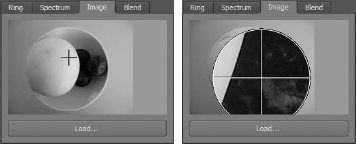
Sampling the color off of an image (Figure 8.23). While using this method, you should be aware that if your image is a photo, the color you are selecting is not pure but is affected by its environment in the image setting. You should look for areas in the image where the color you are looking for has its purest form, with the least distortion from light, reflections, and atmosphere.
Mixing colors by selecting four base colors and picking your desired color (Figure 8.24) from values blended from the four of them. To do this, drag a color from the color palettes to a corner to have it affect the blend of the other three. Click on any of the colors in the blended color region to choose your color.
You can also create, load, save, and import color palettes. To create a color palette, drag and drop colors from the Current/Previous color box at the location on the color palette you want it to be. Mudbox will import Adobe Photoshop .
acocolor sets called swatches.
Having a color palette is indispensible when you are painting a subject that has to conform to a color scheme that your art director has set as the mood for your work. These palettes can come from photographs or other forms of visual inspiration.
To sample colors from an image and place them into a color palette, follow these steps:
Start Mudbox and choose the car mesh. Set the Material to Reflective White. From the Lighting Presets, choose Late Afternoon. Click on the Paint Tools tray and choose the Paint Brush tool. In the properties window for the Paint Brush tool, click the Color button to open the Color Chooser (see Figure 8.21 earlier).
In the Color Chooser, click the Image tab in the Color Wheel section. Click the Load button and load the
Color Palette.jpgfile from theStencilsfolder of the DVD. It is an image I took to capture the interaction of colors of a melon and plums (Figure 8.25).Click and drag on the image and notice how your click magnifies the image to enable you to pick specific colors. When you find the one you are looking for, let go of the button, and that color will become your current selected one.
In the Color Palettes section of the Color Chooser, click on the color palette name, which is set to Default, and from the drop-down menu select New. Type in a name for your new palette and specify a location to save it. This empties your color palette so you can fill it with colors from the image.
Drag and drop the color from the selected color box to any location on your palette to capture that color in the palette.
Repeat steps 3 and 5 until you feel you have grabbed a satisfactory number of colors from the image. After you are finished, click the Save button to save your changes. You have now created a color palette that you can use at future sessions.
You can use an alternate method to step 3. This second method can also come in handy when you do not care to save the palette but just use colors from an image for a single session.
In the Image Browser, navigate to the
Stencilsfolder on the DVD and set the color palette file as your image plane. For detailed instructions on how to do this, see Chapter 1, "Getting Your Feet in the Mud: The Basics of the Mudbox Production Pipeline."Click the + sign in front of the Perspective camera to expand its stencil and image plane. Click in the image plane and in the Advanced section of the Image Plane properties, set the depth to 1000, and make sure the Visibility is at 1.
Click the Paint Brush tool if it is not selected. Then click the Color property of the Paint Brush tool, which brings up the Color Chooser. Move the Color Chooser out of the way of your image plane and car model; if you have a second monitor, this would be an excellent use for it.
Click the Eyedropper tool either in the Color Chooser palette or the Paint Tools tray, and then click on a location of the picture to sample the color from it. Both the Eyedropper in the Color Chooser and the one in the Paint Tools tray do the exact same thing.
And for your prize, click on the car, next, create a new paint layer (the default is fine), and start painting the colors of the photo onto your car, using the shiny material, in a setting lit by an image-based light. In essence, you are sampling colors in real time on a set material and in a specific lighting scenario. This is an extremely powerful capability for doing what if analysis of colors of objects in specific settings to see how the generated color becomes an inherited color as a result of its base color, the effects of the material, and the lighting.
The Eyedropper tool is also indispensible for sampling colors off of a model. It enables you to sample a color from your model from the current paint layer. The color chosen does not take into account the lighting and shading on the model; just the true color of the pixel is sampled. It is the same as sampling a color from the model if it were in flat lighting mode in the 3D view.
You have painted the egg in Chapter 1, and Bertie in Chapter 4, and you are fairly familiar with the painting tools of Mudbox. In this next section, we will cover some of the tools in further detail and introduce some more-advanced capabilities.
The Paint Brush, the Airbrush, the Pencil, and the Paint Erase tools all share the same properties and have functions that are pretty straightforward. One very powerful aspect of the paint tools is that they support symmetry. You can use the Mirror option to paint just as you were able to use it to sculpt, mirroring your paint strokes across all the symmetrical axes as well as the tangent symmetry on objects that are symmetrical but not aligned on an axis.
Follow these steps to use the Paint Brush, Airbrush, Pencil, and Paint Erase Tools:
Start Mudbox and load the
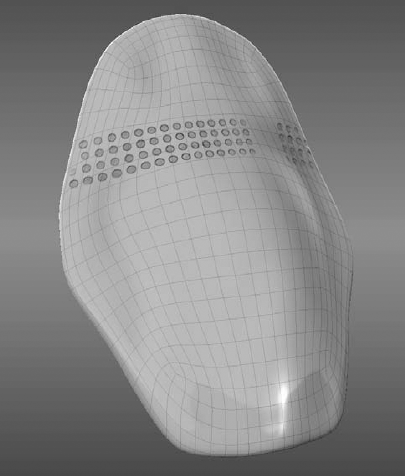
plate_dry_brush.mudfile from the Chapter 8 folder of the DVD. Press the W key to turn on the wireframe. These are armor plates that you will place on the model you sculpted in Chapter 6.On the front top plate, select two symmetrical faces by using the Faces tool from the Select/Move Tools tray (Figure 8.26). Click Mesh → Set Topological Axis to set the topological axis. Click outside the model in 3D view to deselect the faces you had selected. You can now use the topological symmetry of the model to mirror-paint a pattern on the shield.
From the paint tools, select the Paint Brush and click on the model. Accept the default options in the Create New Paint Layer dialog box to create a paint layer. Choose a color, paint on your model, and notice how your work is mirrored (Figure 8.27).
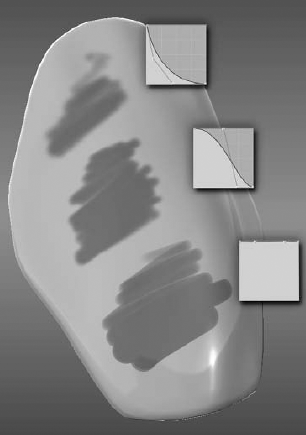
The falloff is common with paint tools, and you can use falloffs to feather the edges of the paint you are applying. Notice the effects of different falloffs on the paint on a surface in Figure 8.28. In the falloff used at the bottom of the figure, there is no feathering or smoothness to the edge of the paint. This creates hard edges and the paint appears as though it has been applied with a marker. The other falloffs have a more feathered edge, like that of an airbrush or spray paint.
Using a tablet with pressure sensitivity while working with these tools is also extremely useful because you can use pressure in your paint stroke to apply or erase paint from the model. Drawing or painting while using less pressure gives you more-subtle buildup or teardown of patterns and color.
The Clone tool works exactly like the Clone Brush in Photoshop: You can set a sampling point by holding down the Ctrl key and clicking on the area from which to sample the color, and then clicking on another location where you want to replicate the colors or patterns of the sampling point. The size of your brush determines the radius of the area you will clone. This is extremely useful to copy a texture or transfer color tone from one area to another. You can also sample texture from one object to another. Note that the Clone tool works with mirroring, so you can use it on symmetrical objects; however, note that the mirrored brush has its own target. That is, it will clone from a mirror of the sampling area on the mirrored side (Figure 8.29).

The Dry Brush tool is useful for conditionally painting on the surface of an object based on the elevation of that surface. You can paint just the protruded areas of a surface with it, and recessed areas while holding down the Ctrl key. It is perfect for painting only protruded or only recessed areas on a surface pattern. It is also extremely useful to add weathering to surfaces.
The Dry Brush tool applies paint depending on whether a face is above an invisible plane that is dynamically calculated as the brush moves on the surface. This invisible plane is calculated by the average positions of vertices on the surface that are within the brush ring. The Size property of the Dry Brush affects the height or depth to which paint is applied to the surface, so a smaller brush size provides better control when applying paint on smaller sculpted patterns and shapes.
Mirror symmetry works with the Dry Brush. However, unlike other tools, it applies the effect of the Dry Brush to the mirrored area instead of reflecting an exact copy. The mirrored Dry Brush will act independently on the two surfaces of the mirror. To go through an example of using the Dry Brush, follow these steps:
Start Mudbox and load the
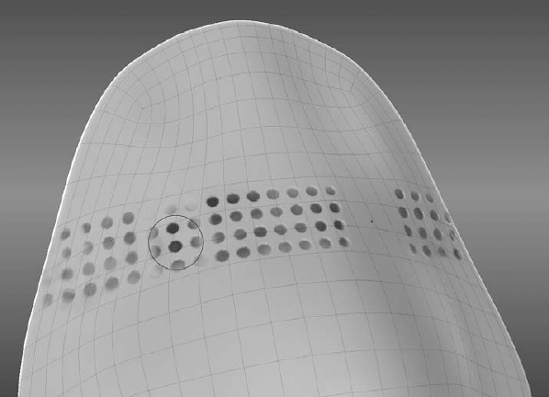
plate_dry_brush.mudfile from theChapter 8folder of the DVD (Figure 8.30). Note that this armor plate has a strip of indented dots, and you need to paint the indented parts a dark gray and add some weathering and smears on the edges.From the paint tools, select the Dry Brush and click on the model. Accept the default options in the Create New Paint Layer dialog box, to create a paint layer. Choose a dark gray color and a Strength of 100, hold down the Ctrl key, and paint on the strip of dots on the plate. Experiment with larger brush sizes to see the effects. From the Mirror drop-down list, select Tangent. Note the effect of mirrored use of the Dry Brush in the area where there is a break in the dot pattern (Figure 8.31).
Select Off in the Mirror drop-down menu and pick a brownish color by using the Color Chooser. Select the first stamp called
bw_acidMetalfrom the Stamp tray and make sure the Use Stamp Image option is selected in the Dry Brush properties. Release the Ctrl key and paint some streaks around the holes (Figure 8.32).
The Blur tool blurs the painted area to which the brush ring is applied. The blur effect is applied only to the paint layer you are working on. The difference between the Blur brush in Mudbox and the one in Photoshop is that the one in Mudbox uses the 3D view to calculate the blur. Any operation that changes the screen image, including tumbling and zooming around your model, and turning paint layers on or off, affects the result of the blur, even if you do not change any of the Blur tool properties. Adjusting the Blur Strength property will change the amount the image is blurred; it will also cause the reference image to be recalculated and updated, and that is why you may notice a pause whenever you change it. The size affects the area that is blurred.
Continuing from the example of the armored plate started in the previous section, follow these steps:
Use the Blur tool to blur out some of the streaks you make with the Dry Brush.
Change the Blur Strength to adjust the amount of blurring and get a feel for how the tool affects the paint on the surface of your model.
The Dodge and Burn tools enable you to lighten and darken areas on your model. You can chose to affect highlights, midtones or shadow areas, or all tonal regions in the areas within the brush ring. I find it a great alternative to the Paint Erase tool to highlight or tone down areas.
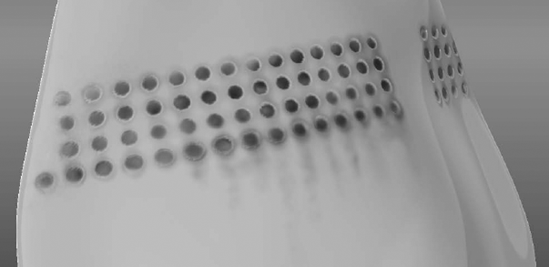
Figure 8.33. Using the Dodge and Burn tools to darken and lighten areas on the streaks and in the holes
Note that only the color value is affected, while hue and saturation are not. Repeated stroking on the same area will have an additive effect. Change the Strength property to affect the buildup of each successive stroke.
The Exposure property controls the amount of lightening or darkening that occurs. The default setting is 1, which you may want to change only to lessen the effect of the lightening and darkening.
Continuing from the example of the armored plate started in the previous section:
Use the Dodge and Burn tools to lighten and darken some of the weathering you applied to the armor plate (Figure 8.33).
Change the Affect property of the Dodge and Burn tools to All, and lighten and darken areas of the weathering on the surface.
The Contrast tool increases or decreases the difference between light and dark pixels on the active paint layer to which it is applied. The Contrast property, which ranges from −10 to 10, controls the difference between light and dark pixels. A positive value in the Contrast property increases the contrast, while a negative value reduces it.
Continuing from the example started in the previous section:
Try the Contrast tool with varying contrast property values on the model to see the effects on bringing out or muting the edges of your weathering.
Try values of −10, −5, 1, 5, and 10.
The Sponge tool makes subtle adjustments to the color saturation of pixels on a texture that is on the active paint layer. The Amount property ranges from −1 to 1; a positive number decreases the color saturation, while a negative number increases it. At the default value of 1, the Sponge tool can be thought of as a tool to sponge off the color of a painted surface.
The Hue tool enables you to replace the hue of pixels on a texture that is on the active paint layer with a user-specified color hue. Your stroke will affect the hue only, and not the color value or the color saturation. Unlike other paint tools, the Hue tool does not have a buildup, and its effect is applied on the first stroke. Make sure you cover the entire area you intend to change the hue of in one stroke; otherwise, you will get borders where you stop and restart your stroke.
Continuing from the example started in the previous section:
From the Paint Layers window drop-down menu, select Import Layer. From the Chapter 8 folder of the DVD, import the
red.tiffile. In the Layers window, drag and drop theRedlayer so it is below the layer you were working on, so your weathering shows through (Figure 8.34).Make sure you are on the
RedPaint layer by clicking on it in the Layers Window and then click the Hue tool in the Paint Tools tray. In the properties for the Hue tool, click the Color button and choose blue in the Color Chooser.With one stroke, paint the image so the red pattern turns blue. Note that the white parts of the texture are not affected. The Hue tool does not affect black or white areas.
The Hue Shift tool shifts the hue by an amount specified in degrees around the color wheel, relative from the current value in a counterclockwise direction. You can enter either a positive or a negative value in the Hue Shift property. The range you can enter is either between 1 and 180 degrees or −1 and −180 degrees.
Continuing from the example started in the previous section:
Make sure you are on the
RedPaint layer and then click the Hue Shift tool in the Paint Tools tray. In the properties for the Hue Shift tool, type 180 in the Hue Shift text box.With one stroke, paint the image so the blue pattern turns green. Try to do the entire hue shift in one stroke, because if you don't, you will continuously shift the hue. Note that the white parts of the texture are not affected. The Hue Shift tool does not affect black or white areas.
Finally, the Invert paint tool enables you to invert the color hue under the region of the brush ring in the current layer.
Continuing from the example started in the previous section:
Make sure you are on the
Red Paintlayer and then click the Invert tool in the Paint Tools tray.With one stroke, paint the image. Try to do the entire inverse in one stroke, because if you don't, you will invert the paint with every stroke. Note that the white parts of the texture are inverted to black.
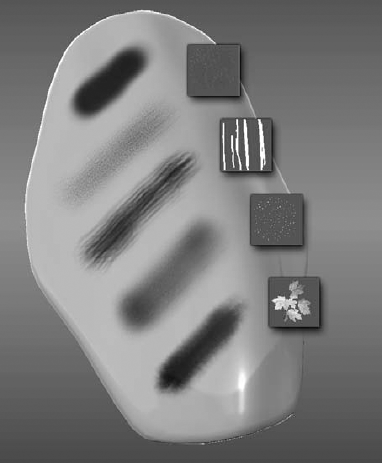
Like sculpting, stamps can be used with all the paint tools except the Eyedropper tool. Painting the model with a stamp is much like painting with a rubber stamp. As you click on the model, a stamp is applied to the model, and as you continue your stroke, more copies of the stamp are applied based on the stamp spacing and other stamp properties.
Stamps can be used to apply a recognizable shape such as a grayscale decal, or to create a more random effect to break up the circular shape of the default brush tip. Stamps are very similar to brushes in Adobe Photoshop. You can use one of the many stamps provided for you in Mudbox, or you can use any image or capture and use your favorite brush from Photoshop.
The makeup of a stamp is an image in one of many formats. You can use 8-bit, 16-bit, and 32-bit images, although you can achieve better results especially with sculpting while using 16-bit or 32-bit depth images because of the level of depth detail that can be included in the higher bit depth.
To apply a stamp, you can choose one from the Stamp tray; however, I find that choosing a stamp from the Image Browser is better because you get a larger, more detailed view of the stamp instead of the small thumbnail in the Stamp tray. After you are familiar with the stamps, you can then choose them from the Stamp tray because it takes less time to do so.
Note that most stamps are square, with resolutions of 256 × 256 or 512 × 512, or some are even 1024 × 1024. Some are grayscale, and some are in color. The Paint Brush tool will allow you to paint with only the grayscale version of the stamp, even if the stamp is in color. To paint with a color version of the stamp, you need to use the Projection tool. Adjust the Stamp Spacing property if you don't want to put down a pattern of the stamps but just a single copy. To more precisely place a stamp, use that stamp as a stencil and use projection painting to place it. The next section provides an example of doing this.
As you have seen, stamps and stencils are images, and you can create and edit them in image-editing programs such as Adobe Photoshop. To create a stamp or stencil in Photoshop, follow the steps in the Help file under Saving Images for Stencils and Stamps as it goes through and details the process of creating an image and choosing the correct settings to save your stamp.
Follow these steps to paint using stamps:
Start Mudbox and load the
plate.mudfile from the Chapter 8 folder of the DVD. Press W to turn on the wireframe.From the paint tools, select the Airbrush tool and click on the model. Accept the default options in the Create New Paint Layer dialog box, to create a paint layer. Choose any color and a Strength of 100. Experiment with different stamps in the Stamp tray to see the effects of painting with the stamp (Figure 8.35).
Experiment with the various Use Stamp Image properties to get different results. Use the Paint Erase tool to erase and start over if needed. Notice that slight variations in the properties produce different results (Figure 8.36). Try using stamps with different paint tools to see their effects. Remember that you can also use these stamps to subtract color as well as add it—for example, when using them with the Paint Erase tool.

To make sure you have the settings you need, remember to select the Use Stamp Image properties every time you select a new stamp. Otherwise, the settings are carried over from your last session.
As mentioned in the previous section, stencils and stamps are essentially images. The way we use them determines whether the images are stamps or stencils. In other words, You can use each default stamp image that come with Mudbox as a stencil or any of the Stencil images that come in Mudbox as a stamp.
If your intent is to get a monochromatic pattern of an image, you can use the Paint Brush tool with an image as a stamp, as shown in the monochromatic leaf pattern at the top of Figure 8.37. In this case, it doesn't matter whether the image you are using for a stamp is color or grayscale; the result will still be the painting of the monochrome version of the image.
If your intent is to get a color pattern of the image, use a color image as a stamp and use the Projection tool to paint on the color pattern. To do this, make sure you do not have a stencil selected, because the Projection tool would then prompt you to use it with a stencil. The result is what you see at the bottom of Figure 8.37.
Follow these steps to projection paint using stamps:
Start Mudbox and load the
plate.mudfile from the Chapter 8 folder of the DVD. If the wireframe is on, press the W key to turn it off.Select the Paint Brush tool and pick the color stamp
rbg_leafs.tif. To find out the name of a stamp, hover on it until a pop-up with the filename comes up. Paint on the top part of the plate to see the effects of using the Paint Brush tool with a stamp. Your results should be similar to the top of Figure 8.37. Experiment with different Use Stamp Image options to see the results.From the paint tools, select the Projection tool and click on the model. Accept the default options in the Create New Paint Layer dialog box to create a paint layer. Make sure the color is white, because that will paint an exact copy of the image. If you used any other color, you would be painting with the hue of that color. Choose a Strength of 100. Ignore the message that tells you to use a stencil.
Paint on the model and see the results. If you need a bigger gap in the spacing of the stamps, increase the Stamp Spacing Distance property of the Projection tool. Remember that you can type in values that are more than 100 to get bigger spacing, even though the slider moves to only 100. Try 200 to get results like Figure 8.38.
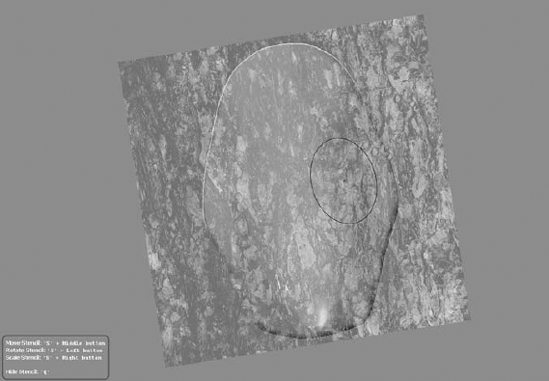
If your intent is to paint an exact copy of an image onto your model, be it a recognizable emblem or a pattern from an image, you should turn off the Use Stamp Image option and choose the image as a stencil. Then you would use the Projection tools to paint the stencil image onto your model. In this mode, you are manipulating two things to align the image to your model: one is the camera and the other the stencil. You are already very familiar with how to use the camera around your model. However, manipulating the stencil has its own commands. Table 8.1 lists the stencil commands.
You do get a reminder of what these keys are in the bottom-left corner of the 3D View when you have a stencil on.
Erase the plate by using the Paint Erase tool. Select the Projection tool and make sure that the Use Stamp Image option is turned off in its properties. Also make sure that you set the Stamp Spacing Distance to 10 if you still have it at 200.
Select the
rgb_tiledBark.pngstencil. Remember, to find out the name of a stencil, you can hover on it until a pop-up with the filename comes up.Position the panel so that it points to the front (Figure 8.39). Because the panel is to fit our sculpted model, it is askew from the X, Y, and Z coordinates.
Press the S key and click and drag with your left mouse button or press down with the stylus to rotate the stencil so the vertical lines on the pattern align with the angle of the panel (Figure 8.39).
Press the S key and click and drag with the middle mouse button or front button on the stylus to move the stencil into position (Figure 8.39).
Press the S key and click and drag with the right mouse button or press the back button on your stylus to scale down the stencil so it covers the panel (Figure 8.39). You can use these steps with the stencil shortcuts to interactively to position the stencil.
Table 8.1. Controls for Translating, Rotating, Scaling, and Hiding Stencils
RESULT
ACTION
Rotate a stencil about its center
S+left button
Translate a stencil
S+middle button
Scale a stencil
S+right button
Hide a stencil
Q (toggle on and off)
Note
When you projection-paint, you have to account for paint not reaching 3D surfaces that are occluded from your view, or stretching on surfaces that are severely bent from your view, such as the edges of the panel. Think of it as if you were projecting a slide of a picture of a face onto a sculpture of a head. If you are standing to the side of the head, you will see distortions of the image on the nose and side of the head and you will see no image on the back of the head. This can easily be remedied because now you can rotate the model as well to paint in those areas from the existing stencil or images shot of the stencil at different angles.
Using the Projection tool at a Strength of 100, paint the panel with the image of the stencil. You will notice that as you press down on the left mouse button or press down on the stylus on the tablet, the stencil disappears and you will start painting the pattern onto the model.
After you are finished painting the plate, press the Q key to hide the stencil. Rotate the model to see the stretching on the bent areas of the plate and also on the edges. This can easily be fixed on a nondescript pattern such as the tree bark; you can position the stencil parts and the model to projection-paint a close pattern on the areas that look stretched. You can also use the Clone tool to patch up stretched areas.
If your intent is to paint a monochrome version of an exact copy of an image onto your model, be it a recognizable emblem or a pattern from an image, you should turn off the Use Stamp Image option and choose the image as a stencil. Then you would use the Projection tools to paint the stencil image onto your model while choosing a saturated color.
From the Color Chooser, choose green for the properties of the Projection tool. Repaint the stencil and notice that it now has a green tint.
Choose black from the Color Chooser for the properties of the Projection tool. Repaint the stencil and notice that none of the detail of the tree bark shows, and you have a completely black image.
Press the Q key to view the stencil. Select the Paint Erase tool and then paint the stencil onto the model. Note that this now has a subtractive effect, as paint is erased from the model in the pattern of the stencil.
Think of the range of color from black to white as the opacity of the stencil. White completely shows the image in its purest form, and as you move to the grays, you are painting darker versions of the image, until at black you are painting with the color black. As you increase the saturation of the color you choose, the more monochromatic you image will get, reflecting only the chosen hue.
Press the Q key to hide the stencil. Use the Paint Erase tool to erase the plate, and select the Paint Brush tool. Press the Q key to show the stencil. With the color black still as the color property of the Paint Brush tool, paint the stencil on the plate. Notice that even though we are using a tree bark image, the result looks more like marble.
Using the Paint Brush tool with a stencil enables you to paint on a desaturated version of the stencil onto the plate.
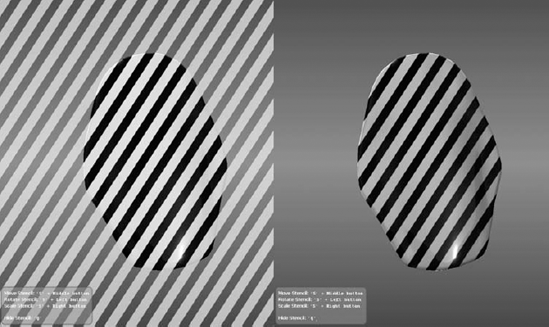
Press the Q key to hide the stencil. Use the Paint Erase tool to erase the plate, and select the Paint Brush tool. In the Image Browser, navigate to the
Stencilsfolder, select thestrip.tiffile, and set it as the stencil. Notice that the stencil properties appear in the properties section of the East Tray.Switch to the 3D View. The stencil should show up, and the properties for it should still be there. If they are not, you can still get them by clicking on the plus sign to the left of the camera you are using, which in our case is the Perspective camera. This expands the stencil and the image plane associated with this camera. Clicking on the stencil in the Image Browser brings up its properties.
Press the Q key to show the stencil if it is not visible. In its properties, make sure that in the Advanced section Use Tiles and Show Tiles are selected. This will tile your image, and if your image is tileable, will create an infinite version of your stencil that you can scale, translate, and rotate to create new patterns. Press the S key to scale, translate, and rotate the pattern of stripes and paint the pattern on the plate (Figure 8.40).
Using the Paint Brush tool and an arbitrary color, paint stripes on the plate. Rotate the stencil, and paint again to create a different pattern (Figure 8.41). Note that you can also use stencils as masks to mask off areas on the stencil that are opaque.
While you have an active stencil, you can still use a stamp to mix the effects—for example, you can use the stamp image to paint a pattern set by the stencil (Figure 8.42).
Note that mirroring and symmetry does not work while you are using stencils. You will find some examples of my experiments with stamps and stencils in Figure 8.43 and in the plate_variations.mud file in the Chapter 8 folder of the DVD.
In previous sections, we covered how paint layers in a channel can be exported and imported into Photoshop by using the Export Channel to PSD option in the Paint Layers window drop-down menu. You can also find how to create and import stencils and stamps from Photoshop in the Saving Images for Stencils and Stamps section in the Help file.
However, there are still a few other ways we can interact with the powerful image-editing tools in Photoshop. The next chapter covers a couple of those, but there is one that also pertains to 3D painting.
As mentioned before, you can use many of Photoshop's powerful painting and image-processing capabilities to augment those on Mudbox. One such capability is the ability to paint on text.
Follow these steps to export screenshots into Photoshop CS4:
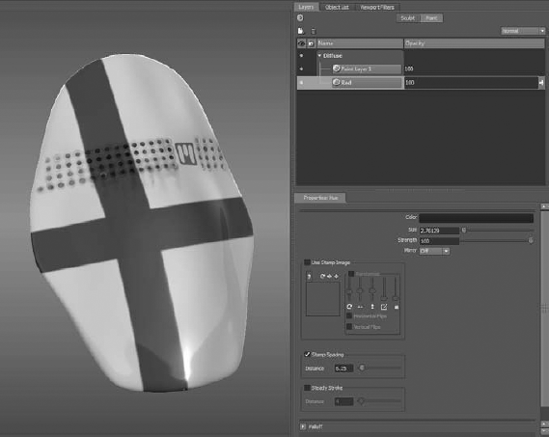
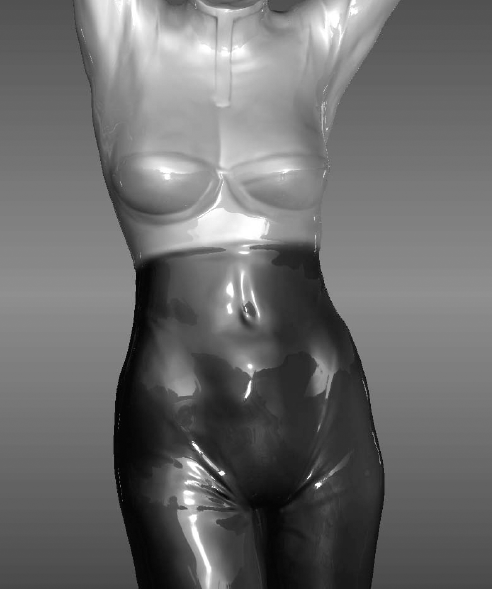
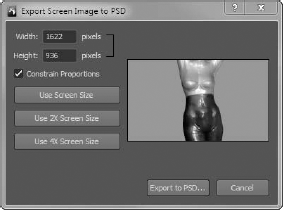
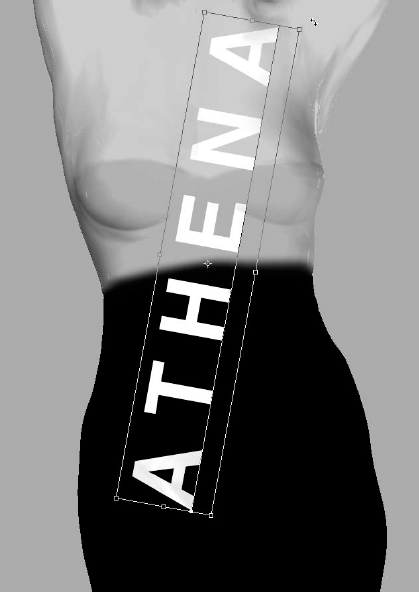
Start Mudbox, and from the Chapter 8 folder of the DVD load the
body_logo.mudfile. Position the model so the torso is centered in the 3D view (Figure 8.44).Click File →Export Screen to PSD, which brings up the Export Screen Image to PSD dialog box (Figure 8.45). Note that the dialog box has the screen resolution of your current screen along with the option to save the image at double, quadruple, or arbitrary width and height. Click Export to PSD to export the image.
Navigate to a location on your hard drive where you wish to save the screen image, and type a name for the PSD file. This saves the file, and if you have Photoshop installed on your machine, opens and loads the file you just saved (Figure 8.46).
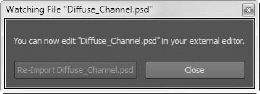
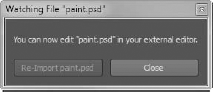
Switch back to Mudbox. Notice that after the file was saved, a Watching File dialog box popped up, giving you two options: to re-import the PSD file or to close the dialog box (Figure 8.47). The Re-Import button is grayed out because Mudbox is watching to see whether a newer version of the PSD file is saved out of Photoshop, in which case the button will be active and you can re-import the modified image and project it onto the model. If you close this dialog box, don't worry, because you can still re-import the PSD file by choosing File → Re-Import From PSD.
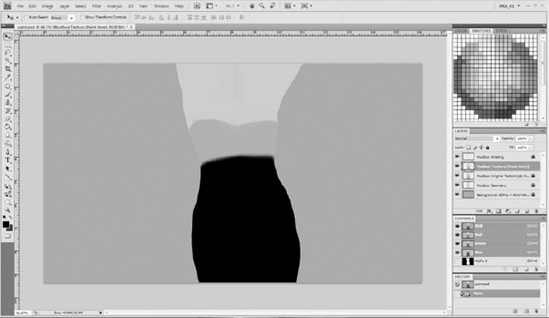
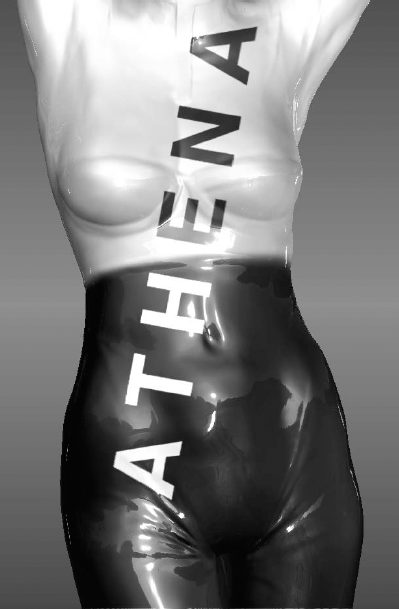
Switch back to Photoshop and notice that the PSD file has various layers, all of which are locked except the one that is called
Mudbox Texture (Paint here), as you can see in Figure 8.48. This is the layer onto which you can composite all the work done in Photoshop so it would transfer back into Mudbox. Also note that your image looks different than it did in Mudbox because you are exporting only the flat color of your texture. You can also notice that there is an alpha layer created to mask the background, calledAlpha 1.In Photoshop, use the Type tool to type a name on the body of the model, and press the Ctrl key to rotate, scale, and position the text (Figure 8.49). You can also use some of the other tools that you are familiar with in Photoshop to draw or add to the image. Remember that your work will be projected onto the model, so be wary of the edges and changing anything that might alter the uniformity of the texture from the parts that are not visible in the projected image.
In the Photoshop Layers window, right-click on the text layer and select Rasterize Type from the drop-down menu. Right-click on it again and select Merge Down from the drop-down menu. This merges the text with the
Mudbox Texturelayer. Save your file.Back in Mudbox you will notice that the Re-Import the PSD file button is now active, and upon clicking it you will import the projected text onto the texture of the model (Figure 8.50).
Save your scene for use in the next section.
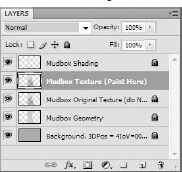
Make sure not to change the layer name for the Mudbox Texture (Paint Here) layer, because the PSD file will no longer re-import into Mudbox. In the next chapter, you will see how you can use the same feature to export the image to composite it in Photoshop with some other layers.
After you have painted our model, if your pipeline requires you to send the model to Maya to render, you can export the paint layers in many ways. The most obvious is to use the texture files that are stored when you save the scene, and physically link them to shaders in Hypershade. That's what you did in Chapter 1.
You can also use the Export to FBX option to export your models to Maya or other applications that support FBX, such as 3ds Max. The FBX export will include the following:
The mesh, along with top-level transformations and pivot points
UV texture coordinates
Cameras, with all their settings
Image planes, exported with the associated cameras
Blend shapes
Joints
Material textures with Diffuse, Specular, Gloss, Bump Map, Incandescence, Reflection Mask, Reflection Map, and Reflection Strength properties along with the Normal, Multiply, and Add blend modes.
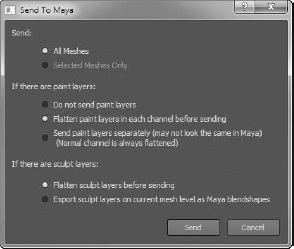
Finally, you can use the easy command to send the model and all the listed FBX properties to Maya 2011, and inversely, use the File → Send to Mudbox command in Maya 2011 to send models to Mudbox.
Upon clicking File → Send to Maya, you will get the Send to Maya dialog box (Figure 8.51). This is where you specify what you want to send.
You can send all the meshes or just the selected ones. You can choose to not send paint layers, send the flattened-by-channel paint layers, or send each layer separately to composite in Maya. Also note that you have the option to flatten all the sculpt layers as well as send them individually as blend shapes.
Follow these steps to export your work to Maya:
Start Mudbox and load your scene from the preceding section.
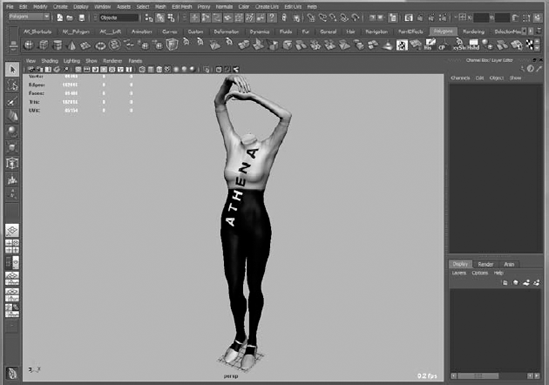
Click File → Send to Maya and click OK to accept the defaults.
If you have Maya installed, it will launch, and you will have your scene available in Maya. When Maya comes up with a security dialog box, click Allow. You will see the progress of your import in a progress bar at the bottom-left corner of the Maya window.
In Maya, open the Hypershade to see your texture already set up (Figure 8.52).
This is a quick and easy way to send your model and textures into Maya.
Painting your creations in 3D in Mudbox is an easy and natural way to texture and paint your models.
You have seen the versatility of painting a model in 3D as well as in flattened UV space with some powerful painting and image-processing tools. You have worked with compositing multiple paint layers and using blend modes to get the final result.
You have learned how to choose and apply color, and seen the capabilities that stencils and stamps give us in painting patterns and textures onto models. You also have seen how Mudbox can interoperate with Photoshop by sending paint layers as well as projection-painting.
Finally, you have seen how to send textures into Maya. In the next chapter, you will see how to light and render models in Mudbox or export them to render in Maya by using mental ray.