1. The Edge Interface
The Edge Screen
Looks can be deceiving. The Edge screen is surprisingly clean and simple, but the interface hides some surprising power and sophistication.
Tools
![]()
In Edge Preview 2, the toolbox features four basic tools: Selection, Rectangle, Rounded Rectangle, and Text. This toolbox may expand or change over time, but you’ll find descriptions of each of the current tools below.
![]()
The Selection tool is used to position elements within your stage and to target them as needed and to apply animation, transitions, transformations, and attributes.
![]()
The Rectangle tool draws rectangular components that are currently specified as div elements within the code. Upcoming versions of Edge may allow you to choose among various HTML elements as you can with text elements, or employ the HTML5 canvas specifications to create rich, native HTML graphical elements. Watch for updates to the toolbox.
![]()
The Rounded Rectangle tool draws rectangles with rounded corners. The corners can be symmetrical or can display a different radius for each. The tool remembers the last specifications you applied, allowing you to quickly create multiple rectangles of the same design. Although the Rectangle and Rounded Rectangle seem to do different things, the tools can be used interchangeably. Both create div elements formatted using CSS3 specifications. Once created, you can add, modify, or remove the rounded corners as desired. By increasing the corner radii, you can create a circle.
![]()
The Text tool enables you to create live text elements that are native to Edge itself. Text components remain editable within Edge and can be formatted independently of the base HTML page containing the Edge graphic.
Text components are generated as div elements by default but can be assigned a variety of HTML tags, including but not limited to: div, p, h1-h6, address, caption, and so on. Note: Elements created in Edge and then inserted in an existing HTML page may inherit styling present in the base document. We’ll explore the ramifications of this behavior in Chapter 4.
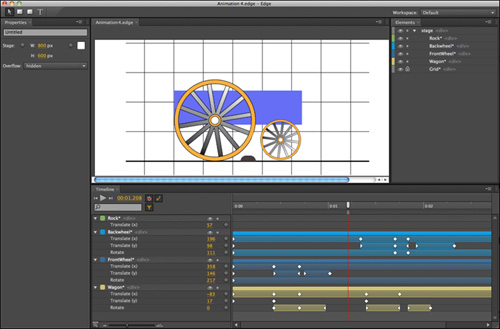
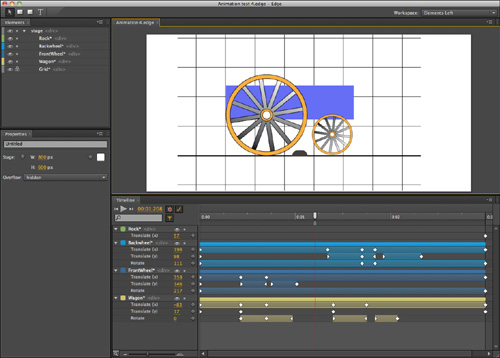
Stage
The Stage is the workspace where you build your animations. You can specify the size of the stage in pixels for standalone animations, or open an existing HTML page and animate the elements contained within it. Standalone animations can also be inserted into existing pages as graphical elements, banner ads, and interactive content.
In standalone Edge files, the Stage is specified as a div element with the attribute: id=“stage”. The div can be assigned standard overflow attributes (visible, hidden, scroll, or auto) depending on whether you want the components to be masked or displayed when they move outside the dimensions of the stage div. We’ll explore these attributes in Chapter 3.
Elements Panel

The Elements panel displays a laundry list of components that Edge can access and animate. The items are listed as they appear in the code or, when dealing with elements that are absolutely positioned, based on their Z-index. There is a one-to-one relationship between the Stage and the Elements panel: If you select an element within the stage, its listing will be highlighted in the panel. Click an item in the panel and the corresponding element on the stage will be selected.
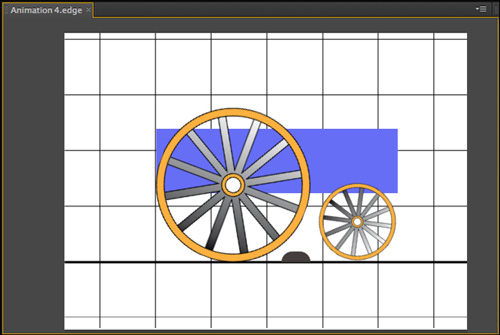
Properties Panel
The Properties panel enables you to examine and modify the size, position, and styling of Elements that appear on the stage. The panel is context sensitive and displays only attributes pertinent to the selected element or elements. Each attribute displayed by the panel can also be assigned via keyframe within the timeline, allowing you to create transformations at a particular moment or over a specified period of time. Some properties can be applied to multiple selected elements at once.
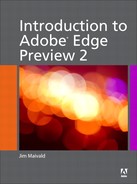
Timeline
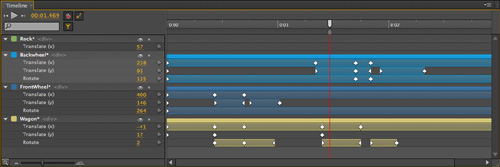
The Timeline organizes and manages a document’s content over time and enables you to specify the moment at which an element movement or transformation will take place. The timeline is composed of a linear graph delineated in fractions of a second, a playhead that can be manually repositioned to target a specific point along the timeline, play controls, an interactive timecode display, and three timeline mode buttons.
By default, only animated elements will appear in the timeline. Static elements will appear in the Elements panel but not in the timeline until and unless a keyframe animation is applied to it, or you deselect the mode button: Only Show Animated Elements. Keyframes appear as filled or hollow diamonds in the timeline, depending on the type of animation created. An animated sequence appears as a colored bar between two keyframe markers. We’ll explore these relationships in more detail in Chapter 4.
Timeline Mode Buttons
The timeline mode buttons control how elements fundamentally interact with the timeline.
Auto-Keyframe Properties
![]()
When active, this mode causes keyframes to be inserted automatically whenever you create an element or modify it on the timeline. Deselect the button when you want to adjust the element without creating a keyframe. We’ll explore the strategies for using this mode starting in Chapter 4.
Generate Smooth Transitions
![]()
When active, this mode animates transitions smoothly when elements on the stage are moved or transformed between two keyframes. Turn it off and element movements will appear abrupt, without transitions.
Only Show Animated Elements
![]()
When active, this mode filters the timeline so that it shows only animated elements on the timeline. Deselect it and all elements visible on the stage will appear on the timeline.
Timeline Zoom Slider
![]()
Zooms in and out of the timeline to provide fine control over detailed animations or to allow you to see the entire timeline at once.
Zoom-to-Fit Tool
![]()
Double-click the Zoom-to-fit tool to fit the timeline to the available panel space.
Workspaces
Default Edge workspace.
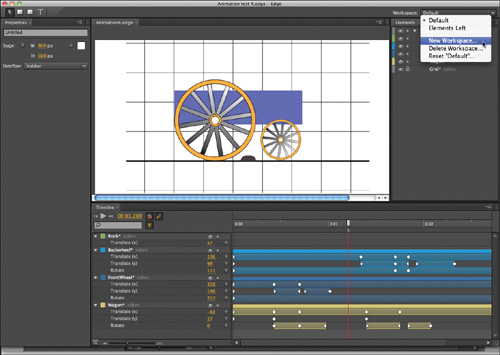
Custom workspace.
Like many Adobe applications, Edge also allows you to save the size and position of the program’s panels in a custom workspace. Use workspaces to create your own ideal configuration or restore the default settings.