4. Animating Text
Introduction to Web-based Text
Text is an essential component of the web and web-based animations. Look at most commercial websites and you’ll see dozens of banner ads and animations, many of which are text-based or text heavy. Edge provides a tool for creating text to populate your animations natively. That means you don’t have to first go to Photoshop, Illustrator, Fireworks, or Flash to save the text as an image or as vector outlines. The Edge Text tool actually creates HTML-based text and formats it using CSS and JavaScript specifications. This opens a world of possibilities to your Edge animations, but erects a few barriers, as well.
The fact that text formatting is a mixed bag on the Internet won’t surprise any hardened web designer. But some Flash developers may be in for a little shock to learn that the text they created in an Edge animation could display completely differently than they designed it. In either case, to get the most from the Text tool, you’ll have to accept certain facts about web-based text:
• Text on the web is vector-based. It is not dependent on the resolution of the screen or output device. It can be enlarged or reduced in size without affecting display quality and uses less disk space and bandwidth than image-based text.
• Formatting is not intrinsic to the text; it is applied separately by cascading style sheets (CSS) and/or by other means.
• Fonts applied to the text are supplied by the user’s computer, not the designers. If the user doesn’t have the font, the text will be displayed in a font that they do have. (And the result may not be a good one.)
• Some or all aspects of the formatting may not be compatible with the device displaying the text, which may result in undesirable formatting or, worse, no display at all.
Some fixes to these problems are in the works through the development and adoption of HTML5 and CSS3, but those solutions are still several years away, if they arrive at all. So, below you will find some tips to help you build effective animations that work today.
Simple Solutions to Web Text Problems
Since Edge doesn’t save text as an image or in some proprietary file format, you’ll have to abide by few simple rules that will ensure your text displays properly in all your animations:
A. Favor fonts common to both Windows and the Mac operating system, such as Arial, Times New Roman, Trebuchet MS, Tahoma, and Verdana. Use other fonts as desired, but accept that they may not be available. Also remember that your animations may be viewed on cell phones and other mobile devices. Fonts are just as big of an issue there as well.
B. Design for success. Know your target audience. Avoid specifications that may not work in all environments. For example, avoid subtle differences in color or font size; some devices may not display the settings correctly.
C. Test, test, test. Check the animation on multiple systems, browsers, and devices. Don’t assume that the animation works because it works on your computer. Edge animations use HTML5, CSS3, and JavaScript specifications that won’t work in some older browsers and on certain mobile devices.
Of course, these limitations will often place too much of a burden on your creative juices. In such instances, you’ll want to fall back on the use of images or other alternatives. We’ll examine the use of web graphics in Chapter 5. For now, let’s learn how to use the Edge Text tool.
Using the Text Tool
In this exercise, you will learn how to create text in Edge and animate it.
1. Launch Edge Preview.
2. Create a New file.
A new Untitled stage opens.
3. If necessary, set the following specifications for the Stage:
W = 500 px
H = 500 px
4. In the Overflow menu, select: hidden.
5. Save the file as: myEdge2.
6. Select the Text tool and click to insert it at center stage.
7. Type: Welcome to the Edge.
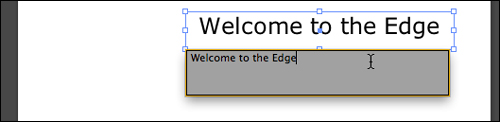
The text appears in the default font and size, or the one you used last.
Note: The Text tool in the current version of Edge is limited to creating a single paragraph at a time. If you paste more than one paragraph from another program, Edge will run all the text together. To create more than one paragraph, insert each paragraph individually, or open an existing web page containing more than one paragraph. We’ll explore how to animate existing web pages in Chapter 6.
8. Change the ID to: text1
9. From the DIV Tag menu, select: h1.
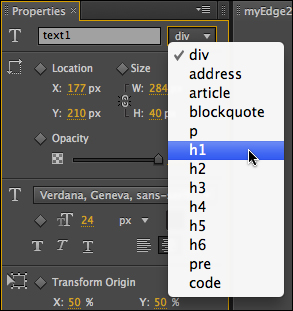
Web text can never stand alone. It always comes in some sort of wrapper element. In Edge, the default is the standard div element, but you can also select from: address, article, blockquote, p, h1-h6, pre, and code. These elements provide more than just an alternative to the standard div, they also pass semantic value to your animation content. Keep in mind that Edge animations are created by standards-based HTML, CSS, and JavaScript code. The content can be fully indexed and ranked by the search engines. Therefore, in some cases, using one tag over another could help to rate your content higher on the web.
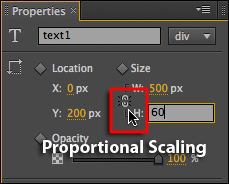
10. Set the following specifications for: text1.
X = 0 px
Y = 200 px
W = 500 px
H = 60 px
Opacity = 100%
Note: When altering the width and height of an element separately, you may need to turn off the Constrain Width and Height Proportions option in the Properties panel.
11. In the Font Name menu, select: Arial Black, Gadget, sans-serif.

The current version of Edge provides 13 font combos. At this time, you can’t create your own font list in Edge, but you can access the JavaScript file separately and insert a specific font if desired. Note: If you add a custom font name, Edge will honor the specification but does not alter the available or default font options.
12. Set the following text properties:
Font Size = 35 px
Text Color = Black
Align = Center
The remaining properties should be at their default settings, unless you have been experimenting with them, and should be fine as is.

The timeline should display one or more keyframe attributes based on the specifications you just made if the Auto-Keyframe Properties option is selected in the Timeline panel. These keyframe attributes won’t help us for the upcoming animation, so let’s delete them.
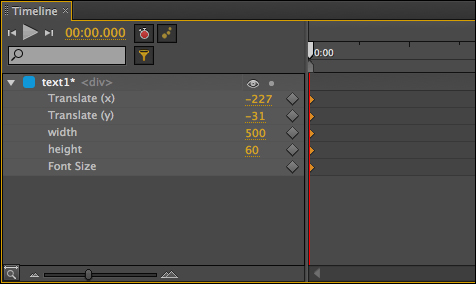
13. Select all keyframe attributes that appear in the timeline for the element text1 or the stage and delete them.
14. Save the file.
You have created and formatted a basic text element in Edge. Now let’s explore how to animate it.
Animating Text Elements
In this exercise, you will learn how to animate text elements.
1. If necessary, open myEdge2.
The file contains a text element filling the stage from side to side and vertically near the center.
2. Select the element: text1.
Previously, you have created what I call front-to-back and targeted animation. In this example, we’ll use a back-to-front animation technique. In this method, you establish the ending-point state first and then create the starting point afterward.
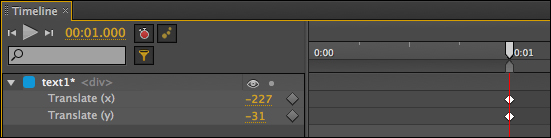
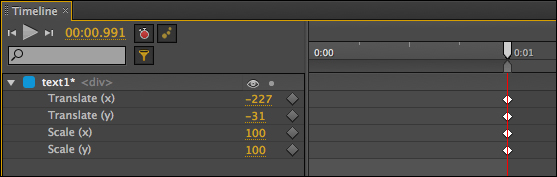
3. Move the Playhead to 0:01 seconds on the timeline.
4. In the Properties panel, click the “Add Keyframe for X and Y” button for the Location property.
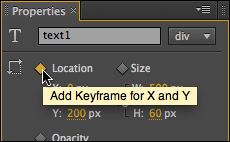
Keyframe attributes for the X and Y coordinates of the text1 element appear on the timeline at 0:01 seconds.
5. Click the “Add Keyframe for Scale X and Y” button for the Size property.
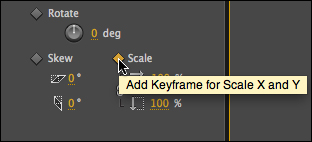
Keyframe attributes for the X and Y Scale appear on the timeline at 0:01 seconds. These keyframes set the ending-point state of the text element. Next, you’ll create the starting-point state.
6. Move the Playhead to 0.00 seconds.
7. If necessary, select the Auto-Keyframe Properties and Proportional Scaling options in the Properties panel to enable them.
8. Set the X and Y Scale property of text1 to 0%.
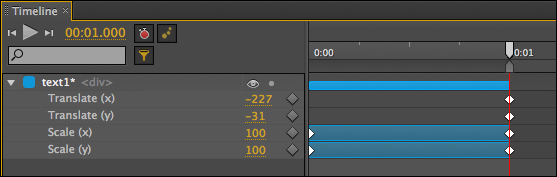
Keyframes appear for Scale (x) and Scale (y) on the timeline at 0.00 seconds, along with a Transition indicating that the element has been animated.
9. Save the file and press the spacebar to preview the animation.
The text element grows from nothing to full size in 1 second. Let’s add some rotation to the animation.
Adding Rotation
In this exercise, you will learn how to add rotation to the text element animation.
1. If necessary, open myEdge1.
The document contains a text element that appears to grow from nothing to the full width of the stage in 1 second. You can add rotation to the element using any of the three animation methods you have learned so far: front-to-back, back-to-front, or targeted. For this exercise, let’s use the front-to-back method. Feel free to experiment with the other two techniques on your own.
2. Move the Playhead to 0.00 seconds.
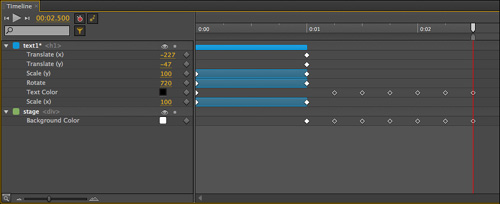
3. In the Properties panel, set a keyframe attribute for the Rotate property.

4. Move the Playhead to 0:01 seconds.
All elements start at 0 degrees. One full rotation equals 360 degrees. Add multiples of 360 degrees to rotate an element more than one time.
5. Set the Rotate property to 720 deg.
A new keyframe and a transition appear on the timeline for the Rotate attribute of text1.
6. Save the file and preview the animation.
As the text element grows to full size, it spins two full revolutions. Next, we’ll add a strobe effect using the text and stage colors.
Creating Frame-by-Frame Animation
Unlike Premiere Pro, Flash, and even Photoshop, Edge can’t produce true frame-by-frame animation. At the moment at least, the animations you’re creating don’t follow the traditional frame metaphor true to film and video production. Instead, Edge animation creates fluid transitions from one element state to another. The element itself isn’t changing, only its formatting and other specifications are. But if you use a few simple tricks, you can create the illusion of frame-by-frame animation.
In this exercise, you will learn how to simulate a frame-by-frame animation sequence.
1. If necessary, open myEdge1.
The document contains a text element that grows from nothing to the full width of the stage in 1 second while spinning two full revolutions. You’ll create a strobe effect by alternating the colors of the text and stage at the same time.
2. Move the Playhead to 0:01 seconds.
3. Select the element: text1. In the Properties panel, add a keyframe for the Text Properties.
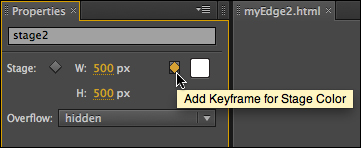
4. Select the stage element. Change the ID to: stage2.
5. Add a keyframe for the Stage Color.
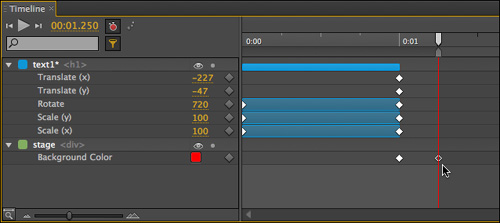
6. Move the Playhead to 0:01.250 seconds.
7. Change the Stage Color to bright red (#ffffff or similar).
The stage color changes to red and a keyframe and a transition appear on the timeline for the stage Background Color attribute.
8. Save the file and preview the animation.
The animation plays as before and then the stage changes from white to red in a smooth transition. Everything is great except for one thing: the effect doesn’t look much like a strobe. A strobe doesn’t transition smoothly; it’s a staccato effect. It flashes. The problem is that Edge creates a smooth transition by default. To produce a quick strobe-like effect you have to turn off the option Generate Smooth Transitions in the Timeline panel.
9. Select Edit > Undo Change background-color to remove the keyframe and transition created in step 7.
The Background Color keyframe for the stage should still be displayed at 0:01 seconds.
10. Click Generate Smooth Transitions in the Timeline panel to disable it.

11. Change the Stage Color to bright red again.
A hollow keyframe appears in the Background Color attribute for the stage at 0:01.250 seconds without a transition, indicating the Background Color transition will be instantaneous this time.
12. Save the file and preview the animation.
The color changes from white to red all at once. Now you need to change the text color in the same way.
13. Select text1 and change the text color to white.
A keyframe appears for the Text Color attribute for text1 at 0:01.250 seconds, but there’s a small problem. We never set up the starting-point state for the text. By adding a Text Color keyframe, you have changed the text color for the entire animation. You can fix this by simply adding another keyframe to set the color of the text at the beginning of the animation.
14. Move the Playhead to 0.00 seconds.
15. Change the text color to black.
A hollow keyframe appears on the timeline at 0.00 seconds to set the starting-point state of the text. To complete the strobe effect, you’ll have to add a few more keyframes for both the text and the stage.
16. Move the Playhead to 0:01.500.
17. Change the text color to black. Change the stage color to white.
18. Move the Playhead to 0:01.750.
19. Change the text color to white. Change the stage color to red.
20. Move the Playhead to 0:02.00.
21. Change the text color to black. Change the stage color to white.
22. Move the Playhead to 0:02.250.
23. Change the text color to white. Change the stage color to red.
24. Move the Playhead to 0:02.500.
25. Change the text color to black. Change the stage color to white.
Now you’ve created multiple standalone keyframes for both the text frame and the stage.
26. Save the file and preview the animation.
The text spins in and then the stage alternates between the colors you selected earlier, creating a nice strobe effect. In this exercise, you learned how to animate elements in a manner reminiscent of traditional frame-by-frame techniques. This method will come in handy for a variety of applications.
The advantage of being able to create text natively in Edge also comes with some limitations. I’ve already described one potential problem of inheriting CSS formatting. Another limitation for text created in Edge is that the content of the text frame itself can’t be animated. That means if you want to, say, morph one word into another or change its color or font, you can’t. Instead, you’ll have to create more than one instance of text in the document.
Animating Multiple Text Frames
Edge allows you to change the position, size, and overall formatting for text, but it doesn’t allow you to edit the individual words, sentences, or paragraphs contained within the element. To change the text, you’ll have to create multiple text elements. In this exercise, you will learn how to work with and animate multiple text elements.
1. If necessary, open the file myEdge2.
The document contains a text element that spins and grows into the center of the screen. The stage and text then alternates colors, creating a strobe-like effect. Let’s add another text element below the first to create a kind of tagline you might use in a banner ad.
2. Move the Playhead to 0:02.500 seconds.
3. Using the Text tool, create a new text element below the existing one. Type: The best new thing since:
4. Change the ID for the new element to: tagintro.
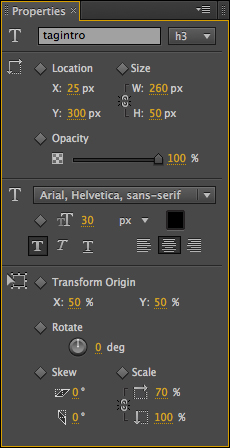
5. Enter the following specifications for the element tagintro:
DIV Tag = h3
X = 25 px
Y = 300 px
W = 260 px
H = 50 px
Font = Arial, Helvetica, sans-serif
Text Size = 30 px
Style = Bold
Scale (x) = 70%
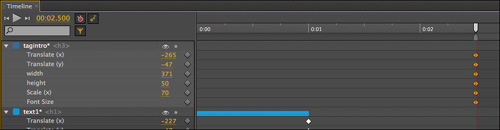
After setting the specifications, several keyframe attributes for the element tagintro should appear on the timeline at 0:02.500 seconds. Most of these keyframes are unnecessary for the intended animation and you’ll delete them shortly. But you may think that since the keyframes appear at a specific time, the element will also appear at a specific time. Unfortunately, that’s not the case with Edge animations.
6. Save the file and preview the animation.
The animation plays as before with the new text fully visible from the first moment. The reason harks back to the basic concept that Edge uses standard HTML, CSS, and JavaScript. The elements—or characters—occupying the stage are simply web-page elements that are declared within the code. All the elements exist in the code from the beginning. Edge doesn’t use a proprietary interface or frame-by-frame analogy.
Edge animations are basically illusions enabled by HTML, CSS, and JavaScript code interpreted by the browser or display device. Therefore, for the element tagintro to be hidden until 0:02.500 seconds, we have to set its starting-point state to be thus until we want it to appear.
Before you set the starting-point state, it’s usually a good idea to remove any unneeded keyframes from the timeline to keep the code as clean as possible.
7. Select and delete all the keyframes for tagintro.
The element tagintro should disappear from the timeline but remain on the stage. Let’s have the text fly in from offstage on the left. We’ll use the back-to-front technique to create the animation.
8. Move the Playhead to 0:03.00 seconds. Make sure the options Generate Smooth Transitions and Auto-Keyframe Properties are enabled in the Timeline panel.
9. In the Properties panel, add a keyframe for the Location property of tagintro.
This establishes the ending-point state for tagintro. If you wanted to change its color or opacity or other attributes, you would add keyframes for each one.
10. Move the Playhead to 0:02.500 seconds.
11. Drag tagintro off the stage to the left. Hold the Shift key to maintain the vertical alignment.
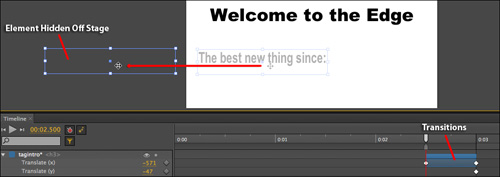
The element tagintro should be completely hidden off the stage to the left. A keyframe attribute for Translate (x) should appear on the timeline with a transition. Watch for any extraneous keyframe attributes and delete them as needed. Note: If tagintro is still visible when you move it off the stage, check that the overflow property assigned to the element is hidden.
12. Save the file.
13. Move the Playhead to 0:02.500 seconds and preview the animation.
The element tagintro flies in from the left side of the stage. Let’s create the first tagline now.
14. Move the Playhead to 0:03:250.
15. Create a new text element below text1 and to the right of tagintro.
16. Type: Sliced Bread.
17. Change the ID for the new element to: tag1.
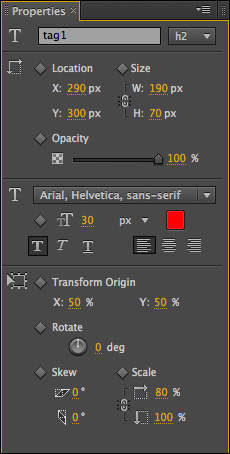
18. Set the following specifications for tag1:
DIV Tag = h2
X = 290 px
Y = 300 px
W = 190 px
H = 70 px
Font = Arial, Helvetica, sans-serif
Text Size = 30 px
Text Color = Red (#ffffff)
Style = Bold
Scale (x) = 80%
Note: When you change some default settings, specifications set earlier may be modified unintentionally. Check all the settings when you are finished to confirm they match the attributes provided above.
19. Select and delete all the keyframe attributes for tag1 appearing at 0:03:250 seconds.
20. Add a keyframe for the Location property for tag1.
You’ve set the ending-point state for tag1.
21. Move the Playhead to 0:03.00 seconds.
22. Drag tag1 off the stage to the right. Hold the Shift key to maintain the vertical alignment.

A keyframe attribute for Translate (x) appears on the timeline for tag1. Now you’ve created the starting-point state.
23. Save the file. Move the Playhead to 0:02.500 seconds and preview the animation.
The element tagintro flies in from the left side of the stage. A moment later, tag1 flies in from the right. Next, you’ll use tag1 to create several other taglines.
Duplicating Elements
When you want to create multiple elements based on the same formatting, Edge allows you to use existing elements as a master copy. In this exercise, you’ll learn how to duplicate an element to make several similar versions.
1. If necessary, open the file myEdge2.
The document contains a text element that spins and grows into the center of the screen, a colorful strobe effect, and a tagline that has been animated by two separate elements. We’ll use the element tag1 to create several similar elements.
2. Move the Playhead to 0:03.500 seconds.
3. Select tag1 on the stage or in the Elements panel.
4. Select Edit > Copy or press Ctrl/Cmd-C.
5. Select Edit > Paste or press Ctrl/Cmd-V.
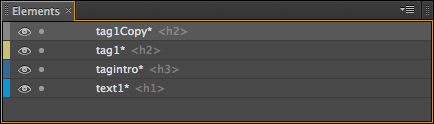
A new element appears in the Elements panel named tag1Copy. It also appears on the stage, but since the two elements are identical, you don’t notice it.
6. Change the ID of tag1Copy to: tag2.
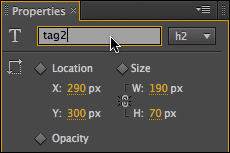
As you can see, tag2 appears above tag1 in the Elements panel. The position of each element in the panel determines its z-index. Since it’s on top, it should be simple to change the content of the element.
7. Select the Text tool and click on the element tag2 on the stage.
The editing window should appear.
8. Change the existing text to: Rock ‘N’ Roll.
When you are done entering the new text, it should be obvious that two text elements exist at the same position on the stage, but at the moment tag2 is not animated. Although we copied and pasted the contents and the formatting of tag1, the new element did not bring along the animation. You’ll have to do it separately.
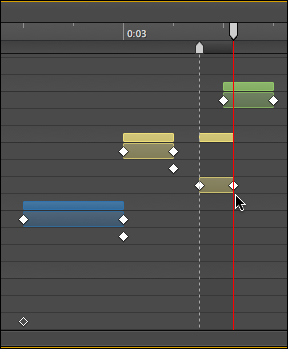
9. Select and copy the transition for tag1 that appears between 0:03:00 to 0:03:250 seconds.
10. Move the Playhead to 0:03.500 seconds.
11. In the Elements panel, select tag2.
The tag2 element appears in the timeline along with a transition starting at 0:03.500 seconds.
12. Save the file. Move the Playhead to 0:03.00 seconds and preview the animation.
The element tag1 flies in and then a moment later tag2 flies in on top of the first element. But since tag1 still appears on the stage, neither element is legible. To make sure the text can be seen, you’ll have to hide tag1 before tag2 gets to its ending-point state. Let’s try adding a fade-out animation.
13. Move the Playhead to 0:03.380.
The tag1 element appears by itself on the stage. The tag2 element is still offstage to the right.
14. Alt/Opt-Click on the Mark.
The Playhead displays a dashed line, indicating that the Playhead and the Mark are not synced.
15. Drag the Playhead to 0:03.550.
The Playhead moves, leaving the Mark at the previous timecode. Since tag1 and tag2 are separated, you should have no problem selecting either one at this moment.
16. Select tag1 on the stage or in the Elements panel. In the Properties panel, change Opacity to: 0.
A tween sequence should appear on the timeline between the Mark and the Playhead for tag1. Don’t forget to resync the Playhead and the Mark.
17. Alt/Opt-Click on the Mark.
The Mark snaps back to the position of the Playhead and resyncs.
18. Save the file. Move the Playhead to 0:02.500 and preview the animation.
The element tagintro flies in from the left; a moment later tag1 flies in from the right. Then, as tag2 begins to fly in, tag1 fades out so that tag2 is fully legible when it assumes its ending-point state. The sequence is nearly complete. To complete the banner, you’ll add a few more tagline elements. But first, let’s duplicate the fade-out sequence you just created on tag1 for tag2. There are several ways to do this, but the easiest is to simply copy the entire sequence from tag1 and then to paste it on tag2.
19. In the Timeline panel, select and copy the transitions for the attributes Translate (x) and Opacity for tag1. Hold the Shift key to select two or more attributes.

20. Move the Playhead to 0:03:500.
21. Select tag2 in either the Timeline or the Elements panel. Select Edit > Paste or press Ctrl/Cmd-V.
The copied sequence replaces the existing transitions and adds the Opacity tween to the timeline for tag2.
22. Save the file. Move the Playhead to 0:02.500 and preview the animation.
Both taglines should fly in and fade out properly. Creating additional taglines is easy. Can you guess how we’re going to do it yet?
Duplicating Complete Sequences
So far you’ve learned how to duplicate element and sequences in Edge, and in this exercise, you’ll learn how to duplicate both at once.
1. If necessary, open the file myEdge2.
The document contains a text element that spins and grows into the center of the screen, a colorful strobe effect, and a tagline that has been animated by three separate elements. To complete the animation, you’ll add a few more taglines and maybe a couple of your own.
2. Select and copy tag2 in either the Timeline or the Elements panel.
3. Select Edit > Paste Special > Paste All Transitions and Elements.
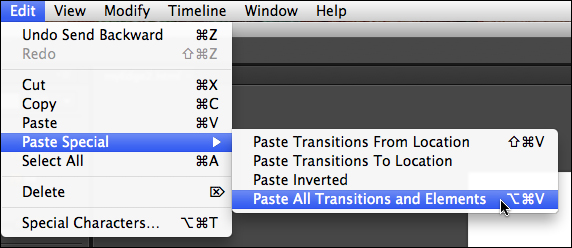
A new element appears in the Timeline panel named tag2Copy. It displays a complete animation sequence identical to tag2. You should notice that both transitions are selected.
4. Drag the transitions for tag2Copy so that they start at 0:04.00 seconds.
5. Change the ID for tag2Copy to: tag3.
6. Change the text to: Elvis.
7. Select and copy tag3 in either the Timeline or the Elements panel.
Note: You could simply continue to paste the copy that is in memory.
8. Select Edit > Paste Special > Paste All Transitions and Elements.
A new element tag3Copy appears in the timeline.
9. Drag the transitions for tag3Copy so that they start at 0:04.500 seconds.
10. Change the ID for tag3Copy to: tag4.
11. Change the text to: PB&Js.
12. Repeat steps 7-11 to create sequences for the following taglines:
At 0:05:000 seconds tag5 = Space Walks
At 0:05.500 seconds tag6 = Red Wagons
At 0:06:000 seconds tag7 = Grilled Cheese
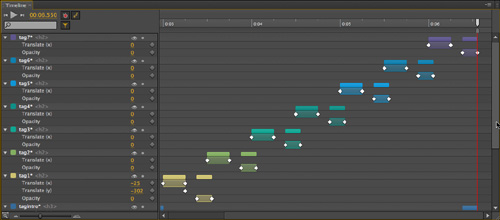
13. Go ahead and create a few taglines of your own at half-second intervals, the funnier the better. Save the file and preview the animation.
The element text1 spins into the screen, the stage, and text strobe, and then the taglines come in one after the other. The one distraction to the animation comes at the end: when the last tagline fades out, the element tagintro is still visible. To correct this, all you have to do is copy the fade-out sequence and paste it on the tagintro when the last tagline starts to fade out.
14. Select and copy the fade-out transition for any of the taglines.
15. Move the Playhead to the timecode where the last tagline begins to fade out.
16. Select the element tagintro.
17. Select Edit Paste or Ctrl/Cmd-V.
A new fade-out transition appears on the timeline for tagintro.
18. Save the file and preview the animation.
The taglines appear one after the other, and when the last one starts to fade out, tagintro fades out, too. Congratulations, you completed your first banner ad in Edge!
Review
In this chapter, you learned how to create text elements and experimented with ways to animate them. You learned how to create frame-by-frame animations and how to duplicate both elements and complete sequences. In Chapter 5, you’ll learn how to import and animate web-based graphics and experiment with more advanced features.