2. Animation Basics
Introduction
The dictionary defines the term “animation” as the rapid display of still images to give the illusion of movement. To the typical graphic designer, animation can be mystifying. We’re used to creating images for specific purposes. It’s not even difficult to understand modifying an image—creating several versions of that image for different purposes, say in an advertising campaign. In animation, however, you don’t have to just create one or two images you have to create thousands.
The next time you watch a movie or cartoon, try to remember that there is no true motion on the screen. What you are seeing are thousands of still images being flashed before your eyes, creating the illusion of motion.
Film-based animation is typically based on a standard of 24 frames per second. That means 24 frames x 60 seconds, or 1,440 frames per minute—86,400 frames per hour! In the days of hand-drawn animation, a full-length feature would require the work of hundreds of artists working over one or more years to complete the task. In fact, the costs became so great that many studios abandoned traditional animation altogether. Other studios developed a variety of methods to cheat the process, such as reusing background images, cutting down on details and color usage, simplifying characters, and so on. Compare animation from the 70s and 80s to ones created in the 40s and 50s and the differences are obvious.
In the 80s, developers tried to apply computer power to the task with mixed results. The computers of that time had a fraction of the graphical power we take for granted today. Animation was difficult and expensive. Sometimes to animate a simple 3-D logo it would take dozens or sometimes hundreds of hours of processing time to complete, and to make a simple change or variation was difficult and would require just as much time to render as the first version. Luckily, this improved as computers became more powerful and their ability to generate images and animation grew. Today, high-quality full-motion animation is being routinely created on high-end desktop computers and dedicated workstations.
Animation can be created by a dozen different methods, both manual and computer-based, but for the purposes of this book, we will concern ourselves with only two types of computer-based animation: frame-by-frame and auto-generation.
Frame-by-Frame Animation
The frame-by-frame technique harkens back to traditional techniques of animation. To produce the illusion of motion or transformation, you must produce a sequence of illustrations that takes the object or character from one point to the next. The typical workflow focuses on creating a series of “keyframes”—key points in motion or character interaction—and then the generation of the frames in-between the keyframes, or “tweens.” Tweening, as it’s known, is crucial to the process of creating realistic-looking animation and is incredibly tedious work. As you can imagine, this type of animation is very time-consuming and laborious, but it is still the best way to create realistic-looking animations that involve people and animals.
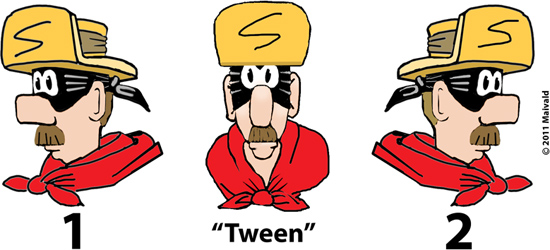
In high-quality, frame-by-frame animation, sometimes you must draw each frame manually. To turn the character’s head from keyframe #1 to keyframe #2 in 1 second would require 24 individual frames. To make his head turn smoothly, you would have to insert approximately 22 unique perspectives, such as the tween pictured.
Most of this type of animation is now generated using sophisticated 3-D modeling software, in which an artist designs a wireframe structure, or model, for each character and object within the story. Characters and objects are placed in a scene in specific positions, and then the program itself generates the animation, surfaces, and other visual effects. In fact, the best feature of this type of animation is the ability to change camera angles, perspectives, lighting, or other visual appearances quickly and easily, something that would have been impossible to do with hand-drawn images.
Although you would probably not want to manually create the thousands of keyframes and tweens you would need for a full-length feature, this technique can still be quite useful for a banner ad or short animation. We’ll explore how you can use this technique in Edge starting in Chapter 3.
Auto-Generation
Auto-generation is the best way to describe the type of animation that programs like Flash and Edge are good at. Instead of drawing each keyframe and tween yourself, the program does most of the drudgework for you. In this workflow, you create an object, or character, and then position it on the stage to create a keyframe. Then you target another moment on the timeline, make changes to the character or characters that exist at that moment, and generate another keyframe. If desired, the program can create all the tweens between these keyframes automatically.
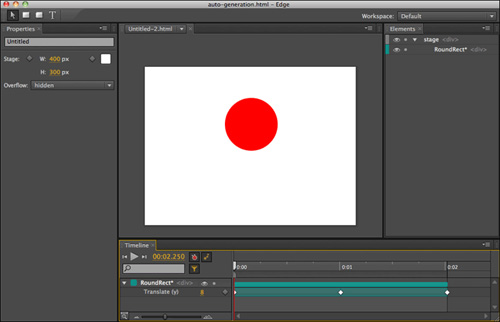
Here is an example of auto-generation in Edge. The circle is a native Edge element that has been positioned to create three keyframes (white diamonds), placing the circle at the top and bottom of the stage to simulate a bouncing motion. The program then auto-generates the “in-between” frames to create the illusion of motion.
Part of the trick that makes auto-generation possible in Flash and Edge is that the graphics are vector-based. Transforming a circle into a square or a triangle is basically only a change to a mathematical formula or a CSS specification, something that’s considerably easier for a computer to do than transforming an image of your left profile to an image of your right profile in a realistic motion. While Flash animations have the advantage of some very sophisticated features and capabilities, Edge can still do some amazing things and doesn’t require a proprietary browser plugin to work. We’ll explore auto-generation starting in Chapter 3.
So what are we waiting for? Let’s get started.