
3. Animating Objects
Working with Objects
Edge Preview 2 offers three tools for creating native elements for your animations: the Text tool, and the Rectangle and Rounded Rectangle tools. We’ll explore the Text tool in Chapter 4, but for now let’s concentrate on objects. As I mentioned earlier, the Rectangle and Rounded Rectangle tools are basically interchangeable. They both create simple div elements, albeit one creates divs featuring rounded corners. But remember, the roundness of the corners is one of the attributes that can be edited and animated, and all native rectangular elements can be converted from rectangular to rounded and back again, as desired.
It’s also important to remember that Edge is building all the animations using standards-based HTML, CSS, and JavaScript code. There’s nothing special about the divs created by the Rectangle or Rounded Rectangle tools. The implication of this thought is that any type of animation you apply to native Edge divs could also be applied to divs in any normal web page. We’ll explore the possibilities of using Edge to animate standard web pages in Chapter 6.
Creating a New Edge Document
Before we can animate a single div you’ve got some work ahead of you. You’ll have to visit Adobe Labs, and download and install Edge Preview. As of this writing, Edge Preview 2 was the most current version, but the program is being updated and bugs are being fixed on a regular basis. So I recommend that you keep on eye on the Adobe Labs site for any new versions. You can download Edge Preview at the following URL:
http://labs.adobe.com/technologies/edge/
In this exercise, you will create and modify an Edge document:
1. Launch Edge Preview.
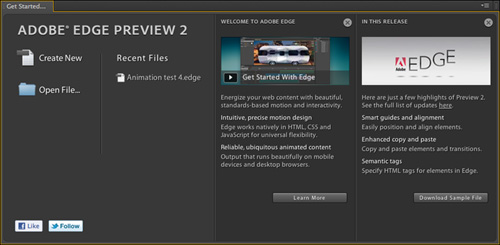
The Get Started screen appears. In this window, you can start a new file, open an existing file, select a file recently created, or access online tutorials or support materials.
2. Select File > New or press Cmd/Ctrl-N.

A new Untitled stage opens. The size of the stage will be a default dimension the first time you use Edge. Thereafter, it uses the size of the last stage that was created.
3. If necessary, switch to the Selection tool and click on the stage to select it.

The Properties panel should display the dimensions of the current stage.
4. If necessary, change W (Width) to 500 px and H (Height) to 500 px.
The stage should now appear 500 pixels wide and 500 pixels high.
5. In the Overflow menu, select hidden.

6. Select File > Save.
7. In the Save dialog box, create a new folder. Name the folder EdgeSamples.

8. Save the file as myEdge1 in the new folder.
9. Open a Windows Explorer or a Finder window and navigate to the location of the EdgeSamples folder.

If you took a moment right now to look for your new document, you may be surprised to find that Edge has actually created a half dozen or more files and at least one new folder. Unlike programs like Flash, which build proprietary graphic file formats, Edge uses standard HTML, CSS, and JavaScript. The magic made possible by Edge requires files that contain all these different types of code. Some of the files are unique to this one document, while others—like those in the edge_includes folder—will be used by all of your Edge animations. In Chapter 6, we’ll explore how you need to work with these files with existing web pages and how to incorporate them on an existing website. For the time being, let’s just have some fun.
Using the Rectangle Tool
In this exercise, you’ll learn how to use the Rectangle tool and add some basic animation.
1. If necessary, launch Edge Preview and open the file myEdge1.
2. Select the Rectangle tool and draw a rectangle approximately 1-inch square. Hold the shift key while you are drawing to force the rectangle into a perfect square.
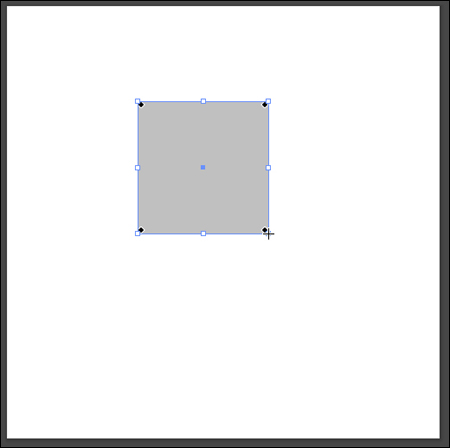
The program doesn’t give you any feedback about the element as you’re drawing; you’ll just have to guess at the size of rectangle. It will appear either in a default gray color or in the last color you used in the program. Once you’ve completed the element, the Properties panel should then display nearly a dozen specifications for the element, including: ID, Location, Size, Opacity, and so on.

Edge automatically gives each element a generic ID. This ID is used to identify the element within the associated HTML, CSS, and JavaScript code. Changing the name of the element in the Properties panel will then update its ID throughout the code. Some animations can get quite dense with elements, so it’s a good idea to give them unique names whenever possible.
3. Select the current ID. Change the ID to box1.
Let’s also standardize the size and other specifications so we’re all working with the same attributes. When you want to set the location of an element, remember that the coordinate (x,y) system is based on the upper-left corner of both the object and stage.
4. Set the following specifications for box1:
X = 175 px
Y = 100 px
W = 150 px
H = 150 px
Opacity = 100%
These settings will create a rectangle 150 pixels square, in the center of the stage horizontally but slightly above the vertical center.
5. Click the Background Color picker. Select a bright red color.

6. Save the file.
Animating the Background Color
Although there are several ways to create animations in Edge, they all have three basic steps in common. Each method requires that you:
• Set an initial or default state or specification,
• Establish a duration or point in time for the change to take place, and then
• Select the target state or specification you wish to establish at the end.
In this exercise, you will change the background using the method I like to call “front to back.”
1. If necessary, open myEdge1.
2. Select the element box1 on the stage.

The box1 element should appear in the timeline featuring the background color attribute and a keyframe (white diamond) at 0:00 seconds. You may also see other keyframe attributes appearing on the timeline that are not needed for the upcoming animation, such as Translate (x) and Translate (y) for box1, and the width and height for the stage element. These keyframes were added automatically because we modified these attributes while the Auto-Keyframe Properties button was selected in the timeline. In most cases, the Auto-Keyframe Properties option will make the process of creating animations quicker and easier, but at certain moments, like this one, it may add unneeded or unwanted keyframes and attributes to the timeline.
3. Select the width and height attributes for the stage element and delete them.
It’s important to delete the attribute, but not the element itself. You’ll know if you selected the attribute because the keyframe will turn yellow or gold in color. If the element itself is selected, the keyframes will remain white.

4. Select and delete all attributes from box1, except background color.
5. Move the Playhead in the timeline from 0:00 seconds to 0:01 seconds.

6. If necessary, select box1. Change the background color to blue.
Edge adds a keyframe at 0:01 seconds and a transition to the background color attribute.

7. Save myEdge1. To play the animation, press the spacebar.
The rectangle box1 should change color, from red to blue.
Adding Motion
As you can see, it’s very easy to transform an element attribute. In this exercise, you’ll learn how to add some motion.
1. If necessary, open myEdge1.
2. Select the Element box1 on the stage or timeline. Note the attributes displayed on the timeline.
The timeline only displays the attribute Background Color. If you want to use the current position as the starting point for the motion, you’ll need to add a keyframe to identify the x/y coordinates of the element. I like to call this method front-to-back animation, because you’ll establish the starting point first. You can also create an animation by starting at the finishing point. I call this method back-to-front animation. At times, you will find one method preferable over the other depending on your goal for the animation. You’ll learn both types of animation as you work through this book.
3. If necessary, move the Playhead to 0:01 seconds.
4. In the Properties panel, click the “Add a Keyframe for X and Y” button for the Location property.

5. Move the Playhead to 0:02 seconds.
6. Drag box1 to the bottom of the stage. To move it straight down, hold the shift key as you drag.

Edge adds a keyframe at 0:02 seconds and a transition to the Translate (y) attribute on the timeline. If you did not move the rectangle straight down, you will also see a Translate (x) attribute that will animate the horizontal movement. If you don’t want to preserve the horizontal movement, you can select and delete the unwanted Translate (x) attribute. Deleting the horizontal attribute doesn’t affect the vertical movement.
To select any keyframes or transitions, you can click on them directly with the Selection tool. To select more than one item, hold the Shift key as you click or marquee-select them. Note: Just be sure to start your marquee in an open space on the timeline.

7. Save myEdge1. Press the spacebar to play the animation.
The rectangle changes color and then moves down to the bottom of the stage.
Reversing the Process
If you’re like me, your mind is already racing to try different kinds of movements and transformations and to start experimenting with them, but stick with me for a few more minutes. We’ve only scratched the surface of all the cool things Edge can do. If I asked you to reverse the animation you just created, you probably could accomplish it pretty easily with just the skills and techniques you’ve already learned. But Edge has more than a couple of tricks up its sleeve that will really wow you. For example, in this exercise, you will learn how to reverse an animation by using copy and paste.
1. If necessary, open myEdge1.
At this moment, the animation consists of two transformations: the rectangle changes color and then moves to the bottom of the stage. You could leave the rectangle where it is; you could move it to a new position; or you could reverse the entire animation and put the element back to how it started. Edge makes reversing the animation as simple as it can get.
2. Locate the Translate (y) attribute for box1 on the timeline. Select the transition between 0:01 and 0:02 seconds for this attribute.
3. Select Edit > Copy or press Ctrl/Cmd-C.
4. Move the Playhead to 0:02 seconds. Make sure box1 is still selected.
5. Select Edit > Paste Special > Paste Inverted.
A new transition appears on the Translate (y) attribute between 0:02 and 0:03 seconds.
6. Save the file and press the spacebar to play the animation.
The rectangle changes color, moves to the bottom of the stage, and then returns to the original position. Wow! Edge did all the work for you and, best of all, it works for any type of animation. Let’s reverse the color change, too.
7. Locate the Background Color attribute for box1 on the timeline. Select the transition between 0:00 and 0:01 seconds for this attribute.
8. Press Ctrl/Cmd-C to copy the transition.
Although the Background Color was the first animation created, you’re under no obligation to reverse the animation in the same order. Pasting the animation can be done at any point along the timeline.
9. If necessary, move the Playhead to 0:02 seconds. Select Edit > Paste Special > Paste Inverted.
You’ve now reversed the animation of the Background Color attribute.

10. Save the file and press the spacebar to play the animation.
The color changes back to red at the same time the rectangle moves back to the top of the stage.
Modifying the Timeline
As easy as it was to create the animation, it’s just as easy to modify it, to make it adapt to your own needs and desires. In this exercise, you will modify the timeline to adjust the order of the actions.
1. If necessary, open myEdge1.
Let’s change the timeline to force box1 to change back to red before it moves back to the top of the stage.
2. Select the transition for the Translate (y) attribute between 0:02 to 0:03 seconds.
3. Drag the transition to the right so that it starts at 0:03 seconds.
4. Save the file and press the spacebar to play the animation.
The rectangle changes color, moves down to the bottom, changes back to red, and then moves back to the top. Changing the order of the actions was just a simple matter of dragging the transitions to a new position on the timeline. Let’s swap the color change and the motion.
5. Drag the transition for the Translate (y) attribute to start at 0:02 seconds. Drag the transition for the Background Color attribute to start at 0:03 seconds.
6. Save the file and press the spacebar to play the animation.
The rectangle changes color, moves down to the bottom, moves back to the top, and then changes back to red. You can move the animation anywhere there’s an open spot on the timeline.
7. Drag the transition for the Translate (y) attribute that starts at 0:02 seconds to start at 0:04 seconds. Drag the Background Color attribute that starts at 0:03 seconds to start at 0:05.

As easy as it was to move the animations around the timeline, you can also change the speed or duration of the transformation just as easily.
8. Select the ending keyframe for the Translate (y) at 0:05 seconds. Drag the keyframe to 0:04.500 seconds on the timeline.

By shortening the transition, you cut in half the time the rectangle takes to move from the bottom to the top of the stage.
9. Select the beginning keyframe for the Background Color starting at 0:05 seconds to start at 0:04.500 seconds.
By extending the transition, you now added a half a second to the time it takes for the color to change from blue back to red.

10. Save the file and press the spacebar to play the animation.
The animation starts as before, but this time when the rectangle touches the bottom of the stage, it pauses for 2 seconds. Then it moves back up twice as fast as it descended but changes color more slowly. As you can see, the Edge interface makes it easy to both create and edit complex web animations.
Using the Rounded Rectangle Tool
The Rounded Rectangle tool is basically identical to the Rectangle tool. In this version of Edge, they both produce div elements that are formatted by CSS and JavaScript. The only real difference is that the elements created by the Rounded Rectangle tool will display rounded corners by default. But at the same time, you should remember that rounded corners can be applied to all rectangles. In this exercise, you will explore some of the attributes of the Rounded Rectangle tool.
1. If necessary, open myEdge1.
The file contains a single rectangle. Let’s make some room for a new element.
2. Move the Playhead to 0:00 seconds. Select the element box1.
3. In the Properties panel, change the Translate (x) attribute to 75 px.
The rectangle moves to the left. A Translate (x) attribute should appear on the timeline. But this attribute adds a horizontal movement to the element that we don’t want. To preserve the animation as you originally created it, you’ll have to eliminate that attribute.
4. Select and delete the Translate (x) attribute for the box1 element.
5. Select the Rounded Rectangle tool and draw a new element to the right of box1 and try to match its size and vertical position.
As you draw, note how Edge displays smart guides to indicate when your new element aligns to or matches the dimensions of the existing rectangle.

6. In the Properties panel, select the ID for the new element. Change the ID to: box2.
Let’s match the size and some of the other specifications of box1.
7. Set the following specifications for box2:
X = 300 px
Y = 100 px
W = 150 px
Y = 150 px
Opacity = 100%

The Rounded Corner tool will produce a rectangle with rounded corners. Pretty obvious, right? The problem is there’s no way to know how rounded your corners may be when you start drawing. When the tool draws a new rectangle, it matches the previous radii that were used—you don’t get access to the tool’s properties specifications until after you finish drawing the element. But you’re not stuck there; Edge gives you complete control over this attribute after the rectangle is created. You can set the radii all at once, or specify the roundness for each corner or each segment of the corner. For now, let’s create symmetrical corners.
8. In the Properties panel Border radii section, select the option: “1.”

The “1” option allows you to enter a single specification to control all four corners.
9. Change the Border Radii option to: 50.
The timeline may display several keyframe attributes at 0:00 seconds after you make these changes. These are not needed and may cause trouble.

10. Select and delete any keyframe attributes for box2.
If the option Only Show Animated Elements is selected in the Timeline panel, the reference for box2 should disappear from the timeline.
11. Save the file and press the spacebar to play the animation.
The rounded corner rectangle (box2) is not animated. Let’s borrow the animation from box1.
Duplicating an Entire Timeline Animation
Edge allows you to apply an existing animation to any other element. In this exercise, you will create an entire animation sequence for the new rounded-corner rectangle by using copy and paste.
1. Using the Selection tool, marquee the entire timeline animation for box1.

2. Select Edit > Copy or press Ctrl/Cmd-C.
3. Move the Playhead to 0:06 seconds.
4. Select the element: box2.
5. Select Edit > Paste or press Ctrl/Cmd-V.
6. Click the Zoom-to-Fit button in the Timeline panel to display the entire timeline for myEdge1.

The animation timeline and transitions for box1 have been applied to box2.
7. Save the file and press the spacebar to play the animation.
The element box2 displays the same animation as box1, but starting at 0:06 seconds. Edge allows you to copy and paste animation not only from one element to another, but you can even apply the animation one or more times to the same element. By using copy and paste, you can create repetitive sequences in one animation or reuse animation from one file in another.
Creating a Subanimation Sequence
Earlier, we explored a basic way of creating an animation sequence by establishing an element’s default state and then targeting the end point of the desired animation. In this workflow, you must create keyframes in each location if Edge doesn’t do it for you. But there’s another way to create an animation sequence that can take care of some of the tedious tasks automatically. In this exercise, you’ll learn how to create a subanimation clip by using the Playhead and the Mark to identify the beginning and end of the sequence.
1. Move the Playhead to 0:08 seconds.
At this point of the timeline, box2 has moved to the bottom of the stage.
2. Move the Mark separately to 0:07 seconds.
By splitting the Playhead from the Mark you are targeting this point of the timeline for the subanimation.
3. In the Properties panel, change the Rotation attribute to: 360 deg.

A Rotate attribute is added to the timeline and a transition appears from 0:07 to 0:08 seconds.
4. Save the file and press the spacebar to play the animation.
The rounded-corner rectangle should rotate 360 degrees as it moves to the bottom of the stage. By predefining the duration of the subanimation, you saved time and a few extra steps. Don’t forget to resync the Playhead and the Mark.
5. Alt/Opt-Click on the Mark or the Playhead.
The Mark snaps to the position of the Playhead and resyncs.
Transforming Border Radii
As you may have already guessed, Edge allows you to animate any of the attributes that appear in the Properties panel. That means you can even transform the radii of any existing element. In this exercise, you will learn how to change the rounded-corner rectangle into a square and then into a circle.
1. Open myEdge1, if necessary.
2. Move the Playhead to 0:07 seconds.
At this point, box2 should be starting to move down to the bottom of the stage.
3. Alt/Opt-Drag the Playhead to 0:08 seconds.
The Playhead should separate from the Mark, leaving the Mark at 0:07 seconds.
4. In the Properties panel, change the Border radius to: 0.
New transitions should appear at the targeted sequence for each of the Border Radii.

5. Save the file.
Animations can be played at any point on the timeline.
6. Move the Playhead to 0:06 seconds and press the spacebar.
The animation plays from the targeted point of the timeline. The rounded rectangle (box2) morphs into a square. Note: To stop the playback, you can press the spacebar a second time.
7. Move the Playhead to 0:12 seconds. Move the Mark to 0:10 seconds.
To create a perfect circle, the Border Radii should be half of the height and width.
8. In the Properties panel, change the Border Radii to: 75.
New transitions should appear in the targeted sequence for each of the Border Radii.
9. Alt/Opt-Click the Playhead to sync the Mark.
Note: It’s important to make sure you resync the Mark each time you are done creating a subanimation clip. It will not resync automatically and may create unintentional sequences when it is separated from the Playhead.
10. Save the file. Move the Playhead to 0:10 seconds and press the spacebar.
The rectangle (box2) morphs into a circle.
Review
In this chapter, you learned how to use many of the basic capabilities of Edge Preview 2. You created simple objects and learned a few ways to animate them. You worked with the various panels of the program to access a host of animation features. And you experienced many of the productivity enhancements offered by Edge by copying and pasting existing timeline transformations from one element to another. In Chapter 4, you will learn how to use the Text tool to create live text elements within Edge.