You already saw how to use some brushes in Sculpt mode to change the mesh’s topology in Chapter 2. You can use similar tools to achieve different effects in Texture Paint, Vertex Paint, and Weight Paint. In Blender, we can paint or modify a texture in Texture Paint mode, both in the UV Image Editor as a two-dimensional image or in the 3D Viewport applied to the object.
Vertex Paint assigns a color to the vertices to create particular effects. In Weight Paint, we give weight to the vertices to control the intensity of the impact of something, for example, particles. In addition, we can create textures for our PBR materials by painting them within Blender, or we can make them with external software such as Gimp, Krita, and Materialize, and then apply them to our materials. This chapter will teach us how to use Blender’s internal digital painting tools and devices available in other software like Krita, with or without using a graphics tablet. These tools will be helpful to get better and more customized textures and materials.
Introduction to color theory
Digital painting
Texture Paint: paint or modify a texture
Vertex Paint: assign a color to the vertices to obtain particular effects
Weight Paint: assign a weight to the vertices to control the intensity of some effects
Painting in Blender 3.0
This chapter will show us how to use Blender 3.0 for digital painting on two- or three-dimensional surfaces.
Doing digital painting and drawing with 3D software allows interaction between the second and third dimensions. We have acquired a good mastery of our software in the previous chapters, and now we will begin to see some new features.
In Blender, as we have seen before, we can sculpt the topology with Sculp mode. This chapter will deepen the exciting union between the second and third dimensions. First, we will cover the basics of color theory, including primary colors and all the theoretical tools needed to understand the color’s language.
Then, we will learn about Blender and Krita’s painting tools and see how to use and customize them for a graphics tablet.
But let’s start with a brief introduction to theory.
Introducing Color Theory
Let’s begin to consider the importance of color. It influences the atmosphere of the scene and the observer’s mood.
To achieve quality effects for photorealistic renderings and paintings or drawings, we need to understand the basics of color theory. This section will deepen our knowledge of color theory using the available Blender tools. We also begin to become familiar with Blender’s devices for color modification.
In Ancient Greece, Aristotle studied the theory of color, then came Sir Isaac Newton, and later Goethe.
Several elements determine the color of an object. These characteristics remain constant in traditional painting, digital painting, and 3D graphics renderings.
The color of the object
The color of the surrounding environment that the object reflects
The intensity and color of the light
The atmosphere of the environment
We must consider all of these elements when creating our 3D scenes. In addition, we must understand the basis of color theory that scientists and philosophers have developed over the years.
In these studies, the researchers have created several types of color wheels to help understand the relationship between one color and another.
The most used is the 12-color wheel, developed on Newton’s color circle, which allows us to figure out the basic structure of color.
Understanding Color Relationships
Color theory teaches us about relationships through colors using the wheel. It helps us understand the language structure of colors and supports us when we need to use them.
First, let’s understand what primary, secondary, and tertiary colors are and their relationships. Primary colors differ according to the model we are considering.
The additive method (RGB) is where the light makes the colors. That’s the digital method. The primary colors are Red, Green, and Blue, and, if combined with the same intensity, they give white as a result. Instead, the absence of light creates black.
Instead, the subtractive method (CMYK) is composed of matter. That’s the analog method. In this model, adding pigment subtracts the light. The model refers to the four ink colors: cyan, magenta, yellow, and black.
Newton was the first researcher who composed a color wheel to understand the relationships between colors, explaining his theories in the treatise “Opticks, or, a Treatise of the Reflections, Refractions, Inflections, and Colours of Light.”1
We create secondary colors by mixing primaries, and we make tertiary colors by combining a primary with a secondary color. We have 12 colors, of which three are primary, three secondary, and six tertiary.
In addition, there are analogous colors, which are harmonious and close to each other in the wheel. There are also complementary colors, which are contrasting and opposite to each other on the color wheel.
Betty Edwards studies color theory theoretically and develops it from a practical point of view in some books.
For a deeper understanding of the concepts developed in this section about theory and its practical application in painting, it is interesting to read her book Color: A Course in Mastering the Art of Mixing Colors.2
From color theory comes the terms hue, saturation, and value, of extreme importance in defining the properties of a color.
Let’s learn their definitions and main concepts.
Value, Saturation, and Hue
Continuing with the discussion on color theory, we can say that each color has three main properties: value, saturation, and hue.

The Blender color picker
RGB is the additive model that uses Red, Green, and Blue as primaries colors.
HSV (or HSB) measures color intensity through brightness.
Hex (or Hexagesimal) allows us to define colors in code like HTML, CSS, etc.
The HSV panel will enable us to determine the material color’s hue, saturation, and value in Blender. We have the eyedropper and the Alpha value in addition to these tools in the color picker.
We can copy any desired color from the Blender window with the eyedropper. With the Alpha value, we set the transparency. Finally, we can see the effect of the trasparency applied to the object in 3D view only after setting the blend mode to Alpha Blend, Alpha Clip, or Alpha Hashed in the Settings window of the Material panel in the Properties panel.
HSV is the default method in Blender; it is an additive color composition method that considers the perception of hue, saturation, and value.
Let’s see the meaning of these three components and how we can use them in Blender by modifying the Blender color picker.

Hue, saturation, and value at zero in the Blender color picker
The figure shows that we obtain pure black by setting the Hue, Saturation, and Value values to zero. First, let’s describe these three color components.
The value modifies the ratio, or percentage, of black and white.

The effect of value in a standard Blender 3.0 material
So, the value is the degree of lightness, or darkness, of the color. In the Blender color picker, if this intensity is 0, no light will be added to the tone, while if this intensity is 1, the color will be visible in all its brightness.
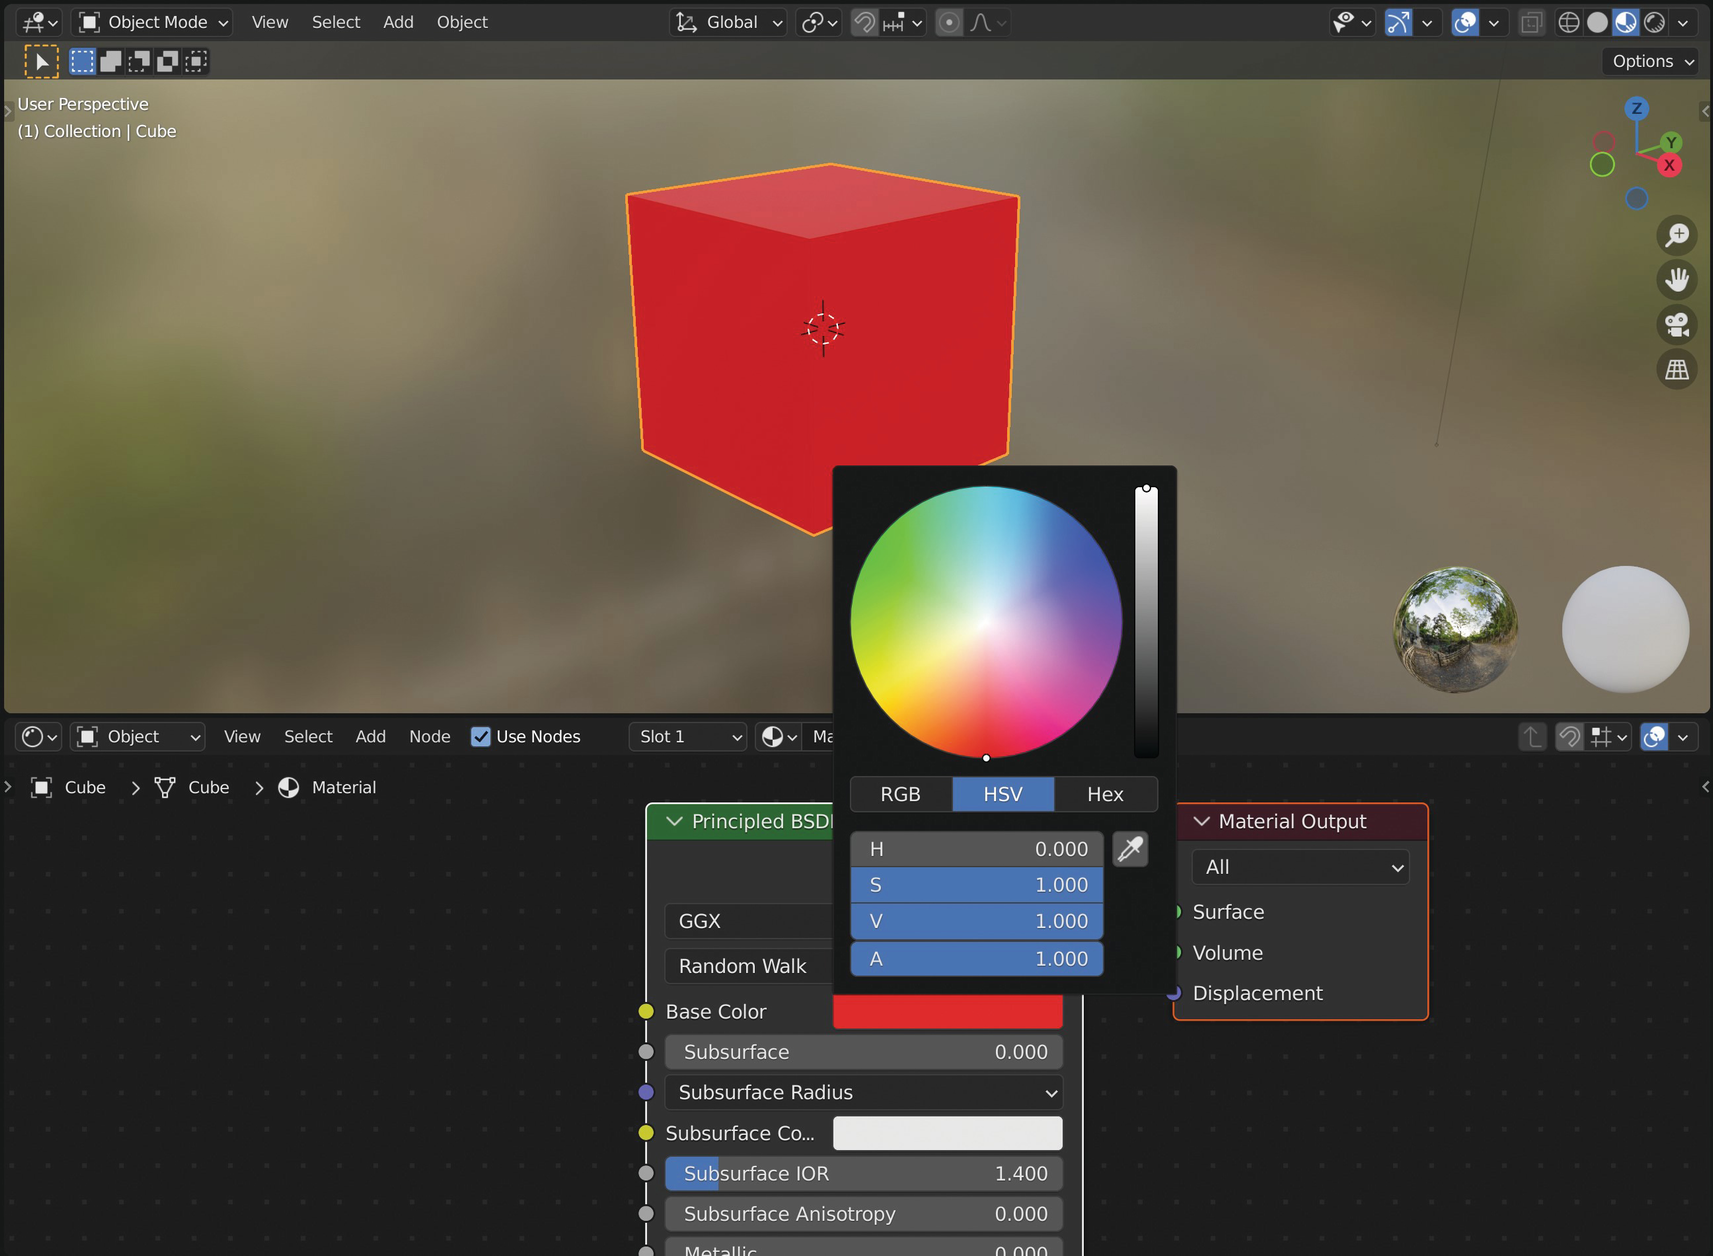
The effect of value and saturation
If the saturation value is equal to zero, the color is achromatic.
When bringing the value to one, the color reaches the maximum intensity, as shown in Figure 5-4. Finally, the hue is the pure color. If we set the value and saturation to 1, we can select the colors at their maximum purity by modifying only the hue values rotating in a circle.
The changing movements of value, saturation, and hue
Changing the values of the Blender color picker boxes, we see the sliders move according to the white lines highlighted in the figure. So, the value cursor moves on the black-and-white diagram on the right, while saturation and hue go around in the color wheel.
This simple operation allows us to understand the influence of every single component.
Now that we have faced the main concepts of color theory, let’s go on with digital painting and drawing.
Introducing Digital Painting
We can import drawing or painting works, 3D models, textures, etc., into a digital workspace through digital scanning or photography.
We can work with masking techniques and virtually reproducing the paper masks used when painting with the airbrush, hiding parts of the drawing that we don’t want to paint.
We can use grids and composition aids that are displayed on the screen but not shown in the final image.
We can work on different layers and create multiple copies of the same drawing while maintaining a base layer and painting on the others.
We can add effects made available by various software.
We can apply our drawings or paintings to the objects and make them interact in multiple ways with the three-dimensional space in Blender.
Blender has sophisticated tools for digital painting, as we will see in later sections.
We can use various software such as Photoshop and Gimp to do digital painting. In addition, some software is created specifically for artwork. We can integrate these products into three-dimensional modeling and graphics workflow.
The first one we’ll discuss is Krita.
Krita
Krita gives us critical help to extend the features of digital painting. We mentioned it in Chapter 4, when we talked about Gimp.
As we already said, the difference between the two pieces of software is that while Gimp is more suitable for image editing, Krita is better for drawing and digital painting.
It’s worth dwelling for a moment on its painting tools that we can use to create textures, painting and sculpting devices, masks, etc.
As we will see in the exercises of this chapter, Blender painting tools, joined to those of Krita, offer us infinite creative possibilities and extend our pictorial possibilities.
Krita allows us to realize painted textures for Blender materials with its numerous brushes. We can implement cartoon, pictorial, or even realistic textures.
As far as digital painting is concerned, Krita is probably the best open source alternative to Photoshop and Gimp, with a wide range of customizable brushes, layering, blending modes, etc.

Krita default interface
As we can see in the image, all the tools for digital painting are in an intuitive interface. If we want to change the interface layout and the tools, we can change the workspace, as in Blender. We click the icon “Choose workspace” in the upper-right corner and choose the favorite workspace in the opening window.
On the other hand, if we want to add some panels or re-add one that we closed by mistake, we click its name in the window that opens from the main menu by selecting Settings ➤ Dockers.
Let’s see some of the tools Krita gives us.
Krita’s Tools, Palettes, and Color Selectors
Brushes are the most exciting tools for us, but before learning about them, let’s briefly mention the devices that help us modify the image data.

Krita’s tools, palettes and color selectors, and brush presets
The Krita toolbar contains all the main tools for creating, selecting, and editing graphic objects.
The Selection tools allow the selection of parts of the drawing in different ways.
The Paint tools create various strokes, which we define with a shape, a size, a kind of opacity, and other elements. They depend on the definition of the image.
The Vector tools do not depend on image definition, but we can modify them using control points like the Bézier curve or freehand path tool.
The Guide tools are drawing aid tools, such as a grid, perspective, or assistant tool.
The Transform tools transform objects or layers on the canvas.
Then we have customizable palettes, which allow us to choose the right colors to get the visual impact of the final project. Krita provides some predefined ones and enables us to create customizable ones. A range of colors is grouped according to different logic and the result we want to achieve.
On the other hand, the color selectors are the tools that allow us to choose the color model, depth, and profile. They allow us to select an additive or subtractive color model; a depth of 8, 16, or 32 bits; and different color profiles.
In this chapter’s “Introducing Color Theory” section, we already saw some of these concepts.
The Brush Presets panel contains all the brush tools divided into categories such as Paint, Sketch, Ink, Texture, etc.
The range of tools is comprehensive and customizable in endless ways.
Now let’s see how to use Krita for digital painting.
Krita’s Brush System
Krita contains a palette of predefined brushes, the Brush Presets panel. These brushes are ready to use and were built to demonstrate the different creative possibilities of this software.
They are divided into several categories and are helpful for other modes of use, ranging from digital painting to 3D texturing, pixel art, etc.
We can paint with the brushes by clicking and dragging the left mouse button or, as we will see shortly, with a graphic tablet.
We can modify the size of the brush by pressing Shift+LMB; we can decrease the opacity by pressing I and increase it by pressing O.
We can modify the brush type in the Brush Presets window.

Krita’s Brush Presets panel with all the available brushes
It is just like actual painting or drawing, where we can use many tools: pencils, charcoals, chalks, watercolors, oil painting, etc.
With its numerous tools, Krita imitates the effects of real painting very effectively.
The available tools give us many editing possibilities because each is customizable in the Edit Brush Settings window, which allows us to edit options and create a virtually infinite number of Drawing and Painting tools.

The Edit Brush Settings button in Krita
Many parameters allow us to vary presets in this window, including Size, Rotation, Opacity, etc.
As in the case of Blender brushes, also in Krita, we start from standard models that we can then modify and save for later use. We find the saved tools together with the others in the Brush Presets panel.
As we saw in Chapter 2, in Blender we must distinguish between tools and brushes. The tools are on the toolbar and have general settings; brushes are our tools saved with the customized settings, and we can save them directly in the Edit Brush Settings panel.
Also in Krita, we have the brush tips and the brush presets: the former are the basis for the latter. We can choose and modify primary forms from time to time with all the parameters provided by the Edit Brush Settings window.
It is essential to use a graphic tablet to make the best use of these tools and extend the pictorial or sculptural functions beyond the use of the mouse.
Let’s see how to choose the graphics tablet and set up our work.
Graphics Tablets with and Without Screens
Using a graphics or pen tablet, we can control our brushes and strokes more easily than with a mouse.
For example, we can modify the pressure sensitivity to alter the radius and the strength of the brushes in every painting or sculpting mode.
We can choose a graphics tablet or a drawing tablet with or without a screen.
The graphics tablet is a sensitive surface connected to a computer. In contrast, the drawing tablet with a screen allows us to draw directly on the display. In some ways, a tablet or PC with a touch screen is easier to use than a pen because we can draw by looking simultaneously at the screens.
In other aspects, a graphic tablet without display is more comfortable because it shows the view freely and allows us to work at a certain distance from the screen, as in traditional painting and drawing.
Also, a graphic tablet has a much lower cost. We can use it effectively with Blender and image editing and painting software like Gimp or Krita.
There are many good-quality graphics tablets such as Wacom, Huion, Ugee, etc. They work well and have many functions, including the following:
Availability of a large work area with a surface that simulates the tactile experience of paper
Possibility of tilting up if we think it necessary
High-level pen pressure sensitivity
Hotkeys that we can customize with our keyboard shortcuts
Easy to install and easy to use for left and right hands
Possibility of connection with mobile phone and support of the Android operating system
Support for multiple operating systems and compatibility with numerous software including Adobe Photoshop, Pixologic ZBrush, and of course Blender
A graphics tablet is also great to use with the Grease Pencil, the recent Blender painting and animating tool that we, unfortunately, don’t cover in this book.
We prefer the graphics tablet without a screen. We can comfortably use it in Blender Sculpt and Edit mode. Also, it is perfect for experimenting with painting and sculpting in Blender and Krita.
The Graphics Tablet with Blender
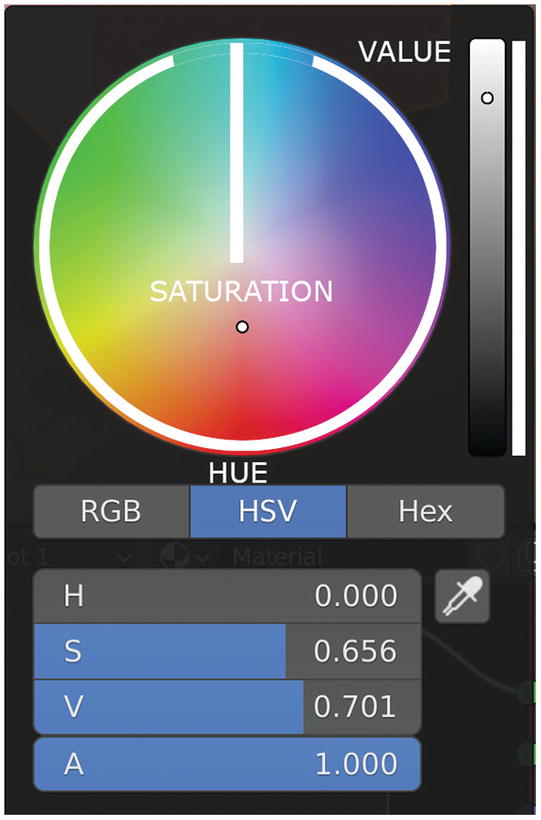
First, we prepare the graphics tablet to use with Blender by setting the pen keys and tablet hotkeys for optimal use of our software.
We will give Blender settings for sculpting and painting.

Setting the pen functions and sensitivity
Let’s define the functions of the pen’s buttons with the same functionalities as the mouse’s buttons and middle wheel.
By rotating it in one direction, we zoom in, and by turning it the other way, we zoom out.
By pressing the wheel and moving the mouse, we rotate the 3D view.
Pressing it and simultaneously moving the mouse while holding down the Shift key, we move horizontally in 3D view in pan mode.
So, it is crucial to be able to use the same functions when using the graphic tablet to work efficiently and quickly.
We set the single button of the pen with the middle mouse wheel function to rotate 3D view easily. We can then adjust the pen’s pressure sensitivity according to our needs in the same window. Our graphics tablet has 8,192 levels of pressure sensitivity available, and we can adjust them in the Pressure Sensitivity Adjustment window to match the way we draw.
Setting the working area

Customizing the tablet hotkeys
- 1.
We use the first button to open the tablet interface, so we can change all settings at any time during our work session if necessary.
- 2.
We set the second button as Scroll Up to zoom in on the view.
- 3.
Let’s set the third button as Scroll Down to zoom out the view.
- 4.
Associate the fourth button on the tablet with the Shift shortcut so that we can quickly pan 3D view by clicking it simultaneously with the pen button.
- 1.
Use the fifth button for the Ctrl key to reverse the brush/chisel function from positive to negative.
- 2.
Associate the sixth key to the shortcut F to change the brush size.
- 3.
Associate the seventh command to the shortcut Shift+F to modify the brush strength.
- 4.
Use the eighth and final key on this tablet for the Ctrl+Z shortcut to the Undo function.
Now let’s see the Blender brushes and how we can use them.
Blender’s Painting Brushes
Blender provides us with brushes and chisels and digital tools for sculpting and painting. We have already met Blender’s chisels in Chapter 2. Also, there are other tools for painting in the Texture, Vertex, and Weight Paint modes. Moreover, we have various exciting painting tools in the Draw mode of the Grease Pencil object.
Blender’s tools change in the different object modes. We find the necessary tools in the toolbar on the left of the interface: in Sculpt mode, we have at our disposal instruments to sculpt; in Texture, Vertex, and Weight Paint mode, we have devices to paint.
Instead, the keyboard shortcuts to perform operations usually do not change in the different modes and ways of painting and sculpting. This characteristic of Blender is attractive. If we learn to use one editor’s interface, we also know how to use the others.
This method makes our work much more manageable. Of course, the sculpting brushes will be a bit different from the painting brushes, but the adjustment tools, the keyboard shortcuts, and the graphic tablet settings will be almost always the same.
Brush Controls
As we already saw in Chapter 2, working with shortcuts in Sculpt mode is faster; for this reason, we have set the most important of them in the side buttons of the graphics tablet: Shift, Ctrl, F, Shift+F, Ctrl+Z.
F adjusts the brush size.
Shift+F modifies the strength of the brush.
Ctrl+F changes the brush rotation.
Ctrl reverses the brush action from positive to negative.
S samples the color from a sample identified by the cursor.
After typing these shortcuts, we must move the mouse or type the value we want to apply and then press Enter or click the left mouse button (LMB) to confirm the operation. Instead, if we press Esc or the right mouse button (RMB), we abandon the change. For example, by pressing F ➤ 50 ➤ LMB, we obtain the brush size of 50 pixels; by pressing Shift+F ➤ 0.5 ➤ LMB, we apply 50 percent of the force.
The fact that we have set some keyboard shortcuts on the graphics tablet does not prevent us from using them on the computer keyboard.
Now let’s see how to paint in Blender in the various painting modes.
Painting in Blender
We deal first with Texture Paint, then with Vertex Paint, and finally with Weight Paint.
Each of these systems has a dedicated Object mode.

The Select Object Interaction Mode button
We’ve already looked at modes in Chapter 1. So now, let’s quickly review them, distinguishing between those for three-dimensional modeling and those for painting.
The first three object modes in the list are for modeling.
Object mode, to work at the object level
Edit mode, to make changes on subobjects such as vertices, edges, and faces
Sculpt mode, which modifies the topology of the object with modeling tools
Texture Paint mode changes the texture directly by modifying the pixels.
Vertex Paint mode changes the color of the mesh vertices in the active vertex color layer.
Weight Paint mode acts on the weight of the vertices in the active vertex group.
Draw mode appears in the window only after creating a Grease Pencil object.
In this first section, we talked about color theory and digital painting with Blender and Krita; then, we presented the painting modes in Blender.
We will study the various creative possibilities and tools available in these different modes.
Let’s start with the Texture Paint mode.
Practicing Texture Paint
As we have already said, textures are fundamental to obtain the materials we want, from photorealistic to cartoon ones. The aspect of our materials and objects, the render quality, and the mood of our 3D environments all depend on textures.
The texture is the thing’s “skin,” and we project it onto the object.

The header of the Image Editor
The first is to create the image inside a graphic editor like Gimp or Krita and then load it in Blender from the Image Editor header menu by clicking the Open button.
Also, we can create a new texture by clicking New from the Image Editor header menu and then paint it with the tools that Blender gives us.
Finally, we can paint a new texture or modify the existing one by painting directly on the object in 3D view of Blender.
The first step to easily paint a texture is to access the Texture Paint workspace that allows us to paint surfaces in Blender both bidimensionally on the images and directly on three-dimensional objects.
Texture Paint Workspace

The Texture Paint workspace
We have an Image Editor in Paint mode on the interface’s left in this workspace.
In the center, there is 3D view in Texture Paint mode.
When we move in the Texture Paint workspace, the mouse cursor turns into a brush, and we can draw with the painting tools available in the toolbar on the left of the two mentioned windows.
Then, on the right of the interface, we find the Outliner at the top and the Properties Editor’s Active Tool and Workspace Settings window at the bottom.
This workspace gives us all the tools we need to paint an image or an object. These devices are as follows:
The Image Editor has a two-dimensional painting space to create an image to paint, or import a texture.
3D view in Texture Paint mode allows us to paint directly on the object.
- From the column on the right, in the Outliner at the top, we can select the objects to paint. Then, at the bottom, in the Active Tool and Workspace Settings of the Properties Editor, we can change the characteristics of all the brushes:
The size with the Radius button
The intensity with the Strength button
The color with the color picker
To understand how this process works, let’s see how to paint a texture on our chair or another object.
Painting on an Object
Before starting to paint, we have to prepare the workspace by performing the following operations:
- 1.
Select the object you want to paint. In 3D view, switch to Edit mode by pressing the Tab button.
- 2.
Then select all the subobjects by pressing A, and with U, open the UV Mapping window and click an Unwrapping method to create the UV map of the object, as shown in Chapter 4.
After choosing to make our texture in Blender or import one, we click the New or Open button on the header menu of the Image Editor and create the new image with the following steps:
- 1.
In the Image Editor, create a new image by clicking the New button. Then, when the window opens, type the resolution you want, for example, 2048 x 2048.
Give a name to the image, choose Color Grid as Generated Type, and click OK.
Then save it in the desired path from the menu Image ➤ Save.
- 2.
Now, to create a material, click New in the Material window of the Properties Editor on the right side of the screen.
Then, in the Base Color box, select Image Texture with the button highlighted in Figure 5-16. Next, click the down arrow in the box and choose the texture from the opening window.
This way, the texture is now part of the material.

The Base Color box and the buttons to create or upload textures
- 3.
Press Z and click Rendered in the 3D Viewport. The texture appears.
- 4.
In the 3D view header’s Viewport Shading panel select Lighting Method and set the lighting to Flat, as shown in Figure 5-17.

Setting lighting to Flat
- 5.
Go back to Texture Paint mode in 3D view and start painting the texture with the toolbar devices. Create and adjust the brushes in the Properties Editor’s Active Tool and Workspace Settings panel.
You can also use F and move the mouse to change the brush radius and press Shift+F to modify the strength.
Now let’s see the painting tools contained in the toolbar.
The Toolbar
The toolbar, on the left of the 3D view, the 3D view header, and the Properties Editor’s Active Tool and Workspace Settings panel contains the essential tools to paint.
These devices are more or less the same in Texture Paint, Vertex Paint, and Weight Paint.

Painting with the toolbar
We see Blender’s main painting tools in the Figure’s 3D view in Texture Paint mode.
Let’s list them with their main functions:
Draw is the essential brush and paints a strip of color. This instrument allows us to paint on the texture or directly on the object. We can use it to paint whole textures or to modify existing images.
Soften is the second instrument in the toolbar. According to our needs, this tool applies a blur effect to modify the image to make it more nuanced in some places.
Then we find Smear. This instrument distorts the image achieving an effect similar to a gradient or a smudge brush” in the traditional drawing. For example, if we click a point in the texture, it checks the color below and blurs it in the direction we move the mouse.
Clone copies the texture color from one point to another in the image.
In the 3D Viewport, we can use Ctrl+LMB to copy the texture from one part of the object. Then we click with the left mouse button to paint the clone.
Fill fills large areas of the image with the chosen color.
We use masks to hide the image’s parts that we do not want to paint with the active brush. Unfortunately, at the moment, it works only when we paint directly on the object in 3D view. But there are other masking methods that we will see shortly in the section “Practicing Masking.”
The selection tools are visible only when activating the Paint Mask button in the editor header. This button activates selection, as we will see shortly in “The Paint Mask and Face Selection Masking” section.
There are four tools: Tweak, Select Box, Select Circle, and Select Lasso.
We use these devices to choose the vertices we want to paint.
Below these instruments, we find the Annotate tools.
As in Sculpt mode, in the toolbar, we can create our custom brushes, setting them as we prefer and saving them for later use when needed.
We can change the brushes’ characteristics by right-clicking in the window or by using the window’s header or keyboard shortcuts.
Brush Settings

The brush settings in the header of 3D view
In the first box in the figure, we find the name of the original tool, in this case, Draw.
In the second, we can name our custom brush and save it for subsequent sessions; by default, it is called TexDraw.

The Active Tool and Workspace Settings window in Texture Paint mode
We can rename the brush with the desired name in the white framed box of the figure. Then we start editing it with the different tools settings available.
- 1.
In the first box, we change the various blending modes of painting.
- 2.
In the second, we change the Radius value of the brush.
- 3.
In the third, we change the brush’s Strength value.
Then we find the color picker for color adjustment. In the same window, we can also create a gradient. Afterward, we can customize our brushes using the Falloff section of the Active Tool and Workspace Settings window.
With this window, we can control, for example, the sharpness or softness of our brush.

The Active Tool and Workspace Settings window in Texture Paint mode
From now on, our brush will create very defined strokes.

The Active Tool and Workspace Settings window in Texture Paint mode
This brush has very fuzzy outlines.

The Active Tool and Workspace Settings window in Texture Paint mode
For example, by setting up a curve like Figure 5-23, we get a line with many blurred points similar to LED lights.
After exploring the tools, let’s now see the blending modes, which can significantly modify the action of our brushes.
Blending Modes
We use mixing modes in computer graphics to determine how to merge two layers.
Image editing software, such as Adobe Photoshop and GIMP, allows users to choose between blending modes. For example, the Multiply blending mode multiplies the RGB channel values of each pixel in the two layers.
In Blender’s Texture Paint mode, blending modes apply the brush color with the color underneath.
These modes change the image’s appearance and are almost the same as any layered 2D graphics software, like Gimp, Krita, or Photoshop.

Blend modes of Texture Paint
In this case Blender works like some image editors.
Mix simply combines the color added by the brush with the color of the underlying texture.
Darken uses the darker value between the color added by the brush and the existing image.
Multiply multiplies the color of the brush by the RGB value of the base.
Lighten increases the RGB value of the base color by the color of the brush.
Add joins the brush color to the RGB value of the existing image; the result is the sum of the two RGB colors.
Subtract deducts the brush color from the current base.
Erase Alpha makes transparent the parts of the image on which we paint with the brush.
Add Alpha has the opposite effect of Erase Alpha. That is where we brush the image if it has a percentage of transparency; it becomes more opaque.
As we can see, the blend modes directly affect the way we paint in Blender by changing the color overlay modes.
After analyzing how Blender mixes the brush colors, let’s practice with another valuable tool for Texture Painting: masks.
Practicing Masking
We can improve the results and speed up the realization time in Texture Painting mode using masks. When we do not want to apply the brush modification to a part of the object, we can mask the portion we want to maintain unchanged, just as we do in software like Gimp or Photoshop.
When we apply a mask, the brush will affect only the unmasked parts or, vice versa, only the hidden region. This option is similar to the sculpting masks in Chapter 2, with some brushes able to mask part of the mesh.
Now let’s see how to use the different types of masks. The first one is Paint Mask.
The Paint Mask and Face Selection Masking
This device is the fastest but is less complex than the ones we will see next. It is available in the 3D view header in Texture Paint, Vertex Paint, and Weight Paint modes.
It allows us to draw only the portions we want to modify and mask where we don’t want to paint.
We select the object to paint, go to Edit mode, and select the faces to paint on.

The paint mask
From now on, we can paint only on the parts we have previously selected in Edit mode.
We can paint with a brush or use the Fill tool from the toolbar to evenly fill all the selected parts.
Afterward, if we want to smooth the line between two colors, we can turn off the paint mask and use the instrument Smear.
Now let’s see a different, more sophisticated method to mask the texture with a stencil.
Create a Stencil
Painting with stencils can add intricate details to our textures effortlessly. With this method, we can create any image in our favorite image editor and then use it inside Blender as a mask to paint our surfaces, as practiced in the Teapot_Stencil file attached to this book.
- 1.
Select the object to paint, create a material, and add a base texture.
- 2.
Make the UV unwrapping, and then move to the Texture Paint workspace.
- 3.
Create a black-and-white image in Krita or Gimp or another image editor. Keep in mind that when you use the texture in Blender, the white will be transparent and the black will be opaque, so you will paint with the white strokes.
- 4.
In the Texture Properties tab of the Properties Editor, add a New texture by clicking the New button shown in Figure 5-26. Call it Stencil.

Add a New Texture button
- 5.
Then with the Open button, load the image previously created with Krita, as shown in Figure 5-27.

Loading the texture
- 6.
You can see the texture loaded in the texture window in the Properties Editor’s Active Tool and Workspace Settings panel. In the same window, change the brush mapping from Tiled to Stencil.
When you move with the cursor in 3D view using the Image Editor, you can see the stencil in the window, as shown in Figure 5-28.

Painting with the stencil mask
- 7.
Now you can move the stencil and start painting on the mask.
To work profitably, we need to know how to use some controls. Let’s see them.
We can move the stencil by clicking the right mouse button (RMB) and dragging the mouse. To change the mask size, we click with Shift+RMB and drag. To rotate, we click and drag with Ctrl+RMB. Then we paint with the brush Draw. So, the white parts are transparent, and the black portions mask the brush strokes.
Reset Tiled instead of Stencil in the Properties Editor’s Active Tool and Workspace Settings panel to return to normal painting mode.
We have just created a custom mask on which we can paint with different colors, and with the same method, with Krita, we can create an infinite number of patterns.
Now we see another masking system that makes a different result.
Painting with a Mask
This masking system is different from the previous one.
Also, with this method, we can create an image inside or outside Blender and then use it inside Blender to paint our surfaces.
But while the black parts hide the brush in the first example, the white portions paint on the object’s surface in this one.
Let’s see how to do that with another quick exercise.
- 1.
In Blender, create a material connecting two different materials based on Principled BSDS shaders with a Mix Shader node and call it Mask.
You can use any material; for example, you can use metal and overlay rust or scratches.
- 2.
Then create an Image Texture node and add a new image by clicking the button New, keep the default settings but change the width and height to 4096 x 4096, and rename the image Mask. Then connect the Color output of the Image Texture node with the Fac (that is the factor input) input of the Mix Shader node, as shown in Figure 5-29.

The nodal chain for the mask
- 3.
Now go to the Texture Paint workspace, change the viewport shading to Rendered, and in the Texture Properties tab of the Properties Editor, choose Brush Mask on the menu that opens; then click New, as in Figure 5-30.

Creating the brush mask
- 4.
Then, to improve texture distribution in the Texture Mask window of the Active Tool and Workspace Settings panel of the Properties Editor, change Mask Mapping from Tiled to Random. Next, select the option Random and increase Jitter in the Stroke section, as shown in Figure 5-31.

Painting with the stencil mask
If we want more control over the brush marks, we can create a more defined image in an external editor and add it to the already made brush mask.
- 1.
Create an image with Krita or Gimp or another image editor of your choice. So, first, make a black-and-white image for a brush. The white portion of the texture will paint the surface.
- 2.
Then in Texture Properties, change the texture type from Marble to Image or Movie and load the texture created in Krita with the Open button.
- 3.
Now select the Mask texture in the Texture Slots window on top of the Active Tool and Workspace Settings panel and start to paint again.
Now we can paint with an image we created instead of using the procedural textures produced by Blender.
There is an example in the Teapot_Mask.blend file that comes with the book.
After this long introduction on Texture Paint, we will learn about two more of Blender’s painting modes in the next section. Instead of operating on a texture, we work on vertices and weight in these two modes. So, we don’t modify the colors of the image we are painting on. Instead, we will paint the vertices of an object and assign a weight to each vertex. In this way, we control the distribution of many effects of various kinds, as we will see in the following two sections.
Now we study Vertex Paint mode where we can paint the vertices of our objects.
Learning Vertex Paint
Blender doesn’t just allow us to paint only on the objects’ textures. So besides painting on the things’ surface, we can do it on the vertices.
The vertex is the simplest element, equivalent to a point. Thus, we can say that it is the basis of all the objects’ geometry and three-dimensional spaces in virtual reality. Two vertices make an edge, and four, joined by four edges, create a face. The whole set of vertices, edges, and faces makes the mesh, which is the structure of the 3D model.
We can create and edit subobjects manually in Edit mode by acting directly on the object’s shape; instead, we can paint surfaces in Vertex Paint mode by applying colors to the vertices.
With Vertex Paint, we can act on vertex colors. Vertex Paint and Weight Paint modes give us great freedom to select the chosen vertices quickly.
With this feature, we directly modify the colors of the object’s vertices and assign a hue not directly related to the material but connected to the data of the vertices themselves or groups of subobjects. For this reason, before working in Vertex Paint, we must add vertices to the mesh by subdividing the surfaces and adding geometry to have enough elements to modify.
To paint an object, we must add a Vertex Color Index in the Vertex Colors window of the Properties Editor’s Object Data Properties panel.
When we paint on a vertex, we also edit the color of the edges and faces assigned to the vertex itself through a gradient.
As in Texture Paint, we can color the object and have the same brushes, but instead of painting the surfaces, we assign the colors directly to the vertices. To activate the Vertex Paint mode, we use the Object Interaction mode button and select Vertex Paint, in the same way as we selected Texture Paint mode.
There is no Vertex Paint workspace, as for Texture Paint, and the toolbar is composed of only four instruments. To access the vertex color information, we can use the Attribute node; we use the Vertex Paint node to render them. We have several tools available to paint the vertices: the Vertex Paint Tools in the toolbar.
Let’s see what they are.
The Toolbar
In Vertex Paint mode, we can find the tools in the toolbar on the interface’s left. However, the Tool Settings are in the 3D View Header and the Active Tool and Workspace Settings panel.
These panels contain the essential tools for working in this mode.

The Vertex Paint mode toolbar
The Draw device allows us to paint on the objects.
Blur shades the color painted with Draw and applies a smoothing effect to change colors fading them.
Average like Blur allows us to obtain a blurred effect, but with the calculated media of the colors.
Smear instead distorts colors by mixing them.
The selection tools are visible only when we activate the Paint Mask or Vertex Selection button in the editor header highlighted in Figure 5-32.
We will see shortly how to use these tools to choose the vertices we want to paint. There are four different instruments: Tweak, Select Box, Select Circle, and Select Lasso.
Also, in this modality, we can customize our brushes and save them for later use.
We can modify these tools in the 3D view header or the Active Tool and Workspace Settings panel, as we will see in a moment.
The 3D View Header and the Tool Settings
The Tool Settings and the panels in the Active Tool and Workspace Settings of the Properties Editor are interactive and automatically change when selecting another tool in the toolbar.

The Tool Settings in Vertex Paint mode
In the upper line, highlighted in white, we can see the Paint Mask and Vertex Selection buttons, which allow us to select the vertices we want to paint on.
To use Paint Mask, we must first select the vertices in Edit mode. On the other hand, Vertex Selection activates the vertex selection tools in the toolbar to create masks.
Here we find the same Tool Settings tools of the Paint Texture mode. We can create our custom brushes; then, we find the color picker to select the brush color. Finally, we find the options to choose blending modes and adjust the Radius and Strength values.
As we have seen, blending modes modify colors concerning the background. The Darken mode, for example, mixes the colors darkening the base layer.
Also, in this modality, the Falloff window presents a chart that allows us to change the transparency and definition of the brush edges.
Using Vertex Paint
In this mode, we can act directly on the colors of the vertices. In practice, we directly modify the colors of the mesh’s subobjects by changing the vertices’ data.
But what happens if we want to render the color assigned to the vertices? In this case, the nodal system comes to our aid with the Vertex Color node. We can paint a model and render the vertex colors as a texture with this node.
- 1.
Open Blender and select the model to paint. Then, subdivide it in Edit mode to increase the number of vertices with a value of at least 50 Number of Cuts.
- 2.
Add a Vertex Color Index with the + button in the Vertex Colors window of the Object Data Properties panel of the Properties Editor, as shown in Figure 5-34.

The Vertex Color Index
- 3.
Click Shading in the Topbar to move to the Shading workspace.
- 4.
In the Shader editor at the bottom, add a new material, and then add a Vertex Color node with the shortcut Shift+A and select Input. Link the output color of this node with the input color of the Principled BSDS node already present in the window.
- 5.
Choose Vertex Paint in the Object Interaction mode. Select a color in the Color Picker in the 3D view header and start painting on the object.
- 6.
You will see the colors painted in Vertex Paint mode in the 3D Viewport Material Preview and Rendered Viewport Shading display mode. Then, if you perform a rendering, you will have the same result.
After learning how to render vertex color, we conclude this section by analyzing the last mode of painting, Weight Paint mode.
Getting Started with Weight Paint
This type of Object mode is not related to painting but involves Blender modeling, animation, physics, etc. For example, we can use the chromatic scales available in Weight Paint mode to distribute particle systems as hair or apply controlled modifiers or rigging.
Weight Paint mode, similar to Vertex Paint, works directly on the vertices, and for this reason, before starting to use it, we must be sure to have enough geometry available to ensure the desired effect.

Weight Paint mode
With these Weight Painting values, we can precisely control different tools like modifiers, particle systems, rigging, and other essential functions of 3D graphics.
As for the Texture Paint and Vertex Paint modes, we can enter Weight Paint from the window that opens by clicking the Object Interaction mode button in the 3D view header.
The Weight Paint tool is helpful in different situations. For example, by using Weight Paint in character rigging, we can precisely determine the part of the mesh influenced by the movement of every single bone.
In physics, we can define which vertices of an object will be affected by the simulation.
In managing particle systems, we can use the Weight Painting tools to determine which parts of the object to place the static particles or which sections of the thing itself will emit dynamic particles.
There are many other cases in which this tool will be helpful.
But let’s see with which instruments we can determine the weight of the painted vertices. The first thing to see is the toolbar.
The Toolbar
Also, in this mode, the editing tools are collected in the toolbar on the left of the screen. We can edit them in the Tool Settings in the 3D Viewport header or in the Active Tool and Workspace Setting panel of the Properties editor.
We can also click with the right mouse button in 3D view and modify three values by using the three boxes that appear: Weight, Radius, and Strength.

The Weight Paint toolbar
The Draw brush allows us to paint.
Blur shades the color painted.
Average allows us to obtain a blurred effect by calculating the average of the colors. It has a much more pronounced effect than Blur.
Smear instead distorts colors by grabbing them.
Gradient creates a gradation effect in color.
Sample consists of two color-selecting instruments: Sample Weight and Sample Vertex Group.
The selection tools selects the vertices to paint. It consists of four tools: Tweak, Select Box, Select Circle, and Select Lasso. We can see them only when activating the Paint Mask or Vertex Selection button in the editor header.
Annotate allows us to make drawings and annotations in the 3D view.
Let’s see how to edit these tools in the Tool Settings.
The 3D View Header and the Tool Settings
In this case, the Tool Settings and the Active Tool and Workspace Settings interact with the toolbar, changing when a different tool is selected.

The 3D view header and the Tool Settings in Weight Paint mode
Here, we find the masking buttons, namely, Paint Mask and Vertex Selection, in the first line of the 3D header. They work in the same way as in Vertex Paint. The other tools are also the same as in Vertex Paint mode.
We can create our brushes.
The color picker is not there because we have the Weight button that determines the color and weight of the painted vertices. We won’t find blending modes either.
Then we have the buttons to modify the values of the Radius and Strength brushes.
Also, here we find the Falloff panel to modify the definition of the brush edges.
Now, let’s see with a short practical exercise of how to use the Weight Paint tool in Blender 3.0.
Using Weight Paint
When we enter this mode, the mesh turns blue, which signifies it is completely weightless, and we can already start painting it with the toolbar functions.
- 1.
Open Blender, open the file Teapot, select the model to paint, and subdivide it in Edit mode to have a sufficient number of vertices. You can divide the teapot with two cuts.
- 2.
Select Weight Paint in the Object Interaction mode. The teapot turns blue.
- 3.
You can start painting on the object. In the beginning, the model is blue: all values are zero.
When we start painting, the model becomes blue, green, yellow, orange, and red. Red represents the maximum value, equal to one.
These colors are not visible in the other object modes; they represent the values assigned to each vertex. We can use these values to control particle systems, physics, rigging, etc.
- 4.
Now go back to Object mode and add a Displace modifier from the Modifier Properties panel of the Properties Editor to the teapot.
- 5.
On the Object Data Properties tab, add a vertex group to the object in the Vertex Groups window and add it in the Vertex Groups box of the Displace modifier. Lower the strength of the Displace modifier to 0.1.
- 6.
The portions painted in Weight Paint turn into reliefs, as shown in Figure 5-38.

Painting the teapot in Weight Paint mode
As we have used Weight Paint in this exercise to create relief on the teapot, in the same way, we can use the system of selection and definition of areas of influence of this operating mode, for example, to define the effect of some modifier or particle system, etc.
We have concluded the theoretical part dedicated to digital painting; now, let’s deepen our experience by applying what we have learned in some practical exercises.
Exercises: Introducing Digital Painting
The exercises of this chapter will introduce digital painting and new ways of making textures for our objects. Moreover, we will take some of the contents performed in the earlier chapters and develop them creatively using the painting tools provided for 3D modeling.
For example, we will paint a texture directly on the teapot or apply a Krita painted image on the chair in Blender.
In the preceding theoretical part, we have covered some technical topics about painting. Now let’s apply them practically. We have applied new textures and materials to the objects modeled until now.
In the first exercise of this chapter, we will paint a diffuse texture directly on the teapot created in Exercise 1 of Chapter 2.
Exercise 10: Painting a Texture
This chapter will create new materials and textures and study techniques to paint the objects created in previous chapters.
We can draw directly on the object.
We can create textures in an external image editor such as Gimp or Krita and then apply them in Blender through materials.
We will study these methods in the first two exercises of this chapter.
We will start painting directly on the object in the first exercise, particularly on the teapot.
Unwrapping the Mesh
We start doing the UV unwrapping of the mesh. In this way, we obtain the two-dimensional development of the three-dimensional object’s form.
- 1.
Open the Teapot file with the teapot modeled in the first exercise of Chapter 2.
- 2.
Move to the UV Editing workspace to create the UV map.
- 3.
In Edit mode, select all the teapot subobjects by pressing A and then clicking U. Unwrap the object and choose Smart UV Project in the UV Mapping window. Leave all the values unchanged and click OK.
Now we can correctly apply the texture to the object.
Creating and Painting the Texture
- 1.
Select the teapot. Click Texture Paint on the Topbar and go to the Texture Paint workspace.
- 2.
Go to the Properties Editor’s Active Tool and Workspace Settings panel. Here, in the Texture Slots panel, create a new texture by clicking the + Add a Texture Paint Slot button in the white highlighted rectangle in Figure 5-39. Next, choose the Base Color channel.
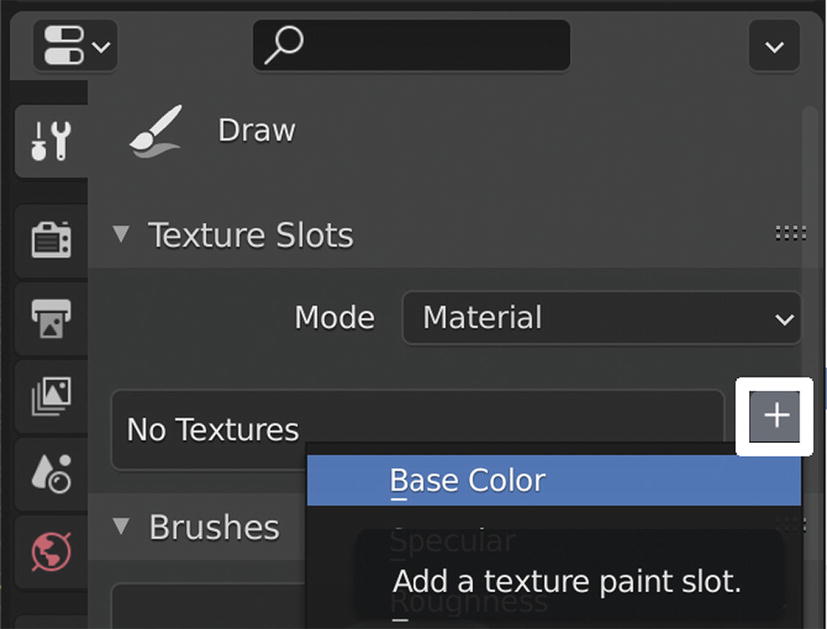
The Texture Slots window and the Add a Texture Paint Slot button
In the window that opens, name your texture CeramicBaseColor, give it a white color, and set the dimensions to 4096 x 4096 pixels. Click OK to confirm.
- 3.
Go to the Shading workspace, and you will see that, in the Shader editor, Blender automatically added an Image Texture node containing the CeramicBaseColor texture.
- 4.
Back in the Texture Paint workspace, you can start painting on the teapot. Select one of the available tools in the toolbar, set the Radius and Strength settings of the Brush to the values you prefer, choose the color, and start painting in 3D view directly on the object.
- 5.
Also, try changing the blending modes to check the different effects.
Note Blender does not save image changes automatically, so remember to keep the texture from time to time in the Image Editor header menu by clicking Image ➤ Save. If you see an asterisk next to the word Image, it means that there are unsaved changes.
- 6.
You can paint directly on the three-dimensional object in the 3D View and on the texture in the Image Editor. In the case of the teapot, since the element is spherical, it is easier to paint some parts directly on the image.
To conclude the example, let’s see how to paint only some object parts with Paint Masking. We talked about different masks in the “Painting with a Mask” section of this chapter.
- 1.
To enable face selection masking, move to Edit mode and select the faces you want to paint.
- 2.
Then we go back to Texture Paint mode and click the Paint Mask button in the 3D viewport header between Texture Paint and View, highlighted in Figure 5-40.

Painting with a mask
- 3.
The picture shows that we can paint only on the parts previously selected in Edit mode.
To activate and deactivate this masking system, click the Face Select button.
The masking doesn’t work with the button deactivated, so we can paint the whole object and not only the parts selected in Edit mode.
In the next exercise, we will apply the second painting method we talked about and make a UV map of an object in Blender.
Exercise 11: Creating a Painted Texture
The second method involves the creation of the UV layout of the chair in Blender. In the previous exercise, we painted an image directly in Blender 3.0. We worked on an image applied to material through a UV map in the Image Editor. Thus, the object in the 3D view reflected the changes we made on the two-dimensional image, and vice versa.
This second exercise will change the process: we will export the UV layout, paint it on an external editor, and reimport the image in Blender.
Following this method, we can export the UV layout of our object from the UV Editor header menu UV ➤ Export UV layout. Then we choose the .png format and click the Export UV Layout button.
It’s better if the textures for Blender materials are square because the UV layout is square. The most suitable image format to use in Blender, in our opinion, is PNG because it supports transparency.
Then we open the file with Gimp, Krita, or Photoshop; paint our texture in the UV layout; and import it back into Blender to apply it to the object through the UV map.
We can manually paint the texture on the UV map in Krita. So, we can use all Krita’s brushes, the filters, the blend modes, and all the other instruments provided by the various image editors.
We will use another object in this second exercise, the red chair.
- 1.
Open the file RedChair. It contains the chair modeled in Exercise 5 of Chapter 3.
- 2.
Move to the UV Editing workspace and unwrap the red chair by selecting all the subobjects in Edit mode by pressing A.
Press U, and in the UV Mapping window, choose SmartUVProject at the bottom of the window and OK.
In this way, we perform the unwrapping as we learned in Chapter 4.
This tool works mainly for geometric objects and automatically unwraps our models rapidly. Once done this, it usually takes only a few manual changes to get a practical map.
- 3.
Arrange the developed parts by scaling and rotating them as shown in Figure 5-41 on the UV editor on the left.

The UV Editing workspace with the chair UV layout
- 4.
In the UV Editor header menu, from the window that opens when you click the main menu on UV, click Export UV Layout, and select the PNG format and the size 4096 x 4096; choose the path and click Export UV Layout. In this way, you have saved the object’s layout in a format that both Blender and Krita can support.
- 5.
Now open the UV layout of the Chair object, the Chair.png file, with Krita, and start painting or pasting images to create a texture for the chair.
With this method, we can work with brushes, paste photographs, etc.; in short, we can create whatever we want.

The texture painted with Krita applied to the object
So, we painted in Krita the parts of the UV layout corresponding to the faces of the chair and imported them into Blender. Then in the Shader editor, we connected this texture with Color Base and Normal inputs through a Bump node of the Principled BSDF shader.
In this way, we applied the texture painted in Krita to the color and the Normal Blender channels. We have used only the Diffuse textures dedicated to the Color channel until now.
But we can also create textures for all other channels directly inside Blender in Texture Paint mode.
In the next exercise, we’ll see how to do it.
Exercise 12: Node-Based Texture Painting
In the first exercise of this chapter, we learned how to create color textures internally in Blender, painting them directly on the objects.
Then, in the second exercise, we saw how to make images in other digital painting software, import them into our 3D modeler, and apply them to Blender 3.0 materials.
Now we will see how to create directly inside Blender effects and textures for the other channels such as Metallic, Specular, Normal, etc.
In this exercise, we will also deepen our knowledge of layers and blending modes.
Introducing the Add Texture Paint Slots
In Exercise 10, we have already seen how to make a Base Color texture in the Texture Slots window.
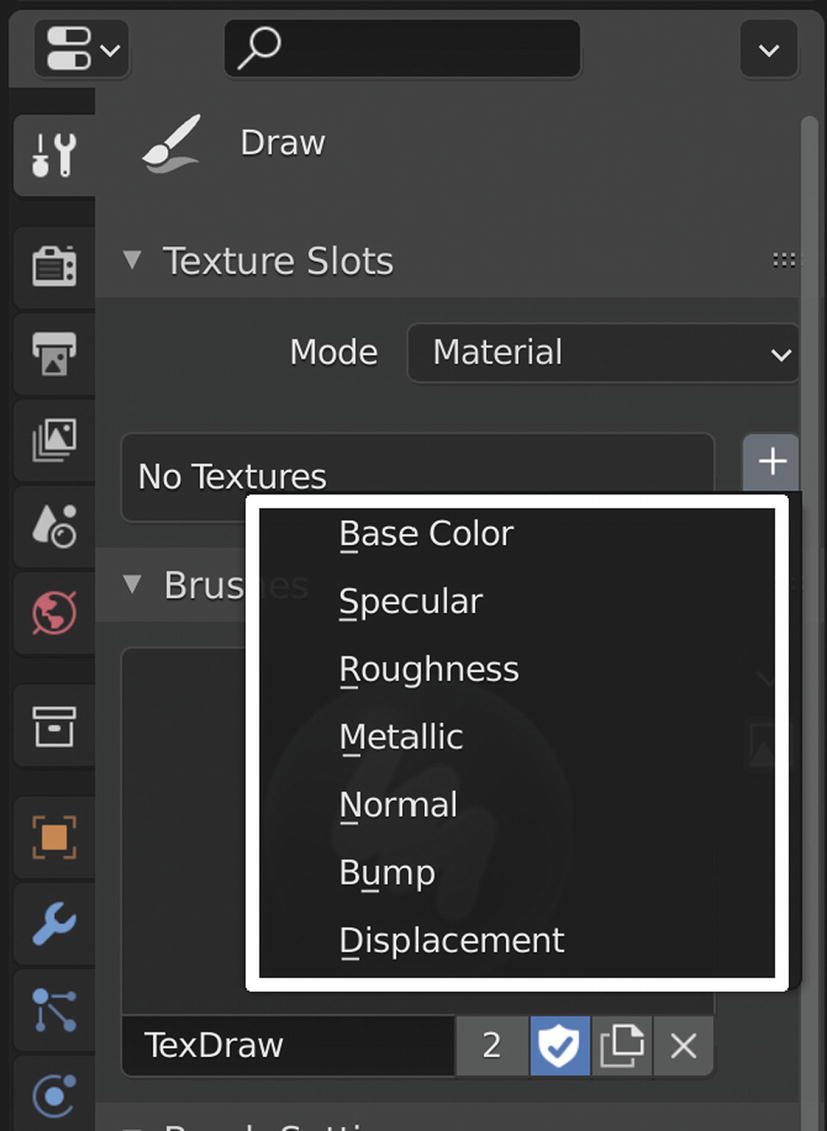
Adding texture paint slots
Base Color defines the color or texture of the substance.
Specular controls the specular effect of the material.
Roughness adjusts the balance between rough/matte and glossy/shiny.
Metallic defines the metallic appearance of a material.
Normal imitates the geometry and the details of the surface with RGB colors.
Bump mimics the bumpiness of the substance as normal but with black-and-white textures.
Displacement simulates depth to the object through the material.
When adding a texture from this box, Blender connects it to the dedicated shader’s inputs and automatically adds the nodes needed to join it correctly.
Now let’s see how to create layers in the Blender Image Editor.
Understanding Layers in Blender 3.0
The Blender Image Editor still lacks a layer system such as Gimp, Krita, or Photoshop.
This exercise will create three layers to modify light and shadow in Blender, directly manipulating textures without using the 3D view lights.
- 1.
Open the file Teapot.
- 2.
Assign a material to the teapot.
- 3.
Then go to the Texture Paint workspace in the Texture Slots panel of the Active Tool and Workspace Settings window of the Properties Editor and create a new texture by clicking the Add a Texture Paint Slot (+) button and choosing Base Color. Retain the default settings by changing only the color to gray and then click OK.
- 4.
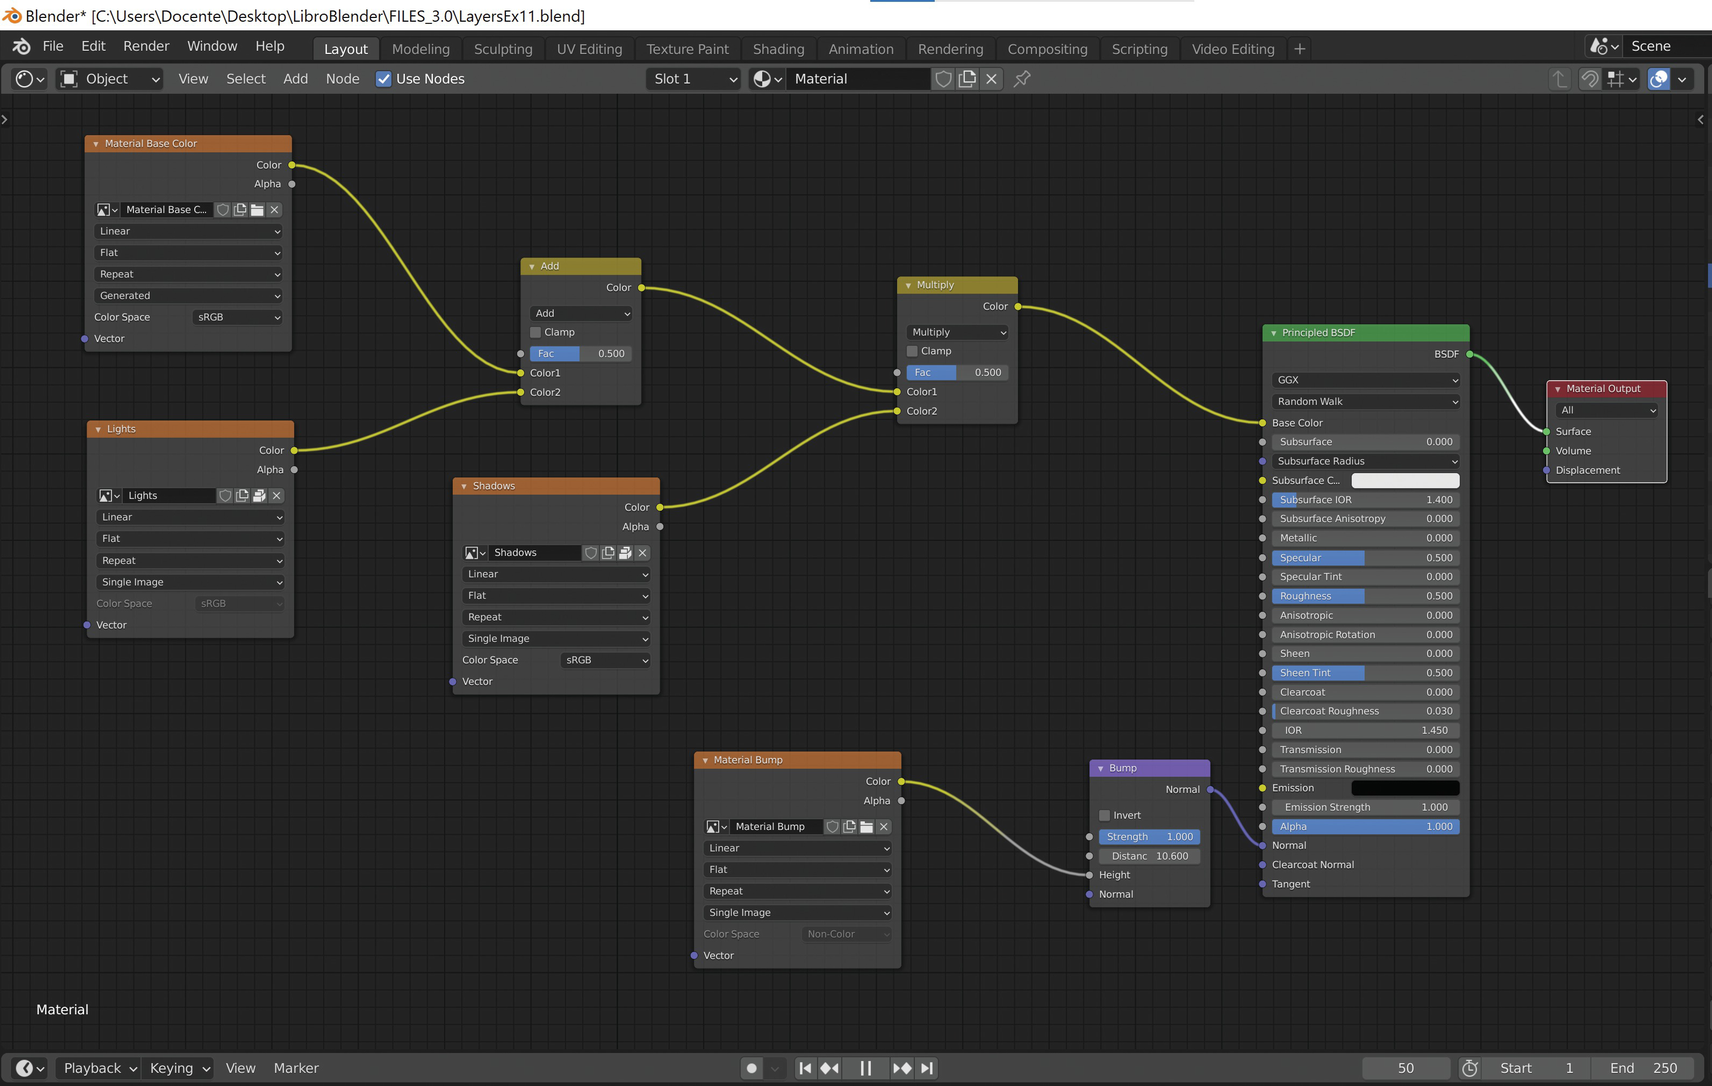
Click Shading in the Topbar to set the workspace with this name. Notice that Blender automatically added a Material Base Color node with the gray texture to the shader Principled BSDF of the object material.
- 5.
Duplicate the Material Base Color node (Shift+D), create a new image with the node’s New image button to the right of the Texture Name, and call it Lights while keeping the color black.
- 6.
Add a MixRGB node and change its blending mode from Mix to Add and insert it between the Material Base Color node and the Principled BSDF Node.
- 7.
Connect the Color output of the Lights node with input Color2 of the RGB Mix Node.
- 8.
Duplicate the Lights node and add a new texture as previously, by pressing the node’s New image button to the right of the Texture name, but make it white by changing the Color in the Color box and call it Shadows.
- 9.
Add another RGB Mix node, and this time use the Multiply blending mode. Insert it between the previous RGB Mix node and the Principled BSDF shader, and then connect the Color output of the Shadows node with input Color 2 of the RGB Mix node.
- 10.
Change the object mode of 3D view from Object to Texture Paint.
- 11.
Open the Active Tool and Workspace Settings window in the Properties Editor.
In the Texture Slots panel, click the Material Base Color.
Change the color from white to gray in the brush Color Picker, and paint the 3D Viewport object.
- 12.
Then select the Lights slot, try to paint over this slot, and repeat the same operation with Shadows, as shown in Figure 5-44.

Controlling light and shadows with layers
With this technique, we can easily paint on three levels, creating black-and-white spots on our teapot, as shown in the figure.
As we can notice, painting with the gray brush on the Material Base Color layer doesn’t result.
Instead, if we paint on the Lights layer, we get a lighter color, and painting on the Shadows layer gets darker. So, we have built two layers to control lights and the intensity of the shadows.
Also, by changing the factor of the two nodes, Add and Multiply, we can modify the shades of the two slots, Lights and Shadows. Modifying the Factor value of Add, we change the intensity of the lights. Likewise, while adjusting the Factor value of Multiply, we influence the power of the shadows. We have the maximum contrast with a value of 1, while with the value 0, the tones are uniform.
Let’s expand this example using another channel we can create in the texture slots: a Normal map.
Drawing a Bump Map Directly on the Object
We learned how to create textures in the texture slot for the Base Color, i.e., the Diffuse maps.
Now let’s add a Bump map to the teapot by following these steps:
- 1.
Go to the Texture Paint workspace and create a new texture from the Texture Slots panel of the Active Tool and Workspace Settings window of the Properties Editor by clicking the Add a Texture Paint Slot (+) button and choosing Bump. Keep the default settings by changing only the color to gray and clicking OK.
In the Shader editor Blender automatically adds a Bump node connected to the normal input of the Principled BSDF shader. In addition, to simulate the relief, Blender adds an Image node with the texture Material Bump.
- 2.
In the Texture Paint editor paint on the teapot with the black-and-white brush while keeping the Material Bump slot selected.
Now, if you draw with white, you get a relief effect, and if you paint with black, you get a hollow result. You can see the result in Material Preview or Rendered Viewport Shading display. But, of course, we don’t change the geometry this way.
Instead, we get a Bump texture that simulates the relief, with the node chain shown in Figure 5-45.
The final node with the Bump map
We can also add maps for other channels by creating them in the texture slots, editing them in Blender, and eventually exporting them to other software.
So far, we have created textures in different ways inside Blender. We also looked at modifying them directly in the software or externally in Krita or similar programs. This software has many brushes and an almost endless possibility of creating textures.
That concludes this chapter on painting inside and outside Blender.
As we have seen, we can use the painting tools very flexibly, either to paint directly into Blender or to create images or textures for our materials.
Summary
In this chapter, we dealt with digital painting. We have seen various painting tools that allow us to use Blender differently, strictly combining the second and third dimensions. We introduced the use of the graphic tablet both for painting and sculpting in Blender to work more professionally and effectively. After reading this chapter, you will know different painting techniques applicable in Blender: Texture, Vertex, and Weight Paint.
In the next chapter, we will analyze rendering with Blender’s two internal renderers: Cycles and Eevee.
Then we’ll delve into compositing and video editing techniques learning how to use Blender 3.0 as a Compositor and Video Sequence Editor with a wide range of effects available through the nodal system.