
What you will learn in this Chapter:
The capabilities offered by the STL
How to create and use containers
How to use iterators with containers
The types of algorithms that are available with the STL, and how you can apply the more common ones
How to use function objects with the STL
How to define lambda expressions and use them with the STL
How to use polymorphic function wrappers with lambda expressions
How to use the STL version that supports C++/CLI class types
At its name implies, the Standard Template Library (STL) is a library of standard class and function templates. You can use these templates to create a wide range of powerful general-purpose classes for organizing your data, as well as functions for processing that data in various ways. The STL is defined by the standard for native C++ and is therefore always available with a conforming compiler. Because of its broad applicability, the STL can greatly simplify programming in many of your C++ applications.
Of course, the STL for native C++ does not work with C++/CLI class types, but in Visual C++ 2010 you have an additional version of the STL available that contains templates and generic functions that you can instantiate with C++/CLI class types.
The STL is a large collection of class and function templates that is provided with your native C++ compiler. I'll first explain, in general terms, the kinds of resources the STL provides and how they interact with one another, before diving into the details of working examples. The STL contains six kinds of components: containers, container adapters, iterators, algorithms, function objects, and function adapters. Because they are part of the standard library, the names of the STL components are all defined within the std namespace.
The STL is a very large library, some of which is highly specialized, and to cover the contents fully would require a book in its own right. In this chapter, I'll introduce the fundamentals of how you use the STL and describe the more commonly used capabilities. Before getting into containers in depth, I'll introduce you to the primary components, concepts, and terminology you will find in the STL.
Containers are objects that you use to store and organize other objects. A class that implements a linked list is an example of a container. You create a container class from an STL template by supplying the type of the object that you intend to store. For example, vector<T> is a template for a container that is a linear array that automatically increases in size when necessary. T is the type parameter that specifies the type of objects to be stored. Here are a couple of statements that are examples of creating vector<T> containers:
vector<string> strings;     // Stores object of type string
vector<double> data;        // Stores values of type double
I chose the vector container as an example because it is probably used most often. The first statement creates the container class, strings, that stores objects of type string, while the second statement creates the data container that stores values of type double.
You can store items of a fundamental type, or of any class type, in a container. If your type argument for an STL container template is a class type, the container can store objects of that type, or objects of any derived class type. Typically, containers store copies of the objects that you store in them, and they automatically allocate and manage the memory that the objects occupy. When a container object is destroyed, the container takes care of deleting the objects it contains and freeing the memory they occupied. One advantage of using STL containers to store your objects is that it relieves you of the chore of managing the memory for them.
The templates for the STL container classes are defined in the standard headers shown in the following table.
The containers in this table represent the complete set that is available with the STL. All the template names are defined within the std namespace. T is the template type parameter for the type of elements stored in a container; where keys are used, K is the type of key.
Microsoft Visual C++ also includes the headers hash_map and hash_set that define templates for the hash_map<K, T> and hash_set<K, T> containers. These are variations on the map<K, T> and set<K, T> containers. The standard map and set containers use an ordering mechanism to locate entries whereas the hash_map and hash_set containers use a hashing mechanism.
The STL also defines container adapters. A container adapter is a template class that wraps an existing STL container class to provide a different, and typically more restricted, capability. The container adapters are defined in the headers in the following table.
Iterators are objects that behave like pointers and are very important for accessing the contents of all STL containers, except for those defined by a container adapter; container adapters do not support iterators. You can obtain an iterator from a container, which you can use to access the objects you have previously stored. You can also create iterators that will allow input and output of objects, or data items of a given type, from, or to, a native C++ stream. Although basically all iterators behave like pointers, not all iterators provide the same functionality. However, they do share a base level of capability. Given two iterators, iter1 and iter2, accessing the same set of objects, the comparison operations iter1 == iter2, iter1 != iter2, and the assignment iter1 = iter2 are always possible, regardless of the types of iter1 and iter2.
There are four different categories of iterators; each category supports a different range of operations, as shown in the following table. The operations described for each category are in addition to the three operations that I mentioned in the previous paragraph.
ITERATOR CATEGORY | DESCRIPTION |
|---|---|
These iterators read or write a sequence of objects and may only be used once. To read or write a second time, you must obtain a new iterator. You can perform the following operations on these iterators: ++iter or iter++ *iter For the dereferencing operation, only read access is allowed in the case of an input iterator, and only write access for an output iterator. | |
Forward iterators incorporate the capabilities of both input and output iterators, so you can apply the operations shown above to them, and you can use them for access and store operations. Forward iterators can also be reused to traverse a set of objects in a forward direction as many times as you want. | |
Bidirectional iterators provide the same capabilities as forward iterators and additionally allow the operations | |
Random access iterators have the same capabilities as bidirectional iterators but also allow the following operations: iter+n or iter-n iter += n or iter += n iter1 + iter2 iter1 < iter2 or iter1 > iter2 iter1 <= iter2 or iter1 >= iter2 iter[n] Being able to increment or decrement an iterator by an arbitrary value |
Thus, iterators in the four successive categories provide a progressively greater range of functionality. Where an algorithm requires an iterator with a given level of functionality, you can use any iterator that provides the required level of capability. For example, if a forward iterator is required, you must use at least a forward iterator; an input or an output operator will not do. On the other hand, you could also use a bidirectional iterator or a random access iterator because they both have the capability provided by a forward iterator.
Note that when you obtain an iterator to access the contents of a container, the kind of iterator you get will depend on the sort of container you are using. The types of some iterators can be complex, but as you'll see, in many instances the auto keyword can deduce the type for you if you initialize the iterator when you create it.
Algorithms are STL function templates that operate on a set of objects provided to them by an iterator. Because the objects are supplied by an iterator, an algorithm needs no knowledge of the source of the objects to be processed. The objects could be retrieved by the iterator from a container or even from a stream. Because iterators work like pointers, all STL template functions that accept an iterator as an argument will work equally well with a regular pointer.
As you'll see, you will frequently use containers, iterators, and algorithms in concert, in the manner illustrated in Figure 10-1.
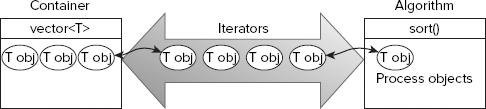
When you apply an algorithm to the contents of a container, you supply iterators that point to objects within the container. The algorithm uses these iterators to access objects within the container and to write them back when appropriate. For example, when you apply the sort() algorithm to the contents of a vector, you pass two iterators to the sort() function. One points to the first object, and the other points to the position that is one past the last element in the vector. The sort() function uses these iterators to access objects for comparison, and to write the objects back to the container to establish the ordering. You see this working in an example later in this chapter.
Algorithms are defined in two standard header files, the algorithm header and the numeric header.
Function objects are objects of a class type that overloads the () operator (the function call operator), which means that the class implements the operator()() function. The STL defines a set of standard function objects as templates; you can use these to create a function object, where the overloaded () operator function works with your object type. For example, the STL defines the template less<T>. If you instantiate the template as less<myClass>, you have a type for function objects that implement operator()() to provide the less-than comparison for objects of type myClass.
Many algorithms make use of function objects to specify binary operations to be carried out, or to specify predicates that determine how or whether a particular operation is to be carried out. A predicate is a function that returns a value of type bool, and because a function object is an object of a type that implements the operator()() member function to return a value of type bool, a function object can also be a predicate. For example, suppose you have defined a class type Comp that implements the operator()() function to compare its two arguments and return a bool value. If you create an object f of type Comp, the expression f(a,b) returns a bool value that results from comparing a and b, and thus acts as a predicate.
Predicates come in two flavors, binary predicates that involve two operands, and unary predicates that require one operand. For example, comparisons such as less-than and equal-to, and logical operations such as AND and OR, are implemented as binary predicates that are members of function objects; logical negation, NOT, is implemented as a unary predicate member of a function object.
Function object templates are defined in the functional header; you can also define your own function objects when necessary. You'll see function objects in action with algorithms, and some container class functions, later in this chapter.
Function adapters are function templates that allow function objects to be combined to produce a more complex function object. A simple example is the not1 function adapter. This takes an existing function object that provides a unary predicate and inverts it. Thus, if the function object function returns true, the function that results from applying not1 to it will be false. I won't be discussing function adapters in depth, not because they are terribly difficult to understand — they aren't — but because there's a limit to how much I can cram into a single chapter.
The STL provides templates for a variety of container classes that you can use in a wide range of application contexts. Sequence containers are containers in which you store objects of a given type in a linear fashion, either as a dynamic array or as a list. Associative containers store objects based on a key that you supply with each object to be stored; the key is used to locate the object within the container. In a typical application, you might be storing phone numbers in an associative container, using names as the keys. This would enable you to retrieve a particular number from the container just by supplying the appropriate name.
I'll first introduce you to sequence containers, and then I'll delve into associative containers and what you can do with them.
The class templates for the three basic sequence containers are shown in the following table.
TEMPLATE | HEADER FILE | DESCRIPTION |
|---|---|---|
|
| Creates a class representing a dynamic array storing objects of type |
|
| Creates a class representing a linked list storing objects of type |
|
| Creates a class representing a double-ended queue storing objects of type |
Which template you choose to use in any particular instance will depend on the application. These three kinds of sequence containers are clearly differentiated by the operations they can perform efficiently, as Figure 10-2 shows.
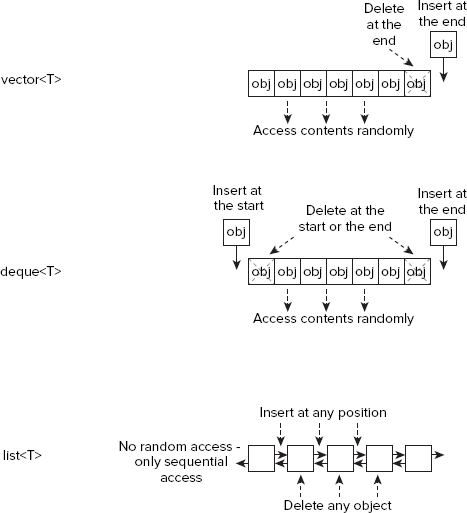
If you need random access to the contents of the container, and you are happy to always add or delete objects at the end of a sequence, then vector<T> is the container template to choose. It is possible to add or delete objects randomly within a vector, but the process will be very slow because all the objects past the insertion or deletion point will have to be moved. A deque<T> container is very similar to a vector<T> and supports the same operations, but it has the additional capability to add and delete at the beginning of the sequence. A list<T> container is a doubly-linked list, so adding and deleting at any position is efficient. The downside of a list is that there is no random access to the contents; the only way to access an object that is internal to the list is to traverse the contents from the beginning, or to run backward through the contents from the end.
Let's look at sequence containers in more detail and try some examples. I'll be introducing the use of some iterators, algorithms, and function objects along the way.
The simplest way to create a vector container is like this:
vector<int> mydata;
This creates a container that will store values of type int. The initial capacity to store elements is zero, so you will be allocating more memory right from the outset when you insert the first value. The push_back() function adds a new element to the end of a vector, so to store a value in this vector you would write:
mydata.push_back(99);
The argument to the push_back() function is the item to be stored. This statement stores the value 99 in the vector, so after executing this statement the vector contains one element.
Here's another way to create a vector to store integers:
vector<int> mydata(100);
This creates a vector that contains 100 elements that are all initialized to zero. If you add new elements to this vector, the memory allocated for storage in the vector will be increased automatically, so obviously it's a good idea to choose a reasonably accurate value for the number of integers you are likely to want to store. This vector already contains 100 elements and can be used just like an array. For example, to store a value in the third element, you can write:
mydata[2] = 999;
Of course, you can only use an index value to access elements within a vector that are within the range of elements that exist. You can't add new elements in this way, though. To add a new element, you should use the push_back() function.
You can initialize the elements in a vector to a different value, when you create it by using this statement:
vector<int> mydata(100, −1);
The second argument to the constructor is the initial value to be used, so all 100 elements in the vector will be set to −1.
If you don't want to create elements when you create the container, you can increase the capacity after you create it by calling its reserve() function:
vector<int> mydata;
mydata.reserve(100);
The argument to the reserve() function is the minimum number of elements to be accommodated. If the argument is less than the current capacity of the vector, then calling reserve() will have no effect. In this code fragment, calling reserve() causes the vector container to allocate sufficient memory for a total of 100 elements.
You can also create a vector with initial values for elements from an external array. For example:
double data[] = {1.5, 2.5, 3.5, 4.5, 5.5, 6.5, 7.5, 8.5, 9.5, 10.5};
vector<double> mydata(data, data+8);
Here the data array is created with 10 elements of type double, with the initial values shown. The second statement creates a vector storing elements of type double, with eight elements initially having the values corresponding to data[0] through data[7]. The arguments to the vector<double> constructor are pointers (and can also be iterators), where the first pointer points to the first initializing element in the array, and the second points to one past the last initializing element. Thus, the mydata vector will contain eight elements with initial values 1.5, 2.5, 3.5, 4.5, 5.5, 6.5, 7.5, and 8.5.
Because the constructor in the previous fragment can accept either pointer or iterator arguments, you can initialize a vector when you create it with values from another vector that contains elements of the same type. You just supply the constructor with an iterator pointing to the first element you want to use as an initializer, plus a second iterator pointing to one past the last element you want to use. Here's an example:
vector<double> values(mydata.begin(), mydata.end());
After executing this statement, the values vector will have elements that are duplicates of the mydata vector. As Figure 10-3 illustrates, the begin() function returns a random access iterator that points to the first element in the vector for which it is called, and the end() function returns a random access iterator pointing to one past the last element. A sequence of elements is typically specified in the STL by two iterators, one pointing to the first element in the sequence and the other pointing to one past the last element in the sequence, so you'll see this time and time again.
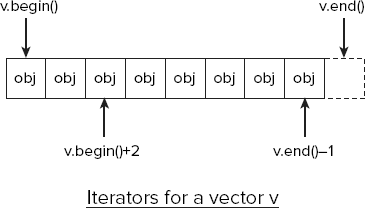
Because the begin() and end() functions for a vector container return random access iterators, you can modify what they point to when you use them. The type of the iterators that the begin() and end() functions return is vector<T>::iterator, where T is the type of object stored in the vector.
Here's a statement that creates a vector that is initialized with the third through the seventh elements from the mydata vector:
vector<double> values(mydata.begin()+2, mydata.end()−1);
Adding 2 to the first iterator makes it point to the third element in mydata. Subtracting 1 from the second iterator makes it point to the last element in mydata; remember that the second argument to the constructor is an iterator that points to a position that is one past the element to be used as the last initializer, so the object that the second iterator points to is not included in the set.
As I said earlier, it is pretty much standard practice in the STL to indicate a sequence of elements in a container by a begin iterator that points to the first element and an end iterator that points to one past the last element. This method allows you to iterate over all the elements in the sequence by incrementing the begin iterator until it equals the end iterator. This means that the iterators only need to support the equality operator to allow you to walk through the sequence.
Occasionally, you may want to access the contents of a vector in reverse order. Calling the rbegin() function for a vector returns an iterator that points to the last element, while rend() points to one past the first element (that is, the position preceding the first element), as Figure 10-4 illustrates.
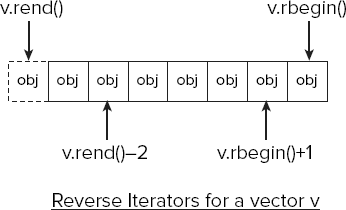
The iterators returned by rbegin() and rend() are called reverse iterators because they present the elements in reverse sequence. Reverse iterators are of type vector<T>::reverse_iterator. Figure 10-4 shows how adding a positive integer to the rbegin() iterator moves back through the sequence, and subtracting an integer from rend() moves forward through the sequence.
Here's how you could create a vector containing the contents of another vector in reverse order:
double data[] = {1.5, 2.5, 3.5, 4.5, 5.5, 6.5, 7.5, 8.5, 9.5, 10.5};
vector<double> mydata(data, data+8);
vector<double> values(mydata.rbegin(), mydata.rend());
Because you are using reverse iterators as arguments to the constructor in the last statement, the values vector will contain the elements from mydata in reverse order.
It's about time I explained the difference between the capacity and the size of a vector container. The capacity is the maximum number of objects a container can currently accommodate without allocating more memory. The size is the number of objects actually stored in the container. So, the size cannot be greater than the capacity.
You can obtain both the size and capacity of the container data at any time by calling the size() and capacity() member functions. For example:
cout << endl << "The current capacity of the container is: " << data.capacity()
     << endl << "The current size of the container is: " << data.size() << endl;
Calling the capacity() function for a vector returns the current capacity, and calling its size() function returns the current size, both values being returned as type vector<T>::size_type. This is an implementation-defined integer type that is defined within the vector<T> class template by a typedef. To create a variable to store the value returned from the size() or capacity() function, you specify it as type vector<T>::size_type, where you replace T with the type of object stored in the container. The following fragment illustrates this:
vector<double> values;
vector<double>::size_type cap = values.capacity();
Note
The Microsoft Visual C++ library implementation of STL defines the vector<T>::size_type type as size_t. size_t is an unsigned integer type that is also a type of the result of the sizeof operator. You could use the auto keyword to specify the type of cap in the fragment above.
If the value returned by the size() function is zero, then clearly the vector contains no elements; thus, you can use it as a test for an empty vector. You can also call the empty() function for a vector to test for this:
if(values.empty())
  cout << "No more elements in the vector."
The empty() function returns a value of type bool that is true when the vector is empty and false otherwise.
You are unlikely to need it very often, but you can discover the maximum possible number of elements in a vector by calling its max_size() function. For example:
vector<string> strings;
cout << "Maximum length of strings vector: " << strings.max_size();
Executing this fragment produces the output:
Maximum length of strings vector: 153391689
The maximum length is returned by the max_size() function as a value, in this case of type vector<string>::size_type. Note that the maximum length of a vector will depend on the type of element stored in the vector. If you try this out with a vector storing values of type int, you will get 1073741823 as the maximum length, and for a vector storing value of type double it is 536870911.
You can change the size of a vector by calling its resize() function, which can either increase or decrease the size of the vector. If you specify a new size that is less than the current size, sufficient elements will be deleted from the end of the vector to reduce it to its new size. If the new size is greater than the old, new elements will be added to the end of the vector to increase its length to the new size. Here's code illustrating this:
vector<int> values(5, 66);   // Contains 66 66 66 66 66
values.resize(7, 88);        // Contains 66 66 66 66 66 88 88
values.resize(10);           // Contains 66 66 66 66 66 88 88 0 0 0
values.resize(4);            // Contains 66 66 66 66
The first argument to resize() is the new size for the vector. The second argument, when it is present, is the value to be used for new elements that need to be added to make up the new size. If you are increasing the size and you don't specify a value to be used for new elements, the default value will be used. In the case of a vector storing objects of a class type, the default value will be the object produced by the no-arg constructor for the class.
You can explore the size and capacity of a vector through the following working example.
TRY IT OUT: Exploring the Size and Capacity of a Vector
In this example, you will try out some of the ways you have seen for creating a vector, and you'll also see how the capacity changes as you add elements.
// Ex10_01.cpp
// Exploring the size and capacity of a vector

#include <iostream>
#include <vector>
using std::cout;
using std::endl;
using std::vector;

// Template function to display the size and capacity of any vector
template<class T>
void listInfo(vector<T> &v)
{
  cout << "Container capacity: " << v.capacity()
       << " size: " << v.size() << endl;
}

int main()
{
  // Basic vector creation
  vector<double> data;
  listInfo(data);

  cout << endl << "After calling reserve(100):" << endl;
  data.reserve(100);
  listInfo(data);

  // Create a vector with 10 elements and initialize it
  vector<int> numbers(10,−1);
  cout << endl << "The initial values are:";
  for(vector<int>::size_type i = 0; i<numbers.size(); i++)
    cout << " " << numbers[i];

  // See how adding elements affects capacity increments
  auto oldC = numbers.capacity();   // Old capacity
  auto newC = oldC;                 // New capacity after adding element
  cout << endl << endl;
  listInfo(numbers);
  for(int i = 0; i<1000 ; i++)
  {
    numbers.push_back(2*i);
    newC = numbers.capacity();
    if(oldC < newC)
    {
      oldC = newC;
      listInfo(numbers);
    }
  }
  return 0;
}

This example produces the following output:
Container capacity: 0 size: 0

After calling reserve(100):
Container capacity: 100 size: 0

The initial values are: −1 −1 −1 −1 −1 −1 −1 −1 −1 −1

Container capacity: 10 size: 10
Container capacity: 15 size: 11
Container capacity: 22 size: 16
Container capacity: 33 size: 23
Container capacity: 49 size: 34
Container capacity: 73 size: 50
Container capacity: 109 size: 74
Container capacity: 163 size: 110
Container capacity: 244 size: 164
Container capacity: 366 size: 245
Container capacity: 549 size: 367
Container capacity: 823 size: 550
Container capacity: 1234 size: 824
How It Works
The #include directive for the vector header adds the definition for the vector<T> template to the source file.
Following the using statement for the std namespace, you have a definition of the listInfo() function template:
template<class T>
void listInfo(vector<T> &v)
{
  cout << "Container capacity: " << v.capacity()
       << " size: " << v.size() << endl;
}
This function outputs the current capacity and size of any vector container. You will often find it convenient to write function templates when working with STL. The example shows how easy it is. The T parameter determines the type of argument the function expects. You can call this function with a vector container as the argument. Specifying the parameter as the reference type, vector<T>&, enables the code in the function body to access directly the container you pass as the argument to the function. If you specified the parameter as type vector<T>, then the argument would be copied each time the function is called, and this could be a time-consuming process for a large vector container.
The first action in main() is to create a vector and output its size and capacity:
vector<double> data;
  listInfo(data);
You can see from the output that the size and the capacity are both zero for this container. Adding an element requires more space to be allocated.
Next you call the reserve() function for the container:
data.reserve(100);
You can see from the output that the capacity is now 100 and the size is zero. To put it another way, the container contains no elements but has memory allocated to accommodate up to 100 elements. Only when you add the 101st element will the capacity be increased automatically.
Next you create another container with this statement:
vector<int> numbers(10,−1);
This creates a container that contains 10 elements at the outset, each initialized with −1. To demonstrate that this is indeed the case, you output the elements in the container with the following loop:
for(vector<int>::size_type i = 0; i<numbers.size(); i++)
    cout << " " << numbers[i];
The upper limit for the loop variable, i, is the value returned by the size() function for the container (the number of elements currently stored). As you see, within the loop you access the container elements in the same way as an ordinary array.
Alternatively, you could write the loop using the auto keyword:
for(auto i = 0; i<numbers.size(); i++)
    cout << " " << numbers[i];
You could also use an iterator to access the elements. A loop to output the elements using an iterator looks like this:
for(auto iter = numbers.begin(); iter < numbers.end(); iter++)
    cout << " " << *iter;
The loop variable is an iterator, iter, of type vector<int>::iterator, that you initialize to the iterator returned by the begin() function. This is incremented on each loop iteration, and the loop ends when it reaches numbers.end(), which points to one past the last element. Note how you dereference the iterator just like a pointer to get at the value of the element.
The remaining statements in main() demonstrate how the capacity of a vector is increased as you add elements. The first two statements set up variables that store the current capacity and the new capacity after adding an element:
auto oldC = numbers.capacity();   // Old capacity
  auto newC = oldC;                 // New capacity after adding element
After displaying the initial size and capacity, you execute the following loop:
for(int i = 0; i<1000 ; i++)
  {
    numbers.push_back(2*i);
    newC = numbers.capacity();
if(oldC < newC)
{
oldC = newC;
listInfo(numbers);
}
}This loop calls the push_back() function for the numbers vector, to add 1000 elements. We are only interested in seeing output when the capacity increases, so the if condition ensures that we only display the capacity and size when the capacity increases.
The output shows an interesting pattern in the way additional space is allocated in the container. As you would expect with the initial size and capacity at 10, the first capacity increase occurs when you add the 11th element. The increase in this case is half the capacity, so the capacity increases to 15. The next capacity increase is when the size reaches 15, and the increase is to 22, so the increment is again half the capacity. This process continues with each capacity increase being half the current capacity. Thus, you automatically get larger chunks of memory space allocated when required, the more elements the vector contains. On the one hand, this mechanism ensures that once the initial memory allocation in a container is occupied, you don't cause more memory to be allocated every time you add a new element. On the other hand, this also implies that you should take care when reserving space for a large number of elements in a vector. If you set up a container that provides initially for 100,000 elements for example, exceeding this by one element will cause space for another 50,000 to be allocated. In this sort of situation you could check for reaching the capacity, and use reserve() to increase the available memory by a more appropriate and less extravagant amount.
You have already seen that you can access the elements in a vector by using the subscript operator, just as you would for an array. You can also use the at() function where the argument is the index position of the element you want to access. Here's how you could list the contents of the numbers vector of integer elements in the previous example:
for(auto i = 0; i<numbers.size() ; i++)
    cout << " " << numbers.at(i);
So how does the at() function differ from using the subscript operator, []? Well, if you use a subscript with the subscript operator that is outside the valid range, the result is undefined. If you do the same with the at() function, an exception of type out_of_range will be thrown. If there's the potential for subscript values outside the legal range to arise in a program, it's generally better to use the at() function and catch the exception than to allow the possibility for undefined results.
To access the first or last element in a vector container you can call the front() or back() function respectively:
cout << "The value of the first element is: " << numbers.front() << endl;
cout << "The value of the last element is: " << numbers.back() << endl;
Both functions come in two versions; one returns a reference to the object stored, and the other returns a const reference to the object stored. The latter option enables you to explicitly prevent modification of the object:
const int& firstvalue = numbers.front();    // firstvalue cannot be changed
int& lastvalue = numbers.back();            // lastvalue can be changed
Storing the reference that is returned in a const variable automatically selects the version of the function that returns a const reference.
In addition to the push_back() function you have seen, a vector container supports the pop_back() operation that deletes the last element. Both operations execute in constant time, that is, the time to execute will be the same, regardless of the number of elements in the vector. The pop_back() function is very simple to use:
vec.pop_back();
This statement removes the last element from the vector vec and reduces the size by 1. If the vector contains no elements, then calling pop_back() has no effect.
You could remove all the elements in a vector by calling the pop_back() function repeatedly, but the clear() function does this much more simply:
vec.clear();
This statement removes all the elements from vec, so the size will be zero. Of course, the capacity will be left unchanged.
You can call the insert() function to insert one or more new elements anywhere in a vector, but this operation will execute in linear time, which means that the time will increase in proportion to the number of elements in the container. This is because inserting new elements involves moving the existing elements. The simplest version of the insert() function inserts a single new element at a specific position in the vector, where the first argument is an iterator specifying the position where the element is to be inserted, and the second argument is the element to be inserted. For example:
vector<int> vec(5, 99);
vec.insert(vec.begin()+1, 88);
The first statement creates a vector with five integer elements, all initialized to 99. The second statement inserts 88 after the first element; so, after executing this, the vector will contain:
99 88 99 99 99 99
You can also insert several identical elements, starting from a given position:
vec.insert(vec.begin()+2, 3, 77);
The first argument is an iterator specifying the position where the first element is to be inserted, the second argument is the number of elements to be inserted, and the third argument is the element to be inserted. After executing this statement, vec will contain:
99 88 77 77 77 99 99 99 99
You have yet another version of the insert() function that inserts a sequence of elements at a given position. The first argument is an iterator pointing to the position where the first element is to be inserted. The second and third arguments are input iterators specifying the range of elements to be inserted from some source. Here's an example:
vector<int> newvec(5, 22);
newvec.insert(newvec.begin()+1, vec.begin()+1, vec.begin()+5);
The first statement creates a vector with five integer elements initialized to 22. The second statement inserts four elements from vec, starting with the second. After executing these statements, newvec will contain:
22 88 77 77 77 22 22 22 22
Don't forget that the second iterator in the interval specifies the position that is one past the last element, so the element it points to is not included.
The erase() function can delete one or more elements from any position within a vector, but this also is a linear time function and will typically be slow. Here's how you erase a single element at a given position:
newvec.erase(newvec.end()−2);
The argument is an iterator that points to the element to be erased, so this statement removes the second to last element from newvec.
To delete several elements, you supply two iterator arguments specifying the interval. For example:
newvec.erase(newvec.begin()+1, newvec.begin()+4);
This will delete the second, third, and fourth elements from newvec. The element that the second iterator argument points to is not included in the operation.
As I said, both the erase() and insert() operations are slow, so you should use them sparingly when working with a vector. If you find you need to use them often in your application, a list<T> is likely to be a better choice of container.
The swap() function enables you to swap the contents of two vectors, provided, of course, the elements in the two vectors are of the same type. Here's a code fragment showing an example of how this works:
vector<int> first(5, 77);              // Contains 77 77 77 77 77
vector<int> second(8, −1);             // Contains −1 −1 −1 −1 −1 −1 −1
first.swap(second);
After executing the last statement, the contents of the vectors first and second will have interchanged. Note that the capacities of the vectors are swapped as well as the contents, and, of course, the size.
The assign() function enables you to replace the entire contents of a vector with another sequence, or to replace the contents with a given number of instances of an object. Here's how you could replace the contents of one vector with a sequence from another:
vector<double> values;
for(int i = 1 ; i <= 50 ; i++)
  values.push_back(2.5*i);
vector<double> newdata(5, 3.5);
newdata.assign(values.begin()+1, values.end()−1);
This code fragment creates the values vector and stores 50 elements that have the values 2.5, 5.0, 7.5,... 125.0. The newdata vector is created with five elements, each having the value 3.5. The last statement calls the assign() function for newdata, which deletes all elements from newdata, and then inserts copies of all the elements from values, except for the first and the last. You specify the new sequence to be inserted by two iterators, the first pointing to the first element to be inserted and the second pointing to one past the last element to be inserted. Because you specify the new elements to be inserted by two iterators, the source of the data can be from any sequence, not just a vector. The assign() function will also work with regular pointers, so you could also insert elements from an array of double elements.
Here's how you use the assign() function to replace the contents of a vector with a sequence of instances of the same element:
newdata.assign(30, 99.5);
The first argument is the count of elements in the replacement sequence, and the second argument is the element to be used. This statement will cause the contents of newdata to be deleted and replaced by 30 elements, each having the value 99.5.
So far, you have only seen vectors storing numerical values. You can store objects of any class type in a vector, but the class must meet certain minimum criteria. Here's a minimum specification for a given class T to be compatible with a vector, or, in fact, any sequence container:
class T
{
  public:
  T();                                 // Default constructor
  T(const T& t);                       // Copy constructor
  ~T();                                // Destructor
  T& operator=(const T& t);            // Assignment operator
};
Of course, the compiler will supply default versions of these class members if you don't supply them, so it's not difficult for a class to meet these requirements. The important thing to note is that they are required and are likely to be used, so when the default implementation that the compiler supplies will not suffice, you must provide your own implementation.
Note that the STL can make use of a move constructor and a move assignment operator when they are provided in a class, so the performance of your class may be increased if you implement these as well.
Let's try an example.
TRY IT OUT: Storing Objects in a Vector
In this example you create Person objects that represent individuals by their name. Just to make it more interesting, I'm going to pretend that you have never heard of the string class, so you are stuck with using null-terminated strings to store names. This means you have to take care how you implement the class if you want to store objects in a vector<Person> container. In general, such a class might have lots of different data members relating to a person, but I'll keep it simple with just their first and second names.
Here's the definition of the Person class:
// Person.h
// A class defining people by their names
#pragma once
#include <cstring>
#include <iostream>
using std::cout;
using std::endl;

class Person
{
  public:
  // Constructor, includes no-arg constructor
  Person(const char* first = "John", const char* second = "Doe")
  {
    initName(first, second);
  }

  // Copy constructor
  Person(const Person& p)
  {
    initName(p.firstname, p.secondname);
  }

   // Destructor
  ~Person()
  {
    delete[] firstname;
    delete[] secondname;
  }

   // Assignment operator
  Person& operator=(const Person& p)
  {
    // Deal with p = p assignment situation
if(&p == this)
return *this;
delete[] firstname;
delete[] secondname;
initName(p.firstname, p.secondname);
return *this;
}
// Less-than operator
bool operator<(const Person& p)
{
int result(strcmp(secondname, p.secondname));
if(result < 0 || result == 0 && strcmp(firstname, p.firstname) < 0)
return true;
return false;
}
// Output a person
void showPerson() const
{
cout << firstname << " " << secondname << endl;
}
private:
char* firstname;
char* secondname;
// Private helper function to avoid code duplication
void initName(const char* first, const char* second)
{
size_t length(strlen(first)+1);
firstname = new char[length];
strcpy_s(firstname, length, first);
length = strlen(second)+1;
secondname = new char[length];
strcpy_s(secondname, length, second);
}
};The #pragma once directive is there to ensure that the header does not get included in a program more than once.
The private initPerson() function is there because the constructors and the assignment operator function need to carry out the same operations to initialize the class data members. Using this helper function avoids having three occurrences of the same code.
Because the Person class allocates memory dynamically to store the first and second names of a person, you must implement the destructor to release the memory when an object is destroyed. You must also implement the assignment operator because this involves more memory allocation. Note the code at the beginning for dealing with the a = a assignment situation. Assigning an object to itself can arise in ways that are less than obvious, and can cause problems if you don't implement the operator=() function to take account of this.
The showPerson() function is a convenience function for outputting an entire name. It is declared as const to allow it to work with const and non-const Person objects. The operator<() function is there for use later.
The program to store Person objects in a vector looks like this:
// Ex10_02.cpp
// Storing objects in a vector

 #include <iostream>
#include <vector>
#include "Person.h"

 using std::cin;
using std::cout;
using std::endl;
using std::vector;

 int main()
{
  vector<Person> people;               // Vector of Person objects
  const size_t maxlength(50);
  char firstname[maxlength];
  char secondname[maxlength];

   // Input all the people
  while(true)
  {
    cout << "Enter a first name or press Enter to end: ";
    cin.getline(firstname, maxlength, '
'),
    if(strlen(firstname) == 0)
      break;
    cout << "Enter the second name: ";
    cin.getline(secondname, maxlength, '
'),
    people.push_back(Person(firstname, secondname));
  }

   // Output the contents of the vector
  cout << endl;
  auto iter(people.begin());
  while(iter != people.end())
    iter++->showPerson();

   return 0;
}

Here's an example of some output from this program:
Enter a first name or press Enter to end: Jane
Enter the second name: Fonda
Enter a first name or press Enter to end: Bill
Enter the second name: Cosby
Enter a first name or press Enter to end: Sally
Enter the second name: Field
Enter a first name or press Enter to end: Mae
Enter the second name: West
Enter a first name or press Enter to end: Oliver
Enter the second name: Hardy
Enter a first name or press Enter to end:

 Jane Fonda
Bill Cosby
Sally Field
Mae West
Oliver Hardy
You create a vector to store Person objects like this:
vector<Person> people; // Vector of Person objects
You then create two arrays of type char[] that you'll use as working storage when reading names from the standard input stream:
const size_t maxlength(50);
  char firstname[maxlength];
  char secondname[maxlength];
Each array accommodates a name up to maxlength characters long, including the terminating null.
You read names from the standard input stream in an indefinite loop:
while(true)
  {
    cout << "Enter a first name or press Enter to end: ";
    cin.getline(firstname, maxlength, '
'),
    if(strlen(firstname) == 0)
      break;
    cout << "Enter the second name: ";
    cin.getline(secondname, maxlength, '
'),
    people.push_back(Person(firstname, secondname));
  }
You read each name using the getline() member function for cin. This reads characters until a newline character is read, or until maxlength-1 characters have been read. This ensures that you don't overrun the capacity of the input array because both arrays have maxlength elements, allowing for strings up to maxlength-1 characters plus the terminating NULL. When an empty string is entered for the first name, the loop ends.
You create the Person object in the expression that is the argument to the push_back() function. This adds the objects to the end of the vector.
The last step is to output the contents of the vector:
cout << endl;
  auto iter(people.begin());
  while(iter != people.end())
    iter++->showPerson();
Here you use an iterator of type vector<Person>::iterator to output the elements of the vector with the type deduced automatically from the initial value. Within the body of the while loop, you output the element that the iterator points to, and then you increment the iterator using the postfix increment operator. The loop continues as long as iter is not equal to the iterator returned by end().
The sort() function template that is defined in the algorithm header will sort a sequence of objects identified by two random access iterators that point to the first and one-past-the-last objects in the sequence. Note that random access iterators are essential; iterators with lesser capability will not suffice. The sort() function template uses the < operator to order the elements. Thus, you can use the sort() template to sort the contents of any container that provides random access iterators, as long as the objects it contains can be compared using the less-than operator.
In the previous example, you implemented operator<() in the Person class, so you can sort a sequence of Person objects. Here's how you could sort the contents of the vector<Person> container:
sort(people.begin(), people.end());
This sorts the contents of the vector in ascending sequence. You can add an #include directive for algorithm, and put the statement in main() before the output loop, to see the sort in action. You'll also need a using declaration for std::sort.
Note that you can use the sort() template function to sort() arrays. The only requirement is that the < operator should work with the type of elements stored in the array. Here's a code fragment showing how you could use it to sort an array of integers:
const size_t max(100);
int data[max];
cout << "Enter up to " << max << " non-zero integers. Enter 0 to end." << endl;
int value(0);
size_t count(0);
for(size_t i = 0 ; i<max ; i++)        // Read up to max integers
{
  cin >> value;                        // Read a value
  if(value == 0)                       // If it is zero,
    break;                             // We are done
  data[count++] = value;
}
sort(data, data+count);                // Sort the integers
Note how the pointer marking the end of the sequence of elements that are to be sorted must still be one past the last element.
When you need to sort a sequence in descending order, you can use a version of the sort() algorithm that accepts a function object that is a binary predicate, as the third argument to the function. The functional header defines a complete set of types for comparison predicates:
less<T> less_equal<T> equal<T> greater_equal<T> greater<T>
Each of these templates creates a class type for function objects that you can use with sort() and other algorithms. The sort() function used in the previous fragment uses a less<int> function object by default. To specify a different function object to be used as the sort criterion, you add it as a third argument, like this:
sort(data, data+count, greater<int>()); // Sort the integers
The third argument to the function is an expression that calls the constructor for the greater<int> type, so you are passing an object of this type to the sort() function. This statement will sort the contents of the data array in descending sequence. If you are trying these fragments out, don't forget that you need the functional header to be included for the function object, and that the greater name is defined in the std namespace.
A vector container, like other containers, makes a copy of the objects you add to it. This has tremendous advantages in most circumstances, but it could be very inconvenient in some situations. For example, if your objects are large, there could be considerable overhead in copying each object as you add it to the container. This is an occasion where you might be better off storing pointers to the objects in the container rather than the objects themselves, and managing the objects externally. You could create a new version of the Ex10_02.cpp example to store pointers to Person objects in a container.
TRY IT OUT: Storing Pointers in a Vector
The Person class definition is exactly the same as before. Here's a revised version of the other source file:
// Ex10_03.cpp // Storing pointers to objects in a vector#include <iostream> #include <vector> #include "Person.h" using std::cin; using std::cout; using std::endl; using std::vector; int main() {vector<Person*> people; // Vector of Person objectsconst size_t maxlength(50); char firstname[maxlength]; char secondname[maxlength]; while(true) { cout << "Enter a first name or press Enter to end: "; cin.getline(firstname, maxlength, ' '),
if(strlen(firstname) == 0)
      break;
    cout << "Enter the second name: ";
    cin.getline(secondname, maxlength, '
'),
    people.push_back(new Person(firstname, secondname));
  }

  // Output the contents of the vector
  cout << endl;
  auto iter(people.begin());
  while(iter != people.end())
    (*(ite++))->showPerson();

  // Release memory for the people
  iter = people.begin();
  while(iter != people.end())
    delete *(iter++);

  // Pointers in the vector are now invalid
  // so remove the contents
  people.clear();

  return 0;
}

The output is essentially the same as before.
How It Works
Only the shaded lines of code have been changed. The first change is in the definition of the container:
vector<Person*> people; // Vector of Person objects
The vector<T> template type parameter is now Person*, which is a pointer to a Person object.
Within the input loop, each Person object is now created on the heap, and the address is passed to the push_back() function for the vector:
people.push_back(new Person(firstname, secondname));
It is important to take care when storing addresses of objects in a container. If you create objects on the stack, these objects will be destroyed when the function exits, and the pointers you have stored will be rendered invalid. With objects created on the heap using the new operator, the objects are only destroyed when you remove them using delete.
The iterator used to output the Person objects now has a different type, vector<Person*>::iterator, but it is still determined automatically:
auto iter(people.begin());
The way in which you output the Person object is also different:
(*(iter++))->showPerson();
The iterator now points to a pointer, so you must dereference the iterator to get to the pointer, and then use the pointer to call the showPerson() function for the Person object to produce the output. Note that the outer parentheses are essential because of operator precedence.
Because you created Person objects on the heap, you are responsible for deleting them:
iter = people.begin();
  while(iter != people.end())
    delete *(iter++);
You obtain another random access iterator pointing to the first element in the vector, and then use this in the loop to delete each of the Person objects. Of course, you have to dereference the iterator to get the address of the object to be deleted.
Finally, because all the objects have been deleted, the pointers in the vector are no longer valid, so you empty the vector by calling its clear() function. This simply deletes everything stored in the container.
The double-ended queue container template, deque<T>, is defined in the deque header. A double-ended queue container is very similar to a vector in that it can do everything a vector container can, and includes the same function members, but you can also add and delete elements efficiently at the beginning of the sequence as well as at the end. You could replace the vector used in Ex10_02.cpp with a double-ended queue, and it would work just as well:
deque<Person> people; // Double-ended queue of Person objects
Of course, you would need to change the #include directive to include the deque header instead of the vector header.
The function to add an element to the front of the container is push_front(), and you can delete the first element by calling the pop_front() function. Thus, if you were using a deque<Person> container in Ex10_02.cpp, you could add elements at the front instead of the back:
people.push_front(Person(firstname, secondname));
The only difference in using this statement to add elements to the container would be that the order of the elements in the double-ended queue would be the reverse of what they are in the vector.
The range of constructors available for a deque<T> container is the same as for vector<T>. Here are examples of each of them:
deque<string> strings;            // Create an empty container
deque<int> items(50);
 // A container of 50 elements initialized to
// default value
deque<double> values(5, 0.5);     // A container with 5 elements 0.5
deque<int> data(items.begin(), items.end());  // Initialized with a sequence
Although a double-ended queue is very similar to a vector and does everything a vector can do, as well as allowing you to add to the front of the sequence efficiently, it does have one disadvantage compared to a vector. Because of the additional capability it offers, the memory management for a double-ended queue is more complicated than for a vector, so it will be slightly slower. Unless you need the ability to add elements to the front of the container, a vector is a better choice.
Let's see a double-ended queue in action.
TRY IT OUT: Using a Double-Ended Queue
This example stores an arbitrary number of integers in a double-ended queue and then operates on them.
// Ex10_04.cpp
// Using a double-ended queue

 #include <iostream>
#include <deque>
#include <algorithm>
#include <numeric>

 using std::cin;
using std::cout;
using std::endl;
using std::deque;
using std::sort;
using std::accumulate;

 int main()
{
  deque<int> data;
  deque<int>::iterator iter;             // Stores an iterator
  deque<int>::reverse_iterator riter;    // Stores a reverse iteraotr

   // Read the data
  cout << "Enter a series of non-zero integers separated by spaces."
       << " Enter 0 to end." << endl;
  int value(0);
  while(cin >> value, value != 0)
    data.push_front(value);

   // Output the data using an iterator
  cout << endl << "The values you entered are:" << endl;
  for(iter = data.begin() ; iter != data.end() ; iter++)
    cout << *iter << "  ";
  cout << endl;

   // Output the data using a reverse iterator
  cout << endl << "In reverse order the values you entered are:" << endl;
  for(riter = data.rbegin() ; riter != data.rend() ; riter++)
    cout << *riter << "  ";

   // Sort the data in descending sequence
cout << endl;
cout << endl << "In descending sequence the values you entered are:" << endl;
sort(data.rbegin(), data.rend());
for(iter = data.begin() ; iter != data.end() ; iter++)
cout << *iter << " ";
cout << endl;
// Calculate the sum of the elements
cout << endl << "The sum of the elements in the queue is: "
<< accumulate(data.begin(), data.end(), 0) << endl;
return 0;
}

Here is some sample output from this program:
Enter a series of non-zero integers separated by spaces. Enter 0 to end.
405 302 1 23 67 34 56 111 56 99 77 82 3 23 34 111 89 0

 The values you entered are:
89  111  34  23  3  82  77  99  56  111  56  34  67  23  1  302  405

 In reverse order the values you entered are:
405  302  1  23  67  34  56  111  56  99  77  82  3  23  34  111  89

 In descending sequence the values you entered are:
405  302  111  111  99  89  82  77  67  56  56  34  34  23  23  3  1

 The sum of the elements in the queue is: 1573
How It Works
You create the double-ended queue container and two iterator variables at the beginning of main():
deque<int> data;
  deque<int>::iterator iter;             // Stores an iterator
  deque<int>::reverse_iterator riter;    // Stores a reverse iterator
The data container is empty to start with. You will be using the iter variable for storing an iterator that accesses the queue elements in a forward direction, and the riter variable for storing a reverse iterator. iter and riter are of different types, but they are both random access iterators in the case of a deque<T> container. This means you can increment or decrement them, or add or subtract integer values. The iterator types are defined within the container class, so you always get the type of iterator that is suited to the organization of the container. For vector and double-ended queue containers, you get random access iterators.
The input is read in a while loop:
int value(0);
  while(cin >> value, value != 0)
    data.push_front(value);
The while loop condition makes use of the comma operator to separate two expressions, one that reads an integer from cin into value and another that tests whether the value read is non-zero. You saw in Chapter 2 that the value of a series of expressions separated by commas is the value of the rightmost expression, so the while loop continues as long as the expression value != 0 is true, and the value read is non-zero. Within the loop you store the value in the queue using the push_front() function.
The next loop lists the values contained in the queue:
cout << endl << "The values you entered are:" << endl;
  for(iter = data.begin() ; iter != data.end() ; iter++)
    cout << *iter << "  ";
This uses iter as the loop control variable to output the values. The loop ends when iter is incremented to be equal to the iterator returned by the end() function. You could also write this as a while loop:
iter = data.begin();
while(iter != data.end())
  cout << *iter++ << "  ";
Here iter is incremented within the loop after the value it points to has been written to cout.
The next loop outputs the values in reverse order:
for(riter = data.rbegin() ; riter != data.rend() ; riter++)
    cout << *riter << "  ";
This uses a reverse iterator, so the loop starts with the last element and ends when riter is incremented to be equal to the iterator returned by rend(). The rbegin() function returns an iterator pointing to the last elements and the rend() function returns an iterator pointing to one before the first element.
Next you sort the elements in descending sequence and output them:
sort(data.rbegin(), data.rend());
  for(iter = data.begin() ; iter != data.end() ; iter++)
    cout << *iter << "  ";
The default operation of the sort() algorithm is to sort the sequence, passed to it by the two random access iterator arguments, in ascending sequence. Here you pass reverse iterators to the functions, so it sees the elements in reverse order and sorts the reversed sequence in ascending order. The result is that the elements end up in descending sequence when seen in the normal forward order.
The last operation in main() is to output the sum of the elements:
cout << endl << "The sum of the elements in the queue is: "
       << accumulate(data.begin(), data.end(), 0)  << endl;
You could use a conventional loop to do this, but here you make use of the accumulate() algorithm that is defined in the numeric header. This accumulates the sum of the sequence of elements identified by the first two iterator arguments. The third argument specifies an initial value for the sum and must be the same type as the elements in the sequence. Supplying an initial value ensures that you always get a sensible result, even if the sequence to be summed is empty. The accumulate() function returns the result of the operation. You can apply the accumulate() function to a sequence of values of any numeric type.
The List<T> container template that is defined in the list header implements a doubly-linked list. The big advantage a list container has over a vector or a double-ended queue is that you can insert or delete elements anywhere in the sequence in constant time. The range of constructors for a list container is similar to that for a vector or double-ended queue. This statement creates an empty list:
list<string> names;
You can also create a list with a given number of default elements:
list<string> sayings(20); // A list of 20 empty strings
Here's how you create a list containing a given number of elements that are identical:
list<double> values(50, 2.71828);
This creates a list of 50 values of type double.
Of course, you can also construct a list initialized with values from a sequence specified by two iterators:
list<double> samples(++values.begin(), --values.end());
This creates a list from the contents of the values list, omitting the first and last elements in values. Note that the iterators returned by the begin() and end() functions for a list are bidirectional iterators, so you do not have the same flexibility as with a vector or a deque container that supports random access iterators. You can only change the value of a bidirectional iterator using the increment or decrement operator.
Just like the other sequence containers, you can discover the number of elements in a list by calling its size() member function. You can also change the number of elements in a list by calling its resize() function. If the argument to resize() is less than the number of elements in the list, elements will be deleted from the end; if the argument is greater, elements will be added using the default constructor for the type of elements stored.
You add an element to the beginning or end of a list by calling push_front() or push_back(), just as you would for a double-ended queue. To add elements to the interior of a list, you use the insert() function, which comes in three versions. Using the first version, you can insert a new element at a position specified by an iterator:
list<int> data(20, 1);                 // List of 20 elements value 1
data.insert(++data.begin(), 77);       // Insert 77 as the second element
The first argument to insert() is an iterator specified in the insertion position, and the second argument is the element to be inserted. The increment operator applied to the bidirectional iterator returned by begin() makes it point to the second element in the list. After executing this, the list contents will be:
1 77 1 1 1 1 1 1 1 1 1 1 1 1 1 1 1 1 1 1 1
You can see that the list now contains 21 elements, and that the elements from the insertion point on are simply displaced to the right.
You can also insert a number of copies of the same element at a given position:
list<int>::iterator iter = data.begin();
for(int i = 0 ; i<9 ; i++)
  ++iter;
data.insert(iter, 3, 88);   // Insert 3 copies of 88 starting at the 10th
The first argument to the insert() function is an iterator specifying the position, the second argument is the number of elements to be inserted, and the third argument is the element to be inserted repeatedly. To get to the tenth element you increment the iterator nine times in the for loop. Thus, this fragment inserts three copies of 88 into the list, starting at the tenth element. Now the contents of the list will be:
1 77 1 1 1 1 1 1 1 88 88 88 1 1 1 1 1 1 1 1 1 1 1 1
Now the list contains 24 elements.
Here's how you can insert a sequence of elements into a list:
vector<int> numbers(10, 5);            // Vector of 10 elements with value 5
data.insert(--(--data.end()), numbers.begin(), numbers.end());
The first argument to insert() is an iterator pointing to the second to last element position. The sequence to be inserted is specified by the second and third arguments to the insert() function, so this will insert all the elements from the vector into the list, starting at the second to last element position. After executing this, the contents of the list will be:
1 77 1 1 1 1 1 1 1 88 88 88 1 1 1 1 1 1 1 1 1 1 5 5 5 5 5 5 5 5 5 5 1 1
Inserting the 10 elements from numbers in the second-to-last element position displaces the last two elements in the list to the right. The list now contains 34 elements.
You can obtain a reference to the first or last element in a list by calling the front() or back() function for the list. To access elements interior to the list you must use an iterator, and increment or decrement the iterator, to get to the element you want. As you have seen, the begin() and end() functions return a bidirectional iterator pointing at the first element, or one past the last element, respectively. The rbegin() and rend() functions return bidirectional iterators and enable you to iterate through the elements in reverse sequence.
Let's try out some of what we have seen in an example.
TRY IT OUT: Working with a List
In this example you read sentences from the keyboard and store them in a list.
// Ex10_05.cpp
// Working with a list

 #include <iostream>
#include <list>
#include <string>

 using std::cin;
using std::cout;
using std::endl;
using std::list;
using std::string;

 int main()
{
  list<string> text;
  list<string>::iterator iter;           // Stores an iterator

   // Read the data
  cout << "Enter a few lines of text. Just press Enter to end:"
       << endl;
  string sentence;
  while(getline(cin, sentence, '
'), !sentence.empty())
    text.push_front(sentence);

   // Output the data using an iterator
  cout << endl << "Here is the text you entered:" << endl;
  for(iter = text.begin() ; iter != text.end() ; iter++)
    cout << *iter << endl;

   // Sort the data in ascending sequence
  cout << endl << "In ascending sequence the sentences you entered are:" << endl;
  text.sort();
  for(iter = text.begin() ; iter != text.end() ; iter++)
    cout << *iter << endl;

   return 0;
}

Here is an example of some output from this program:
Enter a few lines of text. Just press Enter to end:
This sentance contains three erors.
This sentence is false.
People who live in glass houses might as well answer the door.
If all else fails, read the instructions.
Home is where the mortgage is.

 Here is the text you entered:
Home is where the mortgage is.
If all else fails, read the instructions.
People who live in glass houses might as well answer the door.
This sentence is false.
This sentance contains three erors.

 In ascending sequence the sentences you entered are:
Home is where the mortgage is.
If all else fails, read the instructions.
People who live in glass houses might as well answer the door.
This sentance contains three erors.
This sentence is false.
You first create a list container to hold strings, followed by an iterator variable for use in outputting the contents of the list:
list<string> text;
  list<string>::iterator iter;           // Stores an iterator
You then read an arbitrary number of text inputs from the standard input stream, cin:
string sentence;
  while(getline(cin, sentence, '
'), !sentence.empty())
    text.push_front(sentence);
This uses the same idiom for input as the previous example. The second expression in the while loop condition determines when the loop ends, which will be when calling empty() for sentence returns true. You add each input to the list using the push_front() function, but you could equally well use push_back(). The only difference would be that the order of elements in the list would be reversed.
You output the contents of the list in a loop:
for(iter = text.begin() ; iter != text.end() ; iter++)
    cout << *iter << endl;
This is exactly the same mechanism that you have used for a vector, but remember: A list does not support random access to the elements, so the iterators are bidirectional iterators, not random access iterators.
Lastly, you sort the contents of the list and output it:
text.sort();
  for(iter = text.begin() ; iter != text.end() ; iter++)
    cout << *iter << endl;
This uses the sort() member of the list<string> object to sort the contents. Because a list<T> container does not provide random access iterators, you cannot use the sort() function that is defined in the algorithm header. This is why the list<T> template defines its own sort() function member.
The clear() function deletes all the elements from a list. The erase() function allows you to delete either a single element specified by a single iterator, or a sequence of elements specified by a pair of iterators in the usual fashion — the first in the sequence and one past the last.
int data[] = {10, 22, 4, 56, 89, 77, 13, 9};
list<int> numbers(data, data+8);

 numbers.erase(++numbers.begin());      // Remove the second element

 // Remove all except the first and the last two
numbers.erase(++numbers.begin(), --(--numbers.end()));
Initially, the list will contain all the values from the data array. The first erase() operation deletes the second element, so the list will contain:
10 4 56 89 77 13 9
For the second erase() operation, the first argument is the iterator returned by begin(), incremented by 1, so that it points to the second element. The second argument is the iterator returned by end(), decremented twice, so that it points to the second-to-last element. Of course, this is one past the end of the sequence, so the element that this iterator points to is not included in the set to be deleted, and the list contents after this operation will be:
10 13 9
The remove() function removes the elements from a list that match a particular value. With the numbers list defined as in the previous fragment, you could remove all elements equal to 22 with the following statement:
numbers.remove(22);
The assign() function removes all the elements from a list and copies either a single object into the list a given number of times, or copies a sequence of objects specified by two iterators. Here's an example:
int data[] = {10, 22, 4, 56, 89, 77, 13, 9};
list<int> numbers(data, data+8);

 numbers.assign(10, 99);      // Replace contents by 10 copies of 99

 // Remove all except the first and the last two
numbers.assign(data+1, data+4); // Replace contents by 22 4 56
The assign() function comes in the two overloaded versions illustrated here. The arguments to the first are the count of the number of replacement elements, and the replacement element value. The arguments to the second version are either two iterators or two pointers, specifying a sequence in the way you have already seen.
The unique() function will eliminate adjacent duplicate elements from a list, so if you sort the contents first, applying the function ensures that all elements are unique. Here's an example:
int data[] = {10, 22, 4, 10, 89, 22, 89, 10};
list<int> numbers(data, data+8);       // 10 22 4 10 89 22 89 10
numbers.sort();                        // 4 10 10 10 22 22 89 89
numbers.unique();                      // 4 10 22 89
The result of each operation is shown in the comments.
The splice() function allows you to remove all or part of one list and insert it in another. Obviously, both lists must store elements of the same type. Here's the simplest way you could use the splice() function:
int data[] = {1, 2, 3, 4, 5, 6, 7, 8};
list<int> numbers(data, data+3);                 // 1 2 3
list<int> values(data+4, data+8);                // 5 6 7 8
numbers.splice(++numbers.begin(), values);       // 1 5 6 7 8 2 3
The first argument to the splice() function is an iterator specifying where the elements should be inserted, and the second argument is the list that is the source of the elements to be inserted. This operation removes all the elements from the values list and inserts them immediately preceding the second element in the numbers list.
Here's another version of the splice() function that removes elements from a given position in a source list and inserts them at a given position in the destination list:
int data[] = {1, 2, 3, 4, 5, 6, 7, 8};
list<int> numbers(data, data+3);                           // 1 2 3
list<int> values(data+4, data+8);                          // 5 6 7 8
numbers.splice(numbers.begin(), values, --values.end());   // 8 1 2 3
In this version, the first two arguments to the splice() function are the same as the previous version of the function. The third argument is an iterator specifying the position of the first element to be selected from the source list; all elements, from this position to the end, are removed from the source and inserted in the destination list. After executing this code fragment, values will contain 5 6 7.
The third version of splice() requires four arguments and selects a range of elements from the source list:
int data[] = {1, 2, 3, 4, 5, 6, 7, 8};
list<int> numbers(data, data+3);                 // 1 2 3
list<int> values(data+4, data+8);                // 5 6 7 8
numbers.splice(++numbers.begin(), values, ++values.begin(), --values.end());
                                                 // 1 6 7 2 3
The first three arguments to the version of splice() are the same as the previous version, and the last argument is one past the last element to be removed from the source, values. After executing this, values will contain
5 8.
The merge() function removes elements from the list that you supply as an argument and inserts them in the list for which the function is called. The function then sorts the contents of the extended list into ascending order by default, or into some other order determined by a function object that you supply as a second argument to the merge() function. Both lists must be ordered appropriately before you call merge(); in other words, the lists must be ordered in the way that you want the final combined list to be ordered. Here's a fragment showing how you might use it:
int data[] = {1, 2, 3, 4, 5, 6, 7, 8};
list<int> numbers(data, data+3);                 // 1 2 3
list<int> values(data+1, data+8);                // 2 3 4 5 6 7 8
numbers.merge(values);                           // 1 2 2 3 3 4 5 6 7 8
This merges the contents of values into numbers, so values will be empty after this operation. The merge() function that accepts a single argument orders the result in ascending sequence by default, and because the values in both lists are already ordered, you don't need to sort them. To merge the same lists in descending sequence, the code would be as follows:
numbers.sort(greater<int>());                    // 3 2 1
values.sort(greater<int>());                     // 8 7 6 5 4 3 2
numbers.merge(values, greater<int>());           // 8 7 6 5 4 3 3 2 2 1
Here you use the greater<int>() function object that is defined in the functional header to specify that the lists should be sorted in descending sequence and that they should be merged into the same sequence.
The remove_if() function removes elements from a list based on the result of applying a unary predicate; I'm sure you'll recall that a unary predicate is a function object that applies to a single argument and returns a bool value, true or false. If the result of applying the predicate to an element is true, then the element will be deleted from the list. Typically, you would define your own predicate to do this. This involves defining your own class template for the function object that you want, while the STL defines the unary_function<T, R> base template for use in this context. This template just defines types that will be inherited by the derived class that specifies your function object type. The base class template is defined as follows:
template<class _Arg, class _Result>
struct unary_function
{ // base class for unary functions
  typedef _Arg argument_type;
  typedef _Result result_type;
};
This defines argument_type and result_type as standardized types for use in your definition of the operator()() function. You must use this base template if you want to use your predicates with function adapters.
The way in which you can use the remove_if() function is best explained with a specific application, so let's try this in a working example.
TRY IT OUT: Defining a Predicate for Filtering a List
Here's how you could define a template for a function object based on the helper template from the STL, which you could then use to remove negative values from a list:
// function_object.h
// Unary predicate to identify negative values
#pragma once
#include <functional>

 template <class T> class is_negative: public std::unary_function<T, bool>
{
  public:
  result_type operator()(argument_type& value)
  {
    return value < 0;
  }
};
This predicate works with any numeric type. The base template is very useful in that it standardizes the representation of the argument and return types for the predicate, and this is required if you want your function object to be usable with function adapters. Function adapters allow function objects to be used in combination to provide more complex functions. You should be able to see how you could define unary predicates for filtering a list in other ways — selecting even or odd numbers for example, or multiples of a given number, or numbers falling within a given range.
If you are not concerned about the use of your predicate with function adapters, you could define the template very easily without the base class template:
// function_object.h
// Unary predicate to identify negative values
#pragma once

 template <class T> class is_negative
{
  public:
  bool operator()(T& value)
  {
    return value<0;
  }
};
You don't need the #include directive for <functional> here because you are not using the base template. This definition is simple, and perhaps easier to understand, but I included the original version just to show how you use the base template. You will want to do this if you intend to use your predicate in a more general context, in particular if you want to use it with function adapters. I'll create the example with the first version, but you can use either version, or perhaps try both.
To make the example more interesting, I'll include function templates both for inputting data to a list and for writing out the contents of a list. Here's the program to make use of your predicate:
// Ex10_06.cpp
// Using the remove_if() function for a list

 #include <iostream>
#include <list>
#include <functional>
#include "function_object.h"

 using std::cin;
using std::cout;
using std::endl;
using std::list;
using std::greater;

 // Template function to list the contents of a list
template <class T>
void listlist(list<T>& data)
{
  for(auto iter = data.begin() ; iter != data.end() ; iter++)
    cout << *iter << "  ";
  cout << endl;
}

 // Template function to read data from cin and store it in a list
template<class T>
void loadlist(list<T>& data)
{
  T value = T();
  while(cin >> value, value != T())  //Read non-zero values
    data.push_back(value);
}

 int main()
{
  // Process integers
  list<int> numbers;
  cout << "Enter non-zero integers separated by spaces. Enter 0 to end."
       << endl;
  loadlist(numbers);
  cout << "The list contains:" << endl;
  listlist(numbers);
  numbers.remove_if(is_negative<int>());
  cout << "After applying the remove_if() function the list contains:"
       << endl;
  listlist(numbers);

   // Process floating-point values
  list<double> values;
  cout << endl
       << "Enter non-zero values separated by spaces. Enter 0 to end."
       << endl;
  loadlist(values);
  cout << "The list contains:" << endl;
  listlist(values);
  values.remove_if(is_negative<double>());
  cout << "After applying the remove_if() function the list contains:" << endl;
listlist(values);
return 0;
}

Here's some sample output from this program:
Enter non-zero integers separated by spaces. Enter 0 to end.
23 −4 −5 66 67 89 −1 22 34 −34 78 62 −9 99 −19 0
The list contains:
23  −4  −5  66  67  89  −1  22  34  −34  78  62  −9  99  −19
After applying the remove_if() function the list contains:
23  66  67  89  22  34  78  62  99

 Enter non-zero values separated by spaces. Enter 0 to end.
2.5 −3.1 5.5 100 −99 −.075 1.075 13 −12.1 13.2 0
The list contains:
2.5  −3.1  5.5  100  −99  −0.075  1.075  13  −12.1  13.2
After applying the remove_if() function the list contains:
2.5  5.5  100  1.075  13  13.2
How It Works
The output shows that the predicate works for values of type int and type double. The remove_if() function applies the predicate to each element in a list in turn, and deletes the elements for which the predicate returns true.
The body of the loadlist<T>() template function that reads the input is:
T value = T();
  while(cin >> value, value != T())  //Read non-zero values
    data.push_back(value);
The local variable value is defined as type T, the type parameter for the template, so this will be of whatever type you use to instantiate the function. Because value is a template type, you initialize it using the no-arg constructor. The input is read in the while loop, and values continue to be read until you enter zero, in which case the last expression in the while loop condition will be false, thus ending the loop.
The body of the listlist<T>() function template is also very straightforward:
for(auto iter = data.begin() ; iter != data.end() ; iter++)
    cout << *iter << "  ";
  cout << endl;
Note how you can use auto, even in a template. This deduces the type list<T>::iterator for the for loop control variable, which maps to the type required for the iterator for the list container that is passed as the argument. The output is produced by dereferencing the iterator in the way you have seen before.
If you wanted to try out the merge() function within this example, you could add the following code before the return statement in main():
// Another list to use in merge
  list<double> morevalues;
  cout << endl
       << "Enter non-zero values separated by spaces. Enter 0 to end."
       << endl;
  loadlist(morevalues);
  cout << "The list contains:" << endl;
  listlist(morevalues);
  morevalues.remove_if(is_negative<double>());
  cout << "After applying the remove_if() function the list contains:" << endl;
  listlist(morevalues);

   // Merge the last two lists
  values.sort(greater<double>());
  morevalues.sort(greater<double>());
  values.merge(morevalues, greater<double>());
  listlist(values);
Don't forget that you need an #include directive for functional, and a using directive for std::greater, for this to compile.
The remaining sequence containers are implemented through container adapters that I introduced at the beginning of this chapter. I'll discuss each of them briefly and illustrate their operation with an examples.
A queue<T> container implements a first-in first-out storage mechanism through an adapter. You can only add to the end of the queue or remove from the front. Here's one way you can create a queue:
queue<string> names;
This creates a queue that can store elements of type string. By default, the queue<T> adapter class uses a deque<T> container as the base, but you can specify a different sequence container as a base, as long as it supports the operations front(), back(), push_back(), and pop_front(). These four functions are used to operate the queue. Thus, a queue can be based on a list or a vector container. You specify the alternate container as a second template parameter. Here's how you would create a queue based on a list:
queue< string, list<string> > names;
The second type parameter to the adapter template specifies the underlying sequence container that is to be used. The queue adapter class acts as a wrapper for the underlying container class and essentially restricts the range of operations you can carry out to those described in the following table.
FUNCTION | DESCRIPTION |
|---|---|
| Returns a reference to the element at the back of the queue. There are two versions of the function, one returning a |
| Returns a reference to the element at the front of the queue. There are two versions of the function, one returning a |
| Adds the element specified by the argument to the back of the queue. |
| Removes the element at the front of the queue. |
| Returns the number of elements in the queue. |
| Returns |
Note that there are no functions in the table that make iterators available for a queue container. The only way to access the contents of a queue is via the back() or front() functions.
TRY IT OUT: Using a Queue Container
In this example you read a succession of one or more sayings, store them in a queue, and then retrieve the sayings and output them.
// Ex10_07.cpp
// Exercising a queue container

 #include <iostream>
#include <queue>
#include <string>


 using std::cin;
using std::cout;
using std::endl;
using std::queue;
using std::string;


 int main()
{
  queue<string> sayings;
  string saying;
  cout << "Enter one or more sayings. Press Enter to end." << endl;
  while(true)
  {
getline(cin, saying);
if(saying.empty())
break;
sayings.push(saying);
}
cout << "There are " << sayings.size()
<< " sayings in the queue."
<< endl << endl;
cout << "The sayings that you entered are:" << endl;
while(!sayings.empty())
{
cout << sayings.front() << endl;
sayings.pop();
}
return 0;
}

Here's an example of some output from this program:
Enter one or more sayings. Press Enter to end.
If at first you don't succeed, give up.
A preposition is something you should never end a sentence with.
The bigger they are, the harder they hit.
A rich man is just a poor man with money.
Wherever you go, there you are.
Common sense is not so common.

 There are 6 sayings in the queue.

 The sayings that you entered are:
If at first you don't succeed, give up.
A preposition is something you should never end a sentence with.
The bigger they are, the harder they hit.
A rich man is just a poor man with money.
Wherever you go, there you are.
Common sense is not so common.
How It Works
You first create a queue container that stores string objects:
queue<string> sayings;
You read sayings from the standard input stream and store them in the queue container in a while loop:
while(true)
  {
    getline(cin, saying);
    if(saying.empty())
      break;
sayings.push(saying); }
This version of the getline() function reads text from cin into the string object, saying, until a newline character is recognized. Newline is the default input termination character, and when you want to override this, you specify the termination character as the third argument to getline(). The loop continues until the empty() function for saying in the if statement returns true, which indicates an empty line was entered. When the input in saying is not empty, you store it in the sayings queue container by calling its push() function.
When input is complete, you output the count of the number of sayings that were stored in the queue:
cout << "There are " << sayings.size()
<< " sayings in the queue."
<< endl << endl;The size() function returns the number of elements in the queue.
You list the contents of the queue in another while loop:
while(!sayings.empty())
{
cout << sayings.front() << endl;
sayings.pop();
}The front() function returns a reference to the object at the front of the queue, but the object remains in its place. Because you want to access each of the elements in the queue in turn, you have to call the pop() function, after listing each element, to remove it from the queue.
The process of listing the elements in the queue also deletes them, so after the loop ends, the queue will be empty. What if you wanted to retain the elements in the queue? Well, one possibility is that you could put each saying back in the queue after you have listed it. Here's how you could do that:
for(queue<string>::size_type i = 0 ; i < sayings.size() ; i++)
{
saying = sayings.front();
cout << saying << endl;
sayings.pop();
sayings.push(saying);
}Here you make use of the value returned by size() to iterate over the number of sayings in the queue. After writing each saying to cout, you remove it from the queue by calling pop(), and then you return it to the back of the queue by calling push(). When the loop ends, the queue will be left in its original state. Of course, if you don't want to remove the elements when you access them, you could always use a different kind of container.
A priority_queue<T> container is a queue that always has the largest or highest priority element at the top. Here's one way to define a priority queue container:
priority_queue<int> numbers;
The default criterion for determining the relative priority of elements as you add them to the queue is the standard less<T> function object template. You add an element to the priority queue using the push() function:
numbers.push(99); // Add 99 to the queue
When you add an element to the queue, if the queue is not empty the function will use the less<T>() predicate to decide where to insert the new object. This will result in elements being ordered in ascending sequence from the back of the queue to the front. You cannot modify elements while they are in a priority queue, as this could invalidate the ordering that has been established.
The complete set of operations for a priority queue is shown in the following table.
FUNCTION | DESCRIPTION |
|---|---|
| Returns a |
| Adds the element specified by the argument to the priority queue at a position determined by the predicate for the container, which by default is |
| Removes the element at the front of the priority queue, which will be the largest or highest priority element in the container. |
| Returns the number of elements in the priority queue. |
| Returns |
Note that there is a significant difference between the functions available for the priority queue and for the queue container. With a priority queue, you have no access to the element at the back of the queue; only the element at the front is accessible.
By default, the base container used by the priority queue adapter class is vector<T>. You have the option of specifying a different sequence container as the base, and an alternative function object for determining the priority of the elements. Here's how you could do that:
priority_queue<int, deque<int>, greater<int>> numbers;
This statement defines a priority queue based on a deque<int> container, with elements being inserted using a function object of type greater<int>. The elements in this priority queue will be in descending sequence, with the smallest element at the top. The three template parameters are the element type, the container to be used as a base, and the type for the predicate to be used for ordering the elements.
You could omit the third template parameter if you want the default predicate to apply, which will be less<int> in this case. If you want a different predicate but want to retain the default base container, you must explicitly specify it, like this:
priority_queue<int, vector<int>, greater<int>> numbers;
This specifies the default base container vector<int> and a new predicate type, greater<int>, to be used to determine the ordering of elements.
TRY IT OUT: Using a Priority Queue Container
In this example you store Person objects in the container, with the Person class defined this time to hold the names as type string:
// Person.h
// A class defining a person
#pragma once
#include <iostream>
#include <string>
using std::cout;
using std::endl;
using std::string;

 class Person
{
public:
  Person(const string first, const string second)
  {
    firstname = first;
    secondname = second;
  }

   // No-arg constructor
  Person(){}

   // Copy constructor
  Person(const Person& p)
  {
    firstname = p.firstname;
    secondname = p.secondname;
  }

   // Less-than operator
  bool operator<(const Person& p)const
  {
    if(secondname < p.secondname ||
((secondname == p.secondname) && (firstname < p.firstname)))
return true;
return false;
}
// Greater-than operator
bool operator>(const Person& p)const
{
return p < *this;
}
// Output a person
void showPerson() const
{
cout << firstname << " " << secondname << endl;
}
private:
string firstname;
string secondname;
};Note that the > operator is overloaded here. This will make it possible to put objects in a priority queue that is ordered in either ascending or descending sequence.
Here's the program that stores Person objects in a priority queue:
// Ex10_08.cpp
// Exercising a priority queue container

 #include <iostream>
#include <vector>
#include <queue>
#include <functional>
#include "Person.h"

 using std::cin;
using std::cout;
using std::endl;
using std::vector;
using std::priority_queue;
using std::greater;

 int main()
{
  priority_queue<Person, vector<Person>, greater<Person>> people;
  string first, second;
  while(true)
  {
    cout << "Enter a first name or press Enter to end: " ;
    getline(cin, first);
    if(first.empty())
break;
cout << "Enter a second name: " ;
getline(cin, second);
people.push(Person(first, second));
}
cout << endl << "There are " << people.size()
<< " people in the queue."
<< endl << endl;
cout << "The names that you entered are:" << endl;
while(!people.empty())
{
people.top().showPerson();
people.pop();
}
return 0;
}

Typical output from this example looks like this:
Enter a first name or press Enter to end: Oliver
Enter a second name: Hardy
Enter a first name or press Enter to end: Stan
Enter a second name: Laurel
Enter a first name or press Enter to end: Harold
Enter a second name: Lloyd
Enter a first name or press Enter to end: Mel
Enter a second name: Gibson
Enter a first name or press Enter to end: Brad
Enter a second name: Pitt
Enter a first name or press Enter to end:

 There are 5 people in the queue.

 The names that you entered are:
Mel Gibson
Oliver Hardy
Stan Laurel
Harold Lloyd
Brad Pitt
How It Works
The Person class is simpler than in the earlier version because the names are stored as string objects, and no dynamic memory allocation is necessary. You no longer need to define the assignment operator, as the default will be fine. Defining the < operator function is sufficient to allow Person objects to be stored in a default priority queue, and the overloaded > operator will permit Person objects to be ordered using the greater<Person> predicate type.
You define the priority queue in main() like this:
priority_queue< Person, vector<Person>, greater<Person>> people;
Because you want to specify the third template type parameter, you must supply all three, even though the base container type is the default. Incidentally, don't confuse the type argument you are using in the template instantiation here, greater<Person>, with the object, greater<Person>(), that you might supply as an argument to the sort() algorithm.
Of course, the third parameter to the priority queue template that defines the predicate for ordering the objects does not have to be a template type. You could use your own function object type as long as it has a suitable implementation of operator()() in the class:
// function_object.h
#pragma once
#include <functional>
#include "Person.h"
using std::binary_function;

 class PersonComp: binary_function<Person, Person, bool>
{
public:
  result_type operator()(const first_argument_type& p1,
                         const second_argument_type& p2) const
  {
    return p1 > p2;
  }
};xs
For function objects that work with the STL, a binary predicate must implement operator()() with two parameters, and if you want the predicate to work with function adapters, your function object type must have an instance of the binary_function<Arg1Type, Arg2Type, ResultType> template as a base. Although you will typically make both arguments to a binary predicate of the same type, the base class does not require it, so when it is meaningful, your predicates can apply to arguments of different types.
If you don't want to use your function objects with function adapters, you could define the type as:
// function_object.h
#pragma once
#include "Person.h"

 class PersonComp
{
public:
  bool operator()(const Person& p1, const Person& p2) const
  {
    return p1 > p2;
  }
};
With this function object type, you could define the priority queue object as:
priority_queue< Person, vector<Person>, PersonComp> people;
You read names from the standard input stream in an indefinite while loop:
while(true)
  {
    cout << "Enter a first name or press Enter to end: " ;
    getline(cin, first);
    if(first.empty())
      break;

     cout << "Enter a second name: " ;
    getline(cin, second);
    people.push(Person(first, second));
  }
An empty first name will terminate the loop. After reading a second name, you create the Person object in the argument expression to the push() function that adds the object to the priority queue. It will be inserted at a position determined by a greater<Person>() predicate. This will result in the objects being ordered in the priority queue with the smallest at the top. You can see from the output that the names are in ascending sequence.
After outputting the number of objects in the queue using the size() function, you output the contents of the queue in a while loop:
while(!people.empty())
  {
    people.top().showPerson();
    people.pop();
  }
The top() function returns a reference to the object at the front of the queue, and you use this reference to call the showPerson() function to output the name. You then call pop() to remove the element at the front of the queue; unless you do this, you can't access the next element.
When the loop ends, the priority queue will be empty. There's no way to access all the elements and retain them in the queue. If you want to keep them, you would have to put them somewhere else — perhaps in another priority queue.
The stack<T> container adapter template is defined in the stack header and implements a pushdown stack based on a deque<T> container by default. A pushdown stack is a last-in first-out storage mechanism where only the object that was added most recently to the stack is accessible.
Here's how you can define a stack:
stack<Person> people;
This defines a stack to store Person objects.
The base container can be any sequence container that supports the operations back(), push_back(), and pop_back(). You could define a stack base on a list like this:
stack<string, list<string>> names;
The first template type argument is the element type, as before, and the second is the container type to be used as a base for the stack.
There are only five operations available with a stack<T> container, and they are shown in the following table.
FUNCTION | DESCRIPTION |
|---|---|
| Returns a reference to the element at the top of the stack. If the stack is empty, then the value returned is undefined. You can assign the reference returned to a |
| Adds the element specified by the argument to the top of the stack. |
| Removes the element at the top of the stack. |
| Returns the number of elements in the stack. |
| Returns |
As with the other containers provided through container adapters, you cannot use iterators to access the contents of a stack.
Let's see a stack working in another example.
TRY IT OUT: Using a Stack Container
This example stores Person objects in a stack. The Person class is the same as in the previous example, so I won't repeat the code here.
// Ex10_09.cpp
// Exercising a stack container

 #include <iostream>
#include <stack>
#include <list>
#include "Person.h"

 using std::cin;
using std::cout;
using std::endl;
using std::stack;
using std::list;

 int main()
{
  stack<Person, list<Person>> people;

   string first, second;
  while(true)
  {
    cout << "Enter a first name or press Enter to end: " ;
    getline(cin, first);
    if(first.empty())
      break;

     cout << "Enter a second name: " ;
    getline(cin, second);
    people.push(Person(first, second));
  }

   cout << endl << "There are " << people.size()
       << " people in the stack."
       << endl << endl;
  cout << "The names that you entered are:" << endl;
  while(!people.empty())
  {
    people.top().showPerson();
    people.pop();
  }

   return 0;
}

Here is an example of the output:
Enter a first name or press Enter to end: Gordon
Enter a second name: Brown
Enter a first name or press Enter to end: Harold
Enter a second name: Wilson
Enter a first name or press Enter to end: Margaret
Enter a second name: Thatcher
Enter a first name or press Enter to end: Winston
Enter a second name: Churchill
Enter a first name or press Enter to end: David
Enter a second name: Lloyd-George
Enter a first name or press Enter to end:

 There are 5 people in the stack.

 The names that you entered are:
David Lloyd-George
Winston Churchill
Margaret Thatcher
Harold Wilson
Gordon Brown
The code in main() is more or less the same as in the previous example. Only the container definition is significantly different:
stack<Person, list<Person>> people;
The stack container stores Person objects and is based on a list<T> container in this instance. You could also use a vector<T> container, and if you omit the second type parameter, the stack will use a deque<T> container as a base.
The output demonstrates that a stack is indeed a last-in first-out container, as the order of names in the output is the reverse of the input.
The array<T, N> container that is defined in the array header stores an array of N elements of type T. The array <> container is very easy to use, and you can initialize it in the same way as an ordinary C++ array. For example:
std::array<int, 10> samples = { 1, 2, 3, 4, 5};The samples container stores 10 elements of type int. The first five are initialized by the values in the initializer list; the elements without initial values will be zero. If the elements were of a class type, any elements that were not already initialized would be initialized using the no-arg constructor for the element type.
Like the vector<> and list<> containers, you can work through all the elements in an array<> using an iterator:
for(auto iter = samples.begin() ; iter != samples.end() ; ++iter)
  cout << *iter << "  ";
Because it also behaves like an ordinary array, you can also use an index value to access the elements in an array<> container:
for(size_t i = 0 ; i < samples.size() ; ++i)
  cout << samples[i] << "  ";
Elements are indexed from zero, just like an ordinary array. The size() member returns the number of elements in the container, and you just use this in the for loop to control indexing over all the elements.
A further possibility for accessing elements in an array is to use the at() function. The argument is the index position of the element you want to access, and the operation will throw an exception of type out_of_range if the argument is not a valid index. You could therefore write the previous loop as:
for(size_t i = 0 ; i < samples.size() ; ++i)
  cout << samples.at(i) << "  ";
Of course, if you want to deal with an index out-of-range condition you must put the statement in a try block and catch the exception.
There are overloaded operators for the full complement of comparison operators for array<> objects so you can use the operators <, <=, ==, !=, >= and > to compare array<> containers. Array containers are compared element by element, and the first pair of elements that differ determines that the arrays are unequal and whether one array<> object is greater or less than the other. Two array<> objects are equal if they have the same number of elements and corresponding elements are equal.
The tuple<> class template that is defined in the tuple header is a useful adjunct to the array<> container, and to other sequence containers such as the vector<>. As its name suggests, a tuple<> object encapsulates a number of different items of different types. If you were working with fixed records from a file, or possibly from an SQL database, you could use a vector<> or an array<> container to store tuple<> objects that encapsulate the fields in a record. Let's look at a specific example.
Suppose you are working with personnel records that contain an integer employee number, a first name, a second name, and the age of the individual in years. You could define a tuple<> instance to encapsulate an employee record like this:
typedef std::tuple<int, std::string, std::string, int> Record;
A typedef is very useful for reducing the verbosity of the type specification in this case. This typedef defines the Record type as being a tuple<> that stores values of type int, string, string, and int, corresponding to a person's ID, first name, second name, and age. You could now define an array<> container to store Record objects:
std::array<Record, 5> personnel = { Record(1001, "Joan", "Jetson", 35),
                                    Record(1002, "Jim", "Jones", 26),
                                    Record(1003, "June", "Jello", 31),
                                    Record(1004, "Jack", "Jester", 39)};
This defines the personnel object, which is an array that can store five Record objects. If you wanted flexibility in the number of tuples you were dealing with, you could use a vector<> or a list<> container. Here you initialize four of the five elements in personnel from the initializer list. You could add elements explicitly though. Here's how you might add a fifth element:
personnel[4] = Record(1005, "Jean", "Jorell", 29);
This uses the index operator to access the fifth element in the array. You also have the option of creating a tuple<> object using the make_tuple() function template:
personnel[4] = std::make_tuple(1005, "Jean", "Jorell", 29);
The make_tuple() function creates a tuple<> instance that is equivalent to our Record type because the deduced type parameters are the same.
To access the fields in a tuple, you use the get() function template. The template parameter is the index position of the field you want, where fields in a tuple are indexed from zero. The argument to the get() function is the tuple that you are accessing. For example, here's how you could list the records in our personnel container:
cout << std::setiosflags(std::ios::left);      // Left align output
for(auto iter = personnel.begin() ; iter != personnel.end() ; ++iter)
  cout << std::setw(10) << get<0>(*iter) << std::setw(10) << get<1>(*iter)
       << std::setw(10) << get<2>(*iter) << std::setw(10) << get<3>(*iter)
       << endl;
This outputs the fields in each tuple in personnel on a single line, where the fields are left-justified in a field width of 10 characters, so it looks tidy. Note that the type parameter to the get() function template must be a compile-time constant. This implies that you cannot use a loop index variable as the type parameter, so you can't iterate over the fields in a loop. It is helpful to define some integer constants that you can use to identify the fields in a tuple in a more readable way. For example, you could define the following constants:
const size_t ID(0), firstname(1), secondname(2), age(3);
Now you can use these variables as type parameters in get() function instantiations making it much clearer which field you are retrieving.
Let's put some of the fragments together into something you can compile and run.
TRY IT OUT: Storing tuples in an array
Here's the code for the example:
// Ex10_10.cpp Using an array storing tuple objects
#include <array>
#include <tuple>
#include <string>
#include <iostream>
#include <iomanip>

 using std::get;
using std::cout;
using std::endl;
using std::setw;
using std::string;

 const size_t maxRecords(100);
typedef std::tuple<int, string, string, int> Record;
typedef std::array<Record, maxRecords> Records;

 // Lists the contents of a Records array
void listRecords(const Records& people)
{
  const size_t ID(0), firstname(1), secondname(2), age(3);
  cout << std::setiosflags(std::ios::left);
  for(auto iter = people.begin() ; iter != people.end() ; ++iter)
  {
    if(*iter == Record()) break;
cout << setw(6) << get<ID>(*iter) << setw(15) << get<firstname>(*iter)
<< setw(15) << get<secondname>(*iter) << setw(5) << get<age>(*iter)
<< endl;
}
}
int main()
{
Records personnel = {Record(1001, "Clarke", "Kent", 89),
Record(1002, "Mary", "Pickford", 55),
Record(1003, "Mel", "Smith", 34),
Record(1004, "June", "Whitfield", 74)};
personnel[4] = std::make_tuple(1005, "Charles", "Chapin", 42);
personnel.at(5) = Record(1006, "Lewis", "Hamilton", 22);
listRecords(personnel);
return 0;
}

This program produces the following output:
1001  Clarke         Kent           89
1002  Mary           Pickford       55
1003  Mel            Smith          34
1004  June           Whitfield      74
1005  Charles        Chapin         42
1006  Lewis          Hamilton       22
How It Works
To make the code easier to read, there are two typedef statements:
typedef std::tuple<int, string, string, int> Record;
typedef std::array<Record, maxRecords> Records;
The first typedef statement defines Record as equivalent to the tuple<> type that stores four fields of type int, string, string, and int. The second typedef defines Records as an array<> type, storing maxRecords elements of type Record. maxRecords is defined as a const value of type size_t. typedef statements are a great help in simplifying code that uses the STL.
The listRecords() function outputs the elements in a Records array:
void listRecords(const Records& people)
{
  const size_t ID(0), firstname(1), secondname(2), age(3);
  cout << std::setiosflags(std::ios::left);
  for(auto iter = people.begin() ; iter != people.end() ; ++iter)
  {
    if(*iter == Record()) break;
    cout << setw(6)  << get<ID>(*iter)         << setw(15) << get<firstname>(*iter)
         << setw(15) << get<secondname>(*iter) << setw(5)  << get<age>(*iter)
         << endl;
  }
}
The first statement in the function body defines constants for accessing the fields in a Record tuple. This enables meaningful names to be used, rather than numeric index values whose meaning would not be obvious. The next statement ensures that subsequent output to the standard output stream will be left-aligned. The for loop uses an iterator to run through the elements in the Records array that has been passed to the function. Elements that were not explicitly initialized will have been initialized using the no-arg constructor for the element type, Record. You don't want to see elements that are the equivalent of zero, so the if statement ends the loop when such an element is found. Fields in the tuple that each array element contains are accessed with the get<>() function using the constants that were defined for that purpose. The setw() manipulators set the width of the output field for the next item that is written to cout.
In main() you create the personnel array as type Records and initialize the first four elements with Record objects:
Records personnel = {Record(1001, "Clarke", "Kent", 89),
                       Record(1002, "Mary", "Pickford", 55),
                       Record(1003, "Mel", "Smith", 34),
                       Record(1004, "June", "Whitfield", 74)};
This is clearly a much more readable statement because of the typedef statements for Records and Record.
The next statement adds another Record to the array:
personnel[4] = std::make_tuple(1005, "Charles", "Chapin", 42);
This uses the operator[]() function overload for the personnel array to access the element, and uses the make_tuple() function to create a tuple that is similar to the tuple of type Record to be stored in the array.
Curiously, the next statement uses a different technique to set the value for an array element:
personnel.at(5) = Record(1006, "Lewis", "Hamilton", 22);
This uses the at() function for the array, and the argument value of 5 selects the sixth element in the array. Here, the tuple is created using the Record type name.
Finally, in main(), you call the listRecords() function to list the contents of personnel. The output shows that everything works as it should.
The most significant feature of the associative containers such as map<K, T> is that you can retrieve a particular object without searching. The location of an object of type T within an associative container is determined from a key of type K that you supply along with the object, so you can retrieve any object rapidly just by supplying the appropriate key. The key is actually a sort key that determines the order of the entries in the map.
For set<T> and multiset<T> containers, objects act as their own keys. You might be wondering what the use of a container is if, before you can retrieve an object, you have to have the object available. After all, if you already have the object, why would you need to retrieve it? The point of set and multiset containers is not so much to store objects for later retrieval, but to create an aggregation of objects that you can test to see whether or not a given object is already a member.
In this section, I'll concentrate on map containers. The set and multiset containers are used somewhat less frequently, and their operations are very similar to the map and multimap containers, so you should have little difficulty using these once you have learned how to apply the map containers.
The template for map containers is defined in the map header. When you create a map<K, T> container, you must supply type arguments for the type of key you will use, K, and the type of the object associated with a key, T. Here's an example:
map<Person, string> phonebook;
This defines an empty map container that stores entries that are key/object pairs, where the keys are of type Person and the objects are of type string.
Note
Although you use class objects here for both keys and objects to be stored in the map, the keys and associated objects in a map can also be of any fundamental type, such as int, or double or char.
You can also create a map container that is initialized with a sequence of key/object pairs from another map container:
map<Person, string> phonebook(iter1, iter2);
iter1 and iter2 are a pair of iterators defining a series of key/object pairs from another container in the usual way, with iter2 specifying a position one past the last pair to be included in the sequence. You obtain iterators to access the contents of a map by calling the begin() and end() functions, just as you would for a sequence container. The iterators for a map are bidirectional iterators.
The entries in a map are ordered based on a function object of type less<Key> by default, so they will be stored in ascending key sequence. You can change the type function object used for ordering entries in a map by supplying a third template type parameter. For example:
map<Person, string, greater<Person>> phonebook;
This map stores entries that are Person/string pairs, where Person is the key with an associated string object. The ordering of entries will be determined by a function object of type greater<Person>, so the entries will be in descending key sequence.
The objects that you store in a map are always a key/object pair that are of a template type pair<K, T>, where K is the type of key and T is the type of object associated with the key. The pair<K, T> type is defined in the utility header, which is included in the map header, so if you are using a map the type is automatically available. You can define a pair object like this:
auto entry = pair<Person, string>(Person("Mel", "Gibson"), "213 345 5678");This creates the variable entry of type pair<Person,string> and initializes it to an object created from a Person object and a string object. I'm representing a phone number in a very simplistic way, just as a string, but of course it could be a more complicated class identifying the components of the number, such as country code and area code. The Person class is the class you used in the previous example.
An instance of the pair<K, T> class template defines two constructors, and the one you are using in the previous fragment defines an object from a key and its associated object. The other constructor is a copy constructor that allows you to construct a new pair from an existing one. You can access the elements in a pair through the members first and second; thus, in the example, entry.first references the Person object and entry.second references the string object.
You can also use a helper function, make_pair(), that is defined in the utility header to create a pair object:
auto entry = make_pair(Person("Mel", "Gibson"), "213 345 5678");The make_pair() function is defined as a template, so it automatically deduces the type for the pair, from the argument types you supply.
All of the comparison operators are overloaded for pair objects, so you can compare them with any of the operators <, <=, ==, !=, >=, and >.
It's sometimes convenient to use a typedef statement to abbreviate the pair<K, T> type you are using in a particular instance. For example:
map<Person, string> phonebook;
typedef pair<Person, string> Entry;
The first statement defines a map container that will store string objects using Person objects as keys. The second statement defines Entry as the type for the key/object pair. Having defined the Entry type, you can create objects of this type. For example:
Entry entry1 = Entry(Person("Jack", "Jones"), "213 567 1234");This statement defines a pair of type pair<Person, string>, using Person("Jack", "Jones") as the Person argument and "213 567 1234" as the string argument.
You can insert one or more pairs in a map using the insert() function. For example, here's how you insert a single object:
phonebook.insert(entry1);
This statement inserts the entry1 pair into the phonebook container, as long as there is no other entry in the map that uses the same key. In fact, this version of the insert() function returns a value that is also a pair, where the first object in the pair is an iterator and the second is a value of type bool. The bool value in the pair will be true if the insertion was made, and false otherwise. The iterator value in the pair will point to the element if it was stored in the map, or the element that is already in the map if the insert failed. Therefore, you can check if the object was stored, like this:
auto checkpair = phonebook.insert(entry1);
if(checkpair.second)
  cout << "Insertion succeeded." << endl;
else
  cout << "Insertion failed." << endl;
The pair that the insert() function returns is stored in checkpair. The type for checkpair is pair<map<Person,string>::iterator, bool>, which corresponds to a pair encapsulating an iterator for our map of type map<Person,string>::iterator, which you could access as checkpair.first; and a value of type bool, which you access in the code as checkpair.second.
Dereferencing the iterator in the pair returned by the insert() function will give you access to the pair that is stored in the map; you can use the first and second members of that pair to access the key and object, respectively. This can be a little tricky, so let's see what it looks like for checkpair in the code above:
cout << "The key for the entry is:" << endl;
checkpair.first->first.showPerson();
The expression checkpair.first references the first member of the checkpair pair, which is an iterator, so you are accessing a pointer to the object in the map with this expression. The object in the map is another pair, so the expression checkpair.first->first accesses the first member of that pair, which is the Person object. You use this to call the showPerson() member to output the name. You could access the object in the pair in a similar way, with the expression checkpair.first->second.
You have another version of the insert() function for inserting a series of pairs in a map. The pairs are defined by two iterator arguments, and the series would typically be from another map container.
The map<K,T> template defines the operator[]() function, so you can also use the subscript operator to insert an object. Here's how you could insert the entry1 object in the phonebook map:
phonebook[Person("Jack", "Jones")] = "213 567 1234";The subscript value is the key to be used to store the object that appears to the right of the assignment operator. This is perhaps a somewhat more intuitive way to store objects in a map. The only disadvantage, compared to the insert() function, is that you lose the ability to discover whether the key was already in the map.
You can use the subscript operator to retrieve the object from a map that corresponds to a given key. For example:
string number = phonebook[Person("Jack", "Jones")];This stores the object corresponding to the key
Person("Jack", "Jones")in number. If the key is not in the map, then a pair entry will be inserted into the map for this key, with the object as the default for the object type; here, the no-arg Person class constructor will be called to create the object for this key if the entry is not there.
Of course, you may not want a default object inserted when you attempt to retrieve an object corresponding to a given key. In this case, you could use the find() function to check whether there's an entry for a given key, and then retrieve it:
string number;
Person key = Person("Jack", "Jones");
auto iter = phonebook.find(key);

 if(iter != phonebook.end())
{
  number = iter->second;
  cout << "The number is " << number << endl;
}
else
{
  cout << "No number for the key ";
  key.showPerson();
}
The find() function returns an iterator of type map<Person,string>::iterator that points to the object corresponding to the key if the key is present in the map, or to one past the last entry in the map, which corresponds to the iterator returned by the end() function. Thus, if iter is not equal to the iterator returned by end(), the entry is present, and you can access the object through the second member of the pair. If you want to prevent the object in the map from being modified, you could define the iterator type explicitly as map<Person,string>::const_iterator.
Calling the count() function for a map with a key as the argument will return a count of the number of entries found corresponding to the key. For a map, the value returned can only be 0 or 1, because each key in a map must be unique. A multimap container allows multiple entries for a given key, so in this case other values are possible for the return value from count().
The erase() function enables you to remove a single entry, or a range of entries, from a map. You have two versions of erase() that will remove a single entry. One version requires an iterator as the argument pointing to the entry to be erased, and the other requires a key corresponding to the entry to be erased. For example:
Person key = Person("Jack", "Jones");
auto count = phonebook.erase(key);
if(count == 0)
  cout << "Entry was not found." << endl;
When you supply a key to the erase() function, it returns a count of the number of entries that were erased. With a map container, the value returned can only be 0 or 1. A multimap container can have several entries with the same key, in which case the erase() function may return a value greater than 1.
You can also supply an iterator as an argument to erase():
Person key = Person("Jack", "Jones");
auto iter = phonebook.find(key);
iter = phonebook.erase(iter);
if(iter == phonebook.end())
  cout << "End of the map reached." << endl;
In this case, the erase() function returns an iterator that points to the entry that remains in the map beyond the entry that was erased, or a pointer to the ends of the map if no such element is present.
The following table shows the other operations available with a map container.
FUNCTION | DESCRIPTION |
|---|---|
| Returns a bidirectional iterator pointing to the first entry in the map. |
| Returns a bidirectional iterator pointing to one past the last entry in the map. |
| Returns a reverse iterator pointing to the last entry in the map. |
| Returns a reverse iterator pointing to one before the first entry in the map. |
| Accepts a key as an argument and returns an iterator pointing to the first entry with a key that is greater than or equal to (the lower bound of) the specified key. If the key is not present, the iterator pointing to one past the last entry will be returned. |
| Accepts a key as an argument and returns an iterator pointing to the first entry with a key that is greater than (the upper bound of) the specified key. If the key is not present, the iterator pointing to one past the last entry will be returned. |
| Accepts a key as an argument and returns a pair object containing two iterators. The first member of the pair points to the lower bound of the specified key, and the second member points to the upper bound of the specified key. If the key is not present, both iterators in the pair will point to one past the last entry in the map. |
| Interchanges the entries in the map you pass as the argument, with the entries in the map for which the function is called. |
| Erases all entries in the map. |
| Returns the number of elements in the map. |
| Returns |
The lower_bound(), upper_bound(), and equal_range() functions are not very useful with a map container. However, they come into their own with a multimap container, when you want to find all the elements with the same key.
Let's see a map in action.
TRY IT OUT: Using a Map Container
In this example you use a map container to store phone numbers, and provide a mechanism for finding a phone number for a person. You use a variation on the Person class:
// Person.h
// A class defining a person
#pragma once
#include <iostream>
#include <string>
#include <functional>
using std::cout;
using std::endl;
using std::string;

 class Person
{
public:
  Person(const string first = "", const string second = "")
  {
    firstname = first;
    secondname = second;
  }

   // Less-than operator
  bool operator<(const Person& p)const
  {
    if(secondname < p.secondname ||
      ((secondname == p.secondname) && (firstname < p.firstname)))
      return true;

     return false;
  }

   // Get the name
  string getName()const
  {
    return firstname + " " + secondname;
  }

 private:
  string firstname;
  string secondname;
};
There are only a few minor changes from the previous version of the Person class. The no-arg constructor is now defined by providing default values for the constructor arguments. I have omitted the > operator function, the copy constructor, the assignment operator, and the showPerson() function. There is a new function, getName() that returns the complete name as a string object.
The source file containing main() and some helper functions looks like this:
// Ex10_11.cpp
// Using a map container

 #include <iostream>
#include <cstdio>
#include <iomanip>
#include <string>
#include <map>
#include "Person.h"

 using std::cin;
using std::cout;
using std::endl;
using std::setw;
using std::ios;
using std::string;
using std::pair;
using std::map;
using std::make_pair;

 // Read a person from cin
Person getPerson()
{
  string first;
  string second;
  cout << "Enter a first name: " ;
  getline(cin, first);
  cout << "Enter a second name: " ;
  getline(cin, second);
  return Person(first, second);
}

 // Add a new entry to a phone book
void addEntry(map<Person, string>& book)
{
  string number;
  Person person = getPerson();

   cout << "Enter the phone number for "
    << person.getName() << ": ";
    getline(cin, number);
    auto entry = make_pair(person, number);
    auto pr = book.insert(entry);

     if(pr.second)
      cout << "Entry successful." << endl;
    else
    {
      cout << "Entry exists for " << person.getName()
<< ". The number is " << pr.first->second << endl;
}
}
// List the contents of a phone book
void listEntries(map<Person, string>& book)
{
if(book.empty())
{
cout << "The phone book is empty." << endl;
return;
}
cout << setiosflags(ios::left); // Left justify output
for(auto iter = book.begin() ; iter != book.end() ; iter++)
{
cout << setw(30) << iter->first.getName()
<< setw(12) << iter->second << endl;
}
cout << resetiosflags(ios::right); // Right justify output
}
// Retrieve an entry from a phone book
void getEntry(map<Person, string>& book)
{
Person person = getPerson();
auto iter = book.find(person);
if(iter == book.end())
cout << "No entry found for " << person.getName() << endl;
else
cout << "The number for " << person.getName()
<< " is " << iter->second << endl;
}
// Delete an entry from a phone book
void deleteEntry(map<Person, string>& book)
{
Person person = getPerson();
auto iter = book.find(person);
if(iter == book.end())
cout << "No entry found for " << person.getName() << endl;
else
{
book.erase(iter);
cout << person.getName() << " erased." << endl;
}
}
int main()
{
map<Person, string> phonebook;
char answer = 0;
while(true)
{
cout << "Do you want to enter a phone book entry(Y or N): " ;cin >> answer;
cin.ignore(); // Ignore newline in buffer
if(toupper(answer) == 'N')
break;
if(toupper(answer) != 'Y')
{
cout << "Invalid response. Try again." << endl;
continue;
}
addEntry(phonebook);
}
// Query the phonebook
while(true)
{
cout << endl << "Choose from the following options:" << endl
<< "A Add an entry D Delete an entry G Get an entry" << endl
<< "L List entries Q Quit" << endl;
cin >> answer;
cin.ignore(); // Ignore newline in buffer
switch(toupper(answer))
{
case 'A':
addEntry(phonebook);
break;
case 'G':
getEntry(phonebook);
break;
case 'D':
deleteEntry(phonebook);
break;
case 'L':
listEntries(phonebook);
break;
case 'Q':
return 0;
default:
cout << "Invalid selection. Try again." << endl;
break;
}
}
return 0;
}

Here is some output from this program:
Do you want to enter a phone book entry(Y or N): y
Enter a first name: Jack
Enter a second name: Bateman
Enter the phone number for Jack Bateman: 312 455 6576
Entry successful.
Do you want to enter a phone book entry(Y or N): y
Enter a first name: Mary
Enter a second name: Jones
Enter the phone number for Mary Jones: 213 443 5671
Entry successful.
Do you want to enter a phone book entry(Y or N): y
Enter a first name: Jane
Enter a second name: Junket
Enter the phone number for Jane Junket: 413 222 8134
Entry successful.
Do you want to enter a phone book entry(Y or N): n

 Choose from the following options:
A  Add an entry   D Delete an entry   G  Get an entry
L  List entries   Q  Quit
a
Enter a first name: Bill
Enter a second name: Smith
Enter the phone number for Bill Smith: 213 466 7688
Entry successful.

 Choose from the following options:
A  Add an entry   D Delete an entry   G  Get an entry
L  List entries   Q  Quit
g
Enter a first name: Mary
Enter a second name: Miller
No entry found for Mary Miller

 Choose from the following options:
A  Add an entry   D Delete an entry   G  Get an entry
L  List entries   Q  Quit
g
Enter a first name: Mary
Enter a second name: Jones
The number for Mary Jones is 213 443 5671

 Choose from the following options:
A  Add an entry   D Delete an entry   G  Get an entry
L  List entries   Q  Quit
d
Enter a first name: Mary
Enter a second name: Jones
Mary Jones erased.

 Choose from the following options:
A  Add an entry   D Delete an entry   G  Get an entry
L  List entries   Q  Quit
L
Jack Bateman                  312 455 6576
Jane Junket                   413 222 8134
Bill Smith                    213 466 7688

 Choose from the following options:
A  Add an entry   D Delete an entry   G  Get an entry
L  List entries   Q  Quit
q
You define a map container in main() like this:
map<Person, string> phonebook;
The object in an entry in the map is a string containing a phone number, and the key is a Person object.
You load up the map initially in a while loop:
while(true)
  {
    cout << "Do you want to enter a phone book entry(Y or N): " ;
    cin >> answer;
    cin.ignore();                      // Ignore newline in buffer
    if(toupper(answer) == 'N')
      break;
    if(toupper(answer) != 'Y')
    {
      cout << "Invalid response. Try again." << endl;
      continue;
    }
    addEntry(phonebook);
  }
You check whether an entry is to be read by reading a character from the standard input stream. Reading a character from cin leaves a newline character in the buffer, and this can cause problems for subsequent input. Calling ignore() for cin ignores the next character so that subsequent input will work properly. If 'n' or 'N' is entered, the loop is terminated. When 'y' or 'Y' is entered, an entry is created by calling the helper function addEntry() that is coded like this:
void addEntry(map<Person, string>& book)
{
  string number;
  Person person = getPerson();

   cout << "Enter the phone number for "
    << person.getName() << ": ";
    getline(cin, number);
    auto entry = make_pair(person, number);
    auto pr = book.insert(entry);

     if(pr.second)
      cout << "Entry successful." << endl;
    else
    {
      cout << "Entry exists for " << person.getName()
           << ". The number is " << pr.first->second << endl;
    }
}
Note that the parameter for addEntry() is a reference. The function modifies the container that is passed as the argument, so the function must have access to the original object. In any event, even if only access to the container argument was needed, it is important not to allow potentially very large objects, such as a map container, to be passed by value, because this can seriously degrade performance.
The process for adding an entry is essentially as you have seen in the previous section. The getPerson() helper function reads a first name and a second name, and then returns a Person object that is created using the names. The getName() member of the Person class returns a name as a string object, so you use this in the prompt for a number. Calling the make_pair() function returns a pair<Person, string> object that you store in entry, and the auto keyword avoids the necessity of explicitly spelling out the type. You then call insert() for the container object, and store the object returned in pr. The pr object enables you to check that the entry was successfully inserted into the map, by testing its bool member. The pr variable is of type pair<map<Person,string>::iterator,bool>, but the auto keyword works that out for you from the initial value. The first member of pr provides access to the entry, whether it's an existing entry or the new entry, and you use this to output a message when insertion fails.
After initial input is complete, a while loop provides the mechanism for querying and modifying the phone book. The switch statement in the body of the loop decides the action to be taken, based on the character that is entered and stored in answer. Querying the phone book is managed by the getEntry() function:
void getEntry(map<Person, string>& book)
{
  Person person = getPerson();
  auto iter = book.find(person);
  if(iter == book.end())
    cout << "No entry found for " << person.getName() << endl;
  else
    cout << "The number for " << person.getName()
         << " is " << iter->second << endl;
}
A Person object is created from a name that is read from the standard input stream by calling the getPerson() function. The Person object is then used as the argument to the find() function for the map object. This returns an iterator of type map<Person,string>::const_iterator that either points to the required entry, or points to one past the last entry in the map. If an entry is found, accessing the second member of the pair pointed to by the iterator provides the number corresponding to the Person object key.
The deleteEntry() function deletes an entry from the map. The process is similar to that used in the getEntry() function, the difference being that when an entry is found by the find() function, the erase() function is called to remove it. You could use another version of erase() to do this, in which case the code would be like this:
void deleteEntry(map<Person, string>& book)
{
  Person person = getPerson();
  if(book.erase(person))
    cout << person.getName() << " erased." << endl;
else
cout << "No entry found for " << person.getName() << endl;
}The code turns out to be much simpler if you pass the key to the erase() function.
The listEntries() function lists the contents of a phone book:
void listEntries(map<Person, string>& book)
{
  if(book.empty())
  {
    cout << "The phone book is empty." << endl;
    return;
  }
  cout << setiosflags(ios::left);              // Left justify output
  for(auto iter = book.begin() ; iter != book.end() ; iter++)
  {
    cout << setw(30) << iter->first.getName()
         << setw(12) << iter->second << endl;
  }
  cout << resetiosflags(ios::right);           // Right justify output
}
After an initial check for an empty map, the entries are listed in a for loop using an iterator whose type is determined from the initial value. The output is left-justified by the setiosflags manipulator to produce tidy output. This remains in effect until the resetiosflags manipulator is used to restore right-justification.
A multimap container works very much like the map container, in that it supports the same range of functions — except for the subscript operator, which you cannot use with a multimap. The principle difference between a map and a multimap is that you can have multiple entries with the same key in a multimap, and this affects the way some of the functions behave. Obviously, with the possibility of several keys having the same value, overloading the operator[]() function would not make much sense for a multimap.
The insert() function flavors for a multimap are a little different from the insert() functions for a map. The simplest version of insert() that accepts a pair<K, T> object as an argument, returns an iterator pointing to the entry that was inserted in the multimap. The equivalent function for a map returns a pair object, because this provides an indication of when the key already exists in the map and the insertion is not possible; of course, this cannot arise with a multimap. A multimap also has a version of insert() with two arguments: the second being the pair to be inserted, and the first being an iterator pointing to the position in the multimap from which to start searching for an insertion point. This gives you some control over where a pair will be inserted when the same key already exists. This version of insert() also returns an iterator pointing to the element that was inserted. The third version of insert() accepts two iterator arguments that specify a range of elements to be inserted from some other source.
When you pass a key to the erase() function for a multimap, it erases all entries with the same key, and the value returned indicates how many entries were deleted. The significance of having a version of erase() available that accepts an iterator as an argument should now be apparent — it allows you to delete a single element. You also have a version of erase() available that accepts two iterators to delete a range of entries.
The find() function can only find the first element with a given key in a multimap. You really need a way to find several elements with the same key and the lower_bound(), upper_bound(), and equal_range() functions provide you with a way to do this. For example, given a phonebook object that is type
multimap<Person, string>
rather than type map<Person, string>, you could list the phone numbers corresponding to a given key like this:
Person person = Person("Jack", "Jones");
auto iter = phonebook.lower_bound(person);
if(iter == phonebook.end())
  cout << "There are no entries for " << person.getName() << endl;
else
{
  cout << "The following numbers are listed for " << person.getName() << ":"
       << endl;
  for(  ;  iter != phonebook.upper_bound(person) ; iter++)
     cout << iter->second << endl;
}
It's important to check the iterator returned by the lower_bound() function. If you don't, you could end up trying to reference an entry one beyond the last entry.
The iterator header defines several templates for iterators that transfer data from a source to a destination. Stream iterators act as pointers to a stream for input or output, and they enable you to transfer data between a stream and any source or destination that works with iterators, such as an algorithm. Inserter interators can transfer data into a basic sequence container. The iterator header defines two stream iterator templates, istream_iterator<T> for input streams and ostream_iterator<T> for output streams, where T is the type of object to be extracted from, or written to, the stream. The header also defines three inserter templates, inserter<T>, back_inserter<T> and front_inserter<T>, where T is the type of sequence container in which data is to be inserted.
Let's explore some of these iterators in a little more depth.
Here's an example of how you create an input stream iterator:
istream_iterator<int> numbersInput(cin);
This creates the iterator numbersInput of type istream_iterator<int> that can point to objects of type int in a stream. The argument to the constructor specifies the actual stream to which the iterator relates, so this is an iterator that can read integers from cin, the standard input stream.
The default istream_iterator<T> constructor creates an end-of-stream iterator, which will be equivalent to the end iterator for a container that you have been obtaining by calling the end() function. Here's how you could create an end-of-stream iterator for cin, complementing the numbersInput iterator:
istream_iterator<int> numbersEnd;
Now you have a pair of iterators that defines a sequence of values of type int from cin. You could use these to load values from cin into a vector<int> container:
vector<int> numbers;
cout << "Enter integers separated by spaces then a letter to end:" << endl;
istream_iterator<int> numbersInput(cin), numbersEnd;
while(numbersInput != numbersEnd)
  numbers.push_back(*numbersInput++);
After defining the vector container to hold values of type int, you create two input stream iterators: numbersInput is an input stream iterator reading values of type int from cin, and numbersEnd is an end-of-stream iterator for the same input stream. The while loop continues as long as numbersInput is not equal to the end-of-stream iterator, numbersEnd. When you execute this fragment, input continues until end-of-stream is recognized for cin. But what produces that condition? The end-of-stream condition will arise if you enter Ctrl+Z to close the input stream, or if you enter an invalid character such as a letter.
Of course, you are not limited to using input stream iterators as loop control variables. You can use them to pass data to an algorithm, such as accumulate(), which is defined in the numeric header:
cout << "Enter integers separated by spaces then a letter to end:" << endl;
istream_iterator<int> numbersInput(cin), numbersEnd;
cout << "The sum of the input values that you entered is "
     << accumulate(numbersInput, numbersEnd, 0) << endl;
This fragment outputs the sum of however many integers you enter. You will recall that the arguments to the accumulate() algorithm are an iterator pointing to the first value in the sequence, an iterator pointing to one past the last value, and the initial value for the sum. Here you are transferring data directly from cin to the algorithm.
The sstream header defines the basic_istringstream<T> type that defines an object type that can access data from a stream buffer such as a string object. The header also defines the istringstream type as basic_istringstream<char>, which will be a stream of characters of type char. You can construct an istringstream object from a string object, which means you can read data from the string object, just as you read from cin. Because an istringstream object is a stream, you can pass it to an input iterator constructor and use the iterator to access the data in the underlying stream buffer. Here's an example of how you do that:
string data("2.4 2.5 3.6 2.1 6.7 6.8 94 95 1.1 1.4 32");
istringstream input(data);
istream_iterator<double> begin(input), end;
cout << "The sum of the values from the data string is "
     << accumulate(begin, end, 0.0) << endl;
You create the istringstream object, input, from the string object, data, so you can read from data as a stream. You create two stream iterators that can access double values in the input stream, and you use these to pass the contents of data to the accumulate() algorithm. Note that the type of the third argument to the accumulate() function determines the type of the result, so you must specify this as a value of type double to get the sum produced correctly.
Let's try a working example.
TRY IT OUT: Using an Input Stream Iterator
In this example you use a stream iterator to read text from the standard input stream and transfer it to a map container to produce a word count for the text. Here's the code:
// Ex10_12.cpp
// A simple word collocation
#include <iostream>
#include <iomanip>
#include <string>
#include <map>
#include <iterator>
using std::cout;
using std::cin;
using std::endl;
using std::string;

 int main()
{
  std::map<string, int> words;           // Map to store words and word counts
  cout << "Enter some text and press Enter followed by Ctrl+Z then Enter to end:"
       << endl << endl;

   std::istream_iterator<string> begin(cin); // Stream iterator
  std::istream_iterator<string> end;        // End stream iterator

   while(begin != end )                      // Iterate over words in the stream
    words[*begin++]++;                      // Increment and store a word count

   // Output the words and their counts
  cout << endl << "Here are the word counts for the text you entered:" << endl;
  for(auto iter = words.begin() ; iter != words.end() ; ++iter)
    cout << std::setw(5) << iter->second << " " << iter->first << endl;

   return 0;
}

Here's an example of some output from this program:
Enter some text and press Enter followed by Ctrl+Z then Enter to end:

 Peter Piper picked a peck of pickled pepper
A peck of pickled pepper Peter Piper picked
If Peter Piper picked a peck of pickled pepper
Where's the peck of pickled pepper Peter Piper picked
^Z

 Here are the word counts for the text you entered:
    1 A
    1 If
    4 Peter
    4 Piper
    1 Where's
    2 a
    4 of
    4 peck
    4 pepper
    4 picked
    4 pickled
    1 the
How It Works
You first define a map container to store the words and the word counts:
std::map<string, int> words; // Map to store words and word counts
This container stores each word count of type int, using the word of type string as the key. This will make it easy to accumulate the count for each word when you read from the input stream using stream iterators.
std::istream_iterator<string> begin(cin); // Stream iterator
  std::istream_iterator<string> end;        // End stream iterator
The begin iterator is a stream iterator for the standard input stream, and end is an end-of-stream iterator that you can use to detect when the end of the input is reached.
You read the words and accumulate the counts in a loop:
while(begin != end )                      // Iterate over words in the stream
    words[*begin++]++;                      // Increment and store a word count
This simple while loop does a great deal of work. The loop control expression will iterate over the words entered via the standard input stream until the end-of-stream state is reached. The stream iterator reads words from cin delimited by whitespace, just like the overloaded >> operator for cin. Within the loop, you use the subscript operator for the map container to store a count with the word as the key; remember, the argument to the subscript operator for a map is the key. The expression *begin accesses a word, and the expression *begin++ increments the iterator after accessing the word.
The first time a word is read, it will not be in the map, so the expression words[*begin++] will store a new entry with the count having the default value 0, and increment the begin iterator to the next word, ready for the next loop iteration. The whole expression words[*begin++]++ will increment the count for the entry, regardless of whether it is a new entry or not. Thus, an existing entry will just get its count incremented, whereas a new entry will be created and then its count incremented from 0 to 1.
Finally, you output the count for each word in a for loop:
for(auto iter = words.begin() ; iter != words.end() ; ++iter)
    cout << std::setw(5) << iter->second << " " << iter->first << endl;
This uses the iterator for the container just as you have seen several times before. The loop control expressions are very much easier to read because of the use of the auto keyword. The loop control variable, iter, is of type std::map<string,int>::const_iterator, but the auto keyword enables the type to be deduced automatically.
An inserter iterator is an iterator that can add new elements to the sequence containers vector<T>, deque<T>, and list<T>. There are three templates that create inserter iterators:
back_insert_iterator<T>— inserts elements at the end of a container of typeT. The container must provide thepush_back()function for this to work.front_insert_iterator<T>— inserts elements at the beginning of a container of typeT. This depends onpush_front()being available for the container.insert_iterator<T>— inserts elements starting at a specified position within a container of typeT. This requires that the container has aninsert()function that accepts an iterator as the first argument, and an item to be inserted as the second argument.
The constructors for the first two types of inserter iterators expect a single argument specifying the container in which elements are to be inserted. For example:
list<int> numbers;
front_insert_iterator< list<int> > iter(numbers);
Here you create an inserter iterator that can insert data at the beginning of the list<int> container numbers.
Inserting a value into the container is very simple:
*iter = 99; // Insert 99 at the front of the numbers container
You could also use the front_inserter() function with the numbers container, like this:
front_inserter(numbers) = 99;
This creates a front inserter for the numbers list and uses it to insert 99 at the beginning of the list. The argument to the front_inserter() function is the container to which the iterator is to be applied.
The constructor for an insert_iterator<T> iterator requires two arguments:
insert_iterator<vector<int>> iter_anywhere(numbers, numbers.begin());
The second argument to the constructor is an iterator specifying where data is to be inserted — the start of the sequence, in this instance. You can use this iterator in exactly the same way as the previous one. Here's how you could insert a series of values into a vector container using this iterator:
for(int i = 0 ; i<100 ; i++)
  *iter_anywhere = i + 1;
This loop inserts the values from 1 to 100 in the numbers container at the beginning. After executing this, the first 100 elements will be 100, 99, and so on, through to 1.
You could also use the inserter() function to achieve the same result:
for(int i = 0 ; i<100 ; i++)
  inserter(numbers, numbers.begin()) = i + 1;
The first argument to inserter() is the container, and the second is an iterator identifying the position where data is to be inserted. The inserter iterators can be used in conjunction with the copy() algorithm in a particularly useful way. Here's how you could read values from cin and transfer them to a list<T> container:
list<double> values;
cout << "Enter a series of values separated by spaces"
     << " followed by Ctrl+Z or a letter to end:" << endl;
istream_iterator<double> input(cin), input_end;
copy(input, input_end, back_inserter<list<double>>(values));
You first create a list container that stores double values. After a prompt for input, you create two input stream iterators for values of type double. The first iterator points to cin, and the second iterator is an end-of-stream iterator created by the default constructor. You specify the input to the copy() function with the two iterators; the destination for the copy operation is a back inserter iterator that you create in the third argument to the copy() function. The back inserter iterator adds the data transferred by the copy operation to the list container, values. This is quite powerful stuff. If you ignore the prompt, in three statements you can read an arbitrary number of values from the standard input stream and transfer them to a list container.
Complementing the input stream iterator template, the ostream_iterator<T> template provides output stream iterators for writing objects of type T to an output stream. There are two constructors for creating an instance of the output stream iterator template. One creates an iterator that just transfers data to the destination stream:
ostream_iterator<int> out(cout);
The type argument, int, to the template, specifies the type of data to be handled, while the constructor argument, cout, specifies the stream that will be the destination for data, so the out iterator can write value of type int to the standard output stream. Here's how you might use this iterator:
int data[] = {1, 2, 3, 4, 5, 6, 7, 8, 9};
vector<int> numbers(data, data+9);     // Contents 1 2 3 4 5 6 7 8 9
copy(numbers.begin(), numbers.end(), out);
The copy() algorithm that is defined in the algorithm header copies the sequence of objects specified by the first two iterator arguments to the output iterator specified by the third argument. Here, the function copies the elements from the numbers vector to the out iterator, which will write the elements to cout. The result of executing this fragment will be:
123456789
As you can see, the values are written to the standard output stream with no spaces in between. The second output stream iterator constructor can improve on this:
ostream_iterator<int> out(cout, ", ");
The second argument to the constructor is a string to be used as a delimiter for output values. If you use this iterator as the third argument to the copy() function in the previous fragment, the output will be:
1, 2, 3, 4, 5, 6, 7, 8, 9,
The delimiter string that you specify as a second constructor argument is written to the stream following each value.
Let's see how an output stream iterator works in practice.
TRY IT OUT: Using an Inserter Iterator
Suppose you want to read a series of integer values from cin and store them in a vector. You then want to output the values and their sum. Here's how you could do this with the STL:
// Ex10_13.cpp
// Using stream and inserter iterators
#include <iostream>
#include <numeric>
#include <vector>
#include <iterator>
using std::cout;
using std::cin;
using std::endl;
using std::vector;
using std::istream_iterator;
using std::ostream_iterator;
using std::back_inserter;
using std::accumulate;

 int main()
{
  vector<int> numbers;
  cout << "Enter a series of integers separated by spaces"
<< " followed by Ctrl+Z or a letter:" << endl;
istream_iterator<int> input(cin), input_end;
ostream_iterator<int> out(cout, " ");
copy(input, input_end, back_inserter<vector<int>>(numbers));
cout << "You entered the following values:" << endl;
copy(numbers.begin(), numbers.end(), out);
cout << endl << "The sum of these values is "
<< accumulate(numbers.begin(), numbers.end(), 0) << endl;
return 0;
}

Here's an example of some output:
Enter a series of integers separated by spaces followed by Ctrl+Z or a letter:
1 2 3 4 5 6 7 8 9 10 11 12 13 14 15 ^Z
You entered the following values:
1 2 3 4 5 6 7 8 9 10 11 12 13 14 15
The sum of these values is 120
How It Works
After creating the numbers vector to store integers and issuing a prompt for input, you create three stream iterators:
istream_iterator<int> input(cin), input_end;
  ostream_iterator<int> out(cout, " ");
The first statement creates two input stream iterators for reading values of type int from the standard input stream, input and input_end, the latter being an end-of-stream iterator. The second statement creates an output stream iterator for transferring values of type int to the standard output stream, with the delimiter of a single space following each output value.
Data is read from cin and transferred to the vector container using the copy() algorithm:
copy(input, input_end, back_inserter<vector<int>>(numbers));
You specify the source of data for the copy operation by the two input stream iterators, input and input_end, and the destination for the copy operation is a back inserter iterator for the numbers container. Thus, the copy operation will transfer data values from cin to the numbers container via the back inserter.
You output the values that have been stored in the container using another copy operation:
copy(numbers.begin(), numbers.end(), out);
Here the source for the copy is specified by the begin() and end() iterators for the container, and the destination is the output stream iterator, out. This operation will therefore write the data from numbers to cout, with the values separated by a space.
Finally, you calculate the sum of the values in the numbers container in the output statement using the accumulate() algorithm:
cout << endl << "The sum of these values is "
       << accumulate(numbers.begin(), numbers.end(), 0) << endl;
You specify the range of values to be summed by the begin() and end() iterators for the container, and the initial value for the sum is zero. If you wanted the average rather than the sum, this is easy too, using the expression:
accumulate(numbers.begin(), numbers.end(), 0)/numbers.size()
The functional header defines an extensive set of templates for creating function objects that you can use with algorithms and containers. I won't discuss them in detail, but I'll summarize the most useful ones. The function objects for comparisons are shown in the following table.
FUNCTION OBJECT TEMPLATE | DESCRIPTION |
|---|---|
| Creates a binary predicate representing the |
| Creates a binary predicate representing the |
| Creates a binary predicate representing the |
| Creates a binary predicate representing the |
| Creates a binary predicate representing the |
| Creates a binary predicate representing the |
| Creates a binary predicate that is the negation of a binary predicate of type |
Here's how you could use the not2<B> template to define a binary predicate for use with the sort() algorithm:
sort(v.begin(), v.end(), not2(greater<string>()));
The argument to the not2 constructor is greater<string>(), which is a call to the constructor for the greater<string> class type, so the sort() function will sort using "not greater than" as the comparison between objects in the container, v.
The functional header also defines function objects for performing arithmetic operations on elements. You would typically use these to apply operations to sequences of numerical values using the transform() algorithm that is defined in the algorithm header. These function objects are described in the following table, where the parameter T specifies the type of the operands.
FUNCTION OBJECT TEMPLATE | DESCRIPTION |
|---|---|
| Calculates the sum of two elements of type |
| Calculates the difference between two elements of type |
| Calculates the product of two elements of type |
| Divides the first operand of type |
| Calculates the remainder after dividing the first operand of type |
| Returns the negative of the operand of type |
To make use of these you need to apply the transform() function, and I'll explain how this works in the next section.
The algorithm and numeric headers define a large number of algorithms. The algorithms in the numeric header are primarily devoted to processing arrays of numerical values, whereas those in the algorithm header are more general purpose and provide such things as the ability to search, sort, copy, and merge sequences of objects specified by iterators. There are far too many to discuss in detail in this introductory chapter, so I'll just introduce a few of the most useful algorithms from the algorithm header to give you a basic idea of how they can be used.
You have already seen the sort() and copy() algorithms from the algorithm header in action. Let's take a brief look at a few other of the more interesting functions in the algorithm header.
The fill() function is of this form:
fill(ForwardIterator begin, ForwardIterator end, const Type& value)
This fills the elements specified by the iterators begin and end with value. For example, given a vector v, storing values of type string containing more than 10 elements, you could write:
fill(v.begin(), v.begin()+10, "invalid");
This would set the first 10 elements in v to "invalid", the value specified by the last argument to fill().
The replace() algorithm is of the form:
replace(ForwardIterator begin, ForwardIterator end,
                                      const Type& oldValue, const Type& newValue)
This function examines each element in the range specified by begin and end, and replaces each occurrence of oldValue by newValue. Given a vector v that stores string objects, you could replace occurrences of "yes" by "no" with the following statement:
replace(v.begin(), v.end(), string("yes"), string("no"));Like all the algorithms that receive an interval defined by a couple of iterators, the replace() function will also work with pointers. For example:
char str[] =  "A nod is as good as a wink to a blind horse.";
replace(str, str+strlen(str), 'o', '*'),
cout << str << endl;
This will replace every occurrence of 'o' in the null-terminated string str by '*', so the result of executing this fragment will be the output:
A n*d is as g**d as a wink t* a blind h*rse.
The find() function is of the form:
find(InputIterator begin, InputIterator end, const Type& value)
This function searches the sequence specified by the first two arguments for the first occurrence of value. For example, given a vector v containing values of type int, you could write:
vector<int>::iterator iter = find(v.begin(), v.end(), 21);
Obviously, by using iter as the starting point for a new search, you could use the find() algorithm repeatedly to find all occurrences of a given value. Perhaps like this:
vector<int>::iterator iter = v.begin();
int value = 21, count = 0;
while((iter = find(iter, v.end(), value)) != v.end())
{
  iter++;
  count++;
}
cout << "The vector contains " << count << " occurrences of " << value << endl;
This fragment searches the vector v for all occurrences of value. On the first loop iteration, the search starts at v.begin(). On subsequent iterations, the search starts at one past the previous position that was found. The loop will accumulate the total number of occurrences of value in v. You could also code the loop as a for loop:
for((iter = find(v.begin(), v.end(), value)); iter != v.end() ;
                                  (iter = find(iter, v.end(), value))++, count++);
Now the find operation is in the third loop control expression, and you increment iter after the result from the find() function is stored. In my view, the while loop is a better solution because it's easier to understand.
The transform() function comes in two versions. The first version applies an operation specified by a unary function object to a set of elements specified by a pair of iterators, and is of the form:
transform(InputIterator begin, InputIterator end,
                                       OutputIterator result, UnaryFunction f)
This version of transform() applies the unary function f to all elements in the range specified by the iterators begin and end, and stores the results, beginning at the position specified by the iterator result. The result iterator can be the same as begin, in which case the results will replace the original elements. The function returns an iterator that is one past the last result stored.
Here's an example:
double values[] = { 2.5, −3.5, 4.5, −5.5, 6.5, −7.5};
vector<double> data(values, values+sizeof values/sizeof values[0]);
transform(data.begin(), data.end(), data.begin(), negate<double>());
The transform() function call applies a negate<double> function object to all the elements in the vector data. The results are stored back in data and overwrite the original values; so, after this operation the vector will contain:
−2.5, 3.5, −4.5, 5.5, −6.5, 7.5
Because the operation writes the results back to the data vector, the transform() function will return the iterator data.end().
The second version of transform() applies a binary function, with the operands coming from two ranges specified by iterators. The function is of the form:
transform(InputIterator1 begin1, InputIterator1 end1, InputIterator2 begin2,
                                       OutputIterator result, BinaryFunction f)
The range specified by begin1 and end1 represents the set of left operands for the binary function f that is specified by the last argument. The range representing the right operands starts at the position specified by the begin2 iterator; an end iterator does not need to be supplied for this range because there must be the same number of elements as in the range specified by begin1 and end1. The results will be stored in the range, starting at the result iterator position. The result iterator can be the same as begin1 if you want the results stored back in that range, but it must not be any other position between begin1 and end1. Here's an example of how you might use this version of the transform() algorithm:
double values[] = { 2.5, −3.5, 4.5, −5.5, 6.5, −7.5};
vector<double> data(values, values+ sizeof values/sizeof values[0]);
vector<double> squares(data.size());
transform(data.begin(), data.end(), data.begin(),
                                           squares.begin(), multiplies<double>());
ostream_iterator<double> out(cout, " ");
copy(squares.begin(), squares.end(), out);
You initialize the data vector with the contents of the values array. You then create a vector squares to store the results of the transform() operation with the same number of elements as data. The transform() function uses the multiplies<double>() function object to multiply each element of data by itself. The results are stored in the squares vector. The last two statements use an output stream iterator to list the contents of squares, which will be:
6.25 12.25 20.25 30.25 42.25 56.25
A lambda expression is a C++ language capability that provides you with an alternative programming mechanism to function objects in many instances. Lambda expressions are not specific to STL, but they can be applied extensively in this context, which is why I chose to discuss them here. A lambda expression defines a function object without a name, and without the need for an explicit class definition. You would typically use a lambda expression as the means of passing a function as an argument to another function. A lambda expression is much easier to use and understand, and requires less code, than defining and creating a regular function object. Of course, it is not a replacement for function objects in general.
Let's consider an example. Suppose you want to calculate the cubes (x3) of the elements in a vector containing numerical values. You could use the transform() operation for this, except that there is no function object to calculate cubes. You can easily create a lambda expression to do it, though:
double values[] = { 2.5, −3.5, 4.5, −5.5, 6.5, −7.5};
vector<double> data(values, values+6);
vector<double> cubes(data.size());
transform(data.begin(), data.end(), cubes.begin(),
                                [](double x){ return x*x*x;} );
The last statement uses the transform() operation to calculate the cubes of the elements in the vector data and store the result in the vector cubes. The lambda expression is the last argument to the transform()function:
[](double x){ return x*x*x;}The opening square brackets are called the lambda introducer, because they mark the beginning of the lambda expression. There's a bit more to this, but I'll come back to that a little later in this chapter.
The lambda introducer is followed by the lambda parameter list between parentheses, just like a normal function. In this case, there's just a single parameter, x. There are restrictions on the lambda parameter list, compared to a regular function: You cannot specify default values for the parameters to a lambda expression, and the parameter list cannot be of a variable length.
Finally, in the example, you have the body of the lambda expression between braces, again just like a normal function. In this case the body is just a single return statement, but in general, it can consist of as many statements as you like, just like a normal function. I'm sure you have noticed that there is no return type specification. When the body of the lambda expression is a single return statement that returns a value in the body, the return type defaults to that of the value returned. Otherwise, the default return type is void. Of course, you can specify the return type. To specify the return type you would write the lambda expression like this:
[](double x)->double { return x*x*x;}The type double following the arrow specifies the return type as such.
If you wanted to output the values calculated, you could do so in the lambda expression, like this:
[](double x)->double {
                      double result(x*x*x);
                      cout << result << "  ";
                      return result;
                     }
This just extends the body of the lambda to provide for writing the value that is calculated to the standard output stream. In this case, the return type must be specified because the default return type would be void.
The lambda introducer can contain a capture clause that determines how the body of the lambda can access variables in the enclosing scope. In the previous section, the lambda expression had nothing between the square brackets, indicating that no variables in the enclosing scope can be accessed within the body of the lambda. The first possibility is to specify a default capture clause that applies to all variables in the enclosing scope. You have two options for this. If you place = between the square brackets, the body has access to all automatic variables in the enclosing scope by value — i.e., the values of the variables are made available within the lambda expression, but the original variables cannot be changed. On the other hand, if you put & between the square brackets, all the variables in the enclosing scope are accessible by reference, and therefore can be changed by the code in the body of the lambda. Look at this code fragment:
double factor = 5.0;
double values[] = { 2.5, −3.5, 4.5, −5.5, 6.5, −7.5};
vector<double> data(values, values+6);
vector<double> cubes(data.size());
transform(data.begin(), data.end(), cubes.begin(),
           [=](double x){ return factor*x*x*x;} );
In this fragment, the = capture clause allows all the variables in scope to be accessible by value from within the body of the lambda. Note that this is not quite the same as passing arguments by value. The value of the variable factor is available within the lambda, but you cannot update the copy of factor because it is effectively const. The following transform() statement will not compile, for example:
transform(data.begin(),data.end(),cubes.begin(),
           [=](double x)-> double{ factor += 10.0;          // Not allowed!
                                   return factor*x*x*x;} );
If you want to modify the temporary copy of a variable in scope from within the lambda, adding the mutable keyword will enable this:
transform(data.begin(),data.end(),cubes.begin(),
           [=](double x)mutable -> double{ factor += 10.0;          // OK
                                   return factor*x*x*x;} );
Now you can modify the copy of any variable within the enclosing scope without changing the original variable. After executing this statement, the value of factor will still be 5.0. The lambda remembers the local value of factor from one call to the next, so for the first element factor will be 5+10=15, for the second element it will be 15+10=25, and so on.
If you do want to change the original value of factor from within the lambda, just use & as the capture clause:
transform(data.begin(),data.end(),cubes.begin(),
             [&](double x)->double{ factor += 10.0;    // Changes original variable
                                    return factor*x*x*x;} );
cout << "factor = " << factor << endl;
You don't need the mutable keyword here. All variables within the enclosing scope are available by reference, so you can use and alter their values. The result of executing this will be that factor has the value 65. If you thought it was going to be 15.0, remember that the lambda expression executes once for each element in data, and the cubes of the elements will be multiplied by successive values of factor from 15.0 to 65.0.
There may be circumstances where you want to be more selective about how a lambda expression accesses variables in the enclosing scope. In this case, you can explicitly identify the variables to be accessed. You could rewrite the previous transform() statement as:
transform(data.begin(), data.end(), cubes.begin(),
      [&factor](double x)->double{ factor += 10.0;    // Changes original variable
                                   return factor*x*x*x;} );
Now, factor is the only variable from the enclosing scope that is accessible, and it is available by reference. If you omit the &, factor would be available by value and not updatable. If you want to identify multiple variables in the capture clause, you just separate them with commas. You could include = in the capture clause list, as well as explicit variable names. For example, with the capture clause [=,&factor] the lambda would have access to factor by reference and all other variables in the enclosing scope by value. Conversely, putting [&,factor] as the capture clause would capture factor by value and all other variables by reference. Note that in a function member of a class, you can include the this pointer in the capture clause for a lambda expression, which allows access to the other functions and data members that belong to the class.
A lambda expression can also include a throw() exception specification that indicates that the lambda does not throw exceptions. Here's an example:
transform(data.begin(), data.end(), cubes.begin(),
      [&factor](double x)throw() −>double{ factor += 10.0;
                                   return factor*x*x*x;} );
If you want to include the mutable specification, as well as the throw() specification, the mutable keyword must precede throw() and must be separated from it by one or more spaces.
You can use a lambda expression inside a template. Here's an example of a function template that uses a lambda expression:
template <class T>
T average(const vector<T>& vec)
{
  T sum(0);
  for_each(vec.begin(), vec.end(),
    [&sum](const T& value){ sum += value; });
  return sum/vec.size();
}
This template generates functions for calculating the average of a set of numerical values stored in a vector. The lambda expression uses the template type parameter in the lambda parameter specification, and accumulates the sum of all the elements in a vector. The sum variable is accessed from the lambda by reference, so it is able to accumulate the sum there. The last line of the function returns the average, which is calculated by dividing sum by the number of elements in the vector. Let's try an example.
TRY IT OUT: Using lambda expressions
This example shows the use of a variety of lambda expressions:
// Ex10_14.cpp Using lambda expressions
#include <algorithm>
#include <iostream>
#include <iomanip>
#include <vector>
#include <ctime>
#include <cstdlib>
using namespace std; // Just to avoid a lot of using directives in the example...
// Template function to return the average of the elements in a vector
template <class T> T average(const vector<T>& vec)
{
T sum(0);
for_each(vec.begin(), vec.end(),
[&sum](const T& value){ sum += value; });
return sum/vec.size();
}
// Template function to set a vector to values beginning with start
// and incremented by increment
template <class T> void setValues(vector<T>& vec, T start, T increment)
{
T current(start);
generate(vec.begin(), vec.end(),
[increment, ¤t]()->T{T result(current);
current += increment;
return result;});
}
// Template function to set a vector to random values between min and max
template<class T> void randomValues(vector<T>& vec, T min, T max)
{
srand(static_cast<unsigned int>(time(0))); // Initialize random
// number generator
generate(vec.begin(), vec.end(),
[=](){ return static_cast<T>(static_cast<double>(rand())/
RAND_MAX*(max-min)+min); });
}
// Template function to list the values in a vector
template<class T> void listVector(const vector<T>& vec)
{
int count = 0; // Used to control outputs per line
for_each(vec.begin(), vec.end(),
[&count](const T& n)->void{ cout << setw(10) << n;
if(++count % 5)
cout << " ";
else
cout << endl;});
}
int main(){
vector<int> integerData(50);
randomValues(integerData, 1, 10); // Set random integer values
cout << "Vector contains:" << endl;
listVector(integerData);
cout << "Average value is "<< average(integerData) << endl;
vector<double> realData(20);
setValues(realData, 5.0, 2.5); // Set real values starting at 5.0
cout << "Vector contains:" << endl;
listVector(realData);
cout << "Average value is "<< average(realData) << endl;
return 0;
}

This example produces output similar to the following:
Vector contains:
         1           7           7           6           6
         6           1           5           7           1
         2           9           5           5           1
         6           7           3           2           1
         1           8           7           7           9
         3           9           9           6           3
         9           4           2           3           5
         5           1           2           5           5
         3           2           7           3           7
         6           3           5           2           3
Average value is 4
Vector contains:
         5         7.5          10        12.5          15
      17.5          20        22.5          25        27.5
        30        32.5          35        37.5          40
      42.5          45        47.5          50        52.5
Average value is 28.75
Where the example uses random number generation, the values are likely to be different.
How It Works
There are four function templates that use lambda expressions in the implementation of the functions that operate on vector containers. The first template function in sequence, average(), calculates the average value of the elements in a vector by passing the following lambda expression as the last argument to the STL for_each() function:
[&sum](const T& value){ sum += value; }The sum variable that is declared in the average() function is accessed by reference in the lambda to accumulate the sum of all the elements. The parameter to the lambda is value, which is of type reference to T, so the lambda automatically deals with whatever type of element is stored in the vector. The next function template is setValues(). This sets the elements of a vector in sequence with the first element set to start, the next to start+increment, the next to start+2*increment, and so on. Thus, the function will set the vector elements to any set of equispaced values. The function calls the STL generate() function that is defined in the algorithm header. This function sets a sequence of elements, defined by the first two iterator arguments, to the value returned by the function object you specify as the third argument. In this case, the third argument is the lambda expression:
[increment, ¤t]()->T{T result(current);
current += increment;
return result;}The lambda accepts no arguments, but it accesses increment by value and current by reference, the latter being used to store the next value to be set. The following lambda expression is exactly the same as the one above:
[=]()mutable->T{T result(current);
            current += increment;
            return result;}
The third function template is randomValues(), which stores random values of the appropriate type in the elements of a vector. The values will be in the range from min to max, the second and third arguments to the function.
The first statement in the function is:
srand(static_cast<unsigned int>(time(0))); // Initialize random number generator
This calls the srand() function that is defined in the cstdlib header. This function initializes the sequence of random numbers generated by the rand() function, also defined in the cstdlib header. The argument to srand() is an unsigned integer value that is the seed for the random number generator. The same seed will always produce the same sequence of random numbers, so here the argument is the current time that is returned by the time() function (defined in the ctime header). This will always return a different integer each time it is called, so the sequence of random numbers will be different each time the randomValues() function is called.
The randomValues() function calls the generate() function to store values produced by the following lambda expression in the vector:
[=](){ return static_cast<T>(static_cast<double>(rand())/

                                                     RAND_MAX*(max-min)+min); }
All variables within scope are accessible by value, and this includes the randomValues() function parameters, min and max. The RAND_MAX constant represents the maximum integer that the rand() function can return, so the expression for the value to be returned evaluates to a value in the range min to max.
The last template function is listVector(), which outputs the values of the elements in a vector with five values on each line. It uses the following lambda expression as the argument to the for_each() function to do this:
[&count](const T& n)->void{  cout << setw(10) << n;
                                 if(++count % 5)
                                   cout << "  ";
                                 else
                                   cout << endl;}
The capture clause in the expression captures the variable count that is defined in the listVector() function by reference, and this variable is used to record the count of the number of values processed. The parameter is of type const reference to T, so any element type can be processed. The body of the lambda outputs the value of the current element, n, and the if statement ensures that after every fifth value, a newline is written to cout. The setw() manipulator ensures values are presented in the output in a field that is 10 characters wide, so we get nice neat columns of output.
In main(), you first create a vector that can store 50 integers, and then call randomValues() to set the elements to random values between one and 10:
vector<int> integerData(50);
  randomValues(integerData, 1, 10);    // Set random integer values
  cout << "Vector contains:" << endl;
  listVector(integerData);
  cout << "Average value is "<< average(integerData) << endl;
The call to listVector() outputs the values, five to a line, as you see in the output that was produced. The last statement above calls the average() template function to calculate the average of the values in the vector. In all three template functions, the type is deduced from the vector<int> argument that is passed, and this also determines the type in the lambda expression that each function uses.
The next block of code in main() is:
vector<double> realData(20);
  setValues(realData, 5.0, 2.5);   // Set real values starting at 5.0
  cout << "Vector contains:" << endl;
  listVector(realData);
  cout << "Average value is "<< average(realData) << endl;
This uses a vector storing values of type double, and its elements1 values are set using the setValues() template. The output shows that everything works as expected.
An extension to the STL functional header defines the function<> class template that you can use to define a wrapper for a function object; this includes a lambda expression. The function<> template is referred to as a polymorphic function wrapper because an instance of the template can wrap a variety of function objects with a given parameter list and return type. I won't discuss all the details of the function<> class template, but I'll just show how you can use it to wrap a lambda expression. Using the function<> template to wrap a lambda expression effectively gives a name to the lambda expression, which not only provides the possibility of recursion within a lambda expression, it also allows you to use the lambda expression in multiple statements or pass it to several different functions. The same function wrapper could also wrap different lambda expressions at different times.
To create a wrapper object from the function<> template you need to supply information about the return type, and the types of any parameters, to a lambda expression. Here's how you could create an object of type function that can wrap a function object that has one parameter of type double and returns a value of type int:
function<int(double)> f = [](double x)->int{ return static_cast<int>(x*x); };The type specification for the function template is the return type for the function object to be wrapped, followed by its parameter types between parentheses, and separated by commas. Let's try a working example.
TRY IT OUT: Recursion in a Lambda Expression
This example will find the highest common factor (HCF) for a pair of integer values. The HCF is the largest number that will divide exactly into both integers. The HCF is also called the GCD, or greatest common divisor. Here's the code:
// Ex10_15.cpp Wrapping a lambda expression
#include <iostream>
#include <functional>
using std::function;
using std::cout;
using std::endl;

 int main()
{
  // Wrap the lambda expression to compute the HCF
  function<int(int,int)> hcf = [&](int m, int n) mutable −>int{
                                     if(m < n) return hcf(n,m);
                                     int remainder(m%n);
                                     if(0 == remainder) return n;
                                     return hcf(n, remainder);};
  int a(17719), b(18879);
  cout << "For numbers " << a << " and " << b
       << " the HCF is " << hcf(a, b) << endl;
  a = 103*53*17*97;
  b = 3*29*103;
  cout << "For numbers " << a << " and " << b
       << " the HCF is " << hcf(a, b) << endl;

    return 0;
}

This produces the output:
For numbers 17719 and 18879 the HCF is 29
For numbers 9001891 and 8961 the HCF is 103
How It Works
The first statement in main() creates the hcf object using the function class template:
function<int(int,int)> hcf = [&](int m, int n) mutable −>int{
                                     if(m < n) return hcf(n,m);
                                     int remainder(m%n);
                                     if(0 == remainder) return n;
                                     return hcf(n, remainder);};
The lambda expression has two parameters of type int and returns a value of type int, so hcf is of type function<int(int,int)>.
The lambda expression uses Euclid's method for finding the highest common factor for two integer values. This involves dividing the larger number by the smaller number, and if the remainder is zero, the HCF is the smaller number. If the remainder is non-zero, the process continues by dividing the previous smaller number by the remainder, and this is repeated until the remainder is zero.
The code for the lambda expression assumes m is the larger of the two numbers that are passed as arguments, so if it isn't, it calls hcf() with the arguments reversed. If the first argument is the larger number, the remainder after dividing m by n is calculated. If the remainder is zero, then n is the highest common factor and is returned. If the remainder is not zero, hcf() is called with n and the remainder.
In main(), you call hcf() in the first output statement, with a and b as the arguments:
cout << "For numbers " << a << " and " << b
       << " the HCF is " << hcf(a, b) << endl;
The output shows that the HCF is 29.
You also call hcf() a second time, with new values for a and b, in a statement identical to that above. From the expressions defining the values stored in a and b, you can see that the lambda expression does indeed find the HCF for the two integers passed to it.
The STL/CLR library is an implementation of the STL for use with C++/CLI programs and the CLR. The STL/CLR library covers all the capability that I have described for the STL for standard C++, so I won't go over the same ground again. I'll simply highlight some of the differences and illustrate how you use the STL/CLR with examples.
The STL/CLR library is contained within the cliext namespace, so all STL names are qualified by cliext rather than std. There are cliext include subdirectories that are equivalents for each of the standard C++ STL headers, including those for container adapters, algorithms and function objects, and the STL/CLR subdirectory name is the same in every case. Thus, the C++/CLI equivalents to the templates defined in a standard STL header, such as functional, can be found in cliext/functional. So, for example, if you want to use vector containers in your C++/CLI program you, need an #include directive for cliext/vector; to use the queue<T> adapter you must include the header file cliext/queue.
STL/CLR containers can store reference types, handles to reference types, and unboxed value types; they cannot store boxed value types. Most of the time, you will use STL/CLR containers with handles or value types. If you do choose to store reference types in a container, they will be passed by value, and the requirements for storing such objects in an STL/CLR container are essentially the same as for a native STL container. Any reference type stored in an STL/CLR container must at least implement a public copy constructor, a public assignment operator, and a public destructor. These requirements do not apply when you are storing value types or handles to reference types in an STL/CLR container.
Don't forget that the compiler does not supply default versions of the copy constructor and assignment operator for reference types, so when they are needed, you must always define them in your ref classes. Just to remind you, for a type T in a C++/CLI class, these functions will be of the form:
T(const T% t)                          // Copy constructor
{
  // Function body...
}

 T% operator=(const T% t)               // Assignement operator
{
  // Function body...
}

 ~T()                                   // Destructor
{
  // Function body...
}
Some container operations also require a no-arg constructor and the operator==() function to be defined. A no-arg constructor may be used if space for elements in a container needs to be allocated when the container is storing objects rather than handles. If you are storing handles to reference types or value types in an associative container such as a set or a map, they must overload at least one comparison operator — the default requirement is for operator<().
All the sequence containers provided by STL for native C++ are also available with the STL/CLR. The STL/CLR implements all the operations that the native STL containers support, so the differences tend to be notational, arising from the use of C++/CLI types. Let's explore the differences through some examples.
TRY IT OUT: Storing Handles in a Vector
First, define Person as a ref class type:
// Person.h
// A class defining a person
#pragma once
using namespace System;

 ref class Person
{
public:
 Person():firstname(L""), secondname(L""){}

  Person(String^ first, String^ second):firstname(first), secondname(second) {}

   // Destructor
  ~Person(){}

   // String representation of a person
  virtual String^ ToString() override
  {
    return firstname + L" " + secondname;
  }

 private:
  String^ firstname;
  String^ secondname;
};
The class has two constructors, including a no-arg constructor and a destructor. You will be only storing handles to Person objects in a vector, so you don't need to implement a copy constructor or an assignment operator. The ToString() function here overrides the version inherited from class Object and provides the way to get a String representation of a Person object for output purposes.
You can define a main() program that will store Person object handles in a vector like this:
// Ex10_16.cpp
// Storing handles in a vector
#include "stdafx.h"
#include "Person.h"
#include <cliext/vector>

 using namespace System;
using namespace cliext;

 int main(array<System::String ^> ^args)
{
  vector<Person^>^ people = gcnew vector<Person^>();
  String^ first;             // Stores a first name
  String^ second;            // Stores a second name
  Person^ person;            // Stores a Person

   while(true)
  {
    Console::Write(L"Enter a first name or press Enter to end: ");
    first = Console::ReadLine();
    if(0 == first->Length)
      break;
    Console::Write(L"Enter a second name: ");
    second = Console::ReadLine();
    person = gcnew Person(first->Trim(),second->Trim());
people->push_back(person);
}
// Output the contents of the vector
Console::WriteLine(L"
The persons in the vector are:");
for each(Person^ person in people)
Console::WriteLine("{0}",person);
return 0;
}

Here is a sample of output from this program:
Enter a first name or press Enter to end: Marilyn
Enter a second name: Monroe
Enter a first name or press Enter to end: Nicole
Enter a second name: Kidman
Enter a first name or press Enter to end: Judy
Enter a second name: Dench
Enter a first name or press Enter to end: Sally
Enter a second name: Field
Enter a first name or press Enter to end:

 The persons in the vector are:
Marilyn Monroe
Nicole Kidman
Judy Dench
Sally Field
How It Works
You create the vector container on the CLR heap like this:
vector<Person^>^ people = gcnew vector<Person^>();
The template type argument is Person^, which is a handle to a Person object. The container is also created on the CLR heap, so the people variable is a handle of type vector<Person^>^.
You create three handles for use as working storage in the input process:
String^ first;             // Stores a first name
  String^ second;            // Stores a second name
  Person^ person;            // Stores a Person
The first two refer to String objects, and the third is a handle to a Person object.
You read names from the standard input stream, and create Person objects in an indefinite while loop:
while(true)
  {
    Console::Write(L"Enter a first name or press Enter to end: ");
    first = Console::ReadLine();
    if(0 == first->Length)
break;
Console::Write(L"Enter a second name: ");
second = Console::ReadLine();
person = gcnew Person(first->Trim(),second->Trim());
people->push_back(person);
}After prompting for the input, the Console::ReadLine() function reads a name from the standard input stream and stores it in first. If just the Enter key is pressed, the length of the string will be zero, so you test for this to decide when to exit the loop. If the first name read is not of zero length, you read the second name. You then create a Person object on the CLR heap, and store the handle in person. For each String^ argument to the constructor, you call the Trim() function to remove any leading or trailing spaces. Calling the push_back() function for the people container stores the person handle in the vector.
The objects exist independently of the container, so if you were to discard the container (by assigning nullptr to people, for example) it would not necessarily destroy the objects pointed to by the handles it contains. In our example, we do not retain any handles to the objects, so in this case destroying the container would result in the objects not being referenced anywhere; eventually the garbage collector would get around to destroying them and freeing the memory they occupy on the CLR heap.
After the input loop ends, you output the contents of a vector in a for each loop:
for each(Person^ person in people)
    Console::WriteLine("{0}",person);
The for each loop works directly with sequence containers, so you can use this to iterate over all the handles stored in the people vector. The Console::WriteLine() function calls the ToString() function for each Person object to produce the string to be inserted in the first argument string.
It is not normal usage, but let's look at another working example to explore how you can store ref class objects instead of handles in a sequence container.
TRY IT OUT: Storing Reference Class Objects in a Double-Ended Queue
You will use Person object again, but this time you will sort the contents of the container before you generate the output. Here's the new version of the Person class:
// Person.h
// A class defining a person
#pragma once
using namespace System;

 ref class Person
{
public:
 Person():firstname(""), secondname(""){}

  Person(String^ first, String^ second):firstname(first), secondname(second)
{}
// Copy constructors
Person(const Person% p):firstname(p.firstname),secondname(p.secondname){}
Person(Person^ p):firstname(p->firstname), secondname(p->secondname){}
// Destructor
~Person(){}
// Assignment operator
Person% operator=(const Person% p)
{
if(this != %p)
{
firstname = p.firstname;
secondname = p.secondname;
}
return *this;
}
// Less-than operator
bool operator<(Person^ p)
{
if(String::Compare(secondname, p->secondname) < 0 ||
(String::Compare(secondname, p->secondname)== 0 &&
String::Compare(firstname, p->firstname) < 0))
return true;
return false;
}
// String representation of a person
virtual String^ ToString() override
{
return firstname + L" " + secondname;
}
private:
String^ firstname;
String^ secondname;
};You now have two copy constructors for Person objects, one accepting a Person object as an argument and the other accepting a handle to a Person object. A sequence container requires both copy constructors if it is to compile. You also have the assignment operator for Person objects, which is also required by the container. The operator<() function is needed for the sort() algorithm.
Here's the program code that will utilize this version of the Person class:
// Ex10_17.cpp
// Storing ref class objects in a double-ended queue
#include "stdafx.h"
#include "Person.h"
#include <cliext/deque>
#include <cliext/algorithm>

 using namespace System;
using namespace cliext;

 int main(array<System::String ^> ^args)
{

   deque<Person>^ people = gcnew deque<Person>();

   String^ first;             // Stores a first name
  String^ second;            // Stores a second name
  Person person;             // Stores a Person

   while(true)
  {
    Console::Write(L"Enter a first name or press Enter to end: ");
    first = Console::ReadLine();
    if(0 == first->Length)
      break;
    Console::Write(L"Enter a second name: ");
    second = Console::ReadLine();
    person = Person(first->Trim(),second->Trim());
    people->push_back(person);
  }
   sort(people->begin(), people->end());

  // Output the contents of the vector
  Console::WriteLine(L"
The persons in the vector are:");
  for each(Person^ p in people)
    Console::WriteLine(L"{0}",p);

  return 0;
}

Here is some output, similar to that of the previous example, except that the objects have been sorted in ascending sequence:
Enter a first name or press Enter to end: Brad
Enter a second name: Pitt
Enter a first name or press Enter to end: George
Enter a second name: Clooney
Enter a first name or press Enter to end: Mel
Enter a second name: Gibson
Enter a first name or press Enter to end: Clint
Enter a second name: Eastwood
Enter a first name or press Enter to end:

The persons in the vector are:
George Clooney
Clint Eastwood
Mel Gibson
Brad Pitt
How It Works
You create the double-ended queue container like this:
deque<Person>^ people = gcnew deque<Person>();
The type parameter to the deque<T> template is now Person, so you will be storing Person objects, not handles.
The storage for the element to be inserted into the container is now defined like this:
Person person; // Stores a Person
You are now going to store Person objects, so the working storage is no longer a handle, as it was in the previous example.
The input loop is the same as in the previous example except for the last two statements in the while loop:
person = Person(first->Trim(),second->Trim());
    people->push_back(person);
You create a Person object using the same syntax as in native C++. Although you don't use the gcnew keyword here, the compiler will arrange for the object to be created on the CLR heap because ref class objects cannot be created on the stack.
After the input loop, you sort the elements in the container:
sort(people->begin(), people->end());
The sort() algorithm expects two iterators to specify the range of elements to be sorted, and you obtain these by calling the begin() and end() functions for the container.
Finally, you list the contents of the container in a for each loop:
for each(Person^ p in people)
    Console::WriteLine(L"{0}",p);
Note that you still use a handle as the loop variable. Even though the container stores the objects themselves, you access them through a handle in a for each loop.
Of course, you could use the subscript operator for the container to access the objects. In this case, the output loop could be like this:
for(int i = 0 ; i<people->size() ; i++)
    Console::WriteLine("{0}", %people[i]);
The subscript operator returns a reference to an object in the container, and because the Console::WriteLine() function expects a handle, you have to use the % operator to obtain the address of the object.
You also have the possibility to use iterators:
deque<Person>::iterator iter;
  for(iter = people->begin() ; iter < people->end() ; ++iter)
    Console::WriteLine(L"{0}", *iter);
The iterator type is defined in the deque<Person> class, as in native STL. The loop is very similar to a native STL iterator loop, but when you dereference the iterator, you get a handle to the element to which the iterator points. This gives a clue as to why the for each loop iterates over handles — because it uses an iterator.
Just to complete the set, let's see a sequence container storing elements that are value types.
TRY IT OUT: Storing Value Types in a List
This time you will use a list as the container and store values of type double. You will also try out the sort() member of the list<T> container.
// Ex10_18.cpp  Storing value class objects in a list
#include "stdafx.h"
#include <cliext/list>

using namespace System;
using namespace cliext;

int main(array<System::String ^> ^args)
{
  array<double>^ values = {2.5, −4.5, 6.5, −2.5, 2.5, 7.5, 1.5, 3.5};
  list<double>^ data = gcnew list<double>();
  for(int i = 0 ; i<values->Length ; i++)
    data->push_back(values[i]);

  Console::WriteLine(L"The list contains: ");
  for each(double value in data)
    Console::Write(L"{0} ", value);
  Console::WriteLine();

  data->sort(greater<double>());
  Console::WriteLine(L"
After sorting the list contains: ");
  for each(double value in data)
    Console::Write(L"{0} ", value);
  Console::WriteLine();

  return 0;
}

Here is the output from this example:
The list contains:
2.5 −4.5 6.5 −2.5 2.5 7.5 1.5 3.5

After sorting the list contains:
7.5 6.5 3.5 2.5 2.5 1.5 −2.5 −4.5
You first create a handle to a list<T> object with this statement:
list<double>^ data = gcnew list<double>();
The elements to be stored are of type double, so the template type parameter is the same as for the native STL list.
The elements from the values array are stored in the data container in a loop:
for(int i = 0 ; i<sizeof values/sizeof values[0] ; i++)
    data->push_back(values[i]);
This is a straightforward loop that indexes through the values array and passes each element to the push_back() function for the list. Of course, you could also use a for each loop for this:
for each(double value in values)
  data->push_back(value);
You could also have initialized the list container with the contents of the values array:
list<double>^ data = gcnew list<double>(values);
Once the elements have been inserted into the list, and the list contents have been written to the standard output stream, you sort the contents of the list using the sort() function that is defined in the list<double> class:
data->sort(greater<double>());
The sort() function will use the default function object, less<double>(), to sort the list, unless you specify an alternative function object as the argument to the function. Here you specify greater<double>() as the function object to be used, sorting the contents of the list in descending sequence. Finally, you output the contents of the list to confirm that the sort does work as it should.
All the associative containers in STL/CLR work in essentially the same way as the equivalent native STL containers, but there are some important small differences, generally to do with how pairs are represented.
First, the type of an element that you store in a map of type
map<K, T>
in native STL is of type pair<K, T>, but in an STL/CLR map container it is of type map<K,T>::value_type, which is a value type. This implies that you can no longer use the make_pair() function to create a map entry in STL/CLR. Instead you use the static make_value() function that is defined in the map<K, T> class.
Second, the insert() function that inserts a single element in a map<K, T>, returns a value of type pair<map<K, T>::iterator, bool> for a native STL container, whereas for an STL/CLR map<K, T> container, the insert() function returns an object of type
map<K, T>::pair_iter_bool
which is a reference type. An object of type map<K, T>::pair_iter_bool has two public fields, first and second. first is a handle to an iterator of type
map<K, T>::iterator^
and second is of type bool. If second has the value true, then first points to the newly inserted element; otherwise it points to an element that already exists in the map with the same key.
I'll take one example to illustrate how associative containers in the STL/CLR work, and reproduce Ex10_11 as a C++/CLI program.
TRY IT OUT: Implementing a Phone Book Using a Map
This example works in more or less the same way as the native STL example you saw earlier, Ex10_11. First, you must define a suitable version of the ref class Person that will represent keys in the map:
// Person.h
// A class defining a person
#pragma once
using namespace System;
ref class Person
{
public:
Person():firstname(L""), secondname(L""){}
Person(String^ first, String^ second):
firstname(first), secondname(second) {}
// Destructor
~Person(){}
// Less-than operator
bool operator<(Person^ p)
{
if(String::Compare(secondname, p->secondname) < 0 ||
(String::Compare(secondname, p->secondname)== 0 &&
String::Compare(firstname, p->firstname) < 0))
return true;
return false;
}
// String representation of a personvirtual String^ ToString() override
{
return firstname + L" " + secondname;
}
private:
String^ firstname;
String^ secondname;
};The operator<() member is essential because you will use Person objects as keys in the map, and to store a key/object pair, the map has to be able to compare keys.
Here is the content of Ex10_19.cpp, including the same helper functions as the native STL version:
// Ex10_19.cpp
// Storing phone numbers in a map
#include "stdafx.h"
#include "Person.h"
#include <cliext/map>
using namespace System;
using namespace cliext;
// Read a person from standard input
Person^ getPerson()
{
String^ first;
String^ second;
Console::Write(L"Enter a first name: ") ;
first = Console::ReadLine();
Console::Write(L"Enter a second name: ") ;
second = Console::ReadLine();
return gcnew Person(first->Trim(), second->Trim());
}
// Add a new entry to a phone book
void addEntry(map<Person^, String^>^ book)
{
map<Person^, String^>::value_type entry; // Stores a phone book entry
String^ number;
Person^ person = getPerson();
Console::Write(L"Enter the phone number for {0}: ", person);
number = Console::ReadLine()->Trim();
entry = book->make_value(person, number);
map<Person^,String^>::pair_iter_bool pr = book->insert(entry);
if(pr.second)
Console::WriteLine(L"Entry successful.");
else
Console::WriteLine(L"Entry exists for {0}. The number is {1}",
person, pr.first->second);}
// List the contents of a phone book
void listEntries(map<Person^, String^>^ book)
{
if(book->empty())
{
Console::WriteLine(L"The phone book is empty.");
return;
}
map<Person^, String^>::iterator iter;
for(iter = book->begin() ; iter != book->end() ; iter++)
Console::WriteLine(L"{0, −30}{1,−12}",
iter->first, iter->second);
}
// Retrieve an entry from a phone book
void getEntry(map<Person^, String^>^ book)
{
Person^ person = getPerson();
map<Person^, String^>::const_iterator iter = book->find(person);
if(book->end() == iter)
Console::WriteLine(L"No entry found for {0}", person);
else
Console::WriteLine(L"The number for {0} is {1}",
person, iter->second);
}
// Delete an entry from a phone book
void deleteEntry(map<Person^, String^>^ book)
{
Person^ person = getPerson();
map<Person^, String^>::iterator iter = book->find(person);
if(book->end() == iter)
Console::WriteLine(L"No entry found for {0}", person);
else
{
book->erase(iter);
Console::WriteLine(L"{0} erased.", person);
}
}
int main(array<System::String ^> ^args)
{
map<Person^, String^>^ phonebook = gcnew map<Person^, String^>();
String^ answer;
while(true)
{
Console::Write(L"Do you want to enter a phone book entry(Y or N): ") ;
answer = Console::ReadLine()->Trim();
if(Char::ToUpper(answer[0]) == L'N')
break;
addEntry(phonebook);}
// Query the phonebook
while(true)
{
Console::WriteLine(L"
Choose from the following options:");
Console::WriteLine(L"A Add an entry D Delete an entry G Get an entry");
Console::WriteLine(L"L List entries Q Quit");
// Check for an empty line being entered
while(true)
{
answer = Console::ReadLine()->Trim();
if(answer->Length)
break;
Console::WriteLine(L"
You must enter something - try again.");
}
switch(Char::ToUpper(answer[0]))
{
case L'A':
addEntry(phonebook);
break;
case L'G':
getEntry(phonebook);
break;
case L'D':
deleteEntry(phonebook);
break;
case L'L':
listEntries(phonebook);
break;
case L'Q':
return 0;
default:
Console::WriteLine(L"Invalid selection. Try again.");
break;
}
}
return 0;
}

Here's a sample of output from this example:
Do you want to enter a phone book entry(Y or N): y Enter a first name: Jack Enter a second name: Bateman Enter the phone number for Jack Bateman: 312 455 6576 Entry successful. Do you want to enter a phone book entry(Y or N): y Enter a first name: Mary Enter a second name: Jones
Enter the phone number for Mary Jones: 213 443 5671 Entry successful. Do you want to enter a phone book entry(Y or N): y Enter a first name: Jane Enter a second name: Junket Enter the phone number for Jane Junket: 413 222 8134 Entry successful. Do you want to enter a phone book entry(Y or N): n Choose from the following options: A Add an entry D Delete an entry G Get an entry L List entries Q Quit a Enter a first name: Bill Enter a second name: Smith Enter the phone number for Bill Smith: 213 466 7688 Entry successful. Choose from the following options: A Add an entry D Delete an entry G Get an entry L List entries Q Quit g Enter a first name: Mary Enter a second name: Miller No entry found for Mary Miller Choose from the following options: A Add an entry D Delete an entry G Get an entry L List entries Q Quit g Enter a first name: Mary Enter a second name: Jones The number for Mary Jones is 213 443 5671 Choose from the following options: A Add an entry D Delete an entry G Get an entry L List entries Q Quit d Enter a first name: Mary Enter a second name: Jones Mary Jones erased. Choose from the following options: A Add an entry D Delete an entry G Get an entry L List entries Q Quit L Jack Bateman 312 455 6576 Jane Junket 413 222 8134 Bill Smith 213 466 7688 Choose from the following options: A Add an entry D Delete an entry G Get an entry L List entries Q Quit q
How It Works
The first action in main() is to define a suitable map object:
map<Person^, String^>^ phonebook = gcnew map<Person^, String^>();
This map stores an object that combines a handle to a Person object as the key, and a handle to a String object as the associated object. Because this is an STL/CLR map, elements in the map are of type map<Person^, String^>::value_type; for a native STL map the elements would typically be of type pair<Person, string>.
Next, you define somewhere to store an input response:
String^ answer;
The Console::ReadLine() function that you will use to obtain input from the standard input stream always reads a line of input as a String object, so it's convenient to store a response as type String^.
Within the while loop that loads the map with new entries, you obtain a response to the first prompt like this:
answer = Console::ReadLine()->Trim();
The Console::ReadLine() call reads a line of input as a String object, and you call the Trim() function for the object returned to eliminate leading and trailing spaces. The result is stored in answer and the first character will be the input response.
You check for L'n' or L'N' being entered as the response, like this:
if(Char::ToUpper(answer[0]) == L'N')
break;This uses the ToUpper() function in the Char class to convert the first character in answer to uppercase before comparing it to L'N'. If the response is negative, you exit the loop. As it is coded, entering any response other than L'n' or L'N' is interpreted as L'Y'. To remove this anomaly, you could add this if statement following the one above:
if(Char::ToUpper(answer[0]) != L'Y')
{
Console::WriteLine(L"'{0}' response is not valid. Try again.", answer[0]);
continue;
}With this amendment, you output a message and go to the next iteration, if an invalid response is entered.
If the response in answer is not in the negative, you call the addEntry() helper function to add a new entry to the map. The first statement in addEntry() defines a variable you will use to store a new map entry:
map<Person^, String^>::value_type entry; // Stores a phone book entry
The value_type type is defined in the map<K,T> template and is the equivalent of a pair in native STL.
You obtain a handle to a new Person object by calling the getPerson() helper function. This uses Console::ReadLine() to read the names, and creates the Person object on the CLR heap. The phone number corresponding to the Person object is read in the addEntry() function, and you call the make_value() function for the map, with person and number as arguments, to create the new map entry. You insert the new entry using this statement:
map<Person^,String^>::pair_iter_bool pr = book->insert(entry);
The insert() function returns an object of type pair_iter_bool, which is similar to the pair object returned by the native STL version of the function. The first field in the pr object is a handle to an iterator, and the second field is a bool value that indicates whether or not the insert operation was successful. You use the second field in pr to output a suitable message, depending on how effective the insert operation was.
When the input loop ends, you prompt for operations on the map using a switch, as in the native version of the program. All the code for these operations is very similar to that in the native version. Note that the output in the listEntries() function could be coded like this:
for each(auto entry in book)
Console::WriteLine(L"{0, −30}{1,−12}", entry->first, entry->second);This iterates over all the entries in the map using a for each loop. You access the key and object in each entry via the first and second fields.
You can use lambda expression in your C++/CLI programs and with STL/CLR. There is one restriction, though. You cannot capture C++/CLI managed types, only standard C++ fundamental and class types. You, however, can specify a lambda parameter as a managed type, so you still have the potential for accessing variables of managed types in the enclosing scope from within the body of a lambda. Apart from this one exception, lambda expressions work exactly the same in C++/CLI code as they do with native C++.
This chapter introduced the capabilities of the STL in native C++ and demonstrated how the same facilities are provided by STL/CLR for use in your C++/CLI programs.
My objective in this chapter was to introduce enough of the details of the STL and STL/CLR to enable you to explore the rest on your own. There's a great deal more there than I've been able to discuss here, so I encourage you to browse the documentation.
WHAT YOU LEARNED IN THIS CHAPTER
TOPIC | CONCEPT |
|---|---|
Standard Template Libraries | The STL and STL/CLR capabilities include templates for containers, iterators, algorithms, and function objects. |
Containers | A container is a class object for storing and organizing other objects. Sequence containers store objects in a sequence, like an array. Associative containers store elements that are key/object pairs, where the key determines where the pair is stored in the container. |
Iterators | Iterators are objects that behave like pointers. Iterators are used in pairs to define a set of objects by a semi-open interval, where the first iterator points to the first object in the series, and the second iterator points to a position one past the last object in the series. |
Stream iterators | Stream iterators are iterators that allow you to access or modify the contents of a stream. |
Iterator categories | There are four categories of iterators: input and output iterators, forward iterators, bidirectional iterators, and random access iterators. Each successive category of iterator provides more functionality than the previous one; thus, input and output iterators provide the least functionality, and random access iterators provide the most. |
Algorithms | Algorithms are template functions that operate on a sequence of objects specified by a pair of iterators. |
Function objects | Function objects are objects of a type that overloads the |
Lambda expressions | A lambda expression defines an anonymous function object without the need to explicitly define a class type. You can use a lambda expression as an argument to STL algorithms that expect a function object as an argument. |
Polymorphic function wrappers | A polymorphic function wrapper is an instance of the |