WHAT YOU WILL LEARN IN THIS CHAPTER:
The basic elements of an MFC-based program
How Single Document Interface (SDI) applications and Multiple Document Interface (MDI) applications differ
How to use the MFC Application Wizard to generate SDI and MDI programs
Files generated by the MFC Application Wizard and their contents
How an MFC Application Wizard-generated program is structured
The key classes in an MFC Application Wizard-generated program, and how they are interconnected
The general approach to customizing an MFC Application Wizard-generated program
In this chapter, you start down the road of serious Windows application development using the MFC. You'll get an appreciation of what code the Application wizard generates for a Microsoft Foundation Class (MFC) program and what options you have for the features to be included in your code.
You'll be expanding the programs that you generate in this chapter by adding features and code incrementally in subsequent chapters. You will eventually end up with a sizable, working Windows program that incorporates almost all the basic user interface programming techniques you will have learned along the way.
When you write applications using MFC, it implies acceptance of a specific structure for your program, with application data being stored and processed in a particular way. This may sound restrictive, but it really isn't for the most part, and the benefits in speed and ease of implementation you gain far outweigh any conceivable disadvantages. The structure of an MFC program incorporates two application-oriented entities — a document and a view — so let's look at what they are and how they're used.
A document is the name given to the collection of data in your application with which the user interacts. Although the word document seems to imply something of a textual nature, a document isn't limited to text. It could be the data for a game, a geometric model, a text file, a collection of data on the distribution of orange trees in California, or, indeed, anything you want. The term document is just a convenient label for the application data in your program, treated as a unit.
You won't be surprised to hear that a document in your program is defined as an object of a document class. Your document class is derived from the CDocument class in the MFC library, and you'll add your own data members to store items that your application requires, and member functions to support processing of that data. Your application is not limited to a single document type; you can define multiple document classes when there are several different kinds of documents involved in your application.
Handling application data in this way enables standard mechanisms to be provided within MFC for managing a collection of application data as a unit and for storing and retrieving data contained in document objects to and from disk. These mechanisms are inherited by your document class from the base class defined in the MFC library, so you get a broad range of functionality built into your application automatically, without having to write any code.
You have a choice as to whether your program deals with just one document at a time, or with several. The Single Document Interface, abbreviated as SDI, is supported by the MFC library for programs that require only one document to be open at a time. A program using this interface is referred to as an SDI application.
For programs needing several documents to be open at one time, you can use the Multiple Document Interface, which is usually referred to as MDI. With the MDI, as well as being able to open multiple documents of one type, your program can also be organized to handle documents of different types simultaneously with each document displayed in its own window. Of course, you need to supply the code to deal with processing whatever different kinds of documents you intend to support. With an MDI application, each document is displayed in a child window of the application window. You have an additional application variant called the multiple top-level document architecture where each document window is a child of the desktop.
A view always relates to a particular document object. As you've seen, a document contains a set of application data in your program, and a view is an object that provides a mechanism for displaying some or all of the data stored in a document. It defines how the data is to be displayed in a window and how the user can interact with it. Similar to the way that you define a document, you'll define your own view class by deriving it from the MFC class CView. Note that a view object and the window in which it is displayed are distinct. The window in which a view appears is called a frame window.
A view is actually displayed in its own window that exactly fills the client area of a frame window. Figure 14-1 illustrates how the data in a document might be displayed in two views.

In the example in Figure 14-1, each view displays all the data that the document contains in a different form, although a view could display just part of the data in a document if that's what's required.
A document object can have as many view objects associated with it as you want. Each view object can provide a different presentation of the document data or a subset of the same data. If you were dealing with text, for example, different views could be displaying independent blocks of text from the same document. For a program handling graphical data, you could display all of the document data at different scales in separate windows, or in different formats, such as a textual representation of the elements that form the image. Figure 14-1 illustrates a document that contains numerical data — product sales data by month — where one view provides a bar chart representation of the sales performance and a second view shows the data in the form of a graph.
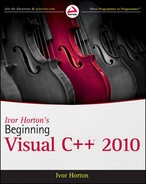
MFC incorporates a mechanism for integrating a document with its views, and each frame window with a currently active view. A document object automatically maintains a list of pointers to its associated views, and a view object has a data member holding a pointer to the document that it relates to. Each frame window stores a pointer to the currently active view object. The coordination among a document, a view, and a frame window is established by another MFC class of objects called document templates.
A document template manages the document objects in your program, as well as the windows and views associated with each of them. There is one document template for each type of document that you have in your application. If you have two or more documents of the same type, you need only one document template to manage them. To be more specific about the role of a document template, a document template object creates document objects and frame window objects, and views of a document are created by a frame window object. The application object that is fundamental to every MFC application creates the document template object itself. Figure 14-2 shows a graphical representation of these interrelationships.
The diagram uses dashed arrows to show how pointers are used to relate objects. These pointers enable function members of one class object to access the public data or the function members in the interface of another object.
MFC has two classes for defining document templates. For SDI applications, the MFC library class CSingleDocTemplate is used. This is relatively straightforward because an SDI application has only one document and usually just one view. MDI applications are rather more complicated. They have multiple documents active at one time, so a different class, CMultiDocTemplate, is needed to define the document template. You'll see more of these classes as we progress into developing application code.
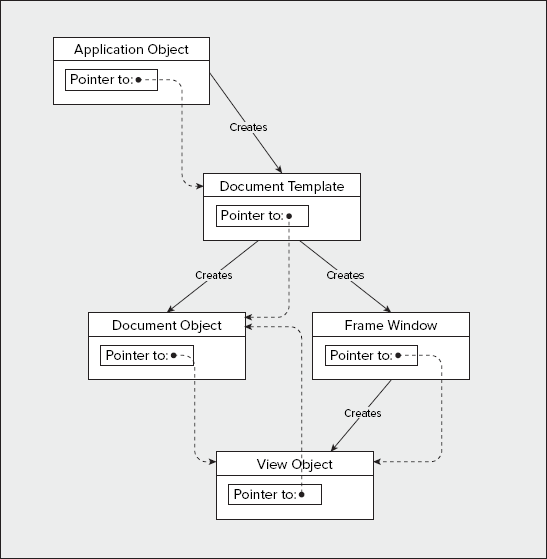
Figure 14-3 shows the four basic classes that are going to appear in virtually all your MFC-based Windows applications:
The application class
CMyAppThe frame window class
CMyWndThe view class
CMyView, which defines how data contained inCMyDocis to be displayed in the client area of a window created by aCMyWndobjectThe document class
CMyDoc, defining a document to contain the application data
The actual names for these classes are specific to a particular application, but the derivation from MFC is much the same, although there can be alternative base classes, particularly with the view class. As you'll see a bit later, MFC provides several variations of the view class that provide a lot of functionality prepackaged for you, saving you lots of coding. You normally don't need to extend the class that defines a document template for your application, so the standard MFC class CSingleDocTemplate usually suffices in an SDI program. When you're creating an MDI program, your document template class is CMultiDocTemplate, which is also derived from CDocTemplate. An MDI application also contains an additional class, beyond the four that appear in Figure 14-3, that defines a child window.
The arrows in the diagram point from a base class to a derived class. The MFC library classes shown here form quite a complex inheritance structure, but, in fact, these are just a very small part of the complete MFC structure. You need not be concerned about the details of the complete MFC hierarchy, but it is important to have a general appreciation of it if you want to understand what the inherited members of your classes are. You will not see any of the definitions of the base classes in your program, but the inherited members of a derived class in your program are accumulated from the direct base class, as well as from each of the indirect base classes in the MFC hierarchy. To determine what members one of your program's classes has, you therefore need to know from which classes it inherits. After you know that, you can look up its members using the Help facility.
Another point you don't need to worry about is remembering which classes you need to have in your program and what base classes to use in their definition. As you'll see next, all of this is taken care of for you by Visual C++ 2010.
You use four primary tools in the development of your MFC-based Windows programs:
You use an Application Wizard for creating the basic application program code when you start. You use an Application Wizard whenever you create a project that results in code being automatically generated.
You use the project context menu in ClassView to add new classes and resources to your project. You display this context menu by right-clicking the project name in ClassView and using the Add/Class menu item to add a new class. Resources are things composed of non-executable data such as bitmaps, icons, menus, and dialog boxes. The Add/Resource menu item from the same context menu helps you to add a new resource.
You use the class context menu in ClassView for extending and customizing the existing classes in your programs. You use the Add/Add Function and Add/Add Variable menu items to do this.
You use a Resource Editor for creating or modifying such objects as menus and toolbars.
There are, in fact, several resource editors; the one used in any particular situation is selected depending on the kind of resource that you're editing. We'll look at editing resources in the next chapter, but for now, let's jump in and create an MFC application.
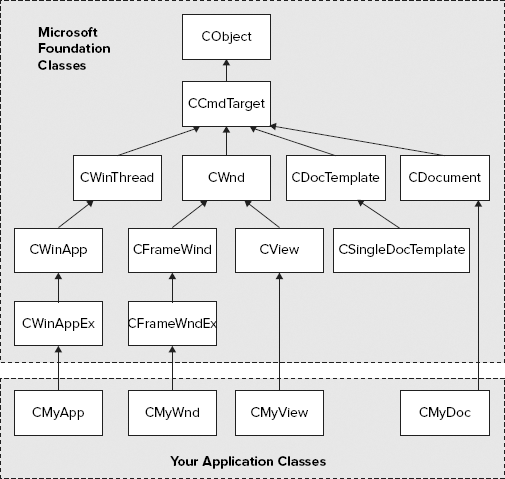
The process for creating an MFC application is just as straightforward as that for creating a console program; there are just a few more choices along the way. As you have already seen, you start by creating a new project by selecting the File
As you know, the name that you assign to the project — TextEditor, in this case — is used as the name of the folder that contains all the project files, but it is also used as a basis for creating the names for classes that the Application Wizard generates for your project. When you click OK in the New Project dialog window, you'll see the MFC Application Wizard dialog, where you can choose options for the application, as shown in Figure 14-5.

As you can see, the dialog explains the project settings that are currently in effect, and on the left of the dialog, you have a range of options you can select. You can select any of these to have a look if you want — you can always get back to the base dialog box for the Application Wizard by selecting the Overview option. Selecting any of the options on the left presents you with a whole range of further choices, so there are a lot of options in total. I won't discuss all of them — I'll just outline the ones that you are most likely to be interested in and leave you to investigate the others. Initially, the Application Wizard enables you to choose an SDI application, an MDI application that optionally can be tabbed, a dialog box-based application, or an application with multiple top-level frame windows. Let's create an SDI application first and explore what some of the choices are as we go along.
Select the Application Type option from the list to the left of the dialog window.
The default option selected is Multiple documents with the tabbed option selected, which selects the multiple document interface (MDI) with each document in its own tabbed page, and the appearance of this is shown at the top left in the dialog window so that you'll know what to expect. Select the Single document option, the MFC standard project style option, and the Windows Native/Default option from the drop-down list of visual styles, and the representation for the application that is shown top-left changes to a single window, as shown in Figure 14-6.
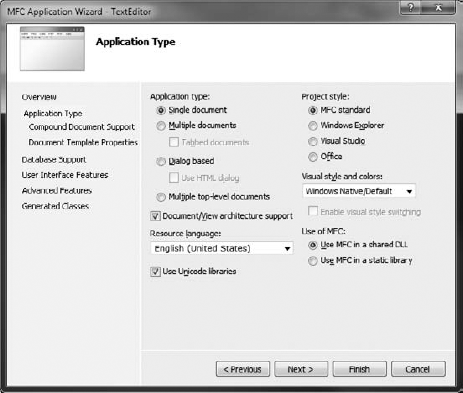
Consider some of the other options you have here for the application type:
OPTION | DESCRIPTION |
|---|---|
Dialog based | The application window is a dialog window rather than a frame window. |
Multiple top-level documents | Documents are displayed in child windows of the desktop rather than child windows of the application as they are with an MDI application. |
Document/View architecture support | This option is selected by default so you get code built in to support the document/view architecture. If you uncheck this option, the support is not provided and it's up to you to implement whatever you want. |
Resource language | The drop-down list box displays the choice of languages available that applies to resources such as menus and text strings in your application. |
Use Unicode libraries | Support for Unicode is provided through Unicode versions of the MFC libraries. If you want to use them, you must check this option. Some functionality in MFC is only available when you elect to use Unicode libraries. |
Project style | Here you can choose the visual appearance of the application window. Your choice will depend on the environment in which you want to run the application and the kind of application. For example, if your application relates to Microsoft Office, you would select the Office option. |
If you hover the mouse cursor over any of the options in the dialog, a tooltip will be displayed explained what the option does. You can leave the Use Unicode libraries option checked by default. If you uncheck it when you create a new application, some of the capabilities that MFC offers in Visual C++ 2010 will not be available.
You have several options for the Project style. I'll select the MFC Standard option and suggest that you do the same. I also selected Windows Native /Default from the Visual style and colors drop-down list. This makes the application appearance the same as your current operating system. If you have Windows 7 installed, you can select the Windows 7 (Scenic) option.
You can also choose how MFC library code is used in your program. The default choice of using the MFC library as a shared DLL (Dynamic Link Library) means that your program links to MFC library routines at run time. This reduces the size of the executable file that you'll generate, but requires the MFC DLL to be on the machine that's running it. The two modules together (your application's .exe module and the MFC .dll) may be bigger than if you had statically linked the MFC library. If you opt for static linking, the MFC library routines are included in the executable module for your program when it is built. Statically linked applications run slightly faster than those that dynamically link to the MFC library, so it's a tradeoff between memory usage and speed of execution. If you keep the default option of using MFC as a shared DLL, several programs running simultaneously using the dynamic link library can all share a single copy of the library in memory.
If you select Document Template Properties in the left pane of the Application Wizard dialog, you can enter a file extension for files that the program creates in the right pane. The extension txt is a good choice for this example. You can also enter a Filter Name, which is the name of the filter that will appear in Open and Save As dialog boxes to filter the list of files so that only files with your file extension are displayed.
If you select User Interface Features from the list in the left pane of the MFC Application Wizard window, you get a further set of options that can be included in your application:
OPTION | DESCRIPTION |
|---|---|
Thick Frame | This enables you to resize the application window by dragging a border. It is selected by default. |
Minimize box | This option is also selected by default and provides a minimize box at the top right of the application window. |
Maximize box | This option is also selected by default and provides a maximize box at the top right of the application window. |
Minimized | If you select this option, the application starts with the window minimized so it appears as an icon. |
Maximized | If you select this option, the application starts with the window maximized. |
System Menu | This option provides the main window with a control-menu box in the title bar. |
About box | This option provides your application with an About dialog. |
Initial status bar | This option adds a status bar at the bottom of the application window containing indicators for CAPS LOCK, NUM LOCK, and SCROLL LOCK and a message line that displays help strings for menus and toolbar buttons. The option also adds menu commands to hide or show the status bar. |
Split window | This option provides a splitter bar for each of the application's main views. |
The Command bars options do not apply when you are using new appearance features, such as the Windows 7 option. The Command bars sub-options enable you to choose whether you use a classic style docking toolbar or an Internet Explorer style toolbar.
In this example, the Use a menu bar and toolbar option is selected by default. The User-defined toolbars and images sub-option allows the toolbar and images to be customized at runtime. The Personalized menu behavior sub-option enables menus to display only the items used most frequently. You can also choose to use a ribbon style for menus that is used in the latest releases of Microsoft Office, but you should only do this if it is appropriate to your application.
You should be aware of couple of features under the Advanced Features set of options. One is Printing and print preview, which is selected by default, and the other is Context-sensitive help, which you get if you check the box. Printing and print preview adds the standard Page Setup, Print Preview, and Print items to the File menu, and the Application Wizard also provides code to support these functions. Enabling the Context-sensitive help (HTML) option results in a basic set of facilities to support context-sensitive help. You'll obviously need to add the specific contents of the help files if you want to use this feature.
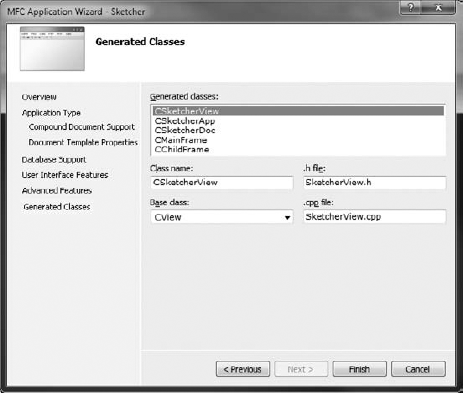
If you select the Generated Classes option in the MFC Application Wizard dialog box, you'll see a list of the classes that the Application Wizard will generate in your program code, as shown in Figure 14-7.
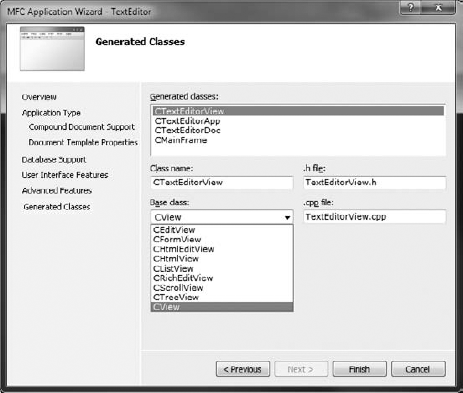
You can highlight any class in the list by clicking it, and the boxes below show the name given to the class, the name of the header file in which the definition will be stored, the base class used, and the name of the file containing the implementation of member functions in the class. The class definition is always contained in a .h file, and the member function source code is always included in a .cpp file.
In the case of the class CTextEditorDoc, you can alter everything except the base class; however, if you select CTextEditorApp, the only thing that you can alter is the class name. Try clicking the other classes in the list. For CMainFrame, you can alter everything except the base class, and for the CTextEditorView class shown in Figure 14-7, you can change the base class as well. Click the down arrow to display the list of other classes that you can have as a base class; the list appears in Figure 14-7. The capability built into your view class depends on which base class you select:
Because you've called the application TextEditor, with the notion that it is able to edit text, choose CEditView to get basic editing capability provided automatically.
You can now click Finish to have the program files for a fully working base program generated by MFC Application Wizard, using the options you've chosen.
All the program files generated by the Application Wizard are stored in the TextEditor project folder, which is a subfolder to the solution folder with the same name. There are also resource files in the res subfolder to the project folder. The IDE provides several ways for you to view the information relating to your project:
TAB/PANE | CONTENTS |
|---|---|
Solution Explorer | Shows the files included in your project. The files are categorized in virtual folders with the names |
Class View | Class View displays the classes you have in your project and their members. It also shows any global entities you have defined. The classes are shown in the upper pane, and the lower pane displays the members for the class selected in the upper pane. By right-clicking entities in the Class View, you can display a menu that you can use to view the definition of the entity or where it is referenced. |
Resource View | This displays the resources such as menu items and toolbar buttons used by your project. Right-clicking a resource displays a menu, enabling you to edit the resource or add new resources. |
Property Manager | This displays the versions you can build for your project. The debug version includes extra facilities to make debugging your code easier. The release version results in a smaller executable, and you build this version when your code is fully tested for production use. By right-clicking a version — either Debug or Release — you can display a context menu where you can add a property sheet or display the properties currently set for that version. A property sheet enables you to set options for the compiler and linker. |
You can switch to view any of these by selecting from the View menu or clicking on a tab label. If you right-click TextEditor in the Solution Explorer pane and select Properties from the pop-up, the project properties window is displayed, as shown in Figure 14-8.
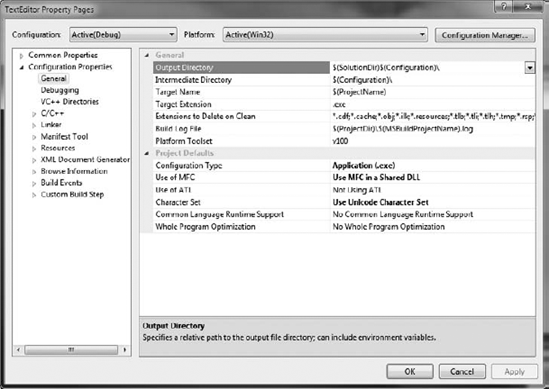
The left pane shows the property groups you can select to be displayed in the right pane. Currently, the General group of properties is displayed. You can change the value for a property in the right pane by clicking it and selecting a new value from the drop-down list box to the right of the property name or, in some cases, by entering a new value.
At the top of the property pages window, you can see the current project configuration and the target platform when the project is built. You can change these by selecting from the drop-down list for each.
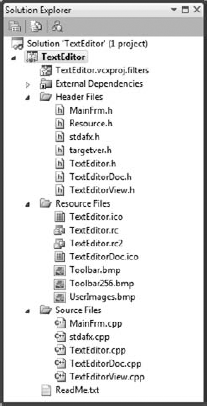
If you select the Solution Explorer tab and expand the list by clicking the [unfilled] symbol for TextEditor files and then click the [unfilled] symbol for each of the Source Files, Header Files, and Resource Files folders, you'll see the complete list of files for the project, as shown in Figure 14-9. To collapse any expanded branch of the tree, just click the [filled] symbol.
Note
If you are still using Windows XP, the symbols to expand or collapse branches of the tree will be + and −.
Figure 14-9 shows the pane as a floating window to make the complete list of files visible at one time; you can arrange for any of the tabbed panes to be floating by clicking the down arrow at the top of the pane and selecting from the list of possible positions. As you can see, there are a total of 19 files shown in the project, excluding ReadMe.txt. You can view the contents of any of the files simply by double-clicking the file name. The contents of the file selected are displayed in the Editor window. Try it out with the ReadMe.txt file. You'll see that it contains a brief explanation of the contents of each of the files that make up the project. I won't repeat the descriptions of the files here, because they are very clearly summarized in ReadMe.txt.
The access to your project presented by the Class View tab is often much more convenient than that of Solution Explorer because classes are the basis for the organization of the application. When you want to look at the code, it's typically the definition of a class or the implementation of a member function you'll want to look at, and from Class View you can go directly to either. On occasions, however, Solution Explorer comes in handy. If you want to check the #include directives in a .cpp file, using Solution Explorer, you can open the file you're interested in directly.
In the Class View pane, you can expand the TextEditor classes item to show the classes defined for the application. Clicking the name of any class shows the members of that class in the lower pane. In the Class View pane shown in Figure 14-10, the CTextEditorDoc class has been selected.
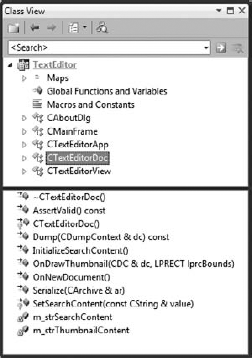
Figure 14-10 shows the Class View pane in its docked state. The icons code the various kinds of things that you can display. You will find a key to what each icon indicates if you look at the Class View documentation.
You can see that you have the four classes that I discussed earlier that are fundamental to an MFC application: CTextEditorApp for the application, CMainFrame for the application frame window, CTextEditorDoc for the document, and CTextEditorView for the view. You also have a class CAboutDlg that defines objects that support the dialog box that appears when you select the menu item Help

The application object, theApp, appears twice because there is an extern statement for theApp in TextEditor.h and the definition for theApp is in TextEditor.cpp. If you double-click either of the appearances of theApp in Class View, it will take you to the corresponding statement. indicators is an array of indicators recording the status of caps lock, num lock, and scroll lock that are displayed in the status bar. The remaining three variables relate to the management of the toolbars in the application. If you double-click any of these, you will see its definition.
To view the code for a class definition in the Editor pane, you just double-click the class name in the tree in Class View. Similarly, to view the code for a member function, double-click the function name. Note that you can drag the edges of any of the panes in an IDE window to view its contents or your code more easily. You can hide or show the Solution Explorer set of panes by clicking the Autohide button at the right end of the pane title bar.
I won't go into the classes in complete detail here — you'll just get a feel for how they look and I'll highlight a few important aspects. Note that the precise content of each class that is generated by the Application Wizard depends on the options you select when creating the project. If you double-click the name of a class in the Class View, the code defining the class is displayed. Take a look at the application class, CTextEditorApp, first. The definition for this class is shown here:
// TextEditor.h : main header file for the TextEditor application
//
#pragma once

#ifndef __AFXWIN_H__
      #error "include 'stdafx.h' before including this file for PCH"
#endif

#include "resource.h" // main symbols


// CTextEditorApp:
// See TextEditor.cpp for the implementation of this class
//

class CTextEditorApp : public CWinAppEx
{
public:
      CTextEditorApp();


// Overrides
public:
      virtual BOOL InitInstance();

// Implementation
      BOOL  m_bHiColorIcons;

      virtual void PreLoadState();
      virtual void LoadCustomState();
      virtual void SaveCustomState();

      afx_msg void OnAppAbout();
      DECLARE_MESSAGE_MAP()
};

extern CTextEditorApp theApp;

The CTextEditorApp class derives from CWinAppEx and includes a constructor, a virtual function InitInstance(), a function OnAppAbout(), three functions concerned with dealing with the application state, and a macro DECLARE_MESSAGE_MAP().
Note
A macro is not C++ code. It's a name de. ned by a #define pre-processor directive that will be replaced by some text that will normally be C++ code but could also be constants or symbols of some kind.
The DECLARE_MESSAGE_MAP() macro is concerned with defining which Windows messages are handled by which function members of the class. The macro appears in the definition of any class that may process Windows messages. Of course, our application class inherits a lot of functions and data members from the base class, and you will be looking further into these as you expand the program examples. If you take a look at the beginning of the code for the class definition, you will notice that the #pragma once directive prevents the file being included more than once. Following that is a group of preprocessor directives that ensure that the stdafx.h file is included before this file.
The application frame window for our SDI program is created by an object of the class CMainFrame, which is defined by the following code:
class CMainFrame : public CFrameWndEx
{
protected: // create from serialization only
      CMainFrame();
      DECLARE_DYNCREATE(CMainFrame)

// Attributes
public:

// Operations
public:

// Overrides
public:
      virtual BOOL PreCreateWindow(CREATESTRUCT& cs);
      virtual BOOL LoadFrame(UINT nIDResource, DWORD dwDefaultStyle =
             WS_OVERLAPPEDWINDOW | FWS_ADDTOTITLE, CWnd* pParentWnd =
             NULL, CCreateContext* pContext = NULL);

// Implementation
public:
      virtual ~CMainFrame();
#ifdef _DEBUG
      virtual void AssertValid() const;
      virtual void Dump(CDumpContext& dc) const;
#endif

protected:  // control bar embedded members
      CMFCMenuBar       m_wndMenuBar;
      CMFCToolBar       m_wndToolBar;
      CMFCStatusBar     m_wndStatusBar;
      CMFCToolBarImages m_UserImages;

// Generated message map functions
protected:
      afx_msg int OnCreate(LPCREATESTRUCT lpCreateStruct);
      afx_msg void OnViewCustomize();
      afx_msg LRESULT OnToolbarCreateNew(WPARAM wp, LPARAM lp);
      DECLARE_MESSAGE_MAP()
};
This class is derived from CFrameWndEx, which provides most of the functionality required for our application frame window. The derived class includes four protected data members — m_wndMenuBar, m_wndToolBar, m_wndStatusBar, and m_UserImages — which are instances of the MFC classes CMFCMenuBar, CMFCToolBar, CMFCStatusBar, and CMFCToolBarImages, respectively. The first three of these objects create and manage the menu bar, the toolbar that provides buttons to access standard menu functions, and the status bar that appears at the bottom of the application window. The fourth objects hold the images that are to appear on toolbar buttons.
The definition of the CTextEditorDoc class that was supplied by the MFC Application wizard is:
class CTextEditorDoc : public CDocument
{
protected: // create from serialization only
      CTextEditorDoc();
      DECLARE_DYNCREATE(CTextEditorDoc)

// Attributes
public:

// Operations
public:

// Overrides
public:
      virtual BOOL OnNewDocument();
      virtual void Serialize(CArchive& ar);
#ifdef SHARED_HANDLERS
      virtual void InitializeSearchContent();
      virtual void OnDrawThumbnail(CDC& dc, LPRECT lprcBounds);
#endif // SHARED_HANDLERS

// Implementation
public:
      virtual ~CTextEditorDoc();
#ifdef _DEBUG
      virtual void AssertValid() const;
      virtual void Dump(CDumpContext& dc) const;
#endif

protected:

// Generated message map functions
protected:
      DECLARE_MESSAGE_MAP()

#ifdef SHARED_HANDLERS
      // Helper function that sets search content for a Search Handler
      void SetSearchContent(const CString& value);
#endif // SHARED_HANDLERS

#ifdef SHARED_HANDLERS
private:
CString m_strSearchContent;
CString m_strThumbnailContent;
#endif // SHARED_HANDLERS
};As in the case of the previous classes, most of the meat comes from the base class and is therefore not apparent here. The DECLARE_DYNCREATE() macro that appears after the constructor (and was also used in the CMainFrame class) enables an object of the class to be created dynamically by synthesizing it from data read from a file. When you save an SDI document object, the frame window that contains the view is saved along with your data. This allows everything to be restored when you read it back. Reading and writing a document object to a file is supported by a process called serialization. You will see how to write your own documents to file using serialization and then reconstruct them from the file data in the examples we will develop.
The document class also includes the DECLARE_MESSAGE_MAP() macro in its definition to enable Windows messages to be handled by class member functions if necessary.
The view class in our SDI application is defined as:
class CTextEditorView : public CEditView
{
protected: // create from serialization only
      CTextEditorView();
      DECLARE_DYNCREATE(CTextEditorView)

// Attributes
public:
      CTextEditorDoc* GetDocument() const;

// Operations
public:

// Overrides
public:
      virtual BOOL PreCreateWindow(CREATESTRUCT& cs);
protected:
      virtual BOOL OnPreparePrinting(CPrintInfo* pInfo);
      virtual void OnBeginPrinting(CDC* pDC, CPrintInfo* pInfo);
      virtual void OnEndPrinting(CDC* pDC, CPrintInfo* pInfo);

// Implementation
public:
      virtual ~CTextEditorView();
#ifdef _DEBUG
      virtual void AssertValid() const;
      virtual void Dump(CDumpContext& dc) const;
#endif

protected:

// Generated message map functions
protected:
      afx_msg void OnFilePrintPreview();
afx_msg void OnRButtonUp(UINT nFlags, CPoint point);
afx_msg void OnContextMenu(CWnd* pWnd, CPoint point);
DECLARE_MESSAGE_MAP()
};
#ifndef _DEBUG // debug version in TextEditorView.cpp
inline CTextEditorDoc* CTextEditorView::GetDocument() const
{ return reinterpret_cast<CTextEditorDoc*>(m_pDocument); }
#endifAs you specified in the Application Wizard dialog box, the view class is derived from the class CEditView, which already includes basic text handling facilities. The GetDocument() function returns a pointer to the document object corresponding to the view, and you will be using this to access data in the document object when you add your own extensions to the view class.
To compile and link the program, click Build
There are two implementations of the CTextEditorView class member function GetDocument() in the code generated by Application Wizard. The one in the .cpp file for the CEditView class is used for the debug version of the program. You will normally use this during program development because it provides validation of the pointer value stored for the document. (This is stored in the inherited data member m_pDocument in the view class.) The version that applies to the release version of your program you can find after the class definition in the TextEditorView.h file. This version is declared as inline and it does not validate the document pointer. The GetDocument() function just provides a link to the document object. You can call any of the functions in the interface to the document class using the pointer to the document that the function returns.
By default, you have debug capability included in your program. As well as the special version of GetDocument(), there are lots of checks in the MFC code that are included in this case. If you want to change this, you can use the drop-down list box in the Build toolbar to choose the release configuration, which doesn't contain all the debug code.
The first time you compile and link a program, it will take some time. The second and subsequent times should be quite a bit faster because of a feature of Visual C++ 2010 called precompiled headers. During the initial compilation, the compiler saves the output from compiling header files in a special file with the extension .pch. On subsequent builds, this file is reused if the source in the headers has not changed, thus saving the compilation time for the headers.
You can determine whether or not precompiled headers are used and control how they are handled through the Properties tab. Right-click TextEditor and select Properties from the menu that is displayed. If you expand the C/C++ node in the dialog box displayed, you can select Precompiled Headers to set this property.
To execute the program, press Ctrl+F5. Because you chose CEditView as the base class for the CTextEditorView class, the program is a fully functioning, simple text editor. You can enter text in the window, as shown in Figure 14-12.
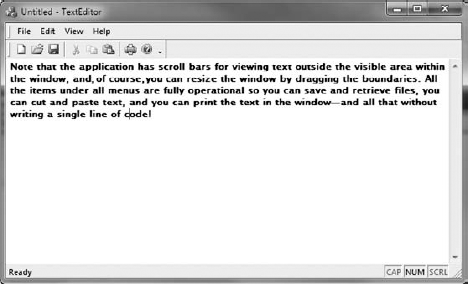
Note that the application has scroll bars for viewing text outside the visible area within the window, and, of course, you can resize the window by dragging the boundaries. All the items under all menus are fully operational so you can save and retrieve files, you can cut and paste text, and you can print the text in the window — and all that without writing a single line of code! As you move the cursor over the toolbar buttons or the menu options, prompts appear in the status bar describing the functions that are invoked, and if you let the cursor linger on a toolbar button, a tooltip is displayed showing its purpose. (You'll learn about tooltips in more detail in Chapter 15.)
As in the trivial MFC example you looked at in an earlier chapter, the application object is created at global scope in our SDI program. You can see this if you expand the Global Functions and Variables item in the Class View, and then double-click theApp. In the Editor window, you'll see this statement:
CTextEditorApp theApp;
This declares the object theApp as an instance of our application class CTextEditorApp. The statement is in the file TextEditor.cpp, which also contains member function declarations for the application class, and the definition of the CAboutDlg class.
After the object theApp has been created, the MFC-supplied WinMain() function is called. This, in turn, calls two member functions of the theApp object. First, it calls InitInstance(), which provides for any initialization of the application that is necessary, and then Run(), which provides initial handling for Windows messages. The WinMain() function does not appear explicitly in the project source code, because it is supplied by the MFC class library and is called automatically when the application starts.
You can access the code for the InitInstance() function by double-clicking its entry in the Class View after highlighting the CTextEditorApp class — or, if you're in a hurry, you can just look at the code immediately following the line defining the theApp object. There's a lot of code in the version created by the MFC Application Wizard, so I just want to remark on a couple of fragments in this function. The first is:
SetRegistryKey(_T("Local AppWizard-Generated Applications"));
LoadStdProfileSettings(4);  // Load standard INI file options (including MRU)
The string passed to the SetRegistryKey() function is used to define a registry key under which program information is stored. You can change this to whatever you want. If I changed the argument to "Horton," information about our program would be stored under the registry key:
HKEY_CURRENT_USERSoftwareHortonTextEditor
All the application settings are stored under this key, including the list of files most recently used by the program. The call to the function LoadStdProfileSettings() loads the application settings that were saved last time around. Of course, the first time you run the program, there aren't any.
A document template object is created dynamically within InitInstance() by the following statement:
pDocTemplate = new CSingleDocTemplate(
    IDR_MAINFRAME,
    RUNTIME_CLASS(CTextEditorDoc),
    RUNTIME_CLASS(CMainFrame),       // main SDI frame window
    RUNTIME_CLASS(CTextEditorView));
The first parameter to the CSingleDocTemplate constructor is a symbol, IDR_MAINFRAME, which defines the menu and toolbar to be used with the document type. The following three parameters define the document, main frame window, and View Class objects that are to be bound together within the document template. Because you have an SDI application here, there is only one of each in the program, managed through one document template object. RUNTIME_CLASS() is a macro that enables the type of a class object to be determined at run time.
There's a lot of other stuff here for setting up the application instance that you need not worry about. You can add any initialization of your own that you need for the application to the InitInstance() function.
The CTextEditorApp class inherits the Run() function from the application base class CWinApp. Because the function is declared as virtual, you can replace the base class version of the function Run() with one of your own, but this is not usually necessary so you don't need to worry about it.
Run() acquires all the messages from Windows destined for the application and ensures that each message is passed to the function in the program designated to service it, if one exists. Therefore, this function continues executing as long as the application is running. It terminates when you close the application.
Thus, you can boil the operation of the application down to four steps:
Creating an application object,
theApp.Executing
WinMain(), which is supplied by MFC.WinMain()callingInitInstance(), which creates the document template, the main frame window, the document, and the view.WinMain()callingRun(), which executes the main message loop to acquire and dispatch Windows messages.
Now let's create an MDI application using the MFC Application Wizard. Give it the project name Sketcher — and plan on keeping it. You will be expanding it into a sketching program during subsequent chapters. You should have no trouble with this procedure, because there are only a few things that you need to do differently from the process that you have just gone through for the SDI application. For the Application type group of options:
Leave the default option, Multiple documents, but opt out of Tabbed documents.
Select MFC standard as the project style and Windows Native/Default as the Visual style and colors option.
Keep the Use Unicode libraries option.
Under the Document Template Properties set of options in the Application Wizard dialog box:
Specify the file extension as ske. You'll see that you automatically get a filter for *.ske documents defined.
Change the Generated Classes set of options at their default settings so that the base class for the CSketcherView class is CView.
You can see in the dialog box with Generated Classes selected that you get an extra class for your application compared with the TextEditor example, as Figure 14-13 shows.
The extra class is CChildFrame, which is derived from the MFC class CMDIChildWndEx. This class provides a frame window for a view of the document that appears inside the application window created by a CMainFrame object. With an SDI application, there is a single document with a single view, so the view is displayed in the client area of the main frame window. In an MDI application, you can have multiple documents open, and each document can have multiple views. To accomplish this, each view of a document in the program has its own child frame window created by an object of the class CChildFrame. As you saw earlier, a view is displayed in what is actually a separate window, but one which exactly fills the client area of a frame window.
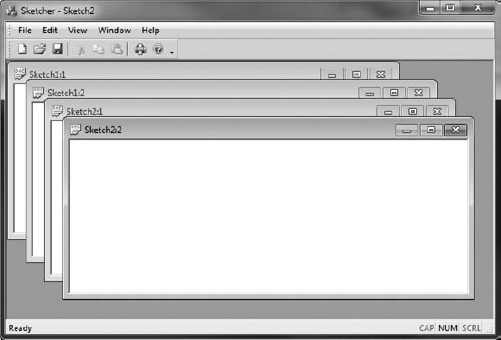
You can build the program in exactly the same way as the previous example. Then, if you execute it, you get the application window shown in Figure 14-14.
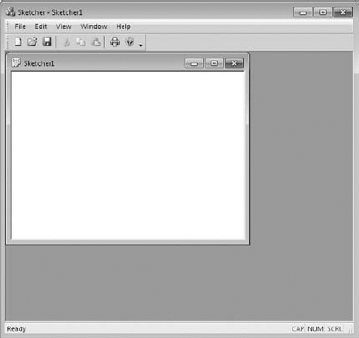
In addition to the main application window, you have a separate document window with the caption Sketch1. Sketch1 is the default name for the initial document, and it has the extension .ske if you save it. You can create additional views for the document by selecting the Window
You can't yet actually create any data in the application because we haven't added any code to do that, but all the code for creating documents and views has already been included by the Application Wizard.
In this chapter, you've been concerned mainly with the mechanics of using the MFC Application Wizard. You have seen the basic components of the MFC programs that the Application Wizard generates for both SDI and MDI applications. All our MFC examples are created by the MFC Application Wizard, so it's a good idea to keep the general structure and broad class relationships in mind. You probably won't feel too comfortable with the detail at this point, but don't worry about that now. You'll find that it becomes much clearer after you begin developing applications in the succeeding chapters.
WHAT YOU LEARNED IN THIS CHAPTER
TOPIC | CONCEPT |
|---|---|
The Application Wizard | The MFC Application Wizard generates a complete, working, framework Windows application for you to customize to your requirements. |
SDI and MDI programs | The Application Wizard can generate single-document interface (SDI) applications that work with a single document and a single view, or multiple-document interface (MDI) programs that can handle multiple documents with multiple views simultaneously. |
Classes in SDI programs | The four essential classes in an SDI application that are derived from the foundation classes are the application class, the frame window class, the document class, and the view class. |
The application object | A program can have only one application object. This is defined automatically by the Application Wizard at global scope. |
Document objects | A document class object stores application-specific data, and a view class object displays the contents of a document object. |
Document templates | A document template class object is used to tie together a document, a view, and a window. For an SDI application, a |