The Sun Microsystems Java Software Development Kit (Java SDK) is the most basic toolkit for Java development. In some ways, it remains the most flexible. Your understanding of Java development should include this very basic toolset, even if you move beyond it to more “hand-holding” Integrated Development Environments (IDEs). This chapter introduces all the major components of the Java 2 Standard Edition (J2SE)[1] development kit. The Enterprise Edition is discussed later. There is a third Java SDK (the Micro Edition) for embedded development which we will not cover in this book.
In this chapter you will learn about the purpose of the programs in the Sun Java Software Development Kit. We will provide you with some details of their options and demonstrate their use in compiling our two sample applications. The next step up in tool automation would be the build tool known as Ant (see Chapter 9 for more information).
These days, many programmers are what we affectionately call “tool junkies.” They can only develop software with the support of complex integrated development environments, their supporting classes, and screen painting tools. By this, we do not mean to imply that we are Luddites. The right IDE can indeed be an enormous boost to productivity, but a programmer should be able to work with any tool. The Sun Java SDK is the lowest common denominator; if you can be productive with it, then you can be productive with absolutely any Java development environment. That makes your skills more portable. And that means more jobs are open to you. And that is good for you and your employers.
The Sun Microsystems Java SDK (formerly known as, and often still referred to as the Sun Microsystems Java Development Kit, or JDK) provides you with all the tools you need to compile, document, run, package, debug, and deploy Java applications and applets. It does this with a collection of purely text-based command-line tools. This is no-frills software development. But a lot of us crusty old types really like that.
You should become comfortable and familiar with these tools. Some IDEs are just fancy window dressing that calls these tools underneath (some are not—some have written their own Java compilers, for example). If you can use these tools comfortably to build any kind of Java program, then you know you have a mastery of the basics and are not “addicted” to a particular tool. You also know the “hardest” way to get the job done. This will help you to make good choices about tools that enhance productivity. Some tools, we find, actually slow you down or get in your way in some cases. If you know the lowest level, you can better recognize the merits and flaws of more advanced tools. Enough justification. On to the SDK.
Note
By the way, you will notice that we do not cover the installation of the Development Kit in this chapter. That is because we are deferring the discussion of installation for the next chapter, where we also introduce the concept of multiple concurrent Development Kits on a single box. See Chapter 6 for details.
At the heart of the SDK is javac, the Java compiler. The general form of javac follows:
javac [option...] [sourcefile...] [@optfile...]
The option list may be zero or more command-line options. We’ll detail those later. The sourcefile list may be the name of zero or more Java source files. Usually you specify just the “main” class of an application. As we will describe later, javac generally will compile all necessary .java files for any classes that main() class references, directly or indirectly. If you prefix a filename with the at sign (@), the contents of the file will be treated as if they had been typed on the command line.
In the simplest case—compiling a single class, such as our FetchURL.java class—you get no diagnostics on success (Example 5.1).
There will now be a new file, FetchURL.class, in the directory with the Java source file. Let’s run that again with a command-line option we will detail later (Example 5.2).
Boy, our single, simple, one-class application sure uses a lot of classes! It does. Where did they come from? They come from the classes referenced by the application, either directly through composition or inheritance, or indirectly because the classes we used are themselves composed of or inherit from other classes. How did the Java compiler know where to find these classes? For this, it used what the Sun documentation calls a bootstrap classpath, which is set when the SDK is installed. A classpath is a list of directories and/or JAR files that are searched for classes. We seem to dimly recall that in early versions of Java, there was only one classpath, and if you changed it, you had to remember to put the Java runtime JAR file on it, or none of the standard APIs were available. This, no doubt, is why Sun created the concept of a bootstrap classpath. If you use any third party JAR files or you create your own, you must tell the compiler about it by creating your own classpath.
Example 5.2. Compiling FetchURL.java with the -verbose option
$ javac -verbose FetchURL.java
[parsing started FetchURL.java]
[parsing completed 479ms]
[loading /usr/java/j2sdk1.4.1_02/jre/lib/rt.jar(java/lang/Object.class)]
[loading /usr/java/j2sdk1.4.1_02/jre/lib/rt.jar(java/net/URL.class)]
[loading /usr/java/j2sdk1.4.1_02/jre/lib/rt.jar(java/lang/String.class)]
[checking FetchURL]
[loading /usr/java/j2sdk1.4.1_02/jre/lib/rt.jar(java/lang/Exception.class)]
[loading /usr/java/j2sdk1.4.1_02/jre/lib/rt.jar(java/lang/Throwable.class)]
[loading /usr/java/j2sdk1.4.1_02/jre/lib/rt.jar(java/io/BufferedReader.class)]
[loading /usr/java/j2sdk1.4.1_02/jre/lib/rt.jar(java/io/InputStreamReader.class)]
[loading /usr/java/j2sdk1.4.1_02/jre/lib/rt.jar(java/net/URLConnection.class)]
[loading /usr/java/j2sdk1.4.1_02/jre/lib/rt.jar(java/io/Reader.class)]
[loading /usr/java/j2sdk1.4.1_02/jre/lib/rt.jar(java/io/InputStream.class)]
[loading /usr/java/j2sdk1.4.1_02/jre/lib/rt.jar(java/lang/System.class)]
[loading /usr/java/j2sdk1.4.1_02/jre/lib/rt.jar(java/io/PrintStream.class)]
[loading /usr/java/j2sdk1.4.1_02/jre/lib/rt.jar(java/io/FilterOutputStream.class)]
[loading /usr/java/j2sdk1.4.1_02/jre/lib/rt.jar(java/io/OutputStream.class)]
[loading /usr/java/j2sdk1.4.1_02/jre/lib/rt.jar(java/lang/Error.class)]
[loading /usr/java/j2sdk1.4.1_02/jre/lib/rt.jar(java/net/MalformedURLException.class)]
[loading /usr/java/j2sdk1.4.1_02/jre/lib/rt.jar(java/io/IOException.class)]
[loading /usr/java/j2sdk1.4.1_02/jre/lib/rt.jar(java/lang/RuntimeException.class)]
[loading /usr/java/j2sdk1.4.1_02/jre/lib/rt.jar(java/lang/StringBuffer.class)]
[wrote FetchURL.class]
[total 3469ms]
$
There are two ways to provide a classpath to the Java compiler. One is through a command-line switch, which we will cover in a moment. The other is through an environment variable. The CLASSPATH environment variable lists directories and/or JAR or ZIP files that contain classes. Each directory or JAR file is separated from the others by a colon (“:”), as shown in Example 5.3.
Example 5.3. Setting the CLASSPATH environment variable
$ export CLASSPATH=/home/mschwarz/java/simpleApp:/var/java/lib/project.jar
$ echo $CLASSPATH
/home/mschwarz/java/simpleApp:/var/java/lib/project.jar
$
The classpath for the compiler consists of the bootstrap classpath plus the user-specified classpath. What does the classpath mean in terms of Java class names? Think of the classpath as a list of “package roots.” In other words, when you refer to a class like java.sql.DriverManager or net.multitool.SAMoney, the Java compiler is going to go to each entry in the combined bootstrap-and-user classpath and check there for java/sql/DriverManager.class or net/multitool/SAMoney.class. If it doesn’t find the .class file in a candidate directory, it will look for the .java file. If it finds the .java file, it will compile it and then use the resulting .class file. When it has a .class file for the class, it stops searching the classpath. In this way, compiling the single “main” class of an application will often compile the whole application (we will get to exceptions to that rule later).
The Java compiler has many command-line options that modify its behavior. We will go over the most important ones here. This is not a complete reference! See the Sun SDK Documentation for complete reference information.
-classpath
Sets the classpath. This overrides the CLASSPATH environment variable, if one is specified.
-d
This switch is followed by a directory name. Compiled classes are placed in that directory. Normally, compiled classes are placed in the same directory as the source code.
-deprecation
This causes every use or reference to a deprecated class or method to be displayed on compilation.[2]
-g
Put full debugging information in the compiled class files. See also -g: (the next entry in this list).
-g: keyword_list
This switch gives you fine-grained control over the amount of debug information included in compiled class files. The argument after the colon may be either none, in which case no debug information is included, or a comma-separated list with any combination of source, to include source file debugging information, lines, to include line number information, or vars, to include information about local variable names. The default, if no -g flag of any kind is specified, is to include source file and line number information only.
-nowarn
Disables warning messages.
-verbose
Causes the compiler to output information about each class encountered during compilation. This can be helpful when trying to resolve problems with missing class definitions.
There are also a number of switches that relate to cross-compiling as well as UNIX-specific options, but these are not commonly used. Refer to the Sun Java SDK Tools documentation if you need details on these options.
You can download and install just the software required to run Java applications without the development tools. This is known as the Java 2 Runtime Edition.
You run a Java program by invoking the java command. Usually, the argument to the command is a class name. That class is loaded, and its main() method is run.
Remember, this is not a filename, but a class name! The rest of the command-line arguments that follow the class name are passed as an array of Strings to the main() method of the named class. Example 5.4 demonstrates running the FetchURL program.
Example 5.4. Running a Java program with java
$ java FetchURL http://www.yahoo.com/news
http://www.yahoo.com/news:
<html>
<head><title>Yahoo! Directory News and Media</title>
<script type="text/javascript"
  src="http://us.js1.yimg.com/us.yimg.com/lib/common/yg_csstare.js">
</script>
<style>
  li { font-size: 12px; margin-bottom: 2px; }
</style>
<base href=http://dir.yahoo.com/News_and_Media/></head>
<body>
...
... etc.
Caution
Remember that if you override the classpath, either with the -classpath or -cp command-line options (detailed below) or with the CLASSPATH environment variable, you must include the “.” directory somewhere in the classpath if you want Java to include current working directory in the search list. Since “.” is the default classpath, many people are surprised when they set a classpath and suddenly can no longer run a .class file in their current directory.
The class invoked must be findable on either the bootstrap or user-specified classpath.
Just as the Java compiler, the runtime program, java, takes a number of command-line options. Here are the most commonly used ones:
-classpath or -cp
Sets the runtime classpath. Overrides any value in the CLASSPATH environment variable.
-Dproperty=value
Allows a system property to be set on the command line.
-jar
Specifies that the first nonoption command-line argument is not a Java class name, but the name of a JAR file. The JAR file must have a Main-Class: specification in its MANIFEST (see Section 5.11). The main() method of the class named by the JAR’s MANIFEST Main-Class: specification will be called as if that class had been named on the command line, rather than the JAR file. This is commonly used in shell scripts and batch files that accompany Java applications distributed in single .jar files.
There are several other command-line options that are less commonly used. We will cover some of them in later chapters when their use will make more sense. Of course, full documentation on all options for this command is in the Sun Java SDK Development Tools documentation.
One of Java’s most useful features is javadoc, a command that (by default) produces comprehensive HTML program documentation directly from the program source. Since it works from the source, it can be automated, and you may be certain that the documentation is up-to-date. It takes much of the documentation burden off of programmers and permits new programmers to join a project and rapidly come up to speed because there is comprehensive documentation in a standard format. The javadoc tool produces HTML documentation by default, but this is because it uses a doclet that produces HTML documentation. You can write your own doclet that produces whatever format you wish. Most find the HTML documentation so satisfactory that custom doclets are rare.
Javadoc can be a large topic, because it not only documents all classes, methods, and class variables, but can also use detailed text from specially formatted comments in the source code. We will cover Javadoc comments only briefly here, but you will see examples in our project code throughout this book.
The javadoc command has the following general form:
javadoc [options...] [package names...] [source filenames...]
 [@optfile...]
Options are covered in the next section. You can specify the classes to document in two ways. First, you can list one or more Java packages on the command line. Source code for the named packages is searched for on the source classpath (see Section 5.5.2). Wildcards are not permitted in package names.
Second, you may list as many Java source files as you like, and you may use wildcards in the names.
As with the javac compiler above, the @optfile allows you to name a text file whose lines are treated as arguments as if they had been typed on the command line.
Example 5.5 shows how to run javadoc on our small multiclass sample.
In this case, we were in the “base directory” of the package when we ran the command. In other words, net was a subdirectory of the current working directory when we ran Javadoc. Javadoc uses the same default classpaths and environment variables as javac does, so by default “.” is on the path.
Generally, specifying packages is the most convenient way to document a number of classes, since packages are how collections of classes are generally managed in Java development.
Figure 5.1 shows the main screen of the documentation thus produced.
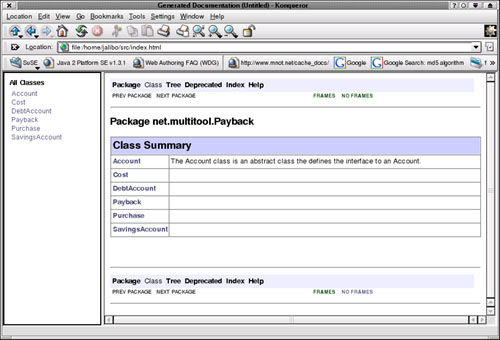
Example 5.5. Running javadoc with defaults against a package
$ javadoc net.multitool.Payback
Loading source files for package net.multitool.Payback...
Constructing Javadoc information...
Standard Doclet version 1.4.1

Generating constant-values.html...
Building tree for all the packages and classes...
Building index for all the packages and classes...
Generating overview-tree.html...
Generating index-all.html...
Generating deprecated-list.html...
Building index for all classes...
Generating allclasses-frame.html...
Generating allclasses-noframe.html...
Generating index.html...
Generating packages.html...
Generating net/multitool/Payback/package-frame.html...
Generating net/multitool/Payback/package-summary.html...
Generating net/multitool/Payback/package-tree.html...
Generating net/multitool/Payback/Account.html...
Generating net/multitool/Payback/Cost.html...
Generating net/multitool/Payback/DebtAccount.html...
Generating net/multitool/Payback/Payback.html...
Generating net/multitool/Payback/Purchase.html...
Generating net/multitool/Payback/SavingsAccount.html...
Generating package-list...
Generating help-doc.html...
Generating stylesheet.css...
$
As with other options documentation in this chapter, this is not intended to be a complete reference document. We are documenting only the most important command-line switches.
-public
Causes only public classes, members, and methods to be documented. You might want this for end-user documentation of a library.
-protected
Causes public and protected classes, members, and methods to be documented. This is the default documentation level. This is also the most likely level at which you would want to document code meant for distribution.
-package
We suspect you can see where this is going. This switch causes package, protected, and public classes, members, and methods to be documented.
-private
This switch causes all classes, members, and methods to be documented. In our experience, this is the setting you will want to use for internal projects. It documents everything.
-sourcepath and -classpath
These are the paths that will be searched for source classes or referenced classes. These switches work like the corresponding switches for the javac compiler.
-verbose and -quiet
These switches control how much output is produced as javadoc runs. If you choose -verbose, detailed information is produced (more than the default; in current versions, this option mostly shows time measurements of the parsing of each source file). If you choose the -quiet option, progress messages are suppressed completely.
-doclet starting_class
We’re not going to go into too much detail on this, but this switch allows you to name a doclet (a class that uses the Doclet API) to use in place of the default doclet. See the next paragraph for more information.
All of the switches documented so far are provided by the javadoc program itself. Javadoc, like the rest of the Sun Microsystems Java SDK, is written in Java. The authors of javadoc took advantage of this. The default behavior of javadoc is to produce HTML documentation with a standard look and feel. However, there exists an API, called the Doclet API, which allows you to write a Java class of your own to process the information parsed out of the source by javadoc. For details, see the Doclet Overview[3] on Sun’s Web site.
Sun provides a default doclet that produces HTML documentation. That doclet takes a number of command-line options as well. We’ll cover the most important of those now. Remember, these are provided by the standard doclet. If you use the -doclet switch, then these switches will not be available (unless, of course, the alternate doclet just happens to provide them).
-d directory
By default, the HTML documentation is saved in the same directory as the source. Use this switch to specify an alternate directory into which documentation is to be placed.
-use
Causes javadoc to generate a “Use” page for each class and package. Such a page is a cross-reference to all uses of the class or package.
-version
Causes any @version tag data to be included in the documentation. If you are using CVS for source control (and why wouldn’t you?) we recommend adding $Id$ after the version tag, which CVS will automatically replace by its ID string containing the filename, CVS revision number, date/time and the author of last check-in. (For more about CVS, see Chapter 8.)
-author
Causes any @author tag data to be included in the documentation.
-splitindex
Causes the alphabetical index to be broken into multiple pages, one per letter. Can be useful when you have a very large number of classes and/or packages documented in a single Javadoc document set.
-windowtitle title
Sets the title for the document set. The text that follows this switch will go into the HTML <title> element on documentation pages.
-nodeprecated
This causes all deprecated methods and classes to go undocumented. Normally they are documented, but marked as deprecated.
-nodeprecatedlist
Drops deprecated classes and methods from indexes, lists, and cross-references, but leaves the actual documentation in place.
There are actually many more switches. Some of the most important that we haven’t covered are the -link, -linkoffline, and related tags. If you end up producing many API packages and document them separately, you can use these switches to link your separate Javadoc documentation together seamlessly, so that when you use classes from separately documented packages, the references in the documentation for your code will be live links to that separate documentation. For details on these and other switches, see the Sun documentation on javadoc.[4]
There’s more to Javadoc than just documenting the types and names of classes, methods, and arguments. A developer can annotate or supplement the documentation by placing specially formatted comments in his or her code.
A Javadoc comment begins with the C-style open comment plus at least one more asterisk. It ends with a C-style close comment. In other words:
/* This is a C-style comment, but it
is _not_ a Javadoc comment. */

/** This is a C-style comment, but it
is also a Javadoc comment. */
This isn’t a part of the Java programming language. It is merely a lexical hack to allow the javadoc program to recognize a comment it should pick up and process. Javadoc is fairly intelligent about where to place the text extracted from a Javadoc comment. For example, a Javadoc comment placed just before the start of a class will appear in the class summary on the package page and at the top of the class detail page. A Javadoc comment placed just before a method will appear in the method’s box on the class detail page, and so on.
We encourage you to discover for yourself the relationship between Javadoc comments and the output of the standard doclet. Use it. Experiment. Or, you can go and read the official Sun Microsystems documentation on Javadoc.[5] That’s your choice.
Since comment text is extracted and placed into certain positions in an HTML document, you may use HTML tags in your comments to affect how they are rendered. Be aware that when you do so, you may get unexpected results if you use any custom doclets.
There’s more to it than that, however. There are a number of macros that you can place in Javadoc comments to mark data of particular significance. For example, @author should appear just before the name of the author of a particular piece of code.
These at-tags must appear after all descriptive text in a Javadoc comment.[6] A tag must be at the beginning of a line within the comment (ignoring any preceding whitespace or asterisks). The tag’s data is everything from the end of the tag to the end of the line (Example 5.6.)
Example 5.6. Sample Javadoc comment with at-tags
/**
 * addWait - adds in the given wait time to all the counters;
 * we could say much more about the method here, but let me say
 * that we sometimes include HTML tags directly in our comments.
 * Since Javadoc will run all our text together, we may need: <br>
 *         break tags <br>
 *         or paragraph tags <br>
 *         for spacing and separation.
 * <p>We also add <i>other</i> HTML tags for <b>emphasis</b>.
 * <p>You should still try to make the comment readable, though,
 * for the programmer who is editing the source, not
 * just for those looking at the formatted Javadoc.
 * @author John Q. Programmer
 * @version $Id$
 *
 * @param delay - elapsed time, in milliseconds
 * @throws TakesTooLongException
 * @returns total time, in milliseconds
 *
 * @see net.multitool.util.TakesTooLongException, net.multitool.ctrl.Time#count
 *
 */
public long
addWait(long delay)
{
  // ...
}
Here are the standard at-tags:
Everything from the tag to the end of the line is taken as the name of the code’s author.
Marks the method or class deprecated. This tag may be optionally followed by explanatory text. If present, this text should describe when and why the class or method was deprecated and what programmers should use instead.
Only valid in the comment for a method or constructor. This tag is followed by the name of an exception class (a descendant of java.lang.Exception) and optionally by additional explanatory text. The intent is to list the exceptions that the method throws.
Only valid in the comment for a method or constructor. This tag should be followed by the name of a parameter to the method followed by descriptive text. This is used to document method and constructor parameters.
Only valid in the comment for a method.[7] This tag is followed by descriptive text meant to document the return value of the method.
Populates a “See Also” section in the documentation that will provide hyperlinks to related content. There is a general format for linking to any URL, but the most common use is to refer to other elements in the same Java program. See below for the general format of such links.
In addition to these standard at-tags, there are other at-tags that may be embedded in any comment text—either the comment itself or in text that is an argument to a standard at-tag.
Such tags are placed within curly braces, for example {@example}, within a Javadoc comment. The one we use the most is the @link tag, which allows you to make a reference to another package, class, method, or class member. The general format is the same as that for the @see tag:
package_name.class_name#member_or_method_name
Any of these elements is optional.
The embedded at-tags include:
This tag may be used when embedding HTML anchor or image tags (A or IMG tags) in a Javadoc comment to supply the root part of the documentation path. You should always use this instead of hard-coding the full URL, or a change in directory structure or server configuration might break all of your links.
Allows you to embed a cross-reference to another section of the program’s documentation directly in comment text. The format of a reference is the same as that for the @see tag.
This list is not complete. As always, see the official documentation[8] for details.
While this book does not cover writing applets, we should mention that, since an applet does not (generally) have a main() method, you need something else to launch it outside of a browser. Enter appletviewer. This program provides an execution environment for applets.
Now we come to the deeper darker mysteries. Let us take a look at javah. No, javah is not a Hebrew word. It is not some lost mystical text from the days before science supplanted magic. It is the Java C header and stub file generator.
If you are not already fairly experienced in writing, compiling, and building shared libraries in C on a Linux system, we would suggest that you skip this section, at least until you have developed intermediate skills in these areas. Otherwise, feel free to proceed.
We’re going to walk you very quickly through building a Java native method here.[9] Don’t worry if you don’t quite follow it all. We will cover this topic at greater length elsewhere in the book. For now, we’re giving you the highlights. Also be sure to check out Section 5.15. We’ll point you to many additional resources on JNI (Java Native Interface) in that section.
Sounds pretty intimidating, huh? Well, depending upon your background and experience, it can be a bit intimidating. As much as this will hurt some diehard Java purists, Java is not the right language for everything. Java’s size and semiinterpreted nature in particular make Java ill-suited for the “close to the metal” tasks, such as device drivers and raw socket networking.
Fortunately, Java’s designers were of this rocket-scientist breed (and so, for that matter, are your bending authors), so they gave Java programmers a back door: native methods. A native method is a class method whose name, arguments, and return type are declared in Java, but whose underlying implementation is written in “native code” (usually C, but it could be any compiled language that can match C’s stack frame conventions).
As an example, let’s implement a native method that will use the native Linux C library calls to get the current program’s effective user ID and the name associated with that user.
First, we will write the Java class (Example 5.7).
You may never have seen code like that at the start of a class definition. The block declared
static { ... }
is called a static initializer and we’ll discuss it in a moment.
Example 5.7. Java application with a native method (GetUser.java)
public class GetUser {
  static {
    System.loadLibrary("getuser");
  }

  public native String getUserName();

  public static void main(String[] args)
  {

    GetUser usr = new GetUser();

    System.out.println(usr.getUserName());
  }
}
Once you have the Java code, compile it with javac. You now have the compiled class. The next step is to use the javah tool to build the header file for your C code.
$ javah GetUser
Example 5.8 shows the header file thus produced.
Note that you run javah on the class file, not on the source file. The normal class name to classpath mappings apply. The file produced as a result is called, in this case, GetUser.h. The next step is to write the C code that implements the method (Example 5.9).
There’s a lot going on here. First, the constant, L_cuserid, is defined in stdio.h; it represents the number of characters required to hold a user name. We’re defining a char array to hold that number of characters plus one.[10] We are then calling the cuserid() function (see the manpage of cuserid(3)) to get the user name of the effective user ID of the process.
That much is familiar C. But what is the argument list? Our method took no arguments. And what’s with the functions being called through the pointer argument?
Example 5.8. Header file for GetUser native methods (GetUser.h)
/* DO NOT EDIT THIS FILE - it is machine generated */
#include <jni.h>
/* Header for class GetUser */

#ifndef _Included_GetUser
#define _Included_GetUser
#ifdef __cplusplus
extern "C" {
#endif
/*
 * Class:     GetUser
 * Method:    getUserName
 * Signature: ()Ljava/lang/String;
 */
JNIEXPORT jstring JNICALL Java_GetUser_getUserName
  (JNIEnv *, jobject);

#ifdef __cplusplus
}
#endif
#endif
Example 5.9. Native method’s C implementation file (GetUser.c)
#include "GetUser.h"
#include <stdio.h>

JNIEXPORT jstring JNICALL
Java_GetUser_getUserName(JNIEnv *jenv, jobject obj)
{
  char buffer[L_cuserid + 1];

  cuserid(buffer);

  return (*jenv)->NewStringUTF(jenv, buffer);
}
All of the Java class member data and Java class methods may be reached through the JNIEnv pointer argument. There are also methods provided by JNI itself. One of those is NewStringUTF(). Remember that Java Strings are Unicode, not 8-bit ASCII, so you must convert to and from Unicode (UTF-8 is an 8-bit encoding for Unicode that coincides with ASCII in the low 7 bits, so it is often used for such conversions). You can think of the JNIEnv as a C++ class pointer, or you can think of it as a structure of data and function pointers (that’s really what a C++ class is, after all). The bottom line is, it provides the means to access and manipulate the Java environment from your native code.
The second argument, jobject, is the “this” pointer. It points to the GetUser class, and it is upcast to the JNI equivalent of the Java Object type. If our method took parameters, they would follow these two constant arguments.
JNI is a huge topic. You can read more about it in the Sun Microsystems JNI Tutorial,[11] or in Java 2 SDK JNI FAQ,[12] or in the JNI 1.1 Specification,[13] or in the associated JDK 1.2 Update[14] or the JDK 1.4 Update.[15]
Even with all of this “We’re too busy to explain things to you” going on here, we’ve got a lot more to cover before we are done. The next step in our little demo is to compile the C program and create a shared library of the code.
$ cc -c GetUser.c
$ cc -shared -o libgetuser.so GetUser.o
$ export LD_LIBRARY_PATH=.
The first line compiles the native method to a .o (object) file. The second command makes a shared library out of it. Now, refer back to the static initializer in Example 5.7. A static initializer is run before everything else in a class, even before main(). In this case, it uses the loadLibrary() method of the System class to load the shared library we just created. Note that library naming rules of the target OS are applied. The library is named getuser and on a Linux system it is assumed that that library will be in a file named libgetuser.so.
The last line sets an environment variable, LD_LIBRARY_PATH, to provide a path where Java will search for libraries. This is behavior inherited from Solaris. Linux uses ldconfig to maintain a list of shared libraries. Usually, a library is placed in a directory named in the file ld.so.conf and a memory cache of these libraries is built and maintained with the ldconfig program. The library loader in the JVM, however, works as the shared library system in Solaris, where the LD_LIBRARY_PATH is searched for shared libraries. If you try a JNI method and get library errors, check your LD_LIBRARY_PATH first. Here, we used “.”, meaning “current directory.” In practice, you wouldn’t do this. You would deploy your shared library to a standard location and have LD_LIBRARY_PATH preset to that directory or directories. We just wanted to show you how it works here.
Let’s see our class in action now.
$ java GetUser
mschwarz
$ su
Password:
# export LD_LIBRARY_PATH=.
# java GetUser
root
# exit
exit
$
Here you see the class being run, and, sure enough, it displays our username. We then run su to become root and (after setting that library path) run it again—and, sure enough, it tells us we are “root.”
We’ll talk more about JNI later in the book, but now you know enough to be dangerous.
Remote Method Invocation (RMI) is a system for distributing application code over multiple hosts. It is a small part of multitier computing. Much of this book will be devoted to the how’s and why’s of multitier client/server computing. Here we are concerned only with the SDK tool rmic, the RMI compiler.
Remote Method Invocation is a basic client-server model for invoking Java methods over a network.
One of the most common problems in computing is how best to make an application available to the largest number of users at the least cost. To this end we have seen the development of “timeshare” systems with dumb terminals all over the place. We have seen the evolution of distributed GUI systems with X Windows and its network display system, and with tools like VNC (Virtual Network Console).[16] We have seen the emergence of the PC, providing autonomous computing at each worker’s desktop. And finally we have seen the desktop turning slowly back into a terminal (albeit a prettier one) with the emergence of client-server computing.
What seems to have emerged from this progression is two major kinds of software systems. One is the PC and associated hardware and software. Developments here have dramatically increased the power and productivity of individual work. The PC revolution was indeed a real change throughout the world of business and technology. But even with this, there are a host of applications and business functions that require a collection of data and resources to be available to multiple workers at the same time. This is the second major kind of software systems. This second kind used to be the only kind, but now it may, in a sense, be the minority of applications, but the most critical to an operation. This second class of system has come to be called enterprise systems.
In enterprise computing, we have the same problem we opened with: How do you make the information and resources available to everyone who needs them at the lowest cost? And the answer is (as it always is) “that depends.”
These days, one of the most common solutions is to use a Web server to publish an application. This works well for a great many applications and it is much easier to do than many other methods. That explains its popularity. The Web interface is quite limited, however, so for more user interface intensive applications, client-server computing evolved. To us techies, all of this stuff is client-server. In this context however, client-server refers to a 2-tier system where the UI and logic exist in a GUI application on a PC and common resources are in an SQL database all the clients share.
This is also commonly used, but becomes expensive in a couple of cases. The first is when the database itself becomes a bottleneck because the number of users grows and grows but only one database can exist. The second is simply the cost of maintenance. Since the logic exists in the client, any change to the logic requires updating the software on all clients. Even when a scheme for automating this exists, it is still time-consuming and costly to get all the changes out to all users simultaneously. There are workarounds for both of these issues, but here we are concerned with a different solution altogether.
So, how can we have a UI richer than with a Web application but avoid the pitfalls of the traditional 2-tier client-server computing? The answer is to separate the UI from the business logic and the business logic from the underlying data store. This results in 3 tiers—presentation, business logic, and data.
Much of this book will concern itself with 3-tier computing solutions. Java has four major architectures for building 3-tier solutions. One of them is RMI.[17]
RMI works by sharing an interface between the client and the server. The interface groups together the methods that a client may call on a server. A class is written on the server side that implements the interface, and a special compiler is used to generate stubs for the server side and the client side. On the client side, a call to an RMI method looks like any other method call, but it is sent across the network to the server, where the actual instructions are carried out. Any return value is then passed back over the network to the client.
We will walk you through a very simple (and very pointless) example just to show you the tools.
Our interface is pathetically simple. It is a class that sums two integer arguments and returns an integer result. Example 5.10 shows the interface file.
Note
The names of the classes in the following examples may seem a bit strange, and they are. It is because we aim to build on this example later.
Example 5.10. The Session interface
package net.multitool.RMIDemo;

import java.rmi.*;

public interface Session extends Remote {
  public int add(int x, int y) throws RemoteException;
}
The two important things to note here are that the interface must extend java.rmi.Remote and that any remote method must be defined as throwing java.rmi.RemoteException. If anything goes wrong during an RMI call, like someone tripping over a network cable, the call will not complete successfully and an exception of that type will be thrown. It is not possible to have a RMI method that cannot throw this exception.
Beyond those features, you can see that defining remote methods is quite familiar and easy.
An interface is an “empty vessel.” Before any interface can be used, you must have an actual class that implements the interface. In an RMI application, the implementing class is the server (Example 5.11).
The class is named SessionImpl to emphasize its relationship with the Session interface. There is no requirement to match up such names. Likewise, the RMI name given, //penfold/Session, uses the interface name, but it could use any name. It is a good idea to develop a naming convention for RMI interfaces and their implementations. It is critical to develop naming conventions for RMI registry names, particularly in production environments. Without a naming convention, it is difficult to avoid confusion and even chaos. What happens when multiple business units develop RMI code destined for a single production server, and they have all made an RMI interface named Session, or Payment?[18] Bad things happen.
There is no “one size fits all” naming convention that we can offer. Possibilities include using package names in RMI registry names, using some element of the business area as a component of the name (such as AccountingSession, ShippingSession, ExecutiveSession). All that matters is that an unambiguous standard be created and followed.
Let’s spend some time talking about what this code does.
First, notice that the class extends UnicastRemoteObject. This is not necessary, but using that as a base class saves a lot of server setup. There are times when you would want to do such setup manually, but for our purpose here it saves a lot of effort. The class also implements our remote interface.
The first method is a constructor that calls the superclass constructor. At first glance, this is pointless. Any Java class gets a default constructor that just calls the superclass constructor, so why is this here? It is here because the superclass constructor throws RemoteException. If we didn’t define a constructor like the one here specifying that it throws RemoteException, the compiler would complain that there is an unhandled exception. So we define a constructor identical to a default constructor except that it specifies that it can throw the exception.
Example 5.11. The Session server implementation
package net.multitool.RMIDemo;

import net.multitool.RMIDemo.*;
import java.rmi.*;
import java.rmi.server.*;

/** SessionImpl is the server class for the Session RMI interface.
 */
public class
SessionImpl
  extends UnicastRemoteObject
  implements Session
{
  /** Constructor needed to ensure call to UnicastRemoteObject
   * constructor and to thus propagate the possible exception.
   */
 public SessionImpl() throws RemoteException {
   super();
 }

 /** A static main() for the server. */
 public static void main(String[] arglist)
 {
   if (System.getSecurityManager() == null) {
     System.setSecurityManager(new RMISecurityManager());
   }

   String rmiName = "//penfold/Session";
   try {
     Session adder = new SessionImpl();
     Naming.rebind(rmiName, adder);
   } catch (Exception e) {
     e.printStackTrace();
   }
 }

 /** Implementation of the RMI method, add. */
 public int add(int x, int y) throws java.rmi.RemoteException
 {
   return x+y;
 }
}
Next, we have the server main() method. It first sets a security manager. The security manager controls what the VM is allowed to do. A number of default security managers are provided, and here we use one that is designed specifically to give safe and reasonable defaults for RMI applications. You can, of course, write your own security manager. Security managers use “policy specifications” to alter their capabilities. For now, we will explain enough to run a simple example. See Section 5.8.4.2 for more information on policies for our example.
Remember that main() is static, so there is no instance of SessionImpl yet, and thus also no instance of Session. We declare a variable of type Session, and set it to a new instance of SessionImpl. (There is no need to typecast here because SessionImpl implements Session, therefore SessionImpl is, among other things, a Session.) We now have an instance of the server class.
Next, the server must make itself available to the world. It does this by registering itself with the RMI registry (see Section 5.8.3). This is done through a static method of the java.rmi.Naming class, rebind(). Put simply, this maps a remote object to a string name in the registry. When clients contact the registry looking for a name then, if a remote object is mapped to that name, the communication can take place (yes, we are simplifying at the moment). The call to rebind() does not return. The server is up and running.
Finally, we have the implementation of our remote method, add().
This looks like a lot of hassle to go through, and it is, but consider writing an interface that offers, for example, methods like getDirContents(), chDir(), downloadFile(), uploadFile(). You’ve just written something like an FTP server. No matter how many methods you add to your interface, the complexity of the setup code does not increase. Maybe now it looks a little more useful?
At this point, Example 5.12 should be fairly obvious. Our class has just a single static method, main(). It, like our server side main(), sets up a security manager. It then contacts a registry on the machine named penfold looking for an instance of a remote interface named Session (again, lookup() is a static method of the java.rmi.Naming class). We store that reference in a variable of type Session called sess. We can then call the add() on sess. We’ll show the server and client running shortly.
Example 5.12. The RMI client program
package net.multitool.RMIDemo;

import java.rmi.*;

public class Client {
  public static void main(String[] arglist) {
    if (System.getSecurityManager() == null) {
      System.setSecurityManager(new RMISecurityManager());
    }

    try {
      String name = "//penfold/Session";
      // Obtain reference to the remote object
      Session sess = (Session) Naming.lookup(name);

      System.out.println("Pointless RMI Client. 47 + 13 = " +
                            sess.add(47,13) + ", right?");
    } catch (Exception e) {
      e.printStackTrace();
    }
  }
}
In order for a remote object to make itself available and in order for a client to be able to call such an object, each method needs a client and server-side stub to proxy the method call. Arguments to the method call are converted to streamable data (this process is called marshaling) by the client stub, and that data is sent over the network to the server stub, which must convert that stream into object instances on the server side (this is called unmarshaling). The server-side stub then calls the actual method implementation. When the method returns, any return values and changes to the state of the arguments must be marshaled by the server stub and sent back to the client stub where they are unmarshaled and stored in the correct locations on the client.
This was the traditionally painful part of writing multitier clients. What rmic does is automate the generation of these stubs, so writing a remote method is only slightly more difficult than writing any other method.
To generate RMI stubs for our application, run rmic[19] against the class that implements the remote interface:
penfold$ rmic net.multitool.RMIDemo.SessionImpl
When you are writing “traditional” Java RMI, that is just about all you need to know about rmic. The program actually has a large number of options and switches, but most of these are to support alternate protocols and systems, such as CORBA IDL and IIOP. If you know what these are, and make use of these, you will find details on these options in Sun’s rmic tool documentation.[20]
The rmiregistry is a naming service that binds RMI server stubs to simple names. Invoking it is incredibly simple. Just type rmiregistry. You may want to run it on other than the default port (1099). For that, just specify the port number on the command line:
$ rmiregistry 21099 &
That example shows us running a registry on port 21099 and running it in the background. You might want to use a nonstandard port in order to run a test version of the service while the production version remains available on the standard port.
That is just about all there is to rmiregistry. You can find details in the Sun Java SDK documentation.
So far, we have written an RMI interface, a server implementation, and a client implementation. We have generated RMI stubs for our RMI object. We are almost ready to fire our system up and give it a try. But first, we’ll give you some information about our sample environment and talk very briefly about security.[21]
RMI servers and clients need to be able to listen for connections on network ports, and they need to be able to initiate connections on network ports. Back in the Java 1.1 days, there were no limits on what RMI methods could do. The CLASSPATH was assumed to be trusted. With the RMI 1.2 protocol specification, the ability to actually pass bytecodes between VMs over RMI was added. That means that it is possible for clients to pass code to servers. Obviously, this opens a lot of possible security risks. For this reason, RMI got a security management layer. It is the same security manager as the one that applets use. It also provides a default security manager class that has virtually all such capabilities safely turned off. We need to turn on some of these capabilities in order to make our sample work.
The RMI system expects Java classes to be made available through one of two paths.
The
CLASSPATH, either the environment variable or on the command line.Through a property that points at URL. This URL may be a
file:URL, or anhttp:URL.
We are going to do the simplest case for now. We will have our compiled code installed on both our server system and our client system. The classes will all be referenced relative to the default classpath (in other words, relative to “.”, the current directory).
This is not the typical case. The most common case will be for the classes to be available in a JAR file via a Web server, and for the java.rmi.server.codebase property to be set to point to the JAR file via an http: URL.
We have two machines. One, penfold, is our server machine. The other, grovel, is our client machine. To keep things straight in our samples, the shell prompts will have the host names in them.
If you are using a JDK that supports the 1.2 RMI specification (and we hope you are—it’s in all current JDKs), you have to give your server and your client permission to access the network ports needed to run. By default, the Java runtime will look for a security policy file in the home directory of the user running the VM. The default name of the file is .java.policy. Example 5.13 shows what we suggest you put in this file, at least to run this example.
Our packages here follow Sun’s suggested naming convention of your domain name, reversed, followed by your package names. It so happens that Mr. Schwarz’s domain is called multitool.net (named after his first book, Multitool Linux), so we put all of these classes in a package called net.multitool.RMIDemo.
For all of the examples in this section, as well as the following section on building and running the client, assume that our current working directory is the directory that contains the net directory of our source code.
The output you see in Example 5.14 includes the result of running our client once. Note that the SessionImpl class doesn’t terminate. It keeps running to service clients indefinitely.
Example 5.15 shows the actual steps we ran to build and run the client.
Example 5.15. Compiling and running our client on grovel
grovel$ javac net/multitool/RMIDemo/Client.java
grovel$ javac net/multitool/RMIDemo/SessionImpl.java
grovel$ /usr/java/jdk/bin/rmic net.multitool.RMIDemo.SessionImpl
grovel$ java net.multitool.RMIDemo.Client
Pointless RMI Client.  47+13=60, right?
grovel$
Note
We compile the server class, SessionImpl, on the client side and run rmic against it just to produce the stubs the client requires. You could copy the stub classes from the server machine, or you could put them in a JAR file, put that file on a Web server, and have the java.rmi.server.codebase property point to that JAR file. We’re taking the simple way here, but in a real implementation, you would not do it this way. We’ll cover more realistic cases later.
RMI greatly simplifies the business of writing multitier client-server applications. It is suitable for many classes of distributed computing problems, but it does lack several features that required in large, mission-critical applications. For one thing, it lacks any sort of transaction support. If a method invocation fails, the client may not know for certain whether the server finished some work, like writing to a database, before the failure. Also, the rmiregistry program is a very simplistic naming/lookup system. Clients must know where to find the registry with the resources they need.
RMI is very useful for problems of a certain scale, but it is not, in and of itself, sufficient for high-volume, highly available, mission-critical enterprise systems.[22] But that is what J2EE and EJB are for. We’ll deal with those in Part V later in the book.
How can you stand using the SDK? It doesn’t even have a debugger!
Wrong. It has a debugger. It just has an extremely basic command-line debugger. Example 5.16 shows the output of its help.
Again, we are not going to document everything here. That’s what the online Sun Microsystems Java SDK documentation is for. Instead, we will use the debugger to step through the execution of our simple application and show you some of the debugger’s basic operations.
There are two ways to invoke jdb. One is to attach it to an already running JVM that has been started with remote debugging enabled. See the Java SDK documentation for details on that method. Here we’ll show you the simpler case of invoking the program locally by running the application directly under the debugger.
The basic invocation is:
$ jdb
You may optionally name the class whose main() is to be executed under the debugger, but we usually use the run from inside the debugger itself to do this. Remember that if you want to be able to view local variables in the debugger, you must have compiled your class or classes with the -g option of javac.
In the rest of this section, we will examine an actual debug session. We will run our single-class application, FetchURL, and use it to retrieve the index.html file from the Web server on the laptop on which this chapter is being written. To refresh your memory, remember that the source code for FetchURL is at Example 3.30. Example 5.17 is what that file looks like.
Example 5.16. The Java debugger help command output
$ jdb GetUser
Initializing jdb ...
> help
** command list **
run [class [args]]        -- start execution of application's main class

threads [threadgroup]     -- list threads
thread <thread id>        -- set default thread
suspend [thread id(s)]    -- suspend threads (default: all)
resume [thread id(s)]     -- resume threads (default: all)
where [thread id] | all   -- dump a thread's stack
wherei [thread id] | all  -- dump a thread's stack, with pc info
up [n frames]             -- move up a thread's stack
down [n frames]           -- move down a thread's stack
kill <thread> <expr>      -- kill a thread with the given exception object
interrupt <thread>        -- interrupt a thread

print <expr>              -- print value of expression
dump <expr>               -- print all object information
eval <expr>               -- evaluate expression (same as print)
set <lvalue> = <expr>     -- assign new value to field/variable/array element
locals                    -- print all local variables in current stack frame

classes                   -- list currently known classes
class <class id>          -- show details of named class
methods <class id>        -- list a class's methods
fields <class id>         -- list a class's fields

threadgroups              -- list threadgroups
threadgroup <name>        -- set current threadgroup

stop in <class id>.<method>[(argument_type,...)]
                          -- set a breakpoint in a method
stop at <class id>:<line> -- set a breakpoint at a line
clear <class id>.<method>[(argument_type,...)]
                          -- clear a breakpoint in a method
clear <class id>:<line>   -- clear a breakpoint at a line
clear                     -- list breakpoints
catch [uncaught|caught|all] <exception-class id>
                          -- break when specified exception occurs
ignore [uncaught|caught|all] <exception-class id>
                          -- cancel 'catch' for the specified exception
watch [access|all] <class id>.<field name>
                          -- watch access/modifications to a field
unwatch [access|all] <class id>.<field name>
                          -- discontinue watching access/modifications to a field
trace methods [thread]    -- trace method entry and exit
untrace methods [thread]  -- stop tracing method entry and exit
step                      -- execute current line
step up                   -- execute until the current method returns to its caller
stepi                     -- execute current instruction
next                      -- step one line (step OVER calls)
cont                      -- continue execution from breakpoint

list [line number|method] -- print source code
use (or sourcepath) [source file path]
                          -- display or change the source path
exclude [class id ... | "none"]
                          -- do not report step or method events for specified classes
classpath                 -- print classpath info from target VM

monitor <command>         -- execute command each time the program stops
monitor                   -- list monitors
unmonitor <monitor#>      -- delete a monitor
read <filename>           -- read and execute a command file

lock <expr>               -- print lock info for an object
threadlocks [thread id]   -- print lock info for a thread

pop                       -- pop the stack through and including the current frame
reenter                   -- same as pop, but current frame is reentered
redefine <class id> <class filename>
                          -- redefine the code for a class

disablegc <expr>          -- prevent garbage collection of an object
enablegc <expr>           -- permit garbage collection of an object

!!                        -- repeat last command
<n> <command>             -- repeat command n times
help (or ?)               -- list commands
version                   -- print version information
exit (or quit)            -- exit debugger

<class id> or <exception-class id>: full class name with package
qualifiers or a pattern with a leading or trailing wildcard ('*')
NOTE: any wildcard pattern will be replaced by at most one full class
name matching the pattern.
<thread id>: thread number as reported in the 'threads' command
<expr>: a Java(tm) Programming Language expression.
Most common syntax is supported.

Startup commands can be placed in either "jdb.ini" or ".jdbrc"
in user.home or user.dir
>
Example 5.17. index.html used in jdb session
<HTML>
  <HEAD>
    <TITLE>RedHat Linux Laptop</TITLE>
  </HEAD>
  <BODY>
    <H1>RedHat Linux Laptop</H1>
    <P>You have contacted Michael Schwarz's RedHat Linux Laptop.
    You would probably rather
    <A HREF="http://www.multitool.net/">see his permanent Web
    page</A> since this server goes up and down all the time, what
    with it being on a laptop.</P>
  </BODY>
</HTML>
Example 5.18 is an actual transcript of a real jdb session. It is annotated with explanatory comments. Our goal here is to get you going. The best way to learn jdb, or indeed any of these tools, is to use them.
Obviously, this little session has merely scratched the surface of the Java debugger. You can debug multithreaded applications with commands that can suspend and resume individual threads, list the running threads, switch your “executable view” between threads, and so forth. You can trace method calls. You can monitor variables. You can execute expressions (including assignment expressions, allowing you to force variables to certain values). You can browse classes. You can dump all local variables with a single command. The debugger is quite capable, if a bit limited in user interface.[23] Learn it. Play with it. Step through your favorite Java program with it.
Example 5.18. An actual jdb session, with commentary
$ jdb
Initializing jdb ...
> stop in FetchURL.main (1)
Deferring breakpoint FetchURL.main.
It will be set after the class is loaded.
> run FetchURL http://localhost
run FetchURL http://localhost
Set uncaught java.lang.Throwable
Set deferred uncaught java.lang.Throwable
>
VM Started: Set deferred breakpoint FetchURL.main

Breakpoint hit: "thread=main", FetchURL.main(), line=48 bci=0
48          for (i = 0; i < args.length; i++)

main[1] list
44       {
45          int i;
46          FetchURL f;
47
48 => (2)    for (i = 0; i < args.length; i++)
49          {
50             System.out.println(args[i] + ":");
51             System.out.println(new FetchURL(args[i]));
52          }
53       }
main[1] step
>
Step completed: "thread=main", FetchURL.main(), line=50 bci=5
50             System.out.println(args[i] + ":");

main[1] step
> http://localhost:

Step completed: "thread=main", FetchURL.main(), line=51 bci=32
51             System.out.println(new FetchURL(args[i]));

main[1] step
>
Step completed: "thread=main", FetchURL.<init>(), line=8 bci=0
8       {

main[1] list
4    public class FetchURL {
5       private URL requestedURL;
6
7       public FetchURL(String urlName)
8 =>    {
9          try {
10             requestedURL = new URL(urlName);
11          } catch (Exception e) {
12             e.printStackTrace();
13          }
main[1] step
>
Step completed: "thread=main", FetchURL.<init>(), line=10 bci=4
10             requestedURL = new URL(urlName);

main[1] step (3)
>
Step completed: "thread=main", FetchURL.<init>(), line=11 bci=16
11          } catch (Exception e) {

main[1] step
>
Step completed: "thread=main", FetchURL.<init>(), line=14 bci=27
14       }

main[1] step
>
Step completed: "thread=main", FetchURL.main(), line=51 bci=45
51             System.out.println(new FetchURL(args[i]));

main[1] step
>
Step completed: "thread=main", FetchURL.toString(), line=19 bci=2
19          String rc = "";

main[1] list
15
16
17       public String toString()
18       {
19 =>       String rc = "";
20          String line;
21          BufferedReader rdr;
22
23          try {
24             rdr = new BufferedReader(
main[1] step
>
Step completed: "thread=main", FetchURL.toString(), line=24 bci=3
24             rdr = new BufferedReader(
main[1] step
>
Step completed: "thread=main", FetchURL.toString(), line=30 bci=28
30             while ((line = rdr.readLine()) != null)

main[1] step
>
Step completed: "thread=main", FetchURL.toString(), line=32 bci=31
32                rc = rc + line + "
";

main[1] list
28             );
29
30             while ((line = rdr.readLine()) != null)
31             {
32 =>             rc = rc + line + "
";
33             }
34          } catch (Exception e) {
35             e.printStackTrace();
36             rc = null;
37          }
main[1] step
>
Step completed: "thread=main", FetchURL.toString(), line=30 bci=55
30             while ((line = rdr.readLine()) != null)

main[1] step
>
Step completed: "thread=main", FetchURL.toString(), line=32 bci=31
32                rc = rc + line + "
";

main[1] step
>
Step completed: "thread=main", FetchURL.toString(), line=30 bci=55
30             while ((line = rdr.readLine()) != null)

main[1] step
>
Step completed: "thread=main", FetchURL.toString(), line=32 bci=31
32                rc = rc + line + "
";

main[1] dump this (4)
 this = {
    requestedURL: instance of java.net.URL(id=378)
}
main[1] dump rc   (5)
  rc = "<HTML>
          <HEAD>
"
main[1] list 36
32                rc = rc + line + "
";
33             }
34          } catch (Exception e) {
35             e.printStackTrace();
36 =>          rc = null;
37          }
38
39          return rc;
40       }
41
main[1] stop at FetchURL:39     (6)
Set breakpoint FetchURL:39
main[1] cont
>
Breakpoint hit: "thread=main", FetchURL.toString(), line=39 bci=79
39          return rc;

main[1] dump rc
  rc = "<HTML>
          <HEAD>
            <TITLE>RedHat Linux Laptop</TITLE>
          </HEAD>
          <BODY>
            <H1>RedHat Linux Laptop</H1>
            <P>You have contacted Michael Schwarz's RedHat Linux Laptop.
            You would probably rather
            <A HREF="http://www.multitool.net/">see his permanent Web
            page</A> since this server goes up and down all the time, what
            with it being on a laptop.</P>
          </BODY>
        </HTML>
"
main[1] step
> <HTML>
       <HEAD>
         <TITLE>RedHat Linux Laptop</TITLE>
       </HEAD>
       <BODY>
         <H1>RedHat Linux Laptop</H1>
         <P>You have contacted Michael Schwarz's RedHat Linux Laptop.
         You would probably rather
         <A HREF="http://www.multitool.net/">see his permanent Web
         page</A> since this server goes up and down all the time, what
         with it being on a laptop.</P>
      </BODY>
    </HTML>
Step completed: "thread=main", FetchURL.main(), line=48 bci=48
48          for (i = 0; i < args.length; i++)

main[1] step
>
Step completed: "thread=main", FetchURL.main(), line=53 bci=57
53       }

main[1] step
>
The application exited
$
Java includes a decompiler of sorts called javap. It is sometimes referred to as the “class file disassembler.” We titled this section “Return to the Source,” but it is a bit misleading; javap simply provides a way to examine the members and methods of a compiled Java class[24] even when you do not have its source code.
The javap command takes the same access-modifier command-line arguments as javadoc (-public, -protected, -package, -private) to determine which attributes and methods are to be reported. An additional switch, -c, causes the bytecodes of methods to be reported. For details, see Sun’s documentation for javap.[25]
Example 5.19 shows what you get if you run javap -c on our FetchURL example.
Distributing a Java application can be a pain. All but the simplest of applications will have many public classes—and since there can only be one public Java class per source file, each Java source file becomes a class file, and the elements of a package name become directory nodes in the path to the class, you end up with a fairly complex collection of directories and files. Wouldn’t it be nice to be able to roll the whole mess up into a single binary file for distribution?
Well, you can. The tool to do the job is called jar, which stands for Java ARchive.[26] The files produced by this utility are called JAR files. The JAR format is the common DOS/Windows ZIP file format, with a few special files to support some special features we will explain as they come up.
Example 5.19. javap output for FetchURL.class
Compiled from FetchURL.java
public class FetchURL extends java.lang.Object {
  private java.net.URL requestedURL;
  public FetchURL(java.lang.String);
  public java.lang.String toString();
  public static void main(java.lang.String[]);
}

Method FetchURL(java.lang.String)
   0 aload_0
   1 invokespecial #1 <Method java.lang.Object()>
   4 aload_0
   5 new #2 <Class java.net.URL>
   8 dup
   9 aload_1
  10 invokespecial #3 <Method java.net.URL(java.lang.String)>
  13 putfield #4 <Field java.net.URL requestedURL>
  16 goto 27
  19 astore_2
  20 aload_2
  21 invokevirtual #6 <Method null>
  24 goto 27
  27 return
Exception table:
   from   to target type
     4    16   19   <Class java.lang.Exception>

Method java.lang.String toString()
   0 ldc #7 <String "">
   2 astore_1
   3 new #8 <Class java.io.BufferedReader>
   6 dup
   7 new #9 <Class java.io.InputStreamReader>
  10 dup
  11 aload_0
  12 getfield #4 <Field java.net.URL requestedURL>
  15 invokevirtual #10 <Method java.net.URLConnection openConnection()>
  18 invokevirtual #11 <Method java.io.InputStream getInputStream()>
  21 invokespecial #12 <Method java.io.InputStreamReader(java.io.InputStream)>
  24 invokespecial #13 <Method java.io.BufferedReader(java.io.Reader)>
  27 astore_3
  28 goto 55
  31 new #14 <Class java.lang.StringBuffer>
  34 dup
  35 invokespecial #15 <Method java.lang.StringBuffer()>
  38 aload_1
  39 invokevirtual #16 <Method java.lang.StringBuffer append(java.lang.String)>
  42 aload_2
  43 invokevirtual #16 <Method java.lang.StringBuffer append(java.lang.String)>
  46 ldc #17 <String "
">
  48 invokevirtual #16 <Method java.lang.StringBuffer append(java.lang.String)>
  51 invokevirtual #18 <Method java.lang.String toString()>
  54 astore_1
  55 aload_3
  56 invokevirtual #19 <Method java.lang.String readLine()>
  59 dup
  60 astore_2
  61 ifnonnull 31
  64 goto 79
  67 astore 4
  69 aload 4
  71 invokevirtual #20 <Method null>
  74 aconst_null
  75 astore_1
  76 goto 79
  79 aload_1
  80 areturn
Exception table:
   from   to target type
     3    64   67   <Class java.lang.Exception>

Method void main(java.lang.String[])
   0 iconst_0
   1 istore_1
   2 goto 51
   5 getstatic #21 <Field java.io.PrintStream out>
   8 new #14 <Class java.lang.StringBuffer>
  11 dup
  12 invokespecial #15 <Method java.lang.StringBuffer()>
  15 aload_0
  16 iload_1
  17 aaload
  18 invokevirtual #16 <Method java.lang.StringBuffer append(java.lang.String)>
  21 ldc #22 <String ":">
  23 invokevirtual #16 <Method java.lang.StringBuffer append(java.lang.String)>
  26 invokevirtual #18 <Method java.lang.String toString()>
  29 invokevirtual #23 <Method void println(java.lang.String)>
  32 getstatic #21 <Field java.io.PrintStream out>
  35 new #24 <Class FetchURL>
  38 dup
  39 aload_0
  40 iload_1
  41 aaload
  42 invokespecial #25 <Method FetchURL(java.lang.String)>
  45 invokevirtual #26 <Method void println(java.lang.Object)>
  48 iinc 1 1
  51 iload_1
  52 aload_0
  53 arraylength
  54 if_icmplt 5
  57 return
A JAR file packages a subdirectory and its descendants into a single file. A Java CLASSPATH specification may contain a JAR filename everywhere it might contain a directory name. Let’s say you use the GPL’ed Java personal finance program called jgnash and you’ve compiled it from source, so you have a directory off your home directory called jgnash/bin. Suppose you run the program by directly invoking java to run the class jgnashMain and you have $HOME/jgnash/bin on your CLASSPATH. You could clean up the mess on your hard drive by using the jar command to squash all the files in jgnash/bin together into a single JAR file, as shown in Example 5.20.
You could then replace the $HOME/jgnash/bin entry in your CLASSPATH with $HOME/jars/jgnash.jar. After that you would still run jgnash with exactly the same java command you always did, but now you got rid of the cluttered pile of files.
This is only the most basic purpose of jar, however. Its uses extend well beyond merely concatenating and compressing collections of .class files.
One of the best uses of jar is to package applications for distribution. You can put a large Java application into a single file with jar, and by using a manifest (which we are about to discuss) you can nominate the main class to run in that JAR file. You can then provide a shell script (and a batch file, if you are also deploying to Microsoft Windows) that will set the CLASSPATH to point to the JAR file and run java against it. With this simple setup, users need not even know they are using a Java application—it runs like any other application.
The only way in which jar really differs from any other ZIP archive utility is in the automatic creation and use of a manifest file, by default named META-INF/MANIFEST in the archive. Even if you do not specify a manifest file of your own, the jar utility creates one for you. Let’s take a moment to look at what goes into the manifest.
A manifest is basically a list of key/value pairs. The key comes at the start of a line and the value comes at the end of the line with a colon separating the two. Example 5.21 shows a sample manifest.
Example 5.21. Manifest from the Payback sample application
Manifest-Version: 1.0
Ant-Version: Apache Ant 1.5.3
Created-By: 1.4.1_02-b06 (Sun Microsystems Inc.)
Version: 1.0
Main-Class: net.multitool.Payback.Payback
All of these entries were produced automatically by ant or the jar utility itself, except for Main-Class, which we specified (albeit with ant, as you will see in Chapter 9). The manifest has certain values that are always filled in by jar, but two that you might commonly specify are
Main-Class, which allows users to run a Java application by merely typingjava someJarFile.jar, without having to know the fully package qualified name of the class that contains the application’smain().Class-Path, which allows you to specify what the classpath should be when the application is run.
There are keys specific to applets, to signed applications, to beans, and so forth. We will address these as it becomes necessary. Full details can, of course, be found in the Sun’s documentation for jar.[27]
Let’s assume we are going to manually put a Java application in a JAR file. We will want to specify the name of the class that contains the main() method of the application. First off, you want the JAR’s directory hierarchy to begin at the folder that contains the first node of each package’s name. Our sample application here is in the package net.multitool.Payback, so we want our present working directory to be the one which contains the net subdirectory. Here’s a dump of the directory tree from that point after compilation of our sample application:
$ find . -print
.
./net
./net/multitool
./net/multitool/Payback
./net/multitool/Payback/Account.class
./net/multitool/Payback/Purchase.class
./net/multitool/Payback/Cost.class
./net/multitool/Payback/DebtAccount.class
./net/multitool/Payback/Payback.class
./net/multitool/Payback/SavingsAccount.class
./net/multitool/util
./net/multitool/util/SAMoney.class
./net/multitool/util/SAMoneyTest$1.class
./net/multitool/util/SAMoneyTest$2.class
./net/multitool/util/SAMoneyTest.class
$
We now want to specify which class contains the application’s main() method. It happens to be the Payback class, so we create a file called manifest[28] with the following contents:
$ cat manifest
Main-Class: net.multitool.Payback.Payback
Next, we use the jar utility to create the JAR file:
$ jar cmf manifest payback.jar net
$ ls -la
total 20
drwxrwxr-x    3 mschwarz mschwarz    4096 Aug  4 18:19 .
drwxrwxr-x    7 mschwarz mschwarz    4096 Aug  4 17:57 ..
-rw-rw-r--    1 mschwarz mschwarz      43 Aug  4 18:17 manifest
drwxrwxr-x    3 mschwarz mschwarz    4096 Jul 28 16:16 net
-rw-rw-r--    1 mschwarz mschwarz    7506 Aug  4 18:21 payback.jar
The options to jar tell it what to do. In our case, -c instructs to create a JAR file, -m adds the contents of the file named in the next parameter to the META-INF/MANIFEST file, -f and the next parameter is the filename of the JAR file being created. If we had not specified -f, the JAR file would have been written to standard out and an I/O redirect would be needed, but the result would have been the same:
$ jar cvm manifest net > payback.jar
$ ls -la
total 24
drwxrwxr-x    3 mschwarz mschwarz    4096 Aug  4 18:24 .
drwxrwxr-x    7 mschwarz mschwarz    4096 Aug  4 17:57 ..
-rw-rw-r--    1 mschwarz mschwarz      43 Aug  4 18:17 manifest
drwxrwxr-x    3 mschwarz mschwarz    4096 Jul 28 16:16 net
-rw-rw-r--    1 mschwarz mschwarz    7506 Aug  4 18:27 payback.jar
Everything that follows parameters required by option letters is considered to be a file or directory that is to be added to the JAR file. The option syntax for jar is similar to that for pkzip in the DOS/Windows world and the tar utility in the UNIX world.
As elsewhere in this chapter, we are just getting you started. See Sun’s documentation for details.
We have already covered the most common case, using jar to create a “rolled-up” Java application. jar has many command options besides -c and we’ll document a few of them.
-c
Create a JAR file.
-u
Update a JAR file—replace updated files, add missing files.
-x
Extract files from a JAR file.
-t
List files in a JAR.
-f
Specify the JAR filename.
-v
Be verbose—display descriptions of what the jar utility is doing as it does it.
-m
Add the contents of the named file to the manifest.
There are additional utilities in the toolkit. Below is a capsule summary of them and their purposes.
This utility checks an applet JAR file for any extensions it requires that are in conflict with the current Java runtime environment. (But we don’t cover applets in this book.)
This is a utility for digitally signing JAR file. Once a JAR is signed, anyone looking at it can be sure of two things—first, the file was definitely prepared by the owner of the private key that matches the public key used to verify the signature;[29] and second, the JAR file has not been modified in any way since it was signed. In other words, depending upon the care with which the signer treats his/her private key, this certifies the authenticity and accuracy of the JAR file; you can trust it as much as you trust the signer.
Generally speaking, an applet must be signed by a key that the user trusts in order for the applet to increase its security access to the client machine (open/read/write files, access the printer, and so on). But we don’t cover applets in this book.
This tool is used to create and manage the keys we were talking about in the previous entry. Again, this is used mainly for JAR signing, and JAR signing is used mainly for applet authentication, but we don’t cover applets in this book.
The RMI activation daemon. In the RMI example we showed you in this chapter, you had to start a server manually and leave it running to process requests. RMI activation is a system where RMI servers may be started on demand.
Reports the RMI serialVersionUID of a class. This can be useful when trying to track down problems with complex RMI systems, especially when multiple versions of an RMI interface with the same name must be in use at the same time.
As mentioned before, Java uses Unicode for all strings. Most of the time, you and we are working with ASCII-encoded files. This program converts files from one format to the other.
Remember how we had to set up a security policy file for our RMI demonstration (Example 5.13)? Well, this is a Java GUI application for creating and editing Java policy files.
There are a few more. One group of utilities is related to Kerberos tickets. Another is related to Java IDL and RMI-IIOP, both of which are to allow Java to interoperate with CORBA. If you are in a CORBA environment, you will want to look at those. We’ve got enough on our plates without trying to jam CORBA in here. You’re on your own, buddy. Finally, there are a couple of programs that support the Java plug-in, which is a way to make Java available in browsers.[30]
For all of its humble command-line interface, the Sun Java 2 SDK provides a complete software development package, with everything you need to write and run a wide gamut of Java applications.
Oh dear, where to start? There are all those programs in the kit we glossed over right at the end there. We barely scratched the surface of JNI and RMI. We positively orbited the topics of policy files and JAR manifests.
You now have exposure to the bulk of the Java SDK. It is only the first step up the learning curve. We’ll take you up a few more as the book progresses, but mastery comes only with time and experience. So use the tools. Write, compile, and debug a lot of Java code.
One of the best sources of information on Java is Sun’s Web site for Java, http://java.sun.com, where you can find a wide variety of information—tutorials, white papers, API specifications, and more.
[1] What does the “2” in “Java 2” mean? Hoo boy. Explaining product marketing names is not always easy. There was Java 1.0. Then there were several releases of Java 1.1.x. Then Sun released Java 1.2.x, but they started calling it “Java 2”. Since then, they have released Java 1.3.x, Java 1.4.x and they still call it “Java 2”. But it gets even more confusing. Sun is now releasing what had been preliminarily numbered 1.5, but is now officially called the 5.0 release, though they still call it Java 2. That’s what the 2 in “J2SE” refers to. So it is Java 2 platform, version 5.0. Any questions? See http://java.sun.com/j2se/naming_versioning_5_0.html.
[2] In Java, it is rare for APIs to break support for existing code. Rather than remove old methods, it is more common to deprecate them. This is done by putting a @deprecated tag in a Javadoc comment on the class or method. The Java compiler will issue a warning (if the -deprecated switch is on) whenever a deprecated class or method is used. In general, deprecation is a warning that the class or method will be removed in a future version of the code or library. It is interesting to note that the javac compiler records that a method or class is deprecated in the binary. Thus the compiler produces different output based on the contents of a comment. As we have written simple compilers and interpreters, this creeps us out. We have always wondered why deprecated has not become a Java language keyword.
[6] The exception is embedded tags, which we will discuss in a moment.
[7] But not a constructor in this case, because constructors cannot return a value.
[9] You might be tempted to call our comments in the introduction where we mentioned that we did not like purely pedagogical examples and that we would provide real, useful code. Well, we have to confess that there are some features of the Java language that we couldn’t cram into our real-world examples. This JNI sample is one such. We admit our failure, and we apologize.
[10] What can we say? We’re paranoid about the trailing null. Sue us.
[17] The others are Enterprise JavaBeans, servlets, and JavaServer Pages. The latter two are Web-based, and therefore suffer from the UI deficiencies of Web forms, but Sun calls them part of Enterprise Java, so we will too.
[18] One solution is to use a more advanced naming system, such as LDAP. See Section 21.3.2.3.
[19] Be careful! If you have one or more Java SDKs installed and you have the GNU Compiler for Java installed, watch out for your PATH. The Java compiler and the Java runtime from the JDK don’t collide with gcj because the compiler has a different name and gcj compiles to native binaries. But gcj does have an rmic compiler, and it is usually in /usr/bin, which is usually ahead of your JDK in the executable path. If you run rmic and it explodes with errors, make sure you aren’t running the rmic from gcj against .class files from a JDK. (And, yes, this bit me and had me confused for a while!)
[21] We’re going to gloss over this subject for now.
[22] If that sentence did not cause you to get “buzzword bingo,” then you aren’t trying.
[23] As you know, we do not automatically like IDEs and GUI development tools (see Section 5.2). A debugger is an exception to that rule. When debugging, a well designed UI with a code pane, a stack pane, a data viewer, a class browser, a thread selection pane, and so on is enormously helpful. You need to be able to see all these elements nearly simultaneously; you need to see the whole system as it runs. The command-line debugger makes everything you need available, but with a traditional “glass-teletype” UI that is quite awkward. By all means, learn the CLI debugger, but then find a good Java debugger with a windowed UI of some kind. It is hard to say which compiler UI is the best, but I think we can safely say the command-line debugger UI is the worst! You should know it as a last resort, but use it as a last resort!
[24] In Chapter 7 we will introduce gcj, the GNU Compiler for Java, which compiles Java to native machine code. javap is useless with such a file. It deals only with JVM bytecodes as documented in Sun’s JVM Specification.
[26] An abbreviation made up of syllables from words instead of just initials is called a portmanteau. The US Navy is particularly keen on them, using terms like COMSURPAC (Commander, Surface Fleet, Pacific), COMSUBLANT (Commander, Submarine Fleet, Atlantic), and so forth. There. Now you can’t claim you didn’t learn anything from this book.
[28] It can have any name. The key/value pairs from the file will be placed by the jar utility into the standard manifest called META-INF/MANIFEST.MF no matter what name you give to this file.
[29] A discussion of public/private keys as an authentication mechanism is beyond our scope here. As a shameless plug, Mr. Schwarz would like to point you to Chapter 10 of his previous book, Multitool Linux, which contains a beginner’s introduction to public key authentication using GnuPG. Of course, a quick Google search will find you many online descriptions that are free.
[30] Those browsers that had Java built into them generally used Java 1.0 or 1.1. After Java 1.1 it became clear that it would be a major pain to have to reintegrate each new version of Java into each browser product. It would make browser versions and Java releases dependent on one another and would, in general, be a pain both for Sun and for Microsoft and Netscape (remember Netscape?). Thus, the plug-in architecture was born (okay, plug-ins were for things like RealPlayer and Macromedia Flash too). Since Java 1.2, browser integration has been via plug-ins.