Some people prefer glitz. The shiny sparkle has always attracted the human eye. Sometimes that sparkle is a real gem, a treasure; sometimes it’s only a gum wrapper on the sidewalk. Integrated Development Environments (IDEs) add glitz to Java development. At their most basic, they combine (integrate) an editing environment with a compiler. This gives you
Language-specific formatting of your Java text (different colors, comments in italics, and so on)
Quick feedback on errors (the ability to click on a compile error message to begin editing at the offending Java statement)
Automatic word completion, to help you finish typing the names of methods in your Java code
A point-and-click GUI for that all important “modern” look-and-feel
If those were all they gave you, IDEs would be, in our opinion, leaning toward “gum wrapper.” But a good IDE can be more than that. It can be extended to integrate many different tools, including:
In this chapter we will examine two major Open Source IDEs, NetBeans and Eclipse. We will show a straightforward installation of each. We will describe the “operating paradigm” of each and show a few major features. It should be enough to get you started using them.
There are several major commercial IDEs, including Idea by IntelliJ, JBuilder from Borland, WebSphere Studio from IBM, SunONE Studio (Enterprise Edition) from Sun, and others. Because they are commercial, and not Open Source, we will not be covering them; their vendors and other experts can provide the documentation and training you need. Be advised, however, that the licenses for such commercial products typically cost anywhere from several hundred to a few thousand dollars per seat. That can make Open Source IDEs look very attractive.
NetBeans is an Open Source IDE, freely available, with full source code. It is also the basis for the SunONE Studio (more on that product later).
A Brief History of NetBeans[1]
NetBeans (originally called Xelfi) began in 1996 as a student project in the Czech Republic, with the goal being to write a Delphi-like Java IDE in Java. A company called NetBeans was formed around this project. By May of 1999, after two commercial releases of Developer, the company released a beta of what was to be Developer 3.0. In October 1999 NetBeans was acquired by Sun Microsystems. After some additional development, Sun released the Forte for Java Community Edition IDE—the same IDE that had been in beta as NetBeans Developer 3.0. There had always been interest in going Open Source at NetBeans. In June 2000, Sun open-sourced the NetBeans IDE; now it can be found at the netbeans.org Web site.
NetBeans can be downloaded from the netbeans.org Web site. You will want the NetBeans “IDE” and not the NetBeans “platform.” The IDE is the fully featured Java development environment. The platform is the underlying core of NetBeans on top of which one can develop other tools—for example, IDEs for other languages. Installation of the IDE consists of only three steps:
The first step is to get the software downloaded onto your system. From the netbeans.org Web site, navigate your way to a download of the latest IDE. The prepackaged “installers” might work—but if they fail, you have no information as to why, and still less as to what you can do about it. We’ll act like “real programmers” and download an archive file. (Here “archive” means a collection of software compressed for easier transmission, not “archive” in the sense of “old documents.”) Click on a link to begin the download (you’ll need to read, review, and accept the license agreement to proceed). The result should be a file on your system named something like NetBeansIDE-release35.tar.bz2.
The installation consists of three steps: untarring the file, adjusting a parameter in a configuration file, then creating a symbolic link for easy startup.[2]
Uncompress the archive:
bunzip2 NetBeansIDE-release35.tar.bz2
This will leave the file NetBeansIDE-release35.tar in place of the .bz2 file.
You can examine the contents of the TAR file with:
tar -tvf NetBeansIDE-release35.tar | more
Here the options (-tvf) specify to show a table of contents (-t) in verbose, that is, long, form (-v) from the specified file (-f) followed by the TAR filename. The output from tar here is piped into more so that you can page through it. Type q when you’ve seen enough, or leave off the | more to let it run through without pausing.
Notice that the names of all the files in the TAR archive begin with netbeans/ which tells us that if we untar the file, it will put all the files into a directory called netbeans. Therefore, we don’t need to make such a folder beforehand.
Change directory to the directory where you would like to install NetBeans. If you are on a system that may be used by different users, you’ll probably want to put it in a more public location like /usr/local or /opt. If it is for your personal use, you can put it anywhere—just be sure that you have write permissions on the directory where you want to install NetBeans. (Reminder: use ls -ld . to see the permissions of the current directory.)
The tar command to untar everything in place is simple:
tar -xf NetBeansIDE-release35.tar
This will extract (-x) all the files that are in the TAR file (-f) named NetBeansIDE-release35.tar. If you’d like to see each file get named as it is extracted, then change the -xf to -xvf (v for verbose) and you will see a whole long list of filenames displayed on your screen as the file is unpacked.
Next, we need to adjust the startup parameter in the configuration file. The file is in the netbeans directory that you just untarred. In there is a directory named bin, and in there is a file called ide.cfg. Open this file with an editor and change the line that begins -jdkhome so that the pathname refers to the location of your Java Development Kit (JDK, see Chapter 5).
Here’s an example of the contents of ide.cfg:
-J-Xms24m -J-Xmx96m
-J-Xverify:none
-jdkhome /usr/local/java/j2sdk1.4.1_01
This specifies that the Java SDK is located in /usr/local/java/j2sdk1.4.1_01, and in that directory there is a bin directory which contains java, javac, javadoc, and so on.
Finally, to make the executable easy to run, we will construct a symbolic link for easy access:
$ ln -s /usr/local/netbeans/bin/runide.sh /usr/local/bin/nb
This creates a symbolic link from the runide.sh file in the current directory to the /usr/local/bin directory, as a file named nb.
Now that you have the symbolic link to the script which runs NetBeans, simply invoke it with nb at a shell prompt. NetBeans will start loading (Figure 10.1).
If you get a message like “Command not found,” check to see if the shell knows where to look. If you used the same name and location as in the previous example, then make sure that /usr/local/bin is part of the search path for the shell. (Reminder: echo $PATH will tell you what directories are searched. If you need to, add /usr/local/bin to PATH, as in:
export PATH="${PATH}:/usr/local/bin"
which you can type from the command line for immediate use and then put in the .bashrc file in your home directory to set things this way next time you invoke a shell.)
Also be sure that the script runide.sh has execute permissions on it. (Reminder: check this with ls -l runide.sh and change with chmod a+x runide.sh.)
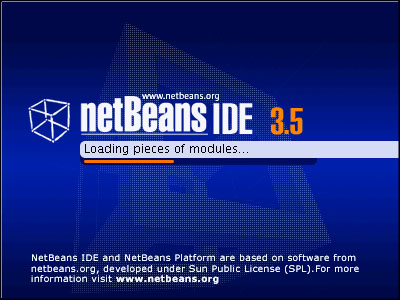
If all goes well then after the splash screen, you should see the window shown in Figure 10.2.
For more information on installing NetBeans, check out http://www.netbeans.org/kb/articles/install.html#unix.
Now let’s take a look at how you might use NetBeans.
Let’s take a look, from top down, at NetBeans’ main window. First, of course, is the menu bar. There are lots of choices to explore there. Much of what you’ll do with NetBeans won’t require much use of the menus—there are so many shortcuts elsewhere.
Next comes a row of icons, which are just shortcuts for menu times. This row of icons can be customized, and you can even add your own (see Section 10.2.5).
The three tabs below the icons, labeled Editing, GUI Editing, and Debugging, modify the window to provide three distinct workspaces. Each one customizes the window environment for a specific task, but it is still working on the same files.
Next, on the left, comes the Explorer, which is in many ways similar to the tools that you may use for traversing filesystems on a Windows or Linux system.
One oddity of NetBeans is that it doesn’t just use the files as it finds them in the directories on your hard drive(s). Rather, is requires you to designate a piece of the filesystem as the part that you want to use. You can designate several such pieces. Each piece is “mounted” as if it were a mountable filesystem. (This is an operating system concept. If you’re not familiar with it, don’t worry. For the purposes of NetBeans, just think of the IDE as too dumb to know about any files until you tell it about them.)
There are three different types of files that you can mount—local, CVS, or JAR. By specifying the type, NetBeans can treat each one in its special way.
Local files need no special treatment; they are just the local files on your hard drive.
If a filesystem is mounted under a version control system (CVS or generic VCS), then its files can have version control operations performed on them (checkin, checkout, and so on), via commands in the IDE. (More on that below.) Also, special directories used by the version control system (e.g., CVS) are hidden from the display, as you almost never want to manipulate these files directly.
When you mount a JAR file or ZIP archive as a filesystem, NetBeans displays the contents of the archive as if they were just files in a directory—which can make them easier to manipulate. More importantly, the JAR is automatically added to the classpath for Java compiling. Therefore, any third-party JARs that you may need for your project should be mounted.
To mount a local directory as a filesystem, right-click on the little icon labeled Filesystems in the Explorer [Filesystems] window. Choose Mount, then Local Directory, and you’ll get a filechooser to let you navigate your file structure and choose a directory to mount.
Important
To ensure that NetBeans knows how to compile your source, you need to mount the directory that contains the base level of your source as a mountpoint, not just have that directory somewhere in a tree of directories.
For example, let’s say that your source is kept in two packages, com.coolco.projecta and com.coolco.util which implies that you have a directory structure with those names. Let’s further assume that you keep them in a directory called src which is itself contained in a directory called brolly, as shown in Figure 10.3.
The likely thing to do is to mount the brolly directory, since it will contain the source and all sorts of other project-related directories. That’s fine, as far as it goes. But since the mountpoints in NetBeans are also the CLASSPATH directories, you need to also mount brolly/src, so that directories like com/coolco/util are found when your Java sources have statements such as import com.coolco.util.*;.
It’s OK to have the same directory show up in different mountpoints. NetBeans won’t get confused, although you may. You’ll probably want to edit and compile from the mountpoint of, in this example, brolly/src. The src folder inside the brolly mountpoint would refer to the same files. Just keep the one always open and the other closed, and you should be able to keep them straight.
The Explorer window has tabs at the bottom which let you look at different aspects of your work. In some instances you’ll want the Project view. For this, you have to mount file’s from the already mounted filesystems in the Filesystem view. Seems redundant, no? The Project view lets you set properties for the project as a whole or for individual files in the project. These settings apply to that file only for the project. Another project, looking at the same files, might have different settings.
For now, don’t worry about the difference. Many people like to work in the Filesystem view and never bother with projects. Others, especially those working on multiple products or projects, like Projects as a way to switch between tasks—you can only have one project active at a time, but when you switch projects, it switches all the mounted filesystems and other settings that you have configured.
Like other IDEs, NetBeans provides its own editing window. It’s a GUI point-and-click environment, with syntax highlighting and other helpful features for a programmer.
At the top of the editing window is a toolbar (Figure 10.4). Each icon on the toolbar has a tooltip, a help text that pops up when you rest your mouse pointer over the icon, to explain the somewhat cryptic little icons. Most of the tools are quite handy. With the pulldown menu, you can navigate to any method or class variable within the class. The next four buttons deal with searching: Select any text in your source file, click on the magnifying glass icon, and the search will be performed for the next occurrence of that text. In addition, all occurrences are highlighted. This highlighting can be toggled on or off.

The toolbar search only works within a single source file. If you want to search across multiple files, go back to the Explorer window and right-click on the folder containing the files you wish to search. There is a Find ... command in the pop-up menu. That brings up a dialog box (Figure 10.5) that has multiple tabs for quite extensive filtering of your search. In its simplest use, just type in the text you want to find, and press Enter.
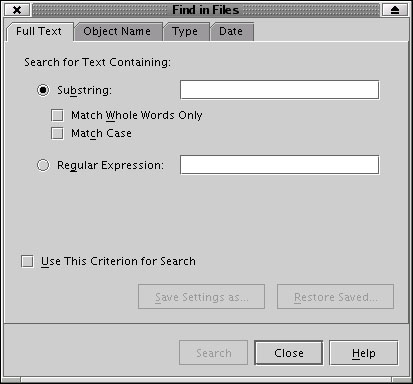
A list of the files which contain the text will appear in a different window, citing filename and linenumber for each file. There you can double-click on any citation to bring up that file in the edit window, at that location.
If you heeded our admonition to learn vi, you’ll be glad to know that NetBeans can handle the fact that the source files can be modified externally from the IDE. Go ahead and edit any of your source files, even while the IDE is running. When you next touch the file from within the IDE, NetBeans will recognize the fact that the file has been modified and load the new version.
If you haven’t yet learned vi, you may find yourself quite comfortable using the NetBeans editor. If you dig deeper into NetBeans you can find how to map certain keystrokes to make it even more editor-like. However, mousing and cut-and-paste may suffice for beginners for quite some time.
NetBeans comes with a built-in CVS client, which means that you don’t need to install any additional features in NetBeans to get it to talk with a CVS server. It has all it needs to check out and commit files from and to a CVS repository. NetBeans can be configured to use external (i.e., outside of NetBeans) CVS commands, but you likely won’t need to do that.
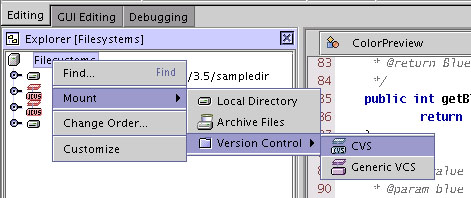
What you will need to do, however, is tell NetBeans that the files you are using are under CVS control. You do this by mounting the filesystem not as just a regular filesystem, but as a CVS filesystem. In the Explorer window, go to the Filesystem tab if you are not already there. On the Filesystem icon, right-click your mouse, and from the pulldown menu choose Mount, then Version Control, then CVS (Figure 10.6). What follows will be a wizard-like series of dialogs which you will fill in to describe the type and location of the CVS repository with which you want to work. Those choices and values are specific to your installation, so we’ll leave that for you to figure out with your network administrator or whoever has set up your repository.
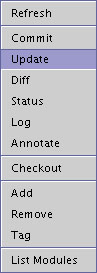
Once mounted, the CVS filesystem’s files will look much like any other filesystem you have mounted—except that the files will show, via their icon, when they have been modified and need to be committed, and will show the version number in parentheses after the filename. The other difference is that there is now a CVS command on the pulldown menu (Figure 10.7) that appears when you right-click on one of the filenames (or on its tab in the Edit view).

Move your mouse over the CVS command; an additional pulldown menu appears (Figure 10.8). If you’ve used CVS at all, then you’ll recognize the list of commands in the cascaded menu. There are the Commit, Update, Diff, Log, Status, and Checkout commands that you are familiar with. The first item, Refresh, is likely unfamiliar, though. Not being a CVS command (it’s not part of the command-line syntax), it is a way for you to tell the IDE to reconsider what it thinks about the CVS-related information displayed in its icons and the parenthetical text.
If you click on a folder instead of a single file, then the Refresh command will be followed by Refresh Recursively which will do a refresh on each file from there on down the tree.
Using the integrated CVS is much like using the command line. If you want to see the changes that you’ve made (before committing), use the Diff command. A window will appear showing the two different versions and coloring the lines that have been added, deleted, or changed.
When you need to commit your changes, click the filename, then right-mouse your way to Commit. A dialog window will appear for you to type in the comment that you want to be associated with this change. (This comment will appear in the Log command display).
To incorporate the changes others on your project may have made on the file, use the Update command. A dialog box will display the CVS output showing what was updated and if any merge conflicts occurred. (See Chapter 8 for more on this.)
The CVS commands in the menu, as we’ve described them so far, don’t allow you to add any options to the commands. They just run with the defaults. What if you want to use some of the options available on the CVS command line? Then hold down the Ctrl key just before your make your CVS choices. You should see an ellipsis (“...”) appear after each CVS command for which you can now select options (Figure 10.9).

Of course one of the great things about knowing the command-line version (see Chapter 8) is that you’re not limited to what the GUI tools will do for you. If you can’t find the option you want, just go back to a window with a shell prompt, cd into the appropriate directory in your source tree, and type the CVS command by hand. As noted earlier, NetBeans is smart enough to catch on to the changes made outside of NetBeans to its files, though you may need to do a Refresh, as described above.
If you’ve already discovered ant, either by using it on a Java project or by reading this book in chapter order, then you’ll know that it’s a plus to have ant integrated into NetBeans. As of NetBeans version 3.5, ant comes bundled with NetBeans and you don’t need to install it separately.
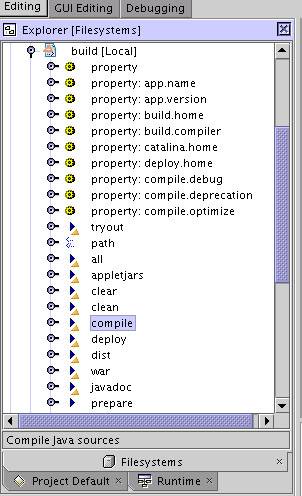
NetBeans recognizes a build.xml buildfile and gives it a special icon. If you click on the icon for the build.xml file in the Explorer, it will show each of the properties and then each of the targets (Figure 10.10). Right-click on a target to choose Execute to run ant with that target. As a shortcut you can either select that target and press the F6 key, or you can just double-click on the target name.
If you are making frequent use of an ant build script in your project, you may want to add a shortcut—an icon that you can put on the icon panel—that will run a specified ant target. You can also add a keyboard shortcut, to invoke the target with a keystroke or two. The specific steps for doing that are found in the NetBeans online help. Just look for the section titled Creating a Shortcut to a Target.
There is one other topic worth mentioning about integration with ant. Normally in NetBeans, when you compile a Java class, the IDE does the compilation. You can configure the IDE to use different types and versions of Java compiler, but it is the IDE which controls the compile. You can invoke a compile with the F9 key as a shortcut. But if you are building with ant, you may want ant to do the compiles for you. Fortunately, you can configure NetBeans to do this. Again, we’ll refer you to the NetBeans online help, to a section called Indirect Ant Compilation.
NetBeans is built to allow other tools to be plugged into it. There is a module that you can add to NetBeans to support C/C++ development. But there are various other plug-ins available. The best reference for all of those is the NetBeans Web site.[3] Many of the add-ons are commercial, but one notable tool is available, at least in its simple form, as a free download.
Poseidon for UML Community Edition is a UML modeling tool that integrates with NetBeans. A product of Gentleware AG, it is distributed at their Web site.[4] The Community Edition is offered free of charge, but they have more advanced (professional, enterprise) versions for sale. Their Web site says that Poseidon for UML Community Edition has the following features:
Fully implemented in Java, platform-independent
All 9 diagrams of the UML supported
Compliant to the UML 1.4 standard
XMI supported as standard saving format
Runs under Java 1.4
Diagram export into GIF, PS, EPS, SVG, JPEG, and PNG
Undo/redo (can be turned on in options)
Copy/cut/paste within the tool
Drag and drop within the tool
Zooming and bird’s eye view of the diagrams
Internationalization and localization for English, German, French, and Spanish
Code generation for Java
Sophisticated support of OCL
Reverse engineering from Java sources
Auto-layout of reverse engineered diagrams
Cognitive support, critique mechanism (by default turned off)
Simple install and update with JavaWebStart
We won’t be discussing its installation or use, but we encourage you to explore this option if you need a UML tool.
SunONE Studio (SOS) Community Edition was built on NetBeans and was distributed for free. You would even see the NetBeans logo on startup. As of SOS 5.0 (summer 2003), the Community Edition is no longer available—NetBeans is what Sun recommends for the no-cost download. (The SOS Enterprise Edition is still actively developed and sold by Sun; it is licensed at a cost similar to other commercial packages.)
Eclipse is yet another GUI IDE. The Standard Widget Toolkit (SWT) was invented as part of this project. Since Eclipse uses SWT for its graphics, it has the most familiar GUI look and feel, and it is the fastest performer on lower end hardware.[5] Eclipse is built as an IDE toolkit. Although it was developed in Java/SWT, you can use it to develop AWT/Swing applications. It is build around a plug-in architecture, so it can be an IDE for virtually any language. To use it for Java, you must actually install the Java plug-ins.
The main site for obtaining Eclipse is www.eclipse.org. Installing Eclipse, particularly for a single user, is incredibly easy. But first, you have a few choices to make as to what to download. As of this writing, the current production release of Eclipse is 2.1.2. If you follow the Downloads link from the main page to the 2.1.2 build, you will see a fairly lengthy list of download choices.
The first major choice you must make is whether or not you plan to write your own plug-ins and extensions to Eclipse. If you do, you will probably wish to download the Eclipse Software Development Kit or the source code and build Eclipse for yourself. We strongly recommend that you choose the Eclipse SDK binary for GTK. The Motif UI is quite dated in comparison. The Eclipse SDK contains the Eclipse Platform (which you need), the Java Development Toolkit (which you need), and the Eclipse Platform Development Kit (which you need only if you plan to develop plug-ins for Eclipse). But by downloading the Eclipse SDK package, you get everything you need in one go. You could also download the Eclipse source package and build the whole thing yourself; save that for a spare week. For now, start with a prebuilt binary.
If you scroll down, you will see a collection of files that have “platform” in their names. You will note that there are two choices of Linux binary: one is Motif, the other GTK. If you are not familiar with these, Motif and GTK are two common extensions to the X Window API that provide widgets and other common functions and UI features. One of these, Motif, is rather old and (to brashly add opinion) dated in appearance, but it is very stable and mature. The other, GTK, stands for GIMP Toolkit and was developed to support the remarkable GNU Image Manipulation Program (GIMP). There are other widget/UI libraries that run on top of X Window, notably the Qt library used by KDE.
So, which to use? If you read the documentation on the Eclipse Web site, you will see that the Motif version has been more heavily tested and is available for other platforms than Linux. This is probably because Motif is standard on most commercial UNIX versions, and thus is where emphasis was placed to get the “most bang for the buck” in development and testing.
However, we much prefer the look of the GTK version and, to date, have found no major problems with it, so that is what we use for our examples. There should be no functional difference between the two—merely differences in the look and feel of menus, toolbars, and dialogs. One reason to select Motif might be if you are working in a mixed environment of Linux and other UNIX platforms, where you may be forced to use the Motif version on some platforms, and do not want the “cognitive dissonance” of switching between the two.[6]
So, step one: Download eclipse-SDK-2.1.2-linux-gtk.zip.
The Eclipse platform is a “generic IDE.” You will see the term perspective all over Eclipse. A perspective is kind of a collection of tools in the IDE. The package you just downloaded contains a generic perspective called Resource. A perspective is a set of views, which are panes within the IDE, each having a specific purpose, such as editing the project contents, editing files, keeping a task list, and so on, as well as menus and toolbars relevant to those views. The Resource perspective has its uses, but it is not the main one you will be using as a Java programmer. As a Java programmer, you will most likely want the Java perspective.[7]
First, you must decide if you are going to install Eclipse in a common location (such as /usr/local or /opt), or if you are just going to install it in your home directory for your own use. The answer to this question, naturally, depends on whether or not you have root access on the machine and whether or not multiple people actually use the machine.
Caution
We are assuming you already have at least one Java SDK installed. If you do not, refer to Chapter 6 for some tips on installing Java SDKs.
We’re going to install in the user’s home directory. Doing this could hardly be simpler. So, step two: From your home directory, type:
$ unzip eclipse-SDK-2.1.2-linux-gtk.zip
That’s it. You’re done. Now just cd to the newly created eclipse directory and type ./eclipse. The first time you do this, you will see a “Completing the install” banner (Figure 10.11).

During this initial run some workspace directories and data files are set up. These store meta-information about projects and perspectives. After a moment, you will get the standard splash screen (Figure 10.12).
Following this, you will see the initial Eclipse IDE, with a welcome screen in the default Resource perspective (Figure 10.13).
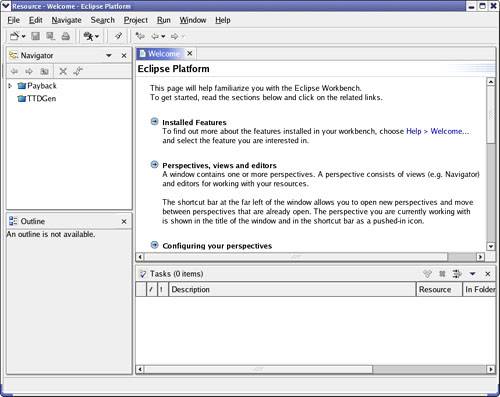
Eclipse works with projects. A project is a collection of files that you manage as a group. Usually a project is a single program, although it need not be. Eclipse remembers the state of all projects. If you close Eclipse in the middle of a debug session on a project, the next time you open Eclipse, it will have that same project open in the Debug perspective. If you then switch to another project and switch back, you will come back to the Debug perspective. Eclipse remembers. But we get ahead of ourselves here. You need to create a project.
Now that you have Eclipse up and running (Figure 10.13), you will want to create a Java project. Eclipse has “wizards” (to use the Microsoft Windows terminology) for creating projects. From the main menu, select File>New>Project. You will get the screen shown in Figure 10.14.
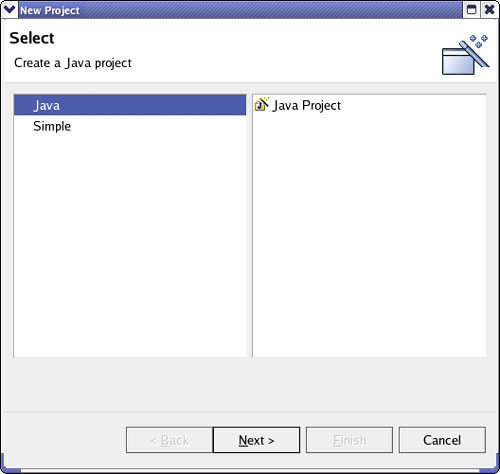
Now, you are not an idiot. This is not “Java Applications Programming on Linux for People with Well Below Average Intelligence.” We’re not going to walk you slowly and painfully through a screenshot of every window Eclipse can display and pretend that this is “educational.” We like trees too much to do that. So let’s pick up the pace a bit. The first screen in Figure 10.14 asks you to select the type of project. The next screen asks for a project name and it automatically chooses a directory to house the project. In Section 10.4.3 we will talk about changing away from this default. For now, trust Eclipse to do it right. Enter a project name and hit the Next button.
The next screen shows a tabbed display. The first tab allows you to add folders for source code. If you have already worked out a directory structure for your project, you may build it here. The next tab is the Projects tab. Here you specify other projects on which this project depends. The next tab is the Libraries tab. Basically, it lets you specify the project’s classpath. Eclipse puts its preferred set of JARs on the classpath by default, including those that are standard with whichever Java runtime Eclipse found on startup. The last tab is called Order and Export; it allows you to specify the order in which source folders should be built, as well as to specify which folders are accessible to other projects that name this project on their Projects tabs (in other words, this is the “other side” of the Projects tab).
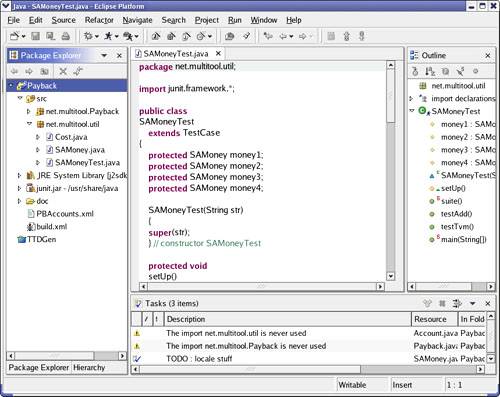
That’s the final wizard box. Hit the Finish button. A dialog box pops up to tell you that the project you just created is associated with the Java perspective. Since you are currently in the Resource perspective, it asks you if it may switch you to the Java perspective. Hit the Yes button, and you will be rewarded with the Java perspective display (Figure 10.15).
At this point, your exploration of the Eclipse tools would be more fruitful than anything we could tell you. There is a marvelous book on Eclipse, The Java Developer’s Guide to Eclipse by Sherry Shavor et al. from Addison-Wesley. We encourage you to seek out that book.
In the previous section, we mentioned that the second wizard screen in setting up a Java project allowed you to override the default path for a project. If you have an existing Java program, point the project path to the directory that is the base for that program’s packages. When you create the project (in other words, when you hit the Finish button in the wizard), Eclipse will scan that directory and analyze what it finds there. It does an excellent job of importing a project and “eclipsifying” it, even to the point of recognizing and analyzing an ant’s build.xml file.
Eclipse is a huge topic. We can’t devote enough space to it for this chapter to qualify as a user guide. The best we can do is to offer you a handful of tips.
The Java perspective consists mainly of the Package Explorer on the left, the edit window in the middle, the outline view in the right, and a bottom window that changes based on context. Initially, it is a task list. When you run a Java application, the console output is displayed there, overlaying the task list.
You can do a lot of what you need to get started on a project by right-clicking in the Package Explorer. For example, you can create a package by right-clicking and selecting New>Package. When you type a new package name into the resulting dialog box, all required folders are created under the project.
You can create new classes and interfaces in the same way. If you right-click on a package in the Package Explorer and select New>Class or New>Interface, an appropriate dialog box comes up, and a skeletal file is created in the appropriate place.
You can compile, run, and debug programs by hitting buttons on the toolbar, by selecting from the menu, by right-clicking almost anywhere, and by keyboard shortcuts. To put it plainly: Eclipse is a modern, rich IDE that works like other IDEs you have seen.
Eclipse’s real advantages lie in some of the dynamism it offers. As you know, the authors of this book like text mode and command line, but we must admit that Eclipse’s refactoring features are a great timesaver. For example, when you use the refactoring tools to change a method, you can be certain that every call to that method, everywhere in the project, is updated. Sure, we staunch CLI guys will tell you that you can use pipes and sed to similar effect, but even we must admit that you can miss some. We stand by what we have said: Know all the tools, and you can then choose the right one. But if all you have is a hammer, you’ll end up using it to repair a china cup.
We’ve given you the choice of two great development environments. With them you can do so much more than just edit and compile. Both are expandable to include other tools, like CVS and JUnit. Each has a slightly different paradigm for how they manage files and projects. It seems the longer we work with one (either one), the more we like it. They kind of grow on you and you get used to some of the shortcuts that they offer. And yet, there are still those times when it’s handy to be back at the simple command line.
NetBeans comes with a built-in version of Tomcat for serving up Web pages and JSP and Java Servlets. It’s very handy for developing and testing on your desktop. We’ll look at that more in Part IV of this book.
In the NetBeans help file, you’ll find this intriguing note:
Using Scripting Languages in NetBeans: NetBeans provides you with a scripting feature that lets you use scripts to operate the IDE remotely or from the Scripting Console or by using a scripting file. You can use the scripting languages provided in the Scripting Console, or you can create a scripting class through the New From Template wizard. The following scripting languages are provided with NetBeans: DynamicJava, BeanShell, and JPython. For information on the scripting languages provided, see DynamicJava at http://www-sop.inria.fr/koala/djava/, BeanShell at http://www.beanshell.org/, JPython at http://www.jpython.org/.
We barely got you into Eclipse. Eclipse supports CVS (check out the Team submenu). Eclipse provides code refactoring features that allow you to rename classes and methods with automatic update of all affected source. Eclipse provides a feature to “externalize” strings (which takes all string constants out of a module and makes them into properties references, allowing for easy internationalization). It is a powerful Java development platform.
NetBeans. NetBeans has some very extensive online help. There are also some very good Web-based documents, including the user guide which can be found at http://usersguide.netbeans.org/. Of particular value is the Getting Work Done guide at http://usersguide.netbeans.org/gwd/ which describes itself as “a more detailed introduction to the IDE than available in the Getting Started tutorial.”
Support for NetBeans, as with many other Open Source projects, happens online. There is no toll-free number to call. Instead you subscribe to an e-mail list; all messages sent to the list are then forwarded to everyone on the list. Anyone can respond, and you are encouraged to respond too, to share what you know with others. The NetBeans developers are often the ones who answer the most difficult questions, but lots of times answers come from others who have just made it a little further up the learning curve than you.
To subscribe to the nbusers list, send e-mail to [email protected]. You might want to create a special mail folder for the constant stream of messages that you’ll get from nbusers. We’ve seen about 15–20 messages per day, on average, over the past year. You don’t need to read them all, but as you scan the subject lines, see if there are ones that you might be able to answer. If you want others to reply to your requests for help, it would only be fair for you to do likewise. For a directory of the many e-mail lists related to NetBeans, go to http://www.netbeans.org/community/lists/.
Eclipse. The Java Developer’s Guide to Eclipse by Sherry Shavor et al. (ISBN 0321159640, from Addison-Wesley Professional) is an excellent book on the Eclipse platform, particularly from (as the title suggests) the Java developer’s point of view. Eclipse is, however, more than just Java. It is designed to be an “IDE Factory,” providing a framework for almost any task that involves an edit/compile/deploy kind of lifecycle.
[1] From the netbeans.org Web site.
[2] Thanks to John Zoetebier from New Zealand for his contribution on the NetBeans users mailing list, on which this manual installation procedure is based.
[5] It’s the fastest performer on high-end hardware too, but the difference is much less perceptible. Really fast and incredibly fast are hard for humans to discern.
[6] Please note that the differences are fewer and smaller than the differences involved in switching between any common X Window desktop and Microsoft Windows. If you can handle that (and many of us do every day), switching between Motif and GTK versions of Eclipse will be no problem for you.
[7] Although you will also often be using the Debug perspective.