Sometimes you gotta have a GUI; even we will admit that command lines only go so far. When it comes to simple interactions with casual users, a Graphical User Interface is a great step forward ... if it’s done well. The toolkit for building such an interface with Java is called Swing. The original Java toolkit is AWT (A Windowing Toolkit), and is still in use, but much less attractive. We’ll take a quick look at some major pieces of Swing, and show a complete example—a GUI for our budget application. After this example, you will have the tools you need to construct some real GUIs on your own.
The Swing GUI paradigm.
A simple standalone Swing application.
Some basic Swing objects—buttons and labels.
A bit about layout managers.
A more complex object—the
JTable.
Let’s take a look at a very simple (in its function, not in its composition) Swing program—a simple “Hello, world” that will appear in a window (Example 16.1).
Example 16.1. A simple Swing application
import java.awt.*;
import javax.swing.*;

public class
hw
{
  public static void
  main(String[] args)
  {
    //Create the top-level container
    JFrame frame = new JFrame();
    JLabel hi = new JLabel("Hello, world.");
    frame.getContentPane().add(hi, BorderLayout.CENTER);
    frame.setDefaultCloseOperation(JFrame.EXIT_ON_CLOSE);
    frame.pack(); // kicks the UI into action
    frame.setVisible(true);

  } // main
} // class hw
Now compile this program and run it from the command line like this:
$ javac hw.java
$ java hw
You should then see a small window appear, looking as in Figure 16.1.
While this may look like a lot of extra junk just to say “Hello, world,” remember that a GUI is not just providing output in fancy windows, but also monitoring and responding to a wide variety of user inputs—a capability of which we make little or no use in this example. But you can see some of this extra capability—grab the lower left corner of the window frame and expand and resize the window.
When we say “Swing,” we generally mean the set of classes in the javax.swing package and its subpackages (such as javax.swing.table). The packages are libraries of code that give you predefined classes from which you can construct a GUI for your application. The programs you write will be written in Java, the syntax will look like Java, but there will be a lot of creation of classes, uses of interfaces, implementations of abstract classes, and a variety of method calls that all deal with these Swing classes.
So what’s going on with all this stuff? What can we expect to do, see, write? In most applications that a programmer writes, it is the job of the programmer to design and write the code for the main execution path of the program. “Yes, every program has a beginning, middle, and an end” (with apologies to “Seymour and his frozen yoghurt stand,” from Sesame Street). But it’s not quite the same with Swing. While it does have to have a beginning, middle, and end (these are, after all, basic Von Neumann architecture machines), the big difference is that you do not have to write most of the control logic; it comes as part of the Swing set.
Look at it this way. With Swing, as with other GUI toolkits, you don’t have to write code to deal with the mouse, keyboard shortcuts, or painting characters onto a graphical screen. You don’t have to write all the code associated with a button press, because, while it seems simple enough, a button press is really a quite complex user interaction, involving repainting of the button’s border, possibly its shading or changing its icon, coordinating that with the mouse presses and releases, and deciding whether the releases happen within or without the boundaries of the button—all this and more, just for a simple button press. All this has been done for you, and packaged up into Swing classes.
So what is left for you to do? You have to:
Construct the various items that will appear on the screen (in one or more windows).
Specify the location of these objects in the windows (layout).
Provide snippets of code that are the actions associated with various events (events happen, for example, when a button is pressed or a mouse is clicked). These actions are the guts of the code that make your application behave how you want.
Remember, some behaviors are enforced by the GUI as part of standard “look and feel.” Some things, like layout, are up to you to do well so long as you keep within the standard UI guidelines. And some is just specific to your application.
With that in mind, let’s walk through the “Hello, world” example for a brief description of what each line does.
We begin with some import statements, to resolve references to both Swing and AWT classes. Swing is built on top of AWT, so some of the classes that you use will actually be AWT classes. The biggest difference this makes to you is in the import statements.
We then begin our class declaration, followed by the definition of the only method in this class, main(). Swing applications will typically have other methods, but for our simple example we only need this one.
Now comes some real Swing. The creation of a JFrame object is very important. In Swing we need to have containers to hold the objects that we want to display. The JFrame is a top-level container, one specifically meant to hold other objects, but also meant to be the first one of a containment hierarchy. (There are only three such top-level containers in Swing: JFrame, JDialog, and JApplet.)
Next we create a JLabel. It’s a Swing object meant to hold small amounts of text. The text can be either constant or changing, but it’s not user-editable (that would be a different kind of Swing object).
We add the label to the frame, so that when the window (the JFrame) appears, it will show our text inside.
The setDefaultCloseAction() does what you think. When you press the X in the upper right of the window frame (or wherever your window manager puts it), then not only will the window go away, but the program will stop running. (This is not the standard default value since JFrames can contain other JFrames, and for most frames you wouldn’t want closing the frame to quit the program.)
When we “pack” the frame, that’s when the real magic happens. It kicks off the GUI activity on a separate thread, but also packs the various pieces that we’ve added to the frame, sizing them as best it can to fit into the frame, and sizing the frame to hold all the pieces. We see little of that with our example, which has only one label.
As an aside, pack() is inherited from awt.Window, which describes the “magic” thus:
A component is displayable when it is connected to a native screen resource. A component is made displayable either when it is added to a displayable containment hierarchy or when its containment hierarchy is made displayable. A containment hierarchy is made displayable when its ancestor window is either packed or made visible.
So pack()-ing the frame connects it to a “native screen resource,” which effectively gets the whole GUI thing going.
And now back to the business at hand.
Finally, the setVisible() call makes the window appear. Then the main() is done. In case you’re wondering, go ahead and put a System.out.println() message after the setVisible(). It will be printed right away. The main() has ended; the GUI activity is happening on another thread.
Let’s take a quick look at a variety of Swing objects that you can use to build a GUI. Like any job of craftsmanship, it helps to be familiar with your tools. What you can build will be aided (and limited) by the tools with which you build, and by how familiar you are with them. Here are some pieces which can be put together to make Swing GUIs:
A push button to trigger actions; can contain text and/or an icon.
A group of buttons where only one value can be chosen at a time.
A choice of one or many of a small set of options.
A pull-down list of choices.
A special case of a pull-down choice, a part of the border of a main window.
A small amount of text, typically used to label other controls.
A simple display and/or entry of one line of text; think “fill-in-the-blank” kinds of forms, password entry, and the like.
A multiline display and/or entry of text, all in a single font format.
Same as text area, plus multifont support, image display, and more; really more like a word processor in a window.
Selection from a list.
A two-dimensional display—rows and columns of data.
A display of hierarchically-structured data.
A graphical control for selecting a value.
A bit of text that appears over objects when the mouse hovers.
A graphical display of progress.
A control for selecting colors from a palette.
A window for interacting with the filesystem—selecting a directory or a filename.
In addition to all these, there are various kinds of containers—objects whose job is to hold and display the other objects:
A simple container.
A container divided into 2 separate parts.
A complex control with scrollbars, used to hold objects larger than the displayable area.
A complex control with tab buttons to select different panels.
A container for holding objects (usually buttons) which can attach to different sides of a window, or separate from a window and stand alone.
Once you decided on all the graphical objects that you want to pack into your GUI, there is still one major hurdle—where to place all the objects. This can be one of the more challenging parts of GUI design because so many different screen sizes are available to the end user. How do you make your GUI look good to all (or most) of them?
Beginners often want to fix their components to absolute locations—for example, by sketching the GUI out on a piece of graph paper and then using those coordinates to fix the location. But with a windowing display, the user can grab a corner of the window and resize it. So, consider that piece of graph paper—what if it just got stretched to twice the size? Do you want all the controls to just get bigger? Buttons need not grow larger, but it would be nice to have additional space contributed to text areas. Consider a word processor: When you resize its window you only want the text area to expand, not the menus and icons.
Layout managers are meant to address the issues of component placement and sizing. Some are very simple, others are much more complex. All have their advantages and disadvantages. We’ll use a few in our example to give you a taste of how they work.
With any serious GUI comes a lot of advanced Java, especially constructs like anonymous inner classes. These are useful when we implement actions for our buttons and listeners for user selections.
Keep in mind that there are three different time frames that we’re considering—compile time, construction time, and event time. Compile time is obvious, and the compiler will complain if it cannot access what it needs due to scoping problems. Construction time is when the program constructs the GUI objects for display in a window using the new and add() calls as well as layout managers. Event time is when the user presses a button or edits text in a field, or when other external events change data.
Our goal is a GUI for the BudgetPro application. We’ve already built a command-line version, so we want to have the same general functions but with the convenience and glamour of a GUI. The GUI will need to:
Display the current account (name and dollars)
Display the list of subaccounts that are part of this account
Provide a way to create a new (sub)account
Provide a way to move down into a subaccount
Provide a way to move up to the parent account
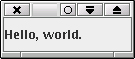
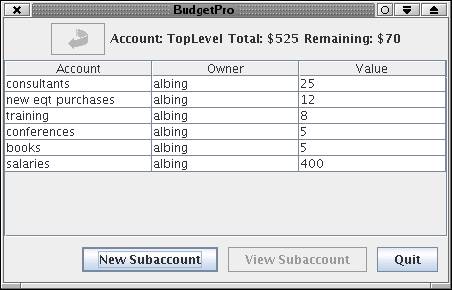
From this brief list we devise a simple display with a heading that contains the current account and its dollar status, a table which lists the subaccounts, and, at the bottom of the window, some buttons—one for creating new accounts and one for viewing subaccounts. Of course, we’ll also need a button to close or exit the application. In order to move back up from a subaccount, we’ll add a button up in the header, an up-arrow, which will take us back to the parent account.
Now we could show you a hand-drawn sketch of what this UI might look like, from our rough description, but we’ll cut to the chase and show you the finished product. This is the GUI for the BudgetPro application, in three stages. First comes the GUI when we first start up, with no subaccounts (Figure 16.2).
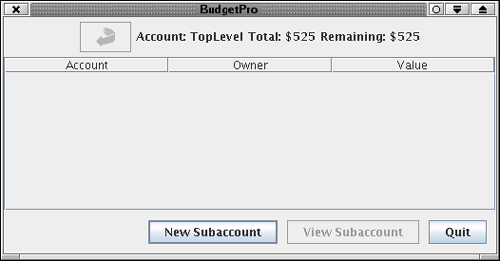
When the New Subaccount button is pressed, a dialog will appear to collect the information need to create the subaccount, namely the new account’s name and the dollar amount to allocate to that account (Figure 16.3).
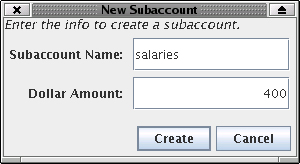
Finally, Figure 16.4 is a look at the main GUI window for BudgetPro once several accounts have been constructed.
There is more to describe, but let’s walk through the code that builds this GUI and explain the parts as we go. The complete listing is available online at http://www.javalinuxbook.com. We’ll make reference to the line numbers of the listing in Appendix B, but sometimes we’ll show excerpts of the code as we go. You might find it handy to have a listing of the code (on paper or in your browser) as you read the next several sections.
We divide the work between two GUI classes: one for the main window and the other for the dialog that will appear when we want to create a new subaccount. All of the other GUI elements will be either existing Swing classes or their extensions as anonymous inner classes in our code. (More on those later.)
So that means that we have four of our own classes that we’re working with: two from the core of our application, Account and User, and two from the GUI side of things, BudgetPro and AcctDialog. This will be reflected in the package structure; we’ll put BudgetPro and AcctDialog into the net.multitool.gui package. This will effect both the location of the source (to be put into net/multitool/gui) and the package statement on line 1 of BudgetPro.java:
1 package net.multitool.gui;
Take a look at the picture of the BudgetPro GUI. Count the GUI objects that we need: four buttons, three labels, and let’s not forget the (empty at first) table of subaccounts. These are declared in lines 23–31. (Ignore lines 22 and 32 for now, we’ll cover them later. Line 34 declares our dialog—more on that later, too.)
21    // gui components
22    private JFrame frame;   // needed by dialogs to root themselves
23    private JLabel nam;
24    private JLabel tot;
25    private JLabel val;
26    private JButton upton = new JButton(
                        new ImageIcon("net/multitool/gui/back.gif"));
27    private JButton creat = new JButton("new subaccount");
28    private JButton view  = new JButton("view subaccount");
29    private JButton clos  = new JButton("quit");
30
31    private JTable list;
32    private AbstractTableModel model;
33
34    private AcctDialog askem;   // make once, use often
Skip all the way to the last method of the class, line 289 and following. It’s the main() which gets run when we run this class. If we focus on the major piece involved in getting our GUI together, it’s these lines:
JFrame frame = new JFrame("BudgetPro");
frame.getContentPane().add(status, ...);
frame.getContentPane().add(list, ...);
frame.getContentPane().add(buttons, ...);
We’re leaving out lots of intermediate text to emphasize the “real” work. We create a JFrame, the outermost window object. We add into it all the other GUI pieces—the status line, the table list of accounts, and the buttons. The JFrame is a bit odd here, in that you have to add objects to its content pane; other container objects you can just add to directly. (We could have done the getContentPane() once, store the result in an intermediate variable, and do the adds to it, but the efficiency gain is unimportant here because we only need to do this once, to get the GUI started.)
When we’ve got it built, we pack the frame, and make it visible:
frame.pack();
frame.setVisible(true);
That’s the basic core of what you need to do with any GUI: construct its pieces, add them to the frame, pack the frame, and make it visible. Now you’re off and running. The rest is just details.
The three pieces that we create—the status, the list, and the buttons—will each package up their objects into an intermediate container, a JPanel, and return that container to main(). This not only serves to chunk the problem into fewer pieces (just three parts, not eight or more), but also helps with the formatting. Each piece can format its objects relative to each other. Then main() only has to lay out the three big pieces. So watch for each of the create...() methods to return a JPanel—a good approach when you build your GUIs, too.
The JPanels returned to main() are just Swing objects. They, like the buttons or labels (that we will see here shortly), just get added into other containers. For main(), that container is the JFrame, the main window. Any container will have a layout manager, the mechanism by which objects are placed in that container. For JFrame, the default is the BorderLayout manager. When you call the add() method on a container using a BorderLayout, you can specify (as a second parameter to the add() method) where the object being added will get placed. The constants defined for placing objects are NORTH, SOUTH, EAST, WEST, or CENTER—hence the “Border” of BorderLayout. There are also relative position values: PAGE_START, PAGE_END, LINE_START, and LINE_END which are just like north, south, west, and east, respectively, provided that the ComponentOrientation is set to LEFT_TO_RIGHT. (If you really want to know, check the Javadoc page for java.awt.BorderLayout.)
With a BorderLayout, if you put something in the NORTH section, it will appear across the top area of that container. If you resize the container (e.g., drag the window edges), it will take extra space and use it for horizontal, but not vertical, stretching. That is, the objects won’t get bigger than they need to vertically, though they will stretch wider. The same is true for SOUTH, but the objects are at the bottom rather than top of the container. Putting something in EAST or WEST will move them to the left or right of the container. For these two areas, though, space when resizing a window is added to the objects vertically, but not horizontally. Putting an object in EAST or WEST will let it get taller, but not wider.
The CENTER area, the default location if you use the add() method with no second parameter, will use extra space both vertically and horizontally.
Adding more than one object into a region (e.g., NORTH) will result in only the last item added being displayed. For this reason, too, one often builds intermediate containers to hold several objects. Then the single container object is added to one of BorderLayout’s regions.
Let’s look at the simplest of the three pieces that we create for our GUI—the top line of information indicating the status of the account. In lines 88–107 we create this portion of the GUI.
 88   private Component
 89   createStatus()
 90   {
 91     JPanel retval = new JPanel();   // default: flow layout
 92
 93     upton.addActionListener(upAction);
 94
 95     nam = new JLabel("Account: Name");
 96     tot = new JLabel("Total: $");
 97     val = new JLabel("Remaining: $");
 98
 99     retval.add(upton);
100     retval.add(nam);
101     retval.add(tot);
102     retval.add(val);
103
104     setStatus();
105
106     return retval;
107   } // createStatus
It consists of three parts, one for the account name, one for the total value of the account, and one for the remaining value. Each part will be represented by its own label, using a JLabel object. (We could have done the entire line in one label, but this gives us a few more objects to manipulate.) Since we want to group the labels together, we create a JPanel, which is a Swing container, to hold all these objects. We’ll also add the JButton object (the variable named upton).
A JLabel is a simple Swing object. You can construct an empty one with new JLabel(); but you can also construct a label with a String as its initial value, which is more useful. You can later change a label’s value with a call to its setText() method, as you see here from line 117:
117 tot.setText("Total: $"+current.getTotal());
The JLabels are added to their JPanel, but with no position argument, unlike the JFrame and BorderLayout used in main(). JPanel has a different default layout manager: It uses FlowLayout. With it, added objects are placed side by side according to the window size. If the window is narrowed, they will simply flow onto the next line. (You won’t see this behavior if you narrow the BudgetPro window, but that’s because the JPanel has been added to the JFrame’s NORTH region, which means it’s no longer just a FlowLayout that determines sizes.) FlowLayout is a layout that’s easy to use, but doesn’t give you much control; it was just fine for our purposes here.
Another simple layout mechanism is the BoxLayout. It allows you to place the objects like stacking boxes—though they can be stacked horizontally as well as vertically. Look at line 224:
224 retval.setLayout(new BoxLayout(retval, BoxLayout.X_AXIS));
Here we are creating a BoxLayout object and associating it with our JFrame to manage its objects. When we create a BoxLayout we can tell it that we want to stack our objects horizontally (using either X_AXIS or LINE_AXIS) or vertically (using either Y_AXIS or PAGE_AXIS). Note that the BoxLayout object needs to be told about (i.e., given a reference to) the container (here, retval, a JPanel) whose objects it will manage, but that the container also needs to be told (via setLayout()) about the BoxLayout object. A bit confusing, perhaps.
Another handy part of BoxLayout is the uses of rigid areas, invisible objects that do nothing except putting some space between objects. These rigid areas are defined in pixels; for our GUI we create them with no height and a width of ten pixels. They are held together using “horizontal glue” (see line 226)
226 retval.add(Box.createHorizontalGlue());
so that if the window is stretched, the extra space doesn’t get added between the buttons, but only to the “glue” component, which absorbs all extra space. This keeps all the buttons to the right hand side of the window.
The method named createButtons() actually packs up the buttons into a JPanel to return to the caller. It begins like this:
218   private Component
219   createButtons(JRootPane root)
220   {
221     JPanel retval = new JPanel();   // default: flow layout
222
223     //Lay out the buttons from left to right.
224     retval.setLayout(new BoxLayout(retval, BoxLayout.X_AXIS));
225     retval.setBorder
                (BorderFactory.createEmptyBorder(10, 10, 10, 10));
226     retval.add(Box.createHorizontalGlue());
227     retval.add(creat);
228     retval.add(Box.createRigidArea(new Dimension(10, 0)));
229     retval.add(view);
230     retval.add(Box.createRigidArea(new Dimension(10, 0)));
231     retval.add(clos);
The buttons themselves were created at the beginning of this class, in lines 27–29, thus:
27    private JButton creat = new JButton("New Subaccount");
28    private JButton view  = new JButton("View Subaccount");
29    private JButton clos  = new JButton("Quit");
Note that the constructor takes a String argument—that’s the text that will appear in the button. A button may also have an icon (image) in it (more on that in just a bit). These buttons, as created, don’t do anything. When clicked on by the user, they will behave as real buttons (depress, then release), but no action will occur. Yet.
We need to attach an action to each button, which is little more than a special class to hold the code that you want to be run when the button is pressed. We can define the action as an anonymous inner class, so that the code is right there, inline with the rest of our code. Then we just attach that code to the button. Here is an example of that for our close button (the one labeled Quit):
234    ActionListener closAction = new ActionListener()
235    {
236      public void
237      actionPerformed(ActionEvent e)
238      {
239          System.exit(0);
240      }
241    } ;
ActionListener is an interface—a very simple interface that defines just one method, actionPerformed(). You can take any class, have it extend ActionListener, and then define an actionPerformed() method for it. That class can then serve as the action for a button. Here we just create an inline class that does nothing but the actionPerformed() method, and a pretty simple one at that. It simply exits.
We could define the action elsewhere, and then just use the reference to the action. If we had put the declaration of closAction at a higher lexical scope (out at the beginning of the class definition, for example) then other UI elements could also use this action. Of course, if you’re going to share your action between GUI elements, be sure that you write the code to be reentrant.
Lines 244–267 (still within the createButtons() method) define the action for the button labeled New Subaccount. Line 268 connects it to the button. Don’t pay attention to the specifics of this action just yet. We’ll discuss it in detail below, once we know more about the other objects. Here is how that action is built:
244    ActionListener creatAction = new ActionListener()
245    {
246      public void
247      actionPerformed(ActionEvent e)
248      {
249        Account child;
250        // get the info via a Dialog (of sorts)
251        if (askem == null) {
252            askem = new AcctDialog(frame, "New Subaccount");
253        } else {
254            askem.clear();
255            askem.setVisible(true);
256        }
257        String subName = askem.getName();
258        String subAmnt = askem.getAmnt();
259
260        // if empty, assume the operation was cancelled, else:
261        if ((subName != null) && (subName.length() > 0)) {
262            child = current.createSub(subName, subAmnt);
263            setStatus();
264            model.fireTableDataChanged(); // notify the table
265        }
266      }
267    };
268    creat.addActionListener(creatAction);
We defined the action for the View Subaccount button (as we said you could) elsewhere in the program. Its action is defined in lines 54–75. Then on line 271 we connect the action to the button. (We’ll get back to this button’s action, too, once we’ve discussed the JTable.) But after we’ve attached the action, we also disable the button (line 273).
270    // function is to get selection from table and cd there
271    view.addActionListener(cdAction);
272    // but it starts off disabled, since there is no data yet
273    view.setEnabled(false);
In Swing, a button is either enabled or disabled. Enabled buttons are the active ones on which you can click. Disabled buttons are grayed out and not responsive to clicks. We can make a button either active or inactive with a method on the button called setEnabled() whose argument is a boolean—true to enable the button, false to disable it. For example:
203                if (lsm.isSelectionEmpty()) {
204                    view.setEnabled(false);
205                } else {
206                    view.setEnabled(true);
207                }
However, we start with the View Subaccount button disabled until the user has created and selected some subaccounts worth viewing.
There is one other button on the BudgetPro application, one that is not located in this bottom panel of buttons. It’s the one on the status line. It, too, starts up disabled or grayed out—but it has an image in it. Any JButton can contain either text or an image, or both, but we’ve chosen to do just one or the other in our application. We declare it like any other button:
private JButton upton;
but for its initialization we use a variation of the JButton constructor, one that takes an ImageIcon object as its parameter:
upton = new JButton(new ImageIcon("net/multitool/gui/back.gif"));
Why do we do that all in one line? When you read it, you can certainly think of it as two steps:
ImageIcon backup = new ImageIcon("net/multitool/gui/back.gif");
upton = new JButton(backup);
but we have no other need for the image, so we don’t need to keep a reference for it in a variable. Some programmers prefer to write it out in two simple steps, as it is easier to read and perhaps to maintain. We’ve chosen to put it all in the JButton’s constructor to show that we’re making no other use of the image. Which style do you prefer?
And what about a button that needs to contain both text and an image? There is a constructor that takes both a String and an ImageIcon. Then you can set certain attributes of the JButton to position the text relative to the image. Look in the Javadoc of JButton for the methods setVerticalTextPosition() and setHorizontalTextPosition().
Look again at our GUI application. In its center you see the table object:
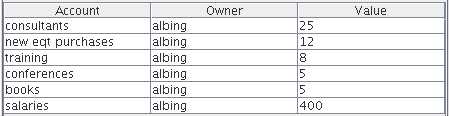
This is a JTable. A simple way to create a JTable is by passing in two arrays to the constructor—first, a two-dimensional array of data objects, and second, a one-dimensional array of column names. Notice that we said data objects; you need to use Integer objects, not simple int types, and Doubles instead of doubles. This allows the constructor to take any Object type and display it in the table via the object’s toString() method.
While this form of a table is simple to use, it usually isn’t enough for all the various things you’ll want to do with a table. Let’s look at the “industrial strength” table initialization. For that, we need to talk about a table model.
If you’ve ever taken an object-oriented design class, they’ve probably talked about the Model/View/Controller design pattern. (If you haven’t taken such a class, at least read a good book or two on the subject; it will improve your Java programming skills.) A simpler version of this pattern is the View/Model pattern. What it describes is separating the core of the data from the frill of its presentation—what you want to display versus how you want to display it. The Model is the underlying data; the View is one particular way to show that data.
This View versus Model distinction is used to great effect with JTable and TableModel objects in Swing. What you need to do is create a TableModel, then give that TableModel to the JTable via the JTable’s constructor. The TableModel will give you all sorts of control over your data—how, where, and when to get or update it. The JTable will display it and let you rearrange or resize the columns.
Rather than implement a complete TableModel from scratch, Swing gives us a helping hand with its AbstractTableModel class. AbstractTableModel is a partially implemented class which handles most of the grundy details—it has most of the Table interface implemented. You only need to implement three methods:
public int getRowCount();
public int getColumnCount();
public Object getValueAt(int row, int column);
Together, these three methods give a pretty good definition of a table: how many rows it has, how many columns it has, and how to access the value at any (row, column) location. Notice, too, that the getValueAt() returns an Object, so you can’t return an int or float or double. You can only return an Integer, Double, and so on. Another option is to return a String value of the number that you want to display.
Let’s take a look at how the AbstractTableModel was implemented in the BudgetPro application. We begin at line 135, inside the createList() method. The createList() method is going to build the central portion of our GUI, the table display. In order to do that, it creates an AbstractTableModel to give to the JTable it creates on line 193. The AbstractTableModel is defined inline as an anonymous inner class that implicitly extends AbstractTableModel. This section of code is listed in Example 16.2; follow along as we discuss it further.
(An aside: We could also have defined this inner class elsewhere in the class file, as a class which explicitly extends AbstractTableModel. However, as with the icon we used in the JButton example, we have no further need of the object other than this single use, so we didn’t bother to create it as a standalone entity. Both ways work, and are more a matter of preference or of how familiar you are with the inline syntax.
In our implementation of the AbstractTableModel, we are going to include column headings, so we begin with a definition of Strings for our column headings (line 137). Then the getColumnCount() method, one of the three methods that we need to implement in this class, is simply a matter of returning the size of this array (line 159). Lines 139–142 override the getColumnName() method, which isn’t one of the three that we must implement. But if we don’t, the default behavior from AbstractTableModel will return nulls, so we’d get no column headings. Instead, we use the column number as an index to our array of column names.
The getRowCount() method is almost as simple (lines 144–155). The number of rows that this table should display for any account is the number of subaccounts defined for the account. Since we’re defining our AbstractTableModel as an inner class, we have access to the data in the outer (BudgetPro) class. We use the instance variable current, which refers to whichever account we’re currently working with. A quick check of the Account class shows that an Account object can return the number of subaccounts (or “children”) via its size() method. So for our getRowCount() method we return current.size()—provided that current is not null. If it is null, we return 1 rather than 0, so that the table itself shows up and the headings appear. (But it also means that getValueAt() has to deal with requests for data from the first row when data may not exist.)
Example 16.2. Defining our AbstractTableModel
130    private Component
131    createList()
132    {
133      JScrollPane retval;
134
135      model = new AbstractTableModel()
136        {
137          private String [] columnNames = {"Account", "Owner", "Value"};
138
139          public String
140          getColumnName(int col) {
141            return columnNames[col];
142          } // getColumnName
143
144          public int
145          getRowCount()
146          {
147            int retval;
148
149            if (current != null) {
150                retval = current.size();
151            } else {
152                retval = 1;     // testing only
153            }
154
155            return retval;
156
157          } // getRowCount
158
159          public int getColumnCount() { return columnNames.length; }
160
161          public Object
162          getValueAt(int row, int col) {
163            Object retval = null;
164            Account aa = null;
165            // return "---"; // rowData[row][col];
166            int count = 0;
167            for (Iterator itr=current.getAllSubs(); itr.hasNext(); )
168            {
169              count++;
170              aa = (Account) itr.next();
171              if (count > row) { break; }
172            } // next
173              switch (col) {
174              case 0:
175                      retval = aa.getName();
176                      break;
177              case 1:
178                      retval = aa.getOwner();
179                      break;
180              case 2:
181                      retval = aa.getTotal();
182                      break;
183              } // endswitch
184              return retval;
185           } // getValueAt
186
187           public boolean
188           isCellEditable(int row, int col)
189           {
190              return false;
191           } // isCellEditable
192         };
193       list = new JTable(model);
194       list.setSelectionMode(ListSelectionModel.SINGLE_SELECTION);
195
196       list.getSelectionModel().addListSelectionListener(
197           new ListSelectionListener()
198           {
199             public void
200             valueChanged(ListSelectionEvent e)
201             {
202               ListSelectionModel lsm = (ListSelectionModel)e.getSource();
203               if (lsm.isSelectionEmpty()) {
204                   view.setEnabled(false);
205               } else {
206                   view.setEnabled(true);
207               }
208             } // valueChanged
209           }
210       );
211
212       retval = new JScrollPane(list);
213
214       return retval;
215
216     } // createList
The core of what makes our data appear is the getValueAt() method, lines 161–185. Since each row represents a subaccount of the current account, we’ll just iterate through current’s list of subaccounts until we reach the row-th subaccount; for example, to get the third row we iterate over this list of subaccounts until we get to the third one returned by the iterator’s next() method. This is a bit “brute force,” to keep marching over the list of accounts, but for our small data size it’s not bad. (Another approach would be to change the Account class to provide a method to return the n-th subaccount. Then it can use its internal knowledge of the way it stores subaccounts to provide a more efficient access. Alternately, our extended AbstractTableModel could iterate over the list once and store the subaccounts in an array, for quicker access later; the trick here is that the array needs to be refreshed every time the account changes—so we took the simple approach.)
Once we have a row selected, we use the switch/case construct to choose the correct data for the requested column. (See the listing in Example 16.2, lines 173–183.)
The return value for getValueAt() is an Object. Here’s one situation where that is very useful. Refer to the definition of the Account object and you’ll see that getName() returns a String, but getOwner() returns a User and getTotal() returns an SAMoney object. Since retval is the most generic type, Object, it can handle all three results.
But how does JTable deal with these odd types? How can it display an SAMoney object when it doesn’t know what one is? There is both a simple and a complicated answer to that question; we’ll try to give you both.
The simple answer is that JTable, to display the data returned by getValueAt(), will call the toString() method on the object. As long as we return an object which has a toString(), we’re fine. Both User and SAMoney do have such a method, so they fit fine here.
The more complex answer has to do with why JTable calls the toString() method at all. The JTable uses, behind the scenes, a complex table cell display mechanism, called a table cell renderer. A renderer is an object that displays data in a certain way. Each table cell renderer returns a GUI component, and if you don’t want to use the default renderer, you can define your own table cell renderer for your table. This allows you to display almost anything you can imagine inside a table’s cell. The renderer acts as a template for those cells and will be called upon with the result of the getValueAt(), along with a few more parameters, so that it can build and display the resulting cell.
Let’s revisit our simple explanation above, in light of the concept of a renderer. The default cell renderer for a JTable uses just a JLabel. When called upon, the default cell renderer is given the object returned by getValueAt() and the renderer fills its JLabel by calling its setText() method, passing in the result of toString() on the given object. That’s how toString() got called on all our results. You can explicitly set a different renderer using the setDefaultRenderer() method on JTable.
In the Javadoc for Swing table objects we find this interface:
public Component
getTableCellRendererComponent(JTable table,
                              Object value,
                              boolean isSelected,
                              boolean hasFocus,
                              int row,
                              int column)
This tells us that if we want to write a class which can act as a renderer, it needs to implement this method. The method will be called with the value returned by getValueAt(), but the row and column (and table) will be repeated here in case your renderer cares. For example, having the row and column would allow you to create a table with the third column of the table in green—your method could check the column number, and if it is 2 (columns are numbered 0, 1, 2, ... ) set the background color to green for the Component that you would return.
JLabel retval = new JLabel();
// ...
if (row == 2) {
    retval.setBackground(Color.GREEN);
} else {
    retval.setBackground(Color.WHITE);
}
return retval;
The full implementation of a renderer can also take into account whether or not the cell is selected and/or has focus. This has to do with enabling mouse clicks to select either that particular cell or the row or column containing that cell. You will likely want to render the cell differently (with a darker color, perhaps) to show that it has been selected. Whatever the renderer, you set up and then return a GUI component whose attributes (font, color, size, and so on) are used to display that cell.
We hope you get the idea—there is a lot more to renderers than we will cover here. The Java Tutorial covers them more, and the Javadoc pages have some introduction, too.
Similar to renderers are editors. When a user clicks in a table cell, the table may allow him or her to edit its contents. A cell editor is needed to do that, and then your program needs to do something with the value that was entered. For our BudgetPro example we avoid this complexity by disallowing the user to enter anything into the table—our table is for display only. We do this on lines 187–191 by overriding the method isCellEditable() to always return false:
187         public boolean
188         isCellEditable(int row, int col)
189         {
190           return false;
191         } // is CellEditable
Notice that the method is passed the row and column means that you could make some cells editable and some not.
Let’s look at the last part of the table that we implement for BudgetPro:
194 list.setSelectionMode(ListSelectionModel.SINGLE_SELECTION);
This call tells our table (list) that we want to allow the user to select only a single row or column at a time. Valid options are:
ListSelectionModel.SINGLE_SELECTION
ListSelectionModel.SINGLE_INTERVAL_SELECTION
ListSelectionModel.MULTIPLE_INTERVAL_SELECTION
The latter two allow the user to select more than one row at a time; multiple intervals mean that the selected rows can be discontinuous. (Think “Shift+click” versus “Control+click” as the user action that selects these.)
So what will our program do, once the user has made a selection? The selected row is a subaccount of the current account and we will allow the user to display that account and its subaccount, if any. Think of it as “changing directory” into that account, to look at or change its status.
For a table to take an action when a selection is made you need another listener called a selection listener. We wrote:
196     list.getSelectionModel().addListSelectionListener(
197       new ListSelectionListener()
198       {
199         public void
200         valueChanged(ListSelectionEvent e)
201         {
202           ListSelectionModel lsm =
                                  (ListSelectionModel)e.getSource();
203           if (lsm.isSelectionEmpty()) {
204               view.setEnabled(false);
205           } else {
206               view.setEnabled(true);
207           }
208         } // valueChanged
209       }
210     );
Similar to how a table has a table model behind it, it also has a selection model behind it. We don’t need to reimplement an entire selection model; we just retrieve the default one from our table (list.getSelectionModel()) and add a listener to it so that it will notify us when something has changed.
The javax.swing.event.ListSelectionListener is an interface with only one method, so it’s easy to extend and override it in place, as we do, beginning at line 197. When called, it will be handed an event (e) and we take the source of that event and coerce it to a ListSelectionModel. That’s safe to do here because it can’t be any other type of event—or we wouldn’t have been called. All we’re doing with it is checking to see if the user just selected or deselected something. The only action we take is to enable or disable the view button.
Deep inside the cdaction object is a line that does the real action that we’re after with our selection. It says:
61 int row = list.getSelectedRow();
This shows that a JTable (list) has a method, getSelectedRow(), which will return the row number of the row that the user has selected (that is, clicked on). This is all part of the action listener (defined on lines 54–75 of BudgetPro) for the View Subaccount button.
54    private ActionListener cdAction = new ActionListener()
55    {
56      public void
57      actionPerformed(ActionEvent e)
58      {
59        // this is the action for VIEW subdirectory;
60        // a "cd" into the subaccount.
61        int row = list.getSelectedRow();
62        // System.out.println("Row="+row); // DEBUG; TODO: REMOVE
63        if (row > -1) {             // only if a row was selected
64          String subname = (String) model.getValueAt(row, 0);
                                                     // name column
65          Account next = current.getSub(subname);
66          if (next != null) {
67            current = next;
68            // System.out.println("cd to:"+current.getName());
69            setStatus();
70            // notify the table, too
71            model.fireTableDataChanged();
72          } // TODO: else infodialog or Beep.
73        }
74      }
75    } ;
With the row number in hand, the actionPerformed() method can then use the row number to look up the account name. Since the account name is in the first column (numbered 0) of our table, we call getValueAt(row, 0) to get that name. Then we give the name to the current account to look up the subaccount (line 65).
As long as this returned Account is not null (line 66), we can make it the current account (line 67). At that point the display needs to be updated, so we: 1) call our own setStatus() method, to update the upper portion of our GUI, and 2) tell the table that its data has changed (line 71).
A word about the fire...() methods. They are not part of the TableModel interface definition. Rather, they are part of the AbstractTableModel class. When a Java class is declared abstract it means that some methods need to be implemented by those classes that use (extend) this class. An abstract class can still have lots of intact, completely implemented methods, and that is the case with AbstractTableModel.
The TableModel interface defines methods for adding and removing listeners. Any implementation of the TableModel interface needs to support these, and to notify any listeners when a change occurs. Such listeners will receive a call to their tableChanged() method when such a change occurs. But it doesn’t tell us how such notification is triggered. Moreover, the change event, when received by the listener, needs to define the extent of the change—just a single cell? a whole row? a column? all columns? and so on.
The AbstractTableModel provides some methods for us to call when a change in the data has occurred, methods that will then notify all the registered listeners (Table 16.1). Moreover, it has different methods depending on the extent of the change, so that the TableModelEvent, sent to all TableModelListeners, can be constructed with the appropriate definition of what has changed.
Table 16.1. AbstractTableModel methods for data change notification
We used (line 71) the fireTableDataChanged() since the content of the table will change with a change of accounts, but the structure remains the same. It is also a handy all-purpose method for you to use if you’d rather not add the complexity of determining which rows have changed to your code.
Finally, remember that anyone who uses (extends) AbstractTableModel, including the DefaultTableModel class, gets these methods for their use.
There are several other interactions that are supported by JTables, ones that don’t require you to do anything to provide them to your application’s end user. When running the BudgetPro GUI, did you try to drag the column headings? You can also rearrange and resize columns. This is the default behavior for JTables. You can turn it off, however, if you want your columns to be fixed:
table.getTableHeader().setResizingAllowed(false);
table.getTableHeader().setReorderingAllowed(false);
The call is not made on the table directly, but rather on its header. We get the JTableHeader object with the call to getTableHeader(). There is much more that could be said about JTableHeader objects, but we will leave that “as an exercise for the reader”; we’ve got to draw the line somewhere.
One last thing to mention about the createList() method is how we deal with tables that are larger than the viewing area. This is typically done with a scroll pane, a GUI element familiar to anyone who has used a word processing program. Such scrolling is accomplished in Swing by putting the potentially big object, such as our table, into a JScrollPane container.
Don’t think of it as adding scrollbars to the table. Rather, we’re putting the table into a container that has scrollbars, and this container is smart enough to retrieve and display the table’s header separately from the table (thus, the table’s data scrolls but the header stays put).
Here, in one step, we create the JScrollPane object and initialize it with the JTable that we want to be scrolled over.
212 retval = new JScrollPane(list);
Think of the JScrollPane as a window with scrollbars through which we can view the JTable. It has the convenient side effect of taking care of the table’s heading for us. Without the scroll pane (e.g., if we just put the JTable in a JPanel) we’d get only the data and no heading, unless we also did a lot of extra work using other objects and method calls.
It is possible to set the JScrollPane to show horizontal as well as vertical scrollbars. Those scrollbars can be made to be always or never visible, or visible only as needed. Setting a scrollbar to “never visible” effectively turns off any scrolling in that direction. Use the setHorizontalScrollBarPolicy() and setVerticalScrollBarPolicy() methods to set the value to one of:
JScrollPane.HORIZONTAL_SCROLLBAR_AS_NEEDED
JScrollPane.HORIZONTAL_SCROLLBAR_NEVER
JScrollPane.HORIZONTAL_SCROLLBAR_ALWAYS
Scroll panes can scroll over any GUI element—that is, any Component object, not just tables. For more information on scroll panes, be sure to refer to the Javadoc pages.
We have covered most of the code in the main GUI functionality—the way it initially creates its parts and lays them out for display. We have examined the JTable in some considerable detail and looked at a few actions associated with buttons. Now we need to get to the user interaction that allows us to create a new account.
Lines 244–268 of BudgetPro are the action that gets attached to the button for creating a new subaccount.
244     ActionListener creatAction = new ActionListener()
245     {
246       public void
247       actionPerformed(ActionEvent e)
248       {
249         Account child;
250         // get the info via a Dialog (of sorts)
251         if (askem == null) {
252             askem = new AcctDialog(frame, "New Subaccount");
253         } else {
254             askem.clear();
255             askem.setVisible(true);
256         }
257         String subName = askem.getName();
258         String subAmnt = askem.getAmnt();
259
260         // if empty, assume the operation was cancelled, else:
261         if ((subName != null) && (subName.length() > 0)) {
262             child = current.createSub(subName, subAmnt);
263             setStatus();
264             model.fireTableDataChanged(); // notify the table
265         }
266       }
267     };
268     creat.addActionListener(creatAction);
Looking at the constructor for an Account, we see that we need three things: a User object (who will own the subaccount), a name for the new subaccount, and the dollars to be allocated to this subaccount. To keep our example simpler, we will always use the current user as the User for creating the new Account. That means we only need some way to get the name and dollar amount.
In the GUI world, this sort of information is typically provided in a dialog box, a window that has blanks to be filled in (Figure 16.5). Then, when the dialog is closed, we can ask that dialog for the values that the user provided.

Swing has some ready-to-use dialogs for warnings or for simple single value inputs. Since we want to get two pieces of data, we need to create our own dialog and display it.
What may seem strange about the createAction() is that we only create the dialog once (line 252), when the reference to it (askem) is null (line 251). Thereafter, we simply clear out the previous values (line 254) and make the dialog visible again (line 255). That is all that it takes to use the dialog more than once. We could throw away the dialog (or let it get garbage-collected) by declaring it internal to the actionPerformed() method. Then on each button press the dialog would need to be recreated. Well, it’s slower to do it that way, and for a button click we want quick response—so we keep it around from one use to the next. When the user closes the dialog, all that really does is makes it invisible; to reuse it, we make it visible again.
Notice, too, that in either case—creating the dialog or making it visible—control does not return to our method until the user has dismissed the dialog. That’s because it’s a modal dialog, one that allows no other interaction with the application until the user has responded to this dialog.
The dialog is dismissed (finished, ended, put away) simply by making it no longer visible. For example:
73 dialog.setVisible(false); // go away
New to our application, in AcctDialog, is the JTextField. On lines 22 and 23 we declare two of them, one for the account name and the other for the amount.
22      nameField = new JTextField(25);
23      amntField = new JTextField(9);
The size that we pass in to the constructor is the number of characters; it sets a maximum for that field, but also gives a clue to some layout managers as to how big the field needs to be.
Speaking of layout managers, we use a few here, including a BoxLayout, to format the buttons relative to each other; a BorderLayout, to hold the overall dialog; and a newer layout manager, the SpringLayout, which is new as of Java 1.4. The Swing Tutorial provides a handy utility class for dealing with SpringLayouts, and we make use of it to format the labels and text fields relative to each other.
Similar to a JTextField is a JPasswordField. It behaves just like a JTextField but instead of showing the characters that the user types it shows, by default, an asterisk for each character typed, thereby hiding the password from passers-by. The character that is displayed can be changed to other than the asterisk—see the Javadoc page.
We do something new with our JLabel in AcctDialog, too. We mess with its font:
44       Font font = label.getFont();
45       label.setFont(label.getFont().deriveFont(font.PLAIN, 14.0f));
This gets the font from the label, however it might have been set, then creates a new value for the font, keeping whatever font family it might have been, but making it 14 pt plain (not italic, not bold).
We also put HTML text in the JLabel:
40       JLabel label = new JLabel("<html><p align=left><i>"
41                      + "Enter the info to create a subaccount.<br>"
42                      + "</i>");
All but the oldest versions of Swing will display the HTML text as it would be formatted by a browser. Here, we make the text italic by means of the (now deprecated) <i> tag, thereby undoing the effort to make it plain in lines 44 and 45.
One of the arguments to the dialog’s constructor is the JFrame inside which the dialog will appear. Lines 102 and 103 round out this picture, setting the size of the dialog and anchoring its position relative to the parent frame. The last step for the constructor is to make the dialog visible, thereby passing control to it.
When programming in Swing, we create the GUI objects and then let Swing do the work of managing all the interactions. We created:
Containers to hold GUI objects, such as
JFramefor our outermost window,JPanelfor an assortment of objects, andJScrollPanefor viewing larger objects through a scrollable window.Labels (
JLabelclass) to hold either a short bit of text, or an image, or both; it can even take snippets of HTML, for fancier formatting and coloring of text.Buttons (
JButtonclass) to which we attached actions—the code fragments that get called when the buttons get pushed; a button could have text and/or an image displayed in it.Actions—whether for buttons or selections (or other triggers yet to be discussed), an action is the code that runs when the event (e.g., button press) occurs.
Text fields (
JTextFieldclass) to take small amounts of user input; our application didn’t need the other types of text fields (JTextAreaandJTextPane) useful for much more extensive user input.A
JTableinstance and its associatedTableModel,SelectionModel, andTableCellRendererwhich provide tremendous flexibility and control over table behavior and contents.A
JDialoginstance with custom content, to allow for multiple user inputs; the dialog comes and goes with its visibility; since it’s a modal dialog, when it is visible, it “hogs” all the user interactions; it is possible to make nonmodal dialogs, but our application didn’t need to.LayoutManagers for ourJFrameandJPanels, used to place objects within a container with various algorithms for placement and expansion.
One could spend a career learning the vagaries of layout managers, especially the way they interact (e.g., a BoxLayout inside the various regions of a BorderLayout). There is still an art to getting all the interactions right; it’s often quickest to prototype the layout before you get too committed to a particular layout. Also, putting objects into containers can help you subdivide the layout problem into more manageable pieces. You can even go so far as to write your own LayoutManager, a topic we do not cover in this book.
The information that we display in the JTable in our example is hierarchical. Swing provides a JTree object for displaying such information. Like a filesystem tree familiar to many PC users, the JTree allows you to view multiple levels at once and to open and close nodes, exposing or hiding their subtrees. It would make more sense to use the JTree in our example, but then we wouldn’t have been able to describe all the ins and outs of the JTable, a class that is so useful in so many applications.
There are many more Swing classes that we haven’t discussed, though many will behave similarly to those you have seen here. There are topics that we have avoided—for example, we haven’t talked about sorting JTables by clicking on the column headings, or about TableColumnModels which add another layer to JTables. Some of what you would need to know in order to use these Swing classes you can glean from the Javadoc pages. The information there should make more sense now, based on your experience with the various Swing mechanisms that you’ve seen in these pages. For some other Swing topics you will have to search farther, and there are plenty of books on the topic—the classic one, the The JFC Swing Tutorial from Sun, being over 900 pages long. Is it any wonder that we didn’t cover it all in this chapter?
The JFC Swing Tutorial: A Guide to Constructing GUIs by Kathy Walrath and Mary Campione, Addison-Wesley, also available online at http://java.sun.com/docs/books/tutorial/uiswing/index.html.
Our favorite bookmark within the Swing tutorial, the visual index of the various Swing components, is at http://java.sun.com/docs/books/tutorial/uiswing/components/components.html.
If you want a better understanding of layout managers, we recommend this tutorial by Jan Newmarch at Monash University in Australia: http://pandonia.canberra.edu.au/java/xadvisor/geometry/geometry.html. Don’t let the mention of AWT scare you away. Almost all of the layout managers (except
BoxLayoutandSpringLayout) are actually from AWT, and they all apply to Swing.