
C H A P T E R 5
![]()
Input and Output
On enterprise applications, there is always the need of obtaining and manipulating the I/O terminals. In today's operating systems, that usually means file access and network connectivity. Java has been slow to adopt good file and network framework because when standing true to its roots of write once, read everywhere, a lot of the original file I/O and network connectivity needed to be simple and universal. If any Java developer wanted to get features like folder monitoring or scalable sockets, she would usually go out and create (or use) native code, but since Java 7, the wait is over!
With Java 7, file and network I/O has evolved into a much better framework for handling files, network scalability, and ease of use. By creating the network input output version 2 API (NIO.2), Java now has the capability of monitoring folders, accessing OS-dependent methods, and create scalable asynchronous network sockets. This is in addition to the already robust library for handling input and output streams, and serializing (and deserializing) object information.
STREAMS AND THE DECORATOR PATTERN
5-1. Serializing Java Objects
Problem
You need to serialize a class (save the contents of the class) so that you can restore it at a later time.
Solution
Java implements a built-in serialization mechanism. You access that mechanism via the ObjectOutputStream class. Look in the following example, in the section saveSettings. There you will see ObjectOutputStream being used to serialize the settings object in preparation for writing the object to disk:
public class Ch_5_1_SerializeExample {

    public static void main(String[] args) {

        Ch_5_1_SerializeExample example = new Ch_5_1_SerializeExample();

        example.start();

    }


    private void start() {

        ProgramSettings settings = new ProgramSettings(  new Point(10,10),

                                                        new Dimension(300,200),

                                                        Color.blue,

                                                        "The title of the application" );


        saveSettings(settings,"settings.bin");

        ProgramSettings loadedSettings = loadSettings("settings.bin");

        System.out.println("Are settings are equal? :"+loadedSettings.equals(settings));


    }


    private void saveSettings(ProgramSettings settings, String filename) {

        try {

            FileOutputStream fos = new FileOutputStream(filename);

            ObjectOutputStream oos = new ObjectOutputStream(fos);

            oos.writeObject(settings);

            oos.close();

        } catch (IOException e) {

            e.printStackTrace();

        }

    }


    private ProgramSettings loadSettings(String filename) {

        try {

            FileInputStream fis = new FileInputStream(filename);

            ObjectInputStream ois = new ObjectInputStream(fis);

            return (ProgramSettings) ois.readObject();

        } catch (IOException e) {

            e.printStackTrace();

        } catch (ClassNotFoundException e) {

            e.printStackTrace();

        }

        return null;

    }

}
How It Works
Java supports serialization, which is the capability of taking an object and creating a byte representation that can be used to restore the object at a later time. By using an internal serialization mechanism, most of the setup to serialize objects is taken care of. Java will transform the properties of an object into a byte stream, which can then be saved to a file or transmitted over the wire.
![]() Note The original Java Serialization framework uses reflection to serialize the objects, so it might be an issue if serializing/deserializing heavily. There are plenty of open source frameworks that offer different trade-offs depending on your need (speed versus size versus ease of use). See
Note The original Java Serialization framework uses reflection to serialize the objects, so it might be an issue if serializing/deserializing heavily. There are plenty of open source frameworks that offer different trade-offs depending on your need (speed versus size versus ease of use). See https://github.com/eishay/jvm-serializers/wiki/.
For a class to be serializable, it needs to implement the Serializable interface, which is a Marker interface: it doesn't have any methods, but instead tells the serialization mechanism that you have allowed the ability of your class to be serialized. While not evident from the onset, serialization exposes all the internal workings of your class (including protected and private members), so if you want to keep secret the authorization code for a nuclear launch, you might want to make the class that contains that information nonserializable.
It is also necessary that all properties (a.k.a. members, variables, or fields) of the class are serializable (and/or transient, which we will get in a minute). All primitives—int, long, double, float (plus their wrapper classes)—and the String class are serializable by design. Other Java classes are serializable on a case-by-case basis. For example, you can't serialize any Swing components (like JButton, JSpinner), and you can't serialize File objects, but you can serialize the Color class (awt.color, to be more precise).
As a design principle you don't want to serialize your main classes, but instead you want to create classes that contain only the properties that you want to serialize. It will save a lot of headache in debugging because serialization becomes very pervasive. If you mark a major class as serializable (implements Serializable), and this class contains many other properties, you need to declare those classes as serializable as well. If your Java class inherits from another class, the parent class must also be serializable. In that way, you will find marking classes serializable when they really shouldn't be.
A possible solution to not declare a property serializable is to declare it as transient. Transient properties tell the Java compiler that you are not interested in saving/loading the property value, so it will be ignored. Some properties are good candidates for being transient, like cached calculations, or a date formatter that you always instantiate to the same value.
By the virtue of the Serialization framework, static properties are not serializable; neither are static classes. The reason is that a static class is supposed to never have any instances at any time. So if we save and then load the static class at the time, we will have loaded another copy of the static class, throwing the JVM for a loop.
The Java serialization mechanism works behind the scenes to convert and traverse every object within the class that you specify to be serialized. If you have objects within objects and you cross-reference objects, the Serialization framework will resolve it and not store two copies of the object—but only one. Each property then gets translated to a byte[] representation. The format of the byte array includes the actual class name (for example: com.somewhere.over.the.rainbow.preferences.UserPreferences), followed by the encoding of the properties (which in turn may encode another object class, with its properties, etc., etc., ad infinitum).
For the curious, if you look at the file generated (even in a text editor), you can see the class name as almost the first part of the file.
![]() Caution Serialization is very brittle. By default, the Serialization framework generates a Stream Unique Identifier (SUID) that captures information about what fields are presented in the class, what kind they are (public/protected), and what is transient, among other things. Even a perceived slight modification of the class (for example: changing an
Caution Serialization is very brittle. By default, the Serialization framework generates a Stream Unique Identifier (SUID) that captures information about what fields are presented in the class, what kind they are (public/protected), and what is transient, among other things. Even a perceived slight modification of the class (for example: changing an int to a long property) will generate a new SUID. A class that has been saved with a prior SUID cannot be deserialized on the new SUID. This is done to protect the serialization/deserialization mechanism, while also protecting the designers.
You can actually tell the Java class to use a specific SUID. This will allow you to serialize classes, modify them, and then deserialize the original classes while implementing some backward compatibility. The danger you run into is that the deserialization must be backward-compatible. Renaming or removing fields will generate an exception as the class is being deserialized. If you are specifying your own serial Serializable on your Serializable class, be sure to have some unit tests for backward-compatibility every time you change the class. In general, the changes that can be made on a class to keep it backward-compatible are found here: http://download.oracle.com/javase/6/docs/platform/serialization/spec/version.html.
![]() Caution Due to the nature of serialization, don't expect constructors to be called. What this means is that if you have initialization code in constructors that is required for your object to function properly, you may need to refactor them out of the constructor to allow to be executed after construction. The reason is that in the deserialization process, the deserialized objects are “restored” internally (not created) and don't invoke constructors.
Caution Due to the nature of serialization, don't expect constructors to be called. What this means is that if you have initialization code in constructors that is required for your object to function properly, you may need to refactor them out of the constructor to allow to be executed after construction. The reason is that in the deserialization process, the deserialized objects are “restored” internally (not created) and don't invoke constructors.
5-2. Serializing Java Objects More Efficiently
Problem
You want to serialize a class, but want to make the output more efficient, or smaller in size, than that generated by the built-in serialization method.
Solution
By making the object implement the Externalizable interface, one instructs the Java Virtual Machine to use a custom serialization/deserialization mechanism, as provided by the readExternal/writeExternal methods.
public class ExternalizableProgramSettings implements Externalizable {

    private Point locationOnScreen;

    private Dimension frameSize;

    private Color defaultFontColor;

    private String title;


    // Empty constructor, required for Externalizable implementors

    public ExternalizableProgramSettings() {


    }


    @Override

    public void writeExternal(ObjectOutput out) throws IOException {

        out.writeInt(locationOnScreen.x);

        out.writeInt(locationOnScreen.y);

        out.writeInt(frameSize.width);

        out.writeInt(frameSize.height);

        out.writeInt(defaultFontColor.getRGB());

        out.writeUTF(title);

    }


    @Override

    public void readExternal(ObjectInput in) throws IOException, ClassNotFoundException {

        locationOnScreen = new Point(in.readInt(), in.readInt());

        frameSize = new Dimension(in.readInt(), in.readInt());

        defaultFontColor = new Color(in.readInt());

        title = in.readUTF();

    }

// getters and setters omitted for brevity

}
How It Works
The Java Serialization framework does provide the ability for you to specify exactly how to serialize an object. As such, it requires implementing the Externalizable interface in lieu of the Serializable interface. Externalizable has two methods: writeExternal(ObjectOutput out) and readExternal(ObjectInput in). By implementing these methods, you are telling the framework how to encode/decode your object.
The writeExternal() method will pass in as a parameter an ObjectOutput object. This object will then let you write your own encoding for the serialization. The ObjectOutput has the methods listed in Table 5-1.
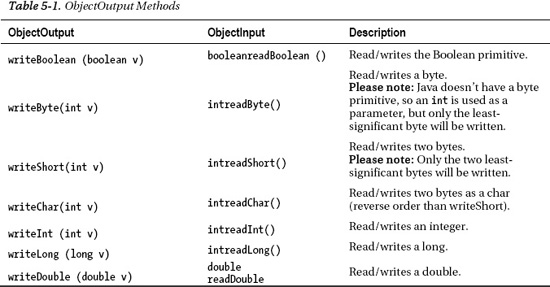
The reason you might want to implement the Externalizable interface instead of the Serializable interface is because Java's default serialization is very inefficient. Because the Java Serialization framework needs to make sure that every object (and dependent object) is serialized, it will write even objects that have default values or that might be empty and/or null. Implementing the Externalizable interface also allows you more finer-grained control on how your class is being serialized. In our example, the Serializable version created a setting of 439 bytes, compared with the Externalizable version of only 103 bytes!
![]() Note You will need an empty (
Note You will need an empty (no-arg) constructor for classes that implement the Externalizable interface.
5-3. Serializing Java Objects as XML
Problem
While you love the Serialization framework, you want to create something that is at least cross-language-compatible (or human readable). You would like to save and load your objects using XML.
Solution
In this example, one uses the XMLEncoder object to encode our own Settings object, which contains program settings information and writes it to the settings.xml file. The XMLDecoder takes the settings.xml file and read is as a stream, decoding the Settings object.
//Encoding


FileSystem fileSystem = FileSystems.getDefault();

FileOutputStream fos = new FileOutputStream("settings.xml");

XMLEncoder encoder = new XMLEncoder(fos);

encoder.setExceptionListener(new ExceptionListener() {

        @Override

        public void exceptionThrown(Exception e) {

        System.out.println("Exception! :"+e.toString());

        }

});

encoder.writeObject(settings);

encoder.close();

fos.close();


//Decoding

FileInputStream fis = new FileInputStream("settings.xml");

XMLDecoder decoder = new XMLDecoder(fis);

ProgramSettings decodedSettings = (ProgramSettings) decoder.readObject();

System.out.println("Is same? "+settings.equals(decodedSettings));

decoder.close();

fis.close();
How It Works
The XMLEncoder and XMLDecoder, like the Serialization framework, use reflection to find out what fields they contain, but instead of writing these fields in binary, they are written in XML. Objects that are to be encoded don't need to be serializable, but they do need to follow the Java Beans specification.
Java Bean is the name of any object that conforms to the following contract:
- The object has a public empty (
no-arg) constructor. - The object has public getters and setters for each protected/private property that take the name of
get{Property}()andset{Property}().
The XMLEncoder and XMLDecoder will encode/decode only the properties of the bean that have public accessors (get{property}, set{property}), so if you have any properties that are private and have no accessors, they will not be encoded/decoded.
![]() Tip It is a good idea to register an Exception Listener when encoding/decoding.
Tip It is a good idea to register an Exception Listener when encoding/decoding.
The XmlEncoder starts by creating a new instance of the class that you are trying to serialize (remember that they need to be Java Beans, so they must have an empty no-arg constructor). The XmlEncoder then figures out what properties are accessible (via get{property}, set{property}). And if a property of the newly instantiated class is the same value as the property of the original class (i.e., has the same default value), the XmlEncoder doesn't write that property. In other words, if the default value of a property hasn't changed, the XmlEncoder will not write it out. This allows the flexibility of changing what a “Default” value is between versions, but it is something to be aware of, as objects that were persisted when the default of a property was, for example “2”, and later decoded after the default property changed from “2” to “4”, will contain the new default property of “4” (which might or might not be correct).
The XMLEncoder also keeps track of references. If an object appears more than once when being persisted in the object graph (for example, an object is inside a Map from the main class, but is also as the DefaultValue property), then the XMLEncoder will only encode it once, and link up a reference by putting a link in the xml.
The XMLEncoder/XMLDecoder is much more forgiving than the serialization framework. When decoding, if a property changed its type, or if it was deleted/added/moved/renamed, the decoding will decode “as much as it can” while skipping the properties that it couldn't decode.
The recommendation is to not persist your main classes (even though the XMLEncoder is more forgiving), but to create special objects that are simple, hold the basic information, and don't do a lot by themselves.
5-4. Creating a Socket Connection and Sending Serializable Objects Across the Wire
Problem
You need to open a network connection, and send/receive objects from it. Also, you have heard that the traditional Java 6 way of doing that doesn't scale well, it's a pain, it's blocking, and it holds kittens hostage.
Solution
Why use Java's New Input Output API version 2 (NIO.2), of course! The solution relies on the NIO.2 features of nonblocking sockets (by using Future tasks):
// Server Side

hostAddress = new InetSocketAddress(InetAddress.getByName("127.0.0.1"), 2583);


Future<AsynchronousSocketChannel> serverFuture = null;

AsynchronousServerSocketChannel serverSocketChannel = AsynchronousServerSocketChannel.open().bind(hostAddress);

serverFuture = serverSocketChannel.accept();

final AsynchronousSocketChannel clientSocket = serverFuture.get(2000, TimeUnit.MILLISECONDS);

System.out.println("Connected!");

if ((clientSocket != null) && (clientSocket.isOpen())) {

        InputStream connectionInputStream = Channels.newInputStream(clientSocket);

        ObjectInputStream ois = null;

        ois = new ObjectInputStream(connectionInputStream);

        while (true) {

                Object object = ois.readObject();

                if (object.equals("EOF")) {

                        connectionCount.decrementAndGet();

                        clientSocket.close();

                        break;

                }

                System.out.println("Received :" + object);

        }

        ois.close();

        connectionInputStream.close();

}


// Client Side

AsynchronousSocketChannel clientSocketChannel = AsynchronousSocketChannel.open();

Future<Void> connectFuture = clientSocketChannel.connect(hostAddress);

connectFuture.get();            // Wait until connection is done.

OutputStream os = Channels.newOutputStream(clientSocketChannel);

ObjectOutputStream oos = new ObjectOutputStream(os);

for (int i = 0; i < 5; i++) {

        oos.writeObject("Look at me " + i);

        Thread.sleep(1000);

}

oos.writeObject("EOF");

oos.close();

clientSocketChannel.close();
How It Works
At its basic level, sockets require a type, IP address, and port. While sockets literature has consumed whole books, the main idea is pretty straightforward. Like the post office, socket communications relies on addresses. These addresses are used to deliver data. In our example, we picked the loopback (the same computer where the program is running) address (127.0.0.1), and chose a random port number (2583).
The advantage of the new NIO.2 is that it is asynchronous in nature. By using asynchronous calls, you can scale your application without creating thousands of threads for each connection. In our example, we have taken the asynchronous calls and wait for a connection (effectively making it single-threaded for the sake of the example), but don't let that stop you for enhancing this example with more asynchronous calls. (Check the recipes on the multithreaded section of this book.)
For a client to connect, it requires a socket channel. The NIO.2API allows creating asynchronous socket channels. Once a socket channel is created, it will need an address to connect to. The socketChannel.connect() operation does not block; instead it returns a Future object (this is a different from traditional NIO, where calling socketChanne.connect() will block until a connection is established). The Future object allows a Java program to continue what it is doing and just query the status of the submitted task. To take the analogy further, instead of waiting at the front door for your mail to arrive, you go do other stuff, and “check” periodically to see whether the mail has arrived. Future objects have methods like isDone(),isCancelled() that let you know if the task is done or cancelled. It also has the get() method, which allows you to actually wait for the task to finish. In our example, we use the Future.get() to wait for the client connection to be established.
Once the connection is established, we use Channels.newOutputStream() to create an output stream to send information. Using the decorator pattern, we decorate the outputStream with our ObjectOutputStream to finally send objects through the socket.
The server code is a little more elaborate. Server socket connections allow more than one connection to happen, thus they are used to monitor or receive connections instead of initiating a connection. For this reason, the server is usually waiting for a connection asynchronously.
The server begins by establishing the address it listens to (127.0.0.1:2583) and accepting connections. The call to serverSocketChannel.accept() returns another Future object that will give you the flexibility of how to deal with incoming connections. In our example, the server connection simply calls future.get(), which will block (stop the execution of the program) until a connection is accepted.
After the server acquires a socket channel, it creates an inputStream by calling Channels.newInputStream(socket) and then wrapping that input stream with an ObjectInputStream. The server then proceeds to loop and read each object coming from the ObjectInputStream. If the object received's toString() method equals “EOF”, the server stops looping, and the connection is closed.
![]() Caution Using an
Caution Using an ObjectOutputStream and ObjectInputStream to send and receive a lot of objects can lead to memory leaks. ObjectOutputStream keeps a copy of the sent object for efficiency. If you were to send the same object again, ObjectOutputStream and ObjectInputStream will not send the same object again, but instead send a previously sent Object ID. This behavior or just sending the Object ID instead of the whole object raises two issues.
The first issue is that objects that are changed in-place (mutable) will not get the change reflected in the receiving client when sent through the wire. The reason is that because the object was sent once, the ObjectOutputStream believes that the object is already transmitted and will only send the ID, negating any changes to the object that have happened since it was sent. To avoid this, don't make changes to objects that were send down the wire. This rule also applies to subobjects from the object graph.
The second issue is that because ObjectOutputStream keeps a list of sent objects and their Object ID, if you send a lot of objects the dictionary of sent objects to keys grows indefinitely, causing memory starvation on a long-running program. To alleviate this issue, you can call ObjectOutputStream.reset(), which will clear the dictionary of sent objects. Alternatively you can invoke ObjectOutputStream.writeUnshared() to not cache the object in the ObjectOutputStream dictionary.
5-5. Obtaining the Java Execution Path
Problem
You want to get the path where the Java program is running.
Solution
Invoke the System class's getProperty method. For example:
String path = System.getProperty("user.dir");How It Works
When a Java program starts, the JRE updates the user.dir system property to record from where the JRE was invoked. The solution example passes the property name "user.dir" to the getProperty method, which returns the value.
5-6. Copying a File
Problem
You need to copy a file from one folder to another.
Solution
From the default FileSystem, you create the “to” and “from” paths where the files/folders exist and then use the Files.copy static method to copy files between the created paths:
        FileSystem fileSystem = FileSystems.getDefault();

        Path sourcePath = fileSystem.getPath("file.log");

        Path targetPath = fileSystem.getPath("file2.log");

        System.out.println("Copy from "+sourcePath.toAbsolutePath().toString()+" to

"+targetPath.toAbsolutePath().toString());

        try {

            Files.copy(sourcePath, targetPath, StandardCopyOption.REPLACE_EXISTING);

        } catch (IOException e) {

            e.printStackTrace();

        }
How It Works
In the new NIO.2 libraries, Java works with an abstraction level that allows for more direct manipulation of file attributes belonging to the underlying operating system.
FileSystem.getDefaults() gets the usable abstract system that we can do file operations on. For example, running this example in Windows will get you a WindowsFileSystem; if you were running this example in Linux, a LinuxFileSystem object would be returned. AllFileSystems supports basic operations; in addition, each concrete FileSystem provides access to the unique features offered for that operating system.
After getting the default FileSystem object, you can query for file objects. In the NIO.2 file, folders and links are all called paths. Once you get a path, you can then perform operations with it. In this example, Files.copy is called with the source and destination paths. The last parameter refers to the different copy options. The different copy options are file-system dependent so make sure that the one that you choose is compatible with the operating system you intend to run the application in.
5-7. Moving a File
Problem
You need to move a file instead of just copying it around.
Solution
As in Solution 5-6, you use the default FileSystem to create the “to” and “from” paths, and invoke the Files.move() static method:
        FileSystem fileSystem = FileSystems.getDefault();

        Path sourcePath = fileSystem.getPath("file.log");

        Path targetPath = fileSystem.getPath("file2.log");

        System.out.println("Copy from "+sourcePath.toAbsolutePath().toString()+

                                " to "+targetPath.toAbsolutePath().toString());

        try {

            Files.move(sourcePath, targetPath);

        } catch (IOException e) {

            e.printStackTrace();

        }
How It Works
Same as copying a file, you create the path of source and destination. After having the source and destination path, Files.move will take care of moving the file for you. Other methods provided by the Files object are the following:
Delete (path): Deletes a file (or a folder, if it's empty).Exists (path): Checks whether a file/folder exists.isDirectory (path): Checks whether the path created points to a directory.isExecutable (path): Checks whether the file is an executable file.isHidden (path): Checks whether the file is visible or hidden in the operating system.
5-8. Creating a Directory
Problem
You need to create a directory from your Java application.
Solution 1
By using the default FileSystem, you instantiate a path pointing to the new directory; then the Files.createDirectory() static method creates the directory specified in the path.
        FileSystem fileSystem = FileSystems.getDefault();

        Path directory= fileSystem.getPath("./newDirectory");

        try {

            Files.createDirectory(directory);

        } catch (IOException e) {

            e.printStackTrace();

        }
Solution 2
If using a Linux operating system, you can specify the folder attributes by invoking the PosixFilePermission() method, which lets you set access at the owner, group, and world levels. For example:
        FileSystem fileSystem = FileSystems.getDefault();

        Path directory= fileSystem.getPath("./newDirectoryWPermissions");

        try {

            Set<PosixFilePermission> perms = PosixFilePermissions.fromString("rwxr-x---");

            FileAttribute<Set<PosixFilePermission>> attr =

PosixFilePermissions.asFileAttribute(perms);

            Files.createDirectory(directory, attr);


        } catch (IOException e) {

            e.printStackTrace();

        }
How It Works
The Files.createDirectory() method takes a path as a parameter and then creates the directory. By default, the directory created will inherit the default permissions. If you wanted to specify specific permissions in Linux, you can use the PosixAttributes as an extra parameter in the createDirectory() method.
5-9. Iterating Over Files in a Directory
Problem
You need to scan files from a directory. There are possibly subdirectories with more files. You want to include those in your scan.
Solution
Using the NIO.2, create a FileVisitor and visit the folder. For example:
        FileVisitor<Path> myFileVisitor = new SimpleFileVisitor<Path>() {

            @Override

            public FileVisitResult visitFile(Path file, BasicFileAttributes attrs)

                                throws IOException {

                System.out.println("Visited File: "+file.toString());

                return FileVisitResult.CONTINUE;

            }

        };


        FileSystem fileSystem = FileSystems.getDefault();

        Path directory= fileSystem.getPath(".");

        try {

            Files.walkFileTree(directory, myFileVisitor);

        } catch (IOException e) {

            e.printStackTrace();

        }
How It Works
Before NIO.2, trying to traverse a directory tree involved recursion, and depending on the implementation, it could be very brittle. The calls to get files within a folder were synchronous and required the scanning of the whole directory before returning, generating what appears to be an unresponsive method call. With the new NIO.2, one can just tell the VM which folder to start traversing on, and the NIO.2 calls will handle the recursion details on its own. The only thing you provide to the NIO.2 API is a class that tells it what to do when a file/folder is found (SimpleFileVisitor implementation). Also, because NIO.2 uses a Visitor pattern, it doesn't need to prescan the whole folder, but instead processes files as they are being iterated over.
The implementation of the SimpleFileVisitor class as an anonymous inner class includes overriding the visitFile(Path file, BasicFileAttributesattrs() method. When you override this method, you can put the behavior of what do when a file is encountered.
The visitFile method returns a FileVisitReturn enum. This enum then tells the FileVisitor what action to take:
CONTINUE: Will continue with the traversing of the directory tree.TERMINATE: Stops the traversing.SKIP_SUBTREE: Stops going deeper from the current tree level (only useful if this enum is returned on thepreVisitDirectory()method).SKIP_SIBLINGS: Skips the other directories at the same tree level than the current.
The SimpleFileVisitor class, aside from the visitFile() method, also contains the following:
preVisitDirectory: Called before entering a directory to be traversedpostVisitDirectory: Called after finished traversing a directoryvisitFile: Called as it visits the file, as in our example codevisitFileFailed: Called if the file cannot be visited; for example, on an I/O error
5-10. Querying (and Setting) File Metadata
Problem
You need to get information about a particular file, such as file size, whether it's a directory, etc. Also, you might want to mark a file as Archived in the Windows operating system or grant specific POSIX file permissions in the Linux operating system (refer to Recipe 5-8).
Solution
Using Java NIO.2 you can get a lot more information on a file/directory than you could do with the regular NIO. For example:
        Path path = FileSystems.getDefault().getPath("./file2.log");

        try {

            // General file attributes, supported by all Java systems

            System.out.println("File Size:"+Files.size(path));

            System.out.println("Is Directory:"+Files.isDirectory(path));

            System.out.println("Is Regular File:"+Files.isRegularFile(path));

            System.out.println("Is Symbolic Link:"+Files.isSymbolicLink(path));

            System.out.println("Is Hidden:"+Files.isHidden(path));

            System.out.println("Last Modified Time:"+Files.getLastModifiedTime(path));

            System.out.println("Owner:"+Files.getOwner(path));


            // Specific attribute views.

            DosFileAttributeView view = Files.getFileAttributeView(path,

DosFileAttributeView.class);

            System.out.println("DOS File Attributes
");

    System.out.println("------------------------------------
");

            System.out.println("Archive  :"+view.readAttributes().isArchive());

            System.out.println("Hidden   :"+view.readAttributes().isHidden());

            System.out.println("Read-only:"+view.readAttributes().isReadOnly());

            System.out.println("System   :"+view.readAttributes().isSystem());


            view.setArchive(false);


        } catch (IOException e) {

            e.printStackTrace();

        }
How It Works
Java NIO.2 allows much more flexibility in getting and setting file attributes. NIO.2 abstracts the different operating system attributes into both a “Common” set of attributes and an “OS Specific” set of attributes. The standard attributes are the following:
isDirectory: True if it's a directory.isRegularFile: Returns false if the file isn't considered a regular file, the file doesn't exist, or it can't be determined whether it's a regular file.isSymbolicLink: True if the link is symbolic (most prevalent in Unix systems).isHidden: True if the file is considered to be hidden in the operating system.LastModifiedTime: The time the file was last updated.Owner: The file's owner per the operating system.
Also, NIO.2 allows entering the specific attributes of the underlying operating system. To do so, you first need to get a view that represents the operating system's file attributes (in this example, it is a DosFileAttributeView). Once you get the view, you can query and change the OS-specific attributes.
![]() Caution Please note that the
Caution Please note that the AttributeView will only work for the operating system that is intended (you cannot use the DosFileAttributeView in a Linux machine).
5-11. Monitoring a Directory for Changes
Problem
You need to keep track when a directory's content has changed (for example, a file was added, changed, or deleted) and act upon those changes.
Solution
By using a WatchService, you can subscribe to be notified on events happening on that folder. In this example, we subscribe for ENTRY_CREATE, ENTRY_MODIFY, and ENTRY_DELETE events:
        try {

            System.out.println("Watch Event, press q<Enter> to exit");

            FileSystem fileSystem = FileSystems.getDefault();

            WatchService service = fileSystem.newWatchService();

            Path path = fileSystem.getPath(".");

            System.out.println("Watching :"+path.toAbsolutePath());

            path.register(service, StandardWatchEventKinds.ENTRY_CREATE,

StandardWatchEventKinds.ENTRY_DELETE, StandardWatchEventKinds.ENTRY_MODIFY);

            boolean shouldContinue = true;

            while(shouldContinue) {

                WatchKey key = service.poll(250, TimeUnit.MILLISECONDS);


                // Code to stop the program

                while (System.in.available() > 0) {

                    int readChar = System.in.read();

                    if ((readChar == 'q') || (readChar == 'Q')) {

                        shouldContinue = false;

                        break;

                    }

                }

                if (key == null) continue;

                for (WatchEvent<?> event : key.pollEvents()) {

                    if (event.kind() == StandardWatchEventKinds.OVERFLOW) continue;

                    WatchEvent<Path> ev = (WatchEvent<Path>)event;

                    Path filename = ev.context();

                    System.out.println("Event detected :"+filename.toString()+" "+ev.kind());

                }

                boolean valid = key.reset();

                if (!valid) {

                    break;

                }

            }

        } catch (IOException | InterruptedException e) {

            e.printStackTrace();

        }
How It Works
With NIO.2, you now have a built-in poll mechanism to watch for changes in the FileSystem. Using a poll mechanism allows you to wait for events and check them at an interval. Once an event happens, you can process it, and, at the end of processing it, consume it. A consumed event tells the NIO.2 framework that you are ready to handle a new event.
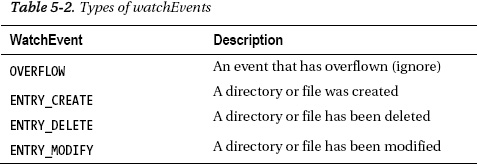
To start watching a folder, create a WatchService that you can use to poll for changes. After the WatchService is created, you should register the WatchService with a path. A path symbolizes a folder in the system. When the WatchService is registered with the path, you define what kinds of events you want to receive (see Table 5-2).
After registering the WatchService with the path, you can then “poll” the WatchService for events. By calling the watchService.poll() method, you will wait for a file/folder event on that path. Using the watchService.poll(int timeout, Timeunit timeUnit) will wait until the timeout specified before continuing. If the watchService receives an event, or if the allowed time has passed, then it will continue execution. If there were no events and the timeout was reached, the WatchKey object returned by the watchService.poll(int timeout) will be null, otherwise the WatchKey object returned will contain the relevant information for the event that has occurred.
Because many events can happen at the same time (say, for example, moving a whole folder or pasting a bunch of files in a folder), the WatchKey might contain more than one event. You can use the watchKey to get all the events that are associated with that key by calling the watchKey.pollEvents() method.
The watchKey.pollEvents() call will return a list of watchEvents that can then be looped through. Each watchEvent contains information on the actual file or folder that the event refers to (for example, a whole subfolder could have been moved or deleted), and the event type (add, edit, delete). The only event types that you will be notified of are the eventTypes registered for when creating the watchService. The event types you can register are listed in Table 5-2.
Once an event has been processed, it is important to call the EventKey.reset(). The reset will return a Boolean value determining whether the WatchKey is still valid or not. A WatchKey becomes invalid if it is cancelled or if its originating watchService is closed. If the eventKey returns false, you should break from the watch loop.
5-12. Reading Property Files
Problem
You need to create some settings for your program that needs to be editable either with text or programmatically.
Solution
Using the Properties object, we load properties stored in the properties.conf file. For certain properties, if not present in the file, we use a default value. Toward the end of the example, we rewrite the properties.conf file, saving the properties back to the file:
File file = new File("properties.conf");

try {

    if (!file.exists()) file.createNewFile();

} catch (IOException e) {

    e.printStackTrace();

}


Properties properties = new Properties();

try {

    properties.load(new FileInputStream("properties.conf"));

} catch (IOException e) {

    e.printStackTrace();

}


boolean shouldWakeUp = false;

int startCounter  = 100;


String shouldWakeUpProperty = properties.getProperty("ShouldWakeup");

shouldWakeUp = (shouldWakeUpProperty == null) ? false :

Boolean.parseBoolean(shouldWakeUpProperty.trim().toLowerCase());


String startCounterProperty = properties.getProperty("StartCounter");

try {

  startCounter = Integer.parseInt(startCounterProperty);

} catch (Exception e) {

    System.out.println("Couldn't read startCounter, defaulting to "+startCounter);

}

String dateFormatStringProperty = properties.getProperty("DateFormatString","MMM dd yy");


System.out.println("Should Wake up? "+shouldWakeUp);

System.out.println("Start Counter: "+startCounter);

System.out.println("Date Format String:"+dateFormatStringProperty);


//setting property

properties.setProperty("StartCounter","250");

try {

    properties.store(new FileOutputStream("properties.conf"),"Properties Description");

} catch (IOException e) {

    e.printStackTrace();

}

properties.list(System.out);
How It Works
The Java Properties class helps you manage your program properties. It allows you to manage the properties either by external modification (someone editing a myapp.conf file) or internally by using the Properties.store() method.
The Properties object can be instantiated either without a file or with a preloaded file. The files that the Properties object read are in the form of [name]=[value] and are textually represented. If you need to store values in other formats, you need to write to and read from a String.
If you are expecting the files to be modified outside the program (the user directly opens a text editor and changes the values), be sure to sanitize the inputs; like trimming the values for extra spaces and ignoring case if need be.
To query the different properties from the Properties, you call the getProperty(String) method. The method will return null if the property is not found. Alternatively, you can invoke the getProperty (String,String) method, on which if the property is not found in the Properties object, it will return the second parameter as its value. It is a good practice to default values in case the file doesn't have an entry for a particular key.
If you look at the generated property file, you will notice that the first two lines indicate the description of the file, and the date when it was modified. These two lines start with #, which in Java property files is the equivalent of a comment. When starting a line with #, the Properties object will skip that line when processing the file.
![]() Caution If you allow users to modify your configuration files directly, it is important to have validation in place when retrieving properties from the
Caution If you allow users to modify your configuration files directly, it is important to have validation in place when retrieving properties from the Properties object. One of the most common issues encountered in the value of properties is leading and/or trailing spaces. If specifying a Boolean or integer property, be sure that they can be parsed from a String. At a minimum, catch an exception when trying to parse to survive an unconventional value (and log the offending value).
5-13. Uncompressing Compressed Files
Problem
You have to uncompress and extract files from a compressed .zip file.
Solution
Using the Java.util.zip package, you can open a .zip file and loop through its entries. If we find a directory entry, we create the directory. If we find a file entry, we write the decompressed file to the file .unzipped.
    file = new ZipFile("file.zip");

    FileSystem fileSystem = FileSystems.getDefault();

    Enumeration<? extends ZipEntry> entries = file.entries();

    String uncompressedDirectory = "uncompressed/";

    Files.createDirectory(fileSystem.getPath(uncompressedDirectory));

    while (entries.hasMoreElements()) {

        ZipEntry entry = entries.nextElement();

        if (entry.isDirectory()) {

            System.out.println("Creating Directory:" + uncompressedDirectory

+ entry.getName());

            Files.createDirectories(fileSystem.getPath(uncompressedDirectory

+ entry.getName()));

        } else {

            InputStream is = file.getInputStream(entry);

            System.out.println("File :" + entry.getName());

            BufferedInputStream bis = new BufferedInputStream(is);


            String uncompressedFileName = uncompressedDirectory + entry.getName();

            Path uncompressedFilePath = fileSystem.getPath(uncompressedFileName);

            Files.createFile(uncompressedFilePath);

            FileOutputStream fileOutput = new FileOutputStream(uncompressedFileName);

            while (bis.available() > 0) {

                fileOutput.write(bis.read());

            }

            fileOutput.close();

            System.out.println("Written :" + entry.getName());

        }

    }
How It Works
By creating a ZipFile object, you get access to the .zip file information. Each ZipFile object will contain a collection of entries, and by looping through the entries you can get information on each of the compressed files in the Zip folder. Each ZipEntry instance will have the compressed and uncompressed size, the name, and the input stream of the uncompressed bytes.
By hooking up to the input stream, we can then read the uncompressed bytes into a byte buffer to then (in our case) write it to a file. Using the fileStream we ask how many bytes we can read without blocking the process. Once we read these many bytes, we then in turn write the read bytes directly into the output file. We keep doing this until we read the number of bytes of the uncompressed file.
![]() Caution Reading the whole file in memory might not be a good idea if the file is extremely large in size. If you need to work with a large file, it would be best to first write it uncompressed to disk (as in the example) and then open it and load it in chunks. If the file that you are working on is not large (you can limit the size by checking the
Caution Reading the whole file in memory might not be a good idea if the file is extremely large in size. If you need to work with a large file, it would be best to first write it uncompressed to disk (as in the example) and then open it and load it in chunks. If the file that you are working on is not large (you can limit the size by checking the getSize() method) you can probably load it in memory.