
C H A P T E R 13
![]()
Java3D
Writing 3D applications used to be hard because a developer needed to know math, have intimate hardware knowledge, and it that hardware knowledge usually didn't transfer very well across platforms. A typical application would have to be programmed for a specific video card. As time progressed, there were new abstractions that within a platform allowed the use of a common API. This common API then either used the capabilities of the video card or implemented them in software, but it was still OS-dependent (Direct3D for Windows, OpenGL for Windows, and other OSs). Finally with Java3D, you get platform-independence and the choice of rendering technology (works with DirectX or OpenGL). While 3D programming still requires (some) math, at the very least there aren't drivers to worry about. It's more about what you want to create than the hardware details of how to create it.
![]() Tip The source code for this chapter contains an actual game that puts all the chapter's recipes together. If you would like to see the different interactions between recipes, you should take a look at the source of SpaceGame.java.
Tip The source code for this chapter contains an actual game that puts all the chapter's recipes together. If you would like to see the different interactions between recipes, you should take a look at the source of SpaceGame.java.
13-1. Installing Java3D
Problem
You need to install Java3D for use by your application.
Solution
Download Java3D from java.net's web site and install it locally. Java3D currently lives at http://java3d.java.net/. Make sure to choose the right version of Java3D for your target OS because there are Windows, Linux, and Mac distributions, and each has 32- or 64-bit variants. Once installed, add a dependency to your application of the <installed Java3d Path>/lib/ package. Your application should have then access to the Java3D classes and methods.
How it works
After installing the Java3D package, you will have access to the accelerated graphics environment provided by the computer's video card. Java3D uses OpenGL/Directx (depending on the operating system running), and has native libraries for the major operating systems. This is why you need to specify the target operating system when downloading Java3D.
13-2. Creating a Simple 3D Object
Problem
You want to create a Java3D object and display it on the screen.
Solution
Using the Java3D's Canvas3D and creating a Scene graph, you can instantiate and display a 3D object onscreen. The following example creates a color cube object, which is a cube with different colors on each side, and displays it onscreen at the default view location (which is looking straight at the cube):
    private void start() {

        JFrame frame = new JFrame("Space Game");

        GraphicsConfiguration configuration = SimpleUniverse.getPreferredConfiguration();

        final Canvas3D canvas = new Canvas3D(configuration);

        JPanel contentPane = new JPanel(new BorderLayout());

        contentPane.add (canvas);

        frame.setContentPane(contentPane);

        // Set universe Viewing Plate where we want it..

        SimpleUniverse universe = new SimpleUniverse(canvas);

        universe.getViewingPlatform().setNominalViewingTransform();

        View view = canvas.getView();

        view.setBackClipDistance(300f);


        // Our Scene

        BranchGroup scene = createScene();

        universe.addBranchGraph(scene);

        frame.setDefaultCloseOperation(JFrame.EXIT_ON_CLOSE);

        frame.setSize(800,600);

        frame.setVisible(true);

    }


    private BranchGroup createScene() {

        BranchGroup branchGroup = new BranchGroup();

        branchGroup.addChild(new ColorCube(.3f));

        branchGroup.compile();

        return branchGroup;

    }
The Canvas3D instance takes care of rendering the application. This is the component that gets added to the JPanel (or other components) and will be a “Window” to the 3D universe created in Java3D.
The SimpleUniverse offers a way of creating a simplified 3D universe; the difference is that it makes certain assumptions like not needing different canvases, and gets sensible defaults for the viewing platform.
The viewing platform is the “eye” positioned within the universe. Only objects that are “in front” and “visible” through the eye are rendered in the canvas. The universe can be very big, and the position (where it is within the universe) and direction (where is it pointing at) determines what do we see in the canvas.
In the example, the viewing platform is located at the origin of the universe (0,0,0), and points toward the depth (-z) space (default). The result is the image in Figure 13-1.
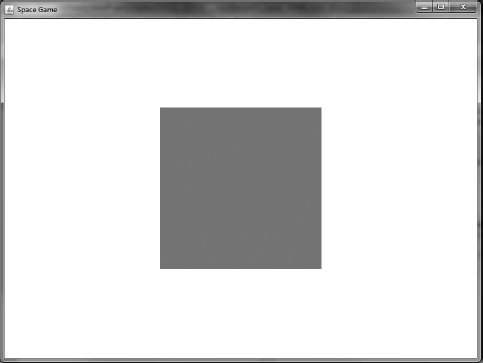
Figure 13-1. Rendering a cube in Java3D
How It Works
Java3D works with trees and nodes. The root node is where a scene starts, and it will include different nodes that represent the objects to be rendered. Each root node will have children nodes that describe transformations on an object. The leaf nodes of the tree will contain actual 3D objects to be rendered. To render an object you add the 3D object to a node and then add the node to the universe. Figure 13-2 illustrates this concept.
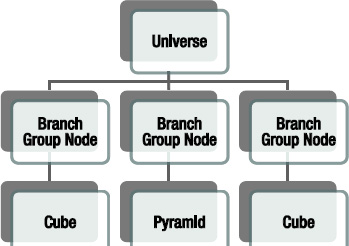
Figure 13-2. Java3D basic universe hierarchy
Within a tree, there are two main types of nodes: branch group nodes and transformation nodes. Transformation nodes are nodes that specify a change for their children. The change can be rotation, translation, and/or scaling. A transformation node can have as children other branch group nodes, other transformation nodes, or the actual 3D objects. Any children of the transformation node will have the transformation (rotation, translation, scaling) applied to all its children as a whole.
Branch group nodes, on the other hand, allow grouping of children nodes and/or 3D objects as a single unit. By adding children to branch group nodes, a branch group node can be manipulated as a single unit. An example would be having a chair composed of different individual 3D objects (six boxes). Each box will be added to a transform group (where the position of each box is specified). After the transform nodes are created, you can add them to a single group node that represents a single “chair.” This group node can be rotated as a unit by attaching it to a transformation node. An example of such a hierarchy is presented in Figure 13-3.

Figure 13-3. Java3D typical universe hierarchy
The easiest way to think of Java3D object is by starting on the “leaves” of the tree (or the actual object that you want to position); then working the way up by making this object a part of a branch group and then adding “transformations” to it. The first one usually will be rotation (which, by default, rotates at the center of the world). Then you make another parent node that does translation; then you add another parent node that makes it part of another group (say part of a chair), and finally you add it to the “top” of the universe. This way you have a complete set of changes you want for each object added to the universe.
![]() Note Java3D's universe uses a Cartesian coordinate system. Most of the measures are done in meters; even so the universe supports any arbitrary distance unit convention. As long as your objects (and your viewing platform) within the universe agree on their relative scale, the universe will render correctly.
Note Java3D's universe uses a Cartesian coordinate system. Most of the measures are done in meters; even so the universe supports any arbitrary distance unit convention. As long as your objects (and your viewing platform) within the universe agree on their relative scale, the universe will render correctly.
13-3. Transforming Objects
Problem
Now that you have an object rendered in the canvas, you want to place it in a specific place on a specific rotation.
Solution
By creating a TransformGroup object and specifying transformations, you can define how an object looks in the canvas. The following example builds on our red cube from the previous recipe by rotating it so that you view two sides at once:
    private TransformGroup createAsteroid( double x, double z) {

        // Leaf, the Cube

        ColorCube child = new ColorCube(0.3f);


        Transform3D rotationTransform = new Transform3D();

        rotationTransform.rotY(Math.PI/8);              // pi/8 radians == 22.5 degrees

        TransformGroup rotationGroup = new TransformGroup(rotationTransform);

        rotationGroup.addChild(child);


        // 2nd Transform Group, translates.

        Transform3D locationTransform = new Transform3D();

        locationTransform.setTranslation(new Vector3d(x, 0d, z));

        TransformGroup translateGroup = new TransformGroup(locationTransform);

        translateGroup.setTransform(locationTransform);

        translateGroup.addChild(rotationGroup);


        return translateGroup;

    }
In this code, the colorCube is created, and then added to a rotationTransform. In the rotationTransform you specify (by creating a Transform3D object) to rotate the cube by 22.5 degrees (pi/8 in radians). Following the first transform group, another transform group is created that translates (moves) the object to the x,z coordinates specified in the function. Note that the location transform adds the rotationTransform as a child. The translation transform is then added to the universe (not shown). Figure 13-4 shows the solution's result.
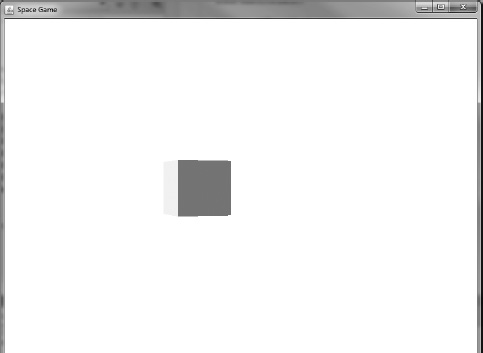
Figure 13-4. Rendering a rotated and translated cube in Java3D.
How It Works
The transform group node is a node in the universe tree that specifies the transformations that are going to be applied to any children of it. A TransformGroup object can have a leaf as a child (like a colorCube or a pyramid) or it can have other transform groups/branch groups as children. The transform group changes the object's rotation, scaling, and/or location.
In this recipe's example, you start with the cube (which is a cube that has each face rendered with a different color) and then add it to a transform group that rotates the cube 22.5 degrees (expressed in radians, this translates to pi/8). After rotating, you add another transform group that translates the location of the rotated group. This is a common process when creating and adding objects to a scene. Chaining up transform groups (with branch groups and all) allows for expressing complex behavior with simple building blocks.
Each transform group needs a transform3D object to specify the changes to the children of the transform group. Within 3D development, there is the concept of transformation matrices. These matrices (double-dimensional arrays of numbers) allow you to specify how an object is rotated, translated, and scaled, all at the same time. The transform3D contains a transformation matrix method (on which rotation, translation, and scaling can all be changed at once), but it also contains helper methods for rotating, translating, and scaling (among other 3D operations) that don't require you to specify a transformation matrix.
13-4. Animating a 3D object
Problem
Now that you have the object looking as you wished, you want to animate it by moving it or rotating it.
Solution
By specifying interpolators, you can change a transform group on a timed interval. For example, the following code creates a spinning cube:
    private TransformGroup createAsteroid( double x, double z) {

        // Leaf, the Cube

        ColorCube child = new ColorCube(0.3f);

        //Wrap around a branchgroup

        BranchGroup asteroidGroup = new BranchGroup();

        asteroidGroup.addChild(child);


        // 1st transform group, rotates

        TransformGroup rotateGroup = new TransformGroup();

        rotateGroup.setCapability(TransformGroup.ALLOW_TRANSFORM_READ);

        rotateGroup.setCapability(TransformGroup.ALLOW_TRANSFORM_WRITE);

        rotateGroup.addChild(asteroidGroup);


        Alpha scaleAlpha = new Alpha(-1,random.nextInt(16000));

        RotationInterpolator rotationInterpolator = new RotationInterpolator(scaleAlpha, rotateGroup);

        rotationInterpolator.setSchedulingBounds(new BoundingSphere(new Point3d(),1000f));      // rotate when we're 1000f

        rotationInterpolator.setTransformAxis(new Transform3D());

        rotateGroup.addChild(rotationInterpolator);


        // 2nd Transform Group, translates.

        TransformGroup translateGroup = new TransformGroup();

        Transform3D locationTransform = new Transform3D();

        locationTransform.setTranslation(new Vector3d(x,0d,z));

        translateGroup.setTransform(locationTransform);

        translateGroup.addChild(rotateGroup);

        translateGroup.setCapability(BranchGroup.ALLOW_DETACH);


        return translateGroup;

    }
In this example, you create an interpolator (which is the class responsible for animating and changing the transform group). The interpolator requires an Alpha object, which describes the timeline on which the transformation happens (Alpha will produce a number between 0 and 1 that indicates how much to rotate). The alpha is specified to go from 0 to 1 in a random number (up to 16,000) of milliseconds, and is specified to repeat this task infinitely (the first argument in the Alpha constructor). Figure 13-5 shows a frame of the resulting spinning cubes.
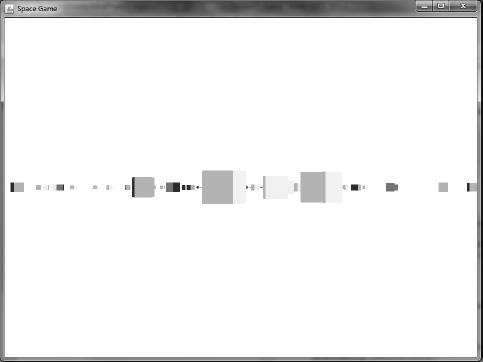
Figure 13-5. Animating many cubes in Java3D
How It Works
There are three main concepts that you have to understand to achieve animation. The first is the Alpha class, which specifies the timing and repeatability of an animation. It produces a value between 0 and 1, and the value produced depends on time and its initial parameters. You can specify the following in the Alpha class:
- How the Alpha class transforms from 0 to 1 and back again. You can choose between a linear and an exponential approach.
- How many times to repeat the transformation. Do you wish to animate once or cyclically?
- When to start (the
starttimeattribute).
The second concept is of interpolators. Each subclass of interpolators changes a specific property of a transform group. The recipe example uses rotationInterpolator to change the rotation of the object. By combining an interpolator with an Alpha, you can get smooth animation that is platform-independent because the Alpha object specifies the time to take. In very fast systems, you might see 30 frames per second, whereas in slow systems you might see 15 frames per second. But even so, the rotation will take the same number of seconds to finish. When you create an interpolator, you add it as a child of the transform group you want animated.
Finally, the animation occurs only when the viewer is within certain bounds. If the viewer is outside of those bounds, the Canvas3D will not animate the object. To do so, you specify the setTransformBounds property on each transformGroup. This is done for performance reasons. If an object is very far away, it might not be necessary or useful to animate it. Specifying the transform bounds allows you to lower the amount of CPU that is devoted to transformations because it will only animate when the view is within those bounds. The bounds are specified by an implementer of the Bounds class. The boundingSphere is the simplest implementation because it just involves a sphere centered where the transform group is, with a specified sphere ratio.
So far, before the current recipe, there were only “static” scenes, on which things have been added at the beginning and then rendered without any animation. As you move into changing objects by time (or by responding to things such as key presses), you must make each branch group/transform group aware that you are going to change their state after you add them to their universe. In the case of the recipe's rotation animation, you need to specify the transform group capabilities of ALLOW_TRANSFORM_READ, ALLOW_TRANSFORM_WRITE. This signals the universe that you might go and revisit this transform group and change its transformation parameters by using the rotation interpolator.
13-5. Navigating the Created 3D Universe
Problem
You are creating the 3D universe by adding transform/branch groups and want to navigate it.
Solution
Using KeyNavigatorBehavior and MouseRotate, you can create a navigable universe. The following example creates a cluster of cubes, on which you can navigate by using the keyboard or the mouse. Figure 13-6 shows a screenshot of what the example looks like.
        KeyNavigatorBehavior keyNavigatorBehavior = new

KeyNavigatorBehavior(universe.getViewingPlatform().getViewPlatformTransform());

        keyNavigatorBehavior.setSchedulingBounds(new BoundingSphere(new Point3d(), 1000.0));

        branchGroup.addChild(keyNavigatorBehavior);


        TransformGroup transformGroup = new TransformGroup();

        transformGroup.addChild(branchGroup);

        transformGroup.setCapability(TransformGroup.ALLOW_TRANSFORM_WRITE);

        transformGroup.setCapability(TransformGroup.ALLOW_TRANSFORM_READ);

        MouseRotate mouseRotate = new MouseRotate();

        mouseRotate.setTransformGroup(transformGroup);

        mouseRotate.setSchedulingBounds(new BoundingSphere(new Point3d(),1000f));

        BranchGroup topGroup = new BranchGroup();

        topGroup.addChild(transformGroup);

        topGroup.addChild(mouseRotate);

        topGroup.compile();
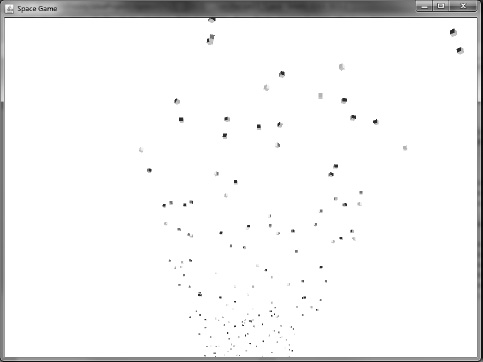
Figure 13-6. Navigating the universe in Java3D
How It Works
KeyNavigatorBehavior sets up a default keyboard mapping that allows you change the viewing platform. Pressing the keyboard's navigation keys moves the viewing platform around the universe. KeyNavigatorBehavior (like all other objects that change or interact with the universe) requires a scheduling bound. The scheduling bound allows Java3D to figure out whether we are close enough to check for the iteration and move the transform group. The use of SchedulingBounds is common in all objects that cause an interaction with the universe; it should be the first thing to debug when the universe doesn't respond to the intended stimuli.
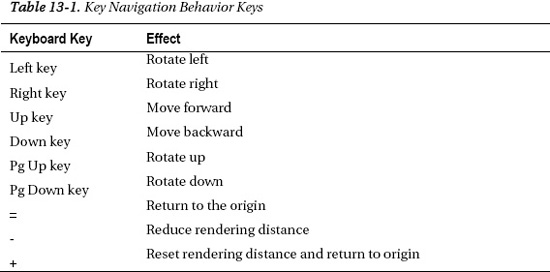
KeyNavigatorBehavior is added then to the ViewPlatform's transform group. ViewPlatform is another “leaf” of the universe. To position the view, you change the transform group that contains the ViewPlatform, which is available by calling the ViewPlatform's getViewPlatformTransform(), which in turn changes how we see the universe. Table 13-1 describes the navigation keys at your disposal.
The mouseRotate behavior allows you to use the mouse to rotate a transform group's children. By creating a transform group that contains the whole scene in the universe, you can use mouseRotate to rotate the universe. mouseRotate needs to be added to the TransformGroup that will be rotated, and also needs the SchedulingBounds property set. Because mouseRotate is changing the TransformGroup after it was created, the TransformGroup needs to have the ALLOW_TRANSFORM_READ and ALLOW_TRANSFORM_WRITE capabilities set.
![]() Caution Having these utility classes will interfere with any other viewer positioning and/or behavior that you later add in your program. If you intend to introduce different navigation by keyboard, you should remove the keyboard/mouse navigators in this recipe.
Caution Having these utility classes will interfere with any other viewer positioning and/or behavior that you later add in your program. If you intend to introduce different navigation by keyboard, you should remove the keyboard/mouse navigators in this recipe.
13-6. Responding to Keyboard Events
Problem
You need to change the universe when someone presses a key.
Solution
Use behaviors to capture keyboard events, and change transform groups in response to the behaviors. The following recipe solution moves our spaceship left or right depending on the key pressed.
/// createSpaceShip

        TransformGroup userTransformGroup = new TransformGroup();

        userTransformGroup.addChild(positionGroup);

        userTransformGroup.setCapability(TransformGroup.ALLOW_TRANSFORM_READ);

        userTransformGroup.setCapability(TransformGroup.ALLOW_TRANSFORM_WRITE);


        KeyboardMoveBehavior keyboardMoveBehavior

                = new KeyboardMoveBehavior(userMovementGroup, transformGroup);

        keyboardMoveBehavior.setSchedulingBounds(new BoundingSphere(new Point3d(), 1000f));

        userTransformGroup.addChild(keyboardMoveBehavior);

        transformGroup.addChild(userTransformGroup);


/// Class definition

    class KeyboardMoveBehavior extends Behavior {


        @Override

        public void initialize() {

            this.wakeupOn(new WakeupOnAWTEvent(KeyEvent.KEY_PRESSED));

            currentAxis = 0f;

        }


        @Override

        public void processStimulus(Enumeration criteria) {

            while (criteria.hasMoreElements()) {

                Object element = criteria.nextElement();

                if (element instanceof WakeupOnAWTEvent) {

                    WakeupOnAWTEvent event = (WakeupOnAWTEvent) element;

                    for (AWTEvent awtEvent : event.getAWTEvent()) {

                        if (awtEvent instanceof KeyEvent) {

                            KeyEvent keyEvent = (KeyEvent) awtEvent;

                            if (keyEvent.getKeyCode() == KeyEvent.VK_LEFT) {

                                moveLeft();

                            } else if (keyEvent.getKeyCode() == KeyEvent.VK_RIGHT) {

                                moveRight();

                            } else if (keyEvent.getKeyCode() == KeyEvent.VK_UP) {

                                moveForward();

                            } else if (keyEvent.getKeyCode() == KeyEvent.VK_DOWN) {

                                moveBackwards();

                            }

                        }

                    }

                }

            }

            this.wakeupOn(new WakeupOnAWTEvent(KeyEvent.KEY_PRESSED));

        }

  }
The KeyboardBehavior extends the Behavior class and implements the initialize() and processStimulus() methods. The initialize() method registers the stimuli that the behavior class will respond to. This recipe calls upon wakeupOn(new WakeupOnAWTEvent(KeyEvent.KEY_PRESSED)) to register an interest in any key that is pressed.
How It Works
Behavior classes allow you to register callbacks on certain conditions called stimuli (like a key press or an object collision). When the stimulus happens, the behavior then calls its processStimulus method with information about the stimulus (for example, what key was pressed). Within the processStimulus, you can then make changes to a transform group (or add/remove children groups) to update the universe. The behavior class can be used to register for many types of stimuli, allowing for an efficient event dispatching. Behavior classes are registered into transform groups.
Like any other Java3D that receives information at runtime, the behavior classes have a scheduling bound on which they will listen for the stimuli to happen. Also, if the behavior class changes a transform group, the transform group will need to have the capabilities set for the changes being made (for example, ALLOW_TRANSFORM_READ, ALLOW_TRANSFORM_WRITE).
![]() Note When a behavior processes a stimulus, it is necessary to reregister the stimuli that we want the behavior to listen to. This is done by making a call to the wakeupOn() method at the end of the
Note When a behavior processes a stimulus, it is necessary to reregister the stimuli that we want the behavior to listen to. This is done by making a call to the wakeupOn() method at the end of the processStimulus() method. This gives you the choice of keeping listening to the stimulus (by reregistering it) or listening to another set of stimuli altogether.
13-7: Changing an Object's Lighting
Problem
You want your object to look illuminated by a light source.
Solution
Using the Appearance class, you can set the rendered object's attribute such as color, material, and shade model. For example, the following solution creates random planets that hang below the asteroids (we're suspending belief for a minute and assume that planets can just be randomly thrown together for the sake of visual effects!): Figure 13-7 shows an example of a rendered planet in the game.
            Appearance appearance = new Appearance();

            Material material = new Material();

            appearance.setMaterial(material);

            appearance.setColoringAttributes(new ColoringAttributes(new Color3f(Color.yellow),

ColoringAttributes.SHADE_GOURAUD));

            Sphere sun = new Sphere(size, Sphere.GENERATE_NORMALS, appearance);

            sunGroup.addChild(sun);


            DirectionalLight directionalLight = new DirectionalLight();

            directionalLight.setDirection(0,1,-1);

            directionalLight.setColor(new Color3f(new Color(random.nextInt())));

            directionalLight.setInfluencingBounds(new BoundingSphere(new Point3d(),50f));

            sunGroup.addChild(directionalLight);
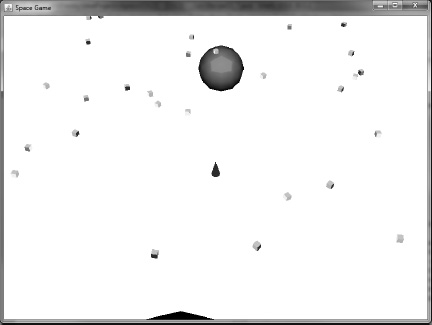
Figure 13-7. Shading objects in Java3D
How It Works
You can set the appearance of each leaf (primitive) object. The Appearance class describes information on the color of the object, the material (different materials will render differently under a light source), and the shade model. The shade model describes the detail on which the Java3D renders the color of the model. All objects (even smooth ones like spheres) are composed of geometric primitives (like triangles and squares). When painting the surface of an object, it is quicker to paint each primitive on a solid color (FLAT_SHADING), but it's not very realistic-looking. In contrast, GOURAUD_SHADING paints each primitive by interpolating the colors of the primitive with its neighbors. It creates a very smooth surface, but requires more CPU processing.
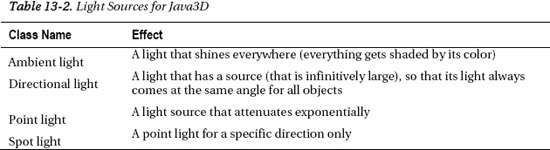
Aside from the appearance, you need a light source. There are four light sources that you can choose for Java3D. These are described in Table 13-2.
![]() Note For a light to work, you need to define an object's appearance (including material), a light source, and the influencing bounds of the light source (Up to what distance can it affect other objects). If any one of these is missing, objects will not render with a light source.
Note For a light to work, you need to define an object's appearance (including material), a light source, and the influencing bounds of the light source (Up to what distance can it affect other objects). If any one of these is missing, objects will not render with a light source.
A light gets added to a group (usually a transform group). Depending on the type of light, it either affects objects uniformly (ambient, directional) or affects them proportionally from the location of the light. Lights have another set of bounds called influencing bounds. By specifying influencing bounds, you are telling the light to affect every object that is within the bounds of the light. Lights influence any object in the scene graph that is in its influencing bounds. It is not limited to the group that the light is a child of.
Figure 13-8 shows a screenshot of the completed space game. The object of the game is to avoid (or destroy) the asteroids that are in your path. To do so, you use the left and right keys to move your spaceship and then use the spacebar to fire your laser gun. If an asteroid collides with you, it's game over!
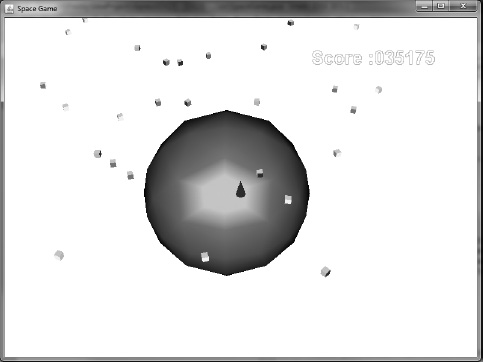
Figure 13-8. Space game