
C H A P T E R 14
![]()
Swing API
The Java Swing API is a GUI toolkit for developers to build client-side, cross-platform desktop applications. Swing is based on the Model View Controller (MVC) architectural framework pattern.
Long before the Swing API, the Abstract Window Toolkit (AWT) alone provided an abstraction layer over the native platform to enable standard windowing functionality. With the creation of Swing, a new dimension was added that allows greater cross-platform capabilities. Some of these capabilities include pluggable look and feel, advanced components (not found in AWT), and keyboard event bindings. Swing goes beyond AWT's abilities by rendering lightweight components that are platform independent. Swing and its foundational toolkit AWT are still heavily used.
Swing is a mature GUI toolkit that has been used in the enterprise for over a decade and still remains to be a viable desktop development solution today. As we move into the future, some user interfaces can become dated or lacking in cultural appeal. Swing was designed from the ground up to keep up with many modern look and feels by allowing many third parties to develop different themes (skins). Later in this chapter, you will learn how to set the look and feel of our applications.
Although there is a vast array of books about Swing, I will touch on the fundamentals and key concepts that will allow you to hit the ground running. In this chapter you will learn how the Swing API allows developers to create windows, custom layouts, buttons, menus, dialog boxes, animation, validation icon feedback, saving data to a database, and much more. So, let's get started on building GUI applications.
14-1. Creating a GUI
Problem
You want to create a simple GUI application.
Solution
Use Java's Swing API to create a simple GUI application. The following classes are the main classes used in this recipe:
The following code will create a simple GUI application using Java's Swing API. When the GUI application is launched, you will see a blank window with a title bar with the standard minimize, maximize, and close buttons.
package org.java7recipes.chapter14.recipe14_01;


import java.awt.BorderLayout;

import java.awt.Dimension;

import java.awt.Toolkit;

import javax.swing.JComponent;

import javax.swing.JFrame;

import javax.swing.SwingUtilities;


/**

 * Creating a GUI.

 * @author cdea

 */

public class CreatingAGui extends JComponent {


    /**

     * @param title the Chapter and recipe.

     * @param canvas the drawing surface.

     */

    protected static void displayGUI(final String title, final JComponent component) {


        // create window with title

        final JFrame frame = new JFrame(title);


        // set window's close button to exit application
        frame.setDefaultCloseOperation(JFrame.EXIT_ON_CLOSE);


        // place component in the center using BorderLayout

        frame.getContentPane().add(component, BorderLayout.CENTER);


        // size window based on layout

        frame.pack();


        // center window

        Dimension scrnSize = Toolkit.getDefaultToolkit().getScreenSize();

        int scrnWidth = frame.getSize().width;

        int scrnHeight = frame.getSize().height;

        int x = (scrnSize.width - scrnWidth) / 2;

        int y = (scrnSize.height - scrnHeight) / 2;


        // Move the window

        frame.setLocation(x, y);


        // display

        frame.setVisible(true);

    }
    public static void main(String[] args) {

        final CreatingAGui c = new CreatingAGui();

        c.setPreferredSize(new Dimension(290, 227));


        // Queueing GUI work to be run using the EDT.

        SwingUtilities.invokeLater(new Runnable() {

            public void run() {

                displayGUI("Chapter 14-1 Creating a GUI", c);

            }

        });

    }

}
Figure 14-1 shows the output from executing the preceding code. Shown here is a basic Swing GUI application with a title and standard window buttons.
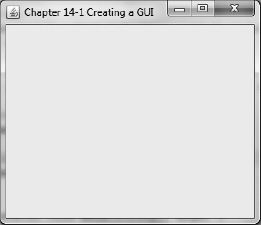
Figure 14-1. Basic GUI application
How It Works
This recipe is pretty straightforward and is the way most Java Swing GUI applications are started and run. They are similar to Java command-line applications, in which they use the main() method as an entry point when executing programs. However, Swing applications will additionally launch a separate thread responsible for displaying the application's UI and graphics. Knowing this fact, it is important to know the appropriate way to manage resources between the main and GUI thread. Before going into the steps of this recipe that assembles and displays the application window frame (javax.swing.JFrame), let's talk about a very important topic called thread safety. What is thread safety and how does it affect your applications?
Thread safety sounds quite scary at first, but it means that concurrent threads that operate on a single resource (data object) can cause any number of issues such as data corruption, race conditions, and even dead locks. However, more often when we talk about it in the GUI world, thread safety is mainly about blocking the GUI thread. In layman's (caveman) terms, your GUI application is frozen (GUI bad). Like most GUI toolkits, Swing uses a single-threaded model in which any GUI renderings are delegated (dispatched) to the GUI thread. In Swing, the GUI thread is called the EDT. The EDT expects events to be queued and ready to be invoked.
So what is the big deal with the EDT? Well, let's say you are periodically retrieving data and updating your GUI screen. The retrieval of the data can be pretty expensive, which can spend approximately one to five seconds (a lifetime IMO). If the retrieval code is called from the EDT, many controls such as buttons, graphics, and animations will typically appear frozen for long periods of time. It is important to defer non-GUI–related work on a separate thread so that blocking doesn't occur. When it's time to render Swing GUI components, you should allow the EDT to execute the code, but most often it's hard to distinguish a thread's context. The Swing API has a convenient way to ensure GUI code gets run on the EDT. This convenience method is the SwingUtilities.invokeLater(), which will asynchronously queue up GUI work to be run on the EDT. Shown here is the method call to queue GUI work onto the EDT:
SwingUtilities.invokeLater()
So let's get down to business. In the main() method, you will call SwingUtilities.invokeLater() by passing in an anonymous inner class of type Runnable where its run() method will invoke the method displayGUI() on the EDT. This may not be obvious, but when you run a Java application it is run on the main thread and not the EDT. This is an important concept because, as in the example scenario relating to the periodic retrieval of data (non-GUI–related work), the work should be deferred on a separate thread; likewise non-GUI threads should not call GUI-related work. If you ignored the use of the invokeLater() method, your application would likely render GUI widgets incorrectly. The following code snippet shows how to dispatch GUI work onto the EDT:
…

final CreatingAGui c = new CreatingAGui();

c.setPreferredSize(new Dimension(290, 227));


// Queueing GUI work to be run using the EDT.

SwingUtilities.invokeLater(new Runnable() {

    public void run() {

            displayGUI("Chapter 14-1 Creating a GUI", c);

    }

 });
Having said all those rules relating to the EDT, you're probably wondering why the two code lines above invokeLater() are not being invoked on the EDT and appearing to violate the rules mentioned earlier. Well, I have to tell you about an exception to the rule. Let me restate one of the rules mentioning threading responsibilities: non-GUI threads should not call GUI-related work. The exception to the rule is that it is okay if the GUI has not been realized. Being realized means the components are about to be shown or are currently being shown.
Now that you know how to safely display a GUI, let's look at the method displayGUI(). It is responsible for the actual creation of the GUI application. It first creates an instance of JFrame with a title. The JFrame is a native window frame that will house your Swing application along with GUI components. Next, you will set the default behavior when the user clicks the close button on the window. You will then take the component passed in to be placed in the content pane using the JFrame's default layout called the BorderLayout. Later, in recipe 14-4 you'll see how to align and position components using layouts. Once components are placed in the content pane along with the layout, you will invoke the JFrame's pack() method. The pack() method is responsible for taking preferred width, window dimension, and other sizing information to properly calculate GUI components that eventually is shown. Following the pack() method you will do a little math to center the window frame on the monitor display. Lastly, you will call the JFrame's setVisible() to true to display to display the GUI application window. When the pack() and setVisible() methods are called to show the components in the window frame, the displayed components are now considered to be realized.
14-2. Running a Swing Application
Problem
You want to run a Java Swing application.
Solution 1: Execute a Java App
On the command prompt, type the following and then press Enter:
java com.myproject.App
Solution 2: Execute a .jar Executable
Double click a .jar executable or on the command prompt type the following and then press Enter:
java –jar myapp.jar
Solution 3: Invoke from a Web Page
Click the Launch button on a web page containing a Java Web Start link. Figure 14-2 shows an example of the sort of button you might see.
Figure 14-2. Java Web Start
How It Works
There are three main ways to launch Java Swing applications. The first two solutions are run on the command line, and the last is via a link on a web page or an icon on your desktop.
Solution 1 is used when your class files are available in your classpath (compiled). This solution is as easy as running any Java application on the command line. To learn how to execute Java applications and pass arguments via the command line or terminal, please see recipe 1-4.
Solution 2 is used when the Java Swing application is packaged in a file called a .jar file (better known as a Java archive). Java archives that are run as a Swing application are specially built to contain metadata on details such as what class file contains a main() method as its entry point. To see more on how to create .jar file executables, see recipe 14-22.
Solution 3 is used when a user clicks a special hyperlink on a web page that launches the Swing application that will be pushed (installed) onto the local workstation. This technology is called Java Web Start. Underneath the covers, Java Web Start provides a network launching protocol called JNLP. Similar to solution 2, in which a .jar file contains a meta file (manifest), solution 3 uses a file with a extension of .jnlp. This file is hosted on the web server along with the .jar file ready to be served up. When a Swing application is launched, you will be presented with a dialog box relating to security (certificates and trusted authorities) and asking the option to put an icon on your desktop. For more details on deploying Swing, see recipe 14-22.
14-3. Adding Components to a GUI
Problem
Your boss has trouble remembering names of people and needs a way to capture a person's contact information.
Solution
Create a simple GUI application with some of Swing's standard UI components representing labels and input fields to allow a user to enter a person's name. I want to remind you that this recipe does not save any information. The following Swing-based UI components used in this recipe example are listed here:
javax.swing.JPaneljavax.swing.JButtonjavax.swing.JLabeljavax.swing.JTextField
In this recipe you will be creating a simple form type application that allows you to type in a person's first and last name. The application screen will contain labels beside the text fields to describe the input field. The form also has a save button to simulate the ability to save the information to a data store. Later in this chapter, you will learn how to save data into an embedded database. The following code listing is a simple form-type application containing some of Swing's standard UI components:
package org.java7recipes.chapter14.recipe14_03;


import javax.swing.JButton;

import javax.swing.JLabel;

import javax.swing.JPanel;

import javax.swing.JTextField;

import org.java7recipes.chapter14.SimpleAppLauncher;


/**

 * Adding Component to GUI.

 * @author cdea

 */

public class AddingComponent2Gui extends JPanel {


    public AddingComponent2Gui(){

        // first name

        add(new JLabel("First Name"));
        add(new JTextField("Fred"));


        // last name

        add(new JLabel("Last Name"));

        add(new JTextField("Sanford"));


        // save button

        add(new JButton("Save"));

    }


    public static void main(String[] args) {

        final JPanel c = new AddingComponent2Gui();

        // Queueing GUI work to be run using the EDT.

        SimpleAppLauncher.launch("Chapter 14-3 Adding Components to GUI", c);

    }

}
The following code listing is the helper class SimpleAppLauncher.java that assists in launching Swing applications by displaying the GUI in a thread safe way:
import java.awt.BorderLayout;

import java.awt.Component;

import java.awt.Dimension;

import java.awt.Toolkit;

import java.awt.event.ComponentAdapter;

import java.awt.event.ComponentEvent;

import javax.swing.JComponent;

import javax.swing.JFrame;

import javax.swing.SwingUtilities;


/**

 * SimpleAppLauncher will create a window and display a component and

 * abide by the event dispatch thread rules.

 *

 * @author cdea

 */

public class SimpleAppLauncher {

    /**

     * @param title the Chapter and recipe.

     * @param canvas the drawing surface.

     */

    protected static void displayGUI(final String title, final JComponent component) {


        // create window with title

        final JFrame frame = new JFrame(title);

        if (component instanceof AppSetup) {

            AppSetup ms = (AppSetup) component;

            ms.apply(frame);

        }


        // set window's close button to exit application
        frame.setDefaultCloseOperation(JFrame.EXIT_ON_CLOSE);


        component.addComponentListener(new ComponentAdapter() {

            // This method is called after the component's size changes

            @Override

            public void componentResized(ComponentEvent evt) {

                Component c = (Component)evt.getSource();


                // Get new size

                Dimension newSize = c.getSize();

                System.out.println("component size w,h = " + newSize.getWidth() + ", " + newSize.getHeight());

            }

        });


        // place component in the center using BorderLayout

        frame.getContentPane().add(component, BorderLayout.CENTER);

        frame.setMinimumSize(component.getMinimumSize());


        // size window based on layout

        frame.pack();


        // center window

        Dimension scrnSize = Toolkit.getDefaultToolkit().getScreenSize();

        int scrnWidth = frame.getSize().width;

        int scrnHeight = frame.getSize().height;

        int x = (scrnSize.width - scrnWidth) / 2;

        int y = (scrnSize.height - scrnHeight) / 2;


        // Move the window

        frame.setLocation(x, y);


        // display

        frame.setVisible(true);

    }


    public static void launch(final String title, final JComponent component) {


        SwingUtilities.invokeLater(new Runnable() {

            public void run() {

                displayGUI(title, component);

            }

        });// invokeLater()

    }// launch()

} // SimpleAppLauncher
Shown here is the AppSetup interface (AppSetup.java) used in later chapters to allow the SimpleAppLauncher class to apply UI components to the main application window. This is primarily used to add menu options to the main application window (JFrame). (It is not used in this recipe, but is mentioned in future recipes.)
Figure 14-3 displays a simple form containing some of Swing's standard UI components used to allow a user to enter a person's first and last name.
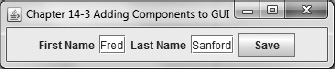
Figure 14-3. Adding components to a GUI
How It Works
When adding components to a GUI application, the first thing you will need is a container to hold components to eventually be displayed. In Swing, a common container that is often used is the JPanel class, which is not only a container but also a component (JComponent). It is just like other components it contains. In the inheritance hierarchy, all Swing components such as the JLabel, JTextField and JPanel classes extend from the JComponent class. So containers can contain other containers, and so on. By default, the JPanel uses a FlowLayout layout to position and size components according to certain layout constraints. In short, the flow layout will lay out the components horizontally and move them to the next line if the component reaches beyond the edge of the panel. Later, we will discuss layouts, but for now let's add some components onto the GUI.
In our default constructor, you will use JPanel's add() method to put components into the container. You will first add a JLabel component that represents a read-only label denoting the first name beside the input field. Next is an input field using Swing's JTextField component, allowing the user to enter and edit text. After the first name components are added, the last name components are added using the same steps as before. Finally, you will add a JButton component onto the JPanel. The following code line adds a save button onto the JPanel panel:
add(new JButton("Save"));
I know the UI form doesn't look very attractive, and the button doesn't do much of anything, you'll see in later recipes how to remedy these things. If you must know, go ahead and jump to layouts (recipe 14-4). To handle button events see recipe 14-5.
Before moving forward, I want to bring your attention to the main() method in this recipe, in which you will call out to the SimpleAppLauncher.launch() method to launch the GUI application window. This convenient method simply displays content in a JFrame window while honoring thread safety (EDT). The SimpleAppLauncher helper class is actually a refactoring of recipe 14-1, which abstracts away common GUI application code. Creating this helper class will enable us to focus on key concepts without being bogged down with application details. The rest of the recipes in Chapter 14 will be using SimpleAppLauncher.launch(), so you won't be scratching your head not knowing where the JFrame code resides.
One last thing to address is the AppSetup interface that I also created in support of SimpleAppLauncher; it is co-located with the org.java7recipes.chapter14.SimpleAppLauncher class. The AppSetup interface contains a single method called apply() that provides an opportunity for the developer to apply settings or menu components onto the parent application window (JFrame) independent of the launching code. The following code is the apply() method from the AppSetup interface:
void apply(JFrame frame);
When implementing the interface AppSetup, the SimpleAppLauncher.displayGUI() method will see whether the component is an instance of an AppSetup before executing the apply() method. Shown here is the SimpleAppLauncher.displayGUI() method:
    protected static void displayGUI(final String title, final JComponent component) {


        // create window with title

        final JFrame frame = new JFrame(title);

        if (component instanceof AppSetup) {

            AppSetup ms = (AppSetup) component;

            ms.apply(frame);

        }

        ...

        // rest of displayGUI() method
Continuing with the rest of the displayGUI() method, I will detail the code line steps to launch and display the application window. After the conditional statement checks to see whether the component is an instance of an AppSetup class, you will be setting the application window close operation by calling the method setDefaultCloseOperation() on the JFrame object with the value JFrame.EXIT_ON_CLOSE. Shown here is the code line to set the application window frame's default close operation when the user clicks the close button:
        // set window's close button to exit application

        frame.setDefaultCloseOperation(JFrame.EXIT_ON_CLOSE);
Most of the recipe code examples in this chapter will call the displayGUI() method by passing in the GUI content or component (JPanel container). When component is passed in, you may want to know the dimensions of the panel while the window is being resized. To know the dimensions of the panel, you will need to add a component listener (ComponentAdapter), allowing you to print out the width and height to the console. Shown here is the code snippet to add a component listener to output the component's dimension when the window is resized:
        component.addComponentListener(new ComponentAdapter() {

            // This method is called after the component's size changes

            @Override

            public void componentResized(ComponentEvent evt) {

                Component c = (Component)evt.getSource();


                // Get new size

                Dimension newSize = c.getSize();

                System.out.println("component size w,h = " + newSize.getWidth() + ", " + newSize.getHeight());

            }

        });
Next, you will want to set the component panel as the content pane and set the minimum size of the window frame based on the panel. You'll notice when adding the component panel to the content pane you will be able to specify the BorderLayout.CENTER constraint. Later, we will discuss layouts, but for now the main content pane by default uses a border layout (BorderLayout) that has a center content area. The center area will take up all the available space when other content areas (North, South, East, and West) don't contain any content. The following code sets the content pane (with a BorderLayout.Center) and sets the minimum size of the application window frame:
        // place component in the center using BorderLayout

        frame.getContentPane().add(component, BorderLayout.CENTER);

        frame.setMinimumSize(component.getMinimumSize());
Once the frame's content pane and dimension is set, you will need to invoke the pack() method on the window frame to notify the Swing toolkit to perform a layout on the UI components and apply constraints on the parent window. Shown here is the pack() method to notify the Swing toolkit to perform a layout:
        // size window based on layout

        frame.pack();
Then you will want to center the application window frame. By using the Toolkit utility class, you can obtain the screen's physical screen size by calling the Toolkit.getDefaultToolkit().getScreenSize() method. Next, you will calculate the window frame's upper-left coordinate in order to center the screen. Once calculated, you will set the location and display the application window to the user. Shown here is the code to center the application window (JFrame) and display to the user:
        // center window

        Dimension scrnSize = Toolkit.getDefaultToolkit().getScreenSize();

        int scrnWidth = frame.getSize().width;

        int scrnHeight = frame.getSize().height;

        int x = (scrnSize.width - scrnWidth) / 2;

        int y = (scrnSize.height - scrnHeight) / 2;


        // Move the window

        frame.setLocation(x, y);


        // display

        frame.setVisible(true);
With all the necessary code to launch Swing-based GUIs, it's nice to think of SimpleAppLauncher as a mini utility or application framework to launch applications easily while adhering to thread safety so you can focus on making your GUIs look amazing!
14-4. Laying Out GUI Components
Problem
Your boss complains about how ugly the UI looks and asks to have components laid out similar to a grid.
Solution
Create a custom layout to position your UI components in a grid-like display. You will create a simple input form like the recipe before that allows a user (your absent-minded boss) to enter a person's first and last name. The following are the main classes used and discussed in this recipe:
java.awt.BorderLayoutjava.awt.FlowLayoutjava.awt.GridBagLayoutjava.awt.LayoutManager2
In the previous recipe, you created a GUI form application that allows the user to enter a person's first and last name where the components were not laid out nicely. In this recipe, you will be able to lay out the same UI components in a grid-like form by creating a custom layout. The custom layout will allow you to add components similar to a table in HTML or Swing's GridBagLayout, except it will be a lot simpler to use. To add components to the layout, you will be able to programmatically specify in which column and row (cell) it will reside. You will also be able to align components using a constraint object within its respective cell based on the column and row. Shown here are three code listings: LayingOutComponentsOnGui.java, MyCustomGridLayout.java, and MyCellConstraint.java. The LayingOutComponentsOnGui class is the main application to be run. The MyCustomGridLayout class is the custom layout that will be used to display UI controls in a grid-like display. The MyCellConstraint class is used to set constraints to align UI controls within a cell.
Shown here is the code listing for LayingOutComponentsOnGui.java file. This is the main application for this recipe:
package org.java7recipes.chapter14.recipe14_04;


import java.awt.Component;

import java.awt.Dimension;

import javax.swing.JButton;

import javax.swing.JLabel;

import javax.swing.JPanel;

import javax.swing.JTextField;

import static org.java7recipes.chapter14.recipe14_04.MyCellConstraint.LEFT;

import static org.java7recipes.chapter14.recipe14_04.MyCellConstraint.RIGHT;

import org.java7recipes.chapter14.SimpleAppLauncher;


/**

 * <pre>


 * +------------------------+

 * | [label ] [   field   ] |

 * | [label ] [   field   ] |

 * |             [ button ] |

 * +------------------------+

 * </pre>

 * Laying GUI Components.

 * @author cdea

 */
public class LayingOutComponentsOnGui extends JPanel {


    public LayingOutComponentsOnGui(){

        super();

        JLabel fNameLbl = new JLabel("First Name");

        JTextField fNameFld = new JTextField(15);

        JLabel lNameLbl = new JLabel("Last Name");

        JTextField lNameFld = new JTextField(15);

        JButton saveButt = new JButton("Save");


        // Create a 2x3 grid with 5 horizontal and vertical gaps

        // between components.

        MyCustomGridLayout cglayout = new MyCustomGridLayout(5, 5, 2, 3);


        setLayout(cglayout);


        // First name label

        addToPanel(fNameLbl, 0, 0, RIGHT);


        // Last name label

        addToPanel(lNameLbl, 0, 1, RIGHT);


        // First name field

        addToPanel(fNameFld, 1, 0, LEFT);


        // Last name field

        addToPanel(lNameFld, 1, 1, LEFT);


        // Save button

        addToPanel(saveButt, 1, 2, RIGHT);

    }


    private void addToPanel(Component comp, int colNum, int rowNum, int align) {

        MyCellConstraint constr = new MyCellConstraint()

                .setColNum(colNum)

                .setRowNum(rowNum)

                .setAlign(align);

        add(comp, constr);

    }


    public static void main(String[] args) {

        final JPanel c = new LayingOutComponentsOnGui();

        c.setPreferredSize(new Dimension(380, 118));

        // Queueing GUI work to be run using the EDT.

        SimpleAppLauncher.launch("Chapter 14-4 Laying GUI Components", c);

    }

}
The code listing shown here is a custom layout called the MyCustomGridLayout class. This layout is responsible for managing components by calculating the available space, width, height, and UI component alignments:
package org.java7recipes.chapter14.recipe14_04;
import java.awt.Component;

import java.awt.Container;

import java.awt.Dimension;

import java.awt.Insets;

import java.awt.LayoutManager2;


/**

 * My Custom Grid Layout.

 * @author cdea

 */

public class MyCustomGridLayout implements LayoutManager2 {


    private int vgap;

    private int hgap;

    private int rows = 2;

    private int cols = 2;

    private int minWidth;

    private int minHeight;

    private int preferredWidth;

    private int preferredHeight;

    private boolean sizeUnknown = true;

    private Component[][] components;

    private MyCellConstraint[][] constraints;


    public MyCustomGridLayout(int hgap, int vgap, int cols, int rows) {

        this.hgap = hgap;

        this.vgap = vgap;

        this.rows = rows;

        this.cols = cols;

        components = new Component[rows][cols];

        constraints = new MyCellConstraint[rows][cols];

    }


    public void addLayoutComponent(String name, Component comp) {

    }


    public void removeLayoutComponent(Component comp) {

    }


    private void setSizes(Container parent) {

        preferredWidth = 0;

        preferredHeight = 0;

        minWidth = 0;

        minHeight = 0;


        // calculate the largest width of all columns

        int maxColWidth[] = new int[cols];

        int maxColHeight[] = new int[rows];

        updateMaxColWidthAndHeight(maxColWidth, maxColHeight);


        // update preferred width

        for (int colIndx = 0; colIndx < maxColWidth.length; colIndx++) {

            preferredWidth += maxColWidth[colIndx];

            preferredWidth += hgap;
        }

        preferredWidth += hgap;

        for (int rowIndx = 0; rowIndx < maxColHeight.length; rowIndx++) {

            preferredHeight += maxColHeight[rowIndx];

            preferredHeight += vgap;

        }

        preferredHeight += vgap;


    }


    public Dimension preferredLayoutSize(Container parent) {

        Dimension dim = new Dimension(0, 0);


        setSizes(parent);


        //Add the container's insets

        Insets insets = parent.getInsets();

        dim.width = preferredWidth + insets.left + insets.right;

        dim.height = preferredHeight + insets.top + insets.bottom;


        sizeUnknown = false;


        return dim;

    }


    public Dimension minimumLayoutSize(Container parent) {

        Dimension dim = new Dimension(0, 0);


        //Add the container's insets

        Insets insets = parent.getInsets();

        dim.width = minWidth + insets.left + insets.right;

        dim.height = minHeight + insets.top + insets.bottom;


        sizeUnknown = false;


        return dim;

    }


    public void layoutContainer(Container parent) {

        Insets insets = parent.getInsets();

        int availableWidth = parent.getWidth() - (insets.left + insets.right);

        int availableHeight = parent.getHeight() - (insets.top + insets.bottom);


        int x = 0, y = insets.top;


        if (sizeUnknown) {

            setSizes(parent);

        }


        // calculate the largest width of all columns

        int maxColWidth[] = new int[cols];


        // calculate the largest height of all columns
        int maxColHeight[] = new int[rows];

        updateMaxColWidthAndHeight(maxColWidth, maxColHeight);


        int previousWidth = 0, previousHeight = 0;


        for (int rowNum = 0; rowNum < components.length; rowNum++) {

            y += previousHeight + vgap;

            x = 0;

            previousWidth = 0;

            for (int colNum = 0; colNum < components[rowNum].length; colNum++) {

                Component curComp = components[rowNum][colNum];

                Dimension cDim = null;

                if (curComp == null) {

                    cDim = new Dimension(maxColWidth[colNum], maxColHeight[rowNum]);

                } else {

                    cDim = curComp.getPreferredSize();

                }


                x += previousWidth + hgap;


                MyCellConstraint cConstr = constraints[rowNum][colNum];


                if (cConstr != null) {

                    switch (cConstr.getAlign()) {

                        case MyCellConstraint.RIGHT:

                            x += maxColWidth[colNum] - cDim.width;

                            break;

                        case MyCellConstraint.CENTER:

                            x += (maxColWidth[colNum] - cDim.width) / 2;

                            break;

                    }

                }


                if (curComp != null) {

                    // Set the component's size and position.

                    curComp.setBounds(x, y, cDim.width, cDim.height);

                }

                previousWidth = cDim.width;


            }


            previousHeight = maxColHeight[rowNum];


        }

        previousWidth += hgap;

        previousHeight += vgap;

    }


    @Override

    public void addLayoutComponent(Component comp, Object constraint) {

        MyCellConstraint targetC = (MyCellConstraint) constraint;
        if (targetC != null) {

            components[targetC.getRowNum()][targetC.getColNum()] = comp;

            constraints[targetC.getRowNum()][targetC.getColNum()] = targetC;

        }

    }


    @Override

    public float getLayoutAlignmentX(Container target) {

        return 1f; // center

    }


    @Override

    public float getLayoutAlignmentY(Container target) {

        return 0f; // leading

    }


    @Override

    public void invalidateLayout(Container target) {

    }


    @Override

    public Dimension maximumLayoutSize(Container target) {

        return preferredLayoutSize(target);

    }


    private void updateMaxColWidthAndHeight(int[] maxColWidth, int[] maxColHeight) {

        for (int rowNum = 0; rowNum < components.length; rowNum++) {

            for (int colNum = 0; colNum < components[rowNum].length; colNum++) {

                Component curComp = components[rowNum][colNum];

                if (curComp == null) {

                    continue;

                }

                Dimension cDim = curComp.getPreferredSize();

                maxColWidth[colNum] = Math.max(maxColWidth[colNum], cDim.width);

                maxColHeight[rowNum] = Math.max(maxColHeight[rowNum], cDim.height);

            }

        }

    }

}
Shown here is the source code listing of the file MyCellConstraint.java. This class is responsible for allowing the developer to specify a cell constraint for a UI component within a cell (as long as there is a UI control within that cell):
/**

 * Cell Constraints. Aligns components on the custom grid layout.

 * @author cdea

 */

public class MyCellConstraint {

    private int rowNum=0;

    private int colNum=0;
    public final static int LEFT = -1;

    public final static int CENTER = 0;

    public final static int RIGHT = 1;

    private int align = LEFT; // left


    public int getAlign() {

        return align;

    }


    public MyCellConstraint setAlign(int align) {

        this.align = align;

        return this;

    }


    public int getColNum() {

        return colNum;

    }


    public MyCellConstraint setColNum(int colNum) {

        this.colNum = colNum;

        return this;

    }


    public int getRowNum() {

        return rowNum;

    }


    public MyCellConstraint setRowNum(int rowNum) {

        this.rowNum = rowNum;

        return this;

    }

}
Figure 14-4 displays a form-type application using a custom layout, allowing a user to enter a person's first and last name.
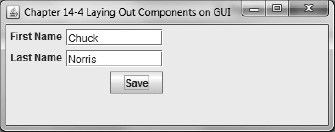
Figure 14-4. Custom layout
How It Works
When developing GUI applications, it is ideal for an application to allow the user to move and adjust the size of their viewable area while maintaining a pleasant user experience. The Java Swing API provides many layouts to choose from straight out of the box. The most common layouts used are BorderLayout, FlowLayout, and GridBagLayout.
![]() Note I will discuss the common layouts very briefly and will not go into detail. My reasoning is that there are numerous sources detailing the common layouts and don't often see many examples of real world layouts that behave well. In other words, in this recipe you will be creating a custom layout in which you will have more control of components. It also gives you a chance to see how things work under the hood. Before you get into the code, I will briefly explain the commonly used layouts.
Note I will discuss the common layouts very briefly and will not go into detail. My reasoning is that there are numerous sources detailing the common layouts and don't often see many examples of real world layouts that behave well. In other words, in this recipe you will be creating a custom layout in which you will have more control of components. It also gives you a chance to see how things work under the hood. Before you get into the code, I will briefly explain the commonly used layouts.
When using the JPanel component without a layout manager, it defaults to Swing's FlowLayout manager. The FlowLayout manager simply lays out components horizontally on a row. The FlowLayout manager will honor a component's preferred size; however, a component's position can move depending on the available space width-wise. Similar to a word processor or text editor having word wrap on, whenever a window is resized smaller than the width of the row components, the FlowLayout manager will reposition the component to the next row. Like all Layout managers, the FlowLayout manager has constraints or settings which allow you to control the alignment of components. To see more, refer to the Javadoc for details. The following code statement sets a JPanel component with a FlowLayout manager with a center constraint:
setLayout(new FlowLayout(FlowLayout.CENTER);
The most commonly used layout is the BorderLayout manager. This is probably the case because it is similar to web pages in a browser. Web pages often have navigation at the top, bottom, left, or right side of the display area and a main content region in the center. The BorderLayout class calls these areas surrounding the center content region NORTH, SOUTH, EAST, and WEST. Of course, the center content region is called CENTER. When adding components to the surrounding regions, it is similar to the FlowLayout where the preferred size is used and positioning occurs based on the width of the region. When adding a component to the center region, the layout manager will give the component as much of the available space as possible. Shown here is the code that sets a JPanel container with a BorderLayout and adds a component in the center content region:
setLayout(new BorderLayout());

add(saveButton, BorderLayout.CENTER);
Another popular (or unpopular) layout is called the GridBagLayout. This layout is used to have finer-grain control over the placement and constraints of components. To set constraints for each component, you would use the GridBagConstraints class. Typically, this layout is used to present a table-like structure. By using the GridBagConstraints class, you can let the layout manager know how to treat components' sizes in each cell in the grid table. Often, constraints can often be so complicated and unwieldy that you have to start all over from scratch. Shown here is setting a JPanel container component with a GridBagLayout layout and adding the JLabel UI component to the cell at column 0 and row 0:
setLayout(new GridBagLayout());

GridBagConstraints c = new GridBagConstraints();

c.fill = GridBagConstraints.HORIZONTAL;

c.gridx = 0;

c.gridy = 0;

add(firstNameLbl, c);
Let's get to the code, shall we? For starters, when developing or designing user interfaces you will need to have requirements. Most applications in the business world are data entry type interfaces or better known as forms. Form interfaces are often symmetrical and similar to a grid-type layout. You are probably thinking about the GridBagLayout, but in our custom layout the API is simpler to use and has expected (predictable) behavior.
Pretend your boss is requesting a form interface to enter contact information. You'll begin with a simple form mockup that has labels, fields, and a button. Shown here is a mockup of our interface:
+------------------------+


| [label ] [   field   ] |

| [label ] [   field   ] |

|             [ button ] |

+------------------------+
Before getting into the guts of our custom layout implementation, it is better to explain how to use the layout's API first. Does this sound like the chicken-or-the-egg scenario? Well, when developing/designing APIs, it's always important to design interfaces before creating concrete implementations (Design by Contract). A similar scenario is pretending the layout manager has already been created, and the developer is using the API. The requirements for the custom layout are these:
- Specify the horizontal gap in (pixels) between components.
- Specify the vertical gap (pixels) between components.
- Specify the number of columns in the grid.
- Specify the number of rows in the grid.
- Align components left, right, or center within a cell width default (left).
- Use the components' preferred height and width.
When using the already created layout (custom layout), you can specify the horizontal gap, vertical gap, number of columns, and number of rows through its constructor. Shown here is setting up the JPanel with the MyCustomGridLayout layout:
// Create a 2x3 grid with 5 horizontal and vertical gaps

// between components.

MyCustomGridLayout cglayout = new MyCustomGridLayout(5, 5, 2, 3);

setLayout(cglayout);
Next, you will set constraints in order to let the custom layout decide where to position and size components within a cell. I created a constraint object called MyCellConstraint which is a plain old Java object (POJO) used when calling the add(JComponent comp, Object constraint) method of a JPanel component. The MyCellConstraint class allows the user of the API to specify which cell in the grid to place the component and an alignment within the cell. The three alignments are left, right, or center where left is the default. In this code recipe, I used the Builder pattern, so specifying cell constraints will resemble a more declarative feel and not be as verbose as using the GridBagConstraints object. When you set the JPanel component's layout, the add() method will delegate to the custom layout's layoutContainer() method to position and size components.
This code adds a JTextField component to a JPanel container with constraints by placing the component in column 1 and row 0 centered within the cell horizontally. You'll also notice it here when specifying properties of the MyCellConstraint object:
JTextField fNameFld = new JTextField(15);

MyCellConstraint constr = new MyCellConstraint()

    .setColNum(1)

    .setRowNum(0)

    .setAlign(MyCellConstraint.CENTER);

add(fNameFld, constr);
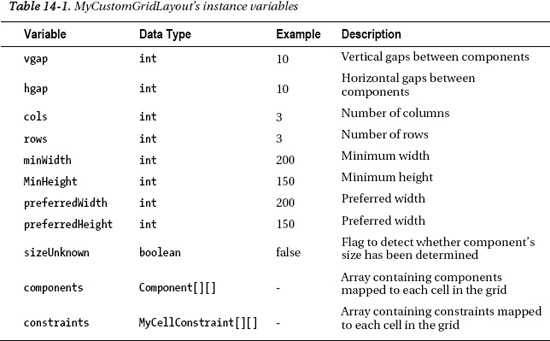
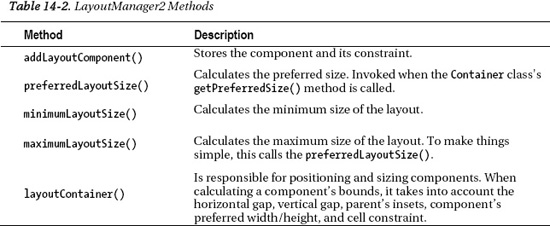
Now that you know how to use the custom layout, we can discuss how it was implemented. Before you get to each of the layout manager methods, take a look at Table 14-1 below which describes the instance variables of the MyCustomGridLayout class.
The MyCustomGridLayout class begins by implementing the Swing's LayoutManager2 interface. In MyCustomGridLayout's constructor you will simply set up the horizontal gap, vertical gap, number of rows, and number of columns for the custom grid layout. For brevity, you will only implement the following methods:
public void addLayoutComponent(Component comp, Object constraint);

public Dimension preferredLayoutSize(Container parent);

public Dimension minimumLayoutSize(Container parent);

public Dimension maximumLayoutSize(Container target);

public void layoutContainer(Container parent);
Table 14-2 provides the descriptions of the methods you will implement from the LayoutManager2 interface. This is in support for the MyCustomGridLayout custom layout class.
When a layout occurs (invalidation), the layoutContainer() will be called to reposition components. This method first obtains the parent's insets to calculate the available width and height you can use to resize components within each cell. Although these variables (availableWidth, availableHeight) aren't used, I implemented them and left them for you as an exercise if you want to make this layout more robust. You may want to create thresholds for components to expand and contract. Next, you will iterate through all the columns to determine the widest component in each column. You will also iterate through all rows to determine the largest height for each row that makes things spaced like a grid. The cell sizes are being determined by obtaining the UI component's preferred size and horizontal and vertical gaps. Each component's upper-left bounding box (x, y) coordinate is updated to be positioned within the cell. With a parallel array containing each cell constraint the (x, y) coordinate gets updated based on the cell constraint's alignment (RIGHT, CENTER, and LEFT).
Many of the recipe examples will reuse a copy of this custom layout called CustomGridLayout along with its CellConstraint class co-located in the package namespace org.java7recipes.chapter14.
Layout management can be quite challenging at times, but understanding the fundamentals will help you decide the best approach when building aesthetically pleasing applications. When developing small applications you should use the stock layouts. But for larger-scale applications you might want to explore more powerful solutions. Shown here are layouts that I highly recommend when creating professional looking applications:
MigLayoutby Mikael Grev:http://www.miglayout.comDesignGridLayoutby Jean-Francois Poilpret:http://designgridlayout.java.netGroupLayout: NetBeansIDE's WYSIWYG editor Swing GUI Builder (formerly Project Matisse):http://netbeans.org/features/java/swing.html- JGoodies Forms by Karsten Lentzsch:
http://www.jgoodies.com
14-5. Generating Events with Buttons
Problem
As a hard worker you often get stressed out and are in search of an easy button.
Solution
Create and application with an easy button that will offer calming advice. The main classes you will be using in this recipe are the following:
java.awt.event.ActionListenerjavax.swing.JButton
The following code listing creates an application that will display a button that when pressed will display text. This code recipe will demonstrate button actions:
package org.java7recipes.chapter14.recipe14_05;


import java.awt.*;

import java.awt.event.*;

import javax.swing.*;

import org.java7recipes.chapter14.SimpleAppLauncher;


/**

 * Generating Event with Buttons.

 * @author cdea

 */

public class GeneratingEventWithButtons extends JPanel {


    public GeneratingEventWithButtons(){

        final JLabel status = new JLabel("Press the easy button to solve all your problems.");

        add(status);


        // save button

        JButton saveMe = new JButton("Easy");

        saveMe.addActionListener(new ActionListener() {


            @Override

            public void actionPerformed(ActionEvent e) {

                status.setText("You will recieve two tickets to the petting zoo...");

            }

        });

        add(saveMe);
    }


    public static void main(String[] args) {

        final JPanel c = new GeneratingEventWithButtons();

        c.setPreferredSize(new Dimension(384, 45));

        // Queueing GUI work to be run using the EDT.

        SimpleAppLauncher.launch("Chapter 14-5 Generating Events With Buttons", c);

    }

}
Figure 14-5 depicts the initial window that displays when the application is launched.
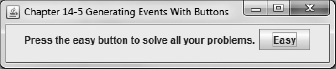
Figure 14-5. Generating events with buttons
How It Works
You want your button to do something when you press it. In Swing, the JButton component has a method called addActionListener() to add code to respond when the button has been clicked or pressed. You'll also notice the method begins with the word add and not set, meaning you can add many actions to the button. Whenever a button is pressed, all ActionListener instances will be notified, so they can carry out their action. Here you will create an anonymous inner instance of an ActionListener that sets the JLabel's text when the user presses the button. The following code adds an ActionListener instance:
JButton saveMe = new JButton("Easy");

saveMe.addActionListener(new ActionListener() {

        @Override

        public void actionPerformed(ActionEvent e) {

                status.setText("You will recieve two tickets to the petting zoo...");

        }

});
In some scenarios, you may want to associate keyboard shortcuts to buttons. To do this, you use the AbstractAction class, which is also an ActionListener instance but can do much more (toolbar, property change support, and so on). See the Javadoc for details.
14-6. Refreshing a User Interface
Problem
When copying many files, you want to display the status and percentage being completed in a GUI that is updated periodically.
Solution
Create an application to simulate files being copied or transferred. This application will contain a start button, cancel button, progress bar, and text area displaying the amount of time in milliseconds each file is being transferred. The primary class you will be focusing on is Java's SwingWorker class, which will be used to update the GUI periodically.
Shown here is the code to create an application that simulates a file transfer:
package org.java7recipes.chapter14.recipe14_06;


import java.awt.*;

import java.awt.event.*;

import java.util.*;

import java.util.concurrent.ExecutionException;

import javax.swing.*;

import org.java7recipes.chapter14.SimpleAppLauncher;


/**

 * Refreshing a GUI.

 * requires jdk7

 * @author cdea

 */

public class RefreshingGUI extends JPanel {


    static SwingWorker<Boolean, String> copyWorker;

    final int numFiles = 30;


    public RefreshingGUI() {


        setLayout(new BorderLayout());


        JPanel topArea = new JPanel();


        // progress bar

        final JLabel label = new JLabel("Files Transfer:", JLabel.CENTER);

        topArea.add(label);


        // progress bar

        final JProgressBar progressBar = new JProgressBar();

        progressBar.setIndeterminate(false);

        progressBar.setStringPainted(true);

        progressBar.setMinimum(0);

        progressBar.setMaximum(numFiles);


        topArea.add(progressBar);


        // create the top area

        add(topArea, BorderLayout.NORTH);


        // build buttons start and cancel
        JPanel buttonsArea = new JPanel(new FlowLayout(FlowLayout.RIGHT));

        final JButton startButton = new JButton("Start");

        final JButton cancelButton = new JButton("Cancel");

        cancelButton.setEnabled(false);

        buttonsArea.add(startButton);

        buttonsArea.add(cancelButton);


        // build status area

        final JTextArea textArea = new JTextArea(5, 15);

        textArea.setEditable(false);

        JScrollPane statusScroll = new JScrollPane(textArea);

        buttonsArea.add(statusScroll);


        // create the buttons area

        add(buttonsArea, BorderLayout.SOUTH);


        // spawn a worker thread

        startButton.addActionListener(new ActionListener() {

            @Override

            public void actionPerformed(ActionEvent e) {

                startButton.setEnabled(false);

                progressBar.setValue(0);

                textArea.setText("");

                cancelButton.setEnabled(true);

                copyWorker = createWorker(numFiles,

                                        startButton,

                                        cancelButton,

                                        textArea,

                                        progressBar);

                copyWorker.execute();

            } // end of actionPerformed()

        }); // end of addActionListener()


        // cancel button will kill worker and reset.

        cancelButton.addActionListener(new ActionListener() {

            @Override

            public void actionPerformed(ActionEvent e) {

                startButton.setEnabled(true);

                cancelButton.setEnabled(false);

                copyWorker.cancel(true);

                progressBar.setValue(0);


            }

        });


    }


    public SwingWorker<Boolean, String> createWorker(final int numFiles,

            final JButton startButton,

            final JButton cancelButton,

            final JTextArea status,
            final JProgressBar pBar){


            return new SwingWorker<>() {


            /**

             * Not on the EDT

             */

            @Override

            protected Boolean doInBackground() throws Exception {

                for (int i = 0; i < numFiles; i++) {

                    long elapsedTime = System.currentTimeMillis();

                    copyFile("some file", "some dest file");

                    elapsedTime = System.currentTimeMillis() - elapsedTime;

                    String status = elapsedTime + " milliseconds";

                    // queue up status

                    publish(status);

                }

                return true;

            }


            /**

             * On the EDT

             */

            @Override

            protected void process(List<String> chunks) {

                super.process(chunks);

                // with each update gui

                for (String chunk : chunks) {

                    status.append(chunk + "
");

                    pBar.setValue(pBar.getValue() + 1);

                }

            }


            /**

             * On the EDT

             */

            @Override

            protected void done() {

                try {

                    if (isCancelled()) {

                        status.append("File transfer was cancelled.
");

                        return;

                    }

                    Boolean ack = get();

                    if (Boolean.TRUE.equals(ack)) {

                        status.append("All files were transferred successfully.
");

                    }

                    startButton.setEnabled(true);

                    cancelButton.setEnabled(false);

                } catch (InterruptedException ex) {

                    status.append("File transfer was interupted.
");

                } catch (ExecutionException ex) {
                    ex.printStackTrace();

                }

            }

        };

    }


    public void copyFile(String src, String dest) throws InterruptedException {

        // simulate a long time

        Random rnd = new Random(System.currentTimeMillis());

        long millis = rnd.nextInt(1000);

        Thread.sleep(millis);

    }


    public static void main(String[] args) {

        final JPanel c = new RefreshingGUI();

        c.setPreferredSize(new Dimension(386, 160));

        c.setMinimumSize(new Dimension(386, 160));


        // Queueing GUI work to be run using the EDT.

        SimpleAppLauncher.launch("Chapter 14-6 Refreshing the GUI", c);

    }

}
Figure 14-6 depicts an application that simulates files being copied or transferred.
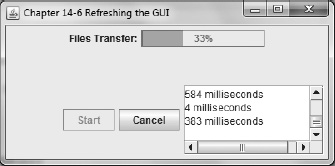
Figure 14-6. Refreshing the GUI
How It Works
In recipe 14-1 we discussed the importance of thread safety and using the EDT. The goal of this recipe is to create a responsive GUI which operates while expensive work is being done in the background, and still allow the user to interact with the application. Because this is a common behavior in GUI development, the amazing client-side Java engineers created a convenience class called the SwingWorker class. The SwingWorker class will properly handle non-GUI work and direct GUI events onto the EDT, thus abiding the thread safety rules in Swing. In this recipe, you will simulate files being transferred and concurrently displaying status to inform the user the percentage of files being transferred. As files are being transferred, the worker thread will update the text area with the amount of time in milliseconds each took to transfer. Before I discuss the details of the SwingWorker class, however, let's set up a GUI window with components.
First, you will add components onto the JPanel using a BorderLayout. On the north region, you will add a JProgressBar instance to let the user know the percentage of files transferred. Because you know how many files you are actually transferring, you will set the progress bar's indeterminate flag to false by calling the setIndeterminate(false) method. Next, you want the percentage string to be displayed while the progress bar is being updated by calling the setStringPainted() method with a value of true. The progress bar's minimum and maximum values are then set. In this scenario, there are 30 files to be transferred, so the maximum value is set to 30. The following code instantiates a new progress bar component (JProgressBar):
   final JProgressBar progressBar = new JProgressBar();

   progressBar.setIndeterminate(false);

   progressBar.setStringPainted(true);

   progressBar.setMinimum(0);

   progressBar.setMaximum(numFiles);
You will add components to the south area of the BorderLayout manager consisting of buttons and a JTextArea component that will display the elapsed times in milliseconds when individual files are transferred. The buttons allow the user to start and stop the file transfer process.
The application doesn't actually transfer files, but simulates the process by generating random sleep times to block the thread as if it were doing work. The start button's action listener will generate an instance of a SwingWorker class to begin execution while the cancel button's action listener will have a reference to the same worker thread to cancel the operation.
![]() Note Remember that all
Note Remember that all actionPerformed() methods are called via the EDT, so expensive calls are frowned upon. That is where the SwingWorker class will come to the rescue!
Now, let's talk about the SwingWorker class. You will create a method called createWorker() to return new instances of swing workers and execute them when the user presses the start button. When creating an instance of a SwingWorker class, you'll notice two generic types declared (SwingWorker<T,V>).The first thing to do is define the data type returned when the entire worker is finished. In this case, T will be a Boolean type that I chose to denote a successful transfer of all files. Second, you will want to define the type for the intermediate result values. In this case, V will be a String type. Intermediate result values are strings representing the time in milliseconds that will be displayed in the text area component. Here are the methods that you will implement from the SwingWorker class:
   protected Boolean doInBackground();

   protected void process(List<String> chunks);

   protected void done();
The following methods describe the life cycle of a SwingWorker class:
doInBackground(): ThedoInBackground()method is called from theSwingWorker.execute()method. This method is a background thread processing work. ThedoInBackground()method can call thepublish()method to queue data for theprocess()method.publish(): Thepublish()method will be called from aSwingWorker.doInBackground()method. This method will callprocess().process(): Theprocess()method will be called from aSwingWorker.publish()invocation indirectly. A list of objects will be queued up for this method to process. The method is using the EDT thread to update the GUI based on a list of data elements.done(): Thedone()method can be called after theSwingWorker.doInBackground()andSwingWorker.cancel()methods are completed. The method is using the EDT thread to update the GUI with a final result to the caller.
14-7. Submitting Form Values to a Database
Problem
After creating a GUI form–type application to capture a person's name, you want to store that information locally onto your computer.
Solution
Use an embedded database such as the Derby database. When using relational databases, you will be using the Java Database Connectivity (JDBC) API.
The following code recipe is an application that allows a user to enter a person's first and last name to be saved into a database:
package org.java7recipes.chapter14.recipe14_07;


import java.awt.*;

import java.awt.event.*;

import java.util.concurrent.ExecutionException;

import javax.swing.*;

import org.java7recipes.chapter14.CellConstraint;

import org.java7recipes.chapter14.CustomGridLayout;

import org.java7recipes.chapter14.SimpleAppLauncher;


/**

 * <p>

 * +------------------------+

 * | [label ] [   field   ] |

 * | [label ] [   field   ] |

 * |             [ button ] |

 * +------------------------+

 * </p>

 *

 * Submitting Form Values to Database.

 * @author cdea

 */
public class SubmittingFormValuestoDatabase extends JPanel {


    public SubmittingFormValuestoDatabase(){

        JLabel fNameLbl = new JLabel("First Name");

        final JTextField fNameFld = new JTextField(20);

        JLabel lNameLbl = new JLabel("Last Name");

        final JTextField lNameFld = new JTextField(20);

        final JButton saveButt = new JButton("Save");


        // Call Swing Worker to save to database.

        saveButt.addActionListener(new ActionListener() {


            @Override

            public void actionPerformed(ActionEvent e) {

                saveButt.setEnabled(false);

                SwingWorker<Integer, Void> worker = new SwingWorker<Integer, Void>() {


                    @Override

                    protected Integer doInBackground() throws Exception {

                        int pk = DBUtils.saveContact(fNameFld.getText(),

lNameFld.getText());

                        return pk;

                    }


                    @Override

                    protected void done() {

                        try {

                            System.out.println("Primary key = " + get());

                        } catch(InterruptedException | ExecutionException e) {

                            e.printStackTrace();

                        }

                        saveButt.setEnabled(true);

                    }

                };

                worker.execute();

            }

        });


        // create a layout 2 columns and 3 rows

        // horizontal and vertical gaps between components are 5 pixels

        CustomGridLayout cglayout = new CustomGridLayout(5, 5, 2, 3);


        setLayout(cglayout);


        // add first name label cell 0,0

        addToPanel(fNameLbl, 0, 0);


        // add last name label cell 0,1

        addToPanel(lNameLbl, 0, 1);


        // add first name field cell 1,0
        addToPanel(fNameFld, 1, 0);


        // add last name field cell 1,1

        addToPanel(lNameFld, 1, 1);


        // add save button and shift to the right

        CellConstraint saveButtConstr = new CellConstraint()

                .setColNum(1)

                .setRowNum(2)

                .setAlign(CellConstraint.RIGHT);

        add(saveButt, saveButtConstr);


    }


    private void addToPanel(Component comp, int colNum, int rowNum) {

        CellConstraint constr = new CellConstraint()

                .setColNum(colNum)

                .setRowNum(rowNum);

        add(comp, constr);

    }

    public static void main(String[] args) {

        final JPanel c = new SubmittingFormValuestoDatabase();

        c.setPreferredSize(new Dimension(402, 118));

        // Queueing GUI work to be run using the EDT.

        SimpleAppLauncher.launch("Chapter 14-7 Submitting Form Values to Database.", c);

    }

}
This recipe will be using an embedded database called Derby from the Apache group at http://www.apache.org. As a requirement, you will need to download the Derby software. To download the software, visit http://db.apache.org/derby/derby_downloads.html to download the latest version containing the libraries. Once it is downloaded, you can unzip or untar into a directory. To compile and run this recipe, you will need to update the classpath in your IDE or environment variable to point to Derby libraries (derby.jar and derbytools.jar). Shown here is the code listing of our database utility class DBUtils.java, which is capable of performing database transactions:
package org.java7recipes.chapter14.recipe14_07;


import java.sql.Connection;

import java.sql.DriverManager;

import java.sql.PreparedStatement;

import java.sql.ResultSet;

import java.sql.SQLException;

import java.sql.Statement;

import java.util.ArrayList;

import java.util.Properties;


/**

 * DBUtils class is responsible for saving contact information

 * into a database.

 * requires jdk7
 * @author cdea

 */

public class DBUtils {


    private static String framework = "embedded";

    private static String driver = "org.apache.derby.jdbc.EmbeddedDriver";

    private static String protocol = "jdbc:derby:";


    public static int saveContact(String fName, String lName) {

        int pk = (fName + lName).hashCode();


        loadDriver();


        Connection conn = null;

        ArrayList statements = new ArrayList();

        PreparedStatement psInsert = null;

        Statement s = null;

        ResultSet rs = null;

        try {

            // connection properties

            Properties props = new Properties();

            props.put("user", "scott");

            props.put("password", "tiger");


            // database name

            String dbName = "demoDB";


            conn = DriverManager.getConnection(protocol + dbName

                    + ";create=true", props);


            System.out.println("Creating database " + dbName);


            // handle transaction

            conn.setAutoCommit(false);


            s = conn.createStatement();

            statements.add(s);


//            s.execute("drop table contact");


            // Create a contact table...

            s.execute("create table contact(id int, fName varchar(40), lName varchar(40))");

            System.out.println("Created table contact");


            psInsert = conn.prepareStatement("insert into contact values (?, ?, ?)");

            statements.add(psInsert);

            psInsert.setInt(1, pk);

            psInsert.setString(2, fName);

            psInsert.setString(3, lName);

            psInsert.executeUpdate();

            conn.commit();
            System.out.println("Inserted " + fName + " " + lName);


            // delete the table for demo

            s.execute("drop table contact");

            System.out.println("Dropped table contact");


            conn.commit();

            System.out.println("Committed the transaction");


            // standard checking code when shutting down database.

            // code from http://db.apache.org/derby/

            if (framework.equals("embedded")) {

                try {

                    // shuts down Derby

                    DriverManager.getConnection("jdbc:derby:;shutdown=true");


                } catch (SQLException se) {

                    if (((se.getErrorCode() == 50000)

&& ("XJ015".equals(se.getSQLState())))) {

                        System.out.println("Derby shut down normally");

                    } else {

                        System.err.println("Derby did not shut down normally");

                        se.printStackTrace();

                    }

                }

            }

        } catch (SQLException sqle) {

            sqle.printStackTrace();

        } finally {

            close(rs);


            int i = 0;

            while (!statements.isEmpty()) {

                Statement st = (Statement) statements.remove(i);

                close(st);

            }


            close(conn);


        }


        return pk;

    }


    private static void close(AutoCloseable closable) {

        try {

            if (closable != null) {

                closable.close();

                closable = null;

            }

        } catch (Exception sqle) {

            sqle.printStackTrace();
        }

    }


    private static void loadDriver() {


            try {

                Class.forName(driver).newInstance();

                System.out.println("Loaded driver");


            } catch (Exception e) {

                e.printStackTrace();

            }


    }

}
Figure 14-7 depicts the form application allowing a user to save a person's name information into a local database.
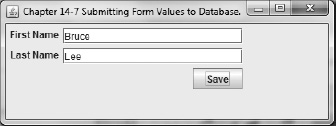
Figure 14-7. Submitting form values to a database
How It Works
When creating form interfaces, there will be a point in time when you have to write the data somewhere. I've been fortunate to work on projects in the past where data is stored locally in an embedded database. In this recipe, I chose the popular embedded database called Derby. Just as a heads-up on being able to run this recipe, you must include the derby.jar and derbytools.jar libraries into your classpath.
When working with form-based applications, you should separate your GUI code from your action code. I created two separate class files: the SubmittingFormValuestoDatabase class and the DBUtils class.
The SubmittingFormValuestoDatabase class is our form and is essentially identical to recipe 14-4, so I won't go into the layout of the components, but focus on the save button. The save button's action listener contains a SwingWorker that will invoke the DBUtils.saveContact() method that will save the form data. You will notice in the doInBackground() method's call to saveContact(), which will return a primary key (on a non-event dispatch thread). The doInBackground() method is not performing the work on the EDT (hence the name) and could take awhile to save the data. Once the doInBackground() method is completed and has returned the primary key the object will be available when the done() method calls the get() method. When inside the done() method, you are now on the EDT where you have an opportunity to update the GUI. Shown here is the done() method calling the get() method that contains the primary key:
@Override

protected void done() {

    try {

        System.out.println("Primary key = " + get());

    } catch(InterruptedException | ExecutionException e) {

        e.printStackTrace();

    }

    saveButt.setEnabled(true);

}
In the code recipe you will simply send the primary key to standard out. To invoke the get() method, you will need to surround it with exception handling. In the preceding code the catch exception code has a pipe symbol between two exception classes (InterruptedException and ExecutionException). This is because new to Java 7 is the “Handling More Than One Type of Exception” feature. This allows you to make your exception blocks smaller.
Next, the DBUtils class is responsible for persisting form data. To simplify things for this example I coded things to create the database and contact table in the beginning and later drop the table when done. So, feel free to take out these lines when creating a real application.
Here is a quick rundown of what is going on in the saveContact() method. First, it receives the contact information from the caller and derives a primary key using a hash of the first name and last name as a relatively unique identifier for a row in the database. Next, the call to loadDriver() will load the JDBC Derby driver. Then it prepares properties to connect to the database and sets the auto-commit to false. After setting the transactions to auto-commit mode false, you will create a table that will hold our contact information. The contact table contains three fields, the ID, first name, and last name. Id is a data type of int, and the name fields are of type varchar(40). Next, you will create a prepared statement that binds our data elements.
Once the prepared statement is executed via executeUpdate() method, it will indicate to the database a transaction is ready to be committed. Last, you will perform the commit() on the connection to flush changes to the database. The rest of the code basically drops the table and closes all resources. For more details on JDBC, see Chapter 11.
14-8. Making a Multi-Window Program
Problem
You want to create an application that generates random quotes displayed in individual windows inside the application (similar to a mini-desktop).
Solution
Create a multi-window application with display content using the JDesktopPane and JInternalFrame classes.
The following code recipe creates an application that allows a user to pop up internal windows with random quotes:
package org.java7recipes.chapter14.recipe14_08;
import java.awt.*;

import java.awt.event.*;

import java.beans.PropertyVetoException;

import java.util.Random;

import javax.swing.*;

import org.java7recipes.chapter14.AppSetup;

import org.java7recipes.chapter14.SimpleAppLauncher;


/**

 * Making a Multi-Window Program.

 * @author cdea

 */

public class MultiWindowGUI extends JDesktopPane implements AppSetup {


    public MultiWindowGUI() {

        setDragMode(JDesktopPane.LIVE_DRAG_MODE);

        //setDragMode(JDesktopPane.OUTLINE_DRAG_MODE);

    }


    public void apply(final JFrame frame) {

        JMenuBar menuBar = new JMenuBar();

        JMenu menu = new JMenu("File");

        JMenuItem newWindowMenuItem = new JMenuItem("New Internal Frame");

        newWindowMenuItem.setMnemonic(KeyEvent.VK_N);

        newWindowMenuItem.setAccelerator(KeyStroke.getKeyStroke(

                KeyEvent.VK_N, ActionEvent.CTRL_MASK));

        final JDesktopPane desktop = this;

        newWindowMenuItem.addActionListener(new ActionListener() {


            @Override

            public void actionPerformed(ActionEvent e) {

                JInternalFrame frame = new InternalFrame();

                frame.setVisible(true);

                desktop.add(frame);

                try {

                    frame.setSelected(true);

                } catch (PropertyVetoException pve) {

                }

            }

        });

        menu.add(newWindowMenuItem);

        menuBar.add(menu);

        frame.setJMenuBar(menuBar);

    }


    public static void main(String[] args) {

        final JDesktopPane c = new MultiWindowGUI();

        c.setPreferredSize(new Dimension(433, 312));

        // Queueing GUI work to be run using the EDT.

        SimpleAppLauncher.launch("Chapter 14-8 Making a Multi-Window Program", c);

    }

}
class InternalFrame extends JInternalFrame {


    static int count = 0;

    static final int xOffset = 35;

    static final int yOffset = 35;

    final static String[] rndQuotes = {

        "Even in laughter the heart is sorrowful",

        "For what does it profit a man to gain the whole world, and forfeit his soul?",

        "The light of the body is the eye; if then your eye is true, all your body will be

full of light.",

        "For many are called, but few are chosen.",

        "A word fitly spoken is like apples of gold in pictures of silver.",

        "Iron sharpeneth iron; so a man sharpeneth the countenance of his friend."

    };


    public InternalFrame() {

        super("Window #" + (count++),

                true, //resizable

                true, //closable

                true, //maximizable

                true);//iconifiable

        Random rand = new Random();

        int q = rand.nextInt(rndQuotes.length);


        setLayout(new BorderLayout());

        JTextArea ta = new JTextArea(rndQuotes[q]);

        JScrollPane sp = new JScrollPane(ta);

        ta.setLineWrap(true);

        ta.setWrapStyleWord(true);

        add(sp, BorderLayout.CENTER);

        setSize(200, 100);


        // Stagger windows

        setLocation(xOffset * count, yOffset * count);

    }

}
Figure 14-8 shows the application displaying multiple internal windows, each containing a random quote.
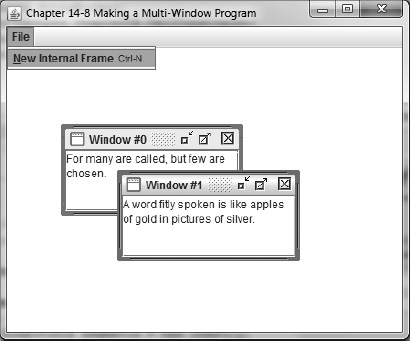
Figure 14-8. Making a multiwindow program
How It Works
Java Swing's JDesktopPane is a container component similar to a JPanel except that it manages mini internal frames (JInternalFrame) similar to a virtualized desktop. These internal frames act very similar to JFrames on your host desktop. Just like JFrames, you may add menu items and any swing components into internal frames.
To create a multi-window application, you will first extend from the JDesktopPane class with a default constructor. Notice that the MultiWindowGUI class extends from JDesktopPane class and therefore it is a JDesktopPane instance. The MultiWindowGUI instance will be passed into the SimpleAppLauncher.launch() method to be then placed onto the application window's content region. Shown here is the code to launch and display the application window (JFrame) having a desktop pane (JDesktopPane):
final JDesktopPane c = new MultiWindowGUI();

c.setPreferredSize(new Dimension(433, 312));

// Queueing GUI work to be run using the EDT.

SimpleAppLauncher.launch("Chapter 14-8 Making a Multi-Window Program", c);
When you place the JDesktopPane instance in the main JFrame window, it is placed in the center content region using the BorderLayout. Placing the JDesktopPane into the center will allow the virtualized desktop to take up all the available space. In the constructor, the call to setDragMode() sets the effect when you drag the internal windows across the desktop. With certain environments that have high latency or lower bandwidths, rendering internal frames across the network can be too expensive (for example, remoting using a VPN). If this is a concern, you will want to set your JDesktopPane's drag mode to outline drag mode (JDesktopPane.OUTLINE_DRAG_MODE). Because we are local and things are fast, you will be setting your drag mode to LIVE_DRAG_MODE to mimic real desktops. In our example, I also implement the AppSetup to add menu options enabling the user to create new internal frames (JInternalFrame) with random quotes when displayed. (Recipe 14-9 discusses menu options and submenus.) You might also notice that the menu has the keyboard shortcut Ctrl+n. (Implementing keyboard shortcuts for menus are discussed in recipe 14-16.) In this recipe, you will want to focus your attention on the newWindowMenu variable, in which you will add an ActionListener. This is where an internal frame is instantiated and placed onto the desktop area.
You will create a class that extends from JInternalFrame. Your objective is to allow the user to select the menu option to create internal frames that will be staggered similarly on most windowed desktops. Each internal frame created will have a title denoting the sequence number or count of the frame when instantiated. You'll notice the call to super() where you will pass in Booleans to the super class to set the JInternalFrame object to be resizable, closable, maximizable, and iconifiable. Next, you will pick a random quote from the static String array rndQuotes. The random quote is placed in a scrollable (JScrollPane) text area (JTextArea) with text wrapping set to true. Once the internal window is sized setSize(200, 100), you will stagger each window according to the count and the offset.
14-9. Adding a Menu to an Application
Problem
You are asked to create a UI for a building security application to allow a user to select items to control.
Solution
Create standard menu options to be added to your application. You will also want to add menus and menu items in your application using the Swing JMenu, JMenuItem, JCheckBoxMenuItem, and JRadioButtonMenuItem classes.
Shown here is the code recipe to create a menu-driven UI that simulates a building security application:
package org.java7recipes.chapter14.recipe14_09;


import java.awt.*;

import java.awt.event.*;

import javax.swing.*;

import org.java7recipes.chapter14.AppSetup;

import org.java7recipes.chapter14.SimpleAppLauncher;


/**

 * Adding Menus to an application.

 * @author cdea

 */

public class AddingMenus extends JPanel implements AppSetup{


    public AddingMenus(){


    }
    public void apply(final JFrame frame) {

        JMenuBar menuBar = new JMenuBar();


        JMenu menu = new JMenu("File");

        JMenuItem newItem = new JMenuItem("New", null);

        menu.add(newItem);


        JMenuItem saveItem = new JMenuItem("Save", null);

        saveItem.setEnabled(false);

        menu.add(saveItem);


        menu.addSeparator();


        JMenuItem exitItem = new JMenuItem("Exit", null);

        menu.add(exitItem);


        menuBar.add(menu);


        JMenu tools = new JMenu("Cameras");

        JCheckBoxMenuItem showCamera1= new JCheckBoxMenuItem("Show Camera 1", null);

        showCamera1.setSelected(true);

        tools.add(showCamera1);


        JCheckBoxMenuItem showCamera2= new JCheckBoxMenuItem("Show Camera 2", null);

        tools.add(showCamera2);

        menuBar.add(tools);


        JMenu alarm = new JMenu("Alarm");

        ButtonGroup alarmGroup = new ButtonGroup();

        JRadioButtonMenuItem alertItem = new JRadioButtonMenuItem("Sound Alarm");

        alarm.add(alertItem);

        alarmGroup.add(alertItem);


        JRadioButtonMenuItem stopItem = new JRadioButtonMenuItem("Alarm Off", null);

        stopItem.setSelected(true);

        alarm.add(stopItem);

        alarmGroup.add(stopItem);


        JMenu contingencyPlans = new JMenu("Contingent Plans");

        JCheckBoxMenuItem selfDestruct = new JCheckBoxMenuItem("Self Destruct in T minus

50");

        contingencyPlans.add(selfDestruct);


        JCheckBoxMenuItem turnOffCoffee = new JCheckBoxMenuItem("Turn off the coffee machine

");

        contingencyPlans.add(turnOffCoffee);


        JCheckBoxMenuItem runOption= new JCheckBoxMenuItem("Run for your lives! ");

        contingencyPlans.add(runOption);
        alarm.add(contingencyPlans);


        menuBar.add(alarm);


        frame.setJMenuBar(menuBar);

    }


    public static void main(String[] args) {

        final JPanel c = new AddingMenus();

        c.setPreferredSize(new Dimension(433, 312));

        // Queueing GUI work to be run using the EDT.

        SimpleAppLauncher.launch("Chapter 14-9 Adding Menus to an Application", c);

    }

}
Figure 14-9 shows an application with menus, submenus, radio button menu items, and check box menu items.
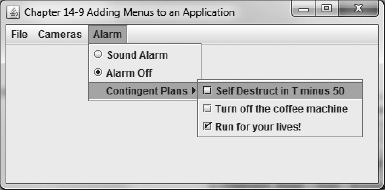
Figure 14-9. Adding menus to an application
How It Works
Menus are standard ways on windowed platform applications to allow users to select options. Menus should also have the functionality of hotkeys or accelerators or mnemonics. Often users will want to use the keyboard instead of the mouse to navigate the menu. When creating menus, you can only add them to the Swing JFrame or JInternalFrame container classes.
First, you will implement the AppSetup interface to allow the developer an opportunity to add components into the main window frame (JFrame). There you will create an instance of a JMenuBar that will contain one-to-many menu (JMenu) objects. The following code line creates a menu bar:
JMenuBar menuBar = new JMenuBar();
Second, you will create menu (JMenu) objects that contain one-to-many menu item (JMenuItem) objects and other JMenu object making submenus. The code statement here creates a file menu:
JMenu menu = new JMenu ("File");
Third, you will create menu items to be added to JMenu objects such as JMenuItem, JCheckBoxMenuItem, and JRadioButtonMenuItem. A thing to note is that menu item can have icons in them. I don't showcase this in the recipe, but I encourage you to explore the various constructors for all JMenuItems. When creating a JRadioButtonMenuItem, you should be aware of the ButtonGroup class. The ButtonGroup class is also used on regular JRadioButtons to allow one selected option only. The following code creates JRadioButtonMenuItem items to be added to a JMenu object:
JMenu alarm = new JMenu("Alarm");

ButtonGroup alarmGroup = new ButtonGroup();

JRadioButtonMenuItem alertItem = new JRadioButtonMenuItem("Sound Alarm");

alarmGroup.add(alertItem);

alarm.add(alertItem);


JRadioButtonMenuItem stopItem = new JRadioButtonMenuItem("Alarm Off", null);

stopItem.setSelected(true);

alarmGroup.add(stopItem);

alarm.add(stopItem);
At times you may want some menu items separated by using visual line separators. To create a visual separator, call the addSeparator() method on the menu item. Other JMenuItems used are the JCheckBoxMenuItem and the JRadioButtonMenuItem classes where they are similar to their counterpart Swing components. Please refer to the Javadoc to see more on JMenuItems.
14-10. Adding Tabs to a Form
Problem
You want to add tabs in your application.
Solution
Create an application with tabs using the Swing container JTabbedPane class.
The code here builds and presents an application with tabs that can be arranged in different orientations. The application will consist of a menu option that allows the user to choose a left, right, top, and bottom orientation.
package org.java7recipes.chapter14.recipe14_10;


import java.awt.*;

import java.awt.event.*;

import javax.swing.*;

import org.java7recipes.chapter14.AppSetup;

import org.java7recipes.chapter14.SimpleAppLauncher;


/**

 * Adding tabs to an application.

 * Requires jdk7
 * @author cdea

 */

public class AddingTabbedPane extends JTabbedPane implements AppSetup{


    public AddingTabbedPane(){


       for (int i=0; i<10; i++) {

           JPanel tabPane = new JPanel();

           tabPane.add(new JLabel("Tab" + i));

           addTab("Tab " + i, null, tabPane, "Tab" + i);

       }

       setTabLayoutPolicy(JTabbedPane.SCROLL_TAB_LAYOUT);

    }


    public void apply(final JFrame frame) {

        JMenuBar menuBar = new JMenuBar();


        JMenu menu = new JMenu("Tabbed Panels");

        JMenuItem left = new JMenuItem("Left", null);

        left.addActionListener(new TabPlacementAction(this, "left"));

        menu.add(left);


        JMenuItem right = new JMenuItem("Right", null);

        right.addActionListener(new TabPlacementAction(this, "right"));

        menu.add(right);


        JMenuItem top = new JMenuItem("Top", null);

        top.addActionListener(new TabPlacementAction(this, "top"));

        menu.add(top);


        JMenuItem bottom = new JMenuItem("Bottom", null);

        bottom.addActionListener(new TabPlacementAction(this, "bottom"));

        menu.add(bottom);


        menuBar.add(menu);


        frame.setJMenuBar(menuBar);

    }


    public static void main(String[] args) {

        final JComponent c = new AddingTabbedPane();

        c.setPreferredSize(new Dimension(433, 312));

        // Queueing GUI work to be run using the EDT.

        SimpleAppLauncher.launch("Chapter 14-10 Adding Tabs to Forms ", c);

    }

}


class TabPlacementAction implements ActionListener {

    private String action;

    private JTabbedPane tabbedPane;

    public TabPlacementAction (JTabbedPane tabbedPane, String action) {
        this.action = action;

        this.tabbedPane = tabbedPane;

    }

    @Override

    public void actionPerformed(ActionEvent e) {

        if ("left".equalsIgnoreCase(action)) {

            tabbedPane.setTabPlacement(JTabbedPane.LEFT);

        } else if ("right".equalsIgnoreCase(action)) {

            tabbedPane.setTabPlacement(JTabbedPane.RIGHT);

        }  else if ("top".equalsIgnoreCase(action)) {

            tabbedPane.setTabPlacement(JTabbedPane.TOP);

        } else if ("bottom".equalsIgnoreCase(action)) {

            tabbedPane.setTabPlacement(JTabbedPane.BOTTOM);

        }

    }

}
Figure 14-10 depicts an application with a menu selection used to choose different tab orientations.
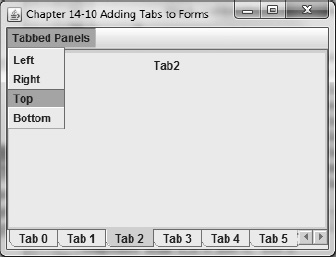
Figure 14-10. Adding tabs to forms
How It Works
Adding tabs to your GUI application is quite simple. You first will create a JTabbedPane contain class that will hold one-to-many JPanels. Each JPanel object added to the container becomes a tab.
In the constructor, I created 10 tabs with a JLabel containing the numbered tab (zero relative). Once the individual tabs were created, I set the tab layout policy to SCROLL_TAB_LAYOUT. Setting the layout policy will create button-like controls to paginate when too many tabs are being displayed at once. Figure 14-10 shows the left and right buttons to the right of Tab 5.
To make things interesting, I created menu options to allow the user to view the tab placement to showcase them displayed on the left, right, top, or bottom. Each menu option will add an instance of a TabPlacementAction that is responsible for calling the tabbed pane's setTabPlacement() method.
14-11. Drawing on a Canvas
Problem
You came across a great idea while at work and you must write it down before you forget. Sadly, your company has just cut its office supply budget, leaving you without pencil or paper.
Solution
Create a doodle application using the Java Swing JPanel, MouseListener, MouseMotionListener, and Graphics2D classes.
The following code recipe creates a doodle application allowing you to use your mouse pointer to draw on a canvas:
package org.java7recipes.chapter14.recipe14_11;


import java.awt.*;

import java.awt.event.*;

import java.awt.geom.*;

import java.util.*;

import javax.swing.*;

import org.java7recipes.chapter14.SimpleAppLauncher;


/**

 * Drawing on a Canvas.

 * @author cdea

 */

public class DrawOnCanvas extends JPanel implements MouseListener,

        MouseMotionListener {


    Path2D oneDrawing = new Path2D.Double();

    List<Path2D> drawings = new ArrayList<>();

    private Point2D anchorPt;


    public DrawOnCanvas() {

        add(new JLabel("Java 7"));

        JTextField field = new JTextField(10);

        add(field);

    }


    @Override

    protected void paintComponent(Graphics g) {

        super.paintComponent(g);


        Graphics2D g2d = (Graphics2D) g;

        g2d.setBackground(Color.WHITE);

        g2d.clearRect(0, 0, getParent().getWidth(), getParent().getHeight());

        g2d.setRenderingHint(RenderingHints.KEY_ANTIALIASING,
                RenderingHints.VALUE_ANTIALIAS_ON);


        g2d.setPaint(Color.BLACK);

        if (oneDrawing != null) {

            g2d.draw(oneDrawing);

        }

        for (Path2D gp : drawings) {

            g2d.draw(gp);

        }


    }


    public static void main(String[] args) {

        final DrawOnCanvas c = new DrawOnCanvas();

        c.addMouseListener(c);

        c.addMouseMotionListener(c);

        c.setPreferredSize(new Dimension(409, 726));

        SimpleAppLauncher.launch("Chapter 14-11 Drawing on a Canvas", c);

    }


    @Override

    public void mouseClicked(MouseEvent e) {

    }


    @Override

public void mousePressed(MouseEvent e) {

        anchorPt = (Point2D) e.getPoint().clone();

        oneDrawing = new GeneralPath();

        oneDrawing.moveTo(anchorPt.getX(), anchorPt.getY());

        repaint();

    }


    @Override

public void mouseReleased(final MouseEvent e) {

        if (anchorPt != null) {

            drawings.add(oneDrawing);

            oneDrawing = null;

        }

        repaint();

    }


    @Override

    public void mouseEntered(MouseEvent e) {

    }


    @Override

    public void mouseExited(MouseEvent e) {

    }


    @Override

public void mouseDragged(MouseEvent e) {

        oneDrawing.lineTo(e.getX(), e.getY());
        repaint();

    }


    @Override

    public void mouseMoved(MouseEvent e) {

    }

}
Figure 14-11 depicts a doodle application with a text label, text field, and a drawing surface.
Figure 14-11. Drawing on canvas
How It Works
When you want to draw on a surface in Swing, you simply override the paintComponent() method of a JComponent class. In this recipe, I wanted to draw and have text components on the same surface; so, instead of extending from the JComponent class, I extended the JPanel container class. Once the paintComponent() method is overridden, you will be able to use the Graphics2D object to draw on the surface. To learn more on the Graphics2D object in Java 2D, see Chapter 12.
Before getting into the implementation, I want to point out the instance variables at the top of the class. The following are the application's instance variable descriptions:
oneDrawing: A single instance of aPath2Dvariable that holds points of the current drawing when the mouse is pressed.drawings: A list ofPath2Dinstances that contain the many paths or drawings. Once a mouse releases, the current path instance is added to this list.anchorPt: This is the point on the surface which starts the path to be drawn. When an initial mouse press occurs, the anchor point is assigned before a mouse drag event occurs.
To listen for mouse events in this recipe, you will implement the MouseListener and MouseMotionListener interfaces. You will implement three methods: mousePress(), mouseReleased(), and mouseDragged(). The following are the mouse method functions:
mousePress(): Is responsible for creating the initial starting point and an instance of aPath2D.mouseDragged(): Will add points to be connected in the path instance using thelineTo().mouseRelease(): Is called when the user releases the mouse button after a drag operation. Also adds the current path instance into the list ofPath2Dobjects.
You'll notice in the code that each method has a repaint() method. The repaint() method notifies the graphics context to repaint the surface via the paintComponent() method.
In the paintComponent() method, you will set the background to white, set anti-aliasing on, and set the color of the stroke to be black. You will draw the current path instance and then loop through the list of previously stored paths (drawings) to be drawn. There you have it a simple doodler!
14-12. Generating and Laying Out Icons
Problem
You want to load icons and position text on buttons and labels.
Solution
Use the ImageIcon, JButton, and JLabel classes.
The following code recipe creates an application to demonstrate loading icons and label as well as positioning text:
package org.java7recipes.chapter14.recipe14_12;


import java.awt.*;

import javax.swing.*;

import org.java7recipes.chapter14.CellConstraint;

import org.java7recipes.chapter14.CustomGridLayout;

import org.java7recipes.chapter14.SimpleAppLauncher;


/**

 * <p>

 * +------------------------+

 * | [label ] [ button ]    |

 * | [label ] [ button ]    |

 * | [label ] [ button ]    |
 * +------------------------+

 * </p>

 *

 * Generating and Laying Out Icons.

 * @author cdea

 */

public final class GeneratingAndLayingIcons extends JPanel {


    public GeneratingAndLayingIcons() {

        JLabel label1 = new JLabel("Gold Spiral", createImageIcon("goldspiral.png"), JLabel.LEFT);

        label1.setHorizontalTextPosition(SwingConstants.RIGHT);

        JLabel label2 = new JLabel("Gold Circle", createImageIcon("goldcircle.png"), JLabel.LEFT);

        label2.setHorizontalTextPosition(SwingConstants.CENTER);

        JLabel label3 = new JLabel("Gold Star", createImageIcon("goldstar.png"),

JLabel.LEFT);

        label3.setHorizontalTextPosition(SwingConstants.LEFT);


        JButton button1 = new JButton("Spiral", createImageIcon("spiral.png"));

        JButton button2 = new JButton("Cube", createImageIcon("cube.png"));

        button2.setHorizontalTextPosition(SwingConstants.CENTER);

        JButton button3 = new JButton("Pentagon", createImageIcon("pentagon.png"));

        button3.setHorizontalTextPosition(SwingConstants.LEFT);


        // create a layout 3x3 cell grid.

        // horizontal and vertical gaps between components are 5 pixels

        CustomGridLayout cglayout = new CustomGridLayout(10, 10, 3, 3);


        setLayout(cglayout);


        // add label1 cell 0,0

        addToPanel(label1, 0, 0, CellConstraint.RIGHT);


        // add label2 cell 1,0

        addToPanel(label2, 0,1, CellConstraint.RIGHT);


        // add label3 cell 2,0

        addToPanel(label3, 0,2, CellConstraint.RIGHT);


        // add button1 cell 0,1

        addToPanel(button1, 1, 0, CellConstraint.RIGHT);


        // add button2 cell 1,1

        addToPanel(button2, 1, 1, CellConstraint.RIGHT);


        // add button2 cell 2,1

        addToPanel(button3, 1, 2, CellConstraint.RIGHT);


    }


    protected ImageIcon createImageIcon(String path) {

        java.net.URL imageURL = getClass().getResource(path);

        if (imageURL != null) {

            return new ImageIcon(imageURL);
        } else {

            throw new RuntimeException("Unable to load " + path);

        }

    }


    private void addToPanel(Component comp, int colNum, int rowNum, int align) {

        CellConstraint constr = new CellConstraint()

                .setColNum(colNum)

                .setRowNum(rowNum)

                .setAlign(align);

        add(comp, constr);

    }


    public static void main(String[] args) {

        final JPanel c = new GeneratingAndLayingIcons();

        c.setPreferredSize(new Dimension(388, 194));

        // Queueing GUI work to be run using the EDT.

        SimpleAppLauncher.launch("Chapter 14-12 Generating and Laying Out Icons.", c);

    }

}
Figure 14-12 shows the application displaying labels and buttons with positioned text and icons.
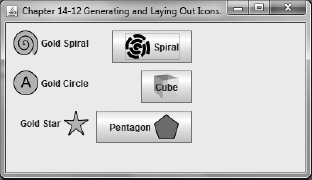
Figure 14-12. Generating and laying out icons
How It Works
Before we discuss the code details, I would like to mention layout. For this recipe you will be using the CustomGridLayout manager to position the UI components in a grid-like table display. For brevity, I will not go into great detail, but will refer you to recipe 14-4, in which the custom grid layout is discussed more in depth. So, let's begin by creating icons, labels, and buttons!
When using JLabels and JButtons, you can easily add icons along with the text when displayed. Another nice functionality of the JLabel and JButton components is to set the text position relative to the icon image. In the recipe code, I created a convenience method called createImageIcon() to load and return an ImageIcon object. The code here is the createImageIcon() method that creates and returns an icon (ImageIcon) loaded from a URL:
public ImageIcon createImageIcon(String path) {

        java.net.URL imageURL = getClass().getResource(path);

        if (imageURL != null) {

            return new ImageIcon(imageURL);

        } else {

            throw new RuntimeException("Unable to load " + path);

        }

    }
![]() Note To run this recipe using the NetBeans IDE, you may have to perform a clean and build of the project to ensure the images get copied properly to reside on the classpath. This allows the
Note To run this recipe using the NetBeans IDE, you may have to perform a clean and build of the project to ensure the images get copied properly to reside on the classpath. This allows the getClass().getResource() method to load and create ImageIcon instances.
The image icons are loaded using the getClass().getResource() method, which returns a URL object representing the location of an image file. After instantiating the ImageIcon class, the method returns to the caller a newly loaded instance of an ImageIcon object.
When creating new instances of a JLabel, I chose the constructor that receives three parameters: the text, icon, and horizontal alignment.
14-13. Designing and Manipulating Borders
Problem
You want to preview different types of borders while changing its color.
Solution
Create an application with sample borders and color selections to allow the user to design a border. Use the Swing BorderFactory API.
The following code recipe creates an application with sample borders and color selections to allow the user to design a border:
package org.java7recipes.chapter14.recipe14_13;


import java.awt.*;

import java.awt.event.*;

import java.util.*;

import javax.swing.*;

import javax.swing.border.*;

import org.java7recipes.chapter14.CellConstraint;

import org.java7recipes.chapter14.CustomGridLayout;

import org.java7recipes.chapter14.SimpleAppLauncher;
/**

 * Border Designer.

 * @author cdea

 */

public final class BorderDesigner extends JTabbedPane {

    final static Map<String, Color> COLOR_MAP = new TreeMap<>();

    static {

        COLOR_MAP.put("Black", Color.BLACK);

        COLOR_MAP.put("Blue", Color.BLUE);

        COLOR_MAP.put("Green", Color.GREEN);

        COLOR_MAP.put("Red", Color.RED);

        COLOR_MAP.put("Gray", Color.GRAY);

        COLOR_MAP.put("Yellow", Color.YELLOW);

        COLOR_MAP.put("White", Color.WHITE);

    }

    final static Border[] BORDERS = new Border[8];

    static {

        BORDERS[0] = BorderFactory.createLineBorder(Color.BLACK);

        BORDERS[1] = BorderFactory.createLoweredBevelBorder();

        BORDERS[2] = BorderFactory.createRaisedBevelBorder();

        BORDERS[3] = BorderFactory.createEtchedBorder(EtchedBorder.LOWERED);

        BORDERS[4] = BorderFactory.createEtchedBorder(EtchedBorder.RAISED);

        BORDERS[5] = BorderFactory.createDashedBorder(Color.BLACK, 4, 4);

        BORDERS[6] = BorderFactory.createStrokeBorder(new BasicStroke(3));

        BORDERS[7] = BorderFactory.createTitledBorder(BORDERS[0], "Titled Border", TitledBorder.LEFT, TitledBorder.DEFAULT_JUSTIFICATION);


    }

    final static String[] BORDER_TYPES = {"Line Border",

            "Lowered Bevel Border",

            "Raised Bevel Border",

            "Lowered Etched Border",

            "Raised Etched Border",

            "Dashed Border",

            "Stroke Border",

            "Titled Border"};


    public BorderDesigner() {


        JPanel borderTab = new JPanel();

        borderTab.setLayout(new CustomGridLayout(10, 20, 2, 2));


        // Border area

        final JPanel borderArea = new JPanel();

        borderArea.add(new JLabel("Java 7 Recipes"));

        borderArea.setPreferredSize(new Dimension(200, 100));

        borderArea.setBorder(BORDERS[0]);

        addToPanel(borderTab, borderArea, 1, 0, CellConstraint.CENTER);


        // ComboBox changing the individual borders

        final JComboBox<String> borderComboBox = new JComboBox<>(BORDER_TYPES);
        // Set border when selection changes

        final List<String> borderTypeList = Arrays.asList(BORDER_TYPES);


        borderComboBox.addActionListener(new ActionListener() {

            @Override

            public void actionPerformed(ActionEvent e) {

                String selected = (String) borderComboBox.getSelectedItem();

                int index = borderTypeList.indexOf(selected);

                borderArea.setBorder(BORDERS[index]);

            }

        });


        // ComboBox to change the color on certain borders

        JComboBox<String> colorComboBox = createColorComboBox(BORDERS, borderArea);


        // Place both combo boxes on North and South of Border layout

        JPanel controlsArea = new JPanel(new BorderLayout(5, 5));

        controlsArea.add(borderComboBox, BorderLayout.NORTH);

        controlsArea.add(colorComboBox, BorderLayout.SOUTH);


        // Place controls area in grid cell 0,0(Left of the border area)

        addToPanel(borderTab, controlsArea, 0, 0, CellConstraint.RIGHT);


        // place borders tab in tabbed pane

        addTab("Borders", null, borderTab, "Simple Borders");


    }


    private JComboBox<String> createColorComboBox(final Border[] borders, final JPanel borderArea) {


        final JComboBox<String> colorComboBox = new JComboBox<>();

        final DefaultComboBoxModel comboBoxModel = new

DefaultComboBoxModel(COLOR_MAP.keySet().toArray());

        colorComboBox.setModel(comboBoxModel);

        colorComboBox.addActionListener(new ActionListener() {


            @Override

            public void actionPerformed(ActionEvent e) {

                Color selected = COLOR_MAP.get(colorComboBox.getSelectedItem().toString());

                Border newColoredBorder = BorderFactory.createLineBorder(selected);

                borders[0] = newColoredBorder;


                newColoredBorder = BorderFactory.createDashedBorder(selected, 4, 4);

                borders[5] = newColoredBorder;


                newColoredBorder = BorderFactory.createStrokeBorder(new BasicStroke(3), selected);

                borders[6] = newColoredBorder;
                newColoredBorder = BorderFactory.createTitledBorder(borders[0], "Titled

Border");

                borders[7] = newColoredBorder;


                Border currentBorder = borderArea.getBorder();


                if (currentBorder instanceof LineBorder) {

                    borderArea.setBorder(borders[0]);

                } else if (currentBorder instanceof StrokeBorder) {

                    StrokeBorder sborder = (StrokeBorder) borderArea.getBorder();

                    if (sborder.getStroke().getDashArray() != null) {

                        borderArea.setBorder(borders[5]);

                    } else {

                        borderArea.setBorder(borders[6]);

                    }

                } else if (currentBorder instanceof TitledBorder) {

                    borderArea.setBorder(borders[7]);

                }

            }

        });

        return colorComboBox;

    }


    private void addToPanel(Container container, Component comp, int colNum, int rowNum, int align) {

        CellConstraint constr = new CellConstraint()

                .setColNum(colNum)

                .setRowNum(rowNum)

                .setAlign(align);

        container.add(comp, constr);

    }


    public static void main(String[] args) {

        final JTabbedPane c = new BorderDesigner();

        c.setPreferredSize(new Dimension(409, 204));

        // Queueing GUI work to be run using the EDT.

        SimpleAppLauncher.launch("Chapter 14-13 Designing Borders", c);

    }

}


int index = borderTypeList.indexOf(selected);

                borderArea.setBorder(BORDERS[index]);
Figure 14-13 depicts the border designer application with drop-down menus, allowing the user to select border styles and color.
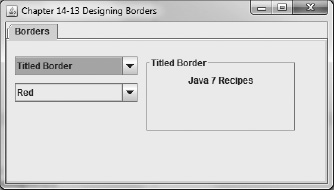
Figure 14-13. Designing borders
How It Works
Borders are simply a way to decorate a component's bordering edges. Throughout most of the recipes in this chapter, Swing components extend from the JComponent class. Knowing this fact means you can set the border on any Swing component using the JComponent's setBorder() method. In this recipe you will present to the user choices of different border styles and color options. The options to set color are only for the lined type borders such as the DashedBorder, StrokeBorder, and TitledBorder classes.
Before I discuss the methods that dynamically change the borders, I want to describe the constant (static final) variables that contain the various border types and colors to choose from. You'll notice that in the static initializer block below the BORDERS array declaration are eight instances of type Border created using the BorderFactory's many create methods. Table 14-3 lists the descriptions of the static final collection and arrays.
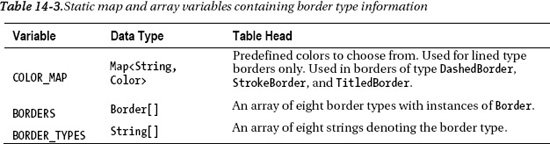
In the BorderDesigner class's constructor is where the components are laid out. You will first create a panel with a custom grid layout. (To see more on layouts, please see recipe 14-4). Then you will create a component using an instance of a JPanel with a default border and a dimension of 200x100. Next you will create a combo box component with the types using the array of strings to allow the user to choose the type of border to display. Added to the combo box is an ActionListener that swaps out the currently displayed border component to the user. Last, you will create a combo box that will apply a chosen color from the user to the appropriate lined type border. You'll notice the method createColorComboBox() that creates the combo box responsible for changing the colors. Actually, it calls the BorderFactory create methods to generate a brand new border with the color applied.
14-14. Creating Text Components
Problem
Your million dollar idea (see recipe 14-11) must be protected from prying eyes.
Solution
Create a login screen having username and password text fields and a login button.
The main classes used in this recipe are JTextField, JPasswordField, and JTextArea classes. When using JTextArea, you should also use a JScrollPane to create scrollbars for larger text content.
The following code creates a login screen application:
package org.java7recipes.chapter14.recipe14_14;


import java.awt.*;

import java.awt.event.ActionEvent;

import java.util.*;

import javax.swing.*;

import javax.swing.UIManager.LookAndFeelInfo;

import javax.swing.UnsupportedLookAndFeelException;

import org.java7recipes.chapter14.CellConstraint;

import org.java7recipes.chapter14.CustomGridLayout;

import org.java7recipes.chapter14.SimpleAppLauncher;


/**

 * Creating Text Components.

 * @author cdea

 */

public class CreatingTextComponents extends JPanel {


    public CreatingTextComponents() {


        CustomGridLayout cglayout = new CustomGridLayout(5, 5, 2, 5);


        setLayout(cglayout);


        JLabel mainLabel = new JLabel("Enter User Name & Password");

        addToPanel(mainLabel, 1, 0, CellConstraint.CENTER);


        JLabel userNameLbl = new JLabel("User Name: ");

        addToPanel(userNameLbl, 0, 1, CellConstraint.RIGHT);


        JLabel passwordLbl = new JLabel("Password: ");

        addToPanel(passwordLbl, 0, 2, CellConstraint.RIGHT);
        JLabel statusLbl = new JLabel("Status: ");

        addToPanel(statusLbl, 0, 4, CellConstraint.RIGHT);


        // username text field

        final JTextField userNameFld = new JTextField("Admin", 20);

        addToPanel(userNameFld, 1, 1);


        // password field

        final JPasswordField passwordFld = new JPasswordField("drowssap", 20);

        addToPanel(passwordFld, 1, 2);


        JButton login = new JButton("Login");

        addToPanel(login, 1, 3, CellConstraint.RIGHT);


        // status text area

        final JTextArea taFld = new JTextArea(10, 20);

        JScrollPane statusScroll = new JScrollPane(taFld);

        taFld.setEditable(false);

        addToPanel(statusScroll, 1, 4);


        login.setAction(new AbstractAction("login") {


            @Override

            public void actionPerformed(ActionEvent e) {

                if ("Admin".equalsIgnoreCase(userNameFld.getText()) &&

                        Arrays.equals("drowssap".toCharArray(), passwordFld.getPassword())) {

                    taFld.append("Login successful
");

                } else {

                    taFld.append("Login failed
");

                }

            }

        });


    }


    private void addToPanel(Component comp, int colNum, int rowNum) {

        CellConstraint constr = new CellConstraint()

                .setColNum(colNum)

                .setRowNum(rowNum);

        add(comp, constr);

    }

    private void addToPanel(Component comp, int colNum, int rowNum, int alignment) {

        CellConstraint constr = new CellConstraint()

                .setColNum(colNum)

                .setRowNum(rowNum)

                .setAlign(alignment);

        add(comp, constr);

    }


    public static void main(String[] args) {

        try {
            String lnf = null;

            for (LookAndFeelInfo info : UIManager.getInstalledLookAndFeels()) {

                if ("Nimbus".equalsIgnoreCase(info.getName())) {

                    lnf = info.getClassName();

                    UIManager.setLookAndFeel(lnf);

                    break;

                }

            }

            if (lnf == null) {

                 UIManager.setLookAndFeel(UIManager.getSystemLookAndFeelClassName());

            }

        } catch (UnsupportedLookAndFeelException e) {

            // handle exception

        } catch (ClassNotFoundException e) {

            // handle exception

        } catch (InstantiationException e) {

            // handle exception

        } catch (IllegalAccessException e) {

            // handle exception

        }


        final JPanel c = new CreatingTextComponents();

        c.setPreferredSize(new Dimension(378, 359));

        // Queueing GUI work to be run using the EDT.

        SimpleAppLauncher.launch("Chapter 14-14 Creating Text Components", c);

    }

}
Figure 14-14 shows the login application complete with a text field, password field, text area, and login button.
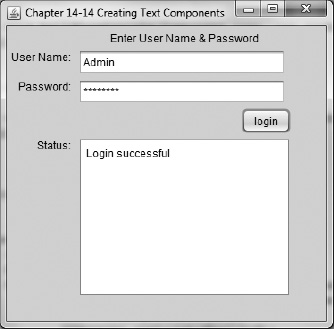
Figure 14-14. Generating events with buttons
How It Works
Have you ever seen a login screen? I'm sure you have. All login screens look the same where the display contains a username, password and login button. In this recipe I will be discussing common text components that are used in form interfaces. Advanced text components such as a JTextPane will be discussed in recipe 14-17. Here we will talk about components of type JTextField, JPasswordField, and JTextArea.
Talking about the same old same old, in this recipe I was a little tired of looking at the old default Look 'n' Feel, so I decided to set it to Java 7's new Nimbus Look 'n' Feel. For more on how to set your Look 'n' Feel, see recipe 14-21. So, on to login screens!
You will begin by using the custom layout to place labels and input fields. (If you don't understand custom layouts, please refer to recipe 14-4.) Moving onto UI controls, you will want to add the JLabel's object into the first column (column zero). Next is adding the JTextField into the second column (column 1) for the username. Then you will create a JPasswordField for the password input field. Added next is a JButton for the simulated login button. Last, you will create a JTextArea for the status in which messages are output when the user presses the login button to confirm. Instead of using an action listener I used an AbstractAction class with a command string as "login" that is set in the constructor. You'll see later in recipe 14-16 the difference between the AbstractAction and ActionListener classes. The last thing to point out is the actionPerformed() method, which checks the username and password. The JPasswordField UI component has a getPassword() method that returns an array of characters instead of a string. When systems use encryption, byte arrays are normally used not strings.
Of course, you'll never see this kind of code in production, but to not make things obvious I've obfuscated the admin password.
14-15. Associating Action Objects with Editing Commands
Problem
You want to create a simple editor with editing actions such as undo and redo.
Solution
Use the StyledDocument class to create a simple text editor and the UndoManager class to handle undo and redo actions.
The following code recipe constructs a simple text editor that demonstrates the ability to handle undo and redo actions. The keyboard shortcut used to perform undo and redo operations is Ctrl+z and Ctrl+y, respectively.
package org.java7recipes.chapter14.recipe14_15;


import java.awt.*;

import java.awt.event.*;

import javax.swing.*;

import javax.swing.event.UndoableEditEvent;
import javax.swing.event.UndoableEditListener;

import javax.swing.text.AbstractDocument;

import javax.swing.undo.CannotRedoException;

import javax.swing.undo.CannotUndoException;

import javax.swing.undo.UndoManager;

import org.java7recipes.chapter14.AppSetup;

import org.java7recipes.chapter14.SimpleAppLauncher;


/**

 * Action with edit commands.

 * @author cdea

 */

public final class ActionWithEditCommand extends JPanel implements AppSetup {


AbstractDocument doc;

    protected UndoManager undo = new UndoManager();

    protected UndoAction undoAction;

    protected RedoAction redoAction;


    public ActionWithEditCommand() {

        setLayout(new BorderLayout(3, 3));


        JTextArea textArea = new JTextArea();

        JScrollPane sp = new JScrollPane(textArea);

        doc = (AbstractDocument) textArea.getDocument();

        undoAction = new UndoAction(undo);

        redoAction = new RedoAction(undo);


        // connect both

        redoAction.setUndoAction(undoAction);

        undoAction.setRedoAction(redoAction);

        doc.addUndoableEditListener(new MyUndoableEditListener());

        add(sp, BorderLayout.CENTER);


    }


    public void apply(final JFrame frame) {

        JMenuBar menuBar = new JMenuBar();


        JMenu editMenu = new JMenu("Edit");


        JMenuItem undoItem = new JMenuItem("Undo", null);

        undoItem.setMnemonic(KeyEvent.VK_Z);

        undoItem.setAccelerator(KeyStroke.getKeyStroke(KeyEvent.VK_Z,

ActionEvent.CTRL_MASK));

        undoItem.setAction(undoAction);

        editMenu.add(undoItem);


        JMenuItem redoItem = new JMenuItem("Redo", null);

redoItem.setMnemonic(KeyEvent.VK_Y);

        redoItem.setAccelerator(KeyStroke.getKeyStroke(KeyEvent.VK_Y,

ActionEvent.CTRL_MASK));
        redoItem.setAction(redoAction);

        editMenu.add(redoItem);

        menuBar.add(editMenu);


        frame.setJMenuBar(menuBar);

}


    protected class MyUndoableEditListener implements UndoableEditListener {


        public void undoableEditHappened(UndoableEditEvent e) {

            undo.addEdit(e.getEdit());

            undoAction.updateState();

            redoAction.updateState();

        }

    }


    public static void main(String[] args) {

        final JPanel c = new ActionWithEditCommand();

        c.setPreferredSize(new Dimension(433, 312));

        // Queueing GUI work to be run using the EDT.

        SimpleAppLauncher.launch("Chapter 14-15 Action with edit commands", c);

    }

}


class UndoAction extends AbstractAction {


    private UndoManager undo = null;

    private RedoAction redoAction = null;


    public UndoAction(UndoManager undo) {

        super("Undo");

        putValue(ACCELERATOR_KEY, KeyStroke.getKeyStroke(KeyEvent.VK_Z,

ActionEvent.CTRL_MASK));

        putValue(MNEMONIC_KEY, KeyEvent.VK_Z);


        setEnabled(false);

        this.undo = undo;

    }


    public void setRedoAction(RedoAction redoAction) {

        this.redoAction = redoAction;

    }


    public void actionPerformed(ActionEvent e) {

        try {

            undo.undo();

        } catch (CannotUndoException ex) {

            ex.printStackTrace();

        }

        updateState();

        redoAction.updateState();

    }
    protected void updateState() {

        if (undo.canUndo()) {

            setEnabled(true);

            putValue(Action.NAME, undo.getUndoPresentationName());

        } else {

            setEnabled(false);

            putValue(Action.NAME, "Undo");

        }

    }

}


class RedoAction extends AbstractAction {


    private UndoManager undo = null;

    private UndoAction undoAction = null;


    public RedoAction(UndoManager undo) {

        super("Redo");

        putValue(ACCELERATOR_KEY, KeyStroke.getKeyStroke(KeyEvent.VK_Y,

ActionEvent.CTRL_MASK));

        putValue(MNEMONIC_KEY, KeyEvent.VK_Y);


        setEnabled(false);

        this.undo = undo;

    }


    public void setUndoAction(UndoAction undoAction) {

        this.undoAction = undoAction;

    }


    public void actionPerformed(ActionEvent e) {

        try {

            undo.redo();

        } catch (CannotRedoException ex) {

            ex.printStackTrace();

        }

        updateState();

        undoAction.updateState();

    }


    protected void updateState() {

        if (undo.canRedo()) {

            setEnabled(true);

            putValue(Action.NAME, undo.getRedoPresentationName());

        } else {

            setEnabled(false);

            putValue(Action.NAME, "Redo");

        }

    }

}
Figure 14-15 depicts a simple text editor about to perform an undo operation.
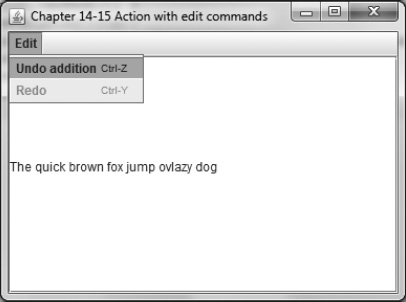
Figure 14-15. Action with edit commands
How It Works
Every editor that I've experienced has an undo or redo feature (vi does, too) when users edit text. A really nice feature in Swing is the UndoManager class. It manages keystrokes, text, and font changes as the user is editing text in a text component. In this recipe, you will be using the text component JTextArea. All text components contain a Document object that is the back end for many GUI text components. In other words, all the text content is maintained in a Document object. To step through this recipe, you will walk though things in the order they appear in the source code, starting with the constructor of the ActionWithEditCommand class for each of the AbstractAction instances.
In this section, you will be looking at the ActionWithEditCommand constructor. You will begin by creating a JTextArea with a JScrollPane for the user to type text into. Next, you will call the JTextArea's getDocument() method to obtain the Document object. Then it gets cast to an AbstractDocument to be referenced later on. This code line obtains the Document object from a text component:
AbstractDocument doc = (AbstractDocument) textArea.getDocument();
Next is the creation of UndoAction and RedoAction instances by passing in an UndoManager object (undo). The UndoManager will maintain an ordered list of all edit actions in the Document object. For instance when the last edit was a word being deleted, the UndoManager can restore the word and its attributes. The following code shows UndoAction and RedoAction created with a reference to the UndoManager:
    undoAction = new UndoAction(undo);

    redoAction = new RedoAction(undo);
Because UndoAction and RedoAction are closely connected, I created methods to allow them to reference each other. The following code lines set the RedoAction and UndoAction objects to reference each other:
// connect both

redoAction.setUndoAction(undoAction);

undoAction.setRedoAction(redoAction);
Once UndoAction and RedoAction have been set and associated, you will need to set the Document object with a MyUndoableEditListener instance. The MyUndoableEditListener listener is responsible for listening for UndoableEditEvent objects. The listener will add UndoableEdit objects every time an edit occurs in the document. After adding a UndoableEdit object to the UndoManager the UndoAction and RedoAction updateState() method is called to update its enabled state so that menu buttons could be grayed-out. Any time there are undo or redo events, the UndoManager will record the change such as a user pressing Backspace to delete a character. When a group of changes occur such as a word being bolded, an undo being performed will revert the whole word and its attributes. The following code is a class that implements an undoableEditHappened() method from the MyUndoableEditListener class:
    protected class MyUndoableEditListener implements UndoableEditListener {

        public void undoableEditHappened(UndoableEditEvent e) {

            undo.addEdit(e.getEdit());

            undoAction.updateState();

            redoAction.updateState();

        }

    }
To implement the UndoAction and RedoAction classes, you will need to extend the AbstractAction class. Each action will invoke the putValue() method to set up the keyboard shortcuts to allow the user to use the keystrokes Ctrl+z and Ctrl+y to undo and redo an edit, respectively. When the action is triggered via a keyboard shortcut, the actionPerformed() method will be invoked. To implement the actionPerformed() method, you will call the UndoManager to perform an undo or redo of the edit and call the updateState() to update the action's enabled state that actually will update the menu options' enabled state and its text. The following code snippet is the UndoAction's actionPerformed() method:
    public void actionPerformed(ActionEvent e) {

        try {

            undo.undo();

        } catch (CannotUndoException ex) {

            ex.printStackTrace();

        }

        updateState();

        redoAction.updateState();

    }
14-16. Creating Keyboard Shortcuts
Problem
You want to create keyboard shortcuts or hot keys to quickly select menu options without having to use the mouse.
Solution
Use the KeyEvent, KeyStroke, and AbstractAction classes.
The following code recipe is an application with menu options assigned keyboard shortcuts. A “New” button is also displayed that is assigned a keyboard shortcut. The available keyboard shortcuts are Alt+n, Ctrl+s, and Alt+x. Alt+n will invoke the action to pop up a dialog box alerting the user of the new option being selected. This action is also bound to the “New” button, as mentioned before. When the user presses the Ctrl+s key combination a popup will display a “saved…” message dialog box. Finally, the Alt+x keyboard shortcut will exit the application.
package org.java7recipes.chapter14.recipe14_16;


import java.awt.BorderLayout;

import java.awt.Dimension;

import java.awt.event.ActionEvent;

import java.awt.event.ActionListener;

import java.awt.event.KeyEvent;

import javax.swing.*;

import org.java7recipes.chapter14.AppSetup;

import org.java7recipes.chapter14.SimpleAppLauncher;


/**

 * Adding Component to GUI.

 * @author cdea

 */

public class KeyboardShortcuts extends JPanel implements AppSetup{


    public KeyboardShortcuts(){


    }


    public void apply(final JFrame frame) {

        JMenuBar menuBar = new JMenuBar();


        JMenu menu = new JMenu("File");

        menu.setMnemonic(KeyEvent.VK_F);

        JMenuItem newItem = new JMenuItem("New", null);

        newItem.setMnemonic(KeyEvent.VK_N);


        AbstractAction newAction = new AbstractAction("New") {

            public void actionPerformed(ActionEvent e) {
                JOptionPane.showMessageDialog(frame, "New option selected");

            }

        };

        newAction.putValue(AbstractAction.MNEMONIC_KEY, new Integer(KeyEvent.VK_N));

        newItem.addActionListener(newAction);

        menu.add(newItem);


        JButton button = new JButton(newAction);

        frame.getContentPane().add(button, BorderLayout.NORTH);


        JMenuItem saveItem = new JMenuItem("Save", null);

        saveItem.setMnemonic(KeyEvent.VK_S);

        saveItem.setAccelerator(KeyStroke.getKeyStroke(KeyEvent.VK_S,

ActionEvent.CTRL_MASK));

        saveItem.addActionListener(new ActionListener() {


            @Override

            public void actionPerformed(ActionEvent e) {

                JOptionPane.showMessageDialog(frame, "Saved..");

            }

        });

        menu.add(saveItem);


        menu.addSeparator();


        JMenuItem exitItem = new JMenuItem("Exit", null);

        exitItem.setMnemonic(KeyEvent.VK_X);

        exitItem.setAccelerator(KeyStroke.getKeyStroke(KeyEvent.VK_X,

ActionEvent.ALT_MASK));

        exitItem.addActionListener(new ActionListener() {


            @Override

            public void actionPerformed(ActionEvent e) {

                System.exit(0);

            }

        });

        menu.add(exitItem);


        menuBar.add(menu);


        frame.setJMenuBar(menuBar);

    }


    public static void main(String[] args) {

        final JPanel c = new KeyboardShortcuts();

        c.setPreferredSize(new Dimension(433, 312));

        // Queueing GUI work to be run using the EDT.

        SimpleAppLauncher.launch("Chapter 14-16 Creating Keyboard Shortcuts", c);

    }

}
In the application there are three menu options with designated keyboard shortcuts along with a “New” button, as shown in Figure 14-16.
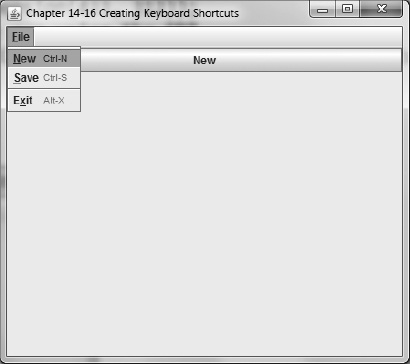
Figure 14-16. Creating keyboard shortcuts
How It Works
When creating menu items, you can set a mnemonic (Alt key) that associates a key on the keyboard to allow the user to select the menu item when the parent menu is visible. For example, when pressing Alt+f, the “File” menu is displayed, which is the parent menu of the menu item for the “New” option (Alt+n). Here you can press Alt+n (or n) to invoke the action to pop up the message dialog box. The same action attached to the “New” menu option is also attached to the “New” button, to also be invoked immediately with a hot key (Alt+n). Menu items can also be set to associate with key combinations that are called key accelerators (for example, Ctrl+S in Windows). An example is when a user wants to save a file using a key combination (shortcut) instead of using the mouse to navigate through menus. The following code sets the “Save” menu item's key mnemonic and key accelerator with the letter s. The s or Alt+s (mnemonic) can be used if the “File” menu is visible. If the Ctrl+s (accelerator) is pressed, the dialog box is immediately shown.
saveItem.setMnemonic(KeyEvent.VK_S);

saveItem.setAccelerator(KeyStroke.getKeyStroke(KeyEvent.VK_S, ActionEvent.CTRL_MASK));
Once the user performs a keyboard shortcut, the ActionListener object will receive the action event and perform the action (display dialog box). In this recipe code listing, actions (AbstractActions) can also contain keyboard shortcuts via the putValue() method. Because an AbstractAction object can contain keyboard shortcuts and because it is an ActionListener, you can not only set them in menu items but also set them in JButtons. Shown here is an AbstractAction instance bound to a menu item and a button:
        AbstractAction newAction = new AbstractAction("New") {

            public void actionPerformed(ActionEvent e) {

                JOptionPane.showMessageDialog(frame, "New option selected");

            }

        };

        newAction.putValue(AbstractAction.MNEMONIC_KEY, new Integer(KeyEvent.VK_N));

        newItem.addActionListener(newAction);

        menu.add(newItem);


        JButton button = new JButton(newAction);
This is also convenient because you can have one action that can control two or more components at the same time. This can allow the developer to disable a menu item and button simultaneously.
14-17. Creating a Document
Problem
You need to write an important business letter. The problem is that you are too cheap to buy Microsoft Word, and your broadband connection has been severed in the middle of your Open Office download.
Solution
Create a simple word processor that can change the font, size, and style of the text. You will be using Java Swing's TextPane and StyledDocument API.
The following code recipe creates a simple word processor application that allows you to select font, size, and style of your text:
package org.java7recipes.chapter14.recipe14_17;


import java.awt.*;

import javax.swing.*;

import javax.swing.text.AbstractDocument;

import javax.swing.text.StyledDocument;

import javax.swing.text.StyledEditorKit;

import org.java7recipes.chapter14.AppSetup;

import org.java7recipes.chapter14.SimpleAppLauncher;


/**

 * Creating A Document.

 * @author cdea

 */

public class CreatingDocument extends JPanel implements AppSetup{


    JTextPane textPane = null;

    public CreatingDocument(){

        setLayout(new BorderLayout(3,3));

        textPane = new JTextPane();
        textPane.setCaretPosition(0);

        textPane.setMargin(new Insets(5,5,5,5));


        add(textPane, BorderLayout.CENTER);


    }


    public void apply(final JFrame frame) {

        JMenuBar menuBar = new JMenuBar();


        JMenu fontsMenu = new JMenu("Fonts");


        ButtonGroup fontGroup = new ButtonGroup();

        JRadioButtonMenuItem serifItem = new JRadioButtonMenuItem("Serif");

        serifItem.setAction(new StyledEditorKit.FontFamilyAction(Font.SERIF, Font.SERIF));

        fontsMenu.add(serifItem);

        fontGroup.add(serifItem);


        JRadioButtonMenuItem sansSerifItem = new JRadioButtonMenuItem("SansSerif", null);

        sansSerifItem.setSelected(true);

        sansSerifItem.setAction(new StyledEditorKit.FontFamilyAction(Font.SANS_SERIF, Font.SANS_SERIF));

        fontsMenu.add(sansSerifItem);

        fontGroup.add(sansSerifItem);


        JRadioButtonMenuItem monoItem = new JRadioButtonMenuItem("MONO SPACED", null);

        monoItem.setAction(new StyledEditorKit.FontFamilyAction(Font.MONOSPACED, Font.MONOSPACED));

        fontsMenu.add(monoItem);

        fontGroup.add(monoItem);


        menuBar.add(fontsMenu);


        JMenu sizeMenu = new JMenu("Size");


        ButtonGroup sizeGroup = new ButtonGroup();

        JRadioButtonMenuItem size12Item = new JRadioButtonMenuItem("12");

        size12Item.setSelected(true);

        size12Item.setAction(new StyledEditorKit.FontSizeAction("12", 12));

        sizeMenu.add(size12Item);

        sizeGroup.add(size12Item);


        JRadioButtonMenuItem size14Item = new JRadioButtonMenuItem("14");

        size14Item.setAction(new StyledEditorKit.FontSizeAction("14", 14));

        sizeMenu.add(size14Item);

        sizeGroup.add(size14Item);


        JRadioButtonMenuItem size16Item = new JRadioButtonMenuItem("16");

        size16Item.setAction(new StyledEditorKit.FontSizeAction("16", 16));

        sizeMenu.add(size16Item);

        sizeGroup.add(size16Item);
        JRadioButtonMenuItem size18Item = new JRadioButtonMenuItem("18");

        size18Item.setAction(new StyledEditorKit.FontSizeAction("18", 18));

        sizeMenu.add(size18Item);

        sizeGroup.add(size18Item);


        menuBar.add(sizeMenu);


        JMenu styleMenu = new JMenu("Style");


        JCheckBoxMenuItem boldItem = new JCheckBoxMenuItem("Bold", null);

        styleMenu.add(boldItem);

        boldItem.setAction(new StyledEditorKit.BoldAction());


        JCheckBoxMenuItem italicItem = new JCheckBoxMenuItem("Italic", null);

        italicItem.setAction(new StyledEditorKit.ItalicAction());

        styleMenu.add(italicItem);


        menuBar.add(styleMenu);


        frame.setJMenuBar(menuBar);

    }


    public static void main(String[] args) {

        final JPanel c = new CreatingDocument();

        c.setPreferredSize(new Dimension(433, 312));

        // Queueing GUI work to be run using the EDT.

        SimpleAppLauncher.launch("Chapter 14-17 Creating A Document", c);

    }

}
Figure 14-17 depicts the simple word processor that allows you to change the font, size, and style of the text.
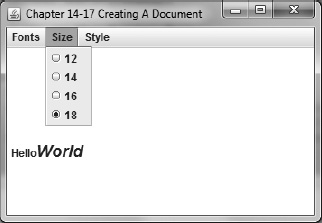
Figure 14-17. Creating keyboard shortcuts
How It Works
Most desktop operating systems often provide simple editor applications that allow users to type stylized text. In the Microsoft world there is an application called WordPad that is similar to Notepad, but allows the user to create documents with stylized text and even allows images to be embedded. In this recipe, you will be creating a WordPad-like application. The application will allow the user to change a font's type (family), size, and style (attribute).
You will start off in the constructor, in which you will create a JTextPane component in a BorderLayout's center content region. This will allow the text editing area to take up the available space when the window is resized. Next, you will learn how to set up menu options to change the fonts when the user types into the text pane area.
Interestingly, JTextPane components can have different types of editor kits. Editor kits are implementations of editors for different document content types. When talking about stylized text, there are currently three editor kit types in Java: HTMLEditorKit, RTFEditorKit, and the default StyledEditorKit. Fortunately, a JTextPane component contains the default StyledEditorKit object. Editor kits have many actions defined to allow the developer to change font styles and even cut and paste actions. An editor kit is just that, a mini editor connected to your JTextPane component. So, let's look at the apply() method where all the actions are attached to menu items.
First menu section is the “Fonts” menu where the user is able to change the font family. Because a JTextPane's default editor kit is a StyledEditorKit, you will create an instance of a FontFamilyAction and set it into the menu option. When the menu option is selected, the font style will be applied to the selected text. This code sets a FontFamilyAction instance on a JRadioButtonMenuItem object:
JRadioButtonMenuItem serifItem = new JRadioButtonMenuItem("Serif");

serifItem.setAction(new StyledEditorKit.FontFamilyAction(Font.SERIF, Font.SERIF));
The second menu section is the “Size” menu, in which the user can change the font's size. Again, you will use the available actions in the StyledEditorKit. In this case, it is the FontSizeAction class. Here is the code used to set a FontSizeAction instance on a JRadioButtonMenuItem menu item:
JRadioButtonMenuItem size14Item = new JRadioButtonMenuItem("14");

size14Item.setAction(new StyledEditorKit.FontSizeAction("14", 14));
Last is our "Style” menu section, in which the user can change the font's attributes such as bold, underline, and italic. Shown here is the code used to set an ItalicAction instance on a JCheckBoxMenuItem menu item:
JCheckBoxMenuItem italicItem = new JCheckBoxMenuItem("Italic", null);

italicItem.setAction(new StyledEditorKit.ItalicAction());
14-18. Developing a Dialog Box
Problem
When creating an application, you want to prompt a user with a window popup to simulate changing a password. You want to present to the user a modal or non-modal dialog box.
Solution
Create an application with a menu option to prompt the user with a dialog box (JDialog). Also, you will create menu option with the ability to change the dialog box's modality.
The following code creates an application with a menu option to allow a user to change their password. It will also demonstrate the ability to change the popup dialog box's modal state:
package org.java7recipes.chapter14.recipe14_18;


import java.awt.*;

import java.awt.event.*;

import javax.swing.*;

import org.java7recipes.chapter14.AppSetup;

import org.java7recipes.chapter14.CellConstraint;

import org.java7recipes.chapter14.CustomGridLayout;

import org.java7recipes.chapter14.SimpleAppLauncher;


/**

 * Developing A Dialog

 * @author cdea

 */

public class DevelopingADialog extends JPanel implements AppSetup {


    static JDialog LOGIN_DIALOG;


    public void apply(final JFrame frame) {


        if (LOGIN_DIALOG == null) {

            LOGIN_DIALOG = new MyDialog(frame);

        }


        JMenuBar menuBar = new JMenuBar();


        JMenu menu = new JMenu("Home");

        JMenuItem newItem = new JMenuItem("Change Password", null);

        newItem.addActionListener(new ActionListener() {


            @Override

            public void actionPerformed(ActionEvent e) {

                LOGIN_DIALOG.pack();


                // center dialog

                Dimension scrnSize = Toolkit.getDefaultToolkit().getScreenSize();

                int scrnWidth = LOGIN_DIALOG.getSize().width;

                int scrnHeight = LOGIN_DIALOG.getSize().height;

                int x = (scrnSize.width - scrnWidth) / 2;

                int y = (scrnSize.height - scrnHeight) / 2;


                // Move the window

                LOGIN_DIALOG.setLocation(x, y);

                LOGIN_DIALOG.setResizable(false);
                LOGIN_DIALOG.setVisible(true);

            }

        });


        menu.add(newItem);


        menu.addSeparator();


        JRadioButtonMenuItem nonModalItem = new JRadioButtonMenuItem("Non Modal", null);


        nonModalItem.addActionListener(new ActionListener() {


            @Override

            public void actionPerformed(ActionEvent e) {

                LOGIN_DIALOG.setModal(false);

            }

        });

        menu.add(nonModalItem);

        ButtonGroup modalGroup = new ButtonGroup();

        modalGroup.add(nonModalItem);


        JRadioButtonMenuItem modalItem = new JRadioButtonMenuItem("Modal", null);

        modalItem.setSelected(true);

        modalItem.addActionListener(new ActionListener() {


            @Override

            public void actionPerformed(ActionEvent e) {

                LOGIN_DIALOG.setModal(true);

            }

        });

        menu.add(modalItem);

        modalGroup.add(modalItem);


        menu.addSeparator();

        JMenuItem exitItem = new JMenuItem("Exit", null);

        exitItem.setMnemonic(KeyEvent.VK_X);

        exitItem.setAccelerator(KeyStroke.getKeyStroke(KeyEvent.VK_X,

ActionEvent.ALT_MASK));

        exitItem.addActionListener(new ActionListener() {


            @Override

            public void actionPerformed(ActionEvent e) {

                System.exit(0);

            }

        });

        menu.add(exitItem);


        menuBar.add(menu);


        frame.setJMenuBar(menuBar);

    }
    public static void main(String[] args) {

        final JPanel c = new DevelopingADialog();

        c.setPreferredSize(new Dimension(433, 312));

        // Queueing GUI work to be run using the EDT.

        SimpleAppLauncher.launch("Chapter 14-18 Developing a Dialog", c);

    }

}


class MyDialog extends JDialog {


    public MyDialog(Frame owner) {

        super(owner, true);

        CustomGridLayout cglayout = new CustomGridLayout(20, 20, 2, 4);


        setLayout(cglayout);

        JLabel mainLabel = new JLabel("Enter User Name & Password");

        addToPanel(mainLabel, 1, 0, CellConstraint.CENTER);


        JLabel userNameLbl = new JLabel("User Name: ");

        addToPanel(userNameLbl, 0, 1, CellConstraint.RIGHT);


        JLabel passwordLbl = new JLabel("Password: ");

        addToPanel(passwordLbl, 0, 2, CellConstraint.RIGHT);


        // username text field

        final JTextField userNameFld = new JTextField("Admin", 20);

        addToPanel(userNameFld, 1, 1, CellConstraint.LEFT);


        // password field

        final JPasswordField passwordFld = new JPasswordField("drowssap", 20);

        addToPanel(passwordFld, 1, 2, CellConstraint.LEFT);


        JButton login = new JButton("Change");

        addToPanel(login, 1, 3, CellConstraint.RIGHT);


        final JDialog dialog = this;

        login.addActionListener(new ActionListener() {


            @Override

            public void actionPerformed(ActionEvent e) {

                dialog.setVisible(false);

                dialog.dispose();

            }

        });


    }


    private void addToPanel(Component comp, int colNum, int rowNum, int alignment) {

        CellConstraint constr = new CellConstraint()

                .setColNum(colNum)
                .setRowNum(rowNum)

                .setAlign(alignment);

        add(comp, constr);

    }

}
The output is shown in Figure 14-18.
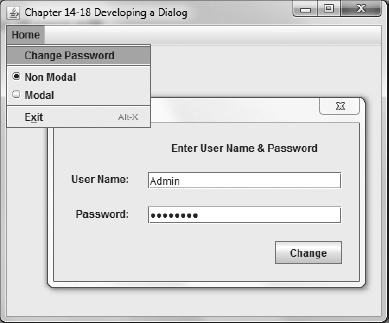
Figure 14-18. Developing a dialog box
How It Works
Oh, brother is this recipe about another login form? Well, this time it's about changing your password with a similar login form. Of course, I don't have a second password field to confirm that it's the same as the first, but I digress. Actually, this recipe is about the JDialog box and setting modality.
Before discussing the apply() method in which the menu items are created to manage the dialog box, we will talk about the JDialog container class. I hope you'll believe me when I tell you how simple it is to create a JDialog. It is as simple as extending the JDialog and adding components onto its content pane. It's just like any other container class except it is a real window similar to the JFrame class. In the MyDialog class, you will extend from JDialog class; however, there is a minor detail, to point out in our constructor. In our constructor you should specify the owner or parent window that the dialog box is called from (JFrame). When calling super() and passing in the owner, this will enable the window toolkit to display the dialog box based on its modal state in relation to the parent window. For instance, if a dialog box's modality is set to non-modal or false, the user will be able to click items in the parent window. When set to modal or true, the user will not be able to click items in the parent and must respond to the dialog such as a login screen. Back to our constructor, you will simply add the components on the content area like other examples. Finally, you will add an ActionListener to the change password button (JButton). The change password button will dismiss the dialog box that simulates a password change. Here is how to close a JDialog:
login.addActionListener(new ActionListener() {

   @Override

   public void actionPerformed(ActionEvent e) {

      dialog.setVisible(false);

      dialog.dispose();

   }

});
Like many recipes that have menus you will simply implement the apply() method from the Chapter 14 interface org.java7recipes.chapter14.AppSetup. In the apply() method, you will begin by instantiating an instance of the MyDialog class, as mentioned previously. Next, you create a “Home” menu with menu items to show the dialog and menu items that set the dialog's modal state. In the “change password” menu item, the ActionListener will show the dialog box just as you would with a JFrame. To show the dialog box, you will call the pack() method. You will then center the window and call the setVisible() method to display the dialog box. Finally, to set the dialog box's modal state, you will call the JDialog's setModal() method with a Boolean value before displaying the dialog box again. Shown in this code is the menu item's action that sets the dialog box's modal state to false.
nonModalItem.addActionListener(new ActionListener() {


   @Override

   public void actionPerformed(ActionEvent e) {

      LOGIN_DIALOG.setModal(false);

   }

});
14-19. Associating Listeners with a Document
Problem
You are tired of looking up words in the dictionary that you don't know how to spell.
Solution
Create a dictionary application with a simple auto-completion component. You will use Java Swing's DocumentListener and Document API.
The following code recipe creates a dictionary application with an auto-completion component narrowing a search as the user types the beginning of the word to search:
package org.java7recipes.chapter14.recipe14_19;


import java.awt.BorderLayout;

import java.awt.Dimension;

import javax.swing.DefaultListModel;

import javax.swing.JList;
import javax.swing.JPanel;

import javax.swing.JTextField;

import javax.swing.event.DocumentEvent;

import javax.swing.event.DocumentListener;

import javax.swing.text.BadLocationException;

import javax.swing.text.Document;

import org.java7recipes.chapter14.SimpleAppLauncher;


/**

 * Adding a Listener to Document.

 * @author cdea

 */

public class AddingListenerToDocument extends JPanel {


    public AddingListenerToDocument() {

        setLayout(new BorderLayout());


        DefaultListModel<String> listModel = new DefaultListModel<>();

        JList people = new JList(listModel);

        add(people, BorderLayout.CENTER);


        JTextField searchFld = new JTextField();

        searchFld.getDocument().addDocumentListener(new MyDocumentListener(people));

        add(searchFld, BorderLayout.NORTH);


    }


    public static void main(String[] args) {

        final JPanel c = new AddingListenerToDocument();

        c.setPreferredSize(new Dimension(379, 200));

        // Queueing GUI work to be run using the EDT.

        SimpleAppLauncher.launch("Chapter 14-19 Adding Listener to Document", c);

    }

}


class MyDocumentListener implements DocumentListener {


    private static String[] dictionary = {"apress",

        "caitlin", "car", "carl", "cat", "cathode",

        "bat", "batter", "barney",

        "fred", "fredrick",

        "gillian", "goose",

        "java", "javafx",

        "swan", "swing"};

    private JList listBox;


    MyDocumentListener(JList listBox) {

        this.listBox = listBox;

    }

    String newline = "
";


    public void insertUpdate(DocumentEvent e) {

        searchDictionary(e);
    }


    public void removeUpdate(DocumentEvent e) {

        searchDictionary(e);

    }


    public void changedUpdate(DocumentEvent e) {

        System.out.println("change: " + e);

    }


    public void searchDictionary(DocumentEvent e) {

        try {

            Document doc = (Document) e.getDocument();

            String text = doc.getText(0, doc.getLength());

            DefaultListModel dlm = (DefaultListModel) listBox.getModel();

            dlm.removeAllElements();

            if (text != null && text.length() > 0) {

                for (String word : dictionary) {

                    if (word.startsWith(text)) {

                        dlm.addElement(word);

                    }

                }

            }

        } catch (BadLocationException ex) {

            ex.printStackTrace();

        }


    }

}
Figure 14-19 depicts the dictionary application narrowing a search as the user types a word.
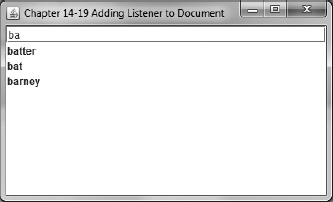
Figure 14-19. Associating listeners with a document
How It Works
Did you ever notice when you begin to type the name of a contact in an e-mail application or a phone number on your smartphone, the application begins to search and display similar names? Well, this can easily be done with Swing's DocumentListener interface. In the recipe example, you will create an input area and a list box below to show the similar items as the user types letters. In Swing, all text components contain a Document object. The Document object allows the developer to add listeners to monitor document events that correspond to the user's interactions with the text component (JTextField).
You will first create a class that implements the DocumentListener interface. Shown here are three methods that you will be implementing in order to listen to document events:
public void insertUpdate(DocumentEvent e);

public void removeUpdate(DocumentEvent e);

public void changedUpdate(DocumentEvent e);
You will only really have to implement the insertUpdate() and removeUpdate() methods to monitor user inserts or remove text as they type into the input field. In the constructor you'll notice it takes a reference to a JListBox; this is where to display the words as the user is typing characters. The methods insertUpdate() and removeUpdate() simply call the searchDictionary() method to compare the beginnings of the words that match and place them into the JList component's ListModel model.
Now that you have a reusable class such as the MyDocumentListener class, you can now create a simple auto-completion application. To create an application using a MyDocumentListener, you will first create a JList view component with an instance of a DefaultListModel class. Second, you will need to create an instance of a DefaultListModel class because (remember the code detailing the searchDictionary() method) it obtains the list model and expects it to be a DefaultListModel object through a cast. The reason for creating a DefaultListModel object is because a JList's default list model is read-only and you wouldn't be able to remove items in the list box via the removeAllElements() method. The following two lines of code will create a JList and DefaultListModel:
        DefaultListModel<String> listModel = new DefaultListModel<>();

        JList people = new JList(listModel);
Finally, the JTextField is created by adding the document listener (MyDocumentListener). Shown here is the creation of a custom search text field component:
JTextField searchFld = new JTextField();

searchFld.getDocument().addDocumentListener(new MyDocumentListener(people));
14-20. Formatting GUI Applications with HTML
Problem
You want to format text in Swing's label and button components with basic HTML.
Solution
Create a simple demonstration application with labels and button. Use basic HTML to apply styling when setting the text for the components.
The following code recipe will create three labels in a column to the left and three buttons also in a column to the right. All labels and buttons with HTML applied will have varying text font, size, and style attributes.
package org.java7recipes.chapter14.recipe14_20;


import java.awt.*;

import javax.swing.*;

import org.java7recipes.chapter14.CellConstraint;

import org.java7recipes.chapter14.CustomGridLayout;

import org.java7recipes.chapter14.SimpleAppLauncher;


/**

 * <p>

 * +------------------------+

 * | [label ] [ button ]    |

 * | [label ] [ button ]    |

 * | [label ] [ button ]    |

 * +------------------------+

 * </p>

 *

 * Formatting components with HTML.

 * @author cdea

 */

public class FormattingGuiWithHtml extends JPanel {


    public FormattingGuiWithHtml() {

        JLabel label1 = new JLabel("<html><center><b>Label 1</b><br>"

                + "<font color=#7f7fdd>Bold</font>");

        JLabel label2 = new JLabel("<html><center><i>Label 2</i><br>"

                + "<font color=#7f7fdd>Italic</font>");

        JLabel label3 = new JLabel("<html><center><font size=+4>Label 3</font><br>"

                + "<font color=#7f7fdd>Larger</font>");


        JButton button1 = new JButton("<html><center><b><u>Button 1</u></b><br>"

                + "<font color=#7f7fdd>underline</font>");


        JButton button2 = new JButton("<html><font color=blue>Button 2</font><br>"

                + "<font color=#7f7fdd>Blue Left</font>");


        JButton button3 = new JButton("<html>Bu<sub>tt</sub>on 3<br>"

                + "<font color=#7f7fdd>Subscript</font>");


        // create a layout 3x3 cell grid.

        // horizontal and vertical gaps between components are 5 pixels

        CustomGridLayout cglayout = new CustomGridLayout(10, 10, 3, 3);


        setLayout(cglayout);


        // add label1 cell 0,0

        addToPanel(label1, 0, 0, CellConstraint.RIGHT);


        // add label2 cell 0,1
        addToPanel(label2, 0, 1, CellConstraint.RIGHT);


        // add label3 cell 0,2

        addToPanel(label3, 0, 2, CellConstraint.RIGHT);


        // add button1 cell 1,0

        addToPanel(button1, 1, 0, CellConstraint.CENTER);


        // add button2 cell 1,1

        addToPanel(button2, 1, 1, CellConstraint.CENTER);


        // add button2 cell 1,2

        addToPanel(button3, 1, 2, CellConstraint.CENTER);


    }


    private void addToPanel(Component comp, int colNum, int rowNum, int align) {

        CellConstraint constr = new CellConstraint()

                .setColNum(colNum)

                .setRowNum(rowNum)

                .setAlign(align);

        add(comp, constr);

    }


    public static void main(String[] args) {

        final JPanel c = new FormattingGuiWithHtml();

        c.setPreferredSize(new Dimension(377, 194));

        // Queueing GUI work to be run using the EDT.

        SimpleAppLauncher.launch("Chapter 14-20 Formatting GUI with Html.", c);

    }

}
Figure 14-20 shows the various labels and buttons styled with HTML:
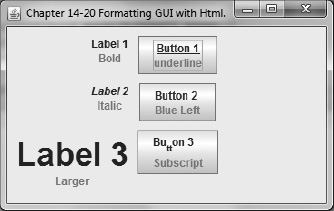
Figure 14-20. Formatting GUI applications with HTML
How It Works
Well, isn't that just dandy? That's a phrase used a long time ago to describe something or someone as having good quality of appearance. In this recipe, you will be able to change the appearance of labels and buttons with simple HTML. That's right HTML. Recipe 14-17 shows that it involves a tad more work to change a text's attributes. Amazingly, the JLabel and JButton components have HTML formatting baked into it. It's as simple as specifying a string containing HTML markup. Shown here is the code to format a JLabel component's text with HTML:
    JLabel label1 = new JLabel("<html><center><b>Label 1</b><br><font

color=#7f7fdd>Bold</font>");
The HTML code makes the text Label 1 centered and bold. It then breaks to a new line with the text Bold set as the color #7f7fdd.
14-21. Changing the Look and Feel of a GUI
Problem
You want to change your application's UI look and feel or theme.
Solution
Create an application with some standard UI components and set the UI to Java 7's new Look 'n' Feel called Nimbus. To do this, you will be using Swing's UIManager.setLookAndFeel() method.
The following code listing builds an application showcasing many of Swing's standard components with the new Nimbus Look 'n' Feel:
package org.java7recipes.chapter14.recipe14_21;


import java.awt.*;

import javax.swing.*;

import javax.swing.UIManager;

import javax.swing.UIManager.LookAndFeelInfo;

import javax.swing.UnsupportedLookAndFeelException;

import org.java7recipes.chapter14.CellConstraint;

import org.java7recipes.chapter14.CustomGridLayout;

import org.java7recipes.chapter14.SimpleAppLauncher;


/**

 * Adding a Listener to Document.

 * @author cdea

 */

public class ChangingLookNFeel extends JPanel {


    public ChangingLookNFeel() {
        CustomGridLayout cglayout = new CustomGridLayout(5, 5, 1, 7);


        setLayout(cglayout);


        JLabel mainLabel = new JLabel("Setting Look N Feel : " +

UIManager.getLookAndFeel().getName());

        addToPanel(mainLabel, 0, 0);


        JTextField textField = new JTextField(10);

        addToPanel(textField, 0, 1);


        JButton button = new JButton("Button");

        addToPanel(button, 0, 2);


        JList list = new JList(new String[] {"Carl", "Jonathan", "Joshua", "Mark", "John",

"Paul", "Ringo", "George"} );

        JScrollPane listScrollPane = new JScrollPane(list);

        listScrollPane.setPreferredSize(new Dimension(200, 100));

        addToPanel(listScrollPane, 0, 3);


        JCheckBox checkBox = new JCheckBox("Check box control");

        addToPanel(checkBox, 0, 4);


        String[][] data = {{"", "", "8", "8", "8", "9", "7"},

            {"", "", "9", "7", "8", "8", "8"},

            {"", "", "8", "8", "8", "9", "6"},

            {"", "", "8", "8.5", "8", "9", "8"},

            {"", "", "8.5", "8.5", "8", "9", "8"},

            {"", "", "8.5", "8.5", "8", "9", "8"},

            {"", "", "8.5", "8.5", "8", "9", "8"},

            {"", "", "8.5", "8.5", "8", "9", "8"}

        };

        String[] colHeaders = {"Sat", "Sun", "Mon", "Tue", "Wed", "Thu", "Fri"};

        JTable table = new JTable(data, colHeaders);

        JScrollPane tableScrollPane = new JScrollPane(table);

        tableScrollPane.setPreferredSize(new Dimension(300, 150));


        addToPanel(tableScrollPane, 0, 5);


        JTree tree = new JTree();

        JScrollPane tScrollPane = new JScrollPane(tree);

        tScrollPane.setPreferredSize(new Dimension(200, 150));

        addToPanel(tScrollPane, 0, 6);


    }


    private void addToPanel(Component comp, int colNum, int rowNum) {

        CellConstraint constr = new CellConstraint()

                .setColNum(colNum)

                .setRowNum(rowNum);

        add(comp, constr);

    }


    public static void main(String[] args) {

        try {
            String lnf = null;

            for (LookAndFeelInfo info : UIManager.getInstalledLookAndFeels()) {

                if ("Nimbus".equalsIgnoreCase(info.getName())) {

                    lnf = info.getClassName();

                    UIManager.setLookAndFeel(lnf);

                    break;

                }

            }

            if (lnf == null) {

                 UIManager.setLookAndFeel(UIManager.getSystemLookAndFeelClassName());

            }

        } catch (UnsupportedLookAndFeelException e) {

            // handle exception

        } catch (ClassNotFoundException e) {

            // handle exception

        } catch (InstantiationException e) {

            // handle exception

        } catch (IllegalAccessException e) {

            // handle exception

        }


        final JPanel c = new ChangingLookNFeel();

        c.setPreferredSize(new Dimension(446, 505));

        // Queueing GUI work to be run using the EDT.

        SimpleAppLauncher.launch("Chapter 14-21 Changing Look n Feel", c);

    }

}
Figure 14-21 depicts the demo application showcasing a sleek text box, button, list, check box, table, and tree component with the Nimbus Look 'n' Feel:
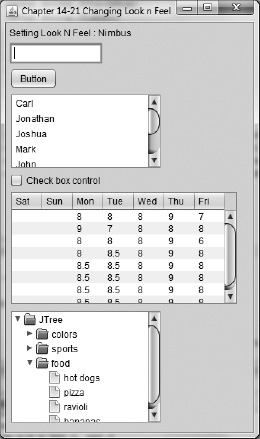
Figure 14-21. Nimbus Look 'n' Feel
How It Works
One of the most impressive things about Swing is the Look 'n' Feel API. The API allows developers to create themes or skins for Swing components. A pluggable Look 'n' Feel can virtually transform the appearance and behavior of all components. Although it is beyond the scope of this book to dig into those APIs, I'll show you how to set the Look 'n' Feel of choice.
New to Java 7 is the Nimbus Look 'n' Feel that provides a clean and professional look to applications. So I decided to just present a handful of common Swing components in the Nimbus Look 'n' Feel. In the main() method before launching the GUI, we loop through all the available Look 'n' Feels using the UIManager.getInstalledLookAndFeels() method. Each element (LookAndFeelInfo) in the list is compared using its name to locate the Nimbus Look 'n' Feel. Once determined, the Look 'n' Feel is set on the UIManager. The following code sets the Look 'n' Feel using a string with the class's fully qualified name:
UIManager.setLookAndFeel("some.fully.qualified.Looknfeel");
If the Nimbus Look 'n' Feel is not found, the system Look 'n' Feel will be chosen. The following code sets the application to use the system Look 'n' Feel:
14-22. Distributing a Swing Application
Problem
You want to distribute a Swing application.
Solution 1: Create an Executable Jar File
Here are the steps to create an executable jar file to run a Java Swing application:
Step 1: Create a text file called manifest.mf with the following contents:
Main-Class: package_name.MyGuiApp
![]() Note The last line of the file must be an end of line or carriage return.
Note The last line of the file must be an end of line or carriage return.
Step 2: Jar up your application along with the manifest file by typing the following:
jarcfm myapp.jarmanifest.mfpackage_name/*.class
Step 3: Run myapp.jar:
java –jar myapp.jar
Solution 2: Create a Web Start Application
Here are the steps to create a Java Web Start application:
Step 1: Create a .jar file by completing solution 1.
Step 2: Create a .jnlp file named “myapp.jnlp” as an XML file with the contents shown below.
The following XML file myapp.jnlp file specifies deployment information contained in a .jnlp file:
<?xml version="1.0" encoding="UTF-8"?>

<jnlp spec="1.0+" codebase="http://www.yourhost.com" href="myapp.jnlp">

<information>
<title>My GUI App</title>

<vendor>Java 7 Recipes</vendor>

</information>

<resources>

<!-- Application Resources -->

<j2se version="1.6+" href="http://java.sun.com/products/autodl/j2se"/>

<jar href="myapp.jar" main="true" />

</resources>

<application-desc

         name="My Simple Gui Application"

         main-class="CreatingAGui"

         width="200"

         height="200">

</application-desc>

<update check="background"/>

</jnlp>
Step 3: Create an HTML file named “myapp.html” which will contain the contents shown below.
Shown here is the code to create an HTML file (myapp.html) that will launch as a Java Web Start application:
<html lang="en-US">

<head>

<title>My Gui App</title>

</head>

<body>

<h1>My Gui App</h1>

<script src="http://www.java.com/js/deployJava.js"></script>

<script>

        var url = "http://www.yourhost.com/myapp.jnlp";

        deployJava.createWebStartLaunchButton(url, '1.6.0'),

</script>

<noscript>JavaScript is required for this page.</noscript>


</body>

</html>
How It Works
Once you have created your awesome Swing GUI application, you will want to distribute or deploy your application. I've provided basically two solutions. Solution 1 is about creating a single jar file as an executable so a user can launch it by double-clicking or running it on the command-line prompt. Solution 2 is a more modern approach: it pushes changes onto the workstation, essentially installing the application locally. Next I will be pointing out things to look out for in each step of solution 1 and solution 2.
Solution 1 assumes that your files are in a directory relative to your class files. You will begin by creating a manifest.mf file in order to reference the entry point or the class containing a main() method. Be sure to read the important note. In Step 2, you will only be jarring up class files, not other resources. To jar other items, please refer to the documentation on the Ant jar task. That's it for solution 1. The downside is getting the jar file to your user's workstation. Solution 2 will resolve the issue of installation.
Solution 2 is almost the same with the first step, except it needs two addition files. Keep in mind that these three files will be deployed on a web server to be served up. So in order to launch the application, they will be clicking a button or link represented in a .jnlp file. In Step 2, you will create a .jnlp file that the user will click to launch the application. The .jnlp element's attribute codebase will contain your web server URL. If you are using Apache or Tomcat it would probably be something like codebase="http://localhost:8080".The href attribute would be the name of the jnlp file. The codebase and href are optional in Java 6 and above. You'll also notice the application-desc element's attribute main-class containing the class that has the main() method. Also, when specifying the main class attribute, be sure to specify the fully qualified name such as “com.acme.myapp.Main". Last but not least, you will create the HTML file that represents the web page in the user's browser to be able to launch the application. In this HTML file, you'll notice the script element containing a JavaScript library (deployJava.js) to generate the commonly recognized orange Java Web Start button along with your .jnlp URL. The following code line creates the Java Web Start button:
deployJava.createWebStartLaunchButton(url, '1.6.0'),
With solution 2's files all created and ready to go, you will need to copy them over to a web server. Any web server will do, but it is very important to ensure the mime types are set up properly. If not, the user will just see the .jnlp document as an XML text. If you are using Apache Tomcat you can set the mime type in the web.xml file using the following elements:
<mime-mapping>

<extension>jnlp</extension>

<mime-type>application/x-java-jnlp-file</mime-type>

</mime-mapping>
Following are some useful references that you can use when implementing the technique shown in this recipe:
- Help on setting an application's entry point:
http://download.oracle.com/javase/tutorial/deployment/jar/appman.html - Help deploying a Java Web Start application:
http://download.oracle.com/javase/tutorial/deployment/webstart/deploying.html - Help with Apache Tomcat:
http://tomcat.apache.org/
14-23. Creating an Animation
Problem
You want to create a glow effect on a button.
Solution
Use a Java Swing timer (javax.swing.Timer).
The following code creates an application that demonstrates a glowing animation effect when the user's mouse pointer hovers over the button:
package org.java7recipes.chapter14.recipe14_23;


import java.awt.*;

import java.awt.event.*;

import javax.swing.*;

import org.java7recipes.chapter14.SimpleAppLauncher;


/**

 * Creating an Animation.

 * @author cdea

 */

public class CreatingAnAnimation extends JPanel {


    public CreatingAnAnimation() {


        // glow button

        final JButton animButton = new JButton("<html><font size=+2>Press Me!</font>");

        animButton.addMouseListener(new MouseAdapter() {


            Color startColor = Color.BLACK;

            Color endColor = Color.RED;

            Color currentColor = startColor;

            int animDuration = 250;

            long startTime;

            Timer timer = new Timer(30, new ActionListener() {


                @Override

                public void actionPerformed(ActionEvent e) {

                    long currentTime = System.nanoTime() / 1000000;

                    long totalTime = currentTime - startTime;

                    if (totalTime > animDuration) {

                        startTime = currentTime;

                        timer.stop();

                        return;

                    }


                    // interpolate

                    float fraction = (float) totalTime / animDuration;

                    int red = (int) ((1 - fraction) * startColor.getRed() + fraction * endColor.getRed());

                    int green = (int) ((1 - fraction) * startColor.getGreen() + fraction * endColor.getGreen());

                    int blue = (int) ((1 - fraction) * startColor.getBlue() + fraction * endColor.getBlue());

                    currentColor = new Color(red, green, blue);

                    animButton.setForeground(currentColor);


                    repaint();

                }

            });


            @Override
            public void mouseEntered(MouseEvent e) {

                currentColor = startColor;

                startTime = System.nanoTime() / 1000000;

                timer.start();

            }


            @Override

            public void mouseExited(MouseEvent e) {

                currentColor = startColor;

                animButton.setForeground(currentColor);

                repaint();

                timer.stop();

            }

        });


        add(animButton);

    }


    public static void main(String[] args) {

        final JPanel c = new CreatingAnAnimation();

        c.setPreferredSize(new Dimension(384, 100));

        // Queueing GUI work to be run using the EDT.

        SimpleAppLauncher.launch("Chapter 14-23 Creating an Animation.", c);

    }

}
Figure 14-22 shows the application with its glowing animated button effect.
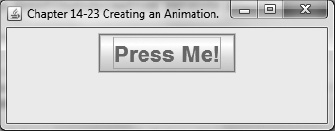
Figure 14-22. Creating an animation
How It Works
When you run this example, you may be wondering where is the animation I speak of? Well, just because it doesn't move around the screen doesn't mean it's not being animated. In this example, the button starts off with its text Press Me! colored black, then as the user begins to hover over the button using the mouse pointer, the text gradually turns red, appearing as if it is pulsing or glowing. Fundamentally, animation is an illusion of things changing over time. Quite similar to a cartoon flip book, each page represents a frame or picture that will be displayed on the timeline for a period of time.
To mimic an animation timeline you will be using Swing's Timer API. Relating to the analogy of a flip book in which each frame can be shown for a certain amount of time; however, in our simple example each frame will be the same amount of time (30 milliseconds, to be precise). Here you will create a linear interpolation that changes the foreground color gradually as it approaches the allotted time. To create timed cycles in support of animating our button, I used the Swing Timer object. Shown here is the code used to create a Swing Timer that invokes its action performed method every 30 milliseconds:
Timer timer = new Timer(30, new ActionListener() {

   @Override

   public void actionPerformed(ActionEvent e) {

      // every 30 milliseconds run code here...

   }

});
The duration of the entire animation is 250 milliseconds using the variable animDuration. When animDuration has run out, the timer's stop() method is invoked. Also, when the user moves the mouse cursor away from the button, the timer's stop() method is invoked to stop the animation. In the actionPerformed() method that is responsible for interpolating the color of the foreground of the button, the repaint() method is called to refresh the GUI.
14-24. Working with the JLayer Component
Problem
You want to validate a field on a form by warning the user with an icon to indicate the problem.
Solution
Use Java 7's new JLayer component.
Shown here is the code recipe used to build a simple application that validates an e-mail field and displays icon indicators when the e-mail is typed incorrectly. The validation rule that alerts the user with an error icon is when the user has not entered the required e-mail symbols such as . and @ .There also must be at least one character for the domain. A warning icon is displayed when the domain contains more than three characters.
package org.java7recipes.chapter14.recipe14_24;


import java.awt.*;

import java.io.IOException;

import javax.imageio.*;

import javax.swing.*;

import javax.swing.plaf.LayerUI;

import org.java7recipes.chapter14.SimpleAppLauncher;


/**

 * <p>

 * +------------------------+
 * | [label ] [   field   ] |

 * |             [ button ] |

 * +------------------------+

 * </p>

 *

 * Using JLayer.

 * @author cdea

 */

public class UsingJXLayer extends JPanel {


    public UsingJXLayer() {


        setLayout(new BorderLayout(10, 20));


        // create input area

        JPanel inputArea = new JPanel();


        JLabel emailLbl = new JLabel("Email");


        // target email field

        final JTextField emailFld = new JTextField(20);


        Image error = null;

        Image warning= null;

        try {

            error = ImageIO.read(this.getClass().getResource("error.png"));

            warning = ImageIO.read(this.getClass().getResource("warning.png"));

        } catch (IOException ex) {

            ex.printStackTrace();

        }


        // email LayerUI

        LayerUI<JTextField> layerUI = new EmailValidationLayerUI(error, warning);


        // JLayer applying layerUI to email field

        JLayer<JTextField> layeredEmail = new JLayer<>(emailFld, layerUI);


        inputArea.add(emailLbl);

        inputArea.add(layeredEmail);


        add(inputArea, BorderLayout.NORTH);


        JComponent buttonArea = new JPanel(new FlowLayout(FlowLayout.RIGHT));

        final JButton saveButt = new JButton("Save");


        buttonArea.add(saveButt);


        add(buttonArea, BorderLayout.SOUTH);


    }


    public static void main(String[] args) {

        final JPanel c = new UsingJXLayer();
        c.setPreferredSize(new Dimension(402, 118));

        // Queueing GUI work to be run using the EDT.

        SimpleAppLauncher.launch("Chapter 14-24 Using JLayer.", c);

    }

}


class EmailValidationLayerUI extends LayerUI<JTextField> {


    Image errorImg;

    Image warningImg;


    public EmailValidationLayerUI(Image error, Image warning) {

        this.errorImg = error;

        this.warningImg = warning;

    }

    @Override

    public void paint(Graphics g, JComponent comp) {

        super.paint(g, comp);


        JLayer jlayer = (JLayer) comp;

        JTextField emailFld = (JTextField) jlayer.getView();

        String text = emailFld.getText();

        String regEx = ".+@.+\.[A-Za-z]+";


        int x = comp.getWidth() - 12;

        int y = (comp.getHeight() - 8) / 2;


        if (text.length() > 0 && !(text.matches(regEx))) {

            Graphics2D g2 = (Graphics2D) g.create();

g2.drawImage(errorImg, x, y, comp);

g2.dispose();

        } else if (text.length() > 0 && text.substring(text.lastIndexOf("."),

text.length()).length() > 4) {

            Graphics2D g2 = (Graphics2D) g.create();

            g2.drawImage(warningImg, x, y, comp);

            g2.dispose();

        }

    }


}
Figure 14-23 depicts the application validating an invalid e-mail address:
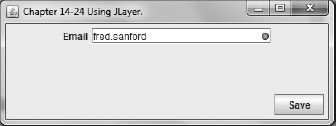
Figure 14-23. Error: e-mail format is required
Figure 14-24 shows the application displaying a warning icon when the user has typed in a root domain with more than three characters.
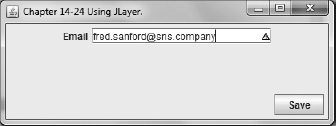
Figure 14-24. Warning: root domain is greater than three characters
How It Works
Hopefully you have gone through most of the recipes in this chapter to give you an idea of how to build a GUI application. Most of the recipes try to touch on all the aspects of building form-type applications from entering data to submitting form information to a database. An important piece missing from the puzzle is validation. Validation can be applied on all layers of a multitier system. I believe it's imperative to have server-side validation, but for better usability, client-side validation can add that extra polish your application needs. In this recipe, you will not only validate a field but also present to the user an error or warning indicator on top of the components. I created a simple form with one input field to allow the user to enter an e-mail address. If the user enters an invalid e-mail address, an error icon is displayed. Now, if an e-mail is valid, but its root domain is more than three characters, a warning icon is displayed. For example: [email protected] will show a warning icon.
In our UsingJXLayer class constructor, you will lay components down on the panel as usual, except you will want to associate a JLayer to the e-mail field (JTextField) for validation with an icon feedback. We first load the error and warning icons using ImageIO.read() from the classpath to be passed into an EmailValidationLayerUI constructor. We'll talk about EmailValidationLayerUI class later when we finish assembling the JLayer.
When instantiating a JLayer, it expects two parameters: the e-mail field (JTextField) and the LayerUI<JTextField> instance (EmailValidationLayerUI).The following code assembles a JLayer component:
// target email field

final JTextField emailFld = new JTextField(20);


// ... image loading code for error and warning icons


// email LayerUI

LayerUI<JTextField> layerUI = new EmailValidationLayerUI(error, warning);


// JLayer applying layerUI to email field

JLayer<JTextField> layeredEmail = new JLayer<>(emailFld, layerUI);
To create a validation layer on top of an ordinary component, extend from the LayerUI generic class. You can think of the LayerUI class as a piece of glass over the top of a component (JTextField). Any time a change occurs in the text field, the paint() method is notified. The paint() method is where the developer will have an opportunity to draw on the imaginary glass layer. In this scenario, you will be drawing an error or warning icon overlaid to the right side of the component. You'll notice in the paint() method how you would obtain the JLayer and the text field by calling the JLayer.getView() method. After obtaining the text from the e-mail field, you can now validate the data. When encountering pattern matches such as an e-mail address, you will want to use Java's regular expressions to validate fields. At last, you will implement the conditionals that decide whether the layer should display an error or a warning icon by drawing an image onto the Graphics object, as shown here:
String text = emailFld.getText();

String regEx = ".+@.+\.[A-Za-z]+";

// not empty and doesn't match regex pattern

if (text.length() > 0 && !(text.matches(regEx))) {

    // draw error icon

    Graphics2D g2 = (Graphics2D) g.create();

    g2.drawImage(errorImg, x, y, comp);

    g2.dispose();

}
To see more details on drawing images, refer to recipe 12-16. For more on regular expressions, refer to recipe 10-4.
14-25. Adding Printing Support to Swing Components
Problem
You want to print items that are contained in a table component similar to a spreadsheet.
Solution
Use Swing's JTable print() method.
The code recipe here constructs a simple timesheet application containing the days of the week with hours worked. As the timesheet is displaying the hours worked, you can click the Print button to send the timesheet to the printer.
package org.java7recipes.chapter14.recipe14_25;


import java.awt.*;

import java.awt.event.*;

import java.awt.print.PrinterException;

import javax.swing.*;

import org.java7recipes.chapter14.SimpleAppLauncher;


/**
 * Printable components.

 * @author cdea

 */

public class PrintableComponents extends JPanel {


    public PrintableComponents(){

        setLayout(new BorderLayout(5, 5));

        String[][] data = {

            {"", "", "8", "8", "8", "9", "7"},

            {"", "", "9", "7", "8", "8", "8"},

            {"", "", "8", "8", "8", "9", "6"},

            {"", "", "8", "8.5", "8", "9", "8"},

            {"", "", "8.5", "8.5", "8", "9", "8"}

        };

        String[] colHeaders = {"Sat", "Sun", "Mon", "Tue", "Wed", "Thu", "Fri"};

        final JTable timeSheet = new JTable(data, colHeaders);


        JScrollPane sp = new JScrollPane(timeSheet);


        add(sp, BorderLayout.CENTER);


        JButton printButton = new JButton("Print");

        add(printButton, BorderLayout.SOUTH);

        printButton.addActionListener(new ActionListener() {


            @Override

            public void actionPerformed(ActionEvent e) {

                try {

                    timeSheet.print();

                } catch (PrinterException ex) {

                    ex.printStackTrace();

                }

            }

        });

    }


    public static void main(String[] args) {

        final JPanel c = new PrintableComponents();

        c.setPreferredSize(new Dimension(384, 45));

        c.setMinimumSize(new Dimension(384, 277));

        // Queueing GUI work to be run using the EDT.

        SimpleAppLauncher.launch("Chapter 14-25 Printable Components", c);

    }

}
Figure 14-25 shows the timesheet application displaying hours worked.
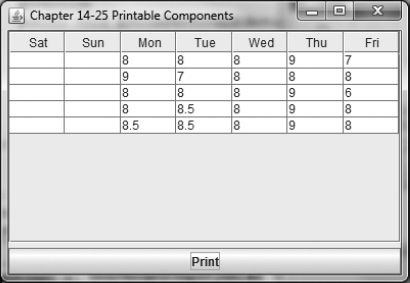
Figure 14-25. Printable components application
Figure 14-26 depicts the Print dialog box after the user has clicked the Print button.
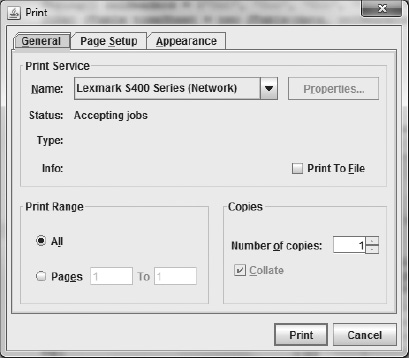
Figure 14-26. Print dialog box
How It Works
On the surface, Java's Swing API may look just like an ordinary GUI toolkit, but this powerful API has a lot of built-in features that you would never expect to see. For instance, recipe 14-20 discussed how JLabels and JButtons contain the ability to format text using HTML. And in recipe 14-17, you learned that a Document object has editor kits that can handle many content types. Well, did you know that some components have the ability to print to the printer all from a single print() method? Normally, when printing documents it involves using the java.awt.print.PrinterJob and java.awt.print.Printable APIs. But some components just have printing baked into it, and you don't have to mess with those APIs. The component I used in this recipe is a JTable that contains this built-in print() method.
In this recipe, the GUI application simulates a weekly timesheet with days and hours, table cells similar to spreadsheet applications (MS Excel). To print your timesheet, just press the Print button, and you'll see a print dialog box. It can't get any simpler than that! Shown here is the Print button's actionPerformed() method that will launch the Print dialog box: