
C H A P T E R 11
![]()
Working with Databases
Almost any nontrivial application contains a database of some sort. Some applications use in-memory databases, while others use traditional relational database management systems (RDBMSs). Whatever the case, it is essential that every Java developer have some skills working with databases. Over the years, the Java Database Connectivity (JDBC) API has evolved quite a bit, and with Java SE 7 there are a couple of major advancements.
This chapter will cover the basics of using JDBC for working with databases. You will learn how to perform all the standard database operations, as well as some advanced techniques for manipulating data. You'll also learn how you can help to create secure database applications and how to save some time on development using some of the latest advancements in the API. In the end, you will be able to develop Java applications that can work with traditional RDBMSs such as Oracle database and MySQL.
![]() Note To follow along with the examples in this chapter, run the
Note To follow along with the examples in this chapter, run the create_user.sql script to create a database user schema. Then, run the create_database.sql script within the database schema that you just created.
11-1. Connecting to a Database
Problem
You want to create a connection to a database from within a desktop Java application.
Solution 1
Use a JDBC Connection object to obtain the connection. Do this by creating a new connection object, and then load the driver that you need to use for your particular database vendor. Once the connection object is ready, call its getConnection() method. The following code demonstrates how to obtain a connection to an Oracle database.
public Connection getConnection() throws SQLException {

    Connection conn = null;


    String jdbcUrl = "jdbc:oracle:thin:@" + this.hostname + ":" +

                    this.port  + ":" + this.database;

    conn = DriverManager.getConnection(jdbcUrl, username, password);

    System.out.println("Successfully connected");

    return conn;

}
The method portrayed in this example returns a Connection object that is ready to be used for database access.
Solution 2
Use a DataSource to create a connection pool. The DataSource object must have been properly implemented and deployed to an application server environment. After a DataSource object has been implemented and deployed, it can be used by an application to obtain a connection to a database. The following code shows code that one might use to obtain a database connection via a DataSource object:
public Connection getDSConnection() {

    Connection conn = null;

    try {

        Context ctx = new InitialContext();

        DataSource ds = (DataSource)ctx.lookup("jdbc/myOracleDS");

        conn = ds.getConnection();


    } catch (NamingException | SQLException ex) {

        ex.printStackTrace();

    }

    return conn;

}
Notice that the only information required in the DataSource implementation is the name of a valid DataSource object. All the information that is required to obtain a connection with the database is managed within the application server.
How It Works
There are a couple of different ways to create a connection to a database within a Java application. How you do so depends on the type of application you are writing. JDBC is often used if an application will be stand-alone or if it is a desktop application. Web-based and intranet applications commonly rely on the application server to provide the connection for the application via a DataSource object.
Creating a JDBC connection involves a few steps. First, you need to determine which database driver you will need to use. After you've determined which driver you will need to use then download the JAR file containing that driver and place it into your CLASSPATH. For this recipe, an Oracle database connection is made. Therefore, the ojdbc6.jar JAR file (or the most recently available JDBC driver) is downloaded and placed into the CLASSPATH. (However, other database vendors will provide different JDBC drivers packaged in JAR files that have different names; please consult the documentation for your particular database for more information.) Once you have the JAR file in your application CLASSPATH, you can use a JDBC DriverManager to obtain a connection to the database. As of JDBC version 4.0, drivers that are contained within the CLASSPATH are automatically loaded into the DriverManager object. If you are using a JDBC version prior to 4.0, the driver will have to be manually loaded.
To obtain a connection to your database using the DriverManager, you need to pass a String containing the JDBC URL to it. The JDBC URL consists of the database vendor name, along with the name of the server that hosts the database, the name of the database, the database port number, and a valid database username and password that has access to the schema that you want to work with. Many times, the values used to create the JDBC URL are obtained from a Properties file so that they can be easily changed if needed. To learn more about using a Properties file to store connection values, please see Recipe 11-5. The code that is used to create the JDBC URL for Solution #1 looks like the following:
String jdbcUrl = "jdbc:oracle:thin:@" + this.hostname + ":" +

                    this.port  + ":" + this.database;
Once all the variables have been substituted into the String, it will look something like the following:
jdbc:oracle:thin:@hostname:1521:database
Once the JDBC URL has been created, it can be passed to the DriverManager.getConnection() method to obtain a java.sql.Connection object. If incorrect information has been passed to the getConnection() method, a java.sql.SQLException will be thrown; otherwise, a valid Connection object will be returned.
The preferred way to obtain a database connection is to use a DataSource when running on an application server or to have access to a Java Naming and Directory Interface (JNDI) service. To work with a DataSource object, you need to have an application server to deploy it to. Any compliant Java application server such as Glassfish, Oracle Weblogic, or Jboss will work. Most of the application servers contain a web interface that can be used to easily deploy a DataSource object. However, you can manually deploy a DataSource object by using code that will look like the following:
org.java7recipes.chapter11.recipe11_01.FakeDataSourceDriver ds =

        new org.java7recipes.chapter11.recipe11_1.FakeDataSourceDriver();

ds.setServerName("my-server");

ds.setDatabaseName("JavaRecipes");

ds.setDescription("Database connection for Java 7 Recipes");
This code instantiates a new DataSource driver class and then it sets properties based upon the database that you want to register. DataSource code such as that demonstrated here is typically used when registering a DataSource in an application server or with access to a JNDI server. Application servers usually do this work behind the scenes if you are using a web-based administration tool to deploy a DataSource. Most database vendors will supply a DataSource driver along with their JDBC drivers, so if the correct JAR resides within the application or server CLASSPATH, it should be recognized and available for use. Once a DataSource has been instantiated and configured, the next step is to register the DataSource with a JNDI naming service.
The following code demonstrates the registration of a DataSource with JNDI:
try {

    Context ctx = new InitialContext();

    DataSource ds =

            (DataSource) ctx.bind("jdbc/java7recipesDB");

} catch (NamingException ex) {

    ex.printStackTrace();

}
Once the DataSource has been deployed, any application that has been deployed to the same application server will have access to it. The beauty of working with a DataSource object is that your application code doesn't need to know anything about the database; it only needs to know the name of the DataSource. Usually the name of the DataSource begins with a jdbc/ prefix, followed by an identifier. To look up the DataSource object, an InitialContext is used. The InitialContext looks at all the DataSources available within the application server and it returns a valid DataSource if it is found; otherwise, it will throw a java.naming.NamingException exception. In Solution #2, you can see that the InitialContext returns an object that must be casted as a DataSource.
Context ctx = new InitialContext();

DataSource ds = (DataSource)ctx.lookup("jdbc/myOracleDS");
If the DataSource is a connection pool cache, it will send one of the available connections within the pool when an application requests it. The following line of code returns a Connection object from the DataSource:
conn = ds.getConnection();
Of course, if no valid connection can be obtained, a java.sql.SQLException is thrown. The DataSource technique is preferred over the DriverManager because database connection information is only stored in one place: the application server. Once a valid DataSource is deployed, it can be used by many applications.
After a valid connection has been obtained by your application, it can be used to work with the database. To learn more about working with the database using a Connection object, please see Recipes 11-2 and 11-4.
11-2. Handling Connection and SQL Exceptions
Problem
A database activity in your application has thrown an exception. You need to handle that SQL exception so that your application does not crash.
Solution
Use a try-catch block in order to capture and handle any SQL exceptions that are thrown by your JDBC connection or SQL queries. The following code demonstrates how to implement a try-catch block in order to capture SQL exceptions:
try {

    // perform database tasks

} catch (java.sql.SQLException){

   // perform exception handling

}
How It Works
A standard try-catch block can be used to catch java.sql.Connection or java.sql.SQLException exceptions. Your code will not compile if these exceptions are not handled, and it is a good idea to handle them in order to prevent your application from crashing if one of these exceptions is thrown. Almost any work that is performed against a java.sql.Connection object will need to perform error handling to ensure that database exceptions are handled correctly. In fact, nested try-catch blocks are often required to handle all the possible exceptions. You need to ensure that connections are closed once work has been performed and the Connection object is no longer used. Similarly, it is a good idea to close java.sql.Statement objects for memory allocation cleanup as well.
Because Statement and Connection objects need to be closed, it is common to see try-catch-finally blocks used to ensure that all resources have been tended to as needed. It is not unlikely that you will see JDBC code that resembles the following style:
try {

    // perform database tasks

} catch (java.sql.SQLException ex) {

    // perform exception handling

} finally {

    try {

        // close Connection and Statement objects

    } catch (java.sql.SQLException ex){

        // perform exception handling

    }

}
As seen in the previous pseudo code, nested try-catch blocks are often required in order to clean up unused resources. Proper exception handling sometimes makes JDBC code rather laborious to write, but it will also ensure that an application requiring database access will not fail, causing data to be lost.
11-3. Querying a Database and Retrieving Results
Problem
A process in your application needs to query a database table for data.
Solution
Obtain a JDBC connection using one of the techniques as described in Recipe 11-1; then use the java.sql.Connection object to create a Statement object. A java.sql.Statement object has the executeQuery() method, which parses a String of text and uses it to query a database. Once you've executed the query, you can retrieve the results of the query into a ResultSet object. The following example queries a database table named RECIPES and prints results:
String qry = "select recipe_num, name, description from recipes";

Statement stmt = null;


try {

    stmt = conn.createStatement();

    ResultSet rs = stmt.executeQuery(qry);

    while (rs.next()) {

        String recipe = rs.getString("RECIPE_NUM");

        String name = rs.getString("NAME");

        String desc = rs.getString("DESCRIPTION");


        System.out.println(recipe + "	" + name + "	" + desc);

    }

} catch (SQLException e) {

    e.printStackTrace();

} finally {

    if (stmt != null) {

        try {

            stmt.close();

        } catch (SQLException ex) {

            ex.printStackTrace();

        }

    if (conn != null) {

        try {

            conn.close();

        } catch (SQLException ex) {

            ex.printStackTrace();

        }


    }

}
If you execute this code using the database script that is included with Chapter 11, you will receive the following results:
11-1     Connecting to a Database        DriverManager and DataSource Implementations

11-2     Querying a Database and Retrieving Results     Obtaining and Using Data from a DBMS

11-3     Handling SQL Exceptions     Using SQLException
How It Works
One of the most commonly performed operations against a database is a query. Performing database queries using JDBC is quite easy, although there is a bit of boilerplate code that needs to be used each time a query is executed. First, you need to obtain a Connection object for the database and schema that you want to run the query against. You can do this by using one of the solutions found in Recipe 11-1. Next, you need to form a query and store it in String format. The Connection object is then used to create a Statement. Your query String will be passed to the Statement object's executeQuery() method in order to actually query the database.
String qry = "select recipe_num, name, description from recipes";

Statement stmt = null;


try {

    stmt = conn.createStatement();

    ResultSet rs = stmt.executeQuery(qry);

…
As you can see, the Statement object's executeQuery() method accepts a String and returns a ResultSet object. The ResultSet object makes it easy to work with the query results so that you can obtain the information you need in any order. If you take a look at the next line of code, a while-loop is created on the ResultSet object. This loop will continue to call the ResultSet object's next() method, obtaining the next row that is returned from the query with each iteration. In this case, the ResultSet object is named rs, so while rs.next() returns true, the loop will continue to be processed. Once all the returned rows have been processed, rs.next() will return a false to indicate that there are no more rows to be processed.
Within the while-loop, each returned row is processed. The ResultSet object is parsed to obtain the values of the given column names with each pass. Notice that if the column is expected to return a String, you must call the ResultSet getString() method, passing the column name in String format. Similarly, if the column is expected to return an int, you'd call the ResultSet getInt() method, passing the column name in String format. The same holds true for the other data types. These methods will return the corresponding column values. In the example in the solution to this recipe, those values are stored into local variables.
        String recipe = rs.getString("RECIPE_NUM");

        String name = rs.getString("NAME");

        String desc = rs.getString("DESCRIPTION");
Once the column value has been obtained, you can do what you want to do with the values you have stored within local variables. In this case, they are printed out using the System.out() method.
System.out.println(recipe + " " + name + " " + desc);
Notice that there is a try-catch-finally block used in this example. A java.sql.SQLException could be thrown when attempting to query a database (for instance, if the Connection object has not been properly obtained or if the database tables that you are trying to query do not exist). You must provide exception handling to handle errors in these situations. Therefore, all database-processing code should be placed within a try block. The catch block then handles a SQLException, so if one is thrown the exception will be handled using the code within the catch block. Sounds easy enough, right? It is, but you must do it each time you perform a database query. Lots of boilerplate code. Inside the finally block, you will see that the Statement and Connection objects are closed if they are not equal to null. Performing these tasks also incurs the overhead of handling java.sql.SQLException when it is thrown. They might occur if an attempt is made to close a null object.
It is always a good idea to close statements and connections if they are open. This will help ensure that the system can reallocate resources as needed, and act respectfully on the database. It is important to close connections as soon as possible so that other processes can reuse them.
11-4. Performing CRUD Operations
Problem
You need to have the ability to perform standard database operations within your application. That is, you need the ability to create, retrieve, update, and delete (CRUD) database records.
Solution
Create a Connection object and obtain a database connection using one of the solutions provided in Recipe 11-1; then perform the CRUD operation using a java.sql.Statement object that is obtained from the java.sql.Connection object. The following code excerpts demonstrate how to perform each of the CRUD operations using JDBC:
import java.sql.Connection;

import java.sql.ResultSet;

import java.sql.SQLException;

import java.sql.Statement;

import org.java7recipes.chapter11.recipe11_01.CreateConnection;


public class CrudOperations {

    public static Connection conn = null;


    public static void main(String[] args) {

        try {

            CreateConnection createConn = new CreateConnection();

            conn = createConn.getConnection();

            performCreate();

            performRead();

            performUpdate();
            performDelete();

            System.out.println("-- Final State --");

            performRead();

        } catch (java.sql.SQLException ex) {

            System.out.println(ex);

        } finally {

            if (conn != null) {

                try {

                    conn.close();

                } catch (SQLException ex) {

                    ex.printStackTrace();

                }

            }

        }


    }


    private static void performCreate(){

        String sql = "INSERT INTO RECIPES VALUES(" +

                     "RECIPES_SEQ.NEXTVAL, " +

                     "'11-4', " +

                     "'Performing CRUD Operations', " +

                     "'How to perform create, read, update, delete functions', " +

                     "'Recipe Text')";

        Statement stmt = null;


        try {

            stmt = conn.createStatement();

            // Returns row-count or 0 if not successful

            int result = stmt.executeUpdate(sql);

            if (result > 0){

                System.out.println("-- Record created --");

            } else {

                System.out.println("!! Record NOT Created !!");

            }

        } catch (SQLException e) {

            e.printStackTrace();

        } finally {

            if (stmt != null) {

                try {

                    stmt.close();

                } catch (SQLException ex) {

                    ex.printStackTrace();

                }

            }


        }


    }
    private static void performRead(){

        String qry = "select recipe_num, name, description from recipes";

        Statement stmt = null;


        try {

            stmt = conn.createStatement();

            ResultSet rs = stmt.executeQuery(qry);

            while (rs.next()) {

                String recipe = rs.getString("RECIPE_NUM");

                String name = rs.getString("NAME");

                String desc = rs.getString("DESCRIPTION");


                System.out.println(recipe + "	" + name + "	" + desc);

            }

        } catch (SQLException e) {

            e.printStackTrace();

        } finally {

            if (stmt != null) {

                try {

                    stmt.close();

                } catch (SQLException ex) {

                    ex.printStackTrace();

                }

            }


        }


    }


    private static void performUpdate(){

        String sql = "UPDATE RECIPES " +

                     "SET RECIPE_NUM = '11-5' " +

                     "WHERE RECIPE_NUM = '11-4'";

        Statement stmt = null;


        try {

            stmt = conn.createStatement();

            int result = stmt.executeUpdate(sql);

            if (result > 0){

                System.out.println("-- Record Updated --");
            } else {

                System.out.println("!! Record NOT Updated !!");

            }

        } catch (SQLException e) {

            e.printStackTrace();

        } finally {

            if (stmt != null) {

                try {

                    stmt.close();

                } catch (SQLException ex) {

                    ex.printStackTrace();

                }

            }

        }


    }


    private static void performDelete(){

        String sql = "DELETE FROM RECIPES WHERE RECIPE_NUM = '11-5'";

        Statement stmt = null;


        try {

            stmt = conn.createStatement();

            int result = stmt.executeUpdate(sql);

            if (result > 0){

                System.out.println("-- Record Deleted --");

            } else {

                System.out.println("!! Record NOT Deleted!!");

            }

        } catch (SQLException e) {

            e.printStackTrace();

        } finally {

            if (stmt != null) {

                try {

                    stmt.close();

                } catch (SQLException ex) {

                    ex.printStackTrace();

                }

            }

        }

    }


}
The result of running the code:
Successfully connected

-- Record created --

11-1     Connecting to a Database?DriverManager and DataSource Implementations

11-2     Querying a Database and Retrieving Results      Obtaining and Using Data from a DBMS

11-3     Handling SQL Exceptions     Using SQLException

11-4     Performing CRUD Operations      How to Perform Create, Read, Update, Delete Functions

-- Record Updated --

-- Record Deleted --

-- Final State --

11-1     Connecting to a Database       DriverManager and DataSource Implementations

11-2     Querying a Database and Retrieving Results     Obtaining and Using Data from a DBMS

11-3     Handling SQL Exceptions Using SQLException
How It Works
The same basic code format is used for performing just about every database task. The format is as follows:
1. Obtain a connection to the database.
2. Create a statement from the connection.
3. Perform a database task with the statement.
4. Do something with the results of the database task.
5. Close the statement (and database connection if finished using it).
The main difference between performing a query using JDBC and using data manipulation language (DML) is that you will call different methods on the Statement object, depending on which operation you want to perform. To perform a query, you need to call the Statement executeQuery() method. In order to perform DML tasks such as insert, update, and delete, call the executeUpdate() method.
The performCreate() method in the solution to this recipe demonstrates the operation of inserting a record into a database. To insert a record in the database, you will construct an SQL insert statement in String format. To perform the insert, pass the SQL string to the Statement object's executeUpdate() method. If the insert is performed, an int value will be returned that specifies the number or rows that have been inserted. If the insert operation is not performed successfully, either a zero will be returned or an SQLException will be thrown, indicating a problem with the statement or database connection.
The performRead() method in the solution to this recipe demonstrates the operation of querying the database. To execute a query, you will call the Statement object's executeQuery() method, passing an SQL statement in String format. The result will be a ResultSet object, which can then be used to work with the returned data. For more information on performing queries, please see Recipe 11-3.
The performUpdate() method in the solution to this recipe demonstrates the operation of updating record(s) within a database table. First, you will construct an SQL update statement in String format. Next, to perform the update operation you will pass the SQL string to the Statement object's executeUpdate() method. If the update is successfully performed, an int value will be returned, which specifies the number of records that were updated. If the update operation is not performed successfully, either a zero will be returned or an SQLException will be thrown, indicating a problem with the statement or database connection.
The last database operation that needs to be covered is the delete operation. The performDelete() method in the solution to this recipe demonstrates the operation of deleting record(s) from the database. First, you will construct an SQL delete statement in String format. Next, to execute the deletion, you will pass the SQL string to the Statement object's executeUpdate() method. If the deletion is successful, an int value specifying the number of rows deleted will be returned. Otherwise, if the deletion fails, a zero will be returned or an SQLException will be thrown, indicating a problem with the statement or database connection.
Almost every database application uses at least one of the CRUD operations at some point. This is foundational JDBC that needs to be known if you are working with databases within Java applications. Even if you will not work directly with the JDBC API, it is good to know these foundational basics.
11-5. Simplifying Connection Management
Problem
Your application requires the use of a database. In order to work with the database, you need to open a connection. Rather than code the logic to open a database connection every time you need to access the database, you'd like to use a single class to perform that task.
Solution
Write a class to handle all the connection management within your application. Doing so will allow you to call that class in order to obtain a connection, rather than setting up a new Connection object each time you need access to the database. Perform the following steps to set up a connection management environment for your JDBC application:
1. Create a class named
CreateConnection.javathat will encapsulate all the connection logic for your application.2. Create a properties file to store your connection information. Place the file somewhere on your CLASSPATH so that the
CreateConnectionclass can load it.3. Use the
CreateConnectionclass to obtain your database connections.
The following code is a listing of the CreateConnection class that can be used for centralized connection management:
import java.io.File;

import java.io.FileInputStream;

import java.io.FileNotFoundException;

import java.io.IOException;
import java.io.InputStream;

import java.nio.file.FileSystems;

import java.nio.file.Files;

import java.sql.Connection;

import java.sql.DriverManager;

import java.sql.SQLException;

import java.util.Properties;

import javax.naming.Context;

import javax.naming.InitialContext;

import javax.naming.NamingException;

import javax.sql.DataSource;


public class CreateConnection {


    static Properties props = new Properties();


    String hostname = null;

    String port = null;

    String database = null;

    String username = null;

    String password = null;

    String jndi = null;


    public CreateConnection(){

        InputStream in = null;

        try {

            // Looks for properties file in the root of the src directory in Netbeans project

            in = Files.newInputStream(FileSystems.getDefault().getPath(System.getProperty("user.dir") +

File.separator + "db_props.properties"));

            props.load(in);

            in.close();

        } catch (IOException ex) {

            ex.printStackTrace();


        } finally {

            try {

                in.close();

            } catch (IOException ex) {

                ex.printStackTrace();

            }

        }

        loadProperties();


    }
    public void loadProperties(){

        hostname = props.getProperty("host_name");

        port = props.getProperty("port_number");

        database = props.getProperty("db_name");

        username = props.getProperty("username");

        password = props.getProperty("password");

        jndi = props.getProperty("jndi");


    }


    /**

     * Demonstrates obtaining a connection via DriverManager

     * @return

     * @throws SQLException

     */

    public Connection getConnection() throws SQLException {

        Connection conn = null;


        String jdbcUrl = "jdbc:oracle:thin:@" + this.hostname + ":" +

                        this.port  + ":" + this.database;

        conn = DriverManager.getConnection(jdbcUrl, username, password);

        System.out.println("Successfully connected");

        return conn;

    }


    /**

     * Demonstrates obtaining a connection via a DataSource object

     * @return

     */

    public Connection getDSConnection() {

        Connection conn = null;

        try {

            Context ctx = new InitialContext();

            DataSource ds = (DataSource)ctx.lookup(this.jndi);

            conn = ds.getConnection();


        } catch (NamingException | SQLException ex) {

            ex.printStackTrace();

        }

        return conn;

    }

}
Next, the following lines of text are an example of what should be contained in the properties file that is used for obtaining a connection to the database. For this example, the properties file is named db_props.properties.
host_name=your_db_server_name

db_name=your_db_name

username=db_username

password=db_username_password

port_number=db_port_number

jndi=jndi_connection_string
Finally, use the CreateConnection class to obtain connections for your application. The following code demonstrates this concept:
try {

    CreateConnection createConn = new CreateConnection();

    conn = createConn.getConnection();

    performDbTask();

} catch (java.sql.SQLException ex) {

    System.out.println(ex);

} finally {

    if (conn != null) {

        try {

            conn.close();

        } catch (SQLException ex) {

            ex.printStackTrace();

        }

    }

}
How It Works
Obtaining a connection within a database application can be code intensive. Moreover, the process can be prone to error if you retype the code each time you need to obtain a connection. By encapsulating database connection logic within a single class, you can reuse the same connection code each time you require a connection to the database. This increases your productivity, reduces the chances of typing errors, and also enhances manageability because if you have to make a change, it can occur in one place rather than in several different locations.
Creating a strategic connection methodology is beneficial to you and others who might need to maintain your code in the future. Although data sources are the preferred technique for managing database connections when using an application server or JNDI, the solution to this recipe demonstrates the use standard JDBC DriverManager connections. One of the security implications of using the DriverManager is that you will need to store the database credentials somewhere for use by the application. It is not safe to store those credentials in plain text anywhere, and it is also not safe to embed them in application code, which might be decompiled at some point in the future. As seen in the solution, a properties file that on disk is used to store the database credentials. Assume that this properties file will be encrypted at some point before deployment to a server.
As seen in the solution, the code reads the database credentials, hostname, database name, and port number from the properties file. That information is then pieced together to form a JDBC URL that can be used by DriverManager to obtain a connection to the database. Once obtained, that connection can be used anywhere and then closed. Similarly, if using a DataSource that has been deployed to an application server, the properties file can be used to store the JNDI connection. That is the only piece of information that is needed to obtain a connection to the database using the DataSource. To the developer, the only difference between the two types of connections would be the method name that is called in order to obtain the Connection object.
One could develop a JDBC application so that the code that is used to obtain a connection needs to be hard-coded throughout. Instead, this solution enables all the code for obtaining a connection to be encapsulated by a single class so that the developer does not need to worry about it. Such a technique also allows the code to be more maintainable. For instance, if the application were originally deployed using the DriverManager, but then later had the ability to use a DataSource, very little code would need to be changed.
11-6. Guarding Against SQL Injection
Problem
Your application performs database tasks. To reduce the chances of an SQL injection attack, you need to ensure that no unfiltered Strings of text are being appended to SQL statements and executed against the database.
![]() Tip: Prepared statements are for more than just protecting against SQL injection. They also give you a way to centralize and better control the SQL used in an application. Instead of creating multiple, possibly different versions of the same query, for example, you can create the query once as a prepared statement and invoke it from many places in your code. Any change to the query logic need happen only at the point that you prepare the statement.
Tip: Prepared statements are for more than just protecting against SQL injection. They also give you a way to centralize and better control the SQL used in an application. Instead of creating multiple, possibly different versions of the same query, for example, you can create the query once as a prepared statement and invoke it from many places in your code. Any change to the query logic need happen only at the point that you prepare the statement.
Solution
Use PreparedStatements for performing the database tasks. PreparedStatements send a precompiled SQL statement to the DBMS rather than a String. The following code demonstrates how to perform a database query and a database update using a java.sql.PreparedStatement object.
In the following code example, a PreparedStatement is used to query a database for a given record. Assume that the String recipeNumber is passed to this code as a variable.
String sql = "SELECT ID, RECIPE_NUM, NAME, DESCRIPTION " +

             "FROM RECIPES " +

             "WHERE RECIPE_NUM = ?";

PreparedStatement pstmt = null;
try {

    pstmt = conn.prepareStatement(sql);

    pstmt.setString(1, recipeNumber);

    ResultSet rs = pstmt.executeQuery();

    while(rs.next()){

        System.out.println(rs.getString(2) + ": " + rs.getString(3) +

                        " - " + rs.getString(4));

    }

} catch (SQLException ex) {

    ex.printStackTrace();

} finally {

    if (pstmt != null){

        try {

            pstmt.close();

        } catch (SQLException ex) {

            ex.printStackTrace();

        }

    }

}
The next example demonstrates the use of a PreparedStatement for inserting a record into the database. Assume that the Strings recipeNumber, title, description, and text are passed to this code as variables.
String sql = "INSERT INTO RECIPES VALUES(" +

             "RECIPES_SEQ.NEXTVAL, ?,?,?,?)";

PreparedStatement pstmt = null;

try{

    pstmt = conn.prepareStatement(sql);

    pstmt.setString(1, recipeNumber);

    pstmt.setString(2, title);

    pstmt.setString(3, description);

    pstmt.setString(4, text);

    pstmt.executeUpdate();

    System.out.println("Record successfully inserted.");

} catch (SQLException ex){

    ex.printStackTrace();

} finally {

    if (pstmt != null){

        try {

            pstmt.close();

        } catch (SQLException ex) {

            ex.printStackTrace();

        }

    }

}
In this last example, a PreparedStatement is used to delete a record from the database. Again, assume that the String recipeNumber is passed to this code as a variable.
String sql = "DELETE FROM RECIPES WHERE " +

             "RECIPE_NUM = ?";

PreparedStatement pstmt = null;

try{

    pstmt = conn.prepareStatement(sql);

    pstmt.setString(1, recipeNumber);

    pstmt.executeUpdate();

    System.out.println("Recipe " + recipeNumber + " successfully deleted.");

} catch (SQLException ex){

    ex.printStackTrace();

} finally {

    if (pstmt != null){

        try {

            pstmt.close();

        } catch (SQLException ex) {

            ex.printStackTrace();

        }

    }

}
As you can see, a PreparedStatement is very much the same as a standard JDBC Statement object, but instead it sends precompiled SQL to the DBMS rather than Strings of text.
How It Works
While standard JDBC statements will get the job done, the harsh reality is that they can sometimes be insecure and difficult to work with. For instance, bad things can occur if a dynamic SQL statement is used to query a database, and a user-accepted String is assigned to a variable and concatenated with the intended SQL String. In most ordinary cases, the user-accepted String would be concatenated, and the SQL String would be used to query the database as expected. However, an attacker could decide to place malicious code inside of the String (a.k.a. SQL Injection), which would then be inadvertently sent to the database using a standard Statement object. The use of PreparedStatements prevents such malicious Strings from being concatenated into a SQL string and passed to the DBMS because they use a different approach. PreparedStatements use substitution variables rather than concatenation to make SQL strings dynamic. They are also precompiled, which means that a valid SQL string is formed prior to the SQL being sent to the DBMS. Moreover, PreparedStatements can help your application perform better because if the same SQL has to be run more than one time, it has to be compiled only once. After that, the substitution variables are interchangeable, but the overall SQL can be executed by the PreparedStatement very quickly.
Let's take a look at how a PreparedStatement works in practice. If you look at the first example in the solution to this recipe, you can see that the database table RECIPES is being queried, passing a RECIPE_NUM and retrieving the results for the matching record. The SQL string looks like the following:
String sql = "SELECT ID, RECIPE_NUM, NAME, DESCRIPTION " +

             "FROM RECIPES " +

             "WHERE RECIPE_NUM = ?";
Everything looks standard with the SQL text except for the question mark (?) at the end of the string. Placing a question mark within a string of SQL signifies that a substitute variable will be used in-place of that question mark when the SQL is executed. The next step for using a PreparedStatement is to declare a variable of type PreparedStatement. This can be seen with the following line of code:
PreparedStatement pstmt = null;
Now that a PreparedStatement has been declared, it can be put to use. However, use of a PreparedStatement might or might not cause an exception to be thrown. Therefore, any use of a PreparedStatement should occur within a try-catch block so that any exceptions can be handled gracefully. For instance, exceptions can occur if the database connection is unavailable for some reason or if the SQL string is invalid. Rather than crashing an application due to such issues, it is best to handle the exceptions wisely within a catch block. The following try-catch block includes the code that is necessary to send the SQL string to the database and retrieve results:
try {

    pstmt = conn.prepareStatement(sql);

    pstmt.setString(1, recipeNumber);

    ResultSet rs = pstmt.executeQuery();

    while(rs.next()){

        System.out.println(rs.getString(2) + ": " + rs.getString(3) +

                        " - " + rs.getString(4));

    }

} catch (SQLException ex) {

    ex.printStackTrace();

}
First, you can see that the Connection object is used to instantiate a PreparedStatement object. The SQL string is passed to the PreparedStatement object's constructor upon creation. Next, the PreparedStatement object is used to set values for any substitution variables that have been placed into the SQL string. As you can see, the PreparedStatement setString() method is used in the example to set the substitution variable at position 1 equal to the contents of the recipeNumber variable. The positioning of the substitution variable is associated with the placement of the question mark (?) within the SQL string. The first question mark within the string is assigned to the first position, the second one is assigned to the second position, and so forth. If there were more than one substitution variable to be assigned, there would be more than one call against the PreparedStatement, assigning each of the variables until each one has been accounted for. PreparedStatements can accept substitution variables of many different data types. For instance, if an int value were being assigned to a substitution variable, a call to the setInt(position, variable) method would be in order. Please see online documentation or your IDE's code completion for a complete set of methods that can be used for assigning substitution variables using PreparedStatement objects.
Once all the variables have been assigned, the SQL string can be executed. The PreparedStatement object contains an executeQuery() method that is used to execute a SQL string that represents a query. The executeQuery() method returns a ResultSet object, which contains the results that have been fetched from the database for the particular SQL query. Next, the ResultSet can be traversed to obtain the values retrieved from the database. Again, positional assignments are used to retrieve the results by calling the ResultSet object's corresponding getter methods and passing the position of the column value that you want to obtain. The position is determined by the order in which the column names appear within the SQL string. In the example, the first position corresponds to the RECIPE_NUM column, the second corresponds to the NAME column, and so forth. If the recipeNumber String variable was equal to "11-1", the results of executing the query in the example would look something like the following:
11-1: Connecting to a Database - DriverManager and DataSource Implementations
Of course, if the substitution variable is not set correctly or if there is an issue with the SQL string, an exception will be thrown. This would cause the code that is contained within the catch block to be executed. You should also be sure to clean up after using PreparedStatements by closing the statement when you are finished using it. It is a good practice to put all the cleanup code within a finally block to be sure that it is executed even if an exception is thrown. In the example, the finally block looks like the following:
finally {

    if (pstmt != null){

        try {

            pstmt.close();

        } catch (SQLException ex) {

            ex.printStackTrace();

        }

    }

}
You can see that the PreparedStatement object that was instantiated, pstmt, is checked to see whether it is NULL. If not, it is closed by calling the close() method.
Working through the code in the solution to this recipe, you can see that similar code is used to process database insert, update, and delete statements. The only difference in those cases is that the PreparedStatement executeUpdate() method is called rather than the executeQuery() method. The executeUpdate() method will return an int value representing the number of rows affected by the SQL statement.
The use of PreparedStatement objects is preferred over JDBC Statement objects. This is due to the fact that they are more secure and perform better. They can also make your code easier to follow, and easier to maintain.
11-7. Performing Transactions
Problem
The way in which your application is structured requires a sequential processing of tasks. One task depends upon another, and each process performs a different database action. If one of the tasks along the way fails, the database processing that has already occurred needs to be reversed.
Solution
Set your Connection object auto-commit to false and then perform the transactions you want to complete. Once you've successfully performed each of the transactions, manually commit the Connection object; otherwise roll back each of the transactions that have taken place. In the following code example, you can see transaction management take place. If you look within the main() method of the TransactionExample class, you will see that the Connection object's autoCommit() preference has been set to false; then the database transactions are performed. If all the transactions are successful, the Connection object is manually committed by calling the commit() method; otherwise, all the transactions are rolled back by calling the rollback() method.
import java.sql.Connection;

import java.sql.PreparedStatement;

import java.sql.ResultSet;

import java.sql.SQLException;

import org.java7recipes.chapter11.recipe11_01.CreateConnection;


public class TransactionExample {

    public static Connection conn = null;


    public static void main(String[] args) {

        boolean successFlag = false;

        try {

            CreateConnection createConn = new CreateConnection();

            conn = createConn.getConnection();

            conn.setAutoCommit(false);

            queryDbRecipes();

            successFlag = insertRecord(
                    "11-6",

                    "Simplifying and Adding Security with Prepared Statements",

                    "Working with Prepared Statements",

                    "Recipe Text");


            if (successFlag = true){


                successFlag = insertRecord(

                        null,

                        "Simplifying and Adding Security with Prepared Statements",

                        "Working with Prepared Statements",

                        "Recipe Text");

            }


            // Commit Transactions

            if (successFlag == true)

                conn.commit();

            else

                conn.rollback();


            conn.setAutoCommit(true);

            queryDbRecipes();

        } catch (java.sql.SQLException ex) {

            System.out.println(ex);

        } finally {

            if (conn != null) {

                try {

                    conn.close();

                } catch (SQLException ex) {

                    ex.printStackTrace();

                }

            }

        }


    }


    private static void queryDbRecipes(){

        String sql = "SELECT ID, RECIPE_NUM, NAME, DESCRIPTION " +

                     "FROM RECIPES";

        PreparedStatement pstmt = null;

        try {
            pstmt = conn.prepareStatement(sql);

            ResultSet rs = pstmt.executeQuery();

            while(rs.next()){

                System.out.println(rs.getString(2) + ": " + rs.getString(3) +

                                " - " + rs.getString(4));

            }

        } catch (SQLException ex) {

            ex.printStackTrace();

        } finally {

            if (pstmt != null){

                try {

                    pstmt.close();

                } catch (SQLException ex) {

                    ex.printStackTrace();

                }

            }

        }


    }


    private static boolean insertRecord(String recipeNumber,

                              String title,

                              String description,

                              String text){

        String sql = "INSERT INTO RECIPES VALUES(" +

                     "RECIPES_SEQ.NEXTVAL, ?,?,?,?)";

        boolean success = false;

        PreparedStatement pstmt = null;

        try{

            pstmt = conn.prepareStatement(sql);

            pstmt.setString(1, recipeNumber);

            pstmt.setString(2, title);

            pstmt.setString(3, description);

            pstmt.setString(4, text);

            pstmt.executeUpdate();

            System.out.println("Record successfully inserted.");

            success = true;

        } catch (SQLException ex){

            success = false;

            ex.printStackTrace();

        } finally {

            if (pstmt != null){

                try {

                    pstmt.close();

                } catch (SQLException ex) {

                    ex.printStackTrace();

                }

            }

        }

        return success;


    }


}
In the end, if any of the statements fails, all transactions will be rolled back. However, if all the statements execute properly, everything will be committed.
How It Works
Transaction management can play an important role in an application. This holds true especially for applications that perform different tasks that depend upon each other. In many cases, if one of the tasks that is performed within a transaction fails, it is preferable for the entire transaction to fail rather than having it only partially complete. For instance, imagine that you were adding database user records to your application database. Now let's say that adding a user for your application required a couple of different database tables to be modified, maybe a table for roles, and so on. What would happen if your first table was modified correctly, and the second table modification failed? You would be left with a partially complete application user addition, and your user would most likely not be able to access the application as expected. In such a situation, it would be nicer to roll back all the already-completed database modifications if one of the updates failed so that the database was left in a clean state and the transaction could be attempted once again.
By default, a Connection object is set up so that auto-commit is turned on. That means that each database insert, update, or delete statement is committed right away. Usually, this is the way that we would like for our applications to function. However, in circumstances where we might have many database statements that rely upon one another, it is important to turn off auto-commit so that all the statements can be committed at once. To do so, call the Connection object's setAutoCommit() method and pass a false value. As you can see in the solution to this recipe, the setAutoCommit() method is called passing a false value, the database statements are executed. Doing so will cause all the database statement changes to be temporary until the Connection object's commit() method is called. This provides you with the ability to ensure that all the statements execute properly before calling commit(). Take a look at this transaction management code that is contained within the main() method of the TransactionExample class within the solution to this recipe:
CreateConnection createConn = new CreateConnection();

conn = createConn.getConnection();

conn.setAutoCommit(false);

queryDbRecipes();

successFlag = insertRecord(

                    "11-6",

                    "Simplifying and Adding Security with Prepared Statements",

                    "Working with Prepared Statements",

                    "Recipe Text");


if (successFlag = true){


    successFlag = insertRecord(

null,

        "Simplifying and Adding Security with Prepared Statements",

        "Working with Prepared Statements",

        "Recipe Text");

}

// Commit Transactions
if (successFlag == true)

    conn.commit();

else

     conn.rollback();


conn.setAutoCommit(true);
Note that the commit() method is only called if all transaction statements were processed successfully. If any of them fail, the successFlag is equal to false, which would cause the rollback() method to be called instead. In the solution to this recipe, the second call to insertRecord() attempts to insert a NULL value into the RECIPE.ID column, which is not allowed. Therefore, that insert fails and everything, including the previous insert, gets rolled back.
11-8. Creating a Scrollable ResultSet
Problem
You have queried the database and obtained some results. You want to store those results in an object that will allow you to traverse forward and backward through the results, updating values as needed.
Solution
Create a scrollable ResultSet object and then you will have the ability to read the next, first record, last, and previous record. Using a scrollable ResultSet allows the results of a query to be fetched in any direction so that the data can be retrieved as needed. The following example method demonstrates the creation of a scrollable ResultSet object:
private static void queryDbRecipes(){

        String sql = "SELECT ID, RECIPE_NUM, NAME, DESCRIPTION " +

                     "FROM RECIPES";

        PreparedStatement pstmt = null;

        try {

            pstmt = conn.prepareStatement(sql, ResultSet.TYPE_SCROLL_INSENSITIVE, ResultSet.CONCUR_READ_ONLY);

            ResultSet rs = pstmt.executeQuery();

            rs.first();

            System.out.println(rs.getString(2) + ": " + rs.getString(3) +

                            " - " + rs.getString(4));

            rs.next();

            System.out.println(rs.getString(2) + ": " + rs.getString(3) +

                            " - " + rs.getString(4));

            rs.previous();

            System.out.println(rs.getString(2) + ": " + rs.getString(3) +
                            " - " + rs.getString(4));

            rs.last();

            System.out.println(rs.getString(2) + ": " + rs.getString(3) +

                            " - " + rs.getString(4));

        } catch (SQLException ex) {

            ex.printStackTrace();

        } finally {

            if (pstmt != null){

                try {

                    pstmt.close();

                } catch (SQLException ex) {

                    ex.printStackTrace();

                }

            }

        }


    }
Executing this method will result in the following output using the data that was originally loaded for this chapter:
Successfully connected

11-1: Connecting to a Database - DriverManager and DataSource Implementations - More to Come

11-2: Querying a Database and Retrieving Results - Obtaining and Using Data from a DBMS

11-1: Connecting to a Database - DriverManager and DataSource Implementations - More to Come

11-3: Handling SQL Exceptions - Using SQLException
How It Works
Ordinary ResultSet objects allow results to be fetched in a forward direction. That is, an application can process a default ResultSet object from the first record retrieved forward to the last. Sometimes an application requires more functionality when it comes to traversing a ResultSet. For instance, let's say you want to write an application that allows for someone to display the first or last record that was retrieved, or perhaps page forward or backwards through results. You could not do this very easily using a standard ResultSet. However, by creating a scrollable ResultSet, you can easily move backwards and forwards through the results.
To create a scrollable ResultSet, you must first create an instance of a Statement or PreparedStatement that has the ability to create a scrollable ResultSet. That is, when creating the Statement, you must pass the ResultSet scroll type constant value to the Connection object's createStatement() method. Likewise, you must pass the scroll type constant value to the Connection object's prepareStatement() method when using a PreparedStatement. There are three different scroll type constants that can be used. Table 11-1 displays those three constants.
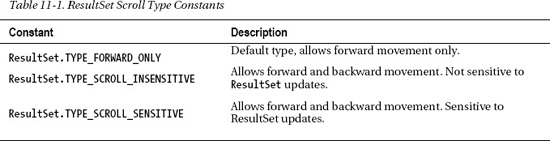
You must also pass a ResultSet concurrency constant to advise whether the ResultSet is intended to be updatable or not. The default is ResultSet.CONCUR_READ_ONLY, which means that the ResultSet is not updatable. The other concurrency type is ResultSet.CONCUR_UPDATABLE, which signifies an updatable ResultSet object.
In the solution to this recipe, a PreparedStatement object is used, and the code to create a PreparedStatement object that has the ability to generate a scrollable ResultSet looks like the following line:
pstmt = conn.prepareStatement(sql, ResultSet.TYPE_SCROLL_INSENSITIVE,

                                                           ResultSet.CONCUR_READ_ONLY);
Once the PreparedStatement has been created as such, a scrollable ResultSet is returned. You can traverse in several different directions using a scrollable ResultSet by calling the ResultSet methods indicating the direction you want to move or the placement that you want to be. The following line of code will retrieve the first record within the ResultSet:
ResultSet rs = pstmt.executeQuery();

rs.first();
The solution to this recipe demonstrates a few different scroll directions. Specifically, you can see that the ResultSet first(), next(), last(), and previous() methods are called in order to move to different positions within the ResultSet. For a complete reference to the ResultSet object, please see the online documentation that can be found at http://download.oracle.com/javase/7/docs/api/java/sql/ResultSet.html.
Scrollable ResultSet objects have a niche in application development. They are one of those niceties that are there when you need them, but they are also something that you might not need very often.
11-9. Creating an Updatable ResultSet
Problem
An application task has queried the database and obtained results. You have stored those results into a ResultSet object, and you want to update some of those values in the ResultSet and commit them back to the database.
Solution
Make your ResultSet object updatable and then update the rows as needed while iterating through the results. The following example method demonstrates how to make ResultSet updatable and then how to update content within that ResultSet, eventually persisting it in the database:
private static void queryAndUpdateDbRecipes(String recipeNumber){

        String sql = "SELECT ID, RECIPE_NUM, NAME, DESCRIPTION " +

                     "FROM RECIPES " +

                     "WHERE RECIPE_NUM = ?";

        PreparedStatement pstmt = null;

        try {

            pstmt = conn.prepareStatement(sql, ResultSet.TYPE_SCROLL_SENSITIVE,

ResultSet.CONCUR_UPDATABLE);

            pstmt.setString(1, recipeNumber);

            ResultSet rs = pstmt.executeQuery();

            while(rs.next()){

                String desc = rs.getString(4);

                System.out.println("Updating row" + desc);


                rs.updateString(4, desc + " -- More to come");

                rs.updateRow();

            }


        } catch (SQLException ex) {

            ex.printStackTrace();

        } finally {

            if (pstmt != null){

                try {

                    pstmt.close();

                } catch (SQLException ex) {

                    ex.printStackTrace();

                }

            }

        }


    }
This method could be called passing a String value containing a recipe number. Suppose that the recipe number "11-1" was passed to this method; the following output would be the result:
Successfully connected

11-1: Connecting to a Database - DriverManager and DataSource Implementations

11-2: Querying a Database and Retrieving Results - Obtaining and Using Data from a DBMS

11-3: Handling SQL Exceptions - Using SQLException

Updating rowDriverManager and DataSource Implementations
11-1: Connecting to a Database - DriverManager and DataSource Implementations - More to come

11-2: Querying a Database and Retrieving Results - Obtaining and Using Data from a DBMS

11-3: Handling SQL Exceptions - Using SQLException
How It Works
Sometimes it makes sense to update data as you are parsing it. Usually this technique involves testing the values that are being returned from the database and updating them if they compare to some other value in one way or another. The easiest way to do this is to make the ResultSet object updatable by passing the ResultSet.CONCUR_UPDATABLE constant to the Connection object's createStatement() or prepareStatement() methods. Doing so will allow the Statement or PreparedStatement object that is returned as a result of calling those methods to produce an updatable ResultSet.
![]() NOTE: Some database JDBC drivers do not support updatable
NOTE: Some database JDBC drivers do not support updatable ResultSets. Please see the documentation for your JDBC driver for more information. This code was run using Oracle's ojdbc6.jar JDBC driver on Oracle database 11.2 release.
The format for creating a Statement that will produce an updatable ResultSet is to pass the ResultSet type as the first argument and the ResultSet concurrency as the second argument. The scroll type must be TYPE_SCROLL_SENSITIVE to ensure that the ResultSet will be sensitive to any updates that are made. The following code demonstrates this technique by creating a Statement object that will produce a scrollable and updatable ResultSet object:
Statement stmt = conn.createStatement(ResultSet.TYPE_SCROLL_SENSITIVE,

ResultSet.CONCUR_UPDATABLE);
The format for creating a PreparedStatement that will produce an updatable ResultSet is to pass the SQL string as the first argument, the ResultSet type as the second argument, and the ResultSet concurrency as the third argument. The solution to this recipe demonstrates this technique using the following line of code:
pstmt = conn.prepareStatement(sql, ResultSet.TYPE_SCROLL_SENSITIVE,


ResultSet.CONCUR_UPDATABLE);
Both of the lines of code discussed in this section will produce scrollable and updatable ResultSet objects. Once you have obtained an updatable ResultSet, you can use it just like an ordinary ResultSet for fetching values that are retrieved from the database. In addition, you can call one of the ResultSet object's updateXXX() methods to update any value within the ResultSet. In the solution to this recipe, the updat eString() method is called, passing the position of the value from the query as the first argument and the updated text as the second argument. In this case, the fourth element column listed in the SQL query will be updated.
rs.updateString(4, desc + " -- More to come");
Finally, to persist the values that you have changed, call the ResultSet updateRow() method, as seen in the solution to this recipe:
rs.updateRow();
Creating an updatable ResultSet is not something that you will need to do every day. In fact, you might never need to create an updatable ResultSet. However, for the cases in which such a strategy is needed, this technique can come in very handy.
11-10. Caching Data for Use When Disconnected
Problem
You want to work with data from a DBMS when you are in a disconnected state. That is, you are working on a device that is not connected to the database, and you still want to have the ability to work with a set of data as though you are connected. For instance, you are working with data on a small portable device, and you are away from the office without a connection. You want the ability to query, insert, update, and delete data, even though there is no connection available. Once a connection becomes available, you want to have your device synchronize any database changes that have been made while disconnected.
Solution
Use a CachedRowSet object to store the data that you want to work with while offline. This will afford your application the ability to work with data as though it were connected to a database. Once your connection is restored or you connect back to the database, synchronize the data that has been changed within the CachedRowSet with the database repository. The following example class demonstrates the usage of a CachedRowSet. In this scenario, the main() method executes the example. Suppose that there was no main() method, though, and that another application on a portable device were to invoke the methods of this class. Follow the code in the example and consider the possibility of working with the results that are stored within the CachedRowSet while not connected to the database. For instance, suppose that you began some work in the office while connected to the network and are now outside of the office, where the network is spotty and you cannot maintain a constant connection to the database:
package org.java7recipes.chapter11.recipe11_10;


import java.sql.Connection;

import java.sql.PreparedStatement;

import java.sql.ResultSet;

import java.sql.SQLException;

import javax.sql.rowset.CachedRowSet;

import javax.sql.rowset.RowSetFactory;

import javax.sql.rowset.RowSetProvider;

import javax.sql.rowset.spi.SyncProviderException;

import org.java7recipes.chapter11.recipe11_10.CreateConnection;
public class CachedRowSetExample {


    public static Connection conn = null;

    public static CreateConnection createConn;

    public static CachedRowSet crs = null;


    public static void main(String[] args) {

        boolean successFlag = false;

        try {
            createConn = new CreateConnection();

            conn = createConn.getConnection();

            // Perform Scrollable Query

            queryWithRowSet();

            updateData();

            syncWithDatabase();

        } catch (java.sql.SQLException ex) {

            System.out.println(ex);

        } finally {


            if (conn != null) {

                try {

                    conn.close();

                } catch (SQLException ex) {

                    ex.printStackTrace();

                }

            }

        }


    }


    /**

     * Call this method to synchronize the data that has been used in the

     * CachedRowSet with the database

     */

    public static void syncWithDatabase() {

        try {

            crs.acceptChanges(conn);

        } catch (SyncProviderException ex) {

            // If there is a conflict while synchronizing, this exception

            // will be thrown.

            ex.printStackTrace();

        } finally {

            // Clean up resources by closing CachedRowSet

            if (crs != null) {

                try {

                    crs.close();

                } catch (SQLException ex) {

                    ex.printStackTrace();

                }

            }

        }

    }


    public static void queryWithRowSet() {

        RowSetFactory factory;


        try {

            // Create a new RowSetFactory

            factory = RowSetProvider.newFactory();


            // Create a CachedRowSet object using the factory

            crs = factory.createCachedRowSet();


            // Alternatively populate the CachedRowSet connection settings

            // crs.setUsername(createConn.getUsername());

            // crs.setPassword(createConn.getPassword());

            // crs.setUrl(createConn.getJdbcUrl());


            // Populate a query that will obtain the data that will be used

            crs.setCommand("select id, recipe_num, name, description from recipes");

// Set key columns

            int[] keys = {1};

            crs.setKeyColumns(keys);

            // Execute query

            crs.execute(conn);


            // You can now work with the object contents in a disconnected state

            while (crs.next()) {

                System.out.println(crs.getString(2) + ": " + crs.getString(3)

                        + " - " + crs.getString(4));

            }


        } catch (SQLException ex) {

            ex.printStackTrace();

        }

    }


    public static boolean updateData() {

        boolean returnValue = false;

        try {
            // Move to the position before the first row in the result set

            crs.beforeFirst();


            // traverse result set

            while (crs.next()) {

                // If the recipe_num equals 11-2 then update

                if (crs.getString("RECIPE_NUM").equals("11-2")) {

                    System.out.println("updating recipe 11-2");

                    crs.updateString("description", "Subject to change");

                    crs.updateRow();

                }


            }

          returnValue = true;


          // Move to the position before the first row in the result set

            crs.beforeFirst();


            // traverse result set to see changes

            while (crs.next()) {


                    System.out.println(crs.getString(2) + ": " + crs.getString(3)

                        + " - " + crs.getString(4));

            }


        } catch (SQLException ex) {

            returnValue = false;

            ex.printStackTrace();

        }

        return returnValue;

    }

}
Running this example code will display output that looks similar to the following code, although the text might vary depending upon the values in the database. Notice that the database record for Recipe 11-2 has a changed description after the update of the CachedRowSet.
Successfully connected

11-1: Connecting to a Database - DriverManager and DataSource Implementations - More to Come

11-2: Querying a Database and Retrieving Results - Subject to Change

11-3: Handling SQL Exceptions - Using SQLException

Updating Recipe 11-2

11-1: Connecting to a Database - DriverManager and DataSource Implementations - More to Come

11-2: Querying a Database and Retrieving Results - Obtaining and Using Data from a DBMS

11-3: Handling SQL Exceptions - Using SQLException
How It Works
It is not possible to remain connected to the Internet 100 percent of the time if you are working on a mobile device and traveling. Nowadays there are devices that allow us to perform substantial work while we are on the go, even when we are not connected directly to a database. In such cases, solutions like the CachedRowSet object can come into play. The CachedRowSet is the same as a regular ResultSet object, except it does not have to maintain a connection to a database in order to remain usable. You can query the database, obtain the results, and place them into a CachedRowSet object; and then work with them while not connected to the database. If changes are made to the data at any point, those changes can be synchronized with the database at a later time.
There are a couple of different ways to create a CachedRowSet. The solution to this recipe uses a RowSetFactory to instantiate a CachedRowSet because this is new to Java SE 7. However, you can also use the CachedRowSet default constructor to create a new instance. Doing so would look like the following line of code:
CachedRowSet crs = new CachedRowSetImpl();
Once instantiated, you need to set up a connection to the database. There are also a couple of ways to do this. Properties could be set for the connection that will be used, and the solution to this recipe demonstrates this technique within comments. The following excerpt from the solution sets the connection properties using the CachedRowSet object's setUsername(), setPassword(), and setUrl() methods. Each of them accepts a String value, and in the example that String is obtained from the CreateConnection class:
// Alternatively populate the CachedRowSet connection settings

// crs.setUsername(createConn.getUsername());

// crs.setPassword(createConn.getPassword());

// crs.setUrl(createConn.getJdbcUrl());
Another way to set up the connection is to wait until the query is executed and pass a Connection object to the executeQuery() method. This is the technique that is used in the solution to this recipe. But before we can execute the query, it must be set using the setCommand() method, which accepts a String value. In this case, the String is the SQL query that we need to execute:
crs.setCommand("select id, recipe_num, name, description from recipes");
Next, if a CachedRowSet will be used for updates, the primary key values should be noted using the setKeys() method. This method accepts an int array that includes the positional indices of the key columns. These keys are used to identify unique columns. In this case, the first column listed in the query, ID, is the primary key:
int[] keys = {1};

crs.setKeyColumns(keys);
Finally, execute the query and populate the CachedRowSet using the execute() method. As mentioned previously, the execute() method optionally accepts a Connection object, which allows the CachedRowSet to obtain a database connection.
crs.execute(conn);
Once the query has been executed and the CachedRowSet has been populated, it can be used just like any other ResultSet. You can use it to fetch records forward and backward, or by specifying the absolute position of the row you'd like to retrieve. The solution to this recipe only demonstrates a couple of these fetching methods, but the most-often-used ones are listed in Table 11-2.
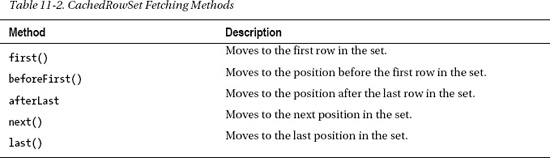
It is possible to insert and update rows within a CachedRowSet. To insert rows, use the moveToInsertRow() method to move to a new row position. Then populate a row by using the various methods [CachedRowSet, updateString(), updateInt(), and so on] that correspond to the data type of the column you are populating within the row. Once you have populated each of the required columns within the row, call the insertRow() method, followed by the moveToCurrentRow() method. The following lines of code demonstrate inserting a record into the RECIPES table:
crs.moveToInsertRow();

crs.updateInt(1, sequenceValue); // obtain current sequence values with a prior query

crs.updateString(2, "11-x");

crs.updateString(3, "This is a new recipe title");

crs.insertRow();

crs.moveToCurrentRow();
Updating rows is similar to using an updatable ResultSet. Simply update the values using the CachedRowSet object's methods [updateString(), updateInt(), and so on] methods that correspond to the data type of the column that you are updating within the row. Once you have updated the column or columns within the row, call the updateRow() method. This technique is demonstrated in the solution to this recipe.
crs.updateString("description", "Subject to change");

crs.updateRow();
To make any updates or inserts propagate to the database, the acceptChanges() method must be called. This method can accept an optional Connection argument in order to connect to the database. Once called, all changes are flushed to the database. Unfortunately, because time might have elapsed since the data was last retrieved for the CachedRowSet, there could be conflicts. If such a conflict arises, a SyncProviderException will be thrown. You can catch these exceptions and handle the conflicts manually using a SyncResolver object. However, resolving conflicts is out of the scope of this recipe, so for more information, please see the online documentation that can be found at http://download.oracle.com/javase/tutorial/jdbc/basics/cachedrowset.html.
CachedRowSet objects provide great flexibility for working with data, especially when you are using a device that is not always connected to the database. However, they can also be overkill in situations where you can simply use a standard ResultSet or even a scrollable ResultSet.
11-11. Joining RowSet Objects When Not Connected to the Data Source
Problem
You want to join two or more RowSets while not connected to a database. Perhaps your application is loaded on a mobile device that is not connected to the database 100 percent of the time. In such a case, you are looking for a solution that will allow you to join the results of two or more queries.
Solution
Use a JoinRowSet to take data from two relational database tables and join them. The data from each table that will be joined should be fetched into a RowSet and then the JoinRowSet can be used to join each of those RowSet objects based upon related elements that are contained within them. For instance, suppose that there were two related tables contained within a database. One of the tables stores a list of authors, and the other table contains a list of chapters that are written by those authors. The two tables can be joined using SQL by the primary and foreign key relationship.
![]() NOTE: A primary key is a unique identifier within each record of a database table, and a foreign key is a referential constraint between two tables.
NOTE: A primary key is a unique identifier within each record of a database table, and a foreign key is a referential constraint between two tables.
However, the application will not be connected to the database to make the JOIN query, so it must be done using a JoinRowSet. The following class listing demonstrates one strategy that can be used in this scenario:
package org.java7recipes.chapter11.recipe11_11;


import com.sun.rowset.JoinRowSetImpl;

import java.sql.Connection;

import java.sql.SQLException;

import javax.sql.rowset.CachedRowSet;

import javax.sql.rowset.JoinRowSet;

import javax.sql.rowset.RowSetFactory;

import javax.sql.rowset.RowSetProvider;

import org.java7recipes.chapter11.recipe11_10.CreateConnection;
public class JoinRowSetExample {


    public static Connection conn = null;

    public static CreateConnection createConn;

    public static CachedRowSet bookAuthors = null;

    public static CachedRowSet authorWork = null;

    public static JoinRowSet jrs = null;


    public static void main(String[] args) {

        boolean successFlag = false;

        try {

            createConn = new CreateConnection();

            conn = createConn.getConnection();

            // Perform Scrollable Query

            queryBookAuthor();

            queryAuthorWork();


            joinRowQuery();

        } catch (java.sql.SQLException ex) {

            System.out.println(ex);

        } finally {


            if (conn != null) {

                try {

                    conn.close();

                } catch (SQLException ex) {

                    ex.printStackTrace();

                }

            }

            if (bookAuthors != null) {

                try {

                    bookAuthors.close();

                } catch (SQLException ex) {

                    ex.printStackTrace();

                }

            }

            if (authorWork != null) {

                try {

                    authorWork.close();

                } catch (SQLException ex) {

                    ex.printStackTrace();

                }

            }

            if (jrs != null) {
                try {

                    jrs.close();

                } catch (SQLException ex) {

                    ex.printStackTrace();

                }

            }

        }


    }


    public static void queryBookAuthor() {

        RowSetFactory factory;


        try {
            // Create a new RowSetFactory

            factory = RowSetProvider.newFactory();


            // Create a CachedRowSet object using the factory

            bookAuthors = factory.createCachedRowSet();


            // Alternatively opulate the CachedRowSet connection settings

            // crs.setUsername(createConn.getUsername());

            // crs.setPassword(createConn.getPassword());

            // crs.setUrl(createConn.getJdbcUrl());


            // Populate a query that will obtain the data that will be used

            bookAuthors.setCommand("SELECT ID, LAST, FIRST FROM BOOK_AUTHOR");


            bookAuthors.execute(conn);


            // You can now work with the object contents in a disconnected state

            while (bookAuthors.next()) {

                System.out.println(bookAuthors.getString(1) + ": " + bookAuthors.getString(2)

                        + ", " + bookAuthors.getString(3));

            }


        } catch (SQLException ex) {
            ex.printStackTrace();

        }

    }


    public static void queryAuthorWork() {

        RowSetFactory factory;


        try {

            // Create a new RowSetFactory

            factory = RowSetProvider.newFactory();


            // Create a CachedRowSet object using the factory

            authorWork = factory.createCachedRowSet();


            // Alternatively opulate the CachedRowSet connection settings

            // crs.setUsername(createConn.getUsername());

            // crs.setPassword(createConn.getPassword());

            // crs.setUrl(createConn.getJdbcUrl());


            // Populate a query that will obtain the data that will be used

            authorWork.setCommand("SELECT ID, AUTHOR_ID, CHAPTER_NUMBER, " +

            "CHAPTER_TITLE FROM AUTHOR_WORK");


            authorWork.execute(conn);


            // You can now work with the object contents in a disconnected state

            while (authorWork.next()) {

                System.out.println(authorWork.getString(1) + ": " + authorWork.getInt(3)

                        + " - " + authorWork.getString(4));

            }


        } catch (SQLException ex) {

            ex.printStackTrace();

        }

    }


    public static void joinRowQuery() {

        try {

            // Create JoinRowSet

            jrs = new JoinRowSetImpl();


            // Add RowSet & Corresponding Keys

            jrs.addRowSet(bookAuthors, 1);

            jrs.addRowSet(authorWork, 2);


            // Traverse Results

            while(jrs.next()){

                System.out.println(jrs.getInt("CHAPTER_NUMBER") + ": " +

                                   jrs.getString("CHAPTER_TITLE") + " - " +

                                   jrs.getString("FIRST") + " " +

                                   jrs.getString("LAST"));

            }


        } catch (SQLException ex) {

            ex.printStackTrace();

        }


    }

}
Running this class will result in output that resembles the following:
Successfully connected

2: JUNEAU, JOSH

3: DEA, CARL

4: BEATY, MARK

5: GUIME, FREDDY

2: 1 - Getting Started With Java 7

3: 2 - Strings

4: 4 - Data Structures, Conditionals, and Iteration

5: 5 - Input and Output

6: 6 - Exceptions, Logging, Debugging

7: 7 - Object Oriented Java

8: 8 - Concurrency

9: 9 - Debugging and Unit Testing

10: 11 - Working with Databases

11: 3 - Numbers and Dates

9: Debugging and Unit Testing - FREDDY GUIME

8: Concurrency - FREDDY GUIME

6: Exceptions, Logging, Debugging - FREDDY GUIME

5: Input and Output - FREDDY GUIME

4: Data Structures, Conditionals, and Iteration - MARK BEATY

3: Numbers and Dates - JOSH JUNEAU

11: Working with Databases - JOSH JUNEAU

7: Object Oriented Java - JOSH JUNEAU

2: Strings - JOSH JUNEAU

1: Getting Started With Java 7 - JOSH JUNEAU
How It Works
A JoinRowSet is a combination of two or more populated RowSet objects. It can be used to join two RowSet objects based upon key value relationships, just as if it were a SQL JOIN query. In order to create a JoinRowSet, you must first populate two or more RowSet objects with related data, and then they can each be added to the JoinRowSet to create the combined result.
In the solution to this recipe, the two tables that are queried are named BOOK_AUTHOR and AUTHOR_WORK. The BOOK_AUTHOR table contains a list of author names, while the AUTHOR_WORK table contains the list of chapters in a book along with the AUTHOR_ID for the author who wrote the chapter. Following along with the main() method, first the BOOK_AUTHOR table is queried, and its results are fetched into a CachedRowSet using the queryBookAuthor() method. For more details regarding the use of CachedRowSet objects, please see Recipe 11-10.
Next, another CachedRowSet is populated with the results of querying the AUTHOR_WORK table, as the queryAuthorBook() method is called. At this point, there are two populated CacheRowSet objects, and they can now be combined using a JoinRowSet. In order to do so, each table must contain one or more columns that relate to the other table. In this case, the BOOK_AUTHOR.ID column relates to the AUTHOR_WORK.AUTHOR_ID column, so the RowSet objects must be joined on those column results.
The final method that is invoked within the main() is joinRowQuery(). This method is where all the JoinRowSet work takes place. First, a new JoinRowSet is created by instantiating a JoinRowSetImpl() object:
jrs = new JoinRowSetImpl();
![]() NOTE: You will receive a compile-time warning when using JoinRowSetImpl because it is an internal SUN proprietary API. However, the Oracle version is OracleJoinRowSet, which is not as versatile.
NOTE: You will receive a compile-time warning when using JoinRowSetImpl because it is an internal SUN proprietary API. However, the Oracle version is OracleJoinRowSet, which is not as versatile.
Next, the two CachedRowSet objects are added to the newly created JoinRowSet by calling its addRowSet() method. The addRowSet() method accepts a couple of arguments. The first is the name of the RowSet object that you want to add to the JoinRowSet, and the second is an int value indicating the position within the CachedRowSet, which contains the key value that will be used to implement the join. In the solution to this recipe, the first call to addRowSet() passes the bookAuthors CachedRowSet, along with the number 1 because the element in the first position of the bookAuthors CachedRowSet corresponds to the BOOK_AUTHOR.ID column. The second call to addRowSet() passes the authorWork CachedRowSet, along with number 2 because the element in the second position of the authorWork CachedRowSet corresponds to the AUTHOR_WORK.AUTHOR_ID column.
// Add RowSet & Corresponding Keys

jrs.addRowSet(bookAuthors, 1);

jrs.addRowSet(authorWork, 2);
The JoinRowSet can now be used to fetch the results of the join, just as if it were a normal RowSet. When calling the corresponding methods [getString(), getInt(), and so on] of the JoinRowSet, pass the name of the database column corresponding to the data you want to store:
while(jrs.next()){

System.out.println(jrs.getInt("CHAPTER_NUMBER") + ": " +

jrs.getString("CHAPTER_TITLE") + " - " +

jrs.getString("FIRST") + " " +

jrs.getString("LAST"));

}
Although a JoinRowSet is not needed every day, it can be handy when performing work against two related sets of data. This especially holds true if the application is not connected to a database all the time, or if you are trying to use as few Connection objects as possible.
11-12. Filtering Data in a RowSet
Problem
Your application queries the database and returns a large number of rows. The number of rows within the cached ResultSet is too large for the user to work with at one time. You would like to limit the number of rows that are made visible so that you can perform different activities with different sets of data that have been queried from the table.
Solution
Use a FilteredRowSet to query the database and store the contents. The FilteredRowSet can be configured to filter the results that are returned from the query so that the only contents visible are the rows that you want to see. In the following example, a filter class is created that will be used to filter the results that are returned from a database query. The filter in the example is used to limit the number of rows that are visible based upon author name. The following class contains the implementation of the filter:
package org.java7recipes.chapter11.recipe11_12;


import java.sql.SQLException;

import javax.sql.RowSet;

import javax.sql.rowset.Predicate;


public class AuthorFilter implements Predicate {


  private String[] authors;

  private String colName = null;

  private int colNumber = -1;


  public AuthorFilter(String[] authors, String colName) {

    this.authors = authors;

    this.colNumber = -1;

    this.colName = colName;

  }


  public AuthorFilter(String[] authors, int colNumber) {

    this.authors = authors;

    this.colNumber = colNumber;

    this.colName = null;

  }


  public boolean evaluate(Object value, String colName) {
    if (colName.equalsIgnoreCase(this.colName)) {

      for (int i = 0; i < this.authors.length; i++) {

        if (this.authors[i].equalsIgnoreCase((String)value)) {

          return true;

        }

      }

    }

    return false;

  }


  public boolean evaluate(Object value, int colNumber) {


    if (colNumber == this.colNumber) {

      for (int i = 0; i < this.authors.length; i++) {

        if (this.authors[i].equalsIgnoreCase((String)value)) {

          return true;

        }

      }

    }

    return false;

  }


  public boolean evaluate(RowSet rs) {


    if (rs == null)

      return false;


    try {

      for (int i = 0; i < this.authors.length; i++) {


        String authorLast = null;


        if (this.colNumber > 0) {

          authorLast = (String)rs.getObject(this.colNumber);

        } else if (this.colName != null) {

          authorLast = (String)rs.getObject(this.colName);

        } else {

          return false;

        }


        if (authorLast.equalsIgnoreCase(authors[i])) {

          return true;

        }
      }

    } catch (SQLException e) {

      return false;

    }

    return false;

  }


}
The filter is used by a FilteredRowSet to limit the visible results from a query. The following class demonstrates how to implement a FilteredRowSet. The main() method calls a method that is appropriately named implementFilteredRowSet(), which contains the code that is used to filter the results of a query on the BOOK_AUTHOR and AUTHOR_WORK tables so that only results from the authors with the last name of "DEA" and "JUNEAU" are returned:
package org.java7recipes.chapter11.recipe11_12;


import com.sun.rowset.FilteredRowSetImpl;

import com.sun.rowset.JoinRowSetImpl;

import java.sql.Connection;

import java.sql.SQLException;

import javax.sql.RowSet;

import javax.sql.rowset.CachedRowSet;

import javax.sql.rowset.FilteredRowSet;

import javax.sql.rowset.JoinRowSet;

import javax.sql.rowset.RowSetFactory;

import javax.sql.rowset.RowSetProvider;

import org.java7recipes.chapter11.recipe11_1.CreateConnection;


public class FilteredRowSetExample {


    public static Connection conn = null;

    public static CreateConnection createConn;

    public static FilteredRowSet frs = null;


    public static void main(String[] args) {

        boolean successFlag = false;

        try {

            createConn = new CreateConnection();

            conn = createConn.getConnection();

            // Perform Scrollable Query

            implementFilteredRowSet();

        } catch (java.sql.SQLException ex) {

            System.out.println(ex);

        } finally {
            if (conn != null) {

                try {

                    conn.close();

                } catch (SQLException ex) {

                    ex.printStackTrace();

                }

            }

            if (frs != null) {

                try {

                    frs.close();

                } catch (SQLException ex) {

                    ex.printStackTrace();

                }

            }

        }

    }


    /**

     *  Demonstrates the FilteredRowSet

     */

    public static void implementFilteredRowSet() {


        String[] authorArray = {"DEA", "JUNEAU"};


        // Creates a filter using the array of authors

        AuthorFilter authorFilter = new AuthorFilter(authorArray, 3);


        try {

            // Instantiate a new FilteredRowSet

            frs = new FilteredRowSetImpl();


            // Set the query

            frs.setCommand("SELECT CHAPTER_NUMBER, CHAPTER_TITLE, LAST "

                    + "FROM BOOK_AUTHOR BA, "

                    + "     AUTHOR_WORK AW "

                    + "WHERE AW.AUTHOR_ID = BA.ID");


            // Execute the query

            frs.execute(conn);


            // View the results

            System.out.println("Prior to adding filter:");

            viewRowSet(frs);

            System.out.println("Adding author filter:");

            frs.beforeFirst();
            frs.setFilter(authorFilter);

            viewRowSet(frs);

        } catch (SQLException e) {

            e.printStackTrace();

        }


    }


    /**

    •  Method used to display results of a RowSet

     */

    public static void viewRowSet(RowSet rs) {

        try {

            while (rs.next()) {

                System.out.println(rs.getString(1) + " " + rs.getString(2) + " - "

                        + rs.getString(3));

            }

        } catch (SQLException ex) {

            ex.printStackTrace();

        }

    }

}
The results of running this code would look similar to the following lines. Notice that only the rows of data corresponding to the authors listed in the filter are returned with the FilteredRowSet.
Successfully connected

Prior to adding filter:

1 Getting Started With Java 7 - JUNEAU

2 Strings - JUNEAU

4 Data Structures, Conditionals, and Iteration - BEATY

5 Input and Output - GUIME

6 Exceptions, Logging, Debugging - GUIME

7 Object Oriented Java - JUNEAU

8 Concurrency - GUIME

9 Debugging and Unit Testing - GUIME

11 Working with Databases - JUNEAU

3 Numbers and Dates - JUNEAU

12 Java 2D Graphics and Media - DEA

13 Java 3D - GUIME

14 Swing API - DEA

15 JavaFX Fundamentals - DEA

16 Graphics with JavaFX - DEA

17 Media with JavaFX - DEA

18 Working with Servlets and Applets - JUNEAU

19 Intro to Android - JUNEAU
20 JavaFX and the Web - DEA

21 Email - GUIME

22 XML and Web Services - JUNEAU

23 Networking - JUNEAU

10 Unicode, Internationalization, Currency - GUIME

Adding author filter:

1 Getting Started With Java 7 - JUNEAU

2 Strings - JUNEAU

7 Object Oriented Java - JUNEAU

11 Working with Databases - JUNEAU

3 Numbers and Dates - JUNEAU

12 Java 2D Graphics and Media - DEA

14 Swing API - DEA

15 JavaFX Fundamentals - DEA

16 Graphics with JavaFX - DEA

17 Media with JavaFX - DEA

18 Working with Servlets and Applets - JUNEAU

19 Intro to Android - JUNEAU

20 JavaFX and the Web - DEA

22 XML and Web Services - JUNEAU

23 Networking - JUNEAU
How It Works
Often, the results that are returned from a database query contain a large number of rows. As you probably know, too many rows can create issues when it comes to visually working with data. It usually helps to limit the number of rows that are returned from a query by using a WHERE clause on an SQL statement. However, if an application retrieves data into an in-memory RowSet and then needs to filter the data by various criteria without additional database requests, an approach other than a query needs to be used. A FilteredRowSet can be used to filter data that is displayed within a populated RowSet so that it can be more manageable to work with.
There are two parts to working with a FilteredRowSet. First, a filter needs to be created that will be used to specify how the data should be filtered. The filter class should implement the Predicate interface. There should be multiple constructors, each accepting a different set of arguments, and the filter should contain multiple evaluate() methods that each accept different arguments and contain different implementations. The constructors should accept an array of contents that can be used to filter the RowSet. They should also accept a second argument, either the column name that the filter should be used against or the position of the column that the filter should be used against. In the solution to this recipe, the filter class is named AuthorFilter, and it is used to filter data per an array of author names. Its constructors each accept an array containing the author names to filter, along with either the column name or position. Each of the evaluate() methods has the task of determining whether a given row of data matches the specified filter; in this case, the author names that have been passed in via an array. The first evaluate() method is called if a column name is passed to the filter rather than a position, and the second evaluate() method is called if a column position is passed. The final evaluate() method accepts the RowSet itself, and it does the work of going through it and returning a Boolean to indicate whether the corresponding column name/position values match the filter data.
The second part of the FilteredRowSet implementation is the work of the FilteredRowSet. This can be seen within the implementFilteredRowSet() method of the FilteredRowSetExample class. The FilteredRowSet will actually use the filter class that we've written to determine which rows to display. You can see that the array of values that will be passed to the filter class is the first declaration within the method. The second declaration is the instantiation of the filter class AuthorFilter. Of course, the array of filter values and the column position that corresponds to the filter values is passed into the filter constructor.
String[] authorArray = {"DEA", "JUNEAU"};


// Creates a filter using the array of authors

AuthorFilter authorFilter = new AuthorFilter(authorArray, 3);
To instantiate a FilteredRowSet, create a new instance of the FilteredRowSetImpl class. After it is instantiated, simply set the SQL query that will be used to obtain the results using the setCommand() method and then execute it by calling the executeQuery() method.
// Instantiate a new FilteredRowSet

frs = new FilteredRowSetImpl();

// Set the query

frs.setCommand("SELECT CHAPTER_NUMBER, CHAPTER_TITLE, LAST "

+ "FROM BOOK_AUTHOR BA, "

+ "     AUTHOR_WORK AW "

+ "WHERE AW.AUTHOR_ID = BA.ID");

// Execute the query

frs.execute(conn);
![]() NOTE: You will receive a compile-time warning when using
NOTE: You will receive a compile-time warning when using FilteredRowSetImpl because it is an internal SUN proprietary API.
Notice that the filter has not yet been applied. Actually, at this point what we have is a scrollable RowSet that is populated with all the results from the query. The example displays those results before applying the filter. To apply the filter, use the setFilter() method, passing the filter as an argument. Once that has been done, the FilteredResultSet will display only those rows that match the criteria specified by the filter.
Again, the FilteredRowSet is a technique that has its place, especially when you are working with an application that might not always be connected to a database. It is a powerful tool to use for filtering data, working with it, and then applying different filters and working on the new results. It is like applying WHERE clauses to a query without querying the database.
11-13. Querying and Storing Large Objects
Problem
The application that you are developing requires the storage of Strings of text that can include an unlimited number of characters.
Solution
Because the size of the Strings that need to be stored is unlimited, it is best to use a character large object (CLOB) data type to store the data. The code in the following example demonstrates how to load a CLOB into the database and how to query it:
package org.java7recipes.chapter11.recipe11_13;


import java.io.File;

import java.io.FileInputStream;

import java.io.IOException;

import java.io.OutputStream;

import java.sql.Blob;


import java.sql.Clob;

import java.sql.Connection;

import java.sql.PreparedStatement;

import java.sql.ResultSet;

import java.sql.SQLException;

import org.java7recipes.chapter11.recipe11_01.CreateConnection;


public class LobExamples {

    public static Connection conn = null;

    public static CreateConnection createConn;


    public static void main(String[] args) {

        boolean successFlag = false;

        try {

            createConn = new CreateConnection();

            conn = createConn.getConnection();

            loadClob();

            readClob();

        } catch (java.sql.SQLException ex) {

            System.out.println(ex);

        } finally {
            if (conn != null) {

                try {

                    conn.close();

                } catch (SQLException ex) {

                    ex.printStackTrace();

                }

            }

        }

    }


    public static void loadClob(){

        PreparedStatement pstmt = null;

        String sql = null;

        Clob textClob = null;

        try{

            textClob = conn.createClob();

            textClob.setString(1, "This will be the recipe text in clob format");

            sql = "INSERT INTO RECIPE_TEXT VALUES(" +

                  "?, " +

                  "(select id from recipes where recipe_num = '11-1'), " +

                  "?)";

            pstmt = conn.prepareStatement(sql);


            // don't do this … obtain the sequence number in real world

            pstmt.setInt(1, 1);

            // set the clob value

            pstmt.setClob(2, textClob);

            pstmt.executeUpdate();

} catch (SQLException ex){

            ex.printStackTrace();

        } finally {

            if(pstmt != null){

                try {

                    pstmt.close();

                } catch (SQLException ex) {

                    ex.printStackTrace();

                }

            }

            if (textClob != null){

                try {

                    textClob.free();

                } catch (SQLException ex) {

                    ex.printStackTrace();

                }

            }

        }

    }
    public static void readClob(){

        PreparedStatement pstmt = null;

        String qry = null;

        Clob theClob = null;

        ResultSet rs = null;

        try {

            qry = "select text from recipe_text";

            pstmt = conn.prepareStatement(qry);

            rs = pstmt.executeQuery();


            while (rs.next()){

                theClob = rs.getClob(1);

                System.out.println("Clob length: " + theClob.length());

System.out.println(theClob.toString());

                java.io.InputStream in =

                    theClob.getAsciiStream();

                int i;

                while( (i = in.read()) > -1 ) {

                    System.out.print( (char)i );

                }

            }

        } catch (IOException ex){

            ex.printStackTrace();

        } catch (SQLException ex){

            ex.printStackTrace();

        } finally {

            if (pstmt != null){

                try {

                    pstmt.close();

                } catch (SQLException ex) {

                    ex.printStackTrace();

                }

            }

            if (rs != null){

                try {

                    rs.close();

                } catch (SQLException ex) {

                    ex.printStackTrace();

                }

            }

        }

    }

}
How It Works
If your application requires the storage of String values, you need to know how large those Strings might possibly become. Most databases have an upper boundary when it comes to the storage size of VARCHAR fields. For instance, the Oracle database has an upper boundary of 2000 characters and anything exceeding that length will be cut off. If you have large amounts of text that need to be stored, use a CLOB field in the database.
A CLOB is handled a bit differently from a String within Java code. In fact, it is actually a bit odd to work with the first couple of times you use it because you have to create a CLOB from a Connection.
![]() NOTE: In reality,
NOTE: In reality, CLOBs and BLOBs (binary large objects) are not stored in the Oracle table where they are defined. Instead, a large object (LOB) locator is stored in the table column. Oracle might place the CLOB in a separate file on the database server. When Java creates the Clob object, it can be used to hold data for update to a specific LOB location in the database or to retrieve the data from a specific LOB location within the database.
Let's take a look at the loadClob() method that is contained in the solution to this recipe. As you can see, a Clob object is created using the Connection createClob() method. Once the Clob has been created, you set its contents using the setString() method by passing the position indicating where to place the String, and the String of text itself:
textClob = conn.createClob();

textClob.setString(1, "This will be the recipe text in clob format");
Once you have created and populated the Clob, you simply pass it to the database using the PreparedStatement setClob() method. In the case of this example, the PreparedStatement performs a database insert into the RECIPE_TEXT table by calling the executeUpdate() method as usual.
Querying a Clob is fairly straightforward as well. As you can see in the readClob() method that is contained within the solution to this recipe, a PreparedStatement query is set up an the results are retrieved into a ResultSet. The only difference between using a Clob and a String is that you must load the Clob into a Clob type. Calling the Clob getString() method will pass you a funny-looking String of text that denotes a Clob object. Therefore, calling the Clob object's getAsciiStream() method will return the actual data that is stored in the Clob. This technique is used in the solution to this recipe.
Although Clobs are fairly easy to use, they take a couple of extra steps to prepare. It is best to plan your applications accordingly and try to estimate whether the database fields you are using might need to be CLOBs due to size restrictions. Proper planning will prevent you from going back and changing standard String-based code to work with Clobs later.
11-14. Storing Array Values
Problem
The database you are working with includes some VARRAY columns that need to be populated by your application.
![]() NOTE: This recipe solution is specific to the Oracle database, but other vendors have similar data structures that can be used in a similar manner.
NOTE: This recipe solution is specific to the Oracle database, but other vendors have similar data structures that can be used in a similar manner.
Solution
Use a combination of Oracle database's oracle.sql.ARRAY and the java.sql.Array to convert values into a format that can be inserted into the database using JDBC. To create a VARRAY type within an Oracle database, you must first define a TYPE, which you would like to use for the VARRAY. The following SQL declares a TYPE of CHAP_LIST_TYPE, which will be used to create the VARRAY column. This SQL is executed within the database.
create type chap_list_type as varray(10) of number;
Now that an SQL TYPE has been created, it can be used to represent a VARRAY column in a database table. The following SQL can be used to create a table that contains a VARRAY column of the CHAP_LIST_TYPE type:
create table author_recipes (

id              number primary key,

author_id       number,

chapter_list    chap_list_type);
The following Java code uses a combination of oracle.sql.ARRAY and java.sql.Array to store an array of values into the VARRAY column of the AUTHOR_RECIPES database table:
package org.java7recipes.chapter11.recipe11_14;


import java.sql.Array;

import java.sql.Connection;

import java.sql.PreparedStatement;

import java.sql.SQLException;

import oracle.sql.ARRAY;

import oracle.sql.ArrayDescriptor;

import org.java7recipes.chapter11.recipe11_01.CreateConnection;
public class ArrayExamples {

   public static Connection conn = null;

    public static CreateConnection createConn;


    public static void main(String[] args) {

        boolean successFlag = false;

        try {

            createConn = new CreateConnection();

            conn = createConn.getConnection();

            storeArray();

        } catch (java.sql.SQLException ex) {

            System.out.println(ex);

        } finally {


            if (conn != null) {

                try {

                    conn.close();

                } catch (SQLException ex) {

                    ex.printStackTrace();

                }

            }


        }

    }


    public static void storeArray() throws SQLException{

        PreparedStatement pstmt = null;

        String sql = null;

        Object [] chapters = {1,2,3};

        ARRAY chapterArray = null;

        try{

            ArrayDescriptor descriptor =

                    ArrayDescriptor.createDescriptor("CHAP_LIST_TYPE", conn);

            chapterArray = new ARRAY(descriptor, conn, chapters);

            sql = "INSERT INTO AUTHOR_RECIPES VALUES(" +

                  "author_recipes_seq.nextval, " +

                  "(select id from BOOK_AUTHOR where last = ?), " +

                  "?)";

            pstmt = conn.prepareStatement(sql);

            pstmt.setString(1, "JUNEAU");

            pstmt.setArray(2, chapterArray);

            pstmt.executeUpdate();

        } catch (SQLException ex){

            ex.printStackTrace();

        } finally {
            if (pstmt != null){

                pstmt.close();

            }

        }

    }

}
Executing the class in this example will cause a record to be inserted into the AUTHOR_RECIPES table, including the array of content that lists the chapters that have been written by the corresponding author.
How It Works
Most databases contain a data type that can be mapped to a Java array. Such data types allow an array of data to be stored within a single column of a database table. Such is the case with the table that is used in the solution to this recipe: AUTHOR_RECIPES. This table contains a column that accepts an array of NUMBER values that correspond to the chapter numbers that were written by the author that is tied to the AUTHOR_ID. In an Oracle database, the data type for this column is known as a VARRAY, and there is a special Java class, oracle.sql.ARRAY, that can be used to populate the database column with a Java array of values.
There are a couple of steps that need to be taken on a standard Java array before it can be inserted into a database. If you take a look at the storeArray() method in the solution to this recipe, you can see that an Object[] has been declared that contains a set of numbers. These numbers correspond to the chapters that we want to populate into the database VARRAY column. A variable of type oracle.sql.ARRAY is also declared and will later be used to manipulate the Object[] so that it can be inserted into the database.
Object [] chapters = {1,2,3}; // Each int within the array is autoboxed as an Integer object

ARRAY chapterArray = null;
Next an ArrayDescriptor is created, which will identify the VARRAY type within the database. In this case, the type is CHAP_LIST_TYPE. Once the descriptor has been created, it can be used to generate a new oracle.sql.ARRAY object by passing it as an argument along with the Connection and Object[]:
ArrayDescriptor descriptor =

                    ArrayDescriptor.createDescriptor("CHAP_LIST_TYPE", conn);

chapterArray = new ARRAY(descriptor, conn, chapters);
The chapterArray is now in a format that can be inserted into the database. This is done by using the PreparedStatement setArray() method, passing the position of the parameter along with the ARRAY. Calling the executeUpdate() method will execute the insert.
pstmt = conn.prepareStatement(sql);

pstmt.setString(1, "JUNEAU");

pstmt.setArray(2, chapterArray);

pstmt.executeUpdate();
Different RDBMSs contain different implementations of the array data type. The Oracle database uses the VARRAY, and this solution will work for the purpose of inserting objects into that data type. However, the same solution will work for inserting into other database array types. All you need to do is substitute the specific RDBMS data type that is used to convert the standard Java array. In this case, we used the oracle.sql.ARRAY; however, that class might be different with another RDBMS.
11-15. Retrieving Array Values
Problem
You have stored some objects into a database in VARRAY format and would like to retrieve them via your application.
![]() NOTE: This recipe solution is specific to the Oracle database, but other vendors have similar data structures that can be used in a similar manner.
NOTE: This recipe solution is specific to the Oracle database, but other vendors have similar data structures that can be used in a similar manner.
Solution
Load the contents of a VARRAY or another database array type into a java.sql.Array object. Once they have been loaded into an Array, extract the contents into a standard array corresponding to the data type of the values that are contained within the array. The following class queries a database table that contains a VARRAY column. The VARRAY column is populated with data that corresponds to the database NUMBER data type.
PreparedStatement pstmt = null;

    String sql = null;

    ResultSet rset = null;

    Array chapters = null;

    try{


        sql = "SELECT AUTHOR_ID, CHAPTER_LIST, LAST " +

              "FROM AUTHOR_RECIPES AR, " +

              " BOOK_AUTHOR BA " +

              "WHERE AR.AUTHOR_ID = BA.ID";

        pstmt = conn.prepareStatement(sql);


        rset = pstmt.executeQuery(sql);

        while(rset.next()){

            chapters = rset.getArray(2);

            BigDecimal[] chapterNumbers = (BigDecimal[]) chapters.getArray();

            System.out.println(rset.getString(3) + " Chapters
");

            for (BigDecimal idx:chapterNumbers){

                System.out.println(idx + "
");
            }

        }


    } catch (SQLException ex){

        ex.printStackTrace();

    } finally {

        if (pstmt != null){

            try {

                pstmt.close();

            } catch (SQLException ex) {

                ex.printStackTrace();

            }

        }

        if (rset != null){

            try {

                pstmt.close();

            } catch (SQLException ex) {

                ex.printStackTrace();

            }

        }

    }

}
The results of running this code will look something like the following, depending upon the data that is contained within your local database:
Successfully connected

JUNEAU Chapters


1


2


3


7


11


18


19


23


24
How It Works
In order to work with data that has been stored in an array format within a database table, you must convert the data into a standard Java array so that it can be parsed. In the solution to this recipe, an Oracle database table that contains a VARRAY column is queried and then the results of the VARRAY column are converted into a standard Java array. After the conversion has taken place, the results are printed out.
To retrieve the Oracle VARRAY data, create a java.sql.Array object and fetch the contents into it using the PreparedStatement getArray() method. In the solution to this recipe, a java.sql.Array object named chapters is used to hold the data from the database VARRAY column.
chapters = rset.getArray(2);
After the java.sql.Array has been populated with the data, it can be converted into a standard Java array by calling the getArray() method and casting it based upon the data type of the values contained within the array. Because the Oracle type was defined as an array of type NUMBER, the values are returned to Java as an array of type BigDecimal. Once the standard Java array object has been populated, the values can be used. In the solution to this recipe, the values are printed out.
BigDecimal[] chapterNumbers = (BigDecimal[]) chapters.getArray();

System.out.println(rset.getString(3) + " Chapters
");

for (BigDecimal idx:chapterNumbers){

    System.out.println(idx + "
");

}
Although this example was written against an Oracle database that contains a table with a VARRAY column, the same techniques could be used to extract the data from another RDBMS that contained a table with an array type column.
11-16. Invoking Stored Procedures
Problem
Some logic that is required for your application is written as a database stored procedure. You require the ability to invoke the stored procedure from within your application.
Solution
The following block of code shows the PL/SQL that is required to create the stored procedure that will be called by Java. The functionality of this stored procedure is very minor; it simply accepts a value and assigns that value to an OUT parameter so that the program can display it:
create or replace procedure dummy_proc (text IN VARCHAR2,

                                        msg OUT VARCHAR2) as

begin
    -- Do something, in this case the IN parameter value is assigned to the OUT parameter

    msg :=text;

end;
The CallableStatement in the following code executes this stored procedure that is contained within the database, passing the necessary parameters. The results of the OUT parameter are then displayed back to the user.
CallableStatement cs = null;

try {

    cs = conn.prepareCall("{call DUMMY_PROC(?,?)}");

    cs.setString(1, "This is a test");

    cs.registerOutParameter(2, Types.VARCHAR);

    cs.executeQuery();


    System.out.println(cs.getString(2));


} catch (SQLException ex){

    ex.printStackTrace();

}
Running the example class for this recipe will display the following output, which is the same as the input. This is because the DUMMY_PROC procedure simply assigns the contents if the IN parameter to the OUT parameter.
Successfully connected

This is a test
How It Works
It is not uncommon for an application to use database stored procedures for logic that can be executed directly within the database. In order to call a database stored procedure from Java, you must create a CallableStatement object, rather than using a PreparedStatement. In the solution to this recipe, a CallableStatement is used to invoke a stored procedure named DUMMY_PROC. The syntax for instantiating the CallableStatement is similar to that of using a PreparedStatement. Use the Connection object's prepareCall() method, passing the call to the stored procedure. The stored procedure call must be enclosed in curly braces {} or the application will throw an exception.
cs = conn.prepareCall("{call DUMMY_PROC(?,?)}");
Once the CallableStatement has been instantiated, it can be used just like a PreparedStatement for setting the values of parameters. However, if a parameter is registered within the database stored procedure as an OUT parameter, you must call a special method, registerOutParameter(), passing the parameter position and database type of the OUT parameter that you want to register. In the solution to this recipe, the OUT parameter is in the second position and it has a VARCHAR type.
cs.registerOutParameter(2, Types.VARCHAR);
To execute the stored procedure, call the executeQuery() method on the CallableStatement. Once this has been done, you can see the value of the OUT parameter by making a call to the CallableStatement getXXX() method that corresponds to the data type:
System.out.println(cs.getString(2));
A NOTE REGARDING STORED FUNCTIONS
11-17. Handling Resources Automatically
Problem
Rather than manually opening and closing resources with each database call, you would prefer to have the application handle such boilerplate code for you.
Solution
Use the try-with-resources syntax to automatically close the resources that you open. The following block of code uses this tactic to automatically close the Connection, Statement, and ResultSet resources when it is finished using them:
String qry = "select recipe_num, name, description from recipes";


try (Connection conn = createConn.getConnection();

        Statement stmt = conn.createStatement();

        ResultSet rs = stmt.executeQuery(qry);) {


    while (rs.next()) {
        String recipe = rs.getString("RECIPE_NUM");

        String name = rs.getString("NAME");

        String desc = rs.getString("DESCRIPTION");


        System.out.println(recipe + "	" + name + "	" + desc);

    }

} catch (SQLException e) {

    e.printStackTrace();

}
The resulting output from running this code should look similar to the following:
Successfully connected

11-1     Connecting to a Database        DriverManager and DataSource Implementations - More to Come

11-2     Querying a Database and Retrieving Results      Subject to Change

11-3     Handling SQL Exceptions Using SQLException
How It Works
Handling JDBC resources has always been a pain in the neck. There is a lot of boilerplate code that is required for closing resources when they are no longer needed. This is no longer the case with the release of Java SE 7. This new release introduces automatic resource management using try-with-resources. Through the use of this technique, the developer no longer needs to close each resource manually, which is a change that can cut down on many lines of code.
In order to use this technique, you must instantiate all the resources for which you want to have automatic handling enabled within a set of parentheses after a try clause. In the solution to this recipe, the resources that are declared are Connection, Statement, and ResultSet.
try (Connection conn = createConn.getConnection();

        Statement stmt = conn.createStatement();

        ResultSet rs = stmt.executeQuery(qry);) {
Once those resources are out of scope, they are automatically closed. This means there is no longer a requirement to code a finally block to ensure that resources are closed. The solution to this recipe executes the same query as that of Recipe 11-3. Go back and compare the amount of code that is written in order to handle the resources manually with this code using the automatic resource handling; it can leave a developer wondering what they are going to do with all their newly found “free time”!
The automatic resource handling is not only available to database work, but to any resource that complies with the new java.lang.Autocloseable API. Other operations such as File I/O adhere to the new API as well. There is a single close() method within java.lang.Autoclosable that manages the closing of the resource. Classes that implement the java.io.Closeable interface can adhere to the API.