
One problem with DOM Level 0 event handlers is that only one function can be assigned to an event handler; assigning another function to the same event handler property overwrites any previous function value assigned to that property. This isn't such a big problem if you own all the code within the web page, as you can write one function that calls as many functions as needed, like the following code:
onload = function() {
    doSomething();
    doSomethingElse();
    andDoSomethingElse();
};
But if you use code written by a third party, it might rely on the same event handler for initialization, like this:
// code from third party module or library
onload = function() {
    initializeLibrary();
};
If that is the case, the outcome will be one of the following: Either your function overwrites the third party's function or vice versa. Nice, eh? It is fortunate that there is a solution to this particular problem, enabling you to add as many event handlers to a specific event as you want. Unfortunately, the solution varies between browsers that support the standard DOM event model (Firefox, Chrome, Safari, Opera, and Internet Explorer 9) and those that support the Internet Explorer (IE) event model (versions 8 and below; version 9 supports both event models).
The standard event model, specified in DOM Level 2, centers around two methods that are members of virtually every element object in the DOM. They are addEventListener() and removeEventListener(). Their purpose is to register or remove event handlers (or listeners — as in, they listen for the event to fire) on a single object.
Let's look at addEventListener() first. Its usage is fairly straightforward. You first obtain an object to call the method on, such as window or an element object from the DOM. Then you call the addEventListener() method and pass it three arguments:
Before we get any further, let's talk about event capture and bubbling.
Life as a client-side developer in the late 1990s was tough. OK, that's a lie. It was one of Dante's nine circles of Hell. The two browsers vying for dominance were Netscape 4 and Microsoft Internet Explorer 4. These browsers had different and incompatible DOMs, and thus different event models. Netscape 4's event model captured the event, whereas Internet Explorer used event bubbling.
When it came time for the W3C to work on a standard for an event model, it took both implementations and fused them together. So in the standard event model there are three phases to an event:
Event capturing
The event reaches the event target (the object in the DOM you specified a listener for).
Event bubbling
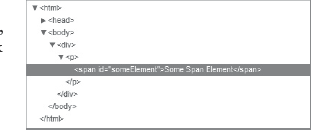
That's great, but what does it all mean? Consider an HTML document with the structure shown in Figure 19-1, and imagine that an event listener is listening for the click event on the <span/> element.
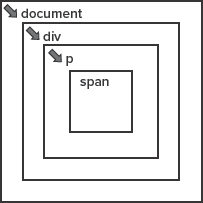
When the user clicks that element the capture phase begins, and the click event is first received by the window — or, rather, the window captures the event and executes any click event listeners for the document. The event then moves down to the document that captures and executes any click event listeners for the document. The event continues down to the next element, the <div/> element, and captures and executes any click event listeners for that element. From there, the <p/> element captures the event (and executes any click listeners for that element). Then the event finally reaches the target, the <span/> element, and the listeners for the click event on the target execute. So, with event capturing, the event starts at the top of the document's tree (the document object), and gets passed down to each descendant, executing every click event listener for each descendant, until it reaches the target (Figure 19-2).
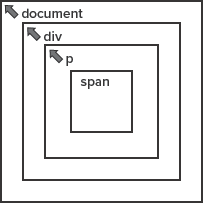
When the event finally reaches the event target, the bubbling phase begins — bubbling is the exact opposite of capture. The event starts at the target (the <span/> element in this case) and executes the click event listeners for the target. The event then bubbles up to each parent in the DOM tree, executing the click listeners at each parent until it reaches the window object (Figure 19-3).
In standards-compliant browsers you have to choose whether you want to use event capture or event bubbling. Since the only version of Internet Explorer to support the standard event model is IE9, the decision is practically made for you: bubbling. That is, of course, if you want your code to work the same in all browsers. In other words, the third argument passed to addEventListener() is almost always false, meaning bubbling (passing true indicates capture).
Let's finally apply this with some code. The following is an example of addEventListener() in use:
var spanEl = document.getElementById("someElement");

function clickHandler1() {
    alert("You clicked me!");
}

function clickHandler2() {
    alert("You clicked me (I like repeating myself)!");
}

spanEl.addEventListener("click", clickHandler1, false);

spanEl.addEventListener("click", clickHandler2, false);
This code first retrieves an element from the document with getElementById(). Then, two functions are defined; both will handle the click event for the <span/> element. It then calls addEventListener() to add a listener for the click event on this element (notice the omission of on), and the listener is set to use event bubbling. Then another event listener is registered for the click event using the clickHandler2() function. When the user clicks this <span/> element an alert box will display the text "You clicked me!" Then, after the user clicks the box's OK button, another alert box will display the text "You clicked me (I like repeating myself)!" When you assign multiple functions to handle the same event on the same object, the functions are called in the order they are assigned.
If you want to remove a listener registered with addEventListener(), use the removeEventListener() method. It accepts the same three arguments passed to addEventListener(), and the values passed to removeEventListener() must exactly match the values that were passed to addEventListener() when you registered the listener. For example, the following code shows the incorrect and the correct ways to remove the second listener registered in the previous code:
// incorrect
spanEl.removeEventListener("click", clickHandler2, true);

// correct
spanEl.removeEventListener("click", clickHandler2, false);
In the first statement, the third argument passed to removeEventListener() is true; the statement attempts to remove a listener for the click event with the provided function, which is using event capture. While this statement does not result in an error, it is incorrect because the listener was registered to use event bubbling.
Now look at the second statement. It too attempts to remove a listener for the click event with the provided function, and the third argument is false. Since all three values match the values originally passed to addEventListener(), that specific listener is removed and the associated function will not execute when the event fires.
Warning
In the standard event model, the this variable used inside a function handling an event refers to the object that fired the event.
Around the time that the W3C was working on the DOM Level 2 event specification, Microsoft released version 5 of IE. The browser offered new ways to register and unregister event handlers: the attachEvent() and detachEvent() methods.
Using these two methods is similar to using the standard event model; you retrieve an object from the document, call the attachEvent() method to register an event handler (or detachEvent() to remove a handler) and pass it two arguments:
The event, prepended with
on, to handleThe function to execute when the event fires
The proprietary IE event model doesn't support event capture — only bubbling. So there is no third parameter for these methods. The following code shows the IE equivalent of the registration code in the previous section:
var spanEl = document.getElementById("someElement");

spanEl.attachEvent("onclick", clickHandler1);

spanEl.attachEvent("onclick", clickHandler2);
Here the attachEvent() method is called twice, registering two onclick event handlers. Notice the use of on in onclick. Unlike with addEventListener() and removeEventListener(), you must use the name of the event handler as opposed to the name of the event. The result of this code is almost the same as earlier: Two alert boxes display two messages when the <span/> element is clicked. Except in this case, the handlers are executed in reverse order. Unlike addEventListener(), multiple functions assigned to handle the same event on the same object execute in the reverse order of how they were assigned.
Removing the second event handler is as simple as calling detachEvent() and passing the same values:
// remove the second listener
spanEl.detachEvent("onclick", clickHandler2);
Warning
In the proprietary IE event model, the this variable used inside a function handling an event refers to the window object.
In this lesson, you learn how to assign event handlers using standard and IE methods.
For this lesson, you need a text editor; any plain text editor will do. For Microsoft Windows users, Notepad is available by default on your system or you can download Microsoft's free Visual Web Developer Express (www.microsoft.com/express/web/) or Web Matrix (www.asp.net/webmatrix/). Mac OS X users can use TextMate, which comes as part of OS X, or download a trial for Coda (www.panic.com/coda/). Linux users can use the built-in VIM.
You also need a modern web browser. Choose any of the following:
Internet Explorer 8+
Google Chrome
Firefox 3.5+
Apple Safari 4+
Opera 10+
Create a subfolder called Lesson19 in the JS24Hour folder you created in Lesson 1. Store the files you create in this lesson in the Lesson19 folder.
You will rewrite the calculator application from Lesson 18 using standard and IE-specific event handlers.
Open your text editor and type the following HTML:
<html>
<head>
    <title>Lesson 19: Example 01</title>
    <style type="text/css">
    td {
        border: 1px solid gray;
        width: 50px;
    }

    #results {
        height: 20px;
    }
    </style>
</head>
<body>
    <table border="0" cellpadding="2" cellspacing="2">
        <tr>
            <td colspan="4" id="results"></td>
        </tr>
        <tr>
            <td><a href="#">1</a></td>
            <td><a href="#">2</a></td>
            <td><a href="#">3</a></td>
            <td><a href="#">+</a></td>
        </tr>
        <tr>
            <td><a href="#">4</a></td>
            <td><a href="#">5</a></td>
            <td><a href="#">6</a></td>
            <td><a href="#">-</a></td>
        </tr>
        <tr>
            <td><a href="#">7</a></td>
            <td><a href="#">8</a></td>
            <td><a href="#">9</a></td>
            <td><a href="#">*</a></td>
        </tr>
        <tr>
            <td><a href="#">Clear</a></td>
            <td><a href="#">0</a></td>
            <td><a href="#">=</a></td>
            <td><a href="#">/</a></td>
        </tr>
    </table>
    <script type="text/javascript">
    function addDigit(digit) {
var resultField = document.getElementById("results"); resultField.innerHTML += digit; return false; } function calculate() { var resultField = document.getElementById("results"); resultField.innerHTML = eval(resultField.innerHTML); return false; } function reset() { var resultField = document.getElementById("results"); resultField.innerHTML = ""; return false; } function getHandlerFunction(innerHTML) { return function() { addDigit(innerHTML); return false; }; } onload = function() { var links = document.getElementsByTagName("a"); var length = links.length; for (var i = 0; i < length; i++) { var link = links[i]; var innerHTML = link.innerHTML;var func = null;switch (innerHTML) {case "Clear":func = reset;break;case "=":func = calculate;break;default:func = getHandlerFunction(innerHTML);}link.addEventListener("click", func, false);} }; </script> </body> </html>Save it as
lesson19_example01.htm. There are a few changes in this version, and the important ones are in bold. A new variable, calledfunc, is declared and initialized asnull. The purpose of this variable is to contain the function used in the call toaddEventListener(), making the code a little easier to read while saving you from typinglink.addEventListener()several times.The
casestatements within theswitchblock remain the same, except thatfuncis assigned the appropriate function in each case. Finally, a new line is added to theforloop, adding aclickevent listener to the<a/>element.Now copy and paste that code into a new instance of your text editor. Make the changes specified in the following code (the changes are in bold):
<html> <head><title>Lesson 19: Example 02</title><style type="text/css"> td { border: 1px solid gray; width: 50px; } #results { height: 20px; } </style> </head> <body> <table border="0" cellpadding="2" cellspacing="2"> <tr> <td colspan="4" id="results"></td> </tr> <tr> <td><a href="#">1</a></td> <td><a href="#">2</a></td> <td><a href="#">3</a></td> <td><a href="#">+</a></td> </tr> <tr> <td><a href="#">4</a></td> <td><a href="#">5</a></td> <td><a href="#">6</a></td> <td><a href="#">-</a></td> </tr> <tr> <td><a href="#">7</a></td> <td><a href="#">8</a></td><td><a href="#">9</a></td> <td><a href="#">*</a></td> </tr> <tr> <td><a href="#">Clear</a></td> <td><a href="#">0</a></td> <td><a href="#">=</a></td> <td><a href="#">/</a></td> </tr> </table> <script type="text/javascript"> function addDigit(digit) { var resultField = document.getElementById("results"); resultField.innerHTML += digit; return false; } function calculate() { var resultField = document.getElementById("results"); resultField.innerHTML = eval(resultField.innerHTML); return false; } function reset() { var resultField = document.getElementById("results"); resultField.innerHTML = ""; return false; } function getHandlerFunction(innerHTML) { return function() { addDigit(innerHTML); return false; }; } onload = function() { var links = document.getElementsByTagName("a"); var length = links.length; for (var i = 0; i < length; i++) { var link = links[i]; var innerHTML = link.innerHTML; var func = null; switch (innerHTML) { case "Clear":func = reset; break; case "=": func = calculate; break; default: func = getHandlerFunction(innerHTML); }link.attachEvent("onclick", func);} }; </script> </body> </html>Save this as
lesson19_example02.htm. The changes make it work with IE —addEventListener()becomesattachEvent(),onis added toclick, and the third parameter originally passed toaddEventListener()is removed.Open each file in the appropriate browser to test it. You'll see that the application works very much as it did in Lesson 17 and Lesson 18.
To get the sample code files, you can download Lesson 19 from the book's website at www.wrox.com.
Note
Please select Lesson 19 on the DVD to view the video that accompanies this lesson.