
In conventional applications, the operating system provides user interface elements and behaviors that enable developers to provide a rich experience for the user. Developing such applications is convenient, as the entire application is typically written in one language. The developer needs to know only one language to write code to interface with a data store (such as a database), code to process that data, code to display that data to the user, and code to interact with the user.
Web developers don't have it that easy. The data store interaction and processing are written in one language (like PHP, Python, or C#), and the user interface is typically a combination of HTML, CSS, and JavaScript. HTML is used for basic output/input for the user, which is a rather static and boring experience. CSS can spice up the application a little, but it isn't designed to do much more than determine how the browser renders the elements. So, to create a rich interactive experience, developers must turn to JavaScript.
But JavaScript is only part of the equation. There has to be an interface that enables a JavaScript developer to interact with a web page while it's loaded in the browser; such an interface exists, and it's called the Document Object Model (DOM).
The DOM is a browser-independent Application Programming Interface (API) — a set of objects, properties, and methods that defines how HTML documents are structured, accessed, and manipulated with JavaScript. It's a standard put forth by the W3C (a standards body) that, when implemented in a browser, provides a means to literally change everything in the HTML page while it is loaded in the browser. There are multiple levels, or versions, of the DOM with each new version building on the last. The latest version is DOM Level 3.
To achieve this level of programmability, every HTML element in the document is represented by an object, and these objects are organized in a tree-like hierarchal structure. This structure is very similar in concept to the file system on a computer. Figure 13-1 shows a screenshot of Windows Explorer in Windows 7.
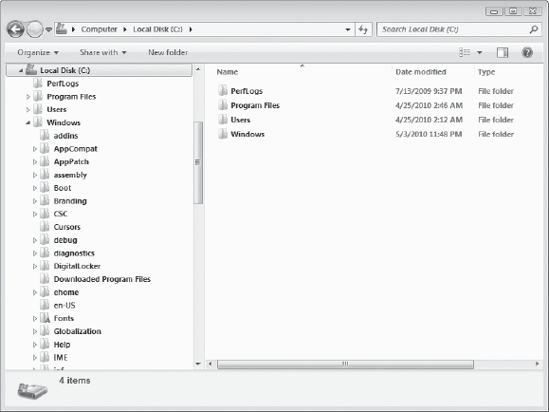
At the very top of the tree is C:, or the root directory. Inside the root are a list of child directories; these are branches that can contain either more branches (directories) or leaves (files). To find a particular file, you start at the root and navigate through the appropriate directories until you find it. The DOM is very similar because HTML documents are structured in a very treelike way. Look at the following HTML:
<html>
<head>
    <title>Sample Page</title>
</head>
<body>
    <p>This is some text.</p>
    <p>This is more text.</p>
    <p>Here is text with a <span>span element</span>.</p>
</body>
</html>
If you were to diagram this HTML document as a tree, it would look like Figure 13-2.
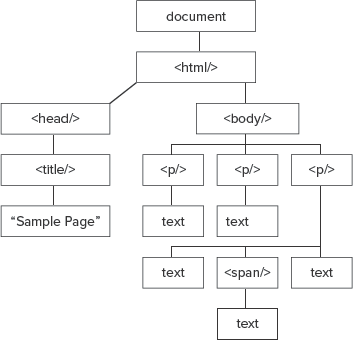
You start at the top of the tree with what is called the root element, the document. In the DOM, each point in the tree is called a node. There are several types of nodes, and the more notable ones are:
The Document node is sometimes referred to as the root node. The root node contains other nodes, such as the doctype declaration (if specified) and the document element, the <html/> element, which is also sometimes referred to as the root element.
The document element contains HTML elements that are represented as child nodes. In the case of this example, the document element node has two child nodes: <head/> and <body/>, and to these nodes the <html/> element node is a parent node. These two child nodes are also related to each other as sibling nodes; all child nodes that share the same parent node are siblings.
The <head/> and <body/> nodes also contain their own children. The <head/> element node contains a <title/> node; this contains a text node containing the text Sample Page. This text node is the end of that particular branch.
The <body/> node contains three child nodes — three <p/> elements. The first two <p/> nodes only contain text, but the third has three children:
As you add elements and text to the web page, a corresponding node is added to the DOM representing that page.
Note
HTML attributes are nodes, too, but they are represented differently in the tree. For the sake of simplicity, attributes have been omitted from this particular discussion.
To get any use out of the DOM, it's important to know how to get around in the DOM tree.
Using the parent, child, and sibling relationships, you can traverse the entire DOM tree using the Node data type's properties and methods. The Node data type is not part of the JavaScript language. Instead, it is provided by the browser to represent nodes in the DOM. It is the most basic of DOM types (most other DOM data types inherit from Node), but it provides the necessary tools to get from one node to another. The following table lists some of the more useful members:
Useful Node Members
MEMBER | DESCRIPTION |
|---|---|
A | |
The first child node of the specified node. Returns | |
The last child node of the specified node. Returns | |
The node immediately following the specified node. Returns | |
The node immediately preceding this node. Returns | |
The document that the specified node belongs to. | |
The parent node of the specified node. Returns | |
The name of the node. If the node is an element, this returns the tag name. If the node is text, it returns | |
The value of the node. If it is a text node, the actual text is returned; if an element, | |
Returns a Boolean value specifying whether the node has any children. |
Using some of these members, you can get from the top of the tree (the document) to the <span/> element in the example HTML from the previous section, like this:
document.firstChild.firstChild.nextSibling.lastChild.childNodes[1];
Let's break this down object by object. This line starts off at the top of the tree with document, and its first child is the <html/> element. So document.firstChild returns <html/>. The firstChild property is used on the <html/> node, getting the <head/> element because it's the first child node of <html/>. Then nextSibling is used, returning the <body/> element node. The <body/> node's lastChild property returns the third <p/> element, and since this <p/> element has three children, you get the <span/> element by specifying the second child in the childNodes collection.
This certainly seems like a lot of work, doesn't it? Maintenance would be a nightmare because even slight changes to the HTML markup would require you to rewrite this code. Thankfully, the document object provides you with some methods to make selecting particular element nodes much easier.
The first method is getElementsByTagName(). It accepts a string argument containing the name of the elements you want to retrieve, and it returns a NodeList of all the elements in the page that have the specified tag name. Using the example HTML provided earlier in this lesson, the following example selects all the <p/> elements:
var paragraphs = document.getElementsByTagName("p");Here the getElementsByTagName() method returns a NodeList of three elements. A NodeList is a special array. It has a length property, and you access each element in the list with a numeric index. The primary difference, however, is that a NodeList is live: any change to the elements within the document is reflected. It is easy to demonstrate this by modifying the example HTML. The following code adds a few elements to the page:
<html>
<head>
    <title>Sample Page</title>
</head>
<body>
    <p>This is some text.</p>
    <p>This is more text.</p>
    <p>Here is text with a <span>span element</span>.</p>
    <script type="text/javascript">
        var paragraphs = document.getElementsByTagName("p");

        alert(paragraphs.length); // 3
    </script>
    <p>Another paragraph.</p>
    <script type="text/javascript">
        alert(paragraphs.length); // 4
    </script>
</body>
</html>
The bold portion of this code adds a script element to call getElementsByTagName(), selecting all <p/> elements currently in the document and assigning the resulting NodeList to the paragraphs variable. Keep in mind that at this point in the document, only three <p/> elements are found in the document, so the alert() call in the first <script/> element alerts the value of 3.
After the first <script/> element is another <p/> element, bringing the total number to four. Then another <script/> element adds another line of JavaScript, alerting the length of paragraphs again; it alerts 4.
So by using the getElementsByTagName() method, you can get to the <span/> element much more easily by selecting all <span/> elements and getting the first element in the NodeList, as shown in the following code:
var theSpan = document.getElementsByTagName("span")[0];That's much easier, isn't it? But you can make it easier still by making a slight modification to the HTML markup and using the getElementById() method. This method's purpose is simple: to select only one element that has an id attribute with a specific value. This functionality and simplicity make the getElementById() method the most frequently used method in JavaScript development.
The following code modifies the original HTML from the beginning of this lesson by adding an id attribute to the <span/> element.
<html>
<head>
    <title>Sample Page</title>
</head>
<body>
    <p>This is some text.</p>
    <p>This is more text.</p>
    <p>Here is text with a <span id="foo">span element</span>.</p>
</body>
</html>
After this simple change, the <span/> element can be instantly found in the document with the following code:
var theSpan = document.getElementById("foo");The getElementById() method is, by far, the easiest way to select single elements in a document. It's also much more maintainable than other methods, as long as the id attribute doesn't change.
If an element with a specified id value cannot be found in the document, getElementById() returns null. Because of this, where you use the getElementById() method is crucial: It can be reliably used only after the browser has loaded the desired HTML element into the DOM. Remember in Lesson 1 when I advised you to place <script/> elements at the bottom of the body? This is another reason — so that all elements can be loaded into the DOM before any script attempts to access them.
In this lesson, you learned about the DOM and how to navigate and find nodes in the tree.
For this lesson, you need a text editor; any plain text editor will do. For Microsoft Windows users, Notepad is available by default on your system or you can download Microsoft's free Visual Web Developer Express (www.microsoft.com/express/web/) or Web Matrix (www.asp.net/webmatrix/). Mac OS X users can use TextMate, which comes as part of OS X, or they can download a trial for Coda (www.panic.com/coda/). Linux users can use the built-in VIM.
You also need a modern web browser. Choose any of the following:
Internet Explorer 8+
Google Chrome
Firefox 3.5+
Apple Safari 4+
Opera 10+
Create a subfolder called Lesson13 in the JS24Hour folder you created in Lesson 1. Store the files you create in this lesson in the Lesson13 folder.
You will write a web page using the HTML provided in this lesson that selects a particular element and changes the text it contains using the nodeValue property.
Open your text editor and type the following code:
<html>
<head>
    <title>Sample Page</title>
</head>
<body>
    <p>This is some text.</p>
    <p>This is more text.</p>
    <p>Here is text with a <span id="foo">span element</span>.</p>
</body>
</html>
This is the same HTML provided earlier in the lesson. Save this file as
lesson13_example01.htm.Now add the following bold code:
<html>
<head>
    <title>Sample Page</title>
</head>
<body> <p>This is some text.</p> <p>This is more text.</p> <p>Here is text with a <span id="foo">span element</span>.</p><script type="text/javascript">var theSpan = document.getElementById("foo");theSpan.childNodes[0].nodeValue = "span element containing new text";</script></body> </html>This new code retrieves the
<span/>element with anidoffoo. It then uses thechildNodes NodeListto select the text node contained within the element (firstChildcould be used in place ofchildNodes[0]), and assigns a new value to the text node.Resave the document and load it into your browser.
To get the sample code files, you can download Lesson 13 from the book's website at www.wrox.com.
Note
Please select Lesson 13 on the DVD to view the video that accompanies this lesson.