
The previous lesson introduced you to many events that you can handle in your JavaScript code. That leads to the question "How do you handle events in JavaScript?"
The answer isn't as straightforward as most would like. There are many ways you can "wire up" JavaScript code to handle an event, and over the course of this lesson, and those following, you'll learn the many ways you can set up functions to handle events.
You'll start this journey by learning how to use HTML attributes to handle events. Admittedly, HTML attribute event handlers aren't used as often as they used to be, but they are very useful when you need to handle an event quickly.
Let's start with an example element. Following is a normal <div/> element:
<div id="myDiv">Hello, Events!</div>
This element has an id of myDiv, and it contains a small bit of text. It's an ordinary element now, but you can add some specialness to it by handling the click event. To handle this event, add an attribute called onclick to the opening tag, like this:
<div id="myDiv" onclick="">Hello, Events!</div>
The name of an attribute used to handle events is the word on followed by the name of the event. In this example the event handler onclick handles the click event. If you wanted to handle the mouseover event, the attribute's name would be onmouseover.
Also keep in mind that even though <div/> elements don't interact with mouse clicks by default, you can add that functionality by handling the click event. In fact, you can add custom functionality to just about any HTML element by handling events.
Let's now add some code to execute when this element is clicked. HTML attributes allow you to assign any JavaScript code as the attribute's value. So changing this element's text color is as simple as using the this variable, followed by the style object, and then the color CSS property, like this:
<div id="myDiv" onclick="this.style.color = 'red'">Hello, Events!</div>
When you're using HTML attributes to handle events, the this variable refers to the element that originated the event. Here this refers to the <div/> element; when the <div/> element is clicked, its text color changes to red.
Note the use of single quotes around red. Single quotes are used here because the onclick attribute uses double quotes to contain its value. If you were to use double quotes around red, it would look like this:
<div id="myDiv" onclick="this.style.color = "red"">Hello, Events!</div>
And this would result in the browser's thinking the value of the onclick attribute is "this.style.color = ", which obviously doesn't result in the intended outcome. Always keep quotation marks in mind, especially when dealing with HTML attribute event handlers.
Attributes also have the rather unusual trait of allowing more than one JavaScript statement in the attributes' value. To demonstrate this, the following code adds another statement that calls the alert() method:
<div id="myDiv" onclick="this.style.color = 'red'; alert('You clicked me!')">
    Hello, Events!
</div>
You can use as many statements as you want; simply use a semicolon at the end of each statement so that the JavaScript engine knows when a statement ends and a new one begins. But if you want to execute multiple statements in an event handler, it's best to group those statements into a function. Doing so is advantageous for the following reasons:
Performing repeated tasks is much easier since all you have to call is a single function, as opposed to repeating the same statements over and over. In other words, code reuse.
Maintaining the code is easier. Organizing the code in function form makes mistakes easier to spot and fix. Maintenance is much easier when you're using the same code in multiple elements'
onclickevent handlers; making changes to a function is much simpler than making changes to multiple attributes.
With this in mind, let's rewrite the previous example by using a function. Let's also add another HTML element that handles the click event and calls the same function, like this:
<script type="text/javascript">
function changeToRed(that) {
    that.style.color = "red";
    alert("You clicked me!");
} </script> <div id="myDiv" onclick="changeToRed(this)">Hello, Events!</div> <p id="myPara" onclick="changeToRed(this)">Hello, Events 2!</p>
Look at the JavaScript function first. It's called changeToRed(), and it accepts an object called that. This parameter name is traditionally used to contain the this object (this and that... get it?), which is its use here. The first line uses the that variable to change the element's text color to red, and then an alert box displays a generic message to the user.
Now look at the HTML. The <div/> element was changed to call the changeToRed() function and passes this as an argument. Another element, a <p/> element, was added, and its onclick event handler was set to call changeToRed() as well, passing it a reference to that element by using the this variable. Even though <p/> is a different element from <div/>, the results will be the same: The <p/> element's text color will change to red, and an alert box displays a message to the user.
So, by taking the original statements and placing them within a function, you've essentially made the code usable by virtually any element in the page, and also made it easier to maintain.
The <div/> and <p/> elements don't have any default behavior when a user clicks them. So the examples up to this point work as expected. But what if you want to provide the same functionality for an <a/> element — an element that does do something by default when it's clicked (such as navigate to a different page)?
When a user clicks a link in a web page, the browser looks at the <a/> element and determines if an onclick event handler is defined for that element. If one is found, the browser executes the JavaScript code first, and then it navigates to the page defined in the href attribute. Let's apply this process to a link that handles the click event by calling changeToRed(), like the following code:
<a href="http://www.wrox.com" onclick="changeToRed(this)">Click me!</a>
In the case of this element, the browser goes through the following steps:
The browser finds the
onclickattribute and executeschangeToRed().The
<a/>element's text color changes to red.An alert box pops up and the browser stays on the page until the user clicks the OK button.
The browser navigates to another page once the OK button is clicked.
What if you want to disable the link's default behavior of navigating to a different page? There are some good reasons to do so; when you get into later lessons, such as Ajax, you'll see why you may want to disable a link's default behavior to enhance the user's experience on your web page.
But for now, just imagine you want the user to see your totally awesome ability to change the link's text color to red. After all, if it weren't for the alert box, anyone clicking the previous link would have no idea the text color had changed to red, because the browser navigates to a different page before the user has a chance to see the change. To disable the default behavior of an <a/> element, or any element for that matter, just ensure that the event handler returns false. This can be done in two ways.
First, simply tack the statement return false after the call to changeToRed(), like this:
<a href="http://www.wrox.com"
    onclick="changeToRed(this); return false">Click me!</a>
But in doing this you've made your code more difficult to manage and maintain — especially if you plan on doing the same thing with other <a/> elements. The better solution is to move the return false statement into changeToRed(), like this:
function changeToRed(that) {
    that.style.color = "red";
    alert("You clicked me!");
    return false;
}
Then you can simply use the return keyword in the event handler to return the value returned by changeToRed(), as shown in the following code:
<a href="http://www.wrox.com" onclick="return changeToRed(this)">Click me!</a>
Even though changeToRed() returns false, it returns only to the calling code — the onclick event handler. The event handler must return false in order to disable the link's default behavior. So that's why the onclick event handler is set to return changeToRed() — because the function returns false. Now when a user clicks this link, the browser goes through the following process:
The browser finds the
onclickevent handler and executes thereturnstatement, which executes thechangeToRed()function.The
<a/>element's text color changes to red.An alert box pops up.
After the user clicks the OK button,
changeToRed()returnsfalseto theonclickevent handler.The event handler returns
false(becausechangeToRed()returnsfalse) to the browser.The browser stays on the same page, cancelling the link's default behavior of navigating to the page specified in the
hrefattribute.
Now that you know the theory behind HTML attribute event handlers, try applying them to an actual application.
In this lesson, you learn how to use HTML attributes to handle events.
For this lesson, you will need a text editor; any plain text editor will do. For Microsoft Windows users, Notepad is available by default on your system or you can download Microsoft's free Visual Web Developer Express (www.microsoft.com/express/web/) or Web Matrix (www.asp.net/webmatrix/). Mac OS X users can use TextMate, which comes as part of OS X, or download a trial for Coda (www.panic.com/coda/). Linux users can use the built-in VIM.
You also need a modern web browser. Choose any of the following:
Internet Explorer 8+
Google Chrome
Firefox 3.5+
Apple Safari 4+
Opera 10+
Create a subfolder called Lesson17 in the JS24Hour folder you created in Lesson 1. Store the files you create in this lesson in the Lesson17 folder.
You will write a web-based calculator using HTML attribute event handlers.
Open your text editor and type the following HTML:
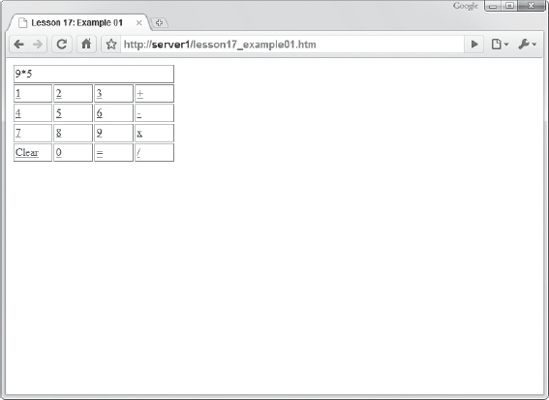
<html>
<head>
    <title>Lesson 17: Example 01</title>
    <style type="text/css">
    td {
        border: 1px solid gray;
        width: 50px;
    }

    #results {
        height: 20px;
    }
    </style>
</head>
<body>
    <table border="0" cellpadding="2" cellspacing="2">
        <tr>
            <td colspan="4" id="results"></td>
        </tr>
        <tr>
            <td><a href="#">1</a></td>
            <td><a href="#">2</a></td>
            <td><a href="#">3</a></td>
            <td><a href="#">+</a></td>
        </tr>
<tr> <td><a href="#">4</a></td> <td><a href="#">5</a></td> <td><a href="#">6</a></td> <td><a href="#">-</a></td> </tr> <tr> <td><a href="#">7</a></td> <td><a href="#">8</a></td> <td><a href="#">9</a></td> <td><a href="#">x</a></td> </tr> <tr> <td><a href="#">Clear</a></td> <td><a href="#">0</a></td> <td><a href="#">=</a></td> <td><a href="#">/</a></td> </tr> </table> <script type="text/javascript"> </script> </body> </html>This is the markup used for this application, and a table makes up the bulk of the HTML. The first row has a
<td/>element with anidofresults. This is the display of the calculator. The subsequent rows consist of four cells on each row, and each cell contains a link. Thehrefattribute of these links is set to#, which prohibits the browser from navigating away from the page. However, this is a little unnecessary, as your JavaScript code will cancel the links' default behavior.Now add the JavaScript function that you see bold in the following code:
<html>
<head>
    <title>Lesson 17: Example 01</title>
    <style type="text/css">
    td {
        border: 1px solid gray;
        width: 50px;
    }

    #results {
        height: 20px;
    }
    </style>
</head>
<body>
    <table border="0" cellpadding="2" cellspacing="2">
        <tr>
            <td colspan="4" id="results"></td>
        </tr>
        <tr>
            <td><a href="#">1</a></td>
<td><a href="#">2</a></td> <td><a href="#">3</a></td> <td><a href="#">+</a></td> </tr> <tr> <td><a href="#">4</a></td> <td><a href="#">5</a></td> <td><a href="#">6</a></td> <td><a href="#">-</a></td> </tr> <tr> <td><a href="#">7</a></td> <td><a href="#">8</a></td> <td><a href="#">9</a></td> <td><a href="#">x</a></td> </tr> <tr> <td><a href="#">Clear</a></td> <td><a href="#">0</a></td> <td><a href="#">=</a></td> <td><a href="#">/</a></td> </tr> </table> <script type="text/javascript">function addDigit(digit) {var resultField = document.getElementById("results");resultField.innerHTML += digit;return false;} </script> </body> </html>This new function, called
ad dDigit(), accepts an argument calleddigit. It uses the value by appending it to theinnerHTMLof the<td/>element with anidofresults. The function returnsfalse.Add the bold function in the following code:
<html>
<head>
    <title>Lesson 17: Example 01</title>
    <style type="text/css">
    td {
        border: 1px solid gray;
        width: 50px;
    }

    #results {
        height: 20px;
    }
    </style>
</head> <body> <table border="0" cellpadding="2" cellspacing="2"> <tr> <td colspan="4" id="results"></td> </tr> <tr> <td><a href="#">1</a></td> <td><a href="#">2</a></td> <td><a href="#">3</a></td> <td><a href="#">+</a></td> </tr> <tr> <td><a href="#">4</a></td> <td><a href="#">5</a></td> <td><a href="#">6</a></td> <td><a href="#">-</a></td> </tr> <tr> <td><a href="#">7</a></td> <td><a href="#">8</a></td> <td><a href="#">9</a></td> <td><a href="#">x</a></td> </tr> <tr> <td><a href="#">Clear</a></td> <td><a href="#">0</a></td> <td><a href="#">=</a></td> <td><a href="#">/</a></td> </tr> </table> <script type="text/javascript"> function addDigit(digit) { var resultField = document.getElementById("results"); resultField.innerHTML += digit; return false; }function calculate() {var resultField = document.getElementById("results");resultField.innerHTML = eval(resultField.innerHTML);return false;}</script> </body> </html>This function, called
calculate(), retrieves the element with anidofresults(the first<td/>element), and uses theeval()method to execute the contents of the element'sinnerHTML. Theeval()method is new to you: It accepts a string value and executes that string as JavaScript. Although it is useful,eval()is typically thought of as "evil" because it leads to sloppy code that can't be maintained and it makes JavaScript execution slower. There are, however, some legitimate uses foreval(), one of which is to execute mathematical computations. Its use here is benign, and used in this example for simplicity's sake.Now add a function to clear the results. It is bold in the following code:
<html>
<head>
    <title>Lesson 17: Example 01</title>
    <style type="text/css">
    td {
        border: 1px solid gray;
        width: 50px;
    }

    #results {
        height: 20px;
    }
    </style>
</head>
<body>
    <table border="0" cellpadding="2" cellspacing="2">
        <tr>
            <td colspan="4" id="results"></td>
        </tr>
        <tr>
            <td><a href="#">1</a></td>
            <td><a href="#">2</a></td>
            <td><a href="#">3</a></td>
            <td><a href="#">+</a></td>
        </tr>
        <tr>
            <td><a href="#">4</a></td>
            <td><a href="#">5</a></td>
            <td><a href="#">6</a></td>
            <td><a href="#">-</a></td>
        </tr>
        <tr>
            <td><a href="#">7</a></td>
            <td><a href="#">8</a></td>
            <td><a href="#">9</a></td>
            <td><a href="#">x</a></td>
        </tr>
        <tr>
            <td><a href="#">Clear</a></td>
            <td><a href="#">0</a></td>
            <td><a href="#">=</a></td>
            <td><a href="#">/</a></td>
        </tr>
    </table>
    <script type="text/javascript">
    function addDigit(digit) {
var resultField = document.getElementById("results"); resultField.innerHTML += digit; return false; } function calculate() { var resultField = document.getElementById("results"); resultField.innerHTML = eval(resultField.innerHTML); return false; }function reset() {var resultField = document.getElementById("results");resultField.innerHTML = "";return false;}</script> </body> </html>The
reset()function resets the calculator's value, setting theinnerHTMLof theresultsfield to an empty string.Wire up the events for each
<a/>element. Don't forget to use thereturnkeyword before calling the appropriate function.<html> <head> <title>Lesson 17: Example 01</title> <style type="text/css"> td { border: 1px solid gray; width: 50px; } #results { height: 20px; } </style> </head> <body> <table border="0" cellpadding="2" cellspacing="2"> <tr> <td colspan="4" id="results"></td> </tr> <tr> <td><a href="#" onclick="return addDigit(1)">1</a></td> <td><a href="#" onclick="return addDigit(2)">2</a></td><td><a href="#" onclick="return addDigit(3)">3</a></td> <td><a href="#" onclick="return addDigit('+')">+</a></td> </tr> <tr> <td><a href="#" onclick="return addDigit(4)">4</a></td> <td><a href="#" onclick="return addDigit(5)">5</a></td> <td><a href="#" onclick="return addDigit(6)">6</a></td> <td><a href="#" onclick="return addDigit('-')">-</a></td> </tr> <tr> <td><a href="#" onclick="return addDigit(7)">7</a></td> <td><a href="#" onclick="return addDigit(8)">8</a></td> <td><a href="#" onclick="return addDigit(9)">9</a></td> <td><a href="#" onclick="return addDigit('*')">x</a></td> </tr> <tr> <td><a href="#" onclick="return reset()">Clear</a></td> <td><a href="#" onclick="return addDigit(0)">0</a></td> <td><a href="#" onclick="return calculate()">=</a></td> <td><a href="#" onclick="return addDigit('/')">/</a></td> </tr> </table> <script type="text/javascript"> function addDigit(digit) { var resultField = document.getElementById("results"); resultField.innerHTML += digit; return false; } function calculate() { var resultField = document.getElementById("results"); resultField.innerHTML = eval(resultField.innerHTML); return false; } function reset() { var resultField = document.getElementById("results"); resultField.innerHTML = ""; return false; } </script> </body> </html>
Note that the links for clearing and totaling the calculator call the reset() and calculate() functions, respectively. All other links call the addDigit() function, and pass it a value representing their respective number or operation.
To work the calculator, click the appropriate links to perform arithmetic operations. Figure 17-1 shows an example of the calculator in action.
To get the sample code files, you can download Lesson 17 from the book's website at www.wrox.com.
Note
Please select Lesson 17 on the DVD to view the video that accompanies this lesson.