
Open a web browser and go to http://www.google.com. You've just sent a GET request to Google's webserver. Now point your browser to http://www.google.com/search?q=JavaScript. Once again you've sent a GET request to Google. Click any link in the search results. Yep, you just sent a GET request.
The HTTP protocol defines nine HTTP methods (also known as verbs) that determine what type of action is taken on the requested resource. The GET verb indicates that the client requesting a resource simply wants to get the data that the resource contains. GET requests are typically thought of as safe requests because they're not meant to cause any change on the server; they are simply used to request a resource's data.
As mentioned in Lesson 32, there are two types of requests you can make with XMLHttpRequest (XHR) objects: GET and POST. The majority of requests users make on the Internet are GET requests. Similarly, the majority of requests you'll make with XHR will be GET requests.
Code samples in Lesson 32 illustrated how you make GET requests, but let's go over everything you need to make these types of requests. First, you create the XHR object and initialize it with the open() method, like this:
var xhr = createXHR();

xhr.open("GET", "info.txt");
The first argument passed to open() tells the XHR object to make a GET request to the URL specified as the second argument, and since the third argument is omitted, the request is sent in asynchronous mode.
It's important to fully understand how XHR objects handle the URL you pass to open(). In the case of the preceding code, the XHR object will attempt to find a file called info.txt in the same directory that the code executes in. So, for example, if this code is executed within a web page located at http://www.yourdomain.com/ajax/get_ajax.htm, the XHR object sends a request to the http://www.yourdomain.com/ajax/info.txt URL. The URL passed to open() in the previous code is referred to as a relative URL—it is relative to the page currently loaded in the browser. The other type of URL is an absolute URL. Absolute URLs contain the protocol, domain, and path of the resource. The URL http://www.yourdomain.com/ajax/info.txt is an absolute URL, and as long as you abide by the same-origin policy discussed in Lesson 32, you can use absolute URLs as well. The following code uses the absolute URL for info.txt in this example:
var xhr = createXHR();

xhr.open("GET", "http://www.yourdomain.com/ajax/info.txt");
It doesn't really matter if you use relative or absolute URLs. Absolute URLs are clear and less prone to errors; relative URLs are shorter but can cause problems if you do not pay attention to where resources are located in relation to the page.
After you initialize a request you want to handle the readystatechange event, check for ready state 4, and also ensure that the request didn't fail. The following code does all that:
xhr.onreadystatechange = function() {
    if (xhr.readyState === 4) {
        var status = xhr.status;
        if ((status >= 200 && status < 300) || status === 304) {
            alert(xhr.responseText);
        } else {
            alert("An error occurred");
        }
    }
};
This code looks similar to a snippet in Lesson 32, but there's something different in the bolded line. A new property of the XHR object, called responseText, is passed to the alert() method on a successful request. The responseText property returns the body of the response—the requested resource's data in text format. So whatever text is contained within info.txt is displayed in the alert box.
Note
There is another property, called responseXML, that returns a DOM object if the returned data is in XML form.
The final step in the process is to send the request, and you do so by calling the send() method. It accepts one argument, which contains the data that makes up the request's body. GET requests do not send data, so you must pass null to the method, like this:
xhr.send(null);
After calling send(), the XHR object then monitors the readyState property and fires the readystatechange event when its value changes.
After the send() method executes, the XHR object functions independently of JavaScript code that may be executing after the call to send(). This is because the XHR object is operating in asynchronous mode, and programming with asynchronous objects requires a different approach from regular programming. Look at the following code:
var xhr = createXHR();

xhr.open("GET", "info.txt");

xhr.onreadystatechange = function() {
    if (xhr.readyState === 4) {
        var status = xhr.status;
        if ((status >= 200 && status < 300) || status === 304) {
            // code removed
        } else {
            alert("An error occurred");
        }
    }
};

xhr.send(null);

alert(xhr.responseText); // wrong!!
This code makes a GET request for the info.txt file, as in the previous section, but there's one little change. Notice that the line of code calling alert() to display the contents of responseText was moved out of the onreadystatechange event handler and placed after the call to send() (the changes are in bold).
Depending on your browser, you'll see either an empty alert box or an error. This is because the browser continues to execute any JavaScript code found after the call to send(). When the final line of code executes and attempts to get a value from the responseText property, the XHR object has not yet received a complete response from the server. So in some browsers responseText is empty and an alert box displays an empty string, while others throw an error.
Perhaps this behavior is better explained with a visual aid. Picture an island in the ocean just off the mainland (Figure 33-1).
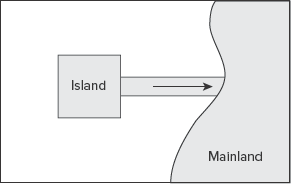
The island is connected to the mainland via a one-way bridge, and vehicles travelling on that bridge can travel only from the island to the mainland. An asynchronous XHR object is like this island, and the rest of the page's JavaScript code is like the mainland. All code relying on the XHR object's data is on the island; if code from the mainland tried to access code on the island, some kind of error would occur (like a wreck). But the code on the XHR island can access code on the mainland whenever it needs to.
Because this particular request was made using asynchronous mode, all code relying on the request's response must be handled within the onreadystatechange event handler (on the island). A common practice is to call a function (on the mainland) when the response is complete and pass the response data as an argument in order to do something with that data. The following code demonstrates this:
function processResponse(data) {
    alert(data);
}

var xhr = createXHR();

xhr.open("GET", "info.txt");

xhr.onreadystatechange = function() {
    if (xhr.readyState === 4) {
        var status = xhr.status;
        if ((status >= 200 && status < 300) || status === 304) {
            processResponse(xhr.responseText);
        } else {
            alert("An error occurred");
        }
    }
};

xhr.send(null);
This code calls the processResponse() function with a successful request, and it makes the code easier to read and maintain.
You can make asynchronous XHR requests even easier to read, maintain, and use by refactoring your XHR code into a function. The only two pieces of information that can vary from request to request are the URL and the function to call when the request is successful (also known as a callback function). The following code defines a function called makeGetRequest():
function makeGetRequest(url, callback) {
    var xhr = createXHR();

    xhr.open("GET", url);

    xhr.onreadystatechange = function() {
        if (xhr.readyState === 4) {
            var status = xhr.status;
            if ((status >= 200 && status < 300) || status === 304) {
                callback(xhr.responseText);
            } else {
                alert("An error occurred");
            }
        }
    };

    xhr.send(null);
}
The request code in makeGetRequest() is almost identical to the code in the previous example. The only changes are that the url variable is in place where info.txt originally was, and that the callback function is invoked in where processResponse() was called. Using makeGetRequest() makes asynchronous requests trivial, as shown in the following code:
function processResponse(data) {
    alert(data);
}

makeGetRequest("info.txt", processResponse);
In this new code processResponse() stays unchanged, but a call to makeGetRequest() passes info.txt and the processResponse() function as arguments. So now you can make a request using one simple line of code and do something with the request's data when the request completes successfully.
In this lesson, you learn how to make GET requests using XHR objects and work with the data you retrieve with them.
For this lesson, you need a text editor; any plain text editor will do. For Microsoft Windows users, Notepad is available by default on your system or you can download Microsoft's free Visual Web Developer Express (www.microsoft.com/express/web/) or Web Matrix (www.asp.net/webmatrix/). Mac OS X users can use TextMate, which comes as part of OS X, or download a trial for Coda (www.panic.com/coda/). Linux users can use the built-in VIM.
You also need a modern web browser. Choose any of the following:
Internet Explorer 8+
Google Chrome
Firefox 3.5+
Apple Safari 4+
Opera 10+
Additionally, you need webserver software installed on your computer. Refer to Lesson 31 on the DVD for installation instructions. Create a subfolder called Lesson33 in the root directory of your webserver. Store the files you create in this lesson in the Lesson33 folder.
Create a new text file and add exactly the following text to it:
Jeremy,Jason,Jeffrey
Note that there are no spaces between the commas and names. Feel free to add more names. Just make sure to separate them with commas and keep the names all in one line. Save this text file as
lesson33_example_data.txt.Create another new file and type the following JavaScript code. Feel free to copy the
createXHR()function fromlesson32_example01.jsfrom Lesson 32:function createXHR() { if (typeof XMLHttpRequest !== "undefined") { return new XMLHttpRequest(); } else { var versions = [ "MSXML2.XmlHttp.6.0", "MSXML2.XmlHttp.3.0" ]; for (var i = 0; i < versions.length; i++) { try { var xhr = new ActiveXObject(versions[i]); return xhr; } catch (error) { // do nothing } } } alert("Your browser does not support XmlHttp"); return null; } function makeGetRequest(url, callback) { var xhr = createXHR(); xhr.open("GET", url); xhr.onreadystatechange = function() { if (xhr.readyState === 4) { var status = xhr.status; if ((status >= 200 && status < 300) || status === 304) { callback(xhr.responseText); } else { alert("An error occurred"); } } }; xhr.send(null); }These are the functions you've created thus far to aid you in Ajax requests. Save the file as
xhr.jsand place it in theLesson33directory.Copy the
eventUtility.jsfile either from the code download or from a previous lesson to theLesson33directory.Type the following HTML:
<html>
<head>
    <title>Lesson 33: Example 01</title>
</head>
<body>

<form name="theForm" action="" onsubmit="validateName(event)">
    <input type="text" name="txtName" value="" />
    <input type="submit" name="btnSubmit" value="Check Name" />
</form>


<script type="text/javascript" src="eventutility.js"></script>
<script type="text/javascript" src="xhr.js"></script>
<script type="text/javascript">

</script>
</body>
</html>
This page has a form called
theForm, and it has a textbox control namedtxtName, and a button namedbtnSubmit. TheeventUtility.jsandxhr.jsfiles are also added to the page via two<script/>elements, with a third<script/>element that will contain inline JavaScript code.The form has an
onsubmitevent handler that calls a function calledvalidateName(). This function should verify that the textbox is not empty, and it should make a request to retrieve thelesson33_example_data.txtfile. Type the following function inside the empty<script/>element:function validateName(event) { var nameToVerify = document.theForm.txtName.value; var button = document.theForm.btnSubmit; if (nameToVerify === "") { alert("Please enter a name."); } else { button.disabled = true; makeGetRequest("lesson33_example_data.txt", processData); } eventUtility.preventDefault(event); }If the textbox is empty, an alert message tells the user to enter a name. Otherwise, a call to
makeGetRequest()requests the text file and calls a function calledprocessData()on a successful request.The button is also disabled before the request is sent. Latency is an issue when making HTTP requests, and the user can generate many requests by repeatedly clicking the button. By disabling the button when a request is made, you ensure that only one request can be sent at any given time.
The event utility's
preventDefault()method prevents the form from being submitted.Write the
processData()function. It should split the data contained in the text file into an array and determine whether the name entered into the textbox has a match in the file. It should also tell the user whether or not a match was found. After everything's been processed, enable the button once again. Type the following function inside the inline<script/>element:function processData(data) { var names = data.split(","); var nameToVerify = document.theForm.txtName.value; var button = document.theForm.btnSubmit; var nameFound = false; for (var i = 0; i < names.length; i++) { var name = names[i]; if (name.toLowerCase() === nameToVerify.toLowerCase()) { nameFound = true; break; } } if (nameFound) { alert("That name is taken."); } else { alert("That name isn't taken"); } button.disabled = false; }
The names in the text file are separated by commas, so the String data type's split() method splits the string using a comma as a delimiter. Next a for loop iterates over the names array and compares each element in the array to the value contained within the textbox. Both values are converted to their lowercase equivalents to make the search case-insensitive. If a match is found in the array, the nameFound variable is set to true and the loop ends. Otherwise, the loop continues to iterate over each element until a match is found or the loop exits.
After the loop exits, the function displays a message to the user. The contents of the message depend on nameFound's value. Finally, the button is re-enabled to allow the user to search for another name.
Save the file as lesson33_example01.htm and point your browser to http://localhost/Lesson33/lesson33_example01.htm. Begin typing names into the textbox and pressing the button to see if the name you typed is found in the text file.
To get the sample code files, download Lesson 33 from the book's website at www.wrox.com.
Note
Please select Lesson 33 on the DVD to view the video that accompanies this lesson.