
We have learned the core features of Angular 2 and how to write programs in TypeScript. Now it's time to develop a simple to-do application using Angular 2 and ASP.NET Core. ASP.NET Core is the latest web development platform from Microsoft, which is more optimized and modular than previous versions of ASP.NET. It provides an option to use the machine-wide .NET Framework, or a new .NET Core which runs on an app-by-app basis and even contains the framework binaries in the published web application folder itself. With the new ASP.NET Core, we are not dependent for running our application on IIS, and there are several other servers provided to run cross-platform using Kestrel. To learn more about ASP.NET Core, please refer to http://docs.asp.net.
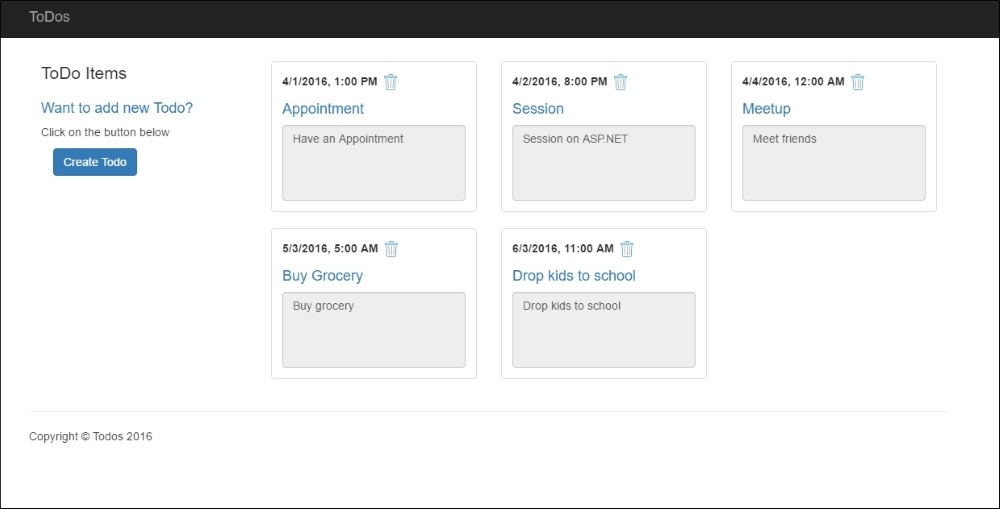
We will go through a step-by-step tutorial that leads to a working to-do application. The following screenshot show a snapshot of the main page. Once the user logs in, it will show a list of all the to-do items available. User can add a new to-do item by clicking a Create Todo button and deleting the existing one as well. We will not be covering the security authentication and authorization module in this chapter, instead focusing on how to use Angular 2 with ASP.NET Core:
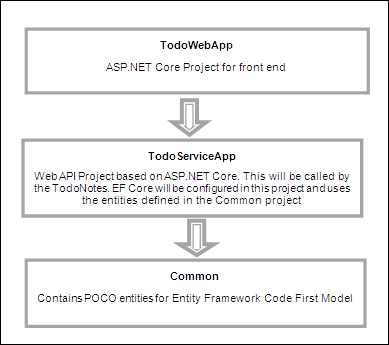
In this application, we will have three projects. TodoWebApp calls the TodoServiceApp, and Common is used by Web API, which holds the entity models. The following diagram shows how to develop these three projects and configure and use Angular 2:
Common projects hold the entities that will be used by the Entity framework to create a database. We will reference this assembly in the Web API project at a later stage:
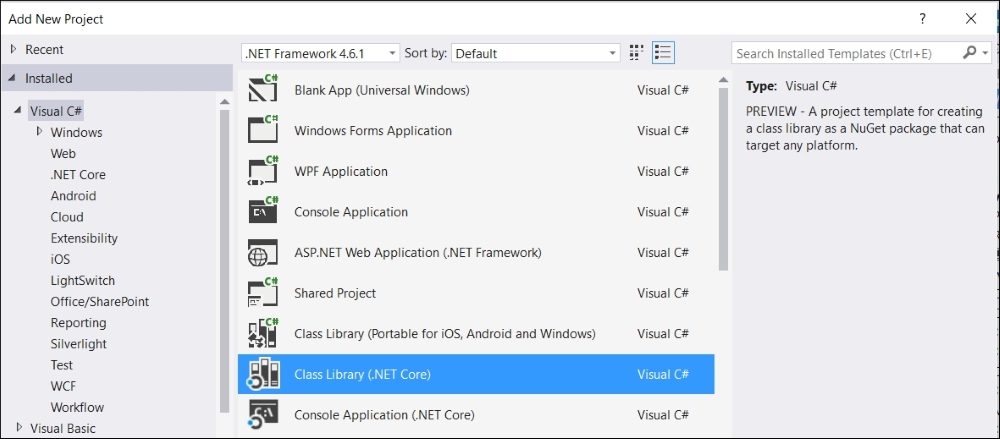
- Create a .NET Core Class Library project:
- Add a new folder,
Models, and add aTodoItemclass as follows:using System; using System.Collections.Generic; using System.Linq; using System.Threading.Tasks; namespace Common { public class TodoItem { public int Id { get; set; } public string Title { get; set; } public string Description { get; set; } public DateTime DueDateTime { get; set; } public int UserId { get; set; } } }The preceding
TodoItemclass contains theId(primary key) andTitle,Description,DueDateTime, and theUserIDto save to-dos for a specific user.
In this project, we will create a web API that will reference the Common project which contains the TodoItem POCO model. In this project, we will expose services and create a database repository that will use Entity Framework Core to perform
Create, Read, Update, and Delete (CRUD) operations in the Microsoft SQL Server database:
- Create a new Web API project, choosing ASP.NET Core template. Web API and ASP.NET MVC have been merged into one unified framework, so there is no separate project template for Web API. In this case, we will use the Empty Project Model available in the ASP.NET Core project templates.
- Open
project.jsonand add a reference to ourCommonassembly:"dependencies": { "Microsoft.NETCore.App": { "version": "1.0.0-rc2-3002702", "type": "platform" }, "Microsoft.AspNetCore.Server.IISIntegration": "1.0.0-rc2-final", "Microsoft.AspNetCore.Server.Kestrel": "1.0.0-rc2-final", "Common": "1.0.0-*" }
In order to enable the MVC project, we have to call AddMvc() in the ConfigureServices method, and UseMvc() in the Configure method:
- Add the MVC package in
project.json:"Microsoft.AspNetCore.Mvc": "1.0.0-rc2-final"
- Call
AddMvc()from theConfigureServicesmethod:public void ConfigureServices(IServiceCollection services) { services.AddMvc(); } - Finally, call
UseMvc()from theConfiguremethod:public void Configure(IApplicationBuilder app) { app.UseMvc(); }
Here are the steps to install Entity Framework:
- Add two Entity Framework assemblies,
Microsoft.EntityFrameworkCore.SqlServerandMicrosoft.EntityFrameworkCore.Tools, as shown in the following code:"dependencies": { "Microsoft.NETCore.App": { "version": "1.0.0-rc2-3002702", "type": "platform" }, "Microsoft.AspNetCore.Server.IISIntegration": "1.0.0-rc2-final", "Microsoft.AspNetCore.Server.Kestrel": "1.0.0-rc2-final", "common": "1.0.0-*", "Microsoft.AspNetCore.Mvc": "1.0.0-rc2-final", "Microsoft.EntityFrameworkCore.SqlServer": "1.0.0-rc2-final", "Microsoft.EntityFrameworkCore.Tools": { "type": "build", "version": "1.0.0-preview1-final" } }
ASP.NET Core provides various options for storing application settings. The default configuration file is now appsettings.json, which stores the data in a JSON format. However, there are other methods available as well to store data in the environment variables, XML, and INI formats as well. In this project, we will store the connection string in the appsettings.json file:
- Add the ASP.NET configuration file
appsettings.jsonand specify the connection string as follows:{ "Data": { "DefaultConnection": { "ConnectionString": "Data Source =.; Initial Catalog = tododatabase; Integrated Security = True;MultiSubnetFailover = False; " } } } - Add the following packages in
project.json:"Microsoft.Extensions.Configuration.Json": "1.0.0-rc2-final", "Microsoft.Extensions.Options.ConfigurationExtensions": "1.0.0-rc2-final",
The new configuration system of ASP.NET Core is based on System.Configuration. To use settings in our project, we will instantiate a Configuration object in our Startup class and use the Options pattern to access individual settings.
The Options pattern converts any class into a settings class and then we can inject that class into the controllers through ASP.NET's built-in dependency injection. Through the options class, the developer can access the settings keys and values, as shown in the following steps:
- In the
Startupclass constructor, we will add theappsettings.jsonfile using theConfigurationBuilderobject.ConfigurationBuilderallows a provision to add different providers and have a build method that builds the configuration stores in different providers and returns theIConfigurationRootinstance:public Startup() { // Set up configuration sources. var builder = new ConfigurationBuilder() .AddJsonFile("appsettings.json") Configuration = builder.Build(); } public IConfigurationRoot Configuration { get; set; } - Now we can use the
Configurationproperty to access the connection string, as follows:Configuration["Data:DefaultConnection:ConnectionString"];
In this section, we will add a TodoContext and TodoRepository class to perform CRUD operations:
- Add a new folder,
DataAccess, and add theTodoContextclass, which will be derived from theDbContextclass. This is the mainTodoContextclass Entity Framework used to create the database:using Common; using Microsoft.Data.Entity; using System; using System.Collections.Generic; using System.Linq; using System.Threading.Tasks; namespace TodoServiceApp.DataAccess { public class TodoContext : DbContext { public DbSet<TodoItem> TodoItem { get; set; } } } - We have to now override the
OnConfiguring()method and call theUseSqlServer()method of theDbContextOptionsBuilderobject. TheOnConfiguring()method is called every time theContextobject is initialized and configures the options specified. TheUseSqlServer()method takes the connection string that is defined in theappsettings.jsonfile, which we have configured in theStartupclass. Now we want to inject the app settings object into this class. In order to do so, we will use theOptionspattern. As per the options pattern, we shouldn't use theConfigurationproperty we have defined in theStartupclass directly, and instead we will create a custom POCO class that contains the same keys we have in our app settings file and overload the defaultTodoContextconstructor, which acceptsIOptions<T>, whereTis our custom POCO app settings class. - As the connection string is defined in a nested object, our
Dataclass will be as follows:using System; using System.Collections.Generic; using System.Linq; using System.Threading.Tasks; namespace TodoServiceApp { public class Data { public DefaultConnection DefaultConnection { get; set; } } public class DefaultConnection { public string ConnectionString { get; set; } } } - In the
Startupclass, we will call theservices.Configure()method to populate thisDataobject with the keys specified in theappsettings.jsonfile, and inject it in the repository we will be creating next. - Create a
TodoRepositoryclass that contains anITodoRepositoryinterface and its implementation,TodoRepository. This class will use theTodoContextobject to perform database operations. Here is the code snippet for theTodoRepositoryclass:using Common; using System; using System.Collections.Generic; using System.Linq; using System.Threading.Tasks; using TodoServiceApp.DataAccess; namespace TodoServiceApp.Repository { public interface ITodoRepository { void CreateTodo(TodoItem todoItem); void DeleteTodo(int todoItemId); List<TodoItem> GetAllTodos(int userId); void UpdateTodo(TodoItem todoItem); } public class TodoRepository : ITodoRepository { private TodoContext context; public TodoRepository() { context = new TodoContext(); } public List<TodoItem> GetAllTodos(int userId) { return context.TodoItems.ToList(); } public void CreateTodo(TodoItem todoItem) { context.TodoItems.Add(todoItem); context.SaveChanges(); } public void DeleteTodo(int todoItemId) { var item = context.TodoItems.Where(i => i.Id == todoItemId).FirstOrDefault(); context.Remove(item); context.SaveChanges(); } public void UpdateTodo(TodoItem todoItem) { context.Update(todoItem); context.SaveChanges(); } } } - In the
Startupclass, add the Entity Framework in theConfigureServices()method, as shown the following code. Our Web API controllers will have an overloaded constructor that takes theITodoRepositoryobject. We will use theservices.AddScoped()method to injectTodoRepositorywhereverITodoRepositoryis required. Finally, call theservices.Configure()method to populate theDataobject with the keys specified in theappsettings.jsonfile:public void ConfigureServices(IServiceCollection services) { string connString = Configuration["Data:DefaultConnection:ConnectionString"]; services.AddDbContext<TodoContext>(options => options.UseSqlServer(connString)); services.AddMvc(); services.AddScoped<ITodoRepository, TodoRepository>(); services.Configure<Data>(Configuration.GetSection("Data")); }
We learned about CORS in the previous chapter; we have to enable CORS in our Web API project, so that from Angular services we can make a request to access the TodoService methods:
- Call
services.AddCors()in theConfigureServicesmethod in theStartupclass:services.AddCors(options => { options.AddPolicy("AllowAllRequests", builder => builder.AllowAnyOrigin().AllowAnyMethod().AllowAnyHeader()); }); - Call
app.UseCors()in theConfiguremethod inStartupclass:app.UseCors("AllowAllRequests");
We are using the Entity Framework Code First model, so now we want to create a database in Microsoft SQL Server. To do so, we will first add the Entity Framework tool support in the project.json file of the TodoServiceApp, and then run .NET CLI commands to add migrations and create the database:
- Add
Microsoft.EntityFrameworkCore.Toolsin theproject.jsonfile, as shown here:"tools": { "Microsoft.AspNetCore.Server.IISIntegration.Tools": { "version": "1.0.0-preview1-final", "imports": "portable-net45+win8+dnxcore50" }, "Microsoft.EntityFrameworkCore.Tools": { "imports": [ "portable-net451+win8" ], "version": "1.0.0-preview1-final" } }, - Now we can run commands, create migrations, and update the database.
- To create migrations, go to the command prompt and navigate to the
TodoServiceAppproject whereproject.jsonresides. - Then, run
dotnet ef migrations add Initial, whereInitialis the name of the migration created. Running this command will add theMigrationsfolder and a class containing code about the DDL operations.The following screenshot shows the
Migrationsfolder created after running the preceding command, and the creation of the20160405115641_Initial.csfile that contains the actual migration code snippets to apply or remove migration from the database: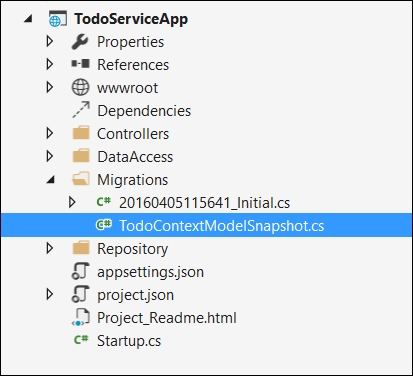
- To create a database, we need to execute another command in the same folder where
project.jsonresides in theTodoServiceAppproject:dotnet ef database update –verbose - This will create a database, and we can now go through, adding a controller to handle different HTTP requests and access the database.
Follow these steps to create a controller:
- Add a new
Controllersfolder and add a class namedTodoController. - Here is the code snippet for the
TodoControllerclass:using System; using System.Collections.Generic; using System.Linq; using System.Threading.Tasks; using Microsoft.AspNetCore.Mvc; using Common; using TodoServiceApp.Repository; namespace TodoApi.Controllers { [Route("api/[controller]")] public class ToDoController : Controller { ITodoRepository repository; public ToDoController(ITodoRepository repo) { repository = repo; } // GET: api/values [HttpGet] public IEnumerable<string> Get() { return repository.GetAllTodos(); } // GET api/values/5 [HttpGet("{id}")] public IEnumerable<TodoItem> Get(int id) { return repository.GetAllTodos(id); } // POST api/values [HttpPost] public void Post([FromBody]TodoItem value) { repository.CreateTodo(value); } // PUT api/values/5 [HttpPut("{id}")] // DELETE api/values/5 [HttpDelete("{id}")] public void Delete(int id) { repository.DeleteTodo(id); } } }
Now we have completed our TodoService project, so we will develop a todo web application project and configure Angular 2.
We will develop a single-page application and use the MVC view to render it using Angular 2. This application will have one main page that lists all the to-do items for a particular user, whereas to add a new to-do item, a new page will open in a modal dialog window:
- To start, let's create an empty project using the ASP.NET Core project template available in Visual Studio 2015, and name it
TodoWebApp. - Add an MVC reference in
project.json:"Microsoft.AspNetCore.Mvc": "1.0.0-rc2-final", "Microsoft.AspNetCore.StaticFiles": "1.0.0-rc2-final",
- In the
Startupclass, add theAddMvc()method in theConfigureServicesmethod and theUseMvc()method in theConfiguremethod. Here is the code snippet of theStartupclass:namespace TodoWebApp { public class Startup { // This method gets called by the runtime. Use this method to add services to the container. // For more information on how to configure your application, visit http://go.microsoft.com/fwlink/?LinkID=398940 public void ConfigureServices(IServiceCollection services) { services.AddMvc(); } // This method gets called by the runtime. Use this method to configure the HTTP request pipeline. public void Configure(IApplicationBuilder app) { app.UseStaticFiles(); app.UseMvc(routes => { routes.MapRoute(name: "default", template: "{controller=Home}/{action=Index}/{id?}"); } }
Angular 2 is part of the Node module, and we can add Node packages through the Node Package Manager (NPM) configuration file, package.json. In package.json, we can add packages through the devDependencies node and the dependencies node. The devDependencies node holds the packages that are used during development, such as Gulp, which can be used to concatenate and minify JavaScript and CSS files, TypeScript for developing Angular 2 components, and rimraf to delete the files. In the dependencies node, we will specify packages such as angular2, systemjs, reflect-metadata, rxjs, and zone.js, which will be used when the application runs:
- Add a new
package.jsonfile from the Visual Studio project template option NPM Configuration File and add the following JSON snippet:{ "name": "ASP.NET", "version": "0.0.0", "dependencies": { "angular2": "2.0.0-beta.9", "systemjs": "0.19.24", "reflect-metadata": "0.1.3", "rxjs": "5.0.0-beta.2", "zone.js": "0.6.4" }, "devDependencies": { "gulp": "3.8.11", "typescript": "1.8.7", } } - Visual Studio automatically downloads and restores packages specified in the
package.jsonfile, creates anode_modulesfolder in the project itself, and places all the packages there. TheNode_modulesfolder is basically hidden by default in Visual Studio, but can be made visible by enabling theShowAllFilesoption.
The following is the list of dependencies with their descriptions:
angular2: It is the Angular 2 package.systemjs: It providesSystem.importto hook up the main entry point of Angular.reflect-metadata: It is a proposal to add decorators to ES7. Through this, we can specify the metadata to our class in Angular 2.rxjs: It is a reactive streams library that allows working with asynchronous data streams.zone.js: It provides an execution context that persists across asynchronous tasks.
The following is the list of development dependencies with their descriptions:
gulp: Used to copy the files to thewwwrootfoldertypescript: Used to write programs in TypeScript
To configure TypeScript, perform the following steps:
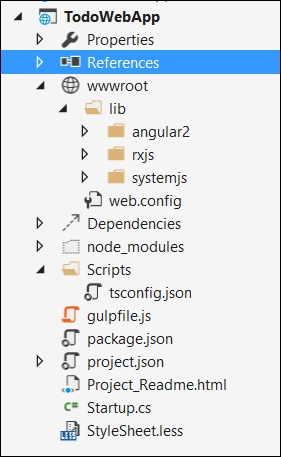
- Add the
Scriptsfolder where all the TypeScript files reside. In the current version of ASP.NET, there is a restriction on naming this folderScripts, and it should be added in the root of the project; otherwise, TypeScript files will not be transpiled to JavaScript files. - After adding the
Scriptsfolder, add the TypeScript configuration file (tsconfig.json) and add the following configuration to it:{ "compilerOptions": { "noImplicitAny": false, "noEmitOnError": true, "removeComments": false, "sourceMap": true, "target": "es5", "module": "commonjs", "moduleResolution": "node", "outDir": "../wwwroot/todosapp", "mapRoot": "../scripts", "experimentalDecorators": true, "emitDecoratorMetadata": true }, "exclude": [ "node_modules", "wwwroot" ] }
Configurations defined within the compilerOptions node are used by Visual Studio when you build your project. Based on the configuration, the JavaScript files are generated and stored in the output directory. The following table shows the description of each property specified in the preceding code:
|
Compiler options |
Description |
|---|---|
|
|
If |
|
|
If |
|
|
It |
|
|
If |
|
|
Sets the target ECMA script version, such as ES5 |
|
|
Specifies the module that generated the code, such as |
|
|
Specifies the module resolution strategy, such as node |
|
|
Path where the generated JavaScript files will be dumped |
|
|
Path where the map files will be located |
|
|
If |
|
|
If |
In this section, we will use Gulp to minify the JavaScript generated by the TypeScript compiler:
- Add the Gulp configuration file,
gulpfile.js. - Gulp is used to run tasks, and Visual Studio provides a task runner window that lists all the tasks specified in the
gulpfile.js, and also allows us to bind those tasks to build events. - Let's add the following script in
gulpfile.js:/// <binding Clean='clean' /> "use strict"; var gulp = require("gulp") var paths = { webroot: "./wwwroot/" }; var config = { libBase: 'node_modules', lib: [ require.resolve('systemjs/dist/system.js'), require.resolve('systemjs/dist/system.src.js'), require.resolve('systemjs/dist/system-polyfills.js'), require.resolve('angular2/bundles/angular2.dev.js'), require.resolve('angular2/bundles/angular2-polyfills.js'), require.resolve('angular2/bundles/router.dev.js'), require.resolve('angular2/bundles/http.dev.js'), require.resolve('angular2/bundles/http.js'), require.resolve('angular2/bundles/angular2'), require.resolve('rxjs/bundles/Rx.js') ] }; gulp.task('build.lib', function () { return gulp.src(config.lib, { base: config.libBase }) .pipe(gulp.dest(paths.webroot + 'lib')); });
In the preceding gulpfile.js, we have first declared the objects of Gulp. Then the paths variable defines the root folder (./wwwroot) for static files. In ASP.NET Core, all the static files should reside under the wwwroot folder; otherwise, they cannot be accessed. Now we need to copy the Angular and other related JavaScript files into the wwwroot folder. Therefore, we have added the task build.lib that calls gulp.src() and chains the gulp.dest() method to copy the files from the node_modules/* folder to the wwwroot/lib folder. Here is the screenshot of the wwwroot folder, which creates the lib folder when you run the preceding steps:
We have installed the Angular packages and configured Gulp to copy the packaged JavaScript files to the wwwroot folder. Now we will add Angular components to define our main application selector and render the ASP.NET page inside it:
- In the
Scriptsfolder, create two folders,appandservices. Theappfolder holds the components that we will use in the view, whereas theservicesfolder holds the services that will be used to call the Web API methods. - Add a main TypeScript file, which will bootstrap the main
TodoAppComponent. Here is the code ofmain.ts://main.ts import {bootstrap} from 'angular2/platform/browser'; import {TodoAppComponent} from './apps/todoapp.component'; import {HTTP_PROVIDERS} from 'angular2/http'; import 'rxjs/add/operator/map'; bootstrap(TodoAppComponent, [HTTP_PROVIDERS]);
In the preceding code snippet, we have added a bootstrap component to bootstrap our first TodoAppComponent. HTTP_PROVIDERS contains all the providers to make any HTTP request. It is provided while bootstrapping, so the TodoAppComponent or the chain of components in the following hierarchy can do HTTP-based operations. Rxjs/add/operator/map is a dependent package for HTTP_PROVIDERS, which needs to be added as well:
- Add a new TypeScript file and name it
todoapp.component.ts. - Add the following code snippet for
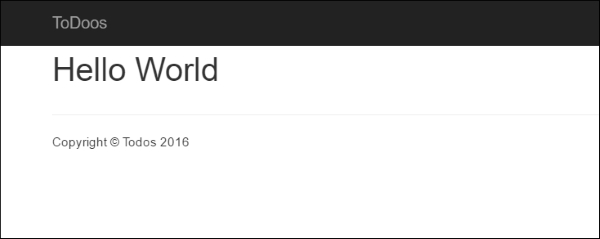
TodoAppComponent. In order to first test whether everything is configured properly, we will simply add a sample heading tag that showsHello World://todoapp.component.ts ///<reference path="../../node_modules/angular2/typings/browser.d.ts" /> import {Component} from 'angular2/core'; @Component({ selector: 'todo', template: '<h1>{{message}}</h1>' }) export class TodoAppComponent { message: string = "Hello World"; } - Now we will add two files,
importer.jsandangular_config.js.importer.jscallsSystem.importand points to the main file that bootstraps the application component.angular_config.jsholds the configuration property to allow default JavaScript extensions to be set totrue.Here is the code snippet for
importer.js:System.import('todosapp/Main') .then(null, console.error.bind(console));Here is the code for
angular_config.js:System.config({ defaultJSExtensions: true }); - Now we need to add the MVC layout page and add all the scripts. Add the following scripts:
//_Layout.cshtml <environment names="Development"> <link rel="stylesheet" href="~/lib/bootstrap/dist/css/bootstrap.css" /> <link rel="stylesheet" href="~/css/site.css" /> <script src="~/lib/angular2/bundles/angular2-polyfills.js"></script> <script src="~/lib/systemjs/dist/system.js"></script> <script src="~/lib/custom/angular_config.js"></script> <script src="~/lib/rxjs/bundles/Rx.js"></script> <script src="~/lib/angular2/bundles/angular2.dev.js"></script> <script src="~/lib/angular2/bundles/router.dev.js"></script> <script src="~/lib/angular2/bundles/http.js"></script> <script src="~/lib/custom/importer.js"></script> <script src="https://ajax.aspnetcdn.com/ajax/jquery/jquery-2.1.4.min.js" asp-fallback-src="~/lib/jquery/dist/jquery.min.js" asp-fallback-test="window.jQuery"> </script> <script src="https://ajax.aspnetcdn.com/ajax/bootstrap/3.3.5/bootstrap.min.js" asp-fallback-src="~/lib/bootstrap/dist/js/bootstrap.min.js" asp-fallback-test="window.jQuery && window.jQuery.fn && window.jQuery.fn.modal"> </script> </environment> - Now let's add
HomeControllerand viewIndex.cshtml. - In
Index.cshtml, add the to-do selectortodo-app:@{ ViewData["Title"] = "Todo Applications"; Layout = "~/Views/Shared/_Layout.cshtml"; } <div id="myCarousel" class="container" data-ride="carousel" data-interval="6000"> <todo-app>Loading...</todo-app> </div> - Build and run the application and it will show Hello World:
We will now add the components inside the services folder that will be responsible for getting data by calling the Todo service:
- First of all, add the
BaseServicecomponent, which containsbaseURL. All the service components will derive fromBaseServiceso they can use the base URL property for making Ajax requests. Add a new TypeScript file and name itbaseservice.component.ts. Here is the code snippet forbaseservice.component.ts://baseservice.component.ts import {Component} from 'angular2/core'; import {Http, Headers} from 'angular2/http'; @Component({}) export class BaseService { baseUrl: string; constructor() { this.baseUrl = "http://localhost:7105/api/"; } } - Now add
todoservice.component.ts, which contains the methods to get all to-do items, add a new to-do item, and delete an existing to-do item. Here is the code snippet forTodoService://todoservice.component.ts import {Component} from 'angular2/core'; import {Http, Headers} from 'angular2/http'; import {BaseService} from '../services/baseservice.component'; @Component({ providers: [TodoService] }) export class TodoService extends BaseService { constructor(private http: Http) { super(); } public getTodoItems() { return this.http.get(this.baseUrl + 'todo/1'); } public createTodo(item) { var path = this.baseUrl + 'todo'; const headers = new Headers({ 'Content-Type': 'application/json' }); return this.http.post(path, JSON.stringify(item), { headers: headers }); } public deleteTodo(itemId) { var path = this.baseUrl + 'todo'; return this.http.delete(path + "/" + itemId); } }In the preceding code, we imported the
httpcomponent and injected the constructor. Thehttpobject provides methods such asget,post,put, anddeleteto read, insert, update, and delete operations. In ourTodoServiceWeb API project, we have these methods available, which we call as shown in the preceding code. Each method returns a promise, and in the calling components we will check the result and take appropriate actions.
We have already added todoapp.component.ts in the preceding step to check whether Angular is configured properly. Now we will modify the same component to call the TodoServiceComponent and display the results on a web page.
Here is the code snippet for TodoApp.Component.ts:
//todoApp.component.ts
///<reference path="../../node_modules/angular2/typings/browser.d.ts" />
import {Component} from 'angular2/core';
import {Http, Response} from 'angular2/http';
import {CreateTodoComponent} from '../apps/createTodo.component';
import {TodoService} from '../services/todoservice.component';

@Component({
  selector: 'todo-app',
  templateUrl: 'Todo',
  directives: [CreateTodoComponent],
  providers: [TodoService]
})
export class TodoAppComponent {
  //member variables
  todos = [
  ];

  //constructor
  constructor(private http: Http, private todoService: TodoService) {
  }

  //Page Initialized Event Handler
  ngOnInit() {
    this.getTodoItems();
  }

  //Member Functions
  getTodoItems() {
    this.todoService.getTodoItems().map((res: Response) => res.json())
      .subscribe(data => {
        this.todos = data
        this.parseDate();
      },
      err  => console.log(err),
      () => console.log('done')
      );
  }
  deleteTodoItem(itemID) {
    var r = confirm("Are you sure to delete this item");
    if (r == true) {
      this.todoService.deleteTodo(itemID)
        .map(r=> r.json())
        .subscribe(result => {
          alert("record deleted");
    });
  }
  this.getTodoItems();
  }

  parseDate() {
    for (let todo of this.todos) {
      let todoDate = new Date(todo.DueDateTime);
      todo.DueDateTime = todoDate;
    }
  }

  handleRefresh(args) {
    this.getTodoItems();
  }
}
In TodoAppComponent, we have first added the CreateTodoComponent directive we will be using in the Todo/Index.cshtml page in a later step. We have implemented the ngOnInit() event handler that gets the list of to-dos and bound it to the todos array object. The getTodoItems() method calls the TodoService to get the list of to-do items, whereas deleteTodoItem() is used to delete the item.
Every request in Angular returns an Observable response object that provides a map method to tell Angular to parse the response in a specific format. The map also returns the Observable object, which can be used to subscribe to the data once it is parsed into the JSON format, as in our case. Finally, we have called the subscribe method and sent the JSON response data to the todos array. To handle errors, we can chain the call with the err method. The anonymous expression() method is invoked in every call, irrespective of the response status. That means whether the result is a success or an error, the code defined under the anonymous expression() method will be executed.
For creating new to-dos, we will create another CreateTodoComponent later, which will call the handleRefresh() method through the Outputs event to refresh the list and reflect the newly added item on the main page.
We have created the Angular components that we will use in the MVC view. We have already bootstrapped the Angular components in the previous section and placed the <todo-app> tag in the Home/Index.cshtml page, which is the landing page of our application. Next, we will create a custom tag helper, then add a TodoController, and use this tag helper in the index page.
On the main page, we will list all the to-do items for a particular user. For this, we will create a custom tag helper in ASP.NET:
Perform the following steps to create this tag helper:
- Create a new controls folder in the root of the
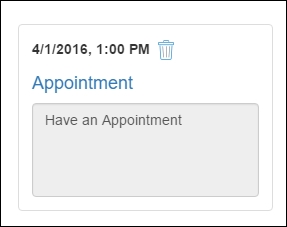
TodoWebAppproject and add aTodoTagHelperclass. Here is the code forTodoTagHelper, which uses Angular 2ngControlto bind values from AngularTodoAppComponentto the form:[HtmlTargetElement("todo")] public class TodoTagHelper : TagHelper { public override void Process(TagHelperContext context, TagHelperOutput output) { string todo = "<div class='thumbnail'><div class='caption'><nav class='nav navbar-inverse' role='navigation'></nav>"; todo += "<label class='date'>{{todo.DueDateTime | date:'short'}}</label> <img src='images/delete.png' (click)=deleteTodoItem(todo.Id)/>"; todo += "<h4><a href='#'>{{todo.Title}}</a></h4>"; todo += "<textarea readonly class='form-control' style='resize:none;' rows='4' cols='28'>{{todo.Description}}</textarea></div></div>"; output.Content.AppendHtml(todo); } } - Add the tag helper in
_ViewImports.cshtml:@addTagHelper "*, TodoWebApp"
Add TodoController in the TodoWebApp project and specify two methods for the index view, which is the main view that displays all the items and creates a new to-do item:
using System.Linq;
using Microsoft.AspNetCore.Mvc;
using TodoNotes.Models;

namespace TodoNotes.Controllers
{
  public class TodoController : Controller
  {
    public TodoController()
    {
      _context = context;
    }
    // GET: Todo
    public IActionResult Index()
    {
      return View();
    }

    // GET: Todo/Create
    public IActionResult Create()
    {
      return View();
    }

}Generate views for the preceding action methods Index and Create.
Here is the code snippet for Todo/Index.cshtml:
@{
Layout = null;
}
<div class="col-md-3">
<p class="lead">ToDo Items</p>
<div class="list-group">
<h4>
<a href="#">Want to add new Todo?</a>
</h4>
<p>Click on the button below</p>
<div class="col-md-3">
<a class="btn btn-primary" data-toggle="modal" data-target="#todoModal">Create Todo</a>
</div>
</div>
</div>
<div id="todoModal" class="modal fade" role="dialog">
<div class="modal-dialog">
<!-- Modal content-->
<div class="modal-content">
<div class="modal-header">
<button type="button" class="close" data-dismiss="modal">×</button>
<h4 class="modal-title">Insert Todo</h4>
</div>
<div class="modal-body">
<createTodo (refreshTodos)="handleRefresh($event)"></createTodo>
</div>
</div>
</div>
</div>
<div class="col-md-9">
<div class="row" >
<div class="col-sm-4 col-lg-4 col-md-4" *ngFor="#todo of todos">
<todo></todo>
</div>
</div>
</div>In the preceding HTML markup, we have first defined a button that opens up a modal dialog, todoModal. In the todoModal dialog markup, we have used the createTodo directive, which is defined in the todoapp.component.ts file associated with this page, and the link actually points to the Todo/Create MVC view, which will be rendered at the place of router-outlet. With the combination of the router link and the router outlet, we can render the template. In todoapp.component.ts, we will see how we can use routing in Angular. Finally, we have used the custom tag helper <todo> to display each item available in the to-do list.
In this section, we will add the Angular component and name it CreateTodoComponent. This is needed because we will be opening a new MVC view in a modal dialog through a custom createTodo selector, and CreateTodoComponent has a method to save a new to-do in the database, as shown in the following code.
Add a new createtodo.component.ts under the Scripts>apps folder, and then add the following code snippet:
//createtodo.component.ts
///<reference path="../../node_modules/angular2/typings/browser.d.ts" />
import {Component} from 'angular2/core';
import {Http, Response} from 'angular2/http';
import {FormBuilder, Validators} from 'angular2/common';
import {TodoService} from '../services/todoservice.component';

@Component({
  selector: 'createTodo',
  templateUrl: 'Todo/Create'
})

export class CreateTodoComponent {

  @Output() refreshTodos = new EventEmitter();

  addTodoForm: any;

  constructor(fb: FormBuilder, private todoService: TodoService) {
    this.addTodoForm = fb.group({
      title: ["", Validators.required],
      description: ["", Validators.required],
      dueDateTime: ["", Validators.required]
    });
  }
  addTodoItem(): void {
    this.todoService.createTodo(this.addTodoForm.value)
      .map(r=> r.json())
      .subscribe(result => {});
    this.refreshTodos.next([]);
    alert("Record added successfully");
  }

}
In the preceding code snippet, we have imported the Http and Response objects to handle the response received from TodoService. In the @Component annotation, we have defined the selector that is used in the parent TodoAppComponent component to render the Create Todo view inside the modal dialog.
FormBuilder and Validator are used to define properties with specific validators that can be bound to the HTML form using the ngControl directive. Lastly, we have the addTodoItem method, which will be invoked on form submission and make a to-do entry in the database by calling TodoService.
Now let's add the following code in Create.cshtml:
@{
  Layout = null;
}

<form [ngFormModel]="addTodoForm" (submit)="addTodoItem($event)" class="container" >
  <div class="form-horizontal">
    <div class="form-group">
      <label class="col-md-2 control-label">Title</label>
      <div class="col-md-10">
        <input ngControl="title" class="form-control" id="Title" placeholder="Enter Todo Title" [(ngModel)]="title" />
      </div>
    </div>
    <div class="form-group">
      <label class="col-md-2 control-label">Description</label>
      <div class="col-md-10">
        <textarea ngControl="description"  class="form-control" placeholder="Enter Description"></textarea>
        {{description}}
      </div>
    </div>
    <div class="form-group">
      <label class="col-md-2 control-label">Due Date</label>
      <div class="col-md-10">
        <input ngControl="dueDateTime" class="form-control" type="datetime-local" placeholder="Enter Due Date" />
      </div>
    </div>
    <div class="form-group">
      <div class="col-md-offset-2 col-md-10">
        <input type="submit" value="Create" class="btn btn-primary" />
      </div>
    </div>
  </div>
</form>
@section Scripts {
  <script src="~/lib/jquery/dist/jquery.min.js"></script>
  <script src="~/lib/jquery-validation/dist/jquery.validate.min.js"></script>
  <script src="~/lib/jquery-validation-unobtrusive/jquery.validate.unobtrusive.min.js"></script>
}
In the preceding code snippet, we have set the ngFormModel to the model we defined in the createtodo.component.ts and the submit form, and we are calling the addTodoItem method, which sends all the values bound with the ngControl directive. ngControl is a new directive introduced in Angular 2 that provides unidirectional binding. With forms, ngControl not only binds the value, but also tracks the state of the control. If the value is invalid, it updates the control with special CSS classes to tell the user that the value is invalid.