
The following are the factors that we should consider to make highly scalable and maintainable web applications that rely heavily on JavaScript.
With big applications, writing everything in a single JavaScript file is not a good practice. Nonetheless, even if you have separate JavaScript files for different modules and referencing them through the scripting <script> tag bloats the global namespace. A proper structuring should be done to keep JavaScript files into separate module-wise folders. For example, an ERP application consists of several modules. We can create separate folders for each module and use specific JavaScript files to provide certain functionality for specific views or pages. However, the common files can reside in the common folder.
Here is the sample project structuring to arrange JavaScript files based on an ERP module. Each module has a service folder that contains some files to do some read or write operations on the server side, and the Views folder to manipulate DOM elements of specific views once the data is loaded or any control event is invoked. The common folder may contain all the helper utilities and functions that are used by all the other modules. For example, to log messages on console, or make an HTTP request on the server side, functions can be defined in the common JavaScript files and they can be used by the services or view JavaScript files:
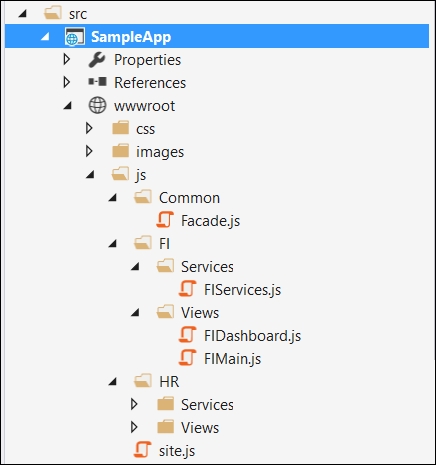
In the preceding structure, the Services folder can have the functions related to perform create, retrieve, update, and delete (CRUD) operations on the database by calling some Web API or web services, whereas a view file such as FIMain.js contains page-specific function.
To make an HTML page clean, it is a better approach to keep JavaScript files separate from the HTML page. So in the preceding screenshot, FIMain.js contains the JavaScript function corresponding to the main page, whereas FIDashboard.js contains the JavaScript function corresponding to the dashboard page, and so on.
These files can simply be added through the <script> scripting tag, but in JavaScript world, adding JavaScript files directly on the page itself is not good practice. Modules can be defined in JavaScript by implementing a module pattern. However, mostly developers prefer using RequireJS API to define modules to make module loading simpler and provide a better scoping of variables and functions defined in this module. It is equivalent to the CommonJS system, but it is recommended because of an asynchronous behavior. It loads the JavaScript modules in an asynchronous way and make the page-load cycle faster.
A module pattern is the most prevailing design pattern used for creating loose-coupled architecture and keeping the pieces of JavaScript code independent of other modules.
Modules are just like .NET classes that can have private, protected, and public properties and methods and provide control to the developer to expose only those methods or properties that are needed by other classes.
In JavaScript, a module pattern can be implemented using immediately invoked function expression (IIFE) that executes immediately and returns a closure. Closure actually hides private variables and methods and returns an object that contains only those methods or variables that are public and are accessible by other modules.
Here is the Logger module that exposed a logMessage() method, which calls one private formatMessage() method to append date and returns the formatted message that is then printed out on a browser's Console window:
<script>
  var Logger= (function () {

    //private method
    var formatMessage = function (message) {
      return message + " logged at: " + new Date();
    }

    return {
      //public method
      logMessage: function (message) {
        console.log(formatMessage(message));
      }
    };

  })();

  Logger.logMessage("hello world");
</script>
In the preceding code, the logMessage() method returns an object that is invoked through a Logger namespace.
A module can contain multiple methods and properties, and to implement this scenario, let's modify the preceding example and add one more method to show alert message and a property to access the logger name and expose them through an object literal syntax. Object literal is another representation of binding methods and properties as name value pairs separated by commas and offers a cleaner representation. Here is the modified code:
<script>
  var Logger= (function () {
    //private variable
    var loggerName = "AppLogger";

    //private method
    var formatMessage = function (message) {
      return message + " logged at: " + new Date();
    }

    //private method
    var logMessage= function (message){
      console.log(formatMessage(message));
    }

    //private method
    var showAlert = function(message){
      alert(formatMessage(message));
    }

    return {

      //public methods and variable
      logConsoleMessage: logMessage,
      showAlertMessage: showAlert,
      loggerName: loggerName
    };

  })();


  Logger.logConsoleMessage("Hello World");
  Logger.showAlertMessage("Hello World");
  console.log(Logger.loggerName);
</script>
In the preceding code, logMessage() and showAlert() will be accessible through logConsoleMessage() and showAlertMessage() methods.
Modules in RequireJS are an extension of the module pattern with the benefit of not needing globals to refer to other modules. RequireJS is a JavaScript API to define modules and load them asynchronously when they are required. It downloads the JavaScript files asynchronously and reduces the time to load the whole page.
A module in RequireJS can be created using the define() method and loaded using the require() method. RequireJS provides two syntax styles to define modules that are as follows:
- Defining module in CommonJS style: Here is the code snippet to define the module in the CommonJS style:
define(function (require, exports, module) {
  //require to use any existing module
  var utility = require('utility');

  //exports to export values
  exports.example ="Common JS";

  //module to export values
  module.exports.name = "Large scale applications";

  module.exports.showMessage = function (message) {
    alert(utility.formatMessage(message));
  }
});
The preceding CommonJS style syntax uses the
define()method of RequireJS API that takes a function. This function takes three parameters:require,exports, andmodule. The last two parameters,exportsandmodule, are optional. However, they have to be defined in the same sequence. If you are not usingrequire, and only wanted to export some functionality using theexportsobject, therequireparameter needs to be provided. Therequireparameter is used to import modules that were exported usingexportsormodule.exportsin other modules. In the preceding code, we have added the dependency of theutilitymodule by specifying the path of theutility.jsfile in calling therequiremethod. When adding any dependency, we just need to specify the path followed with the filename of the JavaScript file and not the.jsfile extension. The file is automatically picked by the RequireJS API. Exporting any function or variable that we need to be used by other modules can be done throughexportsormodule.exportsappropriately. - Defining module in AMD style: Here is the code snippet to define the module in an AMD-style syntax:
define(['utility'], function (utility) {
  return {
    example: "AMD",
    name: "Large scale applications",
    showMessage: function () {
      alert(utility.formatMessage(message));
    }
  }

});
The AMD-style syntax takes the dependencies array as the first parameter. To load the module dependencies in an AMD-style syntax you have to define them in an array. The second parameter takes the
functionparameter, taking the module name that maps to the module defined in the dependencies array so that it can be used in the function body. To export the variables or methods, we can export them through the object literal syntax.
Let's go through a simple example to understand the concepts of using RequireJS in an ASP.NET application. To use the RequireJS API in the ASP.NET Core application, you have to download and place the Require.js file in the wwwroot/js folder. In the following example, we will write a logging module that contains a few methods such as writing to console, showing an alert, and writing on the server.
Let's create the Logging.js file in the wwwroot/js/common folder and write the following code:
define(function () {
  return {
    showMessage: function (message) {
      alert(message);
    },
    writeToConsole: function (message) {
      console.log(message);
    },
    writeToServer: function (message) {
      //write to server by doing some Ajax request
      var xhr = new XMLHttpRequest();
      xhttp.open("POST", "http://localhost:8081/Logging?message="+message, true);
      xhttp.send();
    }
  }
});
The following is the code for the Index.cshtml page that displays an alert message when the page is loaded:
<script src="~/js/require.js"></script>
<script>
  (function () {
    require(["js/common/logging"], function(logging){
      logging.showMessage("demo");
    });
  })();
</script>
We can also wrap the preceding function in the main.js file and bootstrap it through the scripting <script> tag. There is one special attribute known as data-main, which is used by RequireJS as the entry point of the application.
The following is the code for main.js that resides under the wwwroot/JS folder. As main.js resides under the wwwroot/js folder, the path will be common/logging:
//Main.js
require(["common/logging"], function(logging){
  logging.showMessage("demo");
});
Finally, we can bootstrap main.js using scripting tag, as shown in the following code:
<script data-main="~/js/main.js" src="~/js/require.js"></script>
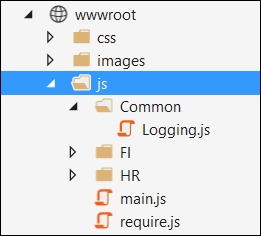
The following is the sample project structure containing the Common folder to have common JavaScript files; whereas, FI and HR folders for module-specific JavaScript files:
Suppose we want to modify the preceding example and pass the message from an input control on a button's click event. This can be done by developing a view module for a particular page and injecting the logging module inside it.
The following is the HTML markup containing input and button elements:
<div id="myCarousel" class="carousel slide" data-ride="carousel" data-interval="6000">
  <input type="text" id="txtMessage" />
  <button id="btnSendMessage" >Send Message</button>
</div>
The following is the view.js file that takes the logging module and call its sendMessage() method by reading the txtMessage element value:
define(['common/logging'], function(logging) {
  $('#btnSendMessage').on('click', function(e) {
    sendMessage();
    e.preventDefault();
  });
  function sendMessage(){
    var message= document.getElementById('txtMessage').value;
    logging.showMessage(message);
  }
  return {
    sendMessage: sendMessage
  };
});
When the button is clicked, an alert message will be displayed.
In the preceding section, we enabled the modularization support for JavaScript files and converted them into modules. In large applications, we cannot just rely on injecting the modules in other modules, we may need some flexibility to invoke events of certain modules through some the Pub/Sub pattern. We have already seen the Pub/Sub pattern in Chapter 7, JavaScript Design Patterns, which maintains a centralized list to register events that point to some callback functions and are invoked through a publisher object. This pattern is very useful when enabling event-driven messaging between modules, but there is another better pattern known as a mediator pattern, which is a superset of the Pub/Sub pattern. The mediator pattern is better as it allows publishers or mediators to access other events/methods of the subscribed object and allows the mediator to decide the method or event that is needed to be called.
Mediator encapsulates objects in a centralized list and uses them by invoking their methods. This list keeps all the objects (or modules) at central location, thus allowing improved communication between them.
Let's go through a practical example of implementing the mediator pattern. The mediator acts as a centralized controlling object where modules can subscribe or unsubscribe. It provides abstract methods that can be invoked by any of the source subscriber module to communicate with the target subscriber module. The mediator holds a centralized dictionary object to hold subscriber objects based on some key, or mostly name, and invokes target module method based on the module name passed by the subscriber. In the following example, we have MediatorCore (mediator), EmployeeRepository (subscriber), and HRModule (subscriber) objects. We will use the RequireJS API to convert JavaScript files into modules.
The following is the MediatorCore JavaScript file:
//MediatorCore.js
define(function () {
  return {

    mediator: function () {
      this.modules = [];

      //To subscribe module
      this.subscribe = function (module) {
        //Check if module exist or initialize array
        this.modules[module.moduleName] = this.modules[module.moduleName] || [];

        //Add the module object based on its module name
        this.modules[module.moduleName].push(module);
        module.mediator = this;
      },

      this.unsubscribe = function (module) {
        //Loop through the array and remove the module
        if (this.modules[module.moduleName]) {
          for (i = 0; i < this.modules[module.moduleName].length; i++) {
            if (this.modules[module.moduleName][i] === module) {
              this.modules[module.moduleName].splice(i, 1);
              break;
            }
          }
        }
      },

      /* To call the getRecords method of specific module based on module name */
      this.getRecords = function (moduleName) {
        if (this.modules[moduleName]) {
          //get the module based on module name
          var fromModule = this.modules[moduleName][0];
          return fromModule.getRecords();
        }
      },

      /* To call the insertRecord method of specific module based on module name */
      this.insertRecord = function (record, moduleName) {
        if (this.modules[moduleName]) {
          //get the module based on module name
          var fromModule = this.modules[moduleName][0];
          fromModule.insertRecord(record);
        }
      },

      /* To call the deleteRecord method of specific module based on module name */
      this.deleteRecord = function (record, moduleName) {
        if (this.modules[moduleName]) {
          //get the module based on module name
          var fromModule = this.modules[moduleName][0];
          fromModule.deleteRecord(record);

        }
      },

      /* To call the updateRecord method of specific module based on module name */
      this.updateRecord = function (record, moduleName) {
        if (this.modules[moduleName]) {
          //get the module based on module name
          var fromModule = this.modules[moduleName][0];
          fromModule.updateRecord(record);

        }
      }

    }
  }
});
This mediator exposes four methods to perform CRUD operations. This example showcases a simple HR module that uses certain repositories to do certain operations. For example, the HR module can have the EmployeeRepository module to save record in employee-specific tables, DepartmentRepository to do operations specific to department, and so on.
Here is the code snippet for EmployeeRepository that contains the concrete implementation of the abstract methods defined in the mediator:
//EmployeeRepository.js
define(function () {
  return {

    //Concrete Implementation of Mediator Interface
    EmployeeRepository: function (uniqueName) {
      this.moduleName = uniqueName;
      //this reference will be used just in case to call some other module methods
      this.mediator = null;

      //Concrete Implementation of getRecords method
      this.getRecords = function () {
        //Call some service to get records

        //Sample text to return data when getRecords method will be invoked
        return "This are test records";

      },
      //Concrete Implementation of insertRecord method
      this.insertRecord = function (record) {
        console.log("saving record");
        //Call some service to save record.
      },

      //Concrete Implementation of deleteRecord method
      this.deleteRecord = function (record) {
        console.log("deleting record");
        //Call some service to delete record
      }

      //Concrete Implementation of updateRecord method
      this.updateRecord = function (record) {
        console.log("updating record");
        //Call some service to delete record
      }

    }
  }
});
EmployeeRepository takes a name parameter at initialization and defines the mediator variable that can be set when it is registered at mediator. This is provided in case EmployeeRepository wants to call some other module or repository of a subscriber module. We can create multiple repositories, for example, RecruitmentRepository and AppraisalRepository for HRModule and use them when needed.
Here is the code for HRModule that calls EmployeeRepository through a mediator:
//HRModule.js
define(function () {
  return {
    HRModule: function (uniqueName) {
      this.moduleName = uniqueName;
      this.mediator = null;
      this.repository = "EmployeeRepository";

      this.getRecords = function () {
        return this.mediator.getRecords(this.repository);
      },

      this.insertRecord = function (record) {
        this.mediator.insertRecord(record, this.repository);
      },

      this.deleteRecord = function (record) {
        this.mediator.deleteRecord(record, this.repository);
      }

      this.updateRecord = function (record) {
        this.mediator.updateRecord(record, this.repository);
      }

    }
  }
});
Now, we will register HRModule and EmployeeRepository with the mediator and call the HRModule methods to perform CRUD operations.
The following is the code for HRView.js that is used to capture the button's click event on the form and calls the getRecords() method when the button is clicked:
//HRView.js
define(['hr/mediatorcore','hr/employeerepository','hr/hrmodule'], function (mediatorCore, employeeRepository, hrModule) {
  $('#btnGetRecords').on('click', function (e) {
    getRecords();
    e.preventDefault();
  });
  function getRecords() {
    var mediator = new mediatorCore.mediator();
    var empModule = new hrModule.HRModule("EmployeeModule");
    mediator.subscribe(empModule);

    var empRepo = new employeeRepository.EmployeeRepository("EmployeeRepository");
    mediator.subscribe(empRepo);

    alert("Records: "+ empModule.getRecords());
  }
  return {
    getRecords: getRecords
  };
});
The following is the main.js file that is used to bootstraps the HRView.js file through the RequireJS API:
//main.js
require(["./hrview"], function(hr){
});
Finally, we can use the preceding Main.js module on the Index.cshtml page in ASP.NET, as follows:
//Index.cshtml
@{
ViewData["Title"] = "Home Page";
}
<script data-main="js/main.js" src="~/js/require.js"></script>
<div id="myCarousel" class="carousel slide" data-ride="carousel" data-interval="6000">
<input type="text" id="txtMessage" />
<button id="btnGetRecords" >Send Message</button>
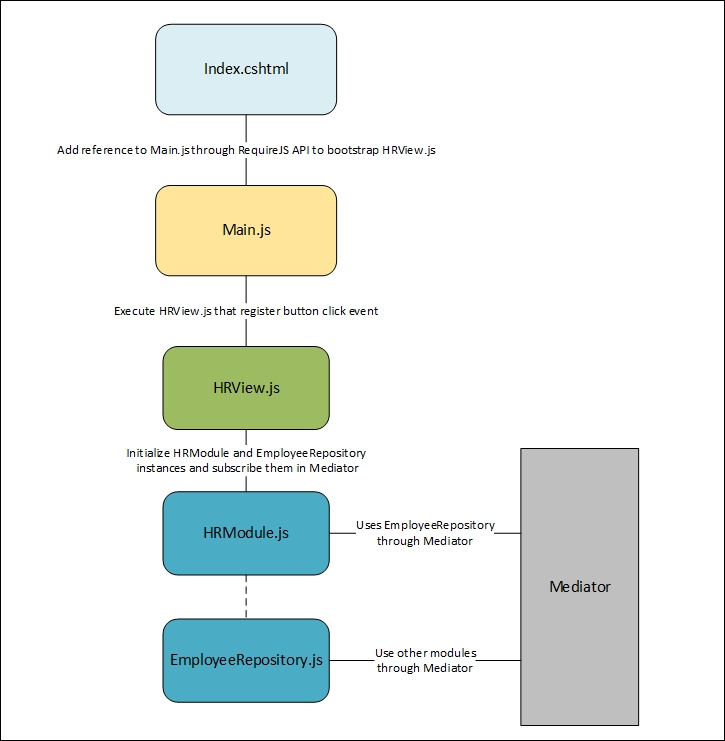
</div>The following is the logical diagram that shows how the modules communicate with each other:
Another core principle of developing highly scalable and maintainable application is to use wrappers and encapsulate complex code into a simpler interface. This can be achieved by implementing a Facade pattern.
The Facade pattern is used to simplify the complex code by exposing a method and hiding all the complex code inside the Facade object. For example, there are many ways and APIs available to perform Ajaxified operations. Ajax requests can be made using a plain XmlHttpRequest object, or with jQuery, it is quite easy to use $.post() and $.get() methods. In AngularJS, it can be achieved using its own http object to invoke services and so on. These type of operations can be encapsulated and benefited in scenarios when the internal API is modified, or when you decided to use some other better API; modification needs to be done, which is far lesser than changing it at all the places where it has been used. With the Facade pattern, you can only modify it in the Facade object and save time on updating it everywhere where it has been used.
Another advantage of using Facade is that it reduces the development effort by encapsulating a bunch of code to a simple method and make it easy for the consumer to use. Facade reduces the development effort by minimizing the lines of code required to call a certain functionality. To learn more about Facade, refer to Chapter 7, JavaScript Design Patterns.
Proper documentation increases the maintainability of your application and makes it easier for developers to reference it when needed or customizing applications. There are many documentation generators available in the market. JSDoc and YUIDoc are very popular JavaScript documentation generators, but in this section, we will use JSDoc3 that not only generates documentation, but also enables intellisense for your custom JavaScript modules to facilitate during development.
JSDoc is an API similar to JavaDoc and PHPDoc. Comments can be added directly to the JavaScript code. It also provides a JSDoc tool through which the documentation website can be created.
JSDoc3 can be added as a Node package and we can use it with the Gulp task runner to generate documents. To add JSDoc3 to your ASP.NET Core project, you can start by adding an entry to the package.json file used by Node. This entry has to be done in the development dependencies:
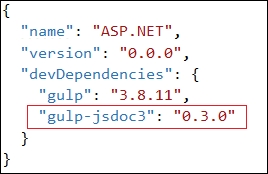
The first development dependency defined in the previous screenshot is Gulp which is required to create tasks, and gulp-jsdoc3 is the actual documentation generator that generates the HTML website when you run that task.
The task can be defined as follows:
/// <binding Clean='clean' />
"use strict";

var gulp = require("gulp"),
jsdoc = require("gulp-jsdoc3");

var paths = {
  webroot: "./wwwroot/"
};

paths.appJs = paths.webroot + "app/**/*.js";

gulp.task("generatedoc", function (cb) {
  gulp.src(['Readme.md', paths.appJs], { read: false })
  .pipe(jsdoc(cb));
});
In the preceding code snippet, we have one task named generatedoc, in which we are reading the files placed at wwwroot/app/**/*.js and generating documentation. The jsdoc object takes the configuration defaults to generate documentation. To pass the default configuration attributes, we can just specify the cb parameter injected in the function level by Gulp. When you run this generatedoc task from the task runner in Visual Studio, it will add a docs folder at the root path of your web application project. As in ASP.NET Core, we already know that all static content should reside in the wwwroot folder, and to access it from browser, simply drag and drop this folder in the wwwroot folder and access it by running your website.
To generate documentation, we need to annotate our code with comments. The more the comments are provided, the better the documentation will be generated. Comments can be added through /** as the starting tag and */ as the ending tag:
/** This method is used to send HTTP Get Request **/
function GetData(path) {
  $.get(path, function (data) {
    return data;
  })
}
If the function is a constructor, you can specify @constructor in the comments to give more meaning to the readers:
/** This method is used to send HTTP Get Request
   @constructor
*/
function GetData(path) {
  $.get(path, function (data) {
    return data;
  })
}
A function takes parameters as well, and this can be indicated by using @param in your comments. Here is the same function that takes the actual path of some service as a parameter to retrieve records:
/** This method is used to send HTTP Get Request
  @constructor
  @param path – Specify URI of the resource that returns data
*/
function GetData(path) {
  $.get(path, function (data) {
    return data;
  })
}
When you run your application, it will show the documentation as follows:
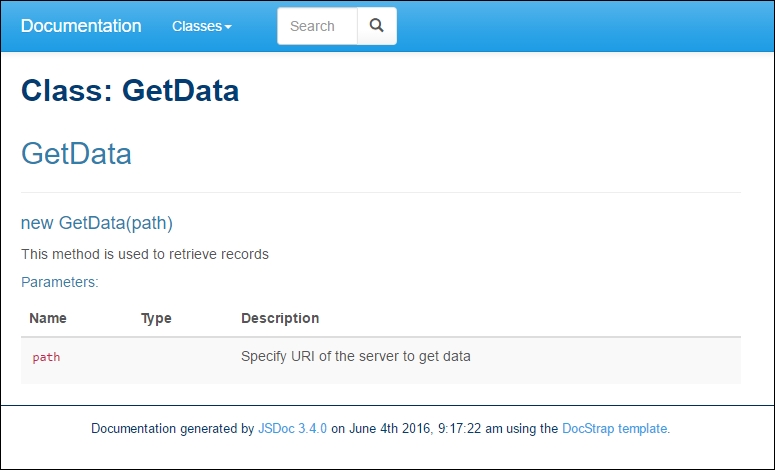
We have seen how easy it is with JSDoc3 to generate documentation. This not only helps to understand the code, but also helps the developer during development by providing intellisense. To learn more about JSDoc3, refer to http://usejsdoc.org/.
Large-scale application consists of large number of JavaScript files. When the page is downloaded, it is parsed and it downloads all the JavaScript files defined with the <script> tag. Once the JavaScript files are downloaded, they are parsed and executed. So, it depends on the number of JavaScript files you have referenced on the page, followed by the lines of code each JavaScript file contains. To optimize the page-loading cycle, it is recommended to compress them through a minification process. This makes the JavaScript file smaller in size and the page-loading cycle becomes faster.
In ASP.NET, we can compress the JavaScript files using Grunt and Gulp modules. These are Node modules and are highly integrated with ASP.NET Core. In ASP.NET Core, we can add these modules by adding a Node package reference in the package.json file, and each module has its separate configuration file known as GulpFile.js or GruntFile.js.
In this example, we will use the Gulp module to minify and compress our JavaScript files. In ASP.NET Core, we can enable Gulp by adding the Gulp module to the package.json file:
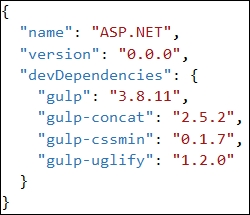
The preceding code snippet uses gulp, gulp-concat, gulp-cssmin, and gulp-uglify. The following is the description of each module:
|
Module |
Description |
|---|---|
|
|
This is used to define tasks that can be run through task runners |
|
|
This is used to concatenate JavaScript files into a single file |
|
| |
|
|
The following is the sample gulpfile.js that can be used to compress JavaScript and CSS files:
/// <binding Clean='clean' />
"use strict";

//Adding references of gulp modules
var gulp = require("gulp"),
rimraf = require("rimraf"),
concat = require("gulp-concat"),
cssmin = require("gulp-cssmin"),
uglify = require("gulp-uglify");

//define root path where all JavaScript and CSS files reside
var paths = {
  webroot: "./wwwroot/"
};

/* Path where all the non-minified JavaScript file resides. JS is the folder and ** is used to handle for sub folders */
paths.js = paths.webroot + "js/**/*.js";

/* Path where all the minified JavaScript file resides. JS is the folder and ** is used to handle for sub folders */
paths.minJs = paths.webroot + "js/**/*.min.js";

/* Path where all the non-minified CSS file resides. Css is the main folder and ** is used to handle for sub folder */
paths.css = paths.webroot + "css/**/*.css";

/* Path where all the minified CSS file resides. Css is the main folder and ** is used to handle for sub folder */
paths.minCss = paths.webroot + "css/**/*.min.css";

/* New JavaScript file site.min.js that contains all the compressed and merged JavaScript files*/
paths.concatJsDest = paths.webroot + "js/site.min.js";

/* New CSS file site.min.css that will contain all the compressed and merged CSS files */
paths.concatCssDest = paths.webroot + "css/site.min.css";

//to delete site.min.js file
gulp.task("clean:js", function (cb) {
  rimraf(paths.concatJsDest, cb);
});

//to delete site.min.css file
gulp.task("clean:css", function (cb) {
  rimraf(paths.concatCssDest, cb);
});

/* To merge, compress and place the JavaScript files into one single file site.min.js */
gulp.task("min:js", function () {
  return gulp.src([paths.js, "!" + paths.minJs], { base: "." })
  .pipe(concat(paths.concatJsDest))
  .pipe(uglify())
  .pipe(gulp.dest("."));
});

/* to merge, compress and place the CSS files into one single file site.min.css */
gulp.task("min:css", function () {
  return gulp.src([paths.css, "!" + paths.minCss])
  .pipe(concat(paths.concatCssDest))
  .pipe(cssmin())
  .pipe(gulp.dest("."));
});
In the preceding code snippet, there are four tasks and the following is their description:
clean:js: This removes thesite.min.jsfileclean:css: This removes thesite.min.cssfilemin:js: This merges all the files specified inpaths.jsandpaths.minJs, minifies them usinguglify(), and finally creates thesite.main.jsfilemin:css: This merges all the files specified inpaths.cssandpaths.minCss, minifies them usingcssmin(), and finally creates thesite.main.cssfile
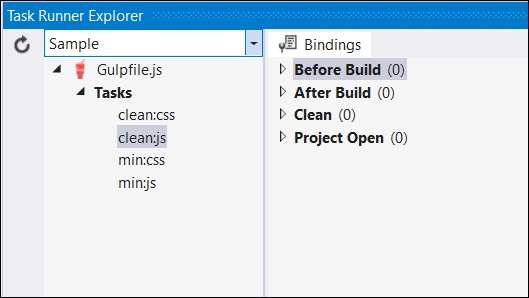
In Visual Studio 2015, you can run these tasks using Task Runner Explorer, and also bind them with the build events:
The following are the options that you can have to associate them with specific build events:
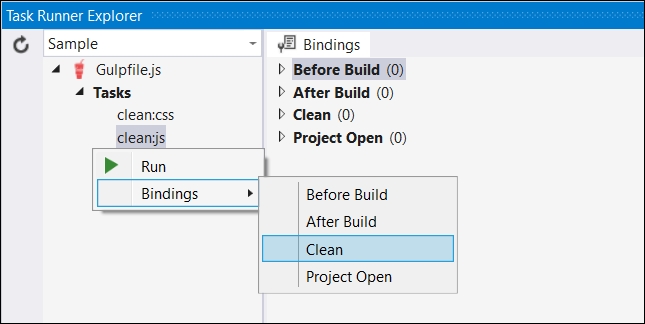
The preceding screenshot shows the steps to bind the clean:js task with a Clean build event. So, whenever your clean your project, it will run clean:js and remove the site.min.js file.