
Chapter 10. Query and transform XML with LINQ to XML
This chapter covers:
- LINQ to XML query axis methods
- Querying XML documents using LINQ to XML
- Transforming XML
Over the last several years, many websites have begun to offer public XML web services that allow developers to access the data inside their site. Amazon.com provides a set of e-commerce web services that allow you to search their product catalog, Flickr lets you grab photographs that people have identified as interesting, and del.icio.us exposes XML feeds that allow you to keep abreast of websites that users have added to their bookmarks. By providing this data to clients as XML, Amazon, Flickr, and del.icio.us have enabled third-party developers to tie into their platforms to create compelling applications.
In order to do interesting things with the data contained in the XML, developers need a toolset that allows them to query the XML for the individual pieces of data that are of interest. With Amazon, they need to be able to read product details out of the XML feed, with Flickr it’s the photograph details, and with del.icio.us it’s the URL of the site that’s been bookmarked.
In this chapter, we explore the querying and transformation capabilities offered by LINQ to XML. After a full chapter focusing on the LINQ to XML API, you might be wondering how LINQ to XML fits in with the rest of the LINQ toolset. After all, the previous chapter was primarily focused on learning about the XML API, and as such didn’t include any discussion about how we can query XML data using LINQ. Now that we understand the core class library and have a feel for the XML API, it’s time to look at how we can leverage the tremendous querying capabilities offered by LINQ when working with XML data.
We’ll start by looking at parts of the XML API that we intentionally brushed over in the previous chapter, the LINQ to XML axis methods. The axis methods are made available by the LINQ to XML programming API and allow us to retrieve particular elements, attributes, and nodes within an XML tree. In order to do anything productive with XML data, we need this basic capability.
Once we’ve covered the LINQ to XML axis methods, we’ll take a look at how the axis methods can be combined with the standard query operators and LINQ query expressions to provide the powerful querying capabilities that we’ve come to expect from LINQ. In addition to looking into the LINQ to XML axis methods and standard query operators, we’ll also show how to query LINQ to XML objects using XPath.
Finally, we’ll switch gears and examine how we can use LINQ to XML to transform XML into alternate formats. In a perfect world, the XML data we receive would already be in the exact format that we require, but sadly that’s rarely the case. In order for us to use XML, we often need to transform it into alternate XML formats or into a format that can be displayed to a user, such as HTML. By combining the powerful query capabilities offered with LINQ to XML with functional construction and/or XML literals, we can transform XML documents into alternate formats quickly and easily.
In the LINQ to Objects and LINQ to SQL sections of this book, you’ve seen how the standard query operators allow a common set of query expressions to be used against objects as well as relational data. In this chapter, we’ll show how the same standard query operators enable the querying of XML. Before we get to the standard query operators, we need to dive into the LINQ to XML axis methods, since they’re the key to enabling the standard query operators to work against XML data. Let’s get started.
10.1. LINQ to XML axis methods
The standard query operators provided by the LINQ framework allow queries to be a first-class language construct in C# and VB.NET. As we learned earlier in this book, the standard query operators operate over a sequence, where the sequence is an object whose type implements the IEnumerable<T> or IQueryable<T> interface. In the case of LINQ to XML, the “some type T” is typically an XElement, XAttribute, or XNode.
In order to use the standard query operators with our XML data, we need to be able to search our XML for a sequence of objects that can then be queried using the standard query operators. The LINQ to XML axis methods provide a means by which we can find the elements, attributes, and nodes that we want to work with within our XML.
Throughout this section we’re going to introduce you to the various axis methods and explain when to use each. Once we have a firm handle on the axis methods, we’ll look at how we can use them along with the standard query operators. To get started, let’s look at the sample XML file that we’ll use throughout this section for learning about the axis methods. The XML in listing 10.1 represents a subset of the books within our LINQ Books catalog.
Listing 10.1. A sample XML file, illustrating the tree-like structure of XML
<category name="Technical">
  <category name=".NET">
    <books>
      <book>CLR via C#</book>
      <book>Essential .NET</book>
    </books>
  </category>
  <category name="Design">
    <books>
      <book>Refactoring</book>
      <book>Domain Driven Design</book>
      <book>Patterns of Enterprise Application Architecture</book>
    </books>
  </category>
  <books>
    <book>Extreme Programming Explained</book>
    <book>Pragmatic Unit Testing with C#</book>
    <book>Head First Design Patterns</book>
  </books>
</category>
As we look at this XML, we can see that it contains information about categories and books. In order for this data to be useful, we need to figure out how we can get it out of the XML and into a set of objects that we can query using LINQ.
Like most XML, this XML is hierarchical in nature. It contains a parent <category> element that contains a series of children (either other <category> elements or <books>), which themselves contain their own children (<book>s). With the LINQ to XML axis methods, we can select the elements and attributes that we’re interested in. In this XML, we might be interested in the name of the root category element, or perhaps we’re interested in the names of all the books within the .NET category. Or maybe we don’t care at all about the categories and just want a list of every book, no matter where it lives in the XML tree.
Before we get any further, we should quickly mention that context is important when discussing the axis methods. Let’s take a step away from the LINQ to XML axis methods for a second and imagine that we’ve decided to take a trip to the grocery store to pick up something to eat in anticipation for a long night of LINQ coding. When we get to the store, we realize we have no idea where anything is. Luckily, we find a lovely lady at the front of the store who seems willing to help. We walk up and tell her our problem. We need to get a pack of Mountain Dew, a bag of chips, and some donuts to fuel our coding frenzy. As the lady tells us where everything is, she does so by using our current location as a point of reference. She tells us the Mountain Dew is three aisles to the left, chips are two aisles to the right, and the donuts are all the way at the other end of the aisle right in front of us. Without knowing our current location, or context, those instructions wouldn’t mean a thing.
The same applies to the LINQ to XML axis methods. In order to understand the results they’re going to produce, we need to know our current location within the XML tree. We’ll remind you of this as we move through our discussion of each method, but since it’s important to understand, we wanted to call your attention to it now before getting started.
With that out of the way, let’s get started with the LINQ to XML axis methods. To explore what the LINQ to XML axis methods provide, let’s try to produce the following output with the help of the axis methods:
.NET
- CLR via C#
- Essential .NET
To produce this output, we’ll need to learn a bit about the Element, Attribute, and Elements axis methods. Once we have a good grasp on these three core axis methods, we’ll move on to look at a few other axis methods such as Descendants and Ancestors.
Let’s get started by showing how the Element axis method can be put into action and get us on our way to accomplishing our goal.
10.1.1. Element
The first thing that we need to do to produce our desired output is select the .NET category element within our XML. The Element axis method allows us to select a single XML element by name. In our case, we’re looking to select the first XML element with the category name. We can use listing 10.2 to do just that.
Listing 10.2. Selecting an element by name using the Element query axis method
XElement root = XElement.Load("categorizedBooks.xml");
XElement dotNetCategory = root.Element("category");
Console.WriteLine(dotNetCategory);
As you can see, we start by loading our XML into an XElement using the static Load method we introduced in chapter 9. Once we have our XML loaded, we call the Element axis method on the root XElement and pass category as a parameter. The Element axis method accepts an XName as a parameter and returns the first matching XElement with the provided name that is a child of the current element. As we learned in the previous chapter, the implicit operator overloads defined on XName allow us to pass category instead of new XName("category"). The implicit operator overload automatically turns the string "category" into a full XName object with the local name set to category. The code in listing 10.2 results in the following output being printed to the console:
<category name=".NET">
  <books>
    <book>CLR via C#</book>
    <book>Essential .NET</book>
  </books>
</category>
If no elements are found with the name provided to the Element axis method, null will be returned.
Now that we have the .NET category XElement, we need to print out the name of the category rather than the entire XML fragment. As we can see, the name of the category is stored in the name attribute. As such, now seems like the perfect opportunity to introduce the Attribute axis method.
10.1.2. Attribute
Now that we have the .NET category element in the form of an XElement, we want to query the XElement for the value of the name attribute. To retrieve the name attribute, we use the Attribute axis method. Like the Element axis method, Attribute returns the first matching attribute with the provided XName. In our case, we only have a single attribute defined on the XElement, but you can be sure that won’t always be the case. Since we’re interested in the name of the category, we’ll call the Attribute axis method and pass name as a parameter, as shown in listing 10.3.
Listing 10.3. Retrieve an attribute from an XML element with the Attribute method
XElement root = XElement.Load("categorizedBooks.xml");
XElement dotNetCategory = root.Element("category");
XAttribute name = dotNetCategory.Attribute("name");
Just like the Element axis method, Attribute returns the first attribute with the provided XName. If no attributes with the provided name are found, null is returned. Now that we have the name XAttribute in hand, we can output the title of the category to the console by casting the XAttribute to a string, as shown:
Console.WriteLine((string) name);
This results in the following output:
.NET
Once we have the category name printed to the console, we can stop and celebrate. We’ve accomplished part of our goal, and at the same time learned about both the Element and Attribute axis methods! Okay, you’re right; perhaps we shouldn’t celebrate just yet. We still have a ways to go.
With the Element and Attribute methods in our arsenal, we’re on our way to being able to use LINQ query expressions and standard query operators with our XML data. We can select individual elements that we’re interested in, as well as read individual attributes of an XElement. We’re not quite ready to show how what we’ve learned can be used in a LINQ query, but you need not worry: It’s coming shortly.
Before moving on to our next LINQ to XML axis method, let’s revisit the XML fragment that we’re working with and talk about what’s next. We started our journey by selecting the first category under the root element in listing 10.1. The following XML fragment is the result:
<category name=".NET">
  <books>
    <book>CLR via C#</book>
    <book>Essential .NET</book>
  </books>
</category>
Once we have the XElement in hand, we output the name of the category to the console with the help of the Attribute query axis method. Next we need to query the category XElement for all the book elements contained within it. Unfortunately, we need to select multiple elements, so we can’t use the Element method that we’ve already learned about. It looks like it’s time to learn about the Elements axis method.
10.1.3. Elements
The Elements axis method is similar to the Element query axis method; the primary difference is that rather than returning the first matching XElement, Elements returns all matches. Given this, it shouldn’t be surprising that Elements returns an IEnumerable of XElement objects, rather than a single XElement. Like Element, Elements accepts an XName as a parameter.
In our case, we’re looking for all <book> elements so we’ll provide book as our parameter to Elements. Since the <book> elements aren’t directly under the category XElement that we selected in sections 10.1.1 and 10.1.2, we’ll need to select the <books> element with the Element query axis method, and then call Elements as shown in listing 10.4.
Listing 10.4. Select all the child book elements using the Elements query axis method
XElement root = XElement.Load("categorizedBooks.xml");
XElement dotNetCategory = root.Element("category");
XAttribute name = dotNetCategory.Attribute("name");

XElement books = dotNetCategory.Element("books");
IEnumerable<XElement> bookElements = books.Elements("book");

Console.WriteLine((string) dotNetcategory);
foreach(XElement bookElement in bookElements) {
  Console.WriteLine(" - " + (string)bookElement);
}
When we run the code, we get the following results:
.NET
- CLR via C#
- Essential .NET
In addition to allowing us to find all elements with a given name, the Elements method also has a parameterless overload that can be used to retrieve all the children of an XElement. In the listing, we could have called the parameterless version of Elements since the <books> element only contains <book> elements as children.
By leveraging the Element, Attribute, and Elements axis methods, we’ve successfully read a set of details out of our sample XML and accomplished our goal. We didn’t set our sights that high, but nevertheless we’ve learned about three essential LINQ to XML axis methods that we’ll use when constructing more complex LINQ to XML queries.
It’s important to remember that Elements only searches the elements that are direct children of the XElement that it’s called on. Sometimes rather than needing just the children of the current element, we want to look at all the elements that exist at any level beneath the current element. It’s for these scenarios that the LINQ to XML API provides the Descendants axis method.
10.1.4. Descendants
The Descendants axis method works in the same way as the Elements method, but instead of limiting the elements returned to those that are direct children of the current element, Descendants will traverse all the elements underneath the current element.
The Descendants axis method is helpful when you want to retrieve all the elements with a particular XName, but you’re not sure where in the tree they live. The Descendants axis method has two overloads. The first overload accepts an XName and returns all elements anywhere underneath the current element with the provided XName. To retrieve every descendant, regardless of XName, you can call Descendants without any parameters.
We’re once again going to use the XML we introduced in listing 10.1. This time, instead of looking for all the books within a single category, we’d like to return every book, no matter what category it’s in. Since the book elements exist at different levels within the XML, we can’t use the Elements axis method. Instead, we’ll use the Descendants axis method. To retrieve every book within our XML, we can write the code shown in listing 10.5.
Listing 10.5. Retrieve every book within the XML with the Descendants method
XElement books = XElement.Load("categorizedBooks.xml");
foreach(XElement bookElement in books.Descendants("book")) {
  Console.WriteLine((string)bookElement);
}
CLR via C#
Essential .NET
Refactoring
Domain Driven Design
Patterns of Enterprise Application Architecture
Extreme Programming Explained
Pragmatic Unit Testing with C#
Head First Design Patterns
As you can see, the Descendants axis method makes it easy to retrieve all the book elements within the XML. Rather than having to navigate the tree ourselves using a combination of the Element and Elements methods, we can use the Descendants method to return all the elements that fall underneath the current element with a given XName (“book”).
Closely related to the Descendants axis method is the DescedantNodes axis method. The only difference between the two is that DescendantNodes includes nonelement nodes (such as XComment and XProcessingInstruction) and as such returns an IEnumerable of XNode objects rather than an IEnumerable of XElement objects.
It’s important to note that the Descendants axis method does not include itself in the tree of elements that are searched. If you need to include the current element, use the DescendantsAndSelf axis method. Just like the Descendants axis method, the DescendantsAndSelf method returns an IEnumberable of XElement objects. The only difference is that DescendantsAndSelf includes itself within the set of XElement objects that will be returned. Let’s once again return to the XML introduced in listing 10.1, which is shown here:
<category name="Technical">
  <category name=".NET">
    <books>
      <book>CLR via C#</book>
      <book>Essential .NET</book>
    </books>
  </category>
  <category name="Design">
    <books>
      <book>Refactoring</book>
      <book>Domain Driven Design</book>
      <book>Patterns of Enterprise Application Architecture</book>
    </books>
  </category>
  <books>
    <book>Extreme Programming Explained</book>
    <book>Pragmatic Unit Testing with C#</book>
    <book>Head First Design Patterns</book>
  </books>
</category>
Now let’s compare the Descendants and DescendantsAndSelf methods with the code shown in listing 10.6.
Listing 10.6. Comparing the Descendants and DescendantsAndSelf query axis methods
XElement root = XElement.Load("categorizedBooks.xml");
IEnumerable<XElement> categories = root.Descendants("category");

Console.WriteLine("Descendants");
foreach(XElement categoryElement in categories) {
  Console.WriteLine(" - " + (string)categoryElement.Attribute("name"));
}

categories = root.DescendantsAndSelf("category");
Console.WriteLine("DescendantsAndSelf");
foreach (XElement categoryElement in categories) {
  Console.WriteLine(" - " + (string)categoryElement.Attribute("name"));
}
As we can see, the way we call Descendants and DescendantsAndSelf is identical. If we examine the following output, we can see that DescendantsAndSelf included the root category (Technical) in its output.
Descendants
  - .NET
  - Design
DescendantsAndSelf
 - Technical
 - .NET
 - Design
Using Descendants and DescendantsAndSelf, we can quickly retrieve all the elements that we’re interested in within a given XML tree as long as the elements are under the current node. When querying XML, you’ll find that Element, Elements, Attribute, and Descendants are the primary axis methods that you use for finding the elements and attributes that are of interest in an XML tree. Since Elements and Descendants return IEnumerable<XElement> objects, they work nicely with the standard query operators and query expressions. We’ll be digging into how the standard query operators work with LINQ to XML in section 10.2, but to give you a small taste, let’s rewrite our earlier query using the LINQ query expression syntax. See listing 10.7.
Listing 10.7. Using LINQ query expression syntax for querying XML
XElement root = XElement.Load("categorizedBooks.xml");
var books = from book in root.Descendants("book")
            select (string)book;

foreach(string book in books) {
  Console.WriteLine(book);
}
As you can see, with a little help from the Descendants axis method, LINQ to XML allows us to write a query against our XML data using the same syntax that we use for querying our objects and relational data. Before further investigating how we can use the standard query operators and query expressions, let’s finish off our discussion of the remaining LINQ to XML axis methods as well as show the more compact syntax Visual Basic provides for several of the axis methods already discussed.
While not as commonly used as the axis methods we’ve already covered, the remaining axis methods provide important functionality to developers. Let’s start by exploring an axis method that shares many similarities with the Descendants axis method, Ancestors.
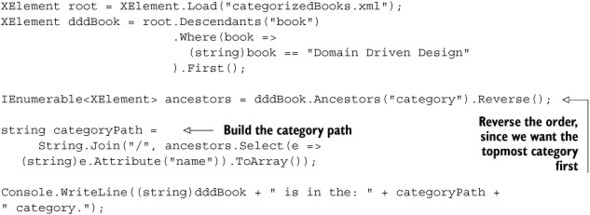
10.1.5. Ancestors
The Ancestors axis method works exactly like the Descendants method, except instead of searching down the XML tree, it searches up the tree. It offers the same signature and has the same related methods, AncestorsAndSelf and AncestorNodes. Unlike all the other axis methods we’ve discussed so far, Ancestors searches for matching elements that are above the current node within the XML tree.
So far, we’ve learned how to get a list of books within a category element using a combination of Element and Elements, as well as how to get every book within our XML using Descendants. In this section, we’re going to learn how we can use Ancestors to get the list of categories that a given book is in. Since the category elements are nested, we’ll look to get the full category path for a book in the following form:
Domain Driven Design is in the: Technical/Design category.
The first thing we’ll need to do is select the book that we’re interested in. To do this, we can use the Descendants axis method to select all the books in our XML. Once we have all the books, we can filter the list of books down to the single one we’re interested in using the Where and First standard query operators, like so:
XElement root = XElement.Load("categorizedBooks.xml");
XElement dddBook =
           root.Descendants("book")
               .Where(book => (string)book == "Domain Driven Design")
               .First();
In the code, we select the Domain Driven Design book element. Once we have the book element in hand, we can call the Ancestors axis method to select all the parent categories for the book element. Once we have the list of parent elements, we’ll do some special processing with Reverse and String.Join to get the categories formatted as we desire. When all is said and done, we end up with listing 10.8.
Listing 10.8. Using Ancestors to query an XML document for elements above a particular element
The result printed to the console includes everything we expect:
Domain Driven Design is in the: Design/Technical category.
The final set of axis methods available within the LINQ to XML API allow you to retrieve all the elements or content that occur before or after the current element. Let’s look at them next.
10.1.6. ElementsAfterSelf, NodesAfterSelf, ElementsBeforeSelf, and NodesBeforeSelf
The ElementsAfterSelf, ElementsBeforeSelf, NodesAfterSelf, and NodesBeforeSelf methods provide an easy way for us to retrieve all the elements or content that exist before or after the current element. As is evident from their names, the ElementsBeforeSelf and ElementsAfterSelf axis methods return all the XElement objects that occur before or after the current element in the XML tree, respectively. If you need to retrieve all nodes, and not just the elements, then the NodesBeforeSelf and NodesAfterSelf methods are what you’re after. Let’s return to our previous example to see how the ElementsBeforeSelf and ElementsAfterSelf axis methods work. Once again we’ll be working with the XML shown in Listing 10.1.
When we examined the Ancestors axis method, we looked at how we could retrieve the category path for a book within the XML tree. With the ElementsBeforeSelf and ElementsAfterSelf methods, we can look at the book elements that sit before or after the Domain Driven Design book element. It’s important to note that unlike the Ancestors and Descendants axis methods, the ElementsBeforeSelf, ElementsAfterSelf, NodesBeforeSelf, and NodesAfterSelf methods only look at the elements and nodes at the same level as the current element. In listing 10.9, we’ll use the ElementsBeforeSelf axis method to retrieve all the elements that are before the Domain Driven Design book element.
Listing 10.9. Finding all element nodes at the same level as an element using ElementsBeforeSelf
XElement root = XElement.Load("categorizedBooks.xml");
XElement dddBook =
             root.Descendants("book")
             .Where(book => (string)book == "Domain Driven Design")
             .First();

IEnumerable<XElement> beforeSelf = dddBook.ElementsBeforeSelf();
foreach (XElement element in beforeSelf) {
  Console.WriteLine((string)element);
}
Not surprisingly, we end up with the following output:
Refactoring
The Refactoring book element is the only element that exists before the Domain Driven Design book element in our sample XML. As we can see from our output, ElementsBeforeSelf is limited to elements on the same level as the current node. It will not traverse up or down the tree like the Ancestors and Descendants axis methods.
As you can see, the way that we navigate the XML tree using the LINQ to XML axis methods is simple, consistent, and powerful. The LINQ to XML axis methods provide us with an easy-to-use API that allows us to navigate to whatever it is we might be looking for within our XML. Before moving on to look at how we can use the LINQ to XML axis methods along with the standard query operators, let’s look at a couple of unique features available within Visual Basic for accessing the axes within an XML tree.
10.1.7. Visual Basic XML axis properties
As we saw in chapter 9, Visual Basic has a few unique features for working with XML, most notably XML literals. XML literals allow XML to be created inside Visual Basic code using XML syntax. To complement this feature, the VB team has added several XML axis properties to Visual Basic that allow LINQ to XML axis methods to be called using a more compact syntax.
Let’s get started by looking at the Visual Basic child axis property.
Child axis property
The child axis property is equivalent to the Elements axis method that we discussed earlier in this chapter. It allows you to return all the child elements with a particular element name. To use the child axis property, the XName of the element is enclosed like this: <element>. To illustrate, let’s compare how we query the RSS feed in listing 10.10 using the child axis property with how we would query it with the Elements axis method.
Listing 10.10. The RSS feed that we’ll query using the Visual Basic XML axis properties
<?xml version="1.0" encoding="utf-8" ?>
<rss>
  <channel>
    <title>LINQ</title>
    <description>This is the LINQ channel!</description>
    <item>
      <title>Learning LINQ</title>
      <description>Learning LINQ is best done by reading the fantastic LINQ
in Action book that's currently in your hands.  It's simply amazing, and
has such wonderful code samples, don't you agree?</description>
    </item>
    <item>
      <title>LINQ to XML Axis methods make XML LINQable</title>
      <description>Without the LINQ to XML Axis methods LINQ to XML would
simply be one of the many XML APIs available in .NET land.  With axis
methods, we get an extremely powerful XML API, as well as a killer query
story that puts XPath, XSLT, and friends to shame.</description>
    </item>
  </channel>
</rss>
Let’s start by looking at how we can query this RSS using the Elements axis method that we used in the previous section, but this time in Visual Basic. See listing 10.11.
Listing 10.11. Querying an RSS feed for all items using the Elements query axis method
Dim rss = XElement.Load("rss.xml")
Dim items = rss.Element("channel").Elements("item")

For Each item As XElement In items
  Console.WriteLine(CType(item.Element("title"), String))
Next
If we convert this code to use the child axis property rather than the Elements axis method, we end up with listing 10.12.
Listing 10.12. Querying an RSS feed for all items using the child axis property
Dim rss = XElement.Load("rss.xml")
Dim items = rss.<channel>(0).<item>

For Each item As XElement In items
  Console.WriteLine(CType(item.<title>.Value, String))
Next
Under the covers, the child axis property is converted into a call to the Elements axis method. Given this, it shouldn’t be surprising that it returns an IEnumerable(Of XElement) with the provided name.
As we discussed when we examined the Elements and Descendants axis methods, often we don’t want to limit the elements that are returned to the immediate children of our current element. If you need to include all the descendant elements in your search, you can use the descendants axis property.
Descendants axis property
As you might have guessed, the descendants axis property is equivalent to the Descendants axis method. It returns all the elements with a particular name that occur anywhere below the current element within the XML tree. The syntax for the descendants axis property is the same as the child axis property, except for one slight difference. Rather than calling the axis property with a single dot, the descendants axis property is accessed with triple-dot notation (...). For instance, to return all <item> elements within an RSS XML feed, you can use code in listing 10.13.
Listing 10.13. Retrieving all descendant nodes with the descendants axis property
Dim rss = XElement.Load("rss.xml")
Dim items as IEnumerable<XElement> = rss...<item>
Like the child axis property, the descendants axis property returns an IEnumerable(Of XElement). If you need to access a particular item within the list of returned XElement objects, you can use the extension indexer or the value extension properties, which we’ll look at next.
Extension indexer and Value extension
Visual Basic provides the extension indexer and Value extension to complement the child and descendants axis properties. The extension indexer allows you to retrieve a particular item in the resulting list of XElement objects. If we want to use the second <item> element in our RSS feed, we can use the element indexer along with the descendants axis property:
Dim secondItem = rss...<item>(1)
The element indexer is converted into a call to the ElementAt extension method. Since we often want to work with the value of the first item within the list of matches, VB provides another extension property to support just that. The Value extension property returns the value of the first XElement returned by the child or descendants axis property. See listing 10.14.
Listing 10.14. Using the Value extension property to return the value of the first XElement
Dim books = <books>
              <book>LINQ in Action</book>
              <book>Art of Unit Testing</book>
            </books>

Console.WriteLine(books.<book>.Value)
The code results in “LINQ in Action” being printed to the console.
Now that we’ve covered the various axis properties available within Visual Basic for retrieving elements, let’s look at the final axis property, the attribute axis property.
Attribute axis property
The attributes axis property is equivalent to the Attribute axis method we talked about earlier, and can be used by placing a @ before the name of the attribute that you wish to retrieve. Let’s look at listing 10.15 to see an example of the attribute axis property in action.
Listing 10.15. Selecting the value of an attribute using the attribute axis property
Dim book = <book publisher='Manning'>LINQ in Action</book>

Console.WriteLine(book.@publisher)
The attribute axis property returns the string value of the attribute, so listing 10.15 will result in “Manning” being printed to the console. If you need to access the actual XAttribute object, you’ll need to resort to the standard Attribute axis method.
By providing a shorthand syntax for accessing the primary XML axes that developers use when querying XML, Visual Basic allows developers to stay focused on the XML they’re trying to consume. While the same result can be achieved using the LINQ to XML axis methods, the Visual Basic axis properties provide a more concise syntax for querying XML.
We’ve completed our discussion of the various axis methods available in LINQ to XML. With these methods, you have the knowledge necessary to begin querying XML documents using LINQ. Now that we have a solid understanding of the LINQ to XML axis methods, we can further explore how we can use the axis methods along with the standard query operators and LINQ query expressions to query our XML data.
10.2. Standard query operators
In addition to providing the ability to select specific elements, attributes, and nodes within an XML tree, the axis methods are also a key enabler of the standard query operators. As we saw in chapter 4, the standard query operators operate over any sequence of objects that implement the IEnumerable<T> or IQueryable<T> interface. The axis methods enable the use of the standard query operators by returning an IEnumerable of XElement, XAttribute, or XNode objects. By enabling the use of the standard query operators, the LINQ to XML axis methods allow us to leverage everything we’ve already learned about querying objects and relational data to our XML data. Rather than having to learn a completely new language or syntax as we switch from objects to relational data to XML, we can instead use LINQ to query all three using the exact same set of standard query operators and query expressions!
Since you’re reading this book, we’re going to go out on a limb and bet that you’re a .NET programmer. What can we say; we like to live on the edge! In this next section, we’re going to find some great .NET books by using the standard query operators and LINQ to XML. We’ll use the standard query operators to explore XML containing the top 20 most-tagged .NET books on Amazon.com. We’re going to use the standard query operators to examine the list of books, filter the list down to those that we think are most interesting, and organize them into logical groupings (such as by publisher). Before we can get started, we need to learn about how we’re going to access the XML containing the top-tagged .NET books on Amazon.com.
Amazon provides a number of web services that allows for data contained within Amazon.com to be accessed via a web service API. To access Amazon’s web services, you have to register with their web services program.[1] After registering, an access key will be assigned to your account that grants you access to the Amazon web services. Once you have the registration complete, you can start using the web services to retrieve information from Amazon. Amazon provides both SOAP and REST versions of their web services. For this section we’ll be accessing the TagLookup web service operation via the REST interface. The REST version of the TagLookup service can be accessed with the following URL:
1http://www.amazon.com/gp/aws/registration/registration-form.html
http://ecs.amazonaws.com/onca/xml?Service=AWSECommerceService
         &AWSAccessKeyId={Your Access Key Here}
         &Operation=TagLookup
         &ResponseGroup=Tags,Small
         &Version=2007-07-16
         &TagName={Tag}
         &Count=20
If you replace “{Your Access Key Here}” with the key provided to you by Amazon and “{Tag}” with the tag that you’re interested in, you can point your web browser to the URL to see the XML returned by Amazon. The screenshot in figure 10.1 shows a fragment of the XML returned for the “dotnet” tag.
Figure 10.1. XML returned by the Amazon.com TagLookup web service for the “dotnet” tag
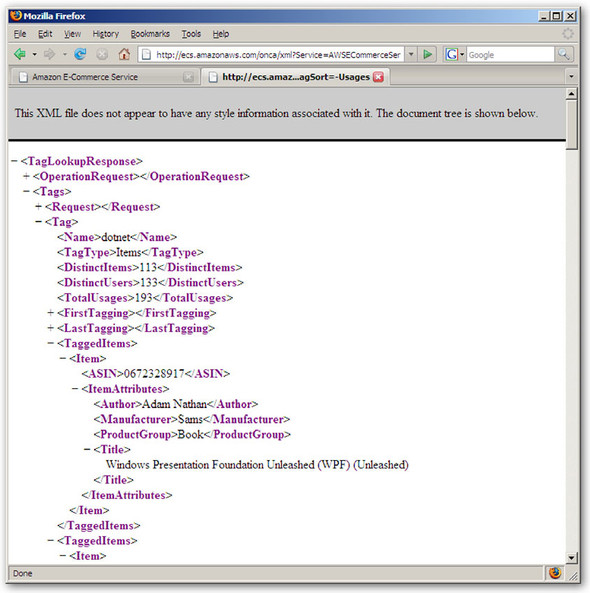
As we can see, the XML returned contains a <Tag> element for the “dotnet” category, along with a series of <TaggedItems> elements representing each of the books that have been tagged with “dotnet” on Amazon.com. Let’s get started by seeing how we can use the Select standard query operator to read the title of each of the books within the XML.
10.2.1. Projecting with Select
The most commonly used standard query operator may be Select. The Select operator performs a projection over a sequence. In our case, the sequence will be an IEnumerable<XElement>. Let’s look at how we can use the Select operator along with the Descendants query axis method that we discussed in the previous section to retrieve the titles of all the books in our XML. In listing 10.16, we build the URL to the Amazon REST Tag Lookup service, define the namespace used in the resulting XML, and finally select the books from the XML using Descendants and the Select operator.
Listing 10.16. Using the Select standard query operator to apply a projection to an XML document
string url =
     "http://ecs.amazonaws.com/onca/xml?Service=AWSECommerceService" +
     "&AWSAccessKeyId={Your Access Key Here}" +
     "&Version=2007-07-16" +
     "&Operation=TagLookup" +
     "&ResponseGroup=Tags,Small" +
     "&TagName=dotnet" +
     "&Count=20";

XNamespace ns =
     "http://webservices.amazon.com/AWSECommerceService/2007-07-16";

XElement tags = XElement.Load(url);
var titles = tags.Descendants(ns + "Title")
                 .Select(titleElement => (string)titleElement);

foreach (string title in titles) {
  Console.WriteLine(title);
}
To select all the <Title> elements within the XML, we use the Descendants axis method. Since the XML returned by Amazon has a default namespace, we declare a local XNamespace variable to be used when we call Descendants. Once we have all the elements, we then call the Select operator and pass it a selector that reads the title out of the <Title> element. The result is a sequence of strings containing the titles for all the books in the source XML. As we learned in chapter 3, the Select operator can also be called using LINQ query expression syntax as shown in listing 10.17.
Listing 10.17. Calling the Select standard query operator using LINQ query expression syntax
XElement tags = XElement.Load(url);
var titles = from title in tags.Descendants(ns + "Title")
             select (string)title;
At the end of the day, the same code gets run whether we call the standard query operators using the direct method call syntax or using the query expression syntax. Due to the expressiveness and compactness of query expressions, they’re generally preferred. As we discussed in chapter 3, not all standard query operators have an equivalent query expression clause. Throughout the remainder of this chapter, we’ll use the query expressions syntax to express our queries whenever possible.
While it’s nice to be able to view all the books within the source XML, it would be even nicer if we could filter the list of books to those that we’re most interested in. With listing 10.17, we don’t have many attributes to filter on, so we’ll keep things simple and filter the list by searching for keywords within the title of the book. As you can tell by our extensive use of Console.WriteLine within our code samples, we’re in desperate need of a couple of books on Windows Presentation Foundation. Hopefully, after we learn how to filter our list of books down to those specifically about Windows Presentation Foundation, you’ll be able to pick out one or two to order so next time around you can create a snazzy 3D GUI for our sample! Let’s see how we can filter our list of books using the Where standard query operator.
10.2.2. Filtering with Where
We’re going to try to find a book on Windows Presentation Foundation so we can expand my UI expertise beyond the simple Console.WriteLine paradigm, which we’ve clearly mastered. To filter our list of books, we’ll use the Where standard query operator. The Where operator is a restriction operator, and as such can be used to filter our list of books down to those that are of interest. Before looking at our query, let’s examine the XML for a single book within our XML.
<TaggedItems>
  <Item>
    <ASIN>0201734117</ASIN>
    <ItemAttributes>
      <Author>Don Box</Author>
      <Manufacturer>Addison-Wesley Professional</Manufacturer>
      <ProductGroup>Book</ProductGroup>
      <Title>Essential .NET, Volume I: The Common Language Runtime</Title>
    </ItemAttributes>
  </Item>
</TaggedItems>
As we can see, we don’t have many attributes by which we can filter our books, so we’ll stick to filtering the books by looking for “Windows Presentation Foundation” in the title. Listing 10.18 loads the XML from Amazon.com and filters the list of books using the where query expression clause.
Listing 10.18. Load XML from Amazon.com and filter the book list using the where clause
string url =
      "http://ecs.amazonaws.com/onca/xml?Service=AWSECommerceService" +
      "&AWSAccessKeyId={Your Access Key Here}" +
      "&Version=2007-07-16" +
      "&Operation=TagLookup" +
      "&ResponseGroup=Tags,Small" +
      "&TagName=dotnet" +
      "&Count=20";

XNamespace ns =
     "http://webservices.amazon.com/AWSECommerceService/2007-07-16";

XElement tags = XElement.Load(url);

var wpfBooks =
  from book in tags.Descendants(ns + "Item")
  let bookAttributes = book.Element(ns + "ItemAttributes")
  let title = ((string)bookAttributes.Element(ns + "Title"))
  where title.Contains("Windows Presentation Foundation")
  select title;

foreach (string title in wpfBooks) {
  Console.WriteLine(title);
}
At the time of this writing, listing 10.18 results in the following books being printed to the console:
Windows Presentation Foundation Unleashed (WPF) (Unleashed)
Programming Windows Presentation Foundation (Programming)
As we can see by examining our output, our query successfully filtered the list of books down to only those that have “Windows Presentation Foundation” in the title. To filter the list of books, we first selected all the <Item> elements in the XML with the Descendants axis method. Once all the <Item> elements were selected, we used the let clause to assign the <ItemAttributes> element to a query variable (bookAttributes). Finally, we constructed a where clause to filter the list of books to only those with “Windows Presentation Foundation” in the title.
In order to express our where clause predicate, we needed to cast the <Title> element to a string. You’ll often find that in order to express the where clause predicate for LINQ to XML queries, you’ll need to cast XElement or XAttribute objects to other .NET types. Luckily, LINQ to XML makes this easy by providing explicit operator overloads for XElement and XAttribute objects. Once the <Title> element is cast to a string, we can complete our predicate definition by calling the Contains method on the string with “Windows Presentation Foundation” as the parameter.
Now that we’ve filtered our list down to a couple of Windows Presentation Foundation books, it’s time to jump over to www.amazon.com to place an order. Hopefully once those books arrive, we’ll be able to start creating more compelling user interfaces within our code samples.
In the meantime, let’s continue to explore a couple more standard query operators to see how they work with LINQ to XML. In addition to applying projections and filtering our XML data, we often want to group the results of our query, as well as order the results. Let’s look at how we can use the OrderBy and GroupBy standard query operators with LINQ to XML.
10.2.3. Ordering and grouping
In the previous section, we used the Where operator to filter our list of books down to those with “Windows Presentation Foundation” in the title. In this section, we’re going to go back to working with all the books in the XML. We’re going to learn about how we can sort the books, as well as how we can group the books by their publisher.
LINQ provides two standard query operators for sorting sequences. The OrderBy standard query operator sorts the elements within a sequence in ascending order. If you want to sort in descending rather than ascending order, the OrderByDescending standard query operator is available. Both the OrderBy and OrderByDescending standard query operators have equivalent query expression clauses. Table 10.1 shows the query expression equivalent for both C# and Visual Basic.
Table 10.1. Standard query operators and their query expression equivalents
|
Standard query operator |
C# equivalent |
VB equivalent |
|---|---|---|
| OrderBy | orderby ... | Order By ... |
| OrderByDescending | orderby ... descending | Order By ... Descending |
Let’s go back to our query from the previous section, but instead of filtering the books, let’s order them instead. Listing 10.19 selects the title of the books from the XML and sorts them in ascending order.
Listing 10.19. Ordering the results of a query using the orderby expression
XNamespace ns =
      "http://webservices.amazon.com/AWSECommerceService/2007-07-16";

string url =
      "http://ecs.amazonaws.com/onca/xml?Service=AWSECommerceService" +
      "&AWSAccessKeyId={Your Access Key Here}" +
      "&Version=2007-07-16" +
      "&Operation=TagLookup" +
      "&ResponseGroup=Tags,Small" +
      "&TagName=dotnet" +
      "&Count=20";

XElement tags = XElement.Load(url);
var groups =
  from book in tags.Descendants(ns + "Item")
  let bookAttributes = book.Element(ns + "ItemAttributes")
  let title = (string)bookAttributes.Element(ns + "Title")
  orderby title
  select title;
Sorting the books in descending rather than ascending order is a matter of changing the orderby title class to orderby title descending. As with the other operators that we’ve discussed, the orderby operator is used with XML data the same as it’s used by objects and relational data. The only difference is that the key that is used for the sorting will come from a LINQ to XML object such as XElement, XAttribute, or XNode. The orderby clause allows multiple keys to be specified, which allows one or more secondary sorts to be performed.
Now that we’ve seen how to sort our data, we’re going to investigate one final standard query operator before moving on to look at how we can query LINQ to XML trees using XPath. The last standard query operator that we’re going to cover is the GroupBy operator.
The GroupBy standard query operator allows a sequence of data to be grouped. To illustrate how we can use the GroupBy standard query operator with LINQ to XML, let’s group the books in our XML by their publisher. To group our books by publisher, we’ll modify our query as shown in listing 10.20.
Listing 10.20. Grouping the results of a query using the group expression
XElement tags = XElement.Load(url);
var groups =
  from book in tags.Descendants(ns + "Item")
  let bookAttributes = book.Element(ns + "ItemAttributes")
  let title = (string)bookAttributes.Element(ns + "Title")
  let publisher = (string)bookAttributes.Element(ns + "Manufacturer")
  orderby publisher, title
  group title by publisher;
In the query, we start by selecting all the books with the Descendants axis method. We then retrieve the title and publisher of the book using the Element axis method. With the title and publisher in hand, we order our results by publisher and then title, and finally group the books by the publisher. The group by query expression results in our query returning an object that implements the IGrouping<K, T> and IEnumerable<T> interfaces. The type K is the type of the value we group by, and the type T is the type of object that we’re putting into our group. In our query, we can determine type K and T by looking at our group by expression.
group title by publisher;
       T          K
In our group by expression, types T and K are both strings. Now that our results are grouped by publisher, let’s loop over the results returned by our query and output them to the console.
foreach (var group in groups) {
  Console.WriteLine(group.Count() + " book(s) published by " + group.Key);
  foreach (var title in group) {
    Console.WriteLine(" - " + title);
  }
}
When we put everything together and run our code, we end up with the following results.
4 book(s) published by Addison-Wesley Professional
 - Essential .NET, Volume I: The Common Language Runtime
 - Framework Design Guidelines: Conventions, Idioms, and Patterns for
Reusable .NET Libraries (Microsoft .NET Development Series)
 - The .NET Developer's Guide to Directory Services Programming (Microsoft
.NET Development Series)
 - The .NET Developer's Guide to Windows Security (Microsoft .NET
Development Series)
5 book(s) published by Apress
 - Foundations of F#
 - Pro .NET 2.0 Windows Forms and Custom Controls in C#
 - Pro C# 2005 and the .NET 2.0 Platform, Third Edition
 - Pro C# with .NET 3.0, Special Edition (Pro)
 - Pro WF: Windows Workflow in .NET 3.0 (Expert's Voice in .Net)
1 book(s) published by Cambridge University Press
 - Data Structures and Algorithms Using C#
3 book(s) published by Microsoft Press
 - Applications = Code + Markup: A Guide to the Microsoft  Windows
Presentation Foundation (Pro - Developer)
 - CLR via C#, Second Edition (Pro Developer)
 - Inside Windows  Communication Foundation (Pro Developer)
4 book(s) published by O'Reilly Media, Inc.
 - C# Cookbook, 2nd Edition (Cookbooks (O'Reilly))
 - Programming .NET Components, 2nd Edition
 - Programming WCF Services (Programming)
 - Programming Windows Presentation Foundation (Programming)
1 book(s) published by Sams
 - Windows Presentation Foundation Unleashed (WPF) (Unleashed)
2 book(s) published by Wrox
 - Professional .NET Framework 2.0 (Programmer to Programmer)
 - Professional C# 2005 (Wrox Professional Guides)
As we’ve seen by exploring the Select, Where, GroupBy, and OrderBy standard query operators, LINQ to XML fully leverages the LINQ framework and allows you to fully express XML queries using the familiar LINQ query expression syntax. While we haven’t explored every standard query operator, rest assured that LINQ to XML fully supports them all. As we discussed earlier in this chapter, not all standard query operators have an equivalent query expression clause. As with LINQ to Objects and LINQ to SQL, LINQ to XML requires you to call those operators using the traditional standard query operator methods.
Now that we’ve introduced the LINQ to XML axis methods, shown how to use a few of the standard query operators with LINQ to XML, and shown how LINQ to XML queries can be expressed using LINQ query expressions syntax, you should have all you need to start building applications that query XML data with LINQ. The consistent query experience for objects, databases, and XML provided by LINQ offers significant advancements for developers. They no longer have to switch gears as they work with different types of data. Instead, they can learn one common set of standard query operators, along with the LINQ to XML axis methods, and begin to build applications that combine all different types of data.
Until now, we’ve completely ignored the primary method for querying XML that existed before LINQ to XML, the standard query operators, and the axis methods came to be: XPath.
10.3. Querying LINQ to XML objects with XPath
XPath is a language for finding information in an XML document, much like the axis methods and standard query operators. However, instead of offering an API for navigating the XML tree and finding the desired elements and attributes, XPath provides a text-based query language that can be used to define the information that should be selected with the query.
As we’ve already seen, the primary means for querying XML data when using LINQ to XML are the standard query operators and LINQ to XML axis methods. Still, there may be times when an existing XPath query will need to be used. To enable this, a number of bridge classes have been added to the System.Xml.XPath namespace that enable the use of XPath with LINQ to XML objects. To use XPath against LINQ to XML objects, a reference will need to be added to the System.Xml.XPath namespace.
using System.Xml.XPath;
Adding a reference to System.Xml.XPath adds a number of extension methods to classes that derive from XNode. The first method added is the CreateNavigator method, which allows an XPathNavigator to be created from an existing XNode. In addition to being able to create an XPathNavigator, the extension methods also allow XPath expressions to be evaluated against an XNode via the XPathEvaluate method. Finally, the XPathSelectElement and XPathSelectElements extension methods allow LINQ to XML objects to be searched via XPath expressions. XPathSelectElement returns the first element matching the XPath expression and XPathSelectElements returns all elements matching the expression.
Let’s see how we can use these extension methods to query the XML with XPath.
<category name="Technical">
  <category name=".NET">
    <books>
      <book>CLR via C#</book>
      <book>Essential .NET</book>
    </books>
  </category>
  <category name="Design">
    <books>
      <book>Refactoring</book>
      <book>Domain Driven Design</book>
      <book>Patterns of Enterprise Application Architecture</book>
    </books>
  </category>
  <books>
    <book>Extreme Programming Explained</book>
    <book>Pragmatic Unit Testing with C#</book>
    <book>Head First Design Patterns</book>
  </books>
</category>
As we did in an earlier example, let’s start by querying the XML for every book within the XML. The Descendants query axis method is ideal for this type of query, since it traverses the entire XML tree. The equivalent XPath expression for retrieving every book element anywhere within the XML tree is //book. Since the XPathSelectElements extension method returns an IEnumerable<XElement>, we can use the familiar query expression syntax for creating our query, as shown in listing 10.21.
Listing 10.21. Querying XElement objects with XPath
XElement root = XElement.Load("categorizedBooks.xml");
var books = from book in root.XPathSelectElements("//book")
            select book;

foreach(XElement book in books) {
    Console.WriteLine((string)book);
}
When this code is run, we get the following results printed to the console:
CLR via C#
Essential .NET
Refactoring
Domain Driven Design
Patterns of Enterprise Application Architecture
Extreme Programming Explained
Pragmatic Unit Testing with C#
Head First Design Patterns
By providing a set of extension methods for the XNode object, the LINQ to XML team has allowed developers to use the same basic API for querying XML data whether it’s via the axis methods and standard query operators or via XPath expressions. Additionally, the extension methods for running XPath queries against LINQ to XML objects allow for a much smoother migration path for applications that we want to move from code based on System.Xml.
Now that we’ve covered how to query XML data using axis methods, the standard query operators, query expressions, and XPath, its time to explore how we can use LINQ to XML to transform XML into alternate formats.
10.4. Transforming XML
When working with XML data, we often find that it needs to be transformed or manipulated in order to support our internal systems. This might be because of the way we need to present the data to our users or due to requirements of other systems within our infrastructure for the XML. No matter the reason, XML often needs to be transformed into alternate formats. Luckily, LINQ to XML provides an intuitive and powerful method for transforming XML that leverages its support for LINQ’s standard query operators, its implementation of the LINQ to XML axis methods, and its support for functional construction.
10.4.1. LINQ to XML transformations
To see the powerful transformational capabilities offered by LINQ to XML, let’s transform the XML from listing 10.22 into an XHTML document that can be shown in a browser.
Listing 10.22. The XML to be transformed
<?xml version="1.0" encoding="utf-8" ?>
<books>
  <book>
    <title>Linq in Action</title>
    <author>Fabrice Marguerie</author>
    <author>Steve Eichert</author>
    <author>Jim Wooley</author>
    <publisher>Manning</publisher>
  </book>
  <book>
    <title>Ajax in Action</title>
    <author>Dave Crane</author>
    <publisher>Manning</publisher>
  </book>
  <book>
    <title>Enterprise Application Architecture</title>
    <author>Martin Fowler</author>
    <publisher>APress</publisher>
  </book>
</books>
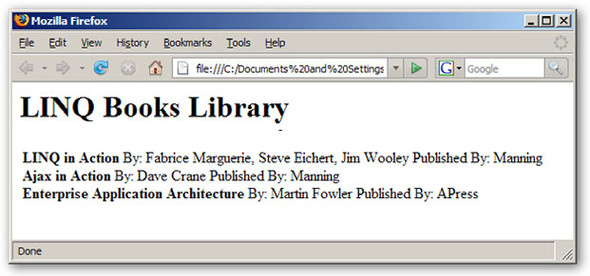
When we’re finished with our transformation, we’ll end up with the following XHTML:
<html>
  <body>
    <h1>LINQ Books Library</h1>
    <div>
      <b>LINQ in Action</b>
      By: Fabrice Marguerie, Steve Eichert, Jim Wooley
      Published By: Manning
    </div>
    <div>
      <b>AJAX in Action</b>
      By: Dave Crane
      Published By: Manning
    </div>
    <div>
      <b>Patterns of Enterprise Application Architecture</b>
      By: Martin Fowler
      Published By: APress
    </div>
  </body>
</html>
In order to transform the XML shown in listing 10.22 into this XHTML, we’ll need to take advantage of the axis methods provided by LINQ to XML as well its functional construction capabilities. Let’s start by examining how we can create the resulting XHTML using functional construction and for the moment ignore the XML that we’re going to transform. To get a jump start, we can copy the resulting XHTML to the clipboard and use the Paste XML as LINQ Visual Studio .NET add-in to create our functional construction code for building the desired XML. When we do so, we end up with listing 10.23.
Note
The Paste XML as LINQ Visual Studio add-in is shipped as a sample. To use it in Visual Studio 2008, you have to compile and install the add-in from the source code provided. The add-in can be found in the LinqSamples directory of the Program FilesVisual Studio 9.0SamplesCSharpSamples.zip file.
Listing 10.23. The LINQ to XML code created via the Paste XML as LINQ Visual Studio .NET add in
XElement xml =
  new XElement("html",
    new XElement("body",
        new XElement("h1", "LINQ Books Library"),
        new XElement("div",
             new XElement("b", "LINQ in Action"),
             "      By: Fabrice Marguerie, Steve Eichert, Jim Wooley
" +
             "      Published By: Manning
"
        ),
        new XElement("div",
            new XElement("b", "AJAX in Action"),
            "      By: Dave Crane
" +
            "      Published By: Manning
"
        ),
        new XElement("div",
            new XElement("b", "Patterns of Enterprise Application
  Architecture"),
            "      By: Martin Fowler
" +
            "      Published By: APress
"
        )
    )
  );
As we can see, the Paste XML as LINQ add-in converted the XHTML into a single functional construction statement that creates each item contained within the XML. While the XML isn’t perfect, it provides a good starting point.
When transforming XML, you may often find it beneficial to start with the end in mind and work your way backward. Now that we have a template for the XHTML we want to produce, we can incorporate LINQ to XML queries and take advantage of the rich support for embedding query expressions within functional construction statements. Before incorporating our query expressions with the functional construction statements, lets write a query to retrieve the data out of our XML. See listing 10.24.
Listing 10.24. Retrieve the title, publisher, and authors for each book within the XML
var books = from book in booksXml.Descendants("book")
            select new {
              Title = (string)book.Element("title"),
              Publisher = (string)book.Element("publisher"),
              Authors = String.Join(", ",
                         book.Descendants("author")
                        .Select(a => (string)a).ToArray())
           };
With this query, we’ve selected the title, publisher, and authors out of the XML file. We’ve done extra work to format the list of author names as a comma-separated list to match our desired output format. Now that we have our functional construction statements and our query, it’s time to combine the two into a single LINQ to XML transformation. See listing 10.25.
Listing 10.25. Transform XML into XHTML with LINQ to XML transformations
XElement html =
  new XElement("html",
  new XElement("body",
    new XElement("h1", "LINQ Books Library"),
    from book in booksXml.Descendants("book")
    select new XElement("div",
      new XElement("b", (string)book.Element("title")),
      "By: " + String.Join(", ", book.Descendants("author")
                                     .Select(b => (string)b).ToArray()) +
      "Published By: " + (string)book.Element("publisher")
    )
  )
);
The resulting XHTML can be seen in figure 10.2.
Figure 10.2. The XHTML result from our LINQ to XML query
As we’ve illustrated, LINQ to XML provides powerful transformation capabilities. Rather than having to learn a new language, such as XSLT, developers can leverage the knowledge they’ve already gained for creating XML using functional construction and their knowledge for querying XML using LINQ queries. By providing a single construction method for creating XML from scratch as well as creating XML from other XML via transformations, LINQ to XML provides a consistent programming model.
While LINQ to XML offers powerful transformations, the LINQ to XML team also recognized that a lot of existing applications have large investments in XSLT as a transformation technology. As such, they’ve provided support for transforming LINQ to XML objects using XSLT. Let’s explore how we can use XSLT to produce the same output that we’ve produced in figure 10.2 with LINQ to XML transformations.
10.4.2. Transforming LINQ to XML objects with XSLT
In order to use XSLT with LINQ to XML objects, a reference to the System.Xml.Xsl namespace must be added to the class handling the transformation. Once a reference has been made to System.Xml.Xsl, an XDocument needs to be created to hold the output of the transformation. From there, you create an XmlWriter using the CreateWriter method on XDocument, load your XSL, then apply the XSL to the XElement. Since the XslCompiledTransform object expects an XmlReader, not an XElement, we need to use the CreateReader() method on XElement and pass the resulting XmlReader on to the transform object. When we put this all together, we end up with listing 10.26.
Listing 10.26. Transforming an XElement using XSLT
string xsl = @"<?xml version='1.0' encoding='UTF-8' ?>
                <xsl:stylesheet version='1.0'
                     xmlns:xsl='http://www.w3.org/1999/XSL/Transform'>
                  <xsl:template match='books'>
                    <html>
                      <title>Book Catalog</title>
                      <ul>
                        <xsl:apply-templates select='book'/>
                      </ul>
                    </html>
                  </xsl:template>
                  <xsl:template match='book'>
                    <li>
                      <xsl:value-of select='title'/> by
                      <xsl:apply-templates select='author'/>
                    </li>
                  </xsl:template>
                  <xsl:template match='author'>
                    <xsl:if test='position() > 1'>, </xsl:if>
                    <xsl:value-of select='.'/>
                  </xsl:template>
                </xsl:stylesheet>";

XElement books = XElement.Load("books.xml");
XDocument output = new XDocument();
using (XmlWriter writer = output.CreateWriter()) {
    XslCompiledTransform xslTransformer = new XslCompiledTransform();
    xslTransformer.Load(XmlReader.Create(new StringReader(xsl)));
    xslTransformer.Transform(books.CreateReader(), writer);
}
Console.WriteLine(output);
The output is exactly the same as that shown in section 10.5.1. In order to make the transform code we used in the code reusable, we can pull the transformation logic into an extension method like in listing 10.27.
Listing 10.27. An extension method for transforming an XNode using XSL
public static class XmlExtensions {
    public static XDocument XslTransform(this XNode node, string xsl) {
       XDocument output = new XDocument();
       using (XmlWriter writer = output.CreateWriter()) {
          XslCompiledTransform xslTransformer = new XslCompiledTransform();
          xslTransformer.Load(XmlReader.Create(new StringReader(xsl)));
          xslTransformer.Transform(node.CreateReader(), writer);
       }
       return output;
    }
}
With this extension method in place, we can apply our transformation using the following code:
XElement.Load("books.xml").XslTransform(xsl));
In this section we’ve shown how to transform XML from one format to another by using the transformational capabilities of functional construction, as well as with XSLT. But often we need to transform XML data into in-memory objects. In the next chapter, we tackle this common scenario as well as many others.
10.5. Summary
In this chapter, we’ve shown you how to query and transform XML using LINQ to XML. We started by looking at the LINQ to XML axis methods and examined how the different axis methods allow elements and attributes within the XML to be selected. Next, we examined how we can use the axis methods along with the standard query operators and LINQ query expressions to express our XML queries using the same syntax as we use for querying objects and relational data. By enabling developers to use a single query syntax for objects, relational data, and XML, LINQ has completely changed how developers work with data. Rather than learn multiple technologies, developers can instead focus on mastering a single technology that covers all their data needs.
In addition to having strong XML-querying features, LINQ to XML has strong transformation features. By combining the powerful XML-creating capabilities offered by LINQ to XML with the advanced querying capabilities of LINQ, LINQ to XML provides developers an easy and intuitive method for transforming XML. Rather than learn a new transformation language, such as XSLT, developers can stay focused on a single set of techniques that can be used for creating, querying, and transforming XML.
With that, we’ve completed our overview of LINQ to XML. While we’ve provided you with the information necessary for building applications with LINQ to XML, we haven’t covered many of the common scenarios that you might encounter. We rectify that in our next and final chapter on LINQ to XML.