
Chapter 6. Getting started with LINQ to SQL
This chapter covers:
- Using LINQ to SQL to access data from SQL Server
- The advantages of LINQ to SQL for fetching relational data
- Updating data with LINQ to SQL
So far in this book, we’ve focused on working with data once it is already in memory. In order to query it, we need a group of items we can iterate over using the IEnumerable<T> interface. While the ability to work with data already in memory is a much-needed feature, it fails to address a large part of the picture—moving data to and from a persistence medium, typically a relational database system like SQL Server.
By this point, we should be able to handle a fairly complex LINQ to Objects query. In this chapter, we’re going to take a look at converting a query and associated classes to use LINQ to SQL rather than custom ADO.NET. We’ll start with a query that will return a listing of books that cost less than $30 and group them by their subject. This will require us to combine information from two collections: Books and Subjects. Listing 6.1 represents a possible solution to the problem at hand.
Listing 6.1. Querying Subjects and Books with LINQ to Objects
IEnumerable<Book> books = Book.GetBooks();
IEnumerable<Subject> subjects = Subject.GetSubjects();

var query = from subject in subjects
            join book in books
                 on subject.SubjectId equals book.SubjectId
            where book.Price < 30
            orderby subject.Description, book.Title
            select new
            {
               subject.Description,
               book.Title,
               book.Price
            };
In this example, we fill collections of books and subjects and then query from the resulting collections. While this achieves our goal, it does not do so as efficiently as we’d like. Here are the resulting SQL queries that are passed to the database when running the code samples that accompany this chapter:
SELECT    ID, Isbn, Notes, PageCount, Price, PubDate,
          Publisher, Subject, Summary, Title
FROM      Book

SELECT    ID, Name, Description
FROM      Subject
Since the filtering, projecting, and sorting are being done on the client, we have to fetch all fields of all records before we start processing. As a result, we will fetch more records and fields than we need. Additionally, we cannot take advantage of the powerful indexes that the database has available. This means we’re putting undue stress on our network and processing power. Worse yet, we have to manually write all of the data access code, which is repetitive and ripe with potential pitfalls.
Here, LINQ to SQL comes to our rescue to reduce the network stress, reduce the client processing, and utilize the database indexes. At the same time, we can eliminate most of the previously necessary plumbing code. When we’re done, we will end up with the following database query:
SELECT    t0.Description, t1.Title, t1.Price
FROM      Subject AS t0 INNER JOIN
                     Book AS t1 ON t0.ID = t1.Subject
WHERE     (t1.Price < @p0)
ORDER BY  t0.Description, t1.Title
Amazingly, we can do all this by adding one line of code and changing two others. The corresponding changes in our business objects allow us to eliminate dozens of lines of ADO.NET code. Additionally, the same changes we make will allow us to eliminate specialized code needed to update records that we fetch.
Over the next three chapters we will dig into LINQ to SQL. In this chapter, we will show how to take advantage of LINQ to SQL with our starting query and identify how we can increase performance while reducing code. In chapter 7, we will peek under the covers and explore how the framework achieves this magic. We’ll conclude our exploration of LINQ to SQL in chapter 8 by diving deeper into the framework to see some of the more advanced techniques LINQ to SQL offers.
6.1. Jump into LINQ to SQL
In our example for this chapter, we’re exploring ways to query our books to see those that cost less than $30 and group them by subject. To do this, we can separate the process into several separate tasks: selecting the ordered subjects, selecting the corresponding books filtered on price, combining the subjects with the books, and projecting only the results that we need. Let’s start by looking at the book-related tasks first and then deal with joining them to the subjects. Listing 6.2 restates the book portion of our starting query.
Listing 6.2. Selecting the book title and price for books less than $30
IEnumerable<Book> books = Book.GetBooks();
var query = from book in books
            where book.Price < 30
            orderby book.Title
            select new
            {
                book.Title,
                book.Price
            };
At this point, we’re still requesting everything from the database and filtering it on the client. To prove this, here is the SQL statement sent to the database:
SELECT     ID, Isbn, Notes, PageCount, Price, PubDate,
           Publisher, Subject, Summary, Title
FROM       Book
Note
Throughout our discussion, the generated SQL we present is based on a prerelease version of Visual Studio 2008. Some of the query details may differ from the final release, but the basic concepts should still apply.
We’re still retrieving all of the fields from the database even though we’re only using two of them. Additionally, we’re fetching all records from the database, not just the ones that meet our criteria. Also, we’re not leveraging our indexes because we’re ordering the results on the client. Ideally, we’d like to issue a statement to the database like the following:
SELECT    Title, Price
FROM      Book AS t0
WHERE     (Price < @p0)
ORDER BY  Title
How many changes does it take to our query to make this change? None! All we need to do is modify our Book class and change how we’re accessing it. Let’s start by revisiting the Book object and table (shown in figure 6.1) to see what changes we will need to make.
Figure 6.1. Comparing the Book table with the Book class
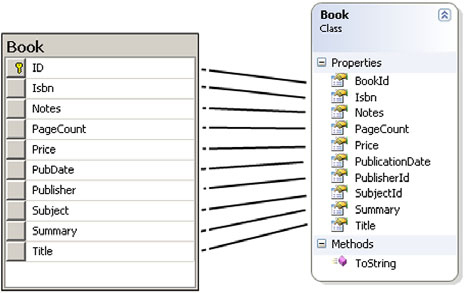
To begin, we’re going to apply a 1-1 field mapping between the table and our destination object. Later in this chapter, we will take a look at joining this table with the corresponding subjects and see how we can handle the foreign key relationships in the database. For now, we will limit our focus to a single table. Let’s start by looking at the code for the Book class, shown in listing 6.3.
Listing 6.3. Starting Book class definition
public class Book
{
  public Guid BookId { get; set; }
  public String Isbn { get; set; }
  public String Notes { get; set; }
  public Int32 PageCount { get; set; }
  public Decimal Price { get; set; }
  public DateTime PublicationDate { get; set; }
  public String Summary { get; set; }
  public String Title { get; set; }
  public Guid SubjectId { get; set; }
  public Guid PublisherId { get; set; }
}
For the sake of this discussion, we use the auto-implemented properties discussed in section 2.2.2. We’re left with a clean class definition that includes only the public property declarations. At this point, we still need a way to fill our objects with data from the database. We do this by setting up a series of mappings to specify how our objects relate to the database tables and columns.
Note
Auto-implemented properties are not available in VB 9.0. With VB, you will need to explicitly include the private backing fields along with the get/set accessors.
6.1.1. Setting up the object mapping
Let’s start our exploration of LINQ to SQL by enabling the Book class. To begin, add a reference to the System.Data.Linq assembly, which is part of the .NET 3.5 Framework, and add a using statement to the top of the class. The Mapping namespace contains attributes that enable us to declaratively establish the relationship between the database and objects.
using System.Data.Linq.Mapping;
For the sake of clarity, we will use attributes to declare our data mappings for this chapter. We’ll only look at the basics at this point. In chapter 7, we will dive deeper into the mapping options, but for now we simply want to get it working.
In most cases, we need to identify two things in a class: what table it is related to, and what columns the values are mapped to. Mapping the book table with the object is perhaps the simplest mapping possible. In this case, our database has a table called Book. Our object structure also represents a book instance with a class called Book. Thus we have a one-to-one mapping between both objects, and they are named the same. To declare the mapping, we add an attribute to the class declaration called Table as follows:
[Table]
public class Book {...}
If we want to be more explicit, we can declare the name of the source table by using a named parameter, Name, as follows:
[Table(Name="dbo.Book")]
public class Book {...}
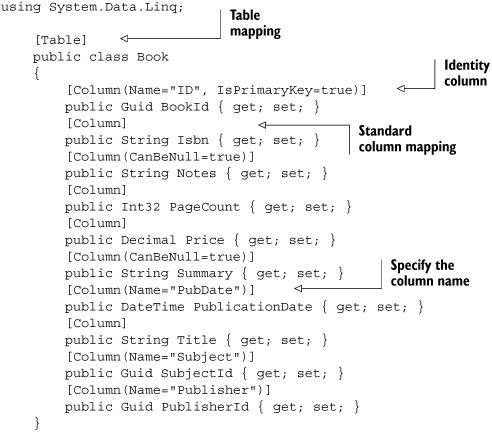
Now that we’ve mapped the class to the table, we need to indicate which properties are stored as columns in the table and how the columns map to the property information. We do this by adding a Column attribute to the properties we wish to map. For example, to map the Title property to the Title column of the book table, we add a Column attribute before the property declaration:
[Column]
public String Title { get; set; }
We’re not limited to direct mappings. We can specify some translation between the table column name and the object’s property name. For example, our Book table has a column called PubDate. To make the business object easier for the client application developer to work with, we may wish to use a more verbose naming convention and name the property PublicationDate. To do this, we specify the name of the source column as part of the attribute’s parameters.
[Column(Name="PubDate")]
public DateTime PublicationDate { get; set; }
One thing we need to identify for each object is the primary key. In our case that will be the BookId property. Here, we combine the Name parameter with a new IsPrimaryKey parameter to declare the mapping. LINQ to SQL requires that at least one property from each object be specified as the primary key in order to manage object identity.
[Column(Name="ID", IsPrimaryKey=true)]
public Guid BookId { get; set; }
We use the same method to declare the mappings for all of the properties in our class. The resulting declaration is shown in listing 6.4.
Listing 6.4. The full Book class with basic mapping
Although it may appear that we’ve doubled the number of lines of code in our Book class, the net result will be drastically reduced code, as we will not need to worry about creating separate methods for the Create, Read, Update, and Delete (CRUD) methods. Additionally, we won’t need a customized implementation for specialized querying operations. We declare the mappings once and the framework takes care of the rest.
With the necessary changes made to our Book, you may be itching to see how to use LINQ to SQL to access our database. Although we’ve specified how to access the tables and columns, we can’t do anything until we identify the database that the tables live in. We need to set up our connection to the database. We do this by using a new DataContext object located in the System.Data.Linq namespace. Once that is done, rest assured, we will jump right in to querying our data.
6.1.2. Setting up the DataContext
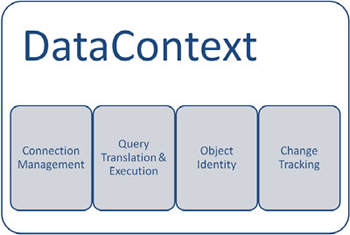
The DataContext, shown in figure 6.2, lies at the heart of LINQ to SQL and handles the majority of the work. First and foremost, it manages our connection to the database. We instruct the DataContext about the connection string. The DataContext will handle opening and closing the connection for us. As a result, we don’t need to worry about abusing our expensive connection external resources.
Figure 6.2. Services offered by the DataContext
To begin working with the DataContext, create an instance of a DataContext object passing it the connection string for our database.
DataContext dataContext = new DataContext(liaConnectionString);
The DataContext also handles managing our mappings and provides a vital resource—the ability to fill a collection of objects from the database. It fills the object into a specialized generic collection type called a Table<>. To get a table of books from the DataContext object, we call dataContext.GetTable<Book>():
DataContext dataContext = new DataContext(liaConnectionString);
Table<Book> books = dataContext.GetTable<Book>();
Without LINQ to SQL, when returning a list of objects, the return type could be a generic List<Book>. In this case, we’re returning a new type—Table<Book>. By making this change, we don’t bring back the raw data, but rather the means through which we can more dynamically access and manipulate our data. This will allow us to modify the query prior to actually issuing the request to the database. Now that we can access our data, let’s see what we can do with LINQ to SQL beyond that.
6.2. Reading data with LINQ to SQL
The first thing we need to do is select values from the database. We’ve already seen one way to access data using the GetTable method. The generic Table class implements a new IQueryable<T> interface, which extends IEnumerable<T>. Because it extends IEnumerable<T>, we’re free to use the standard query operators from LINQ to Objects. Let’s start with a basic query fetching all of the books from our newly refactored Book object. See listing 6.5.
Listing 6.5. Fetch books using LINQ to SQL
DataContext dataContext = new DataContext(liaConnectionString);
IQueryable<Book> query = from book in dataContext.GetTable<Book>()
                         select book;
With this example, we’ve effectively eliminated any custom ADO.NET code that we’d have otherwise needed to write. However, we’re fetching all of the fields regardless of whether we need to use them.
As we’re learning the capabilities of LINQ to SQL, we may want to examine our code on the database. At times, the resulting query may be surprising. We have several options to see the query that is issued to the database. Using the SQL Server Profiler tool that comes with SQL Server, we can watch statements as they are being issued against the database. Alternatively, we can attach the DataContext’s Log property to an output stream, like the one Console has:
dataContext.Log = Console.Out;
With this logging function enabled, any SQL statements issued to the database will be sent to an output stream. If we attach it to the console in a console application, the statements will appear in the console window. In a Windows Forms application, the results will be sent to the Output window. We will use the log frequently throughout these chapters to see what is happening behind the scenes.
As another alternative, Microsoft has a Query Visualizer tool that can be downloaded separately from Visual Studio 2008. The tool, along with the source code and installation instructions, is available at http://weblogs.asp.net/scottgu/archive/2007/07/31/linq-to-sql-debug-visualizer.aspx. Once this tool is installed, we can break into our code and hover over the instantiated query object to see a new magnifying glass as part of the debugging assistance, as shown in figure 6.3.
Figure 6.3. Accessing the LINQ to SQL query visualizer while debugging

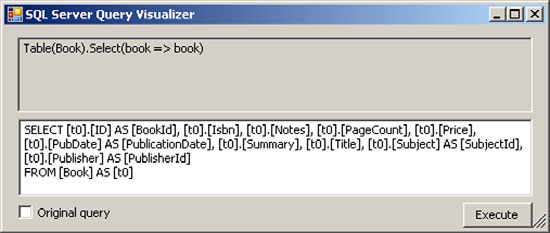
Click the magnifying glass, and the window shown in figure 6.4 opens, allowing access to the full SQL statement that will be issued. The visualizer also allows us to see the results in a data grid and optionally to hand edit the generated SQL.
Figure 6.4. LINQ to SQL query visualizer in action
We can also programmatically access the query using the DataContext’s GetCommand method as follows:
Console.Writeline(dataContext.GetCommand(query).CommandText);
This command will not identify when the query is executed, but it will show the statement that will be issued. While you’re getting used to LINQ to SQL, try each of these techniques out to see which ones work the best for you. Regardless of which you choose, make sure to watch the statements that are being issued. As you learn LINQ to SQL, you will find the need to alter queries to avoid unexpected results you may not notice otherwise.
Let’s return our focus to our query. In the previous example, we showed how we could use the mappings to fetch values, but rather than fetching just the fields we need, we were fetching the entire book object. Since LINQ to SQL builds on the base query expressions, we can project the columns we want into our result set. Thus, if we only want to get a listing of the titles from our query, we could change our select clause as shown in listing 6.6.
Listing 6.6. Fetch the list of book titles
DataContext dataContext = new DataContext(liaConnectionString);
dataContext.Log = Console.Out;
IEnumerable<String> query =
    from book in dataContext.GetTable<Book>()
    select book.Title;
Because we used dataContext.Log, we can look at the output window and see the resulting query.
SELECT [t0].[Title]
FROM [Book] AS [t0]
Viewing this SQL statement, we see that we’re no longer returning all of the book properties from our database. We’re almost back to achieving our first task for this chapter: fetching the book titles and prices. To achieve this goal, we need to change our select clause to return an anonymous type with just the Title and Price values. See listing 6.7.
Listing 6.7. Project into an anonymous type
var query = from book in dataContext.GetTable<Book>()
            select new
            {
               book.Title,
               book.Price
            };
Notice that the generated SQL code only selects the fields asked for as part of the Select extension method, rather than filling the full book object.
SELECT [t0].[Title], [t0].[Price]
FROM [Book] AS [t0]
Try the sample again, but this time step through the code. Pay attention to the console window. Note that the SQL code is not inserted in the window when we call the dataContext.GetTable<Book>() method, nor is it displayed when we declare the query object. In fact, the SQL is not generated and submitted to the database until we first access the data. The query variable contains the definition of how we want to access the data, not the data itself. Execution of the query is deferred until it is first used. We will discuss this more in section 6.6.
Because we don’t create the query until the results are first requested, we can continue to compose the query by adding more functionality. In listing 6.8, we add paging functions to the query after it is first defined using the Skip and Take extension methods. LINQ to SQL then pieces them together to create an optimized single statement.
Listing 6.8. Adding data paging using composition
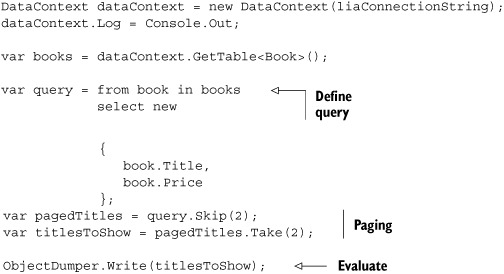
The same query in VB.NET can be performed as a single statement because VB.NET includes the Skip and Take methods as query expressions. Listing 6.9 shows the corresponding VB syntax.
Listing 6.9. VB syntax for paging data
![]()
Dim query = From book In books _
            Skip 2 _
            Take 2 _
            Select book.Title, book.Price
Regardless which option is used, the resulting SQL is as follows:
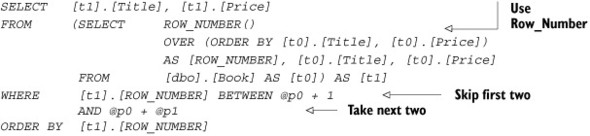
Standard LINQ to Objects would have issued a single SELECT statement that fetched all of the books. Since LINQ to SQL was smart enough to detect the additional operations, it was able to optimize the query to be specific to our database (SQL Server 2005). If we were using SQL Server 2000, a different SQL syntax would have been used because the ROW_NUMBER() option is not available prior to SQL Server 2005.
We’ve seen a bit of the power that LINQ to SQL brings to the table. Instead of blanket fetching our records and relying on LINQ to Objects to do the heavy lifting, LINQ to SQL has the power to evaluate our requests and only return the requested results. If we want to perform additional selection operations including filtering and sorting, we use common LINQ query syntax. The declarative query expression is parsed and adjusted as necessary for the specific business needs at hand. Let’s return our focus on extending our basic fetching queries by adding more functionality.
6.3. Refining our queries
So far, we’ve focused on retrieving results from a table. We’ve shown how LINQ to SQL is better than ADO.NET because we don’t need to rewrite all of the repetitive plumbing code. LINQ to SQL is also able to reduce our network overhead by returning only the fields we need. If the framework were to stop here, it would have already offered a vast improvement over prior techniques.
Relational databases offer specialized capabilities to access and manipulate associated sets of data. By leveraging the indexing and query execution plans, the database can provide data access faster than we’d be able to do without indexes. Additionally, by processing the query on the server, we can often limit the amount of information that must be transmitted over the network. Reducing the network demands is important because the network pipe is typically one of the biggest bottlenecks of data-centric applications. Let’s continue our look at LINQ by seeing how we can refine our queries using some of these additional server-side processes.
6.3.1. Filtering
LINQ to SQL supports a full range of filtering functionality. A filter can be as simple as finding a record with a specific value. In our example for this chapter, we want to see books that cost less than 30 dollars. We can accomplish this with the code from listing 6.10.
Listing 6.10. Filtering using a range
var books = dataContext.GetTable<Book>();
var query = from book in books
            where book.Price < 30
            select book;
If we look at the generated SQL, the results are just as we’d expect.
SELECT [t0].[Title]
FROM [dbo].[Book] AS [t0]
WHERE [t0].[Price] < @p0
The object-based query we started with fetched all rows from the database. When using LINQ to SQL, we’re able to translate the filtering clause into a parameterized query that is executed on the server, limiting the results to rows that meet our criteria.
Additionally, by using parameterized queries, we solve a couple of common issues. First, one of the biggest security vulnerabilities is the ability to inject functionality into a query (like dropping a table).[1] One of the easiest ways to thwart this kind of vulnerability, called a SQL injection attack, is to use parameterized queries or stored procedures.
1 For a look at SQL injection in action, see the webcast at http://www.rockyh.net/AssemblyHijacking/AssemblyHijacking.html.
Another advantage of using parameterized queries is the fact that we can take advantage of SQL Server’s query plan caching. By reusing queries where the only change is the input parameters, SQL Server can determine an appropriate execution plan and cache it for later use. On subsequent requests, the server will use the cached plan rather than reevaluating the expression. If we concatenated the request SQL, the server would need to parse the expression each time to determine the most efficient execution plan based on the indexes available.
Some SQL filtering options do not have a direct translation to keywords in the .NET Framework. In many cases, there is an alternative that performs the same or similar function. When it can, LINQ will translate the function call to the SQL equivalent.
Let’s consider the SQL LIKE clause. LIKE finds records based on a pattern-matching scheme. Instead, the String type has three methods that serve the same function—StartsWith, EndsWith, and Contains. LINQ to SQL has been designed to map these functions to the LIKE expression using the SqlMethods.Like method and inserts the wildcard matching pattern as appropriate. Thus in order to find all books containing the string "on", we use the LINQ expression shown in listing 6.11.
Listing 6.11. Using mapped CLR methods
var books = dataContext.GetTable<Book>();
var query = from book in books
            where book.Title.Contains("on")
            select book.Title;
The query using the Contains method translates to the following SQL expression:
SELECT [t0].[Title]
FROM [dbo].[Book] AS [t0]
WHERE [t0].[Title] LIKE @p0
-- @p0: Input NVarChar (Size = 4) NOT NULL [%on%]
Note that the Contains method has been translated to LIKE and the parameter value now includes the % wildcard, which is specific to SQL Server.
Not all CLR functions can be translated to a database equivalent. Consider the following query:

In this example, the translation provider is able to convert the DateTime.Parse method and insert a database-specific representation of the date. It is not able to handle the ToString method for formatting the data in the select clause. Identifying all of the supported and unsupported expressions that are translated is impossible. Additionally, translation support is dependent on the provider. When you’re unsure whether a method is supported, try it out and see if it works.
In many cases, filtering works as expected. In other cases, experimentation is necessary to find the proper method. We cannot cover all of the mappings here, but hopefully we have enough to get started. By allowing the filter to be applied on the server rather than the client, we can greatly reduce the amount of network bandwidth and take advantage of the database indexes.
So far, we’ve been able to rewrite our original query and objects to return only the desired fields and rows from our database while eliminating custom ADO.NET code. We’re not quite back to the query that we started with, because we still need to utilize the server indexes for sorting our results. Let’s continue to refine our query by adding sorting.
6.3.2. Sorting and grouping
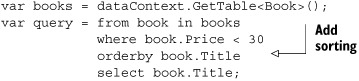
If we needed to perform sorting functions manually, we’d need to write a lot of custom code. LINQ to Objects allows us to simplify the query, but to truly utilize our database’s power, we need to use the indexes that the database has defined. The query expressions orderby and orderby...descending are designed to translate our sorting expression to the database. Consider the change we made to our running query by adding the sorting function, shown in listing 6.12.
Listing 6.12. Sorting with LINQ to SQL
As we indicated early on in this book, this query is truly an example of WYSIWYW (What You See Is What You Want). As seen in the resulting query string, we’ve now accomplished another part of our goal—leveraging the database’s indexes to handle sorting rather than sorting on the client.
SELECT [t0].[Title]
FROM [Book] AS [t0]
WHERE [t0].[Price] < @p0
ORDER BY [t0].[Title]
If we wanted to order the results in descending order, we’d use the descending query expression as part of the clause. Also, if we wanted to sort on multiple columns, we’d include the list of fields separated by commas just as we would with a standard SQL expression.
Often, instead of just sorting the results, we need to group the results to combine like results. In listing 6.13, we group our listing of books by their subject. We project the results of the grouping operation into a temporary result which we can then reuse.
Listing 6.13. Grouping and sorting
var query =
    from book in dataContext.GetTable<Book>()
    group book by book.SubjectId into groupedBooks
    orderby groupedBooks.Key
    select new
    {
        SubjectId = groupedBooks.Key,
        Books = groupedBooks
    };

foreach (var groupedBook in query)
{
    Console.WriteLine("Subject: {0}", groupedBook.SubjectId);
    foreach (Book item in groupedBook.Books)
    {
        Console.WriteLine("Book: {0}", item.Title);
    }
}
The resulting object is an ordered collection of collections. To view the results, we need to iterate over both the grouped results and the contained collection of books for each grouping of subjects. This produces the following SQL:
SELECT [t1].[SubjectId] AS [Key]
FROM (
    SELECT [t0].[Subject] AS [SubjectId]
    FROM [dbo].[Book] AS [t0]
    GROUP BY [t0].[Subject]
    ) AS [t1]
ORDER BY [t1].[SubjectId]
Note that this query only selects the key values. As we iterate over the results, separate queries are issued for each grouping. The resulting collection is contained in the groupedBooks object. While we have our results grouped, it would be nice if we could perform some aggregation on the values so that we can see counts, averages, and totals by the groupings.
6.3.3. Aggregation
LINQ to SQL fully supports all of the standard aggregation methods that extend IEnumerable<T>. Thus, we can create a query to display the number of books that belong to each category. Listing 6.14 uses an anonymous type on our select clause to take our grouped book collections and return the count of the books by subject.
Listing 6.14. Including aggregates in the results
Table<Book> books = dataContext.GetTable<Book>();
var query = from book in books
            group book by book.SubjectId into groupedBooks
            select new
            {
                groupedBooks.Key,
                BookCount = groupedBooks.Count()
            };
Notice that in this example, we could return all of the books as we iterate over the result set and then count them on the client. LINQ to SQL offers the additional benefit of performing the count on the server and only returning that value rather than overloading the network with unnecessary data. Here is the corresponding SQL statement for this query:
SELECT COUNT(*) AS [BookCount], [t0].[Subject] AS [SubjectId]
FROM [Book] AS [t0]
GROUP BY [t0].[Subject]
We continue our tradition of only returning the results we want and not overloading our database or the network with needless data.
Using the other aggregate methods is just as easy. Listing 6.15 aggregates the total price, lowest price, highest price, and average price for the books grouped by each subject.
Listing 6.15. Using multiple aggregates
Table<Book> books = dataContext.GetTable<Book>();
var query =
    from book in books
    group book by book.SubjectId into groupedBooks
    select new
    {
        groupedBooks.Key,
        TotalPrice = groupedBooks.Sum(b => b.Price),
        LowPrice = groupedBooks.Min(b => b.Price),
        HighPrice = groupedBooks.Max(b => b.Price),
        AveragePrice = groupedBooks.Average(b => b.Price)
    };
Once again, the aggregation methods are translated into the appropriate SQL and the aggregation is performed in the database itself. The database only returns the results that we ask for, limiting the amount of data that needs to be returned.
Throughout our discussion so far, we’ve been limited to working only with values from a single table. It would be nice if we could join our Book table with the corresponding Subject table so that we could include the descriptive name of the subject rather than the cryptic unique identifier contained in the Book table. Naturally, LINQ to SQL offers several options for joining our results.
6.3.4. Joining
Combing data from multiple tables is the heart and soul of relational databases. If we didn’t need to combine different pieces of data, we’d be happy writing our enterprise applications in Excel or flat text files. By being able to join related data, we’re able to dig into information otherwise hidden in the individual records. LINQ to SQL offers several mechanisms for joining data between related sources. In our case, we’re going to join the Books table with the Subject table. This way, we can display the name of the subject rather than just the foreign key.
LINQ to SQL supports two syntaxes for joins. One uses a comparison in the Where clause, which is similar to the ANSI-82 SQL syntax. To use this syntax, we can get a reference to the Book and Subject table objects. Notice we didn’t say we’re going to fetch the tables. With the reference to the table objects, the code in listing 6.16 shows how we can compose our query expression selecting from both of the tables where the SubjectId of the Subject object is the same as the SubjectId of the corresponding Book object.
Listing 6.16. Joining Books and Subjects
var subjects = dataContext.GetTable<Subject>();
var books = dataContext.GetTable<Book>();
var query = from subject in subjects
            from book in books
            where subject.SubjectId == book.SubjectId
            select new { subject.Name, book.Title, book.Price };
More than 15 years ago, the ANSI-92 standard replaced ANSI-82. Reverting to the older ANSI-82 syntax may appear unusual. Fortunately, LINQ also supports the join syntax reminiscent of the ANSI-92 SQL syntax. The previous query expression can be rewritten as shown in listing 6.17.
Listing 6.17. Joining with the Join keyword
var query = from subject in subjects join book in books
            on subject.SubjectId equals book.SubjectId
            select new { subject.Name, book.Title, book.Price };
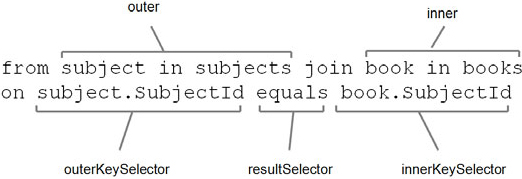
Be aware that the order of the source and destination objects is important in LINQ join clauses. Unlike the forgiving nature of SQL interpreted by the database, LINQ is less forgiving. Because the query expressions are translated to methods, changing the order of the tables but not the fields will result in a compile time error. Here is the definition for the System.Linq.Enumerable.Join extension method:
public static IEnumerable<TResult> Join<TOuter, TInner, TKey, TResult>
  (this IEnumerable<TOuter> outer, IEnumerable<TInner> inner,
   Func<TOuter, TKey> outerKeySelector,
   Func<TInner, TKey> innerKeySelector,
   Func<TOuter, TInner, TResult> resultSelector)
Notice how the first and third parameters match up, as do the second and fourth. Figure 6.5 shows how the Join in our query maps to the parameters of the extension method. We can see how the outer and outerKeySelector parameters match up. If we were to transpose the outer and inner parameters or the corresponding innerKeySelector and outerKeySelector, we’d end up with a mismatch on our parameters when translating them to the underlying extension method.
Figure 6.5. Mapping the join to the extension method parameters
So far each of these joins has been a cross join (or inner join), where we only return the values that have similar results in both tables. But often, we want to return results from one table regardless of whether there are matching results in the other table. In standard SQL terms, this is typically referred to as an outer join. In the previous example, we may want to get a listing of all of the subjects regardless of whether any books are actually in our database for that subject. This would typically be expressed with the following ANSI-92 SQL expression:
SELECT     Subject.Name, Book.Title
FROM       Subject LEFT OUTER JOIN
               Book ON Subject.ID = Book.Subject
To accomplish the same thing with LINQ, we need to observe that we’re looking for books where the subject exists or is null. The DefaultIfEmpty() extension method comes to our rescue, as shown in listing 6.18.
Listing 6.18. Approximating an outer join
var query =
    from subject in Subjects
    join book in books
       on subject.SubjectId equals book.SubjectId into joinedBooks
    from joinedBook in joinedBooks.DefaultIfEmpty()
    select new
    {
        subject.Name,
        joinedBook.Title,
        joinedBook.Price
    };
In this case, we tell LINQ that we want to join the books and subjects and place the results in a new temporary object called joinedBooks. Then we want to view the results from the Subjects and the joined Books, using the DefaultIfEmpty extension method to return a default value if the subject doesn’t contain a book.
Now that we can combine our books and subjects, let’s return to the original query we started at the beginning of the chapter to see how far we’ve come. Listing 6.19 shows the end result.
Listing 6.19. Rewriting the original example using LINQ to SQL
DataContext dataContext = new DataContext(liaConnectionString);

Table<Subject> subjects = dataContext.GetTable<Subject>();
Table<Book> books = dataContext.GetTable<Book>();

var query = from subject in subjects
           join book in books
              on subject.SubjectId equals book.SubjectId
           where book.Price < 30
           orderby subject.Name
           select new
           {
               subject.Name,
               joinedBook.Title,
               joinedBook.Price
           };
Comparing this query, we can see that the only real change in listing 6.1 is the source of the data. The LINQ query is identical. But a quick look at the generated SQL statement shows that we’ve now fetched only the rows and fields that we want. Additionally, we’re performing the join, filter, and sort on the server. Here is the SQL that is generated from our LINQ to SQL query:
SELECT     t0.Name, t1.Title, t1.Price
FROM       Subject AS t0 INNER JOIN
                      Book AS t1 ON t0.ID = t1.Subject
WHERE      (t1.Price < @p0)
ORDER BY   t0.Name
The LINQ expression is more explicit than the corresponding SQL statement due to the fact that LINQ is designed to work not only with relational data, but other data sources as well, including objects and hierarchical sources. Since we’ve accomplished our goal, we could easily stop here, but LINQ to SQL offers more functionality that we need to look into before moving on.
Although there are times where forcing a relational construct into an object-oriented model is necessary, working with object hierarchies directly can often be more appropriate for application development.
6.4. Working with object trees
At the heart of the object/relational impedance mismatch is the clash between rows of data joined by identifying columns (relational) and memory constructs containing collections of objects (object-oriented). These objects can contain additional collections of objects. Thus where our database contains rows of books and subjects that we can join, it doesn’t have an easy way to read a subject and then automatically show us the books associated with that subject. We need to explicitly tell the database to join the two tables to return the results.
In an object-oriented world, we typically obtain an instance of an object, like the Subject. From the Subject, we can drill in to identify the Books that belong to that Subject. We could potentially also drill in through the book to see the Authors, or any other property that we choose to expose. Luckily, LINQ to SQL offers an easy way to navigate these object hierarchies.
If we return to the definition of the Subject class, we may determine that we’d like a method that allows us to drill into the books that belong to that subject. Typically, we’d do that by lazy loading the books related to each subject as we called for them (see section 6.5.1 for more on lazy loading). Books would then be a property of a Subject object that we could drill into and work with as we wished. The mapping functionality in LINQ to SQL used in listing 6.20 shows how we can expose our collection of Book objects as a generic System.Data.Linq.EntitySet<Book> object and call it Books. Again, we will use the auto-implemented property syntax for brevity.
Listing 6.20. Mapping the object associations
using System.Data.Linq.Mapping;
{
    [Table]
    public class Subject
    {
        [Column(IsPrimaryKey = true, Name = "ID")]
        public Guid SubjectId { get; set; }
        [Column]
        public String Description { get; set; }
        [Column]
        public String Name { get; set; }

        [Association(OtherKey="SubjectId")]
        public EntitySet<Book> Books { get; set; }
    }
}
Just like the table and columns, we need to tell the framework how the objects are related. We will do that using the Association attribute. In order for the association to work, we need to identify how our Book type is related to the Subject. We associate the two objects by specifying the property of the related object we will be joining with our current object. Our Book object contains a SubjectId property that we’ve already mapped to the Subject field of the Book table in the database. Thus, for the contained Books property of the Subject class, we specify the property of the Book class that represents the key to our record is called SubjectId. This key is the OtherKey, or the key property in the related object.
Now that we’ve specified the relationship between the two objects, we can fetch our Subjects using a standard LINQ to SQL expression, as in listing 6.21. Instead of explicitly joining the tables, we can directly drill into the books collection of each object. To display the results, we will iterate through the Subjects. As we loop through each subject, we will nest a loop to display the names of the books that are in that Subject.
Listing 6.21. Iterating over object trees
foreach (Subject subject in dataContext.GetTable<Subject>())
{
    Console.WriteLine(subject.Name);
    foreach (Book book in subject.Books)
    {
        Console.WriteLine("...{0}", book.Title);
    }
}
When we run the query, we may notice that by default, we achieve the same results as an outer join. From an object perspective, when we fetch the list of subjects, we don’t know whether there are any associated books attached to each subject. It is only when we iterate over the books for each subject that we find out if there are subjects with no associated books. Thus there may be cases where we display a subject that doesn’t contain any books. Likewise, if we have a book that doesn’t have a subject, it won’t appear in the resulting list.
In order to filter our results a bit, we have at our disposal a couple of additional extension methods: Any and All. The Any method only returns results where related records exist in both result sets. Thus to refine our query to return only the subjects that also have related books (similar to an inner join), listing 6.22 uses the Any extension method.
Listing 6.22. Using Any to achieve an inner join on object trees
var query = from subject in Subjects
            where subject.Books.Any()
            select subject;
If we want, we can simply negate the where clause of the query to return any subjects where there aren’t any related books, as follows:
var query = from subject in Subjects
            where !subject.Books.Any()
            select subject;
If we want to filter the results and see only subjects where the price of the book is less than 30 dollars, we call the All extension method as shown in listing 6.23.
Listing 6.23. Filtering child objects using All
var query = from subject in Subjects
            where subject.Books.All(b => b.Price < 30)
            select subject;
The ability to represent our data through more natural object hierarchies allows us to work with it in a more familiar programming manner. We establish the object dependencies based on the specific business needs and we can work with it as we would any set of objects. This allows us to maintain our business rules and integrity without having to focus on the relational nature of the underlying store. If we want, we can restate our running example using a hierarchical syntax as shown in listing 6.24.
Listing 6.24. Running query using object hierarchies
Table<Subject> subjects = dataContext.GetTable<Subject>(); var query = from subject in subjectsorderby subject.Name select new { subject.Name, Books = from book in subject.Books
where book.Price < 30 select new { book.Title, book.Price } };
In this version, we not only implement the more natural object hierarchies ![]() , but also nest the results as a similar set of hierarchical object structures
, but also nest the results as a similar set of hierarchical object structures ![]() . Again, we let the database do what it’s best at and only return the necessary portions of the underlying objects.
. Again, we let the database do what it’s best at and only return the necessary portions of the underlying objects.
There are times where we will want to query otherwise unrelated items. In those cases, joining data is still required. Both options are available as the business needs demand. Regardless of which method works best for each situation, LINQ to SQL attempts to return just the values requested and only return them when needed. Usually, this is advantageous. Occasionally the lazy loading behavior results in more frequent interaction with the database than originally intended. Let’s continue our exploration of LINQ to SQL by looking at times where the default behavior may result in more frequent database inquiries.
6.5. When is my data loaded and why does it matter?
When we fetch data from the database, LINQ to SQL utilizes a technique called deferred execution. With deferred execution, the results are only loaded into memory when they are requested. Stepping through our examples in this chapter and paying attention to when the SQL statements are being generated, we can see that they are not generated when we define the query. Instead, the database is not accessed until we actually request each record. Waiting to access the values until they are needed is called lazy loading.
6.5.1. Lazy loading
When displaying results, lazy loading offers the benefit of only retrieving the data when we request it, and only returning the data we request. In many cases, this provides performance benefits, but in other cases it can lead to some unexpected results. Consider the code from listing 6.25, which displays the list of subjects that may or may not have associated books. In this case, we will send the generated SQL commands to the console window to be displayed when the request is submitted to the database. When running this example, step through the code and watch the console window carefully to see exactly when each command is being issued.
Listing 6.25. Lazy loading child objects
DataContext dataContext = new DataContext(liaConnectionString);
dataContext.Log = Console.Out;
var subjects = dataContext.GetTable<Subject>();
ObjectDumper.Write(subjects);
Since we only want to list the subjects, we’re not fetching the books. By only fetching the books if and when we really need them, we can optimize our network bandwidth, minimize memory consumption, and limit the amount of work the database needs to do.
We can extend this sample by instructing the ObjectDumper to not only display the Subjects, but also display its children by telling it we want to view one child level in addition to the base level. The ObjectDumper.Write method accepts an overload to indicate the level we want to view. Change the last line in listing 6.25 to request the first-level children as well as follows:
ObjectDumper.Write(Subjects, 1);
Note that the child records for each subject are fetched only when we want them. This lazy loading behavior is beneficial when we don’t need to display all of the children for all parent objects, but only want to fetch them as the user requests the details. As we request the books for each subject, we will send a separate query to the database for each row of the Subject table. Listing 6.26 shows sample output from the changed version of the code.
Listing 6.26. Generated output when lazy loading the child elements
In the generated code, we fetch the list of subjects, then as we iterate through each item, we issue a separate query for each book, passing in the id column of the subject for each row. This means that instead of issuing one statement, we send separate statements for each child record. Before improving the situation, let’s make it worse. In this case, copy the last line and paste it twice so that we call ObjectDumper.Write twice. Step through the code and pay attention to the SQL that is generated.
We will spare you from having to read the gory results again here. In this case, all of the queries were sent to the database twice, once for each Write method. We’ve now turned a very good thing (lazy loading) into a potentially bad thing (too much network traffic to the database). What can we do to improve the situation?
6.5.2. Loading details immediately
If all we want to do is fetch the results more than once, we can prefetch them and store them in an array or list using the ToList, ToDictionary, ToLookup, or ToArray extension methods. Thus, we could change our earlier implementation to indicate that we want to load all of the subjects once and then continue to use the results as long as our subjects variable is in scope.
var subjects = dataContext.GetTable<Subject>().ToList<Subject>();
By explicitly stating that we want to retrieve the results, we force LINQ to SQL to immediately fetch the results and populate a new generic List with the resulting Subject objects. This has the advantage of not requiring round trips to the database each time we want to fetch our list. Additionally, we can use the LINQ to Objects query mechanisms to continue to manipulate our results and perform grouping, joining, aggregating, or sorting as necessary.
Unfortunately, by converting our results into a List or Array, we lose some of the benefits of LINQ to SQL, specifically the ability to optimize the data we retrieve from the database by leveraging the server-side functionality and limiting the amount of data we have to put into memory. Any query expressions applied to the resulting Subjects list will be processed by LINQ to Objects rather than LINQ to SQL.
Simply casting the results ToList still doesn’t help eliminate the separate queries to fetch each of the lazy loaded child collections. Fortunately, LINQ to SQL supports a mechanism to instruct the DataContext which optimizations to make. By using a DataLoadOptions type as shown in listing 6.27, we can shape (but not fetch) the result sets ahead of time. As soon as a record of the declared object type is fetched, it will also retrieve the associated child records.
Listing 6.27. Using DataLoadOptions to optimize object loading
DataLoadOptions options = new DataLoadOptions();
In this example, we create a new DataLoadOptions object called options ![]() . The main function of DataLoadOptions is to indicate which child objects load with a given object type. Since we want to make sure we load our books whenever we
load the subjects, we tell the options to LoadWith<Subject> and pass it a function in the form of an expression
. The main function of DataLoadOptions is to indicate which child objects load with a given object type. Since we want to make sure we load our books whenever we
load the subjects, we tell the options to LoadWith<Subject> and pass it a function in the form of an expression ![]() . We could pass an actual delegate, but since we have lambda expressions at our disposal, we can tell it, “given a subject,
load the Books EntitySet.” All that remains is to attach our options to our data context
. We could pass an actual delegate, but since we have lambda expressions at our disposal, we can tell it, “given a subject,
load the Books EntitySet.” All that remains is to attach our options to our data context ![]() .
.
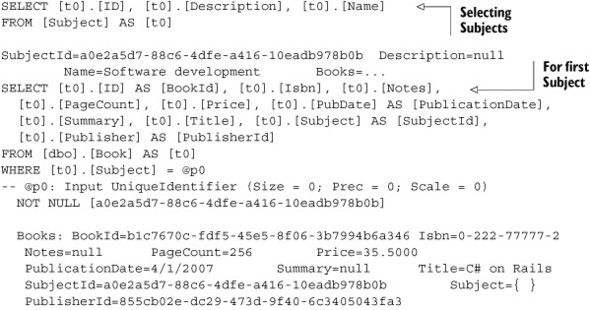
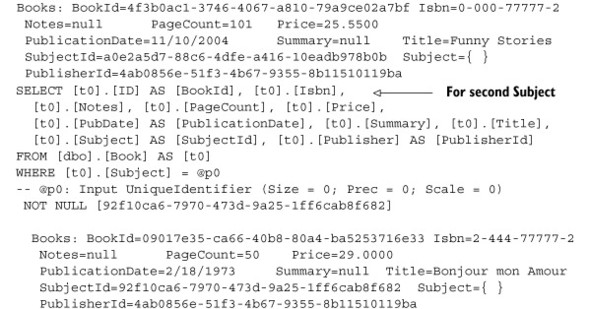
With the new options in place, run the example again. Here is the SQL that LINQ generates:
SELECT [t0].[ID], [t0].[Description], [t0].[Name],
  [t1].[ID] AS [BookId], [t1].[Isbn], [t1].[Notes], [t1].[PageCount],
  [t1].[Price], [t1].[PubDate] AS [PublicationDate], [t1].[Summary],
  [t1].[Title], [t1].[Subject] AS [SubjectId],
  [t1].[Publisher] AS [PublisherId], (
    SELECT COUNT(*)
    FROM [dbo].[Book] AS [t2]
    WHERE [t2].[Subject] = [t0].[ID]
    ) AS [count]
FROM [Subject] AS [t0]
LEFT OUTER JOIN [dbo].[Book] AS [t1] ON [t1].[Subject] = [t0].[ID]
ORDER BY [t0].[ID], [t1].[ID]
By specifying the DataLoadOptions of the data that we want to access, we eliminate the multiple subqueries that were necessary with the previous lazy loaded implementation. This should provide much-improved interaction between our client application and the database. Of course, if we know we won’t need the books, we shouldn’t fetch them, but if we know we will need to work with the books for each category, we can load them up-front and provide a more responsive application.
Be aware that the load options can be set only once on an instance of a context. Once set, they cannot be changed for that instance. Using the DataLoadOptions offers powerful control over the desired results, but take more care when using it.
Simply by specifying the DataLoadOptions, we do not eliminate the multiple fetches if we try to iterate over our results twice. In order to finish our optimization, we can combine the DataLoadOptions with the ToList method. Using both of these together, we can make sure that we access our database once and ensure that the subjects and books are joined properly.
Using joins gives LINQ to SQL a powerful ability to drill into data. Whether we choose to work in an object-oriented manner or mimic relational interaction, we can specify the mapping once and then focus on the business needs. We do need to be careful and check the underlying database interaction to make sure we’re optimizing it as we should. In many simple operations, the default behavior is fine. However, there are times when refactoring our code can produce dramatic improvements in the resulting implementation. If we really need control over the data we receive, we do have additional options including stored procedures and user-defined functions, which we will look at in chapter 8. For now, let’s move beyond simply fetching data and look at options we have to save our data once we change it.
6.6. Updating data
If we were limited to fetching data, the functionality would be no more than a reporting tool. Luckily, updating the data is just as simple as fetching it. As long as we have a persistent DataContext object, we can make additions, alterations, and deletions using standard methods on the table objects. The DataContext keeps track of the changes and handles updating the database with a single method call.
To begin, let’s look at an example that updates the price of our most expensive books so we can offer a discount on them (see listing 6.28). In this case, we fetch only the books that are “expensive”—where the price is greater than $30—and then iterate over them, reducing the price of each by $5. Finally, we persist the changes to our database by calling the SubmitChanges method on our DataContext object.
Listing 6.28. Updating values and committing them to the database
DataContext dataContext = new DataContext(liaConnectionString); var ExpensiveBooks =
The code in listing 6.28 is straightforward C# code. We start by fetching the records that we want to modify ![]() . We then make the necessary changes by working with the book object just as we would with any other collection
. We then make the necessary changes by working with the book object just as we would with any other collection ![]() . Once we’re done, we call SubmitChanges to commit the changes
. Once we’re done, we call SubmitChanges to commit the changes ![]() . We don’t need to worry about creating a separate mapping to issue an update command. The context takes the same metadata
we created for querying and uses it to generate the necessary update statement. Here is the SQL that was generated for our example:
. We don’t need to worry about creating a separate mapping to issue an update command. The context takes the same metadata
we created for querying and uses it to generate the necessary update statement. Here is the SQL that was generated for our example:
UPDATE [Book]
SET [Price] = @p8
WHERE ([ID] = @p0) AND ([Isbn] = @p1) AND ([Notes] IS NULL) AND
  ([PageCount] = @p2) AND ([Price] = @p3) AND ([PubDate] = @p4) AND
  ([Summary] IS NULL) AND ([Title] = @p5) AND ([Subject] = @p6) AND
  ([Publisher] = @p7)
Although this code may appear to be excessive, the first two lines accomplish the update. The rest is in place to check for concurrency violations. We will look at concurrency in chapter 8. What is important at this point is to observe that the change manager of the DataContext object recognized that the only column that needs to be changed in our database is the Price field. It does not try to update any other columns or records. This reduces the amount of data we need to transmit across the network. We’re also able to queue up multiple updates into a single unit of work and commit them with a single call to SubmitChanges. We’ve seen how to read and update. Now, let’s take a look at the other two parts of the CRUD operation: create and delete.
Typically when working with collections, we’d add and remove objects by using IList’s Add and Remove methods. The traditional semantics of Add and Remove imply that the collections immediately reflect the new values. Preview releases of LINQ continued the tradition of using Add and Remove for these functions. However, users were confused when their values were not returned as part of subsequent queries until they were committed to the database. As a result, the names for these methods were changed to InsertOnSubmit and DeleteOnSubmit to reflect the nature of the implementation more accurately.
Creating new items with LINQ to SQL is as simple as calling the InsertOnSubmit method on the table object. To delete, we similarly call the DeleteOnSubmit method. Listing 6.29 demonstrates adding a book to our book collection and subsequently removing it.
Listing 6.29. Adding and removing items from a table
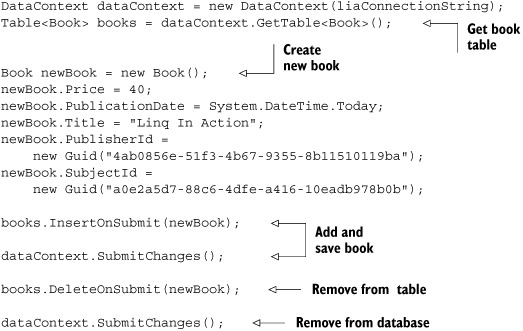
If we check the generated SQL code, we will see that the code to insert a record is a simple INSERT INTO statement. The code to delete the record is a bit more complex than a simple DELETE FROM Table structure. The extra code is required to handle potential concurrency issues. We can perform all of the standard CRUD operations using basic object method calls. The DataContext maintains the changes and automatically generates the SQL to accomplish the requested work.
6.7. Summary
In this chapter, we demonstrated how to map our relational data to object structures. Once we have the mappings set up, we can perform all of the standard query expressions and extension methods. In previous versions of ADO.NET, we had to manually implement the specific data access implementation for each scenario and separate implementations for each of the CRUD operations. With LINQ to SQL, once the mappings are defined, we can ignore the details of the database interaction. Instead, we work with the objects focusing on the business need rather than the implementation details.
Additionally, LINQ to SQL offers an advantage over LINQ to Objects in that we can capitalize on the power of the database to preprocess our results. The queries are dynamically composed to reduce the amount of network bandwidth and client processing requirements. We recommend taking a moment and trying the examples in this chapter before moving on in order to get a feel for LINQ to SQL in action.
In the next couple of chapters, we will dive deeper into the LINQ to SQL capabilities and tools. We could get started working with the technology now, but to understand how it works or some of the advanced options, keep reading. We will explain how LINQ to SQL performs its magic and explore some more advanced options. If you like what you’ve seen so far, keep reading. It gets better.