
Chapter 8: Working with Compiler Flags and Toolchains
In the previous chapter, we learned how to process Clang's AST – one of the most common formats for analyzing programs. In addition, we learned how to develop an AST plugin, which is an easy way to insert custom logic into the Clang compilation pipeline. This knowledge will help you augment your skillset for tasks such as source code linting or finding potential security vulnerabilities.
In this chapter, we are ascending from specific subsystems and looking at the bigger picture – the compiler driver and toolchain that orchestrate, configure, and run individual LLVM and Clang components according to users' needs. More specifically, we will focus on how to add new compiler flags and how to create a custom toolchain. As we mentioned in Chapter 5, Exploring Clang's Architecture, compiler drivers and toolchains are often under-appreciated and have long been ignored. However, without these two important pieces of software, compilers will become extremely difficult to use. For example, users need to pass over 10 different compiler flags merely to build a simple hello world program, owing to the lack of flag translation. Users also need to run at least three different kinds of tools in order to create an executable to run, since there are no drivers or toolchains to help us invoke assemblers and linkers. In this chapter, you will learn how compiler drivers and toolchains work in Clang and how to customize them, which is extremely useful if you want to support Clang on a new operating system or architecture.
In this section, we will cover the following topics:
- Understanding drivers and toolchains in Clang
- Adding custom driver flags
- Adding a custom toolchain
Technical requirements
In this chapter, we are still relying on the clang executable, so make sure you build it, like this:
$ ninja clang
Since we are working with a driver, as we mentioned in Chapter 5, Exploring Clang's Architecture, you can use the -### command-line option to print out the frontend flags that have been translated from the driver, like so:
$ clang++ -### -std=c++11 -Wall hello_world.cpp -o hello_world
"/path/to/clang" "-cc1" "-triple" "x86_64-apple-macosx11.0.0" "-Wdeprecated-objc-isa-usage" "-Werror=deprecated-objc-isa-usage" "-Werror=implicit-function-declaration" "-emit-obj" "-mrelax-all" "-disable-free" "-disable-llvm-verifier" … "-fno-strict-return" "-masm-verbose" "-munwind-tables" "-target-sdk-version=11.0" … "-resource-dir" "/Library/Developer/CommandLineTools/usr/lib/clang/12.0.0" "-isysroot" "/Library/Developer/CommandLineTools/SDKs/MacOSX.sdk" "-I/usr/local/include" "-stdlib=libc++" … "-Wall" "-Wno-reorder-init-list" "-Wno-implicit-int-float-conversion" "-Wno-c99-designator" … "-std=c++11" "-fdeprecated-macro" "-fdebug-compilation-dir" "/Users/Rem" "-ferror-limit" "19" "-fmessage-length" "87" "-stack-protector" "1" "-fstack-check" "-mdarwin-stkchk-strong-link" … "-fexceptions" … "-fdiagnostics-show-option" "-fcolor-diagnostics" "-o" "/path/to/temp/hello_world-dEadBeEf.o" "-x" "c++" "hello_world.cpp"…
Using this flag will not run the rest of the compilation but merely execute the driver and toolchain. This makes it a good way to verify and debug specific flags and check they are correctly propagated from the driver to the frontend.
Last but not least, in the last section of this chapter, Adding a custom toolchain, we will work on a project that can only run on Linux systems. Also, please install OpenSSL beforehand. It is usually available as a package in most Linux systems. For example, on Ubuntu, you can use the following command to install it:
$ sudo apt install openssl
We are only using the command-line utility, so there's no need to install any OpenSSL libraries that are normally used for development.
The code that will be used in this chapter can be found here: https://github.com/PacktPublishing/LLVM-Techniques-Tips-and-Best-Practices-Clang-and-Middle-End-Libraries/tree/main/Chapter08.
In the first section of this chapter, we will provide a brief introduction to Clang's driver and toolchain infrastructure.
Understanding drivers and toolchains in Clang
Before we talk about the compiler driver in Clang, it is necessary to highlight the fact that compiling a piece of code is never a single task (and not a simple one, either). In school, we were taught that a compiler consists of a lexer, a parser, sometimes came with an optimizer, and ended with an assembly code printer. While you still can see these stages in real-world compilers, they give you nothing but textual assembly code rather than an executable or library, as we would normally expect. Furthermore, this naïve compiler only provides limited flexibility – it can't be ported to any other operating systems or platforms.
To make this toy compiler more realistic and usable, many other plumber tools need to be put together, along with the core compiler: an assembler to transform assembly code into (binary format) object file, a linker to put multiple object files into an executable or library, and many other routines to resolve platform-specific configurations, such as data width, default header file paths, or Application Binary Interfaces (ABIs). Only with help from these plumbers can we use a compiler by just typing a few words:
$ clang hello_world.c -o hello_world
A compiler driver is software that organizes these plumber jobs. Despite having multiple different tasks to do during the compilation, we will only focus on two of the most important ones in this chapter – handling compiler flags and invoking the right tools on different platforms – which is what toolchains are designed for.
The following diagram shows the interactions between the driver, the toolchains, and the rest of the compiler:
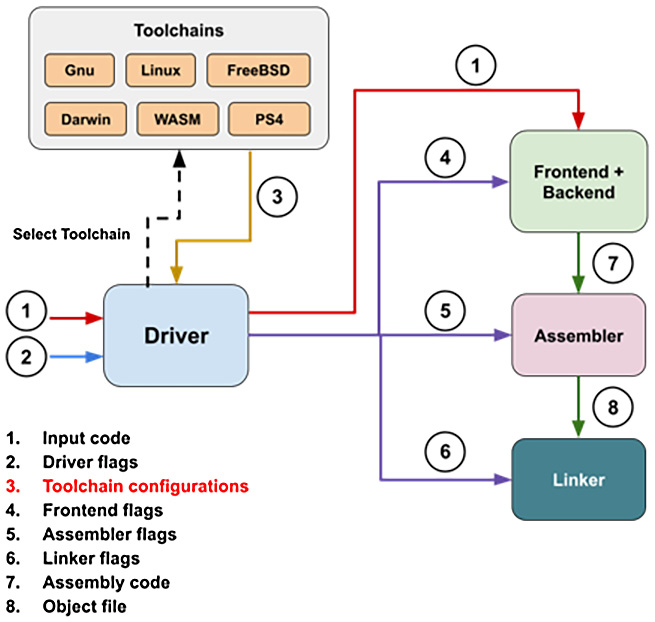
Figure 8.1 – Typical workflow of Clang's driver, toolchains, and the rest of the compiler
As shown in the preceding diagram, Clang's driver acts as a dispatcher and distributes flags and workloads to each of the compilation phases, namely the frontend/backend, the assembler, and the linker. To give you a more concrete idea of what the flags for each of these phases look like, recall the -### compiler option we introduced at the beginning of this chapter. The (massive amount of) content that's printed by that option is the flags for the frontend (4 in the preceding screenshot). For example, among those frontend flags, -internal-isystem carries the information about the system header path, including the path where the C/C++ standard library header files are stored. It is obvious that Clang's frontend needs to know where the standard library headers are stored, but as per your past experiences of using clang (or gcc), you rarely need to tell them where those headers are explicitly – the driver will do that for you. The same logic applies to the linking phase as well. Linkers usually need more than just an object file to properly generate an executable or a library. For example, they need to know where the C/C++ standard library's library files (*.a or *.so on Unix/Linux systems) are. In that case, Clang's driver will provide that information to the linkers via linker flags.
Flags and workloads – or configurations, in short – that are provided to individual compiler phases are translated from two sources: driver flags (2 in the preceding diagram) and the selected toolchain (3 in the preceding diagram). Driver flags are those provided by users via the command-line interface – that is, the compiler flags– such as -c, -Wall, and -std=c++11. In the next section, Adding custom driver flags, we will show you some examples of how Clang translates driver flags into frontend flags or even assembler/linker flags.
On the other hand, a toolchain is an entity that describes how input code should be compiled on a specific platform. Different hardware architectures and operating systems (OS) – platforms, for short – have their own way to build, load, and run programs. Take macOS X and Linux, for example. Although they both have a Unix-like environment, when building a program, the system (standard) libraries for macOS X always reside in Apple's XCode IDE package, whereas Linux usually stores them in normal folders such as /usr/include and /usr/lib. Also, macOS X uses an executable format called Mach-O, which is different from Linux's ELF format. This greatly affects how compilers (Clang) build the code.
For Clang to compile code for various platforms, it uses toolchains (which are effectively represented by the ToolChain C++ class internally) to encapsulate platform-specific information and configurations. In the early stage of compilation, Clang's driver selects a correct toolchain based on the system currently running (called the host system) or the users' preference – you can use the -target= driver flag to ask Clang to build a program for a specific platform that is different from the host system, which is effectively doing cross-compiling. Then, the driver will gather some platform-specific configurations from the selected toolchain before combining it with the aforementioned driver options and dispatching them to individual compiler phases via command-line flags. Note that different platforms usually use different assemblers and linkers. For example, macOS X can only use ld64 and lld linkers for now, whereas Linux can use ld (BFD linker), ld.gold, and lld as linkers. Therefore, a toolchain should also specify what assembler and linker to use. In the last section of this chapter, Adding a custom toolchain, we will go through an example project to learn how Clang's toolchains work. Let's start our journey by learning how driver flags work in Clang.
Adding custom driver flags
In the previous section, we explained the role of the driver and toolchains in Clang. In this section, we are going to learn how Clang's driver does this translation by adding a custom driver flag to Clang. Again, we will go through the overview for this example project first before demonstrating the detailed steps in a separate section.
Project overview
The example project we will be using for this section is going to add a new driver flag so that when that flag is given by users, a header file will be implicitly included in the input code.
To be more specific, here, we have a header file – simple_log.h – shown in the following code that defines some simple APIs to print log messages:
#ifndef SIMPLE_LOG_H
#define SIMPLE_LOG_H
#include <iostream>
#include <string>
#ifdef SLG_ENABLE_DEBUG
inline void print_debug(const std::string &M) {
std::cout << "[DEBUG] " << M << std::endl;
}
#endif
#ifdef SLG_ENABLE_ERROR
inline void print_error(const std::string &M) {
std::cout << "[ERROR] " << M << std::endl;
}
#endif
#ifdef SLG_ENABLE_INFO
inline void print_info(const std::string &M) {
std::cout << "[INFO] " << M << std::endl;
}
#endif
#endif
The goal here is to use these APIs in our code without writing the #include "simple_log.h" line to import the header file. And this feature will only be enabled when we give a custom driver flag, -fuse-simple-log, to clang. For example, let's write the following code, test.cc:
int main() {
print_info("Hello world!!");
return 0;
}
Despite its lack of any #include directives, it can still be compiled (with the -fuse-simple-log flag) and run without any problems:
$ clang++ -fuse-simple-log test.cc -o test
$ ./test
[INFO] Hello world!!
$
Moreover, we can use -fuse-<log level>-simple-log /-fno-use-<log level>-simple-log to include or exclude a function for a specific log level. For example, let's use the same preceding code snippets but add -fno-use-info-simple-log when we compile the code:
$ clang++ -fuse-simple-log -fno-use-info-simple-log test.cc -o test
test.cc:2:3: error: use of undeclared identifier 'print_info'
print_info("Hello World!!");
^
1 error generated
$
The switch for each log printing function is simply controlled by its surrounding #ifdef statements in simple_log.h. For example, print_info will only be included if SLG_ENABLE_INFO is defined. Later, in the Translating custom driver flags section, we will show you how these macro definitions are toggled by driver flags.
Last but not least, you can specify a custom path to the simple_log.h file. By default, our feature will include simple_log.h in the current folder of the source code. You can change this by supplying -fsimple-log-path=<file path> or -fuse-simple-log=<file path>. For example, we want to use an alternative version of simple_log.h – advanced_log.h, which is stored in /home/user – which provides functions with the same interfaces but different implementations. Now, we can use the following commands:
$ clang++ -fuse-simple-log=/home/user/advanced_log.h test.cc -o test
[01/28/2021 20:51 PST][INFO] Hello World!!
$
The following section will show you how to change the code in Clang's driver so that you can implement these features.
Declaring custom driver flags
First, we will lead you through the steps to declare custom driver flags such as -fuse-simple-log and -fno-use-info-simple-log. Then, we are going to wire those flags to the real frontend functionalities.
Clang uses TableGen syntax to declare all kinds of compiler flags – both driver flags and frontend flags.
TableGen
TableGen is a Domain-Specific Language (DSL) that's used for declaring structural and relational data. To learn more, please check out Chapter 4, TableGen Development.
All these flag declarations are put in clang/include/clang/Driver/Options.td. Take the common -g flag, for example, which tells you that you want to generate source-level debug information. For example, it has a declaration like this:
def g_Flag : Flag<["-"], "g">, Group<g_Group>,
HelpText<"Generate source-level debug information">;
The TableGen record, g_Flag, is created from several TableGen classes: Flag, Group, and HelpText. Among them, we are most interested in Flag, whose template values (["-"] and "g") describe the actual command-line flag format. Note that when we are declaring a boolean flag – the value of this flag is determined by its presence and no other values follow – as in this case, we inherit from the Flag class.
In cases where we want to declare a flag that has values that follow an equal sign ("="), we inherit from the Joined class. For example, the TableGen declaration for -std=<C++ standard name> looks like this:
def std_EQ : Joined<["-", "--"], "std=">, Flags<[CC1Option]>, …;
Usually, the record names (std_EQ, in this case) for these kinds of flags have _EQ as their suffices.
Last but not least, the Flags (plural) class can be used to specify some properties. For example, CC1Options in the preceding snippet tells us that this flag can also be a frontend flag.
Now that we've learned how driver flags are generally declared, it is time to create our own:
- First, we are going to deal with the -fuse-simple-log flag. Here is how we declare it:
def fuse_simple_log : Flag<["-"], "fuse-simple-log">,
Group<f_Group>, Flags<[NoXarchOption]>;
This snippet basically has no differences from the examples we used previously, except for the Group class and NoXarchOption. The former specifies the logical group this flag belongs to – for example, f_Group is for flags starting with -f. The latter tells us that this flag can only be used in the driver. You cannot, for example, pass it to the frontend (but how do we pass flags directly to the frontend? We will answer this question shortly, at the end of this section).
Note that we only declare -fuse-simple-log here but not -fuse-simple-log=<file path> – that will be done in another flag that we will introduce shortly.
- Next, we are dealing with -fuse-<log level>-simple-log and -fno-use-<log level>-simple-log. In both GCC and Clang, it is pretty common to see pairwise flags such as -f<flag name>/-fno-<flag name> to enable or disable a certain feature. Therefore, Clang provides a handy TableGen utility – BooleanFFlag – to make creating pairwise flags easier. Please see the declarations for -fuse-error-simple-log/-fno-use-error-simple-log in the following code:
defm use_error_simple_log : BooleanFFlag<"use-error-simple-log">, Group<f_Group>, Flags<[NoXarchOption]>;
BooleanFFlag is a multiclass (so make sure you use defm rather than def to create the TableGen record). Under the hood, it creates TableGen records for both -f<flag name> and -fno-<flag name> at the same time.
Now that we've learned how use_error_simple_log was created, we can use the same trick to create TableGen records for other log levels:
defm use_debug_simple_log : BooleanFFlag<"use-debug-simple-log">, Group<f_Group>, Flags<[NoXarchOption]>;
defm use_info_simple_log : BooleanFFlag<"use-info-simple-log">, Group<f_Group>, Flags<[NoXarchOption]>;
- Finally, we are declaring the -fuse-simple-log=<file path> and -fsimple-log-path=<file path> flags. In the previous steps, we were only dealing with boolean flags, but here, we are creating flags that have values that follow the equal sign, so we are using the Joined class we introduced earlier:
def fsimple_log_path_EQ : Joined<["-"], "fsimple-log-path=">, Group<f_Group>, Flags<[NoXarchOption]>;
def fuse_simple_log_EQ : Joined<["-"], "fuse-simple-log=">, Group<f_Group>, Flags<[NoXarchOption]>;
Again, flags with values will usually use _EQ in their TableGen record name suffix.
That wraps up all the necessary steps for declaring our custom driver flags. During Clang's building process, these TableGen directives will be translated into C++ enums and other utilities that are used by the driver. For example, -fuse-simple-log=<file path> will be represented by an enum; that is, options::OPT_fuse_simple_log_EQ. The next section will show you how to query these flags from all the command-line flags given by users and, most importantly, how to translate our custom flags into their frontend counterparts.
Translating custom driver flags
Recall that compiler drivers do a lot of things for users under the hood. For instance, they figure out the correct toolchain based on the compilation target and translate driver flags that have been designated by users, which is what we are going to do next. In our case here, we want to include the simple_log.h header file for users when our newly created -fuse-simple-log is given and define macro variables such as SLG_ENABLE_ERROR to include or exclude certain log printing functions, depending on the -fuse-<log level>-simple-log/-fno-use-<log level>-simple-log flags. More specifically, these tasks can be broken down into two parts:
- If -fuse-simple-log is given, we are translating it into a frontend flag:
-include "simple_log.h"
The -include frontend flag, as its name suggests, implicitly includes the designated file in the compiling source code.
Using the same logic, if -fuse-simple-log=/other/file.h or -fuse-simple-log -fsimple-log-path=/other/file.h are given, they will be translated into the following:
-include "/other/file.h"
- If either -fuse-<log level>-simple-log or -fno-use-<log level>-simple-log is given – for instance, -fuse-error-simple-log – it will be translated into the following:
-D SLG_ENABLE_ERROR
The -D flag implicitly defines a macro variable for the compiling source code.
However, if only -fuse-simple-only is given, the flag will implicitly include all the log printing functions. In other words, -fuse-simple-only will not only be translated into the -include flag, as introduced in previous bullet point, but also the following flags:
-D SLG_ENABLE_ERROR -D SLG_ENABLE_DEBUG -D SLG_ENABLE_INFO
Let's say a combination of -fuse-simple-log and -fno-use-<log level>-simple-log are used together, for example:
-fuse-simple-log -fno-use-error-simple-log
They will be translated into the following code:
-include "simple_log.h" -D SLG_ENABLE_DEBUG -D SLG_ENABLE_INFO
Last but not least, we also allow the following combinations:
-fuse-info-simple-log -fsimple-log-path="my_log.h"
That is, we only enable a single log printing function without using -fuse-simple-log (instead of using the latter flag and subtracting two other log printing functions) and use a custom simple log header file. These driver flags will be translated into the following code:
-include "my_log.h" -D SLG_ENABLE_INFO
The aforementioned rules and combinations of flags can actually be handled in a pretty elegant way, albeit being complex at first glance. We will show you how to do this shortly.
Now that we have learned what frontend flags we are going to translate to, it is time to learn how to do these translations.
The place where many driver flags translations happen is inside the driver::tools::Clang C++ class. More specifically, this happens in its Clang::ConstructJob method, which is located in the clang/lib/Driver/ToolChains/Clang.cpp file.
About driver::tools::Clang
Some of the most prominent questions for this C++ class are probably, what concept does it represent? Why is it put under the folder named ToolChains? Does that mean it is also a toolchain? While we will answer these questions in detail in the next section, Adding a custom toolchain, for now, you can just think of it as the representative of Clang's frontend. This (kind of) explains why it is responsible for translating driver flags into frontend ones.
Here are the steps to translate our custom driver flags. The following code can be inserted anywhere within the Clang::ConstructJob method, before the addDashXForInput function is called, which starts to wrap up the translation process:
- First, we are defining a help class – SimpleLogOpts – to carry our custom flag's information:
struct SimpleLogOpts {
// If a certain log level is enabled
bool Error = false,
Info = false,
Debug = false;
static inline SimpleLogOpts All() {
return {true, true, true};
}
// If any of the log level is enabled
inline operator bool() const {
return Error || Info || Debug;
}
};
// The object we are going to work on later
SimpleLogOpts SLG;
The bool fields in SimpleLogOpts – Error, Info, and Debug – represent log levels that are enabled by our custom flags. We also define a helper function SimpleLogOpts::All() to create a SimpleLogOpts in which all log levels are enabled, and a bool type conversion operator such that we can use a cleaner syntax, shown here, to tell us if any of the levels are enabled:
if (SLG) {
// At least one log level is enabled!
}
- Let's handle the simplest case first – the -fuse-simple-log flag. In this step, we are only going to turn on all the log levels in SLG when we see a -fuse-simple-log flag.
Inside the Clang::ConstructJob method, the driver flags given by users are stored in the Args variable (one of the arguments for ConstructJob), which is of the ArgList type. There are many ways to query Args, but here, since we only care about the presence of -fuse-simple-log, hasArg is the most suitable option:
if (Args.hasArg(options::OPT_fuse_simple_log)) {
SLG = SimpleLogOpts::All();
}
Each flag we declared in the previous code via TableGen syntax will be represented by a unique enum under the options namespace. In this case, the enum value is OPT_fuse_simple_log. The name of the enum value is usually OPT_, followed by the TableGen record name (that is, the name follows def or defm) when we were declaring the flag. The ArgList::hasArg function will return true if the given flag identifier is present in the input driver flags.
In addition to -fuse-simple-log, we also need to turn on all the log levels when -fuse-simple-log=<file path> is given, even though we are only going to handle the file path that follows later. Thus, we will change the preceding snippet into the following:
if (Args.hasArg(options::OPT_fuse_simple_log,
options::OPT_fuse_simple_log_EQ)) {
SLG = SimpleLogOpts::All();
}
ArgList::hasArg can actually take multiple flag identifiers and return true if any of them are present in the input driver flags. And again, the -fuse-simple-log=<…> flag is represented by OPT_fuse_simple_log_EQ since its TableGen record name is fuse_simple_log_EQ.
- Next, we are going to handle -fuse-<log level>-simple-log/-fno-use-<log level>-simple-log. Taking the error level, as an example (flags for other levels are used in the exact same way, so we are not showing them here), here, we are leveraging the ArgList::hasFlag function:
SLG.Error = Args.hasFlag(options::OPT_fuse_error_simple_log, options::OPT_fno_use_error_simple_log, SLG.Error);
The hasFlag function will return true or false if the flag that's represented by the first (OPT_fuse_error_simple_log here) or second (OPT_fno_use_error_simple_log here) argument is present in the input driver flags, respectively.
If neither of the flags are present, hasFlag will return a default value that's designated by its third argument (SLG.Error, in this case).
Using this mechanism, we have already implemented some of the (complex) rule and flag combinations we mentioned earlier in this section:
a) The -fno-use-<log level>-simple-log flags can disable certain log printing function(s) when -fuse-simple-log – which effectively includes all the log printing functions in the first place – is present.
b) Even without the presence of -fuse-simple-log, we can still enable individual log printing functions by using the -fuse-<log level>-simple-log flag(s).
- Currently, we are only playing around with the SimpleLogOpts data structure. Starting from the next step, we will start to generate frontend flags according to the SimpleLogOpts instance we have built so far. The first frontend flag we are generating here is -include <file path>. First, it only makes sense to proceed if at least one log level has been enabled. Therefore, we will wrap the generation of -include with an if statement by checking on SLG, as we explained earlier:
if (SLG) {
CmdArgs.push_back("-include");
…
}
The CmdArgs (a local variable – with a vector-like type – inside Clang::ConstructJob) is the place where we will put our frontend flags.
Note that you cannot push a frontend flag containing any white space. For instance, you cannot do something like this:
if (SLG) {
CmdArgs.push_back("-include simple_log.h"); // Error
…
}
This is because, eventually, this vector (CmdArgs) will be treated as argv, which we can see in the main function of C/C++, and any white space within a single argument will create failures when those arguments are realized.
Instead, we are pushing the path to a simple log header file separately, as follows:
if (SLG) {
CmdArgs.push_back("-include");
if (Arg *A = Args.getLastArg(options::OPT_fuse_simple_ log_EQ, options::OPT_fsimple_log_path_EQ))
CmdArgs.push_back(A->getValue());
else
CmdArgs.push_back("simple_log.h");
…
}
The ArgList::getLastArg function will retrieve the value (the last value, if there are multiple occurrences of the same flag), follow a given flag, and return null if none of those flags are present. For instance, in this case, the flag is -fuse-simple-log= (-fsimple-log-path= in the second argument is just the alias flag of the first one).
- Finally, we are generating frontend flags that control which log printing functions should be enabled. Again, we are only showing the code for one of the log levels here since other levels are using the same approach:
if (SLG) {
…
if (SLG.Error) {
CmdArgs.push_back("-D");
CmdArgs.push_back("SLG_ENABLE_ERROR");
}
…
}
These are basically all the modifications that are required for our project. The final thing we must do before we move on is verify our work. Recall the -### command-line flag, which is used to print all the flags that are passed to the frontend. We are using it here to see if our custom driver flags are translated properly.
First, let's try this command:
$ clang++ -### -fuse-simple-log -c test.cc
The output should contain these strings:
"-include" "simple_log.h" "-D" "SLG_ENABLE_ERROR" "-D" "SLG_ENABLE_INFO" "-D" "SLG_ENABLE_DEBUG"
Now, let's try the following command:
$ clang++ -### -fuse-simple-log=my_log.h -fno-use-error-simple-log -c test.cc
Tthe output should contain these strings:
"-include" "my_log.h" "-D" "SLG_ENABLE_INFO" "-D" "SLG_ENABLE_DEBUG"
Finally, let's use the following command:
$ clang++ -### -fuse-info-simple-log -fsimple-log-path=my_log.h -c test.cc
The output should contain the following strings :
"-include" "my_log.h" "-D" "SLG_ENABLE_INFO"
In the last subsection of this section, we are going to talk about some miscellaneous ways to pass flags to the frontend.
Passing flags to the frontend
In the previous sections, we showed you the differences between driver flags and frontend flags, how they are related, and how Clang's driver translates the former into the latter. At this point, you might be wondering, can we skip through the driver and pass the flags directly to the frontend? What flags are we allowed to pass?
The short answer for the first question is yes, and you have actually already done that several times in previous chapters. Recall that in Chapter 7, Handling AST, we developed a plugin – more specifically, an AST plugin. We were using command-line arguments like the one shown here to load and run our plugin inside Clang:
$ clang++ -fplugin=MyPlugin.so
-Xclang -plugin -Xclang ternary-converter
-fsyntax-only test.cc
You might already find that, somehow, we need to precede a -Xclang flag before the -plugin and ternary-converter arguments. And the answer is simple: this is because -plugin (and its value, ternary-converter) is a frontend-only flag.
To pass a flag directly to the frontend, we can put -Xclang in front of it. But there is a caveat of using -Xclang: a single -Xclang will only relay one succeeding command-line argument (a string without any whitespace) to the frontend. In other words, you cannot rewrite the preceding plugin loading example like this:
# Error: `ternary-converter` will not be recognized
$ clang++ -fplugin=MyPlugin.so
-Xclang -plugin ternary-converter
-fsyntax-only test.cc
This is because -Xclang will only transfer -plugin to the frontend and leave ternary-converter behind, in which case Clang will fail to know which plugin to run.
Another way to pass flags directly to the frontend would be using -cc1. Recall that when we were using -### to print out the frontend flags that had been translated by the driver in the previous sections, among those frontend flags, the first one that followed the path to the clang executable was always -cc1. This flag effectively collects all the command-line arguments and sends them to the frontend. Though this looks handy – there's no need to prefix every flag we want to pass to the frontend with -Xclang anymore – be careful that you are not allowed to mix any driver-only flags inside that list of flags. For example, earlier in this section, when we were declaring our -fuse-simple-log flag in TableGen syntax, we annotated the flag with NoXarchOption, which stated that it can only be used by the driver. In that case, -fuse-simple-log cannot appear after -cc1.
This leads us to our final question: what flags can be used by either the driver or the frontend, and what flags are accepted by both? The answer can actually be seen via NoXarchOption, which was just mentioned. When declaring flags – either for the driver or the frontend – in TableGen syntax, you can use the Flags<…> TableGen class and its template parameters to enforce some constraints. For instance, using the following directives, you can prevent the -foo flag from being used by the driver:
def foo : Flag<["-"], "foo">, Flags<[NoDriverOption]>;
In addition to NoXarchOption and NoDriverOption, here are some other common annotations you can use in Flags<…>:
- CoreOption: States that this flag can be shared by both clang and clang-cl. clang-cl is an interesting driver that is compatible with the command-line interface (including command-line arguments) used by MSVC (the compiler framework used by Microsoft Visual Studio).
- CC1Option: States that this flag can be accepted by the frontend. It doesn't say it's a frontend-only flag, though.
- Ignored: States that this flag is going to be ignored by Clang's driver (but continue the compilation process). GCC has many flags that are not supported in Clang (either obsolete or just not applicable). However, Clang actually tries to recognize those flags but does nothing except show a warning message about a lack of implementation. The rationale behind this is we hope that Clang can be a drop-in replacement for GCC without the need to modify the existing building scripts in many projects (without this compatibility layer, Clang will terminate the compilation when it sees unknown flags).
In this section, we learned how to add custom flags for Clang's driver and implemented the logic to translate them into frontend flags. This skill is pretty useful when you want to toggle custom features in a more straightforward and clean way.
In the next section, we are going to learn the role of a toolchain and how it works in Clang by creating our own custom one.
Adding a custom toolchain
In the previous section, we learned how to add custom flags for the driver in Clang and learned how the driver translated them into flags that are accepted by the frontend. In this section, we are going to talk about the toolchain – an important module inside the driver that helps it adapt to different platforms.
Recall that in the first section of this chapter, Understanding drivers and toolchains in Clang, we showed the relationships between driver and toolchains in Figure 8.1: the driver chooses a proper toolchain based on the target platform before leveraging its knowledge to do the following:
- Execute the correct assembler, linker, or any tool that is required for the target code's generation.
- Pass platform-specific flags to the compiler, assembler, or linker.
This information is crucial for building the source code since each platform might have its own unique characteristics, such as system library paths and supported assembler/linker variants. Without them, a correct executable or library cannot even be generated.
This section hopes to teach you how to create Clang toolchains for custom platforms in the future. The toolchain framework in Clang is powerful enough to be adapted to a wide variety of use cases. For example, you can create a toolchain that resembles conventional compilers on Linux – including using GNU AS to assemble and GNU LD for linking – without you needing to make many customizations to a default library path or compiler flags. On the other hand, you can have an exotic toolchain that does not even use Clang to compile source code and uses a propriety assembler and linker with uncommon command-line flags. This section will try to use an example that catches the most common use cases without missing this framework's flexible aspect.
This section is organized as follows: as usual, we will start with an overview of the project we are going to work on. After that, we will break down our project workload into three parts – adding custom compiler options, setting up a custom assembler, and setting up a custom linker – before we put them together to wrap up this section.
System requirements
As another friendly reminder, the following project can only work on Linux systems. Please make sure OpenSSL is installed.
Project overview
We are going to create a toolchain called Zipline, which still uses Clang (its frontend and backend) to do normal compilation but encode the generated assembly code using Base64 during the assembling phase, and package those Base64-encoded files into a ZIP file (or .tarbell file) during the linking phase.
Base64
Base64 is an encoding scheme that is commonly used to convert binary into plain text. It can be easily transmitted in a context that does not support binary format (for example, HTTP headers). You can also apply Base64 to normal textual files, just like in our case.
This toolchain is basically useless in production environments. It's merely a demo that emulates common situations a developer might encounter when they're creating a new toolchain for custom platforms.
This toolchain is enabled by a custom driver flag, -zipline/--zipline. When the flag is provided, first, the compiler will implicitly add the my_include folder to your home directory as one of the header files searching the path. For example, recall that in the previous section, Adding custom driver flags, our custom -fuse-simple-log flag would implicitly include a header file, simple_log.h, in the input source code:
$ ls
main.cc simple_log.h
$ clang++ -fuse-simple-log -fsyntax-only main.cc
$ # OK
However, if simple_log.h is not in the current directory, as in the preceding snippet, we need to specify its full path via another flag:
$ ls .
# No simple_log.h in current folder
main.cc
$ clang++ -fuse-simple-log=/path/to/simple_log.h -fsyntax-only main.cc
$ # OK
With the help of Zipline, you can put simple_log.h inside /home/<user name>/my_include, and the compiler will find it:
$ ls .
# No simple_log.h in current folder
main.cc
$ ls ~/my_include
simple_log.h
$ clang++ -zipline -fuse-simple-log -fsyntax-only main.cc
$ # OK
The second feature of Zipline is that the clang executable will compile the source code into assembly code that's encoded by Base64 under the -c flag, which was supposed to assemble the assembly file – coming out from the compiler – into an object file. Here is an example command:
$ clang -zipline -c test.c
$ file test.o
test.o: ASCII text # Not (binary) object file anymore
$ cat test.o
CS50ZXh0CgkuZmlsZQkidGVzdC5jYyIKCS 5nbG9ibAlfWjNmb29pCgkucDJhbGln
bgk0LCAweDkwCgkudHlwZQlfWjNmb29p LEBmdW5jdGlvbgpfWjNmb29pOgoJLmNm
… # Base64 encoded contents
$
The preceding file command showed that the generated file, test.o, from the previous invocation of clang, is no longer a binary format object file. The content of this file is now a Base64-encoded version of the assembly code that was generated from the compiler's backend.
Finally, Zipline replaces the original linking stage with a custom one that packages and compresses the aforementioned Base64-encoded assembly files into a .zip file. Here is an example:
$ clang -zipline test.c -o test.zip
$ file test.zip
test.zip: Zip archive, at least v2.0 to extract
$
If you unzip test.zip, you will find that those extracted files are Base64-encoded assembly files, as we mentioned earlier.
Alternatively, we can use Linux's tar and gzip utilities to package and compress them in Zipline. Let's look at an example:
$ clang -zipline -fuse-ld=tar test.c -o test.tar.gz
$ file test.tar.gz
test.tar.gz: gzip compressed data, from Unix, original size…
$
By using the existing -fuse-ld=<linker name> flag, we can choose between using zip or tar and gzip for our custom linking phase.
In the next section, we are going to create the skeleton code for this toolchain and show you how to add an additional folder to the header file searching path.
Creating the toolchain and adding a custom include path
In this section, we are going to create the skeleton for our Zipline toolchain and show you how to add an extra include folder path – more specifically, an extra system include path – to the compilation stage within Zipline. Here are the detailed steps:
- Before we add a real toolchain implementation, don't forget that we are going to use a custom driver flag, -zipline/--zipline, to enable our toolchain. Let's use the same skill we learned in the previous section, Adding custom driver flags, to do that. Inside clang/include/clang/Driver/Options.td, we will add the following lines:
// zipline toolchain
def zipline : Flag<["-", "--"], "zipline">,
Flags<[NoXarchOption]>;
Again, Flag tells us this is a boolean flag and NoXarchOption tells us that this flag is driver-only. We will use this driver flag shortly.
- Toolchains in Clang are represented by the clang::driver::ToolChain class. Each toolchain supported by Clang is derived from it, and their source files are put under the clang/lib/Driver/ToolChains folder. We are going to create two new files there: Zipline.h and Zipline.cpp.
- For Zipline.h, let's add the following skeleton code first:
namespace clang {
namespace driver {
namespace toolchains {
struct LLVM_LIBRARY_VISIBILITY ZiplineToolChain
: public Generic_ELF {
ZiplineToolChain(const Driver &D, const llvm::Triple &Triple, const llvm::opt::ArgList &Args)
: Generic_ELF(D, Triple, Args) {}
~ZiplineToolChain() override {}
// Disable the integrated assembler
bool IsIntegratedAssemblerDefault() const override
{ return false; }
bool useIntegratedAs() const override { return false; }
void
AddClangSystemIncludeArgs(const llvm::opt::ArgList &DriverArgs, llvm::opt::ArgStringList &CC1Args)
const override;
protected:
Tool *buildAssembler() const override;
Tool *buildLinker() const override;
};
} // end namespace toolchains
} // end namespace driver
} // end namespace clang
The class we created here, ZiplineToolChain, is derived from Generic_ELF, which is a subclass of ToolChain that's specialized for systems that use ELF as its execution format – including Linux. In addition to the parent class, there are three important methods that we are going to implement in this or later sections: AddClangSystemIncludeArgs, buildAssembler, and buildLinker.
- The buildAssembler and buildLinker methods generate Tool instances that represent the commands or programs to be run in the assembling and linking stages, respectively. We will cover them in the following sections. Now, we are going to implement the AddClangSystemIncludeArgs method. Inside Zipline.cpp, we will add its method body:
void ZiplineToolChain::AddClangSystemIncludeArgs(
const ArgList &DriverArgs,
ArgStringList &CC1Args) const {
using namespace llvm;
SmallString<16> CustomIncludePath;
sys::fs::expand_tilde("~/my_include", CustomIncludePath);
addSystemInclude(DriverArgs,
CC1Args, CustomIncludePath.c_str());
}
The only thing we are doing here is calling the addSystemInclude function with the full path to the my_include folder located in the home directory. Since each user's home directory is different, we are using the sys::fs::expand_tilde helper function to expand ~/my_include – where ~ represents the home directory in Linux and Unix systems – in the absolute path. The addSystemInclude function, on the other hand, helps you add "-internal-isystem" "/path/to/my_include" flags to the list of all the frontend flags. The -internal-isystem flag is used for designating folders of system header files, including standard library headers and some platform-specific header files.
- Last but not least, we need to teach the driver to use the Zipline toolchain when it sees our newly created -zipline/--zipline driver flag. We are going to modify the Driver::getToolChain method inside clang/lib/Driver/Driver.cpp to do so. The Driver::getToolChain method contains a huge switch case for selecting different toolchains based on the target operating system and hardware architecture. Please navigate to the code handling the Linux system; we are going to add an extra branch condition there:
const ToolChain
&Driver::getToolChain(const ArgList &Args,
const llvm::Triple &Target) const {
…
switch (Target.getOS()) {
case llvm::Triple::Linux:
…
else if (Args.hasArg(options::OPT_zipline))
TC = std::make_unique<toolchains::ZiplineToolChain> (*this, Target, Args);
…
break;
case …
case …
}
}
The extra else-if statement basically says that if the target OS is Linux, then we will use Zipline when the -zipline/--zipline flag is given.
With that, you have added the skeleton of Zipline and successfully told the driver to use Zipline when a custom driver flag is given. On top of that, you've also learned how to add extra system library folders to the header file search path.
In the next section, we are going to create a custom assembling stage and connect it to the toolchain we created here.
Creating a custom assembling stage
As we mentioned in the Project overview section, instead of doing regular assembling to convert assembly code into an object file in the assembling stage of Zipline, we are invoking a program to convert the assembly file we generated from Clang into its Base64-encoded counterpart. Before we go deeper into its implementation, let's learn how each of these stages in a toolchain is represented.
In the previous section, we learned that a toolchain in Clang is represented by the ToolChain class. Each of these ToolChain instances is responsible for telling the driver what tool to run in each compilation stage – namely compiling, assembling, and linking. And this information is encapsulated inside a clang::driver::Tool type object. Recall the buildAssembler and buildLinker methods in the previous section; they return the very Tool type objects that depict the actions to perform and the tool to run in the assembling and linking stages, respectively. In this section, we will show you how to implement the Tool object that's returned by buildAssembler. Let's get started:
- Let's go back to Zipline.h first. Here, we are adding an extra class, Assembler, inside the clang::driver::tools::zipline namespace:
namespace clang {
namespace driver {
namespace tools {
namespace zipline {
struct LLVM_LIBRARY_VISIBILITY Assembler : public Tool {
Assembler(const ToolChain &TC)
: Tool("zipeline::toBase64", "toBase64", TC) {}
bool hasIntegratedCPP() const override { return false; }
void ConstructJob(Compilation &C, const JobAction &JA,
const InputInfo &Output,
const InputInfoList &Inputs,
const llvm::opt::ArgList &TCArgs,
const char *LinkingOutput) const override;
};
} // end namespace zipline
} // end namespace tools
namespace toolchains {
struct LLVM_LIBRARY_VISIBILITY ZiplineToolChain … {
…
};
} // end namespace toolchains
} // end namespace driver
} // end namespace clang
Be careful because the newly created Assembler resides in the clang::driver::tools::zipline namespace, while ZiplineToolChain, which we created in the previous section, is in clang::driver::toolchains.
The Assembler::ConstructJob method is where we will put our logic for invoking Base64 encoding tools.
- Inside Zipline.cpp, we will implement the method body of Assembler::ConstructJob:
void
tools::zipline::Assembler::ConstructJob(Compilation &C,
const JobAction &JA,
const InputInfo &Output,
const InputInfoList &Inputs,
const ArgList &Args,
const char *LinkingOutput) const {
ArgStringList CmdArgs;
const InputInfo &II = Inputs[0];
std::string Exec =
Args.MakeArgString(getToolChain(). GetProgramPath("openssl"));
// opeenssl base64 arguments
CmdArgs.push_back("base64");
CmdArgs.push_back("-in");
CmdArgs.push_back(II.getFilename());
CmdArgs.push_back("-out");
CmdArgs.push_back(Output.getFilename());
C.addCommand(
std::make_unique<Command>(
JA, *this, ResponseFileSupport::None(),
Args.MakeArgString(Exec), CmdArgs,
Inputs, Output));
}
We are using OpenSSL to do the Base64 encoding, and the command we hope to run is as follows:
$ openssl base64 -in <input file> -out <output file>
The job of the ConstructJob method is building a program invocation to run the previous command. It is realized by the C.addCommand(…) function call at the very end of ConstructJob. The Command instance that's passed to the addCommand call represents the concrete command to be run during the assembling stage. It contains necessary information such as the path to the program executable (the Exec variable) and its arguments (the CmdArgs variable).
For the Exec variable, the toolchain has provided a handy utility, the GetProgramPath function, to resolve the absolute path of an executable for you.
The way we build arguments for openssl (the CmdArgs variable), on the other hand, is very similar to the thing we did in the Adding custom driver flags section: translating driver flags (the Args argument) and the input/output file information (the Output and Inputs argument) into a new set of command-line arguments and storing them in CmdArgs.
- Finally, we connect this Assembler class with ZiplineToolChain by implementing the ZiplineToolChain::buildAssembler method:
Tool *ZiplineToolChain::buildAssembler() const {
return new tools::zipline::Assembler(*this);
}
These are all the steps we need to follow to create a Tool instance that represents the command to run during the linking stage of our Zipline toolchain.
Creating a custom linking stage
Now that we've finished the assembler stage, it's time to move on to the next stage – the linking stage. We are going to use the same approach we used in the previous section; that is, we will create a custom Tool class representing the linker. Here are the steps:
- Inside Zipline.h, create a Linker class that is derived from Tool:
namespace zipline {
struct LLVM_LIBRARY_VISIBILITY Assembler : public Tool {
…
};
struct LLVM_LIBRARY_VISIBILITY Linker : public Tool {
Linker(const ToolChain &TC)
: Tool("zipeline::zipper", "zipper", TC) {}
bool hasIntegratedCPP() const override { return false; }
bool isLinkJob() const override { return true; }
void ConstructJob(Compilation &C, const JobAction &JA,
const InputInfo &Output,
const InputInfoList &Inputs,
const llvm::opt::ArgList &TCArgs,
const char *LinkingOutput) const override;
private:
void buildZipArgs(const JobAction&, const InputInfo&,
const InputInfoList&,
const llvm::opt::ArgList&,
llvm::opt::ArgStringList&) const;
void buildTarArgs(const JobAction&,
const InputInfo&, const InputInfoList&,
const llvm::opt::ArgList&,
llvm::opt::ArgStringList&) const;
};
} // end namespace zipline
In this Linker class, we also need to implement the ConstructJob method to tell the driver what to execute during the linking stage. Differently from Assembler, since we need to support both the zip and tar + gzip packaging/compression schemes, we will add two extra methods, buildZipArgs and buildTarArgs, to handle argument building for each.
- Inside Zipline.cpp, we'll focus on the implementation of Linker::ConstructJob first:
void
tools::zipline::Linker::ConstructJob(Compilation &C,
const JobAction &JA,
const InputInfo &Output,
const InputInfoList &Inputs,
const ArgList &Args,
const char *LinkingOutput) const {
ArgStringList CmdArgs;
std::string Compressor = "zip";
if (Arg *A = Args.getLastArg(options::OPT_fuse_ld_EQ))
Compressor = A->getValue();
std::string Exec = Args.MakeArgString(
getToolChain().GetProgramPath(Compressor.c_str()));
if (Compressor == "zip")
buildZipArgs(JA, Output, Inputs, Args, CmdArgs);
if (Compressor == "tar" || Compressor == "gzip")
buildTarArgs(JA, Output, Inputs, Args, CmdArgs);
else
llvm_unreachable("Unsupported compressor name");
C.addCommand(
std::make_unique<Command>(
JA, *this, ResponseFileSupport::None(),
Args.MakeArgString(Exec),
CmdArgs, Inputs, Output));
}
In this custom linking stage, we hope to use either the zip command or the tar command – depending on the -fuse-ld flag specified by users – to package all the (Base64-encoded) files generated by our custom Assembler.
The detailed command format for both zip and tar will be explained shortly. From the preceding snippet, we can see that the thing we are doing here is similar to Assembler::ConstructJob. The Exec variable carries the absolute path to either the zip or tar program; the CmdArgs variable, which is populated by either buildZipArgs or buildTarArgs, which will be explained later, carries the command-line arguments for the tool (zip or tar).
The biggest difference compared to Assembler::ConstructJob is that the command to execute can be designated by the -fuse-ld flag that's supplied by users. Thus, we are using the skill we learned about in the Adding custom driver flags section to read that driver flag and set up the command.
- If your users decide to package files in a ZIP file (which is the default scheme, or you can specify it explicitly via -fuse-ld=zip), we are going to run the following command:
$ zip <output zip file> <input file 1> <input file 2>…
Therefore, we will build our Linker::buildZipArgs method, which constructs an argument list for the preceding command, as follows:
void
tools::zipline::Linker::buildZipArgs(const JobAction &JA,
const InputInfo &Output,
const InputInfoList &Inputs,
const ArgList &Args,
ArgStringList &CmdArgs) const {
// output file
CmdArgs.push_back(Output.getFilename());
// input files
AddLinkerInputs(getToolChain(), Inputs, Args, CmdArgs, JA);
}
The CmdArgs argument of Linker::buildZipArgs will be where we'll export our results. While we are still using the same way to fetch the output filename (via Output.getFilename()), since a linker might accept multiple inputs at a time, we are leveraging another helper function, AddLinkerInputs, to add all the input filenames to CmdArgs for us.
- If your users decide to use the tar + gzip packaging scheme (via the -fuse-ld=tar or -fuse-ld=gzip flags), we are going to run the following command:
$ tar -czf <output tar.gz file> <input file 1> <input file 2>…
Therefore, we will build our Linker::buildTarArgs method, which constructs an argument list for the previous command, as follows:
void
tools::zipline::Linker::buildTarArgs(const JobAction &JA,
const InputInfo &Output,
const InputInfoList &Inputs,
const ArgList &Args,
ArgStringList &CmdArgs) const {
// arguments and output file
CmdArgs.push_back("-czf");
CmdArgs.push_back(Output.getFilename());
// input files
AddLinkerInputs(getToolChain(), Inputs, Args, CmdArgs, JA);
}
Just like buildZipArgs, we grab the output filename via Output.getFilename() and add all the input filenames, using AddLinkerInput, into CmdArgs.
- Last but not least, let's connect our Linker to ZiplineToolChain:
Tool *ZiplineToolChain::buildLinker() const {
return new tools::zipline::Linker(*this);
}
That's all of the steps for implementing a custom linking phase for our Zipline toolchain.
Now that we have created the necessary components for the Zipline toolchain, we can execute our custom features – encode the source files and package them into an archive – when users select this toolchain. In the next section, we are going to learn how to verify these functionalities.
Verifying the custom toolchain
To test the functionalities we implemented in this chapter, we can run the example commands depicted in the project overview or we can leverage the -### driver flag again to dump all the expected compiler, assembler, and linker command details.
So far, we've learned that the -### flag will show all the frontend flags that have been translated by the driver. But actually, it will also show the assembler and linker commands that have been scheduled to run. For instance, let's invoke the following command:
$ clang -### -zipline -c test.c
Since the -c flag always tries to run the assembler over the assembly file generated by Clang, our custom assembler (that is, the Base64 encoder) within Zipline will be triggered. Therefore, you will see an output similar to the following:
$ clang -### -zipline -c test.c
"/path/to/clang" "-cc1" …
"/usr/bin/openssl" "base64" "-in" "/tmp/test_ae4f5b.s" "-out" "test.o"
$
The line starting with /path/to/clang -cc1 contains the frontend flags we learned about earlier. The line that follows is the assembler invocation command. This, in our case, runs openssl to perform Base64 encoding.
Note that the weird /tmp/test_ae4f5b.s filename is the temporary file that's created by the driver to accommodate the assembly code that's generated by the compiler.
Using the same trick, we can verify our custom linker stage, as follows:
$ clang -### -zipline test.c -o test.zip
"/path/to/clang" "-cc1" …
"/usr/bin/openssl" "base64" "-in" "/tmp/test_ae4f5b.s" "-out" "/tmp/test_ae4f5b.o"
"/usr/bin/zip" "test.zip" "/tmp/test_ae4f5b.o"
$
Since the -o flag was used in the previous command, Clang will build a complete executable from test.c involving the assembler and the linker. Therefore, our custom linking stage is up here due to the zip command taking the result (the /tmp/test_ae4f5b.o file) from the previous assembling stage. Feel free to add the -fuse-ld=tar flag to see the zip command replace the tar command with a completely different argument list.
In this section, we showed you how to create a toolchain for Clang's driver. This is a crucial skill for supporting Clang on custom or new platforms. We also learned that the toolchain framework in Clang is flexible and can handle a variety of tasks that are required by the target platform.
Summary
In this chapter, we started by introducing Clang's driver and the role of the toolchain – the module that provides platform-specific information such as the supported assemblers and linkers – that assisted it. Then, we showed you one of the most common ways to customize the driver – adding a new driver flag. After that, we talked about the toolchain and, most importantly, how to create a custom one. These skills are really useful when you want to create a new feature in Clang (or even LLVM) and need a custom compiler flag to enable it. Also, the ability to develop a custom toolchain is crucial for supporting Clang on new operating systems, or even new hardware architecture.
This is the final chapter of the second part of this book. Starting from the next chapter, we will talk about LLVM's middle end – the platform-independent program analysis and optimization framework.
Exercises
- It is common to override the assembling and linking stage since different platforms tend to support different assemblers and linkers. However, is it possible to override the compiling stage (which is Clang)? If it is possible, how can we do this? Why may people wish to do this?
- When we were working on tools::zipline::Linker::ConstructJob, we simply use llvm_unreachable to bail out the compilation process if a user provides an unsupported compressor name through the -fuse-ld flag. Can we replace it with Clang's diagnostic framework, which we learned about in Chapter 7, Handling AST, to print out better messages?
- Just like we can use -Xclang to pass flags directly to the frontend, we can also pass assembler-specific or linker-specific flags directly to the assembler or linker using driver flags such as -Wa (for the assembler) or -Wl (for the linker). How can we consume those flags in our custom assembler and linker stages within Zipline?