Creating Calculators with Operators
C++ provides operators that allow you to express all sorts of mathematical formulae in computer programs. You have access to operators that allow us to carry out algebra, compare values, and even manipulate the individual bit pattern of a variable’s value directly. This chapter is going to cover these C++ operators and end by having you create a simple command line calculator.
The Assignment Operator
The first operator we are going to look at is the assignment operator. We have already been using the assignment operator in the previous chapters as it is the operator that allows us to assign a value to a variable. This operator uses the = symbol:
int number1 = 1;
As you can see we have assigned the value of 1 to an integer variable named number1. We can also assign variable values to other variables:
int number2 = number1;
Here the program will read the value stored in number1 and assign that value to the variable number2. As we saw in the previous chapter, the assignment operator can also automatically convert from one variable type to another.
char charNumber = 1;
int intNumber = charNumber;
The assignment is one of the most widely used operators in C++; thankfully, it’s also easy to use and fairly obvious in nature.
The assignment operator can also be used in some pieces of code that aren’t necessarily very readable. Take the following line, for instance:
number1 = number2 = number3 = 1;
C++ compilers will evaluate these statements from right to left. 1 is assigned to number3, which would be assigned to number2, which would be assigned to number1, and all three variables will end up storing 1. I wouldn’t recommend writing code like this.
Arithmetic Operators
C++ also allows us to carry out basic arithmetic operations and we have five of these available:
- Addition operator
- Subtraction operator
- Multiplication operator
- Division operator
- Modulo operator
The Addition Operator
The addition operator behaves exactly as you would expect: It allows us to add two numbers together. The addition operator can add a value from the right to a value on the left and the result can be used in a statement, like this:
int sum = number1 + number2;
Here we have added number2 to number1 and stored the result in a third variable named sum.
It is also possible to use the same values in all of the places in our addition statement, for example:
int number = 1;
number = number + number;
Here we end up with 2 being stored in the variable number after this code has executed.
The subtraction operator works exactly like the addition operator, although unsurprisingly it subtracts one number from another and creates a result:
int number1 = 2;
int number2 = 1;
int result = number1 - number2;
This code would cause the value 1 to be stored in the variable result.
The Multiplication and Division Operators
These operators are also fairly self-explanatory; the multiplication operator multiplies numbers together and the division operator divides the number on the left by the number on the right:
int number1 = 4;
int number2 = 2;
int multiplied = number1 * number2;
int divided = number1 / number2;
The result of the multiplication would be 8 and the result of the division would be 2.
The division operator, like the subtraction operator, has a result that depends on the order of the variables.
int divided1 = number1 / number2;
int divided2 = number2 / number1;
After executing these lines of code, divided1 would store 2 as earlier but divided2 would store 0 as 4 cannot divide into 2. You can think of the results of the division as being rounded down to the nearest whole integer. The following example shows a similar result.
int number1 = 5;
int number2 = 2;
int divided1 = number1 / number2;
int divided2 = number2 / number1;
In the preceding code, divided1 will contain 2 after execution. The actual math would be 5/2 = 2.5 or 2 remainder 1, but as integers can only store whole numbers we lose the extra 0.5 or remainder. 2/5 = 0 remainder 5, and again we lose the remainder; therefore divided2 will store 0.
float divided2 = static_cast<float>(number2) / static_cast<float>(number1);
Casting both numerator and denominator to float values (or dividing two float variables) would have yielded a result of 0.5f. This is why it is important to use the correct type of variable for the job at hand.
Our guessing game in Listing 2-1 has already shown a usage of the modulo operator. This can be thought of as a remainder operator, as it will return the remainder of dividing one number by another.
int numerator = 12;
int denominator = 10;
int remainder = numerator % denominator;
The variable remainder shown here will store the value 2 as 12 divided by 10 equals 1 remainder 2.
A Simple Arithmetic Calculator
We will now write a simple program that can show the results of the arithmetic operators. Listing 3-1 shows the code that will take two numbers and add them together. This sample code was created using Xcode and the main function is suitable for creating command-line programs for OS X.
Listing 3-1. Adding Two Numbers
#include <iostream>
using namespace std;

int main(int argc, const char * argv[])
{
        cout << "Enter your first number: " << endl;
        float number1 = 0.0f;
        cin >> number1;

        cout << "Enter your second number: " << endl;
        float number2 = 0.0f;
        cin >> number2;

        float result = number1 + number2;
        cout << "The result of adding your two numbers is: " << result << endl;
        return 0;
}
We once again use cin and cout to communicate with users and ask them to enter two numbers. We then store the result of an addition in the variable result and print the output to the console. An example of the output from this program is shown here:
Enter your first number:
40
Enter your second number:
10
The result of adding your two numbers is: 50
Listing 3-2 shows a subtraction version of this program.
Listing 3-2. Subtracting Two Numbers
#include <iostream>
using namespace std;

int main(int argc, const char * argv[])
{
        cout << "Enter your first number: " << endl;
        float number1 = 0.0f;
        cin >> number1;

        cout << "Enter your second number: " << endl;
        float number2 = 0.0f;
        cin >> number2;

        float result = number1 - number2;
        cout << "The result of subtracting your two numbers is: " << result << endl;
        return 0;
}
Listing 3-3 shows a multiplication version of this program.
Listing 3-3. Multiplying Two Numbers
#include <iostream>
using namespace std;

int main(int argc, const char * argv[])
{
        cout << "Enter your first number: " << endl;
        float number1 = 0.0f;
        cin >> number1;

        cout << "Enter your second number: " << endl;
        float number2 = 0.0f;
        cin >> number2;

        float result = number1 * number2;
        cout << "The result of multiplying your two numbers is: " << result << endl;
        return 0;
}
Listing 3-4 shows a division version of this program.
Listing 3-4. Dividing Two Numbers
#include <iostream>
using namespace std;

int main(int argc, const char * argv[])
{
        cout << "Enter your first number: " << endl;
        float number1 = 0.0f;
        cin >> number1;

        cout << "Enter your second number: " << endl;
        float number2 = 0.0f;
        cin >> number2;

        float result = number1 / number2;
        cout << "The result of dividing your second number into your first is: "
                << result << endl;
        return 0;
}
Last but not least, Listing 3-5 shows a modulo version of this program.
Listing 3-5. Finding the Remainder Between Two Numbers
#include <iostream>
using namespace std;

int main(int argc, const char * argv[])
{
        cout << "Enter your first number: " << endl;
        int number1 = 0;
        cin >> number1;

        cout << "Enter your second number: " << endl;
        int number2 = 0;
        cin >> number2;

        int result = number1 % number2;
        cout << "The remainder from dividing your second number into your first is: "
                << result << endl;
        return 0;
}
We have to change the variables in Listing 3-5 to int from float as the modulo operator can only operate on integer values.
Now that we have covered the arithmetic operators, we will take a look at relational operators.
C++ allows us to compare variable values using relational operators. These operators allow us to work out if two variables are equal, not equal, one is greater than the other, or one is less than the other. There are also operators to work out if variables are less than or equal, and greater than or equal.
Each of these operators provides a true or false result that can be stored in a bool. C++ provides the following relational operators:
- Equality operator
- Greater-than operators
- Less-than operators
The equals operator is ==. We can use this in the following way:
bool isEqual = number1 == number2;
isEqual will contain true if number1 and number2 store the same value; otherwise it will contain false.
C++ also contains an inequality operator that can be thought of as a not equals operation. It can be used as follows.
bool isNotEqual = number1 != number2;
As we can see, the inequality operator uses an exclamation mark before the equals symbol. This operator provides true when the two values are not the same and false if they are the same.
C++ also allows us to work out if a value stored in a variable is greater than another. We can do this as follows:
bool isGreater = number1 > number2;
We can also tell if a number is greater than or equal to another:
bool isGreaterThanOrEqual = number1 >= number2;
We can work out if a value is less than another using the less-than operator:
bool isLessThan = number1 < number2;
As with greater-than, there is a less-than or equal to operator:
bool isLessThanOrEqual = number1 <= number2;
We will create some small programs to show off the relational operators just as we did with the arithmetic operators.
Listing 3-6 shows the source code for a simple program that tests the equality of two values.
Listing 3-6. Using the Equality Operator
#include "stdafx.h"
#include <iostream>

using namespace std;

int _tmain(int argc, _TCHAR* argv[])
{
        cout << "Enter your first number: " << endl;
        int number1 = 0;
        cin >> number1;

        cout << "Enter your second number: " << endl;
        int number2 = 0;
        cin >> number2;

        bool result = number1 == number2;
        cout << "It is "
                << result
                << " that your first number is equal your second."
                << endl;

        return 0;
}
This sample application was created using Microsoft Visual Studio. The program will end very quickly after the second value has been entered, so a good trick is to set a breakpoint on the return line using the F9 key and to use debug mode to run the program using the F5 key.
The boolean value in this sample will be printed out as a 1 when the operation results in a true value and 0 when the result is false.
Listing 3-7 shows a simple program using the inequality operator.
Listing 3-7. The Inequality Operator
#include "stdafx.h"
#include <iostream>

using namespace std;

int _tmain(int argc, _TCHAR* argv[])
{
        cout << "Enter your first number: " << endl;
        int number1 = 0;
        cin >> number1;

        cout << "Enter your second number: " << endl;
        int number2 = 0;
        cin >> number2;

        bool result = number1 != number2;
        cout << "It is "
                << result
                << " that your first number is not equal your second."
                << endl;

       return 0;
}
Listing 3-8 contains the source code for an example of the greater-than operator.
Listing 3-8. The Greater-Than Operator
#include "stdafx.h"
#include <iostream>

using namespace std;

int _tmain(int argc, _TCHAR* argv[])
{
        cout << "Enter your first number: " << endl;
        int number1 = 0;
        cin >> number1;

        cout << "Enter your second number: " << endl;
        int number2 = 0;
        cin >> number2;

        bool result = number1 > number2;
        cout << "It is "
                << result
                << " that your first number is greater than your second."
                << endl;

       return 0;
}
Listing 3-9 shows a use of the greater-than or equal to operator.
Listing 3-9. The Greater-Than or Equal To Operator
#include "stdafx.h"
#include <iostream>

using namespace std;

int _tmain(int argc, _TCHAR* argv[])
{
        cout << "Enter your first number: " << endl;
        int number1 = 0;
        cin >> number1;

        cout << "Enter your second number: " << endl;
        int number2 = 0;
        cin >> number2;

        bool result = number1 >= number2;
        cout << "It is "
                << result
                << " that your first number is greater than"
                << " or equal to your second."
                << endl;

       return 0;
}
Listing 3-10 shows an example of the less-than operator.
Listing 3-10. The Less Than Operator
#include "stdafx.h"
#include <iostream>

using namespace std;

int _tmain(int argc, _TCHAR* argv[])
{
        cout << "Enter your first number: " << endl;
        int number1 = 0;
        cin >> number1;

        cout << "Enter your second number: " << endl;
        int number2 = 0;
        cin >> number2;

        bool result = number1 < number2;
        cout << "It is "
                << result
                << " that your first number is less than your second."
                << endl;

       return 0;
}
Finally, Listing 3-11 shows a use of the less-than or equal to operator.
Listing 3-11. The Less-Than or Equal To Operator
#include "stdafx.h"
#include <iostream>

using namespace std;

int _tmain(int argc, _TCHAR* argv[])
{
        cout << "Enter your first number: " << endl;
        int number1 = 0;
        cin >> number1;

        cout << "Enter your second number: " << endl;
        int number2 = 0;
        cin >> number2;

        bool result = number1 <= number2;
        cout << "It is "
                << result
                << " that your first number is less than "
                << " or equal to your second."
                << endl;

       return 0;
}
So far we have looked at arithmetic operators for carrying out basic mathematical operations and relational operators for comparing the values stored in variables. The next set of operators supplied by C++ is the bitwise operators, which allow us to modify the individual bits that make up our values.
All of the values we have seen so far have been backed by bits stored in computer memory. In a binary computer system, a single bit can either contain a one or a zero. We represent higher numbers than these by using different patterns of bits. This section covers the operators that allow us to manipulate bits.
As a programmer you will generally deal with data sizes in terms of numbers of bytes rather than numbers of bits. A byte is a collection of 8 bits. We have already seen that the char data type consists of a single byte and that an int consists of 4 bytes. This means that a char consists of 8 bits and an int is 32 bits.
We can think of the 8 bits of a byte as being represented in the same manner as in Table 3-1.
Table 3-1. The Unsigned char Bit Sequence for 137

The bit sequence in Table 3-1 represents the unsigned char value of 137. We have a bit telling us that the value consists of a 1, an 8, and a 128. These are added together to give us 137.
The bitwise operators allow us to set and unset individual bits, test if bits are set, and even merge bit patterns together. A set bit means that its value is 1 and an unset bit has the value 0. The rest of this section looks at the bitwise operators available in C++ as well as the hexadecimal representation of numbers.
Hexadecimal Number Representation
When we normally write numbers, such as 11, we are using the decimal number representation. Decimal numbers have a base 10 format. We say it is base 10, as we have 10 unique digits, 0 through 9. Once we add one to 9 in a column, we reset the column to 0 and add a one to the column to the left, so 9 becomes 10, 19 becomes 20, and 1999 becomes 2000.
Note It’s probably not a coincidence that we have 10 fingers, or digits, on our hands and that our modern counting systems are all based on the base 10 number system. The binary numbers we have been looking at so far are actually numbers in the base 2 representation of numbers!
Table 3-1 shows how we can represent numbers in the binary format. 1 is 1, 2 in binary is 10, and 137 in binary is 10001001. Once we get to 32-bit values we have to keep track of 32 individual bits, and things are even worse now that we are seeing processors that can operate on 64-bit values. To make life easier for all, the hexadecimal number format can be used to represent large bitfields. Despite the “hex” part leading us toward believing that we are dealing with sets of six, hexadecimal values actually work in sets of 16, or base 16. The hexadecimal representation uses the digits 0, 1, 2, 3, 4, 5, 6, 7, 8, 9, A, B, C, D, E, and F where A, B, C, D, E, and F represent 10, 11, 12, 13, 14, and 15, respectively.
Table 3-1 can be used to work out that the binary value 1111 is actually the number 15. We can represent the 8-bit value of 15 in C++ using the following line of code:
unsigned char hex15 = 0x0F;
If we wish to print a value out onto the console in hex format we tell cout in the following manner:
cout << std::hex << number << std::dec << number;
For the rest of this section we use simple 8-bit binary representations of numbers to show how the bitwise operators change values in our code. This small section on hexadecimal numbers is useful, as we would use this format for binary values in source code for shipping game titles.
C++ provides us with the following bitwise operators:
- AND operator
- OR operator
- Exclusive OR operator
- Left Shift operator
- Right Shift operator
The Binary & (AND) Operator
The & operator is known as the AND operator. Listing 3-12 shows how the & operator is used.
Listing 3-12. The Bitwise & Operator
#include "stdafx.h"
#include <iostream>

using namespace std;

int _tmain(int argc, _TCHAR* argv[])
{
        unsigned int first = 0x0F;
        unsigned int second = 0x18;
        unsigned int anded = first & second;

        cout << hex << showbase;
        cout << first << endl;
        cout << second << endl;
        cout << anded << endl;

        return 0;
}
Note We are using unsigned int and not unsigned char in these examples as cout prints character symbols when using char types but converts to human-readable numbers when using int types.
We are using the & operator on the variables first and second in Listing 3-12 and storing the result in anded. The first use of cout tells the output stream that we would like to show numbers in the hex format. The showbase specifier tells the output stream that we would also like to show the 0x part of the number. The output from this program would look like the following:
0xf
0x18
0x8
0x0f and 0x18 were our input numbers and 0x08 is the output generated. Table 3-2 shows how we derive this result.
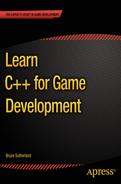
Table 3-2. The Result of Using Bitwise & on 0x0F and 0x18
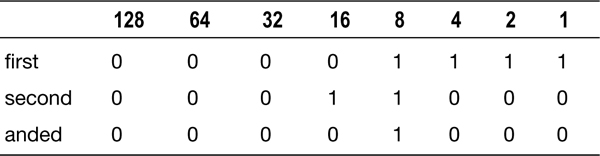
Table 3-2 shows how we can derive 0x08 as the result of an & between 0x0F and 0x18. We begin with the right-most column and work our way to the left.
In the 1s column we have a 1 in first and a 0 in second; therefore the result bit is 0.
In the 2s column we have a 1 in first and a 0 in second; therefore the result bit is 0.
In the 4s column we have a 1 in first and a 0 in second; therefore the result bit is 0.
In the 8s column we have a 1 in first and a 1 in second; therefore the result bit is 1.
In the 16s column we have a 0 in first and a 1 in second; therefore the result bit is 0.
All other columns have 0s in both values.
As you can see, to be able to have a 1 in a bit column in our result value the corresponding bit column also had to be 1 in the first and second values. If either of the values was a 0 then the result bit at the same column is also a 0.
The Bitwise |, or OR, operator is used to determine if either of the bits in a given column is set to 1 in either of the two supplied values. Table 3-3 shows the result of using | with the same 0x0F and 0x18 values as the previous example.
Table 3-3. The Result of Using Bitwise | on 0x0F and 0x18
The result of the | on the two values is 0x1F. We derived this using the following method from left to right.
In the 1s column we have a 1 in first; therefore the result bit is 1.
In the 2s column we have a 1 in first; therefore the result bit is 1.
In the 4s column we have a 1 in first; therefore the result bit is 1.
In the 8s column we have a 1 in first; therefore the result bit is 1.
In the 16s column we have a 1 in second; therefore the result bit is 1.
All other columns have 0s in both values.
Using the | operator is as simple as using the & operator; however, the resulting bit for each column is set to 1 if either of the bits from the two input values were 1.
The Binary ^ (Exclusive OR) Operator
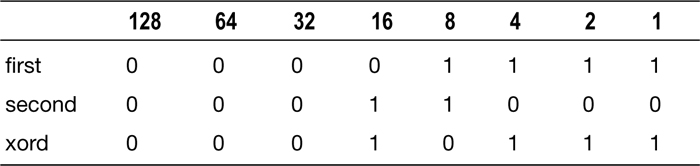
Our last bitwise operator is the ^ (or Exclusive OR/XOR) operator. This operator differs from the | operator by requiring that one of the two input values bits is set, but not both. Table 3-4 shows this in practice.
Table 3-4. The Result of Using Bitwise ^ on 0x0F and 0x18
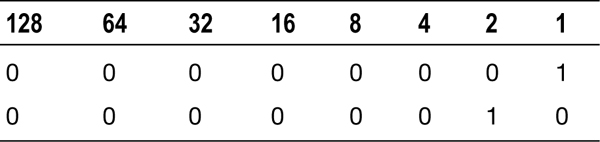
The result from 0x0F ^ 0x18 is 0x17. As you can see, every column that contains a 1 and a 0 resulted in a 1 being placed into the result. The columns that contain two 1s or two 2s all result in 0s being stored.
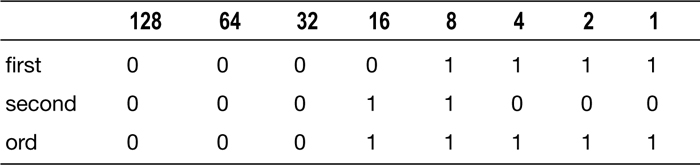
You can use the left shift operator to move bits to the left by a specified number of bits. The following code shows how we can use the shift operator.
unsigned int shifted = 1 << 1;
If you print the value stored in shifted you will see that it contains the number 2. This is because the bit to the left of the first bit represents 2. The following patterns show what has happened.
If we had shifted the number of bits by 2 then shifted would have contained 4. When we use the left shift operator, all of the bits at the right of the pattern are set to 0. This ensures that we do not introduce new values into our variable.
A more complicated way of thinking about the shift operator is to imagine that we are multiplying the left value by 2 raised to the power of the number of shifted bits. In our example, we had 1*(2^1)=2. If we had shifted by 4 bits we would have 1*2^4=16.
The last thing you should consider when using left shift is what happens to values on the end. Consider the following line of code.
unsigned int shifted = 0x80000000 << 1;
This code shows that we will shift the end bit off of the end. In this case shifted will store 0 after execution. As all bits to the right of the shift are set to 0, any bits that are shifted out of the variable will be lost.
The right shift operator carries out the opposite operation to the left shift operator.
unsigned int shifted = 0x2 >> 1;
shifted contains 1 after executing this line of code. Again, if you shift values off the end then they are lost.
There is a significant difference between the left and right shift operators. When left shifting, all of the new values are set to 0. When right shifting the new bits depend on whether your value is a signed or unsigned type. Unsigned types have the values at the left of the bit pattern set to 0. Signed types have these set to the value contained in the sign bit. This means that positive values will have these bits set to 0 and negative values will have these bits set to 1. If you’re having trouble remembering why this would be, you should go back over the description of twos complement numbers in the previous chapter.
Bitwise operators can be fairly complex to get your head around, but they can be a very powerful tool for a programmer. The next set of operators that we will be looking at is the logical operators.
We are going to cover logical operators here without covering any source examples. Logical operators are at their most useful when combined with flow control statements, which we will look at in Chapter 6. There are two logical operators: Logical AND (&&) and Logical OR (||). These behave differently to the Bitwise & and | operators, so it is critical that you ensure that you are choosing the appropriate operator for the task at hand.
Logical operators operate on two boolean values and return a boolean result.
The && operator simply tells us whether two booleans are both true. For example:
bool isTrue = true && true;
bool isFalse = false && true;
bool isFalse = true && false;
bool isFalse = false && false;
bool isTrue = true && true && true;
There isn’t any more to the && operator than this.
The || operator is as simple as the && operator. Some results when using || are as follows:
bool isTrue = true || true;
bool isTrue = false || true;
bool isTrue = true || false;
bool isFalse = false || false;
bool isTrue = true || false || false;
As you can see, the result is only false when all parameters in the || chain are false where they were all true, to provide a true result using &&.
Another class of operators we can use in C++ are the unary operators. So far all of the operators we have looked at have required two input values to create an output value. Unary operators can work on a single variable.
C++ provides a set of operators that can be used with a single variable as opposed to the operators that take two operands as we have seen so far. There are arithmetic, logical, and binary unary operators, which we look at in this section. First we take a look at the arithmetic unary operators.
The arithmetic unary operators are the plus and negative operators, and the increment and decrement operators.
The unary negative operator is used to negate a given value just as we do in general arithmetic. -x means negate x. If x happened to be 4 then the value would become –4, if it was –3 the value would become 3. It can be used in C++ code as follows:
int negatedValue = -4;
int positiveValue = -negatedValue;
positiveValue would contain 4 after executing these lines of code.
Unary Plus Operator
The unary plus operator simply returns the same value as it reads and therefore finds little use in practical programming.
int valueA = 1;
int valueB = +valueA;
In the preceding code, valueB would also contain the number 1.
The Increment and Decrement Operators
The increment operator allows us to increase a value by one and the decrement operator allows us to decrease a value by one. If we place the operator before the variable name, it is said to be a preincrement or predecrement operator. If we place it after it is said to be a postincrement or postdecrement operator. Listing 3-13 shows a small MSVC program that outputs various values using these operators.
Listing 3-13. The Increment and Decrement Operators
#include "stdafx.h"
#include <iostream>

using namespace std;

int _tmain(int argc, _TCHAR* argv[])
{
        int value = 0;
        cout << value << endl;
        cout << value++ << endl;
        cout << ++value << endl;
        cout << value-- << endl;
        cout << --value << endl;
        return 0;
}
The output from this program is the following:
0
0
2
2
0
We achieve this in the following way. 0 is output in the first cout line as the variable value was initialized to 0. The second cout also prints 0 as the postincrement operator returns the value of the variable, then increases it; therefore, we print out 0 then add 1. The third cout uses a preincrement operator; therefore, 1 is added to the variable, giving 2, which is then returned to cout for printing. Our fourth cout uses a post decrement operator that causes the value 2 to be returned from the variable before it is decremented to 1. The last cout decrements the variable to 0 before returning it to the cout command for printing.
These operators will be useful when we look at arrays in Chapter 4.
The Logical Not Unary Operator
Logical Not allows us to flip the value of a boolean value. Using !, true becomes false and false becomes true. We could determine if two values were not equal in the following way:
bool notEqual = !(valueA == valueB);
This is a simple example of how to use the ! operator.
The One’s Complement Operator
The operator, ~, can be used to flip all of the bits in a variable. Listing 3-14 shows a program to print the output from the ~ operator.
Listing 3-14. The ~ Operator
#include "stdafx.h"
#include <iostream>

using namespace std;

int _tmain(int argc, _TCHAR* argv[])
{
        int test = 0x0000000F;
        cout << hex << ~test;
        return 0;
}
This program will write out 0xFFFFFFF0, which is the value 0x0000000F with all of the bits flipped from 0 to 1 and 1 to 0.
Summary
In this chapter we have covered all of the basic operators that we will be using to construct procedural programs. These operators allow us to carry out arithmetic on variables, compare the relationships between values in variables, and even carry out complicated operations on individual bits inside variable values.
Every program we write uses combinations of these operators to carry out complicated and complex tasks. The examples so far in this book have been basic programs that help us to understand the effects of these operators on the types provided by the C++ programming language. The examples beginning in Chapter 4 will actually start us on our journey into creating a text adventure game using C++.