Managing Memory for Game Developers
This chapter is the first in the last part of this book, which will cover general game development topics that are important for new programmers to attempt to grasp. The first of these chapters is going to introduce you to the C++ memory model and the implications of using different types of memory.
Memory management is a very important topic in game development. All games go through a period in development where memory is running low and the art team would like some more for extra textures or meshes. The way memory is laid out is also vitally important to the performance of your game. Understanding when to use stack memory, when to use heap memory, and the performance implications of each are important factors in to being able to optimize your programs for cache coherency and data locality. Before you can understand how to approach those problems you will need to understand the different places where C++ programs can store their data.
There are three places in C++ where you can store your memory: There is a static space for storing static variables, the stack for storing local variables and function parameters, and the heap (or free store) from where you can dynamically allocate memory for different purposes.
Static Memory
Static memory is handled by the compiler and there isn’t much to say about it. When you build your program using the compiler, it sets aside a chunk of memory large enough to store all of the static and global variables defined in your program. This includes strings that are in your source code, which are included in an area of static memory known as a string table.
There’s not much else to say regarding static memory, so we’ll move on to discussing the stack.
The stack is more difficult to understand. Every time you call a function, the compiler generates code behind the scenes to allocate memory for the parameters and local variables for the function being called. Listing 22-1 shows some simple code that we then use to explain how the stack operates.
Listing 22-1. A Simple C++ Program
void function2(int variable1)
{
        int variable2{ variable1 };
}

void function1(int variable)
{
        function2(variable);
}

int _tmain(int argc, _TCHAR* argv[])
{
        int variable{ 0 };
        function1(variable);

        return 0;
}
The program in Listing 22-1 is very simple: It begins with _tmain, which calls function1 which calls function2. Figure 22-1 illustrates what the stack would look like for the main function.

Figure 22-1. The stack for _tmain
The stack space for main is very simple. It has a single storage space for the local variable named variable. These stack spaces for individual functions are known as stack frames. When function1 is called, a new stack frame is created on top of the existing frame for _tmain. Figure 22-2 shows this in action.
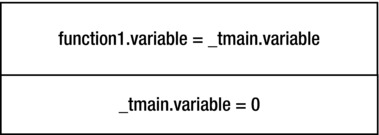
Figure 22-2. The added stack frame for function1
When the compiler creates the code to push the stack frame for function1 onto the stack it also ensures that the parameter variable is initialized with the value stored in variable from _tmain. This is how parameters are passed by value. Finally, Figure 22-3 shows the last stack frame for function2 added to the stack.

Figure 22-3. The complete stack frame
The last stack frame is a little more complicated but you should be able to see how the literal value 0 in _tmain has been passed all the way along the stack until it is eventually used to initialize variable2 in function2.
The remaining stack operations are relatively simple. When function2 returns the stack frame generated for that call is popped from the stack. This leaves us back at the state presented in Figure 22-2, and when function1 returns we are back at Figure 22-1. That’s all you need to know to understand the basic functionality of a stack in C++.
Unfortunately things aren’t actually this simple. The stack in C++ is a very complicated thing to fully understand and requires a bit of assembly programming knowledge. That topic is outside the scope of a book aimed at beginners, but it’s well worth pursuing once you have a grasp of the basics. The article “Programmers Disassemble” in the September 2012 edition of Game Developer Magazine is an excellent introductory article on the operation of the x86 stack and well worth a read, available free from http://www.gdcvault.com/gdmag.
This chapter hasn’t covered the ins and outs of how references and pointers are handled on the stack or how return values are implemented. Once you begin to think about this, you might begin to understand how complicated it can be. You might also be wondering why it’s useful to understand how the stack works. The answer lies in trying to work out why your game has crashed once it is in a live environment. It’s relatively easy to work out why a game crashes while you are developing, as you can simply reproduce the crash in a debugger. On games that have launched, you might receive a file known as a crash dump, which does not have any debugging information and simply has the current state of the stack to go on. At that point you need to look out for the symbol files from the build that let you work out the memory addresses of the functions that have been called, and you can then manually work out which functions have been called from the addresses in the stack and also try to figure out which function passed along an invalid memory address of value on the stack.
This is complicated and time-consuming work, but it does come up every so often in professional game development. Services such as Crashlytics for iOS and Android or BugSentry for Windows PC programs can upload crash dumps and provide a call stack for you on a web service to help alleviate a lot of the pain from trying to manually work out what is going wrong with your game.
The next big topic in memory management in C++ is the heap.
Working with Heap Memory
So far in this book I have avoided using dynamic memory as much as possible because manually managing dynamically allocated memory is sometimes challenging, slower than using stack memory, and also very often unnecessary. Managing dynamic memory will become more important for you once you advance to writing games that load data from external files, as it’s often impossible to tell how much memory you’ll need at compile time. The very first game I worked on prevented programmers from allocating dynamic memory altogether. We worked around this by allocating arrays of objects and reusing memory in these arrays when we ran out. This is one way to avoid the performance cost of allocating memory.
Allocating memory is an expensive operation because it has to be done in a manner that prevents memory corruption where possible. This is especially true on modern multiprocessor CPU architectures where multiple CPUs could be trying to allocate the same memory at the same time. This chapter, like the last, is not intended to be an exhaustive resource on the topic of memory allocation techniques for game development, but instead introduces the concept of managing heap memory.
You saw the use of the new and delete operators in Chapter 21 when creating the Singleton EventManager object. Listing 22-2 shows a simple program using the new and delete operators.
Listing 22-2. Allocating Memory for a class Dynamically
class Simple
{
private:
        int variable{ 0 };

public:
        Simple()
        {
                std::cout << "Constructed" << std::endl;
        }

        ~Simple()
        {
                std::cout << "Destroyed" << std::endl;
        }
};

int _tmain(int argc, _TCHAR* argv[])
{
        Simple* pSimple = new Simple();
        delete pSimple;
        pSimple = nullptr;

        return 0;
}
This simple program shows new and delete in action. When you decide to allocate memory in C++ using the new operator, the amount of memory required is calculated automatically. The new operator in Listing 22-2 will reserve enough memory to store the Simple object along with its member variables. If you were to add more members to Simple or inherit it from another class, the program would still operate and enough memory would be reserved for the expanded class definition.
The new operator returns a pointer to the memory that you have requested to allocate. Once you have a pointer to memory that has been dynamically allocated, you are responsible for ensuring that the memory is also freed appropriately. You can see that this is done by passing the pointer to the delete operator. The delete operator is responsible for telling the operating system that the memory we reserved is no longer in use and can be used for other purposes. A last piece of housekeeping is then carried out when the pointer is set to store nullptr. By doing this we help prevent our code from assuming the pointer is still valid and that we can read and write from the memory as though it is still a Simple object. If your programs are crashing in seemingly random and inexplicable ways, accessing freed memory from pointers that have not been cleared is a common suspect.
The standard new and delete operators are used when allocating single objects; however, there are also specific new and delete operators that should be used when allocating and freeing arrays. These are shown in Listing 22-3.
Listing 22-3. Arraynew and delete
int* pIntArray = new int[16];
delete[] pIntArray;
This call to new will allocate 64 bytes of memory to store 16 int variables and return a pointer to the address of the first element. Any memory you allocate using the new[] operator should be deleted using the delete[] operator, because using the standard delete can result in not all of the memory you requested being freed.
Note Not freeing memory and not freeing memory properly is known as a memory leak. Leaking memory in this fashion is bad, as your program will eventually run out of free memory and crash because it eventually won’t have any available to fulfill new allocations.
Hopefully you can see from this code why it’s beneficial to use the available STL classes to avoid managing memory yourself. If you do find yourself in a position of having to manually allocate memory, the STL also provides the unique_ptr and shared_ptr templates to help delete the memory when appropriate. Listing 22-4 updates the code from Listing 22-2 and Listing 22-3 to use unique_ptr and shared_ptr objects.
Listing 22-4. Using unique_ptr and shared_ptr
#include <memory>

class Simple
{
private:
        int variable{ 0 };

public:
        Simple()
        {
                std::cout << "Constructed" << std::endl;
        }

        ~Simple()
        {
                std::cout << "Destroyed" << std::endl;
        }
};

int _tmain(int argc, _TCHAR* argv[])
{
        using UniqueSimplePtr = std::unique_ptr<Simple>;
        UniqueSimplePtr pSimple1{ new Simple() };
        std::cout << pSimple1.get() << std::endl;

        UniqueSimplePtr pSimple2;
        pSimple2.swap(pSimple1);
        std::cout << pSimple1.get() << std::endl;
        std::cout << pSimple2.get() << std::endl;

        using IntSharedPtr = std::shared_ptr<int>;
        IntSharedPtr pIntArray1{ new int[16] };
        IntSharedPtr pIntArray2{ pIntArray1 };

        std::cout << std::endl << pIntArray1.get() << std::endl;
        std::cout << pIntArray2.get() << std::endl;

        return 0;
}
As the name suggests, unique_ptr is used to ensure that you only have a single reference to allocated memory at a time. Listing 22-3 shows this in action. pSimple1 is assigned a new Simple pointer and pSimple2 is then created as empty. You can try initializing pSimple2 by passing it pSimple1 or using an assignment operator and your code will fail to compile. The only way to pass the pointer from one unique_ptr instance to another is using the swap method. The swap method moves the stored address and sets the pointer in the original unique_ptr instance to be nullptr. The first three lines of output in Figure 22-4 show the addresses stored in the unique_ptr instances.
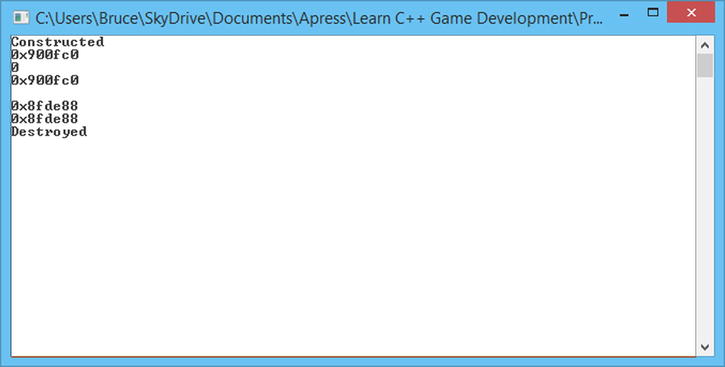
Figure 22-4. The output from Listing 22-4
This output shows that the constructor from the Simple class is called. The pointer stored in pSimple1 is then printed out before the call to swap is made. After the call to swap pSimple1 stores a nullptr that is output as 00000000 and pSimple2 stores the address originally held there. The very final line of the output shows that the destructor for the Simple object has also been called. This is another benefit we receive from using unique_ptr and shared_ptr: Once the objects go out of scope then the memory is freed automatically.
You can see from the two lines of output immediately before the line containing Destroyed that the two shared_ptr instances can store a reference to the same pointer. Only a single unique_ptr can reference a single memory location, but multiple shared_ptr instances can reference an address. The difference manifests itself in the timing of the delete call on the memory store. A unique_ptr will delete the memory it references as soon as it goes out of scope. It can do this because a unique_ptr can be sure that it is the only object referencing that memory. A shared_ptr, on the other hand, does not delete the memory when it goes out of scope; instead the memory is deleted when all of the shared_ptr objects pointing at that address are no longer being used.
This does require a bit of discipline, as if you were to access the pointer using the get method on these objects then you could still be in a situation where you are referencing the memory after it has been deleted. If you are using unique_ptr or shared_ptr make sure that you are only passing the pointer around using the supplied swap and other accessor methods supplied by the templates and not manually using the get method.
Writing a Basic Single Threaded Memory Allocator
This section is going to show you how to overload the new and delete operators to create a very basic memory management system. This system is going to have a lot of drawbacks: It will store a finite amount of memory in a static array, it will suffer from memory fragmentation issues, and it will also leak any freed memory. This section is simply an introduction to some of the processes that occur when allocating memory, and it highlights some of the issues that make writing a fully featured memory manager a difficult task.
Listing 22-5 begins by showing you a structure that will be used as a header for our memory allocations.
Listing 22-5. The MemoryAllocationHeader struct
struct MemoryAllocationHeader
{
        void* pStart{ nullptr };
        void* pNextFree{ nullptr };
        size_t size{ 0 };
};
This struct stores a pointer to the memory returned to the user in the pStart void* variable, a pointer to the next free block of memory in the pNextFree pointer, and the size of the allocated memory in the size variable.
Our memory manager isn’t going to use dynamic memory to allocate memory to the user’s program. Instead it is going to return an address from inside a static array. This array is created in an unnamed namespace shown in Listing 22-6.
Listing 22-6. The Unnamed namespace from Chapter22-MemoryAllocator.cpp
namespace
{
        const unsigned int ONE_MEGABYTE = 1024 * 1024 * 1024;
        char pMemoryHeap[ONE_MEGABYTE];
        const size_t SIZE_OF_MEMORY_HEADER = sizeof(MemoryAllocationHeader);
}
Here you can see that we allocate a static array of 1 MB in size. We know that this is 1 MB as the char type is one byte in size on most platforms and we are allocating an array that is 1,024 bytes times 1,024 KB in size for a total of 1,048,576 bytes. The unnamed namespace also has a constant storing the size of our MemoryAllocationHeader object, calculated using the sizeof function. This size is 12 bytes: 4 bytes for the pStart pointer, 4 bytes for the pNextFree pointer, and 4 bytes for the size variable.
The next important piece for code overloads the new operator. The new and delete functions that you have seen so far are just functions that can be hidden in the same way you can hide any other function with your own implementation. Listing 22-7 shows our new function.
Listing 22-7. The Overloaded new Function
void* operator new(size_t size)
{
        MemoryAllocationHeader* pHeader =
                reinterpret_cast<MemoryAllocationHeader*>(pMemoryHeap);
        while (pHeader != nullptr && pHeader->pNextFree != nullptr)
        {
                pHeader = reinterpret_cast<MemoryAllocationHeader*>(pHeader->pNextFree);
        }

        pHeader->pStart = reinterpret_cast<char*>(pHeader)+SIZE_OF_MEMORY_HEADER;
        pHeader->pNextFree = reinterpret_cast<char*>(pHeader->pStart) + size;
        pHeader->size = size;

        return pHeader->pStart;
}
The new operator is passed the size of the allocation we would like to reserve and returns a void* to the beginning of the block of memory to which the user can write. The function begins by looping over the existing memory allocations until it finds the first allocated block with a nullptr in the pNextFree variable.
Once it finds a free block of memory, the pStart pointer is initialized to be the address of the free block plus the size of the memory allocation header. This ensures that every allocation also includes space for the pStart and pNextFree pointer and the size of the allocation. The new function ends by returning the value stored in pHeader->pStart ensuring that the user doesn’t know anything about the MemoryAllocationHeader struct. They simply receive a pointer to a block of memory of the size they requested.
Once we have allocated memory, we can also free that memory. The overloaded delete operator clears the allocations from our heap in Listing 22-8.
Listing 22-8. The Overloaded delete Function
void operator delete(void* pMemory)
{
        MemoryAllocationHeader* pLast = nullptr;
        MemoryAllocationHeader* pCurrent =
                reinterpret_cast<MemoryAllocationHeader*>(pMemoryHeap);
        while (pCurrent != nullptr && pCurrent->pStart != pMemory)
        {
                pLast = pCurrent;
                pCurrent = reinterpret_cast<MemoryAllocationHeader*>(pCurrent->pNextFree);
        }

        if (pLast != nullptr)
        {
                pLast->pNextFree = reinterpret_cast<char*>(pCurrent->pNextFree);
        }

        pCurrent->pStart = nullptr;
        pCurrent->pNextFree = nullptr;
        pCurrent->size = 0;
}
This operator traverses the heap using two pointers, pLast and pCurrent. The heap is traversed until the pointer passed in pMemory is matched against an allocated memory block stored in the pStart pointer in a MemoryAllocationHeader struct. Once we find the matching allocation we set the pNextFree pointer to the address stored in pCurrent->pNextFree. This is the point at which we create two problems. We have fragmented our memory by freeing memory potentially between two other blocks of allocated memory, meaning that only an allocation of the same size or smaller can be filled from this block. In this example, the fragmentation is redundant because we have not implemented any way of tracking our free blocks of memory. One option would be to use a list to store all of the free blocks rather than storing them in the memory allocation headers themselves. Writing a full-featured memory allocator is a complicated task that could fill an entire book.
Note You can see that we have a valid case for using reinterpret_cast in our new and delete operators. There aren’t many valid cases for this type of cast. In this case we want to represent the same memory address using a different type and therefore the reinterpret_cast is the correct option.
Listing 22-9 contains the last memory function for this section and it is used to print out the contents of all active MemoryAllocationHeader objects in our heap.
Listing 22-9. The PrintAllocations Function
void PrintAllocations()
{
        MemoryAllocationHeader* pHeader =
                reinterpret_cast<MemoryAllocationHeader*>(pMemoryHeap);

        while (pHeader != nullptr)
        {
                std::cout << pHeader << std::endl;
                std::cout << pHeader->pStart << std::endl;
                std::cout << pHeader->pNextFree << std::endl;
                std::cout << pHeader->size << std::endl;

                pHeader = reinterpret_cast<MemoryAllocationHeader*>(pHeader->pNextFree);

                std::cout << std::endl << std::endl;
        }
}
This function loops over all of the valid MemoryAllocationHeader pointers in our head and prints their pStart, pNextFree, and size variables. Listing 22-10 shows an example main function that uses these functions.
Listing 22-10. Using the Memory Heap
int _tmain(int argc, _TCHAR* argv[])
{
        memset(pMemoryHeap, 0, SIZE_OF_MEMORY_HEADER);

        PrintAllocations();

        Simple* pSimple1 = new Simple();

        PrintAllocations();

        Simple* pSimple2 = new Simple();

        PrintAllocations();

        Simple* pSimple3 = new Simple();

        PrintAllocations();

        delete pSimple2;
        pSimple2 = nullptr;

        PrintAllocations();

        pSimple2 = new Simple();

        PrintAllocations();

        delete pSimple2;
        pSimple2 = nullptr;

        PrintAllocations();

        delete pSimple3;
        pSimple3 = nullptr;

        PrintAllocations();

        delete pSimple1;
        pSimple1 = nullptr;

        PrintAllocations();

        return 0;
}
This is a very simple function. It begins by using the memset function to initialize the first 12 bytes of the memory heap. memset works by taking an address, then a value to use, then the number of bytes to set. Each byte is then set to the value of the byte passed as the second parameter. In our case we are setting the first 12 bytes of pMemoryHeap to 0.
We then have our first call to PrintAllocations and the output from my run is the following.
0x00870320
0x00000000
0x00000000
0
The first line is the address of the MemoryAllocationHeader struct, which for our first call is also the address stored in pMemoryHeap. The next line is the value stored in pStart, then pNextFree, then size. These are all 0 as we have not yet made any allocations. The memory addresses are being printed as 32-bit hexadecimal values.
Our first Simple object is then allocated. It turns out that because the Simple class only contains a single int variable, we only need to allocate 4 bytes to store it. The output from the second PrintAllocations call confirms this.
Constructed
0x00870320
0x0087032C
0x00870330
4

0x00870330
0x00000000
0x00000000
0
We can see the Constructed text, which was printed in the constructor for the Simple class and then that our first MemoryAllocationHeader struct has been filled in. The address of the first allocation remains the same, as it is the beginning of the heap. The pStart variable stores the address from 12 bytes after the beginning as we have left enough space to store the header. The pNextFree variable stores the address after adding the 4 bytes required to store the pSimple variable, and the size variable stores the 4 from the size passed to new. We then have the printout of the first free block, starting at 00870330, which is conveniently 16 bytes after the first.
The program then allocates another two Simple objects to produce the following output.
Constructed
0x00870320
0x0087032C
0x00870330
4

0x00870330
0x0087033C
0x00870340
4

0x00870340
0x0087034C
0x00870350
4

0x00870350
0x00000000
0x00000000
0
In this output you can see the three allocated 4-byte objects and each of the start and next addresses in each allocation header. The output is updated again after deleting the second object.
Destroyed
0x00870320
0x0087032C
0x00870340
4

0x00870340
0x0087034C
0x00870350
4

0x00870350
0x00000000
0x00000000
0
The first allocated object now points to the third and the second allocated object has been removed from the heap. A fourth object is allocated just to see what would happen.
Constructed
0x00870320
0x0087032C
0x00870340
4

0x00870340
0x0087034C
0x00870350
4

0x00870350
0x0087035C
0x00870360
4

0x00870360
0x00000000
0x00000000
0
At this point pSimple1 is stored at address 0x0087032C, pSimple2 is at 0x0087035C, and pSimple3 is at 0x0087034C. The program then ends by deleting each allocated object one by one.
Despite the problems that would prevent you from using this memory manager in production code, it does serve as a useful example of how a heap operates. Some method of tracking allocations is used so that the memory management system can tell which memory is in use and which memory is free to be allocated.
Summary
This chapter has given you a very simple introduction to the C++ memory management model. You’ve seen that your programs will use static memory, stack memory, and heap memory to store the objects and data to be used by your games.
Static memory and stack memory are handled automatically by the compiler, and you’ve already been using these types of memory throughout this book without having to do anything in particular. Heap memory has higher management overhead, as it requires that you also free the memory once you have finished using it. You’ve seen that the STL provides the unique_ptr and shared_ptr templates to help automatically manage dynamic memory allocations. Finally, you were introduced to a simple memory manager. This memory manager would be unsuitable for production code, but it does provide you with an overview of how memory is allocated from a heap and how you can overload the global new and delete methods to hook in your own memory manager.
Extending this memory manager to be fully featured would involve adding support for reallocating freed blocks, defragmenting contiguous free blocks in the heap, and eventually ensuring the allocation system is thread safe. Modern games also tend to create multiple heaps to serve different purposes. It’s not uncommon for games to create memory allocators to handle mesh data, textures, audio, and online systems. There could also be thread-safe allocators and allocators that are not thread safe that can be used in situations where memory accesses will not be made by more than one thread. Complex memory management systems also have small block allocators to handle memory requests below a certain size to help alleviate memory fragmentation, which could be caused by frequent small allocations made by the STL for string storage, and so on. As you can see, the topic of memory management in modern games is a far more complex problem than can be covered in this chapter alone.