Chapter 26: Building Multi-File Programs with Make
Every program we have created up to this point has been compiled with a single command-line compiler directive. This is usually fine for single-file programs, even if remembering the appropriate compiler options may become a challenge. As programs are made up of multiple source code files, especially when the number of files is greater than five or six, compiling such programs becomes even more of a challenge. Building a program of several dozen or more files becomes a task fraught with potential problems. An erroneously built program will introduce a whole new set of potential bugs (the program may build but it may not actually be complete).
This was a problem faced by the creators of early versions of Unix and its family of system tools, such as yacc, lex, awk, the C compiler, the C debugger, editors, as well as Unix itself and its various subsystems. What the creators needed, and what they also created, was a build-system, called make. Build systems ease the burden of compiling and linking a large and complex set of source files, library files, and other components reliably in a working program.
In this chapter, we will explore the basics of make. In fact, we will only skim the surface of the capabilities that make provides. We will use our card dealer files in this exploration. By the end of this chapter, we will not only have a good understanding of make but also a general makefile file for any simple programs you may develop.
The following topics will be covered in this chapter:
- Preparing dealer.c for make
- An introduction to the make utility
- Using macros
- Creating rules – targets, dependencies, and actions
- A general makefile for simple projects
- Going further with make
Many of the details presented are specific to the make utility. On the other hand, along the way, you will gain an understanding of what other build systems would provide.
Technical requirements
As detailed in the Technical requirements section of Chapter 1, Running Hello, World!, continue to use the tools you have chosen.
The source code for this chapter can be found at https://github.com/PacktPublishing/Learn-C-Programming-Second-Edition/tree/main/Chapter26.
Preparing dealer.c for make
Before turning our focus to make, we need to first revisit the header file organization we used in our dealer program. In that set of files, we took a simplistic approach where every source file included the same header file, dealer.h, which itself included all the header files from each of the source files. This was a shortcut that is not typical of most C source files. Including all the header files in a single header file and then only including that one file has limiting and possibly undesirable implications. First, doing this assumes that all source files are bound together and interdependent. Second, it means if any source file or header file changes, we must recompile all of the files to regenerate the program. For projects with many files, this means a lot of unnecessary work needs to be done; instead, we’d like to just compile the files that change and then link the unchanged and changed files together. We cannot do that with our previous method of compiling.
In many cases, we cannot avoid interdependency – for example, card.c doesn’t depend upon any other source file. The deck.c file depends only on card.h. Likewise, hand.c depends only on card.h; dealer.c, on the other hand, depends on deck.h and hand.h, which in turn both depend on card.h.
Lastly, we’d like to use parts of the dealer program in other card projects (hint – we’re going to do that in the next chapter). Not all card games have hands. Some interact more actively with the dealer. Others don’t even have a dealer. So, at a minimum, we’d like card.c and deck.c to stand alone as much as possible. To prepare for that as we explore make, we will need to untangle the header files in our current dealer program.
To further minimize the interdependence of source and header files, we need to be able to compile each source file in its intermediate object format. When all source files have been compiled to the object formats, we can then link them all together, along with any other libraries as needed, into the final program. Instead of the single command, we’ve been using the following:
cc card.c hand.c deck.c dealer.c -o dealer -Wall –Werror –std=c17
Instead of a single command, in order to compile each file separately, we will use the following series of commands:
Cc –c card.c -Wall –Werror –std=c17
cc –c hand.c -Wall –Werror –std=c17
cc –c deck.c -Wall –Werror –std=c17
cc –c dealer.c -Wall –Werror –std=c17
cc card.o hand.o deck.o dealer.o -o dealer
In the preceding sequence, the –c options tell the compiler to only generate an object file, which will have a <file>.o extension, where <file> is the base name of the source file. For each command, we must give the same compiler options. Doing so is good practice; mixing different compiler options can lead to some very unusual behaviors and bugs that are very difficult to track down.
Once card.o, hand.o, deck.o, and dealer.o have been created, we can then issue the final command, which links all the object files together along with the C runtime library and creates an executable program called dealer.
With a single-line command, the compiler and linker were invoked together – we never saw the intermediate object files. In the latter case, we invoked the compiler alone and then invoked the linker separately.
One other thing to note is that the -Wall –Werror –std=c17 options are compiler options. They do not apply to the linker. The linker has its own set of options that we rarely need to specify. The most common linker options are the inclusion of libraries not in the C runtime library. If, for instance, you needed special functions in the math library, you’d specify –lm (an abbreviation for math) as a linker option. Other linker options are beyond the scope of this book.
To begin the process of untangling header file dependencies from our dealer program, we’re going to rework the placement of header files in each of the source files. To achieve this, do the following:
- Copy the following source files from Chapter 24, Working with Multi-File Programs, to a folder for this chapter: card.c, card.h, deck.c, deck.h, hand.c, hand.h, dealer.c, and dealer.h (there are eight files in all).
card.c and card.h will need no changes.
- To deck.h, before the #include "card.h" line, add the following:
#include <stdbool.h> // for Boolean
#include <stdlib.h> // for rand() and srand()
#include <time.h> // for date()
- To deck.c, replace the #include "dealer.h" line with the following:
#include "deck.h"
- Also in deck.c, it turns out that the PrintDeck() function needs to know about the hand structure. That’s a dependency that fits better in dealer.c. Let’s move that function to dealer.c. This makes more sense, since dealer.c is the only source file that knows about the deck and the hands into which it deals cards.
- To hand.h, before the #include "card.h" line, add the following:
#include <stdio.h> // for printf()
- To hand.c, replace the #include "dealer.h" line with the following:
#include "hand.h"
- To dealer.c, replace the #include "dealer.h" line with the following:
#include <stdbool.h> // for Boolean
#include <stdio.h> // for printf()
#include "hand.h"
#include "deck.h"
void PrintDeck( Deck* pDeck );
Remember that we already moved the function in step 5, so we need the prototype.
- Delete dealer.h. We no longer need it. The included files from it are already included everywhere else they are needed.
To verify that everything works, build the dealer program either with the single command line as we have always done or try building each file with a series of single-file compiles and a final link (the series of commands given earlier in this section). Once this successfully builds and runs, as it did in Chapter 24, Working with Multi-File Programs, we will make no further changes to any of these files in this chapter.
We are now ready to move on to make.
Introducing the make utility
make is a Unix program that orchestrates the building of all the parts – one or more source files, other generated files, libraries, and other processes – needed to create a valid program. make was first created in 1976 at AT&T Bell Labs because of a need to achieve consistent build results when one or more parts of complex programs changed as they were developed. It turns out there are many different versions of make. However, GNU make is the most widely distributed and is available for most computer systems.
make is rule-based – that is, it processes a set of rules that specify a build product, or target, and the actions needed to build that target. We’ll get into the details of rules in the Creating rules – targets, dependencies, and actions section.
By default, make operates on a file named makefile or Makefile where the rules are specified by you. The advantage of using a Makefile is that in a directory listing, it will appear at the top (when your filesystem uses a case-sensitive sort order). Let’s create a simple makefile with a single rule:
dealer: card.c hand.c deck.c dealer.c
cc card.c hand.c deck.c dealer.c -o dealer -Wall -Werror
-std=c17
This rule creates the target dealer and has a single action that is identical to the single-line command we’ve been using. Notice that after dealer, there is a space-separated list of source files that make up the dealer program. These are the dependencies of the target. make uses the timestamp of each dependency file and the target to see whether any dependency is newer than the target timestamp. If so, it performs the specified action.There is one critical element that is not obvious from this rule – each action begins with the <tab> character. The <tab> indicates that what follows is a command to be executed.
Create a new file and enter the preceding two-lined rule. Remember to begin the action with the <tab> character. Save the file with the name makefile (no extension). We can now run this rule by typing only make<return> in the command line, as follows:
Figure 26.1 – A screenshot of the simplest rule to build dealer
Here, makefile is the default file to process. The first (and only) rule is then processed. Since this is the first time running make, it performs the action, printing it out to the console.
Try running make again without making any changes to any source file. You should see the following:
Figure 26.2 – A screenshot of make running again without any changes
The target timestamp is later than all of its dependencies, so nothing needs to be done.
We can simulate making a change to card.c (or any of the listed dependency files) with the Unix touch command; touch changes the file’s timestamp to the current time. Run make again and you should see the following:

Figure 26.3 – A screenshot of make running after changing card.c.
Okay, that’s simple enough. We have a single rule to build our program. You might wonder what would happen if we changed a header file and ran make again. Try touching a header file and run make for yourself. Nothing happened. We’ll explore that in an upcoming section.
Note that running make with no other parameters is identical to the command:
make –f makefile
This implies that you can have makefiles with different names and specify the one you want when you run make. But that’s more work than I want to do. In the repository, this makefile is named makefile.1.
We can now move on to more convenient features of make.
Using macros
make provides a macro facility. This is similar to C’s preprocessor directives. Unlike preprocessor macros, make has a number of predefined macros. We’ll encounter just a few of them here. If you want to see the full list (and “full” is an understatement), use the following command:
make –p
You’ll get a bewildering list of macros. They are there for very advanced and wide-ranging uses of make.
Using macros involves two steps:
- Define the macro name and assign it a value.
- Use the macro in a rule by wrapping it in $(…).
The two predefined macros we’ll use are CC for which compiler to call and CCFLAGS for compiler options. With this in mind, modify your makefile to define and use these macros as follows:
CC = clang
CCFLAGS = -Wall -Werror -std=c17
dealer: card.c hand.c deck.c dealer.c
$(CC) card.c hand.c deck.c dealer.c -o dealer $(CCFLAGS)
On my system, I am using the clang compiler. Instead of clang, you might use gcc. The compiler options are exactly the same as those we’ve been using for quite a while. In the repository, this makefile is named makefile.2.
Note that this now seems like more work than it’s worth. Hold on though – it’s about to get very terse, with special macros.
Using special macros
There are a handful of special macros that are particularly useful when making general rules. The following list shows just a few of what we will use in our makefile:
- $@: The filename representing the target
- $<: The filename of the first dependency
- $^: A space-separated list of all dependencies; duplicates are removed
Note that each of these macros is only two characters (there is no colon in them).
The other special macros are for more advanced makefile processing. These, however, are beyond the scope of this chapter. We can now put these special macros to use. Modify your makefile as follows:
CC = clang
CCFLAGS = -Wall -Werror -std=c17
dealer: card.c hand.c deck.c dealer.c
$(CC) $^ -o $@ $(CCFLAGS)
Now, our action has gotten a lot simpler. Take a moment to see how $^ represents the dependencies list and $@ represents the target, dealer. It may take a little while to get comfortable with these odd symbols. To verify, touch card.c and run make; everything should build.
If you are ever uncertain what make will do, you can do a dry run of your rule with the following command:
make –n
This will do everything but actually run the actions. Later, we’ll see how to use our tried-and-true caveman debugging techniques, which even work in make.
In the repository, this makefile is named makefile.3.
Now that we can use macros and special macros in our simple rule, we are now ready to explore the basic rules of rule making.
Creating rules – targets, dependencies, and actions
A rule consists of one or more targets with one or more dependencies to perform one or more actions:
<target1> <target2> ... : <dependency1> <dependency2> ...
<action1>
<action2>
...
Yes, that’s a lot of possibilities. However, we will limit ourselves to a single target for each rule. Again, remember that each action line begins with <tab>.
We can have quite a few dependencies. In our current makefile, if we change any header file, nothing happens. To fix this, we can make all of the header files dependencies for dealer. Modify your makefile to add those dependencies, as follows:
CC = clang
CCFLAGS = -Wall -Werror -std=c17
dealer: card.c hand.c deck.c dealer.c card.h hand.h deck.h
$(CC) $^ -o $@ $(CCFLAGS)
Save it. In the repository, this makefile is named makefile.4a. In the terminal, touch any of these files and run make. You should see the following:

Figure 26.4 – A screenshot of the new dependencies
This didn’t work! It turns out that we can’t use @^ with header files because make has some automatic rules that it tries to use to build .o files from the .c and .h files; those automatic rules kick in and then muck things up. We can fix this by adding two macros, as follows:
CC = clang
CCFLAGS = -Wall -Werror -std=c17
SRCS = card.c hand.c deck.c dealer.c
INCS = card.h hand.h deck.h
dealer: $(SRCS) $(INCLS)
$(CC) -o $@ $(SRCS) $(CCFLAGS)
We now have a list of source files and a list of header files. Both of these appear in the dependencies, but only SRCS appears in the action. In the repository, this makefile is named makefile.4b.
Now, when you run make, you should see the following:

Figure 26.5 – A screenshot of the better use of macros
For very simple projects, this makefile is almost quite enough. Any change to a header would trigger a rebuild of all files. If that’s not an issue, we’d be done.
However, what if we had a larger project and not all source files depended on all header files (actually, quite common)? To get both a reliable and efficient build, we would have to add explicit rules for each object file, as follows:
CC = clang
CCFLAGS = -Wall -Werror -std=c17
LDLIBS =
dealer: card.o hand.o deck.o dealer.o
$(CC) -o $@ $^ $(LDLIBS)
card.o: card.c card.h
$(CC) -c card.c $(CCFLAGS)
hand.o: hand.c hand.h card.h
$(CC) -c hand.c $(CCFLAGS)
deck.o: deck.c deck.h card.h
$(CC) -c deck.c $(CCFLAGS)
dealer.o: dealer.c deck.h hand.h card.h
$(CC) -c dealer.c $(CCFLAGS)
The rule for the dealer target has dependencies for each object file. The action for this rule is to invoke the linker only. We’ve added the built-in LDLIBS macro and set it to nothing in case we need it later. For now, this is only a placeholder for when we have a project that requires additional libraries.
Next, each source file has a rule for its object file. In this manner, we can be explicit about which header files are dependencies for each source file. In the repository, this makefile is named makefile.4c.
A couple of things to notice here. The first rule is for the dealer target. This is what make does first unless you specify another target on the command line. But when you run this makefile, you’ll see the following:
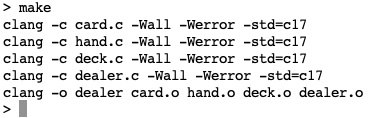
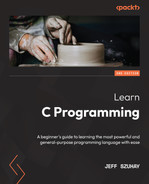
Figure 26.6 – A screenshot of the object file rules
Each action for each object file is executed before the final target is built. Note that this is the series of commands we encountered in the Preparing dealer.c for make section.
make is not like the imperative programming model we have been learning with C. Because it’s rule-based, it needs to evaluate all of its rule dependencies and then determine a course of action. This is rarely in the order that the rules appear.
The next thing to notice is that each <file>.o target depends upon different header files. For instance, if we touch card.h, everything gets rebuilt. But if we only touch hand.h, only hand.o, dealer.o, and dealer get rebuilt, sparing the work of rebuilding card.o and deck.o. For very large projects with lots of big C files, avoiding unnecessary compiling can be a significant saving.
There is one additional kind of rule to explore – rules that have only actions.
Creating useful rules that have only actions
Rules that have only actions and no dependencies are useful because they can do additional work for us that might otherwise be tedious or error-prone. These are called phony rules. They are phony because they typically don’t generate anything. They have a target, but that target may actually be a file in a very large project. To prevent confusion, they are preceded by the following line:
.PHONY: <target>
Here are two common utility rules. Add these to the end (after all other rules) of your makefile and save it:
.PHONY: clean
clean:
rm -f *.o dealer
.PHONY: run
run:
dealer
The clean rule deletes any object file and executable file from any prior builds.
The run rule runs the built program. In this case, it’s a very simple action. If you wanted to test your program with various command-line inputs, this would be a convenient and reliable way to test your program over multiple builds.
You can now invoke these rules with make clean and make run. Make dealer, run it (you should see it output exactly what we saw in Chapter 24, Working with Multi-File Programs), and then make it clean.
In the repository, this makefile is named makefile.5.
To get to our final solution, we need to use a few more features of make. One of the most useful of these is pattern rules.
Pattern rules and %
The last makefile that had an object rule for each source file is a bit verbose. This is fine for small projects but becomes tedious for larger projects. A pattern rule is a shortcut for a file of one type – say, an object file – that is created from a source file, or a source file and a header file. A pattern rule looks like the rules we’ve seen so far, except the stem of the file is represented by the % character. The stem of a file is that part before its extension. The stem for card.c is card. That stem is the same for card.h and card.o. So, we can replace the following rule:
card.o : card.c card.h
$(cc) -c card.c
It can then become the following:
%.o : %.c %.h
$(CC) -c $<
But wait – nowhere in this second rule does the stem, card, appear. Therefore, this rule can apply to any .o target that has .c and .h files as dependencies. So, now with this rule, we don’t need an explicit rule for each target but can use just one rule for all files of this pattern.
Built-in functions
make processes filenames and files. It should come as no surprise then that make has a plethora of built-in filename and string functions. Functions in make appear quite different than C functions. They have following the general format:
$(<function_name> , <parameter1> , <parameter2> , ... )
So, the function and its parameters appear within $(...). The function return value, whether a string or a list, becomes the macro value.
One extremely useful function is the wildcard function, as shown here:
$(wildcard , *.x)
Here, wildcard is the function and *.x is the filename pattern to match in the current directory. The result of this function is a space-separated list of filenames that match the *.x pattern. We can then use this to build a list of, say, source files, header files, or object files. We will do this in our last solution.
Another frequently used function is patsubst, which searches for a pattern in text and replaces it with another pattern. This has the following form:
$(patsubst, search-pattern , replace-pattern, text)
Here, patsubst is the function. The result of this function is the modified text. We’ll use this with the % pattern and the $(SRCS) list. This way, we can change every *.c filename to a *.o filename.
There are many more of these powerful string and filename functions. There are too many for us to go into here. The last feature we’ll explore is caveman debugging.
Caveman debugging in your makefile
Caveman debugging is an extremely simple yet powerful and reliable way to understand what’s happening as a program or utility – in this case, make runs. We can do this in any makefile by using the echo command in the action part of any rule. Every command in an action is duplicated to the console. Sometimes this is handy, but with echo, the duplication of the action and its result is not useful; the echo action seems to appear twice. We can suppress the terminal output of any command by prepending an @ sign before the command. We will do this in our last solution.
A general makefile for simple projects
We have seen the various ways we can use make to build our simple projects. With what we currently know, we can create a general makefile for simple projects. A makefile for these simple projects has some limitations, as follows:
- All source files and header files are in the same directory.
- Header dependency is simple; all source files depend upon all headers. This is not ideal, but the purpose of this makefile is simple. To keep that simplicity, some efficiency is sacrificed.
- A single target is generated.
With those limitations in mind, you can now modify your makefile as follows:
CC = clang
CCFLAGS = -Wall -Werror -std=c17
LDLIBS =
SRCS = $(wildcard *.c)
HDRS = $(wildcard *.h)
OBJS = $(patsubst %.c, %.o , $(SRCS))
PROG = dealer
$(PROG): $(OBJS)
@echo [Sources: $(SRCS)]
@echo [Headers: $(HDRS)]
@echo [Objects: $(OBJS)]
@echo [Program: $(PROG)]
$(CC) -o $@ $^ $(LDLIBS)
%.o: %.c $(HDRS)
@echo [$< depends on all header files]
$(CC) $(CCFLAGS) -c $<
%.o: %.c %.h
@echo [$< has a header file of same name]
$(CC) $(CCFLAGS) -c $<
%.o: %.c
@echo [$< does not have a header file]
$(CC) $(CCFLAGS) -c $<
.PHONY: clean
clean:
@echo [cleaning up]
rm -f $(OBJS) $(PROG)
.PHONY: run
run:
@echo [executing $(PROG)]
$(PROG)
Everything that this makefile does should now be obvious to you.
Save this makefile. When you run this with various commands, you should see the following output:
Figure 26.7 – A screenshot of a general makefile
In this makefile, the rule that applies for every source file is the one where the .o target depends on all the headers. If you remove this rule, the other .o targets will occur when a .c file has or does not have a header.
To use this makefile, you need only to copy into the directory where your source files are and change a single line – the line where PROG is defined.
Going further with make
We have only touched the surface of what is possible with make. We have only explored a few simple features. It is an incredibly powerful and flexible tool that has been in widespread use for nearly as long as C has existed. There are many more features, and there are many more ways it can be used than just building C programs. There are many online tutorials and books to help you go further with make if you have the need and are interested. However, make, like C, is not perfect and has its limitations.
There are alternative build systems for C and C++. Most Integrated Developer Environments (IDEs) have their own build system integrated into each project. Other languages such as Java, Go, and Rust have their own build tools. Some interpreted languages such as Python, Ruby, and JavaScript don’t even require a build system because the latest version of every file is processed when the program runs.
Summary
In Chapter 24, Working with Multi-File Programs, we saw how to break a single C file into multiple files each with one or more headers. In this chapter, we extended our ability to reliably and easily build multi-file projects with the help of the GNU make utility. This utility allows us to set macro values and create build rules, where each rule has a target, dependencies, and actions to be performed when the target is out of date (or non-existent). We created two utility rules to make working with files easier. We saw how to use make’s special macros, a basic pattern rule, and two built-in string functions. From this, we have a general makefile for use in any simple source code project.
In the next chapter, we will use parts of the dealer source code files along with the continued use of make to build two rudimentary interactive card games – Blackjack and one-handed Solitaire.
Questions
- What is the default filename that make will process if no other is given?
- Unless otherwise specified, which rule will always be processed?
- What are the three parts of a make rule?
- How does make determine whether a target needs to be rebuilt?