Chapter 2
Strings
Strings are probably the most important data structure on the Web, since web pages ultimately consist of strings of characters sent from the server to the browser, and many other kinds of programs also require string manipulation. As a result, strings make an excellent place to start our JavaScript programming journey.
2.1 String Basics
Strings are made up of sequences of characters in a particular order. We’ve already seen several examples in the context of our “hello, world” programs in Chapter 1. Let’s see what happens if we type a string by itself (without console.log) into a Node session:
$ node
> "hello, world!"
'hello, world!'
A sequence of characters typed literally is called a string literal, which we’ve created here using the double quote character ". The REPL prints the result of evaluating the line, which in the case of a string literal is just the string itself.
There’s one detail you might have noticed above: We entered the string using double quotes, but the REPL returned it using single quotes. This detail is system-dependent (for example, the console in browsers like Chrome and Safari uses double quotes for string return values), so you shouldn’t be concerned if your system differs. But this small discrepancy gives us an opportunity to learn about the difference between single and double quotes in JavaScript.
Unlike many other languages, JavaScript uses double and single quotes interchangeably for almost all practical purposes. The main exception is that apostrophes have to be escaped out with a backslash when included inside single-quoted strings:
> "It's not easy being green"
'It's not easy being green'
Here the output includes a backslash in front of the apostrophe in “It’s”. If we were to type the same string without escaping the apostrophe, the REPL would think that the string ended after “It”, leading to a syntax error:
> 'It's not easy being green'
'It's not easy being green'
> 'It's not easy being green'
'It's not easy being green'
    ^
SyntaxError: Unexpected identifier
What’s happening here is that JavaScript sees a bare letter s after the string 'It'. Since there’s no identifier called s, the REPL raises an error (Figure 2.1).1 (We’ll have more to say about identifiers in Section 2.2 (Box 2.2).)
1. Image courtesy of LorraineHudgins/Shutterstock.

Figure 2.1: Sometimes it’s not easy dealing with syntax errors.
Similarly, inside double-quoted strings, literal double quotes have to be escaped out:
> "Let's write a "hello, world" program!"
'Let's write a "hello, world" program!'
As you might have guessed, the return value shows how no escaping of double quotes is necessary inside a single-quoted string.
A particularly important string is one with no content, consisting simply of two quotes. This is known as an empty string (or sometimes the empty string):
> ""
''
We’ll have more to say about the empty string in Section 2.4.2 and Section 3.1.
2.1.1 Exercise
2.2 Concatenation and Interpolation
Two of the most important string operations are concatenation (joining strings together) and interpolation (putting variable content into strings).
Whether we use single- or double-quoted strings, we can concatenate (join) them with the + operator:2
2. This use of + for string concatenation is common in programming languages, but in one respect it’s an unfortunate choice, because addition is the canonical commutative operation in mathematics: a + b = b + a. (In contrast, multiplication is in some cases non-commutative; for example, when multiplying matrices it’s often the case that AB ≠ BA.) In the case of string concatenation, though, + is most definitely not a commutative operation, since, e.g., "foo" + "bar" is "foobar", whereas "bar" + "foo" is "barfoo". Partially for this reason, some languages (such as PHP) use a different symbol for concatenation, such as a dot · (yielding "foo" · "bar").
$ node
> "foo" + "bar";        // String concatenation
'foobar'
Here the result of evaluating "foo" plus "bar" is the string "foobar". (The meaning of the odd names “foo” and “bar” is discussed (https://www.learnenough.com/command-line-tutorial/manipulating_files#aside-foo_bar) in Learn Enough Command Line to Be Dangerous (https://www.learnenough.com/command-line).) Note also that the concatenation example includes a descriptive JavaScript comment (Box 2.1), which you wouldn’t ordinarily include in a REPL session, but will sometimes be added in this tutorial for clarity.
Let’s take another look at string concatenation in the context of variables, which you can think of as named boxes that contain some value (as mentioned in Learn Enough CSS & Layout to Be Dangerous (https://www.learnenough.com/css-and-layout) and discussed further in Box 2.2).
We can create variables for a first name and a last name using the JavaScript command let, as shown in Listing 2.1.
Listing 2.1: Using let to assign variables.
> let firstName = "Michael";
> let lastName  = "Hartl";
Here let associates the identifier firstName with the string "Michael" and the identifier lastName with the string "Hartl".
The identifiers firstName and lastName in Listing 2.1 are written in so-called CamelCase (named for the resemblance of the capital letters to humps of a camel (Figure 2.3)),4 which is a common naming convention for JavaScript variables. Variable names conventionally start with a lowercase character, whereas object prototypes like String (Chapter 7) start with a capital letter.
4. Image courtesy of Utsav Academy and Art Studio. Pearson India Education Services Pvt. Ltd.

Figure 2.3: The origin of CamelCase.
Having defined the variable names in Listing 2.1, we can use them to concatenate the first and last names, while also inserting a space in between (Listing 2.2).
Listing 2.2: Concatenating string variables (and a string literal).
> firstName + "  " + lastName;
'Michael Hartl'
By the way, the use of let in Listing 2.1 is characteristic of modern JavaScript (often referred to as ES6 because of the significant upgrade represented by version 6 of the ECMAScript standard (Box 1.2)). In this book, we’ll always use let (or the closely related const, which we’ll first see in Section 4.2) for variable assignment, but you should be aware that the use of the nearly equivalent var is still extremely common (Listing 2.3), so it’s important to understand both.
Listing 2.3: Using the slightly outdated var to assign variables.
var firstName = "Michael";
var lastName  = "Hartl";
(You shouldn’t type in Listing 2.3; it’s shown only for purposes of illustration.)
2.2.1 The Backtick Syntax
Another way to build up strings is via interpolation using a special ES6 backtick syntax known as template literals:
> `${firstName} is my first name.`
'Michael is my first name.'
Here we have a string enclosed in backticks '…', with the variable to be interpolated introduced with a dollar sign $ and enclosed in curly braces {…}. JavaScript automatically inserts, or interpolates, the value of the variable firstName into the string at the appropriate place.5
5. Programmers familiar with Perl or PHP should compare this to the automatic interpolation of dollar sign variables in expressions like "Michael $lastName".
We can use the backtick syntax to replicate the result of Listing 2.2, as shown in Listing 2.4.
Listing 2.4: Concatenation review, then interpolating with backticks.
> firstName + "  " + lastName;    // Concatenation, with a space in between
'Michael Hartl'
> `${firstName} ${lastName}`;    // The equivalent interpolation
'Michael Hartl'
The two expressions shown in Listing 2.4 are equivalent, but I generally prefer the interpolated version because having to add the single space " " in between strings feels a bit awkward.
2.2.2 Exercises
What happens if you use
leta second time with the same variable name? What if you usevarinstead?Assign variables
cityandstateto your current city and state of residence. (If residing outside the U.S., substitute appropriate analogues.) Using interpolation, print a string consisting of the city and state separated by a comma and a space, as in “Los Angeles, CA”.Repeat the previous exercise but with the city and state separated by a tab character.
2.3 Printing
As we saw in Section 1.3 and subsequent sections, the JavaScript way to print a string to the screen is to use the console.log function:
> console.log("hello, world!");     // Print output
hello, world!
This function operates as a side effect, which refers to anything a function does other than returning a value. In particular, the expression
console.log("hello, world!");prints the string to the screen and then returns nothing. This is why some consoles display undefined after the printed value (Figure 2.4). We’ll generally omit undefined when showing results in the REPL, but it’s good to distinguish between functions that return values (almost all of them) and those like console.log that operate using side effects.

Figure 2.4: An undefined return value in Node.
In contrast to many other languages—whose print functions are things like print, printf (“print format”), and puts (“put string”)—the print function in JavaScript is rather long and cumbersome, requiring calling a method on the console object and using the rather unintuitive name log. This is due to the origins of JavaScript as a language designed specifically to run inside web browsers, rather than being designed as a general-purpose programming language.
The name console.log is a hint of its original purpose: to write a log to the browser console—a task at which it still excels, and which is useful in debugging. For example, we can write to the index page’s console log by adding a line inside the script tag, as shown in Listing 2.5.
Listing 2.5: Writing to the console log.index.html
<!DOCTYPE html>
<html>
  <head>
    <title>Learn Enough JavaScript</title>
    <meta charset="utf-8">
    <script>
      alert("hello, world!");
      console.log("This page contains a friendly greeting.");
    </script>
  </head>
  <body>
    <h1>Hello, world!</h1>
    <p>This page includes an alert written in JavaScript.</p>
  </body>
</html>
The result is that the index page (after displaying the alert) logs the message to the console, as shown in Figure 2.5.

Figure 2.5: The console log message on the index page.
Finally, it’s worth noting that (as seen briefly in Section 1.4.1) the default behavior for console.log is to insert a space:
> console.log(firstName, lastName);
Michael Hartl
This does you little good if you actually want a string representing the combination (as in Section 2.2), but it does mean you can omit the concatenation or interpolation if all you’re interested in is the output.
2.3.1 Exercise
Define
firstNameandlastNamevariables (as in Section 2.2) insideindex.html, and output them in the browser console usingconsole.log.
2.4 Properties, Booleans, and Control Flow
Almost everything in JavaScript, including strings, is an object. This means that we can get useful information about strings and do useful things with them using the dot notation introduced in Section 1.3.1.
We’ll start by accessing a string property (also called an attribute), which is a piece of data attached to an object. In particular, in the console we can use the length property to find the number of characters in a string:
$ node
> "badger".length;   // Accessing the "length" property of a string
6
> "".length          // The empty string has zero length.
0
As it happens, length is the only property of string objects, as you can verify using the MDN entry on String (https://developer.mozilla.org/en-US/docs/Web/JavaScript/Reference/Global_Objects/String) and using your browser’s “Find” capability to search for the string “properties”.
The length property is especially useful in comparisons, such as checking the length of a string to see how it compares to a particular value (note that the REPL supports “up arrow” to retrieve previous lines, just like the command-line terminal):
> "badger".length > 3;
true
> "badger".length > 6;
false
> "badger".length >= 6;
true
> "badger".length < 10;
true
> "badger".length == 6;
true
The last line uses the equality comparison operator ==, which JavaScript shares with many other languages, but there’s a huge gotcha:
> "1" == 1;     // Uh, oh!
true
In other words, JavaScript considers the string "1" to be equal to the number 1, at least when using == to do the comparison.
As programming languages go, this behavior is unusual, so it can be a source of frustrating bugs for people coming to JavaScript from other languages. In order to avoid confusion, it’s best to use triple equals instead:
> "1" === 1;     // This is probably what you want.
false
Throughout the rest of this tutorial, we’ll always do equality comparisons with ===.
The return values in the comparisons above, which are always either true or false, are known as boolean values, after mathematician and logician George Boole (Figure 2.6).6
6. Image courtesy of Yogi Black/Alamy Stock Photo.

Figure 2.6: True or false? This is a picture of George Boole.
Boolean values are especially useful for control flow, which lets us take actions based on the result of a comparison (Listing 2.6).
Listing 2.6: Control flow with if.
> let password = "foo";
> if (password.length < 6) {
    "Password is too short.";
  }
'Password is too short.'
Note in Listing 2.6 that the comparison after if is in parentheses, and the string is inside curly braces {…}.7 We also followed a consistent indentation convention, which is irrelevant to JavaScript but is important for human readers of the code (Box 2.3).
7. Such curly braces are characteristic of C-like languages, that is, languages with syntax similar to that of the C programming language.
We can add a second behavior using else, which serves as the default result if the first comparison is false (Listing 2.7).
Listing 2.7: Control flow with if and else.
> password = "foobar";
> if (password.length < 6) {
    "Password is too short.";
  } else {
    "Password is long enough.";
  }
'Password is long enough.'
The first line in Listing 2.7 redefines password by assigning it a new value (with no let required since it was already defined before). After reassignment, the password variable has length 6, so password.length < 6 is false. As a result, the if part of the statement (known as the if branch) doesn’t get evaluated; instead, JavaScript evaluates the else branch, resulting in a message indicating that the password is long enough.
2.4.1 Combining and Inverting Booleans
Booleans can be combined or inverted using the && (“and”), || (“or”), and ! (“bang” or “not”) operators.
Let’s start with &&. When comparing two booleans with &&, both have to be true for the combination to be true. For example, if I said I wanted both french fries and a baked potato, the only way the combination could be true is if I could answer “yes” (true) to both of the questions “Do you want french fries?” and “Do you want a baked potato?” The resulting combinations of possibilities are collectively known as a truth table; the truth table for && appears in Listing 2.8.
Listing 2.8: The truth table for && (“and”).
> true && true
true
> false && true
false
> true && false
false
> false && false
false
We can apply this to a conditional as shown in Listing 2.9.
Listing 2.9: Using the && operator in a conditional.
> let x = "foo";
> let y = "";
> if (x.length === 0 && y.length === 0) {
    "Both strings are empty!";
  } else {
    "At least one of the strings is nonempty.";
  }
'At least one of the strings is nonempty.'
In Listing 2.9, y.length is in fact 0, but x.length isn’t, so the combination is false (in agreement with Listing 2.8), and JavaScript evaluates the else branch.
In contrast to &&, || lets us take action if either comparison (or both) is true (Listing 2.10).
Listing 2.10: The truth table for || (“or”).
> true || true
true
> true || false
true
> false || true
true
> false || false
false
We can use || in a conditional as shown in Listing 2.11.
Listing 2.11: Using the || operator in a conditional.
> if (x.length === 0 || y.length === 0) {
    "At least one of the strings is empty!";
  } else {
    "Neither of the strings is empty.";
  }
'At least one of the strings is empty!'
Note from Listing 2.10 that || isn’t exclusive, meaning that the result is true even when both statements are true. This stands in contrast to colloquial usage, where a statement like “I want fries or a baked potato” implies that you want either fries or a baked potato, but you don’t want both (Figure 2.8).8
8. Image courtesy of Rikaphoto/Shutterstock.

Figure 2.8: Turns out I only wanted fries.
In addition to && and ||, JavaScript supports negation via the “not” operator ! (often pronounced “bang”), which just converts true to false and false to true (Listing 2.12).
Listing 2.12: The truth table for !.
> !true
false
> !false
true
We can use ! in a conditional as shown in Listing 2.13.
Listing 2.13: Using the ! operator in a conditional.
> if (!(x.length === 0)) {
  "x is not empty.";
} else {
  "x is empty.";
}
'x is not empty.'
The code in Listing 2.13 is valid JavaScript, as it simply negates the test x.length === 0, yielding true:
> (!(x.length === 0))
true
In this case, though, it’s more common to use !== (“not equals”):
> if (x.length !== 0) {
    "x is not empty.";
  } else {
  "x is empty.";
  }
'x is not empty'
2.4.2 Bang Bang
Not all booleans are the result of comparisons, and in fact every JavaScript object has a value of either true or false in a boolean context. We can force JavaScript to use such a boolean context with !! (pronounced “bang bang”); because ! converts between true and false, using two exclamation points returns us back to the original boolean:
> !!true
true
> !!false
false
Using this trick allows us to see that a string like "foo" is true in a boolean context:
> !!"foo"
true
As it happens, the empty string is false in a boolean context:9
9. This is the sort of detail that varies from language to language. In Ruby, for example, even the empty string is true in a boolean context.
> !!""
false
As a result, we can rewrite code like Listing 2.9 more compactly by omitting the length comparison (while negating x and y), as shown in Listing 2.14.
Listing 2.14: Using a conditional to force a boolean context.
> if (!x && !y) {
    "Both strings are empty!";
  } else {
    "At least one of the strings is nonempty.";
  }
'At least one of the strings is nonempty.'
2.4.3 Exercises
If
xis"foo"andyis""(the empty string), what is the value ofx && y? Verify using the “bang bang” notation thatx && yis false in a boolean context. Hint: When applying!!to a compound expression, wrap the whole thing in parentheses.What is
x || y? What is it in a boolean context? Rewrite Listing 2.14 to usex || y, ensuring that the result is the same. (Hint: Switch the order of the strings.)
2.5 Methods
As noted in Section 2.4, JavaScript string objects have only one property (length), but they support a wide variety of methods.10 In the language of object-oriented programming, a particular string, or string instance, is said to “respond to” a particular method, indicated using the dot notation first seen in Section 1.3.1.
10. Recall from Section 1.3.1 that a method is a particular kind of function, one attached to an object and invoked using the dot notation.
For example, strings respond to the instance method toLowerCase(), which (surprise!) converts the string to all lowercase letters (Figure 2.9):11
11. Image courtesy of Pavel Kovaricek/Shutterstock.

Figure 2.9: This honey badger used to be a HONEY BADGER, but he don’t care.
$ node
> "HONEY BADGER".toLowerCase();
'honey badger'
This is the sort of method that could be useful, for example, when standardizing on lowercase letters in an email address:12
12. If you’ve exited and re-entered your Node console, firstName might no longer be defined, as such definitions don’t persist from session to session. If this is the case, apply your technical sophistication (Box 1.1) to figure out what to do.
> let username = firstName.toLowerCase();
> `${username}@example.com`;   // Sample email address
'[email protected]'
Note that, in contrast to the length property, a method has to be called with arguments, even if there aren’t any. That’s why
toLowerCase()
ends with opening and closing parentheses: toLowerCase is a function that takes zero arguments. Also note that official JavaScript string methods follow the same capitalization convention (CamelCase with a lowercase letter to start) that we introduced ourselves in Section 2.2.
As you might be able to guess, JavaScript supports the opposite operation as well; before looking at the example below, see if you can guess the method for converting a string to uppercase (Figure 2.10).13
13. Image courtesy of arco1/123RF.

Figure 2.10: Early typesetters kept large letters in the “upper case” and small letters in the “lower case”.
I’m betting you got the right answer:
> lastName.toUpperCase();
'HARTL'
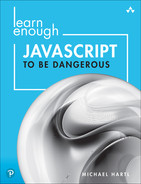
Being able to guess answers like this is a hallmark of technical sophistication, but as noted in Box 1.1 another key skill is being able to use the documentation. In particular, the Mozilla Developer Network page on String objects has a long list of useful string instance methods.14 Let’s take a look at some of them (Figure 2.11).
14. You can find such pages by going directly to the MDN website (https://developer.mozilla.org/en-US/docs/Web/JavaScript), but the truth is that I nearly always find such pages by Googling things like “javascript string”.
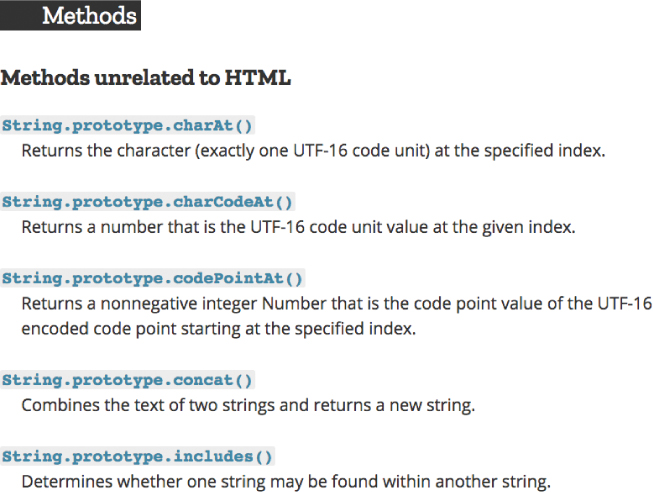
Figure 2.11: Some JavaScript string methods.
Inspecting the methods in Figure 2.11, we see on the bottom some code that looks like this:
String.prototype.includes()followed by a brief description. What does String.prototype mean here? We’ll find out in Chapter 7, but the real answer is we don’t have to know exactly what it means to use the documentation. Selective ignorance is classic technical sophistication.
Clicking through on the String.prototype.includes() link and scrolling down shows us a bunch of examples (Figure 2.12). Notice that, as prophesied in Section 2.2, the use of var instead of let is very common; being able to tolerate these slight mismatches is yet another application of technical sophistication.
Figure 2.12: Examples for the string includes() method.
Let’s try out the examples shown in Figure 2.12, with the following modifications:
Use
letinstead ofvar.Use
soliloquyinstead ofstr.Use double-quoted strings instead of single-quoted strings.
Change the quote to use a colon as in the original (Figure 2.13).15
15. Image courtesy of Everett Collection/Shutterstock.

Figure 2.13: Hamlet, Prince of Denmark, asks: “To be, or not to be, that is the question.”
Omit the use of
console.log.Omit the current comments, while adding some of our own.
The result in a Node REPL looks something like Listing 2.15.
Listing 2.15: Includes or does not include? That is the question.
> let soliloquy = "To be, or not to be, that is the question:";
> soliloquy.includes("To be");        // Does it include the substring "To be"?
true
> soliloquy.includes("question");     // What about "question"?
true
> soliloquy.includes("nonexistent");  // This string doesn't appear.
false
> soliloquy.includes("TO BE");        // String inclusion is case-sensitive.
false
> soliloquy.includes("To be", 1);     // Can you guess what this one means?
false
> soliloquy.includes("o be,", 1);     // A hint for the previous one
true
Of the lines in Listing 2.15, the only two that you might not be able to figure out right away are the last two. You’ll find the solution to this mystery, as well as pointers to some other common string methods, in the section exercises.
2.5.1 Exercises
Write the JavaScript code to test whether the string “hoNeY BaDGer” includes the string “badger” without regard to case.
What does
includes(string, i)do for any integeri? Hint: Counting in JavaScript starts at0rather than1.
2.6 String Iteration
Our final topic on strings is iteration, which is the practice of repeatedly stepping through an object one element at a time. Iteration is a common theme in computer programming, and we’ll see some other examples later in this tutorial (Section 3.5 and Section 5.4). We’ll also see how one sign of your growing power as a developer is learning how to avoid iteration entirely (as discussed in Chapter 6 and Section 8.5).
In the case of strings, we’ll be learning how to iterate one character at a time. There are two main prerequisites to this: First, we need to learn how to access a particular character in a string, and second, we need to learn how to make a loop.
We can figure out how to access a particular string character by consulting the list of String methods (https://developer.mozilla.org/en-US/docs/Web/JavaScript/Reference/Global_Objects/String), which includes the following entry:
String.prototype.charAt()
Returns the character (exactly one UTF-16 code unit) at the specified index.
Drilling down into the documentation (https://developer.mozilla.org/en-US/docs/Web/JavaScript/Reference/Global_Objects/String/charAt) for the method itself, we see from the examples what charAt and “index” mean in this context. Using the soliloquy string from Section 2.5, we can illustrate this as shown in Listing 2.16.
Listing 2.16: Investigating the behavior of charAt.
> console.log(soliloquy);   // Just a reminder of what the string is
To be, or not to be, that is the question:
> soliloquy.charAt(0);
'T'
> soliloquy.charAt(1);
'o'
> soliloquy.charAt(2);
' '
We see in Listing 2.16 that charAt(0) returns the first character, charAt(1) returns the second, and so on. (We’ll discuss this possibly counter-intuitive numbering convention, called “zero-offset”, further in Section 3.1.) Each number 0, 1, 2, etc., is called an index (plural indexes or indices).
Now let’s look at our first example of a loop. In particular, we’ll use a for loop that defines an index value i and increments its value until it reaches some maximum (Listing 2.17).
Listing 2.17: A simple for loop.
> for (let i = 0; i < 5; i++) {
  console.log(i);
}
0
1
2
3
4
This sort of loop (with only minor variations in syntax) is common across an astonishing variety of programming languages, from C and C++ to Java, Perl, PHP, and (as we’ve just seen) JavaScript. Listing 2.17 shows how, after using let to create i and set it to 0, the index variable gets incremented by 1 until it reaches 5, at which point i < 5 is false and the loop stops. The notation i++, meanwhile, is an increment statement that bumps up the value of i by one at a time.
If you find the code in Listing 2.17 confusing or ugly, you’re in good company. I consider it a hallmark of good programming to avoid using for loops as much as possible, preferring instead forEach loops (Section 5.4) or avoiding loops entirely using functional programming (Chapter 6 and Section 8.5). As computer scientist (and personal friend) Mike Vanier (Figure 2.14) once put it in an email to Paul Graham:

Figure 2.14: Just a few more for loops and Mike Vanier will be a millionaire.
This [tedious repetition] grinds you down after a while; if I had a nickel for every time I’ve written “for (i = 0; i < N; i++)” in C I’d be a millionaire.
Note how the for loop syntax in Mike’s email is almost identical to that in Listing 2.17; the only differences are the absence of let and the use of N, which we can infer from context represents some upper bound on the loop’s index.
We’ll see how to avoid getting ground down starting in Chapter 6, but for now Listing 2.17 is the best we can do.
Let’s combine Listing 2.16 and Listing 2.17 to iterate through all the characters in the first line of Hamlet’s famous soliloquy. The only new thing we need is the index for when the loop should stop. In Listing 2.17, we hard-coded the upper limit (i < 5), and we could do the same here if we wanted. The soliloquy variable is a bit long to count the characters by hand, though, so let’s ask JavaScript to tell us using the length property (Section 2.4):
> soliloquy.length
42
This exceptionally auspicious result suggests writing code like this:
for (let i = 0; i < 42; i++) {
  console.log(soliloquy.charAt(i));
}
This code will work, and it is in perfect analogy with Listing 2.17, but it also raises a question: Why hard-code the length when we can just use the length property in the loop itself?
The answer is that we shouldn’t, and when looping it’s common practice to use the length property whenever possible. The resulting improved for loop (with result) appears in Listing 2.18.
Listing 2.18: Combining charAt and a for loop.
> for (let i = 0; i < soliloquy.length; i++) {
  console.log(soliloquy.charAt(i));
}
T
o
b
e
.
.
.
t
i
o
n
:
As noted above, for loops are best avoided if at all possible, but this less elegant style of looping is still an excellent place to start. As we’ll see in Chapter 8, one powerful technique is to write a test for the functionality we want, then get it passing any way we can, and then refactor the code to use a more elegant method. The second step in this process (called test-driven development, or TDD) often involves writing inelegant but easy-to-understand code—a task at which the humble for loop excels.
2.6.1 Exercises
Use
letto define a variableNthat’s equal to the length ofsoliloquy, and show that the code in Mike Vanier’sforloop actually works in JavaScript exactly as written. (In particular, you can sometimes get away with omittinglet, though this isn’t a good practice.)Show that you can replace the
charAtmethod in Listing 2.18 with a literal bracket notation, like this:soliloquy[i].