
Chapter 12: Java GUI Programming
This chapter provides an overview of Java graphical user interface (GUI) technologies and demonstrates how the JavaFX kit can be used to create a GUI application. The latest versions of JavaFX not only provide many helpful features but also allow for the preserving and embedding of legacy implementations and styles.
In a certain respect, the GUI is the most important part of an application. It directly interacts with the user. If the GUI is inconvenient, unappealing to the eye, or confusing, even the best backend solution might not persuade the user to use this application. By contrast, a well-thought-out, intuitive, and nicely designed GUI helps to retain users, even if the application does not do the job as well as its competitors.
The agenda of the chapter requires us to cover the following topics:
- Java GUI technologies
- JavaFX fundamentals
- HelloWorld with JavaFX
- Control elements
- Charts
- Applying CSS
- Using FXML
- Embedding HTML
- Playing media
- Adding effects
By the end of the chapter, you will be able to create a user interface using Java GUI technologies, as well as creating and using a user interface project as a standalone application.
Technical requirements
To be able to execute the code examples provided in this chapter, you will need the following:
- A computer with a Microsoft Windows, Apple macOS, or Linux operating system
- Java SE version 17 or later
- An IDE or code editor of your choice
The instructions for how to set up Java SE and the IntelliJ IDEA editor were provided in Chapter 1, Getting Started with Java 17. The files with the code examples for this chapter are available on GitHub at https://github.com/PacktPublishing/Learn-Java-17-Programming.git in the examples/src/main/java/com/packt/learnjava/ch12_gui folder and in the gui folder, which contains a standalone GUI application.
Java GUI technologies
The name Java Foundation Classes (JFC) may be a source of much confusion. It implies the classes that are at the foundation of Java, while, in fact, JFC includes only classes and interfaces related to the GUI. To be precise, JFC is a collection of three frameworks: the Abstract Window Toolkit (AWT), Swing, and Java 2D.
JFC is part of Java Class Library (JCL), although the name JFC came into being only in 1997, while AWT was part of JCL from the very beginning. At that time, Netscape developed a GUI library called Internet Foundation Classes (IFC), and Microsoft created Application Foundation Classes (AFC) for GUI development, too. So, when Sun Microsystems and Netscape decided to form a new GUI library, they inherited the word Foundation and created JFC. The Swing framework took over the Java GUI programming from AWT and was successfully used for almost two decades.
A new GUI programming toolkit, JavaFX, was added to JCL in Java 8. It was removed from JCL in Java 11, and since then, has resided as an open source project supported by the company Gluon as a downloadable module in addition to the JDK. JavaFX uses a somewhat different approach to GUI programming than AWT and Swing. It presents a more consistent and simpler design and has a good chance of being a winning Java GUI-programming toolkit.
JavaFX fundamentals
Cities such as New York, London, Paris, and Moscow have many theaters, and people who live there cannot avoid hearing about new plays and productions released almost every week. It makes them inevitably familiar with theater terminology, in which the terms stage, scene, and event are probably used most often. These three terms are at the foundation of a JavaFX application structure, too.
The top-level container in JavaFX that holds all other components is represented by the javafx.stage.Stage class. So, you can say that, in the JavaFX application, everything happens on a stage. From a user perspective, it is a display area or window where all the controls and components perform their actions (like actors in a theater). And, similar to the actors in a theater, they do it in the context of a scene, represented by the javafx.scene.Scene class. So, a JavaFX application, like a play in a theater, is composed of Scene objects presented inside the Stage object one at a time. Each Scene object contains a graph that defines the positions of the scene actors (called nodes) in JavaFX: controls, layouts, groups, shapes, and so on. Each of them extends the abstract class, javafx.scene.Node.
Some of the nodes’ controls are associated with events: a button clicked or a checkbox checked, for example. These events can be processed by the event handler associated with the corresponding control element.
The main class of a JavaFX application has to extend the abstract java.application.Application class, which has several life cycle methods. We list them in the sequence of the invocation: launch(), init(), notifyPreloader(), start(), and stop(). It looks like quite a few to remember. But, most probably, you need to implement only one method, start(), where the actual GUI is constructed and executed. Nevertheless, we will review all the life cycle methods just for completeness:
- static void launch(Class<? extends Application> appClass, String... args): This launches the application and is often called the main method; it does not return until Platform.exit() is called or all the application windows close. The appClass parameter must be a public subclass of the Application class with a public no-argument constructor.
- static void launch(String... args): The same as the preceding method, assuming that the public subclass of the Application class is the immediately enclosing class. This is the method most often used to launch the JavaFX application; we are going to use it in our examples, too.
- void init(): This method is called after the Application class is loaded; it is typically used for some kind of resource initialization. The default implementation does nothing, and we are not going to use it.
- void notifyPreloader(Preloader.PreloaderNotification info): This can be used to show progress when the initialization takes a long time; we are not going to use it.
- abstract void start(Stage primaryStage): The method we are going to implement. It is called after the init() method returns, and after the system is ready to do the main job. The primaryStage parameter is the stage where the application is going to present its scenes.
- void stop(): This is called when the application should stop, and can be used to release the resources. The default implementation does nothing, and we are not going to use it.
The API of the JavaFX toolkit can be found online (https://openjfx.io/javadoc/18//). As of the time of writing, the latest version is 18. Oracle provides extensive documentation and code examples, too (https://docs.oracle.com/javafx/2//). The documentation includes the description and user manual of Scene Builder (a development tool that provides a visual layout environment and lets you quickly design a user interface for the JavaFX application without writing any code). This tool may be useful for creating a complex and intricate GUI, and many people use it all the time. In this book though, we will concentrate on JavaFX code writing without using this tool.
To be able to do it, the following are the necessary steps:
- Add the following dependency to the pom.xml file:
<dependency>
<groupId>org.openjfx</groupId>
<artifactId>javafx-controls</artifactId>
<version>18</version>
</dependency>
<dependency>
<groupId>org.openjfx</groupId>
<artifactId>javafx-fxml</artifactId>
<version>18</version>
</dependency>
- Download the JavaFX SDK for your OS from https://gluonhq.com/products/javafx/ (the openjfx-18_osx-x64_bin-sdk.zip file, as of the time of writing) and unzip it in any directory.
- Assuming you have unzipped the JavaFX SDK into the /path/javafx-sdk/ folder, add the following options to the Java command, which will launch your JavaFX application on the Linux platform:
--module-path /path/javafx-sdk/lib
--add-modules=javafx.controls,javafx.fxml
On Windows, the same options look as follows:
--module-path C:pathjavafx-sdklib
--add-modules=javafx.controls,javafx.fxml
/path/JavaFX/ and C:pathJavaFX are the placeholders that you need to substitute with the actual path to the folder that contains the JavaFX SDK.
Assuming that the application’s main class is HelloWorld, in the case of IntelliJ, enter the preceding options into the VM options field, as follows (the example is for Linux):

These options have to be added to Run/Debug Configurations of the HelloWorld, BlendEffect, and OtherEffects classes of the ch12_gui package of the source code. If you prefer a different IDE or have a different OS, you can find recommendations on how to set it in the openjfx.io documentation (https://openjfx.io/openjfx-docs).
To run the HelloWorld, BlendEffect, and OtherEffects classes from the command line, use the following commands on the Linux platform in the project root directory (where the pom.xml file is located):
mvn clean package
java --module-path /path/javafx-sdk/lib
--add-modules=javafx.controls,javafx.fxml
-cp target/examples-1.0-SNAPSHOT.jar:target/libs/*
com.packt.learnjava.ch12_gui.HelloWorld
java --module-path /path/javafx-sdk/lib
--add-modules=javafx.controls,javafx.fxml
-cp target/examples-1.0-SNAPSHOT.jar:target/libs/*
com.packt.learnjava.ch12_gui.BlendEffect
java --module-path /path/javafx-sdk/lib
--add-modules=javafx.controls,javafx.fxml
-cp target/examples-1.0-SNAPSHOT.jar:target/libs/*
com.packt.learnjava.ch12_gui.OtherEffects
On Windows, the same commands look as follows:
mvn clean package
java --module-path C:pathjavafx-sdklib
--add-modules=javafx.controls,javafx.fxml
-cp targetexamples-1.0-SNAPSHOT.jar;targetlibs*
com.packt.learnjava.ch12_gui.HelloWorld
java --module-path C:pathjavafx-sdklib
--add-modules=javafx.controls,javafx.fxml
-cp targetexamples-1.0-SNAPSHOT.jar;targetlibs*
com.packt.learnjava.ch12_gui.BlendEffect
java --module-path C:pathjavafx-sdklib
--add-modules=javafx.controls,javafx.fxml
-cp targetexamples-1.0-SNAPSHOT.jar;targetlibs*
com.packt.learnjava.ch12_gui.OtherEffects
Each of the HelloWorld, BlendEffect, and OtherEffects classes has two start() methods: start1() and start2(). After you run the class once, rename start() as start1(), and start1() as start(), and run the preceding commands again. Then, rename start() as start2(), and start2() as start(), and run the previous commands yet again. And so on, until all the start() methods are executed. This way you will see the results of all the examples in this chapter.
This concludes the high-level presentation of JavaFX. With that, we move to the most exciting (for any programmer) part: writing code.
HelloWorld with JavaFX
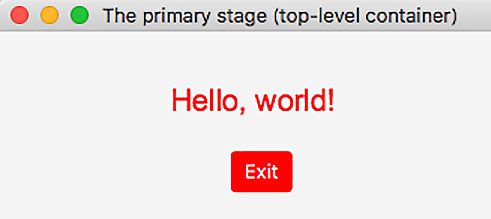
Here is the HelloWorld JavaFX application that shows the Hello, World! and Exit text:
import javafx.application.Application;
import javafx.application.Platform;
import javafx.scene.control.Button;
import javafx.scene.layout.Pane;
import javafx.scene.text.Text;
import javafx.scene.Scene;
import javafx.stage.Stage;
public class HelloWorld extends Application { public static void main(String... args) {launch(args);
}
@Override
public void start(Stage primaryStage) { Text txt = new Text("Hello, world!");txt.relocate(135, 40);
Button btn = new Button("Exit");btn.relocate(155, 80);
btn.setOnAction(e:> { System.out.println("Bye! See you later!");Platform.exit();
});
Pane pane = new Pane();
pane.getChildren().addAll(txt, btn);
primaryStage
.setTitle("The primary stage (top-level container)");primaryStage.onCloseRequestProperty()
.setValue(e:> System.out.println(
"Bye! See you later!"));
primaryStage.setScene(new Scene(pane, 350, 150));
primaryStage.show();
}
}
As you can see, the application is launched by calling the Application.launch(String... args) static method. The start(Stage primaryStage) method creates a Text node with the message Hello, World! located at the absolute position 135 (horizontally) and 40 (vertically). Then, it creates another node, Button, with the text Exit located at the absolute position 155 (horizontally) and 80 (vertically). The action, assigned to Button (when it is clicked), prints Bye! See you later! on a screen and forces the application to exit using the Platform.exit() method. These two nodes are added as children to the layout pane, which allows absolute positioning.
The Stage object is assigned the title of The primary stage (top-level container). It is also assigned an action on clicking the close-the-window symbol (the x button) in the window’s upper corner: top left on the Linux system and top right on the Windows system.
While creating actions, we have used a Lambda expression, which we are going to discuss in Chapter 13, Functional Programming.
The created layout pane is set on a Scene object. The scene size is set to 350 pixels horizontally and 150 pixels vertically. The Scene object is placed on the stage. Then, the stage is displayed by calling the show() method.
If we run the preceding application (the start() method of the HellowWorld class), the following window will pop up:

Clicking on the Exit button results in the expected message being displayed:

But, if you need to do something else after the x button is clicked and the window closes, you can add an implementation of the stop() method to the HelloWorld class. In this example it looks as follows:
@Override
public void stop(){
System.out.println(
"Doing what has to be done before closing");}
If you click the x button or the Exit button, the display will show the following:

This example gives you a sense of how JavaFX works. From now on, while reviewing the JavaFX capabilities, we will present only the code in the start() method.
The toolkit has a huge number of packages, each with many classes, and each class having many methods. We won’t be able to discuss all of them. Instead, we are going to present just an overview of all the major areas of the JavaFX functionality in the most simple and straightforward way we can.
Control elements
The control elements are included in the javafx.scene.control package (https://openjfx.io/javadoc/11/javafx.controls/javafx/scene/control/package-summary.html). There are more than 80 of them, including a button, text field, checkbox, label, menu, progress bar, and scroll bar, to name a few. As we have mentioned already, each control element is a subclass of Node that has more than 200 methods. So, you can imagine how rich and fine-tuned a GUI can be when built using JavaFX. However, the scope of this book allows us to cover only a few elements and their methods.
We have already implemented a button in the example in the preceding section. Let’s now use a label and a text field to create a simple form with input fields (first name, last name, and age) and a Submit button. We will build it in steps. All the following code snippets are sequential sections of another start() method in the HelloWorld class (rename the previous start() method start1(), and rename the start2() method start()).
First, let’s create controls:
Text txt = new Text("Fill the form and click Submit");TextField tfFirstName = new TextField();
TextField tfLastName = new TextField();
TextField tfAge = new TextField();
Button btn = new Button("Submit");btn.setOnAction(e:> action(tfFirstName, tfLastName, tfAge));
As you can guess, the text will be used as the form instructions. The rest is quite straightforward and looks very similar to what we have seen in the HelloWorld example. action() is a function implemented as the following method:
void action(TextField tfFirstName,
TextField tfLastName, TextField tfAge ) {String fn = tfFirstName.getText();
String ln = tfLastName.getText();
String age = tfAge.getText();
int a = 42;
try {a = Integer.parseInt(age);
} catch (Exception ex){}fn = fn.isBlank() ? "Nick" : fn;
ln = ln.isBlank() ? "Samoylov" : ln;
System.out.println("Hello, "+fn+" "+ln + ", age " + a + "!");
Platform.exit();
}
This function accepts three parameters (the javafx.scene.control.TextField objects), then gets the submitted input values and just prints them. The code makes sure that there are always some default values available for printing, and that entering a non-numeric value of age does not break the application.
With the controls and action in place, we then put them into a grid layout using the javafx.scene.layout.GridPane class:
GridPane grid = new GridPane();
grid.setAlignment(Pos.CENTER);
grid.setHgap(15);
grid.setVgap(5);
grid.setPadding(new Insets(20, 20, 20, 20));
The GridPane layout pane has rows and columns that form cells in which the nodes can be set. Nodes can span columns and rows. The setAlignment() method sets the position of the grid to the center of a scene (the default position is the top left of a scene). The setHgap() and setVgap() methods set the spacing (in pixels) between the columns (horizontally) and rows (vertically). The setPadding() method adds some space along the borders of the grid pane. The Insets() object sets the values (in pixels) in the order of top, right, bottom, and left.
Now, we are going to place the created nodes in the corresponding cells (arranged in two columns):
int i = 0;
grid.add(txt, 1, i++, 2, 1);
GridPane.setHalignment(txt, HPos.CENTER);
grid.addRow(i++, new Label("First Name"), tfFirstName);grid.addRow(i++, new Label("Last Name"), tfLastName);grid.addRow(i++, new Label("Age"), tfAge);grid.add(btn, 1, i);
GridPane.setHalignment(btn, HPos.CENTER);
The add() method accepts either three or five parameters:
- The node, the column index, and the row index
- The node, the column index, the row index, how many columns to span, and how many rows to span
The columns and rows indices start from 0.
The setHalignment() method sets the position of the node in the cell. The HPos enum has values LEFT, RIGHT, and CENTER. The addRow(int i, Node... nodes) method accepts the row index and the varargs of nodes. We use it to place the Label and TextField objects.
The rest of the start() method is very similar to the HelloWorld example (only the title and size have changed):
primaryStage.setTitle("Simple form example");primaryStage.onCloseRequestProperty()
.setValue(e -> System.out.println("Bye! See you later!"));primaryStage.setScene(new Scene(grid, 300, 200));
primaryStage.show();
If we run the newly implemented start() method, the result will be as follows:

We can fill the data as follows, for example:

After you click the Submit button, the following message is displayed and the application exits:

To help visualize the layout, especially in the case of a more complex design, you can use the setGridLinesVisible(boolean v) grid method to make the grid lines visible. It helps to see how the cells are aligned. We can add (uncomment) the following line to our example:
grid.setGridLinesVisible(true);
We run it again, and the result will be as follows:

As you can see, the layout is now outlined explicitly, which helps us to visualize the design.
The javafx.scene.layout package includes 24 layout classes such as Pane (we saw it in the HelloWorld example), StackPane (allows us to overlay nodes), FlowPane (allows the positions of nodes to flow as the size of the window changes), and AnchorPane (preserves the nodes’ position relative to their anchor point), to name a few. The VBox layout will be demonstrated in the next section, Charts.
Charts
JavaFX provides the following chart components for data visualization in the javafx.scene.chart package:
- LineChart: Adds a line between the data points in a series. Typically used to present the trends over time.
- AreaChart: Similar to LineChart, but fills the area between the line that connects the data points and the axis. Typically used for comparing cumulated totals over time.
- BarChart: Presents data as rectangular bars. Used for visualization of discrete data.
- PieChart: Presents a circle divided into segments (filled with different colors), each segment representing a value as a proportion of the total. We will demonstrate it in this section.
- BubbleChart: Presents data as two-dimensional oval shapes called bubbles, which allow presenting three parameters.
- ScatterChart: Presents the data points in a series as is. Useful to identify the presence of a clustering (data correlation).
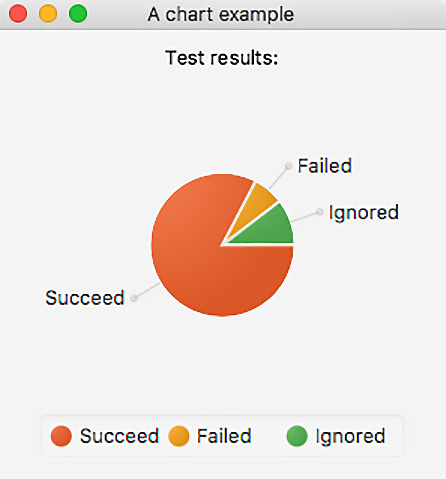
The following example (the start3() method of the HellowWorld class) demonstrates how the result of testing can be presented as a pie chart. Each segment represents the number of tests succeeded, failed, or ignored:
Text txt = new Text("Test results:");PieChart pc = new PieChart();
pc.getData().add(new PieChart.Data("Succeed", 143));pc.getData().add(new PieChart.Data("Failed" , 12));pc.getData().add(new PieChart.Data("Ignored", 18));VBox vb = new VBox(txt, pc);
vb.setAlignment(Pos.CENTER);
vb.setPadding(new Insets(10, 10, 10, 10));
primaryStage.setTitle("A chart example");primaryStage.onCloseRequestProperty()
.setValue(e:> System.out.println("Bye! See you later!"));primaryStage.setScene(new Scene(vb, 300, 300));
primaryStage.show();
We have created two nodes—Text and PieChart—and placed them in the cells of the VBox layout, which sets them in a column, one above another. We have added the padding of 10 pixels around the edges of the VBox pane. Notice that VBox extends the Node and Pane classes, as other panes do, too. We have also positioned the pane in the center of the scene using the setAlignment() method. The rest is the same as all other previous examples, except the scene title and size.
If we run this example (rename the previous start() method start2(), and rename the start3() method start()), the result will be as follows:
The PieChart class, as well as any other chart, has several other methods that can be useful for presenting more complex and dynamic data in a user-friendly manner.
Now, let’s discuss how you can enrich the look and feel of your application by using the power of Cascading Style Sheets (CSS).
Applying CSS
By default, JavaFX uses the style sheet that comes with the distribution JAR file. To override the default style, you can add a style sheet to the scene using the getStylesheets() method:
scene.getStylesheets().add("/mystyle.css");The mystyle.css file has to be placed in the src/main/resources folder. Let’s do it, and add the mystyle.css file with the following content to the HelloWorld example:
#text-hello {:fx-font-size: 20px;
-fx-font-family: "Arial";
-fx-fill: red;
}
.button {-fx-text-fill: white;
-fx-background-color: slateblue;
}
As you can see, we would like to style the Button node and the Text node that has a text-hello ID in a certain way. We also have to modify the HelloWorld example by adding the ID to the Text element and the style sheet file to the scene (the start4() method):
Text txt = new Text("Hello, world!");txt.setId("text-hello");txt.relocate(115, 40);
Button btn = new Button("Exit");btn.relocate(155, 80);
btn.setOnAction(e -> { System.out.println("Bye! See you later!");Platform.exit();
});
Pane pane = new Pane();
pane.getChildren().addAll(txt, btn);
Scene scene = new Scene(pane, 350, 150);
scene.getStylesheets().add("/mystyle.css");primaryStage.setTitle("The primary stage (top-level container)");primaryStage.onCloseRequestProperty()
   .setValue(e -> System.out.println("
Bye! See you later!"));
primaryStage.setScene(scene);
primaryStage.show();
If we run this code (rename the previous start() method start3() and rename the start4() method start()), the result will be as follows:

Alternatively, an inline style can be set on any node that will be used to overwrite the file style sheet, default or not. Let’s add (uncomment) the following line to the latest version of the HelloWorld example:
btn.setStyle("-fx-text-fill: white; -fx-background-color: red;");If we run the example again, the result will be as follows:
Look through the JavaFX CSS reference guide (https://docs.oracle.com/javafx/2/api/javafx/scene/doc-files/cssref.html) to get an idea of the variety and possible options for custom styling.
Now, let’s discuss an alternative way of building a user interface for an FX application, without writing Java code, by using FX Markup Language (FXML).
Using FXML
FXML is an XML-based language that allows building a user interface and maintaining it independently of the application (business) logic (as far as the look and feel are concerned, or other presentation-related changes). Using FXML, you can design a user interface without even writing one line of Java code.
FXML does not have a schema, but its capabilities reflect the API of the JavaFX objects used to build a scene. This means you can use the API documentation to understand what tags and attributes are allowed in the FXML structure. Most of the time, JavaFX classes can be used as tags and their properties as attributes.
In addition to the FXML file (the view), the controller (Java class) can be used for processing the model and organizing the page flow. The model consists of domain objects managed by the view and the controller. It also allows using all the power of CSS styling and JavaScript. But, in this book, we will be able to demonstrate only the basic FXML capabilities. The rest you can find in the FXML introduction (https://docs.oracle.com/javafx/2/api/javafx/fxml/doc-files/introduction_to_fxml.html) and many good tutorials available online.
To demonstrate FXML usage, we are going to reproduce the simple form we created in the Control elements section and then enhance it by adding the page flow. Here’s how our form, with first name, last name, and age, can be expressed in FXML:
<?xml version="1.0" encoding="UTF-8"?>
<?import javafx.scene.Scene?>
<?import javafx.geometry.Insets?>
<?import javafx.scene.text.Text?>
<?import javafx.scene.control.Label?>
<?import javafx.scene.control.Button?>
<?import javafx.scene.layout.GridPane?>
<?import javafx.scene.control.TextField?>
<Scene fx:controller="com.packt.learnjava.ch12_gui.HelloWorldController"
xmlns:fx="http://javafx.com/fxml"
width="350" height="200">
<GridPane alignment="center" hgap="15" vgap="5">
<padding>
<Insets top="20" right="20" bottom="20" left="20"/>
</padding>
<Text id="textFill" text="Fill the form and click
Submit" GridPane.rowIndex="0" GridPane.columnSpan="2">
<GridPane.halignment>center</GridPane.halignment>
</Text>
<Label text="First name"
GridPane.columnIndex="0" GridPane.rowIndex="1"/>
<TextField fx:id="tfFirstName"
GridPane.columnIndex="1" GridPane.rowIndex="1"/>
<Label text="Last name"
GridPane.columnIndex="0" GridPane.rowIndex="2"/>
<TextField fx:id="tfLastName"
GridPane.columnIndex="1" GridPane.rowIndex="2"/>
<Label text="Age"
GridPane.columnIndex="0" GridPane.rowIndex="3"/>
<TextField fx:id="tfAge"
GridPane.columnIndex="1" GridPane.rowIndex="3"/>
<Button text="Submit"
GridPane.columnIndex="1" GridPane.rowIndex="4"
onAction="#submitClicked">
<GridPane.halignment>center</GridPane.halignment>
</Button>
</GridPane>
</Scene>
As you can see, it expresses the desired scene structure, familiar to you already, and specifies the controller class, HelloWorldController, which we are going to see shortly. As we have mentioned already, the tags match the class names we have been using to construct the same GUI with Java only. We put the preceding FXML code (as the helloWorld.fxml file) into the resources folder.
Now, let’s look at the start5() method (rename it start()) of the HelloWorld class that uses the helloWorld.fxml file:
try {ClassLoader classLoader =
Thread.currentThread().getContextClassLoader();
String file =
classLoader.getResource("helloWorld.fxml").getFile();FXMLLoader lder = new FXMLLoader();
lder.setLocation(new URL("file:" + file));Scene scene = lder.load();
primaryStage.setTitle("Simple form example");primaryStage.setScene(scene);
primaryStage.onCloseRequestProperty().setValue(e ->
                  System.out.println("
Bye! See you later!"));
primaryStage.show();
} catch (Exception ex){ex.printStackTrace();
}
The start() method just loads the helloWorld.fxml file and sets the stage, the latter being done exactly as in our previous examples.
Now, let’s look at the HelloWorldController class. If need be, we could launch the application having only the following:
public class HelloWorldController {@FXML
protected void submitClicked(ActionEvent e) {}
}
The form would be presented, but the button click would do nothing. That is what we meant while talking about the user interface development independent of the application logic. Notice the @FXML annotation. It binds the method and properties to the FXML tags using their IDs. Here is how the full controller implementation looks:
@FXML
private TextField tfFirstName;
@FXML
private TextField tfLastName;
@FXML
private TextField tfAge;
@FXML
protected void submitClicked(ActionEvent e) {String fn = tfFirstName.getText();
String ln = tfLastName.getText();
String age = tfAge.getText();
int a = 42;
try {a = Integer.parseInt(age);
} catch (Exception ex) {}
fn = fn.isBlank() ? "Nick" : fn;
ln = ln.isBlank() ? "Samoylov" : ln;
String hello = "Hello, " + fn + " " + ln + ", age " +
a + "!";
System.out.println(hello);
Platform.exit();
}
It should look very familiar to you for the most part. The only difference is that we refer to the fields and their values not directly (as previously), but using binding marked with the @FXML annotation. If we run the HelloWorld class now (don’t forget to rename the start5() method as start()), the page appearance and behavior will be exactly the same as we described in the Control elements section:

If the x button in the upper corner is clicked, the following output appears on the screen:

If the Submit button is clicked, the output shows the following message:

Now, let’s look at the standalone GUI application with two pages implemented as a separate project in the gui folder:

As you can see, this application consists of the main GuiApp class, two Controller classes, the User class, and two pages (the .fxml files). Let us start from the .fxml files. To make it simple, the page01.fxml file has almost exactly the same content as the helloWorld.fxml file described in the preceding section. The only difference is that it refers to the Controller01 class, which has the start() method implemented exactly as the start5() method described previously, too. The main GuiApp class looks very simple:
public class GuiApp extends Application { public static void main(String... args) {launch(args);
}
@Override
public void stop(){ System.out.println("Doing what has to be done...");}
public void start(Stage primaryStage) {Controller01.start(primaryStage);
}
}
As you can see, it just invokes the start() method in the Controller01 class, which in turn displays the familiar page to your form:

After the form is filled and the Submit button is clicked, the submitted values are processed in the Controller01 class and then passed to the Controller02 class, using the submitClicked() method of the Controller01 class:
@FXML
protected void submitClicked(ActionEvent e) {String fn = tfFirstName.getText();
String ln = tfLastName.getText();
String age = tfAge.getText();
int a = 42;
try {a = Integer.parseInt(age);
} catch (Exception ex) {}
fn = fn.isBlank() ? "Nick" : fn;
ln = ln.isBlank() ? "Samoylov" : ln;
Controller02.goToPage2(new User(a, fn, ln));
Node source = (Node) e.getSource();
Stage stage = (Stage) source.getScene().getWindow();
stage.close();
}
The Controller02.goToPage2() method looks as follows:
public static void goToPage2(User user) { try {ClassLoader classLoader =
Thread.currentThread().getContextClassLoader();
String file = classLoader.getResource("fxml" + File.separator + "page02.fxml").getFile();
FXMLLoader loader = new FXMLLoader();
loader.setLocation(new URL("file:" + file));Scene scene = loader.load();
Controller02 c = loader.getController();
String hello = "Hello, " + user.getFirstName() + " " +
user.getLastName() + ", age " + user.getAge() + "!";
c.textHello.setText(hello);
Stage primaryStage = new Stage();
primaryStage.setTitle("Second page of GUI App");primaryStage.setScene(scene);
primaryStage.onCloseRequestProperty()
.setValue(e -> { System.out.println("
Bye!");Platform.exit();
});
primaryStage.show();
} catch (Exception ex) {ex.printStackTrace();
}
}
The second page just presents the received data. Here is how its FXML looks (the page2.fxml file):
<?xml version="1.0" encoding="UTF-8"?>
<?import javafx.scene.Scene?>
<?import javafx.geometry.Insets?>
<?import javafx.scene.text.Text?>
<?import javafx.scene.layout.GridPane?>
<Scene fx:controller="com.packt.lernjava.gui.Controller02"
xmlns:fx="http://javafx.com/fxml"
width="350" height="150">
<GridPane alignment="center" hgap="15" vgap="5">
<padding>
<Insets top="20" right="20" bottom="20" left="20"/>
</padding>
<Text fx:id="textHello"
GridPane.rowIndex="0" GridPane.columnSpan="2">
<GridPane.halignment>center</GridPane.halignment>
</Text>
<Text id="textDo" text="Do what has to be done here"
GridPane.rowIndex="1" GridPane.columnSpan="2">
<GridPane.halignment>center</GridPane.halignment>
</Text>
</GridPane>
</Scene>
As you can see, the page has only two read-only Text fields. The first one (with id="textHello") shows the data passed from the previous page. The second just shows the message, Do what has to be done here. This is not very sophisticated, but it demonstrates how the flow of data and pages can be organized.
If we execute the GuiApp class, we will see the familiar form and can fill it with data:

After we click the Submit button, this window will be closed and the new one will appear:

Now, we can click the x button in the upper-left corner (or in the upper-right corner on Windows) and see the following message:

The stop() method worked as expected.
With that, we conclude our presentation of FXML and move to the next topic of adding HTML to the JavaFX application.
Embedding HTML
To add HTML to JavaFX is easy. All you have to do is to use the javafx.scene.web.WebView class, which provides a window where the added HTML is rendered similar to how it happens in a browser. The WebView class uses WebKit, the open source browser engine, and thus supports full browsing functionality.
Like all other JavaFX components, the WebView class extends the Node class and can be treated in the Java code as such. In addition, it has its own properties and methods that allow adjusting the browser window to the encompassing application by setting the window size (maximum, minimum, and preferred height and width), font scale, zoom rate, adding CSS, enabling the context (right-click) menu, and similar. The getEngine() method returns a javafx.scene.web.WebEngine object associated with it. It provides the ability to load HTML pages, navigate them, apply different styles to the loaded pages, access their browsing history and the document model, and execute JavaScript.
To start using the javafx.scene.web package, two steps have to be taken first:
- Add the following dependency to the pom.xml file:
<dependency>
<groupId>org.openjfx</groupId>
<artifactId>javafx-web</artifactId>
<version>11.0.2</version>
</dependency>
The version of javafx-web typically stays abreast with the Java version, but at the time of writing, version 12 of javafx-web has not yet been released, so we are using the latest available version, 11.0.2.
- Since javafx-web uses the com.sun.* packages, which have been removed from Java 9 (https://docs.oracle.com/javase/9/migrate/toc.htm#JSMIG-GUID-F7696E02-A1FB-4D5A-B1F2-89E7007D4096), to access the com.sun.* packages from Java 9+, set the following VM options in addition to --module-path and --add-modules, described in the JavaFX fundamentals section in Run/Debug Configuration of the HtmlWebView class of the ch12_gui package (for Windows, change the slash sign to the backward slash):
--add-exports javafx.graphics/com.sun.javafx.sg.prism=ALL-UNNAMED
--add-exports javafx.graphics/com.sun.javafx.scene=ALL-UNNAMED
--add-exports javafx.graphics/com.sun.javafx.util=ALL-UNNAMED
--add-exports javafx.base/com.sun.javafx.logging=ALL-UNNAMED
--add-exports javafx.graphics/com.sun.prism=ALL-UNNAMED
--add-exports javafx.graphics/com.sun.glass.ui=ALL-UNNAMED
--add-exports javafx.graphics/com.sun.javafx.geom.transform=ALL-UNNAMED
--add-exports javafx.graphics/com.sun.javafx.tk=ALL-UNNAMED
--add-exports javafx.graphics/com.sun.glass.utils=ALL-UNNAMED
--add-exports javafx.graphics/com.sun.javafx.font=ALL-UNNAMED
--add-exports javafx.graphics/com.sun.javafx.application=ALL-UNNAMED
--add-exports javafx.controls/com.sun.javafx.scene.control=ALL-UNNAMED
--add-exports javafx.graphics/com.sun.javafx.scene.input=ALL-UNNAMED
--add-exports javafx.graphics/com.sun.javafx.geom=ALL-UNNAMED
--add-exports javafx.graphics/com.sun.prism.paint=ALL-UNNAMED
--add-exports javafx.graphics/com.sun.scenario.effect=ALL-UNNAMED
--add-exports javafx.graphics/com.sun.javafx.text=ALL-UNNAMED
--add-exports javafx.graphics/com.sun.javafx.iio=ALL-UNNAMED
--add-exports javafx.graphics/com.sun.scenario.effect.impl.prism=ALL-UNNAMED
--add-exports javafx.graphics/com.sun.javafx.scene.text=ALL-UNNAMED
- To execute the HtmlWebView class from the command line, go to the examples folder and use the following command for Unix/Linux/macOS systems (don't forget to substitute /path/JavaFX with the actual path to the folder that contains the JavaFX SDK):
mvn clean package
java --module-path /path/javaFX/lib --add-modules=javafx.controls,javafx.fxml --add-exports javafx.graphics/com.sun.javafx.sg.prism=ALL-UNNAMED --add-exports javafx.graphics/com.sun.javafx.scene=ALL-UNNAMED --add-exports javafx.graphics/com.sun.javafx.util=ALL-UNNAMED --add-exports javafx.base/com.sun.javafx.logging=ALL-UNNAMED --add-exports javafx.graphics/com.sun.prism=ALL-UNNAMED --add-exports javafx.graphics/com.sun.glass.ui=ALL-UNNAMED --add-exports javafx.graphics/com.sun.javafx.geom.transform=ALL-UNNAMED --add-exports javafx.graphics/com.sun.javafx.tk=ALL-UNNAMED --add-exports javafx.graphics/com.sun.glass.utils=ALL-UNNAMED --add-exports javafx.graphics/com.sun.javafx.font=ALL-UNNAMED --add-exports javafx.graphics/com.sun.javafx.application=ALL-UNNAMED --add-exports javafx.controls/com.sun.javafx.scene.control=ALL-UNNAMED --add-exports javafx.graphics/com.sun.javafx.scene.input=ALL-UNNAMED --add-exports javafx.graphics/com.sun.javafx.geom=ALL-UNNAMED --add-exports javafx.graphics/com.sun.prism.paint=ALL-UNNAMED --add-exports javafx.graphics/com.sun.scenario.effect=ALL-UNNAMED --add-exports javafx.graphics/com.sun.javafx.text=ALL-UNNAMED --add-exports javafx.graphics/com.sun.javafx.iio=ALL-UNNAMED --add-exports javafx.graphics/com.sun.scenario.effect.impl.prism=ALL-UNNAMED --add-exports javafx.graphics/com.sun.javafx.scene.text=ALL-UNNAMED -cp target/examples-1.0-SNAPSHOT.jar com.packt.learnjava.ch12_gui.HtmlWebView
- On Windows, the same command looks as follows (don't forget to substitute C:pathJavaFX with the actual path to the folder that contains the JavaFX SDK):
mvn clean package
java --module-path C:pathJavaFXlib --add-modules=javafx.controls,javafx.fxml --add-exports javafx.graphicscom.sun.javafx.sg.prism=ALL-UNNAMED --add-exports javafx.graphicscom.sun.javafx.scene=ALL-UNNAMED --add-exports javafx.graphicscom.sun.javafx.util=ALL-UNNAMED --add-exports javafx.basecom.sun.javafx=ALL-UNNAMED --add-exports javafx.basecom.sun.javafx.logging=ALL-UNNAMED --add-exports javafx.graphicscom.sun.prism=ALL-UNNAMED --add-exports javafx.graphicscom.sun.glass.ui=ALL-UNNAMED --add-exports javafx.graphicscom.sun.javafx.geom.transform=ALL-UNNAMED --add-exports javafx.graphicscom.sun.javafx.tk=ALL-UNNAMED --add-exports javafx.graphicscom.sun.glass.utils=ALL-UNNAMED --add-exports javafx.graphicscom.sun.javafx.font=ALL-UNNAMED --add-exports javafx.graphicscom.sun.javafx.application=ALL-UNNAMED --add-exports javafx.controlscom.sun.javafx.scene.control=ALL-UNNAMED --add-exports javafx.graphicscom.sun.javafx.scene.input=ALL-UNNAMED --add-exports javafx.graphicscom.sun.javafx.geom=ALL-UNNAMED --add-exports javafx.graphicscom.sun.prism.paint=ALL-UNNAMED --add-exports javafx.graphicscom.sun.scenario.effect=ALL-UNNAMED --add-exports javafx.graphicscom.sun.javafx.text=ALL-UNNAMED --add-exports javafx.graphicscom.sun.javafx.iio=ALL-UNNAMED --add-exports javafx.graphicscom.sun.scenario.effect.impl.prism=ALL-UNNAMED --add-exports javafx.graphicscom.sun.javafx.scene.text=ALL-UNNAMED -cp targetexamples-1.0-SNAPSHOT.jar com.packt.learnjava.ch12_gui.HtmlWebView
The HtmlWebView class contains several start() methods too. Rename and execute them one by one, as described in the JavaFX fundamentals section.
Let’s look at a few examples now. We create a new application, HtmlWebView, and set VM options for it with the VM options (--module-path, --add-modules, and --add-exports) we have described. Now, we can write and execute code that uses the WebView class.
First, here is how simple HTML can be added to the JavaFX application (the start() method in the HtmlWebView class):
WebView wv = new WebView();
WebEngine we = wv.getEngine();
String html =
"<html><center><h2>Hello, world!</h2></center></html>";
we.loadContent(html, "text/html");
Scene scene = new Scene(wv, 200, 60);
primaryStage.setTitle("My HTML page");primaryStage.setScene(scene);
primaryStage.onCloseRequestProperty()
.setValue(e -> System.out.println("Bye! See you later!"));primaryStage.show();
The preceding code creates a WebView object, gets the WebEngine object from it, uses the acquired WebEngine object to load the HTML, sets the WebView object on the scene, and configures the stage. The loadContent() method accepts two strings: the content and its mime type. The content string can be constructed in the code or created from reading the .html file.
If we run the HtmlWebView class, the result will be as follows:

If necessary, you can show other JavaFX nodes along with the WebView object in the same window. For example, let’s add a Text node above the embedded HTML (the start2() method in the HtmlWebView class):
Text txt = new Text("Below is the embedded HTML:");WebView wv = new WebView();
WebEngine we = wv.getEngine();
String html =
"<html><center><h2>Hello, world!</h2></center></html>";
we.loadContent(html, "text/html");
VBox vb = new VBox(txt, wv);
vb.setSpacing(10);
vb.setAlignment(Pos.CENTER);
vb.setPadding(new Insets(10, 10, 10, 10));
Scene scene = new Scene(vb, 300, 120);
primaryStage.setScene(scene);
primaryStage.setTitle("JavaFX with embedded HTML");primaryStage.onCloseRequestProperty()
.setValue(e -> System.out.println("Bye! See you later!"));primaryStage.show();
As you can see, the WebView object is not set on the scene directly, but on the layout object instead, along with a txt object. Then, the layout object is set on the scene. The result of the preceding code is as follows:

With a more complex HTML page, it is possible to load it from the file directly, using the load() method. To demonstrate this approach, let’s create a form.html file in the resources folder with the following content:
<!DOCTYPE html>
<html lang="en">
<head>
<meta charset="UTF-8">
<title>The Form</title>
</head>
<body>
<form action="http://someServer:port/formHandler" method="post">
<table>
<tr>
<td><label for="firstName">First name:</label></td>
<td><input type="text" id="firstName" name="firstName">
</td>
</tr>
<tr>
<td><label for="lastName">Last name:</label></td>
<td><input type="text" id="lastName" name="lastName">
</td>
</tr>
<tr>
<td><label for="age">Age:</label></td>
<td><input type="text" id="age" name="age"></td>
</tr>
<tr>
<td></td>
<td align="center">
<button id="submit" name="submit">Submit</button>
</td>
</tr>
</table>
</form>
</body>
</html>
This HTML presents a form similar to the one we have created in the Using FXML section. After the Submit button is clicked, the form data is posted to a server to the formHandler URI (see the <form> HTML tag). To present this form inside a JavaFX application, the following code can be used:
ClassLoader classLoader =
Thread.currentThread().getContextClassLoader();
String file = classLoader.getResource("form.html").getFile();Text txt = new Text("Fill the form and click Submit");WebView wv = new WebView();
WebEngine we = wv.getEngine();
File f = new File(file);
we.load(f.toURI().toString());
VBox vb = new VBox(txt, wv);
vb.setSpacing(10);
vb.setAlignment(Pos.CENTER);
vb.setPadding(new Insets(10, 10, 10, 10));
Scene scene = new Scene(vb, 300, 200);
primaryStage.setScene(scene);
primaryStage.setTitle("JavaFX with embedded HTML");primaryStage.onCloseRequestProperty()
.setValue(e -> System.out.println("Bye! See you later!"));primaryStage.show();
As you can see, the difference from our other examples is that we now use the File class and its toURI() method to access the HTML in the src/main/resources/form.html file directly, without converting the content to a string first. If you run the start3() method (renamed start() ) of the HtmlWebView class, the result looks as follows:

This solution is useful when you need to send a request or post data from your JavaFX application. But, when the form you would like a user to fill is already available on the server, you can just load it from the URL.
For example, let’s incorporate a Google search in the JavaFX application. We can do it by changing the parameter value of the load() method to the URL of the page we would like to load (the start4() method of the HtmlWebView class):
Text txt = new Text("Enjoy searching the Web!");WebView wv = new WebView();
WebEngine we = wv.getEngine();
we.load("http://www.google.com");VBox vb = new VBox(txt, wv);
vb.setSpacing(20);
vb.setAlignment(Pos.CENTER);
vb.setStyle("-fx-font-size: 20px;-fx-background-color: lightblue;");vb.setPadding(new Insets(10, 10, 10, 10));
Scene scene = new Scene(vb,750,500);
primaryStage.setScene(scene);
primaryStage.setTitle(
"JavaFX with the window to another server");
primaryStage.onCloseRequestProperty()
.setValue(e -> System.out.println("Bye! See you later!"));primaryStage.show();
We have also added a style to the layout in order to increase the font and add color to the background, so we can see the outline of the area where the rendered HTML is embedded. When we run this example (don’t forget to rename the start4() method start()), the following window appears:

In this window, you can perform all the aspects of a search that you usually access via the browser.
And, as we have mentioned already, you can zoom into the rendered page. For example, if we add the wv.setZoom(1.5) line to the preceding example, the result will be as follows:

Similarly, we can set the scale for the font and even the style from a file:
wv.setFontScale(1.5);
we.setUserStyleSheetLocation("mystyle.css");Notice, though, that we set the font scale on the WebView object, while we set the style in the WebEngine object.
We can also access (and manipulate) the DOM object of the loaded page using the WebEngine class method, getDocument():
Document document = we.getDocument();
And, we can access the browsing history, get the current index, and move the history backward and forward:
WebHistory history = we.getHistory();
int currInd = history.getCurrentIndex();
history.go(-1);
history.go( 1);
For each entry of the history, we can extract its URL, title, or last-visited date:
WebHistory history = we.getHistory();
ObservableList<WebHistory.Entry> entries =
history.getEntries();
for(WebHistory.Entry entry: entries){String url = entry.getUrl();
String title = entry.getTitle();
Date date = entry.getLastVisitedDate();
}
Read the documentation of the WebView and WebEngine classes to get more ideas about how you can take advantage of their functionality.
Playing media
Adding an image to a scene of the JavaFX application does not require the com.sun.* packages, so the --add-export VM options listed in the Embedding HTML section are not needed. But, it doesn’t hurt to have them anyway, so leave the --add-export options in place if you have added them already.
An image can be included in a scene using the javafx.scene.image.Image and javafx.scene.image.ImageView classes. To demonstrate how to do it, we are going to use the Packt logo, packt.png, located in the resources folder. Here is the code that does it (the start6() method of the HelloWorld class):
ClassLoader classLoader =
Thread.currentThread().getContextClassLoader();
String file = classLoader.getResource("packt.png").getFile();Text txt = new Text("What a beautiful image!");FileInputStream input = new FileInputStream(file);
Image image = new Image(input);
ImageView iv = new ImageView(image);
VBox vb = new VBox(txt, iv);
vb.setSpacing(20);
vb.setAlignment(Pos.CENTER);
vb.setPadding(new Insets(10, 10, 10, 10));
Scene scene = new Scene(vb, 300, 200);
primaryStage.setScene(scene);
primaryStage.setTitle("JavaFX with embedded HTML");primaryStage.onCloseRequestProperty()
.setValue(e -> System.out.println("Bye! See you later!"));primaryStage.show();
If we run the preceding code, the result will be as follows:

The currently supported image formats are BMP, GIF, JPEG, and PNG. Look through the API of the Image and ImageView classes (https://openjfx.io/javadoc/11/javafx.graphics/javafx/scene/image/package-summary.html) to learn the many ways an image can be formatted and adjusted as needed.
Now, let’s see how to use other media files in a JavaFX application. Playing an audio or movie file requires the --add-export VM options listed in the Embedding HTML section.
The currently supported encodings are as follows:
- AAC: Advanced Audio Coding audio compression
- H.264/AVC: H.264/MPEG-4 Part 10 / AVC (Advanced Video Coding) video compression
- MP3: Raw MPEG-1, 2, and 2.5 audio; layers I, II, and III
- PCM: Uncompressed, raw audio samples
You can see a more detailed description of the supported protocols, media containers, and metadata tags in the API documentation (https://openjfx.io/javadoc/11/javafx.media/javafx/scene/media/package-summary.html).
The following three classes allow constructing a media player that can be added to a scene:
javafx.scene.media.Media;
javafx.scene.media.MediaPlayer;
javafx.scene.media.MediaView;
The Media class represents the source of the media. The MediaPlayer class provides all the methods that control the media playback: play(), stop(), pause(), setVolume(), and similar. You can also specify the number of times that the media should be played. The MediaView class extends the Node class and can be added to a scene. It provides a view of the media being played by the media player and is responsible for a media appearance.
For the demonstration, let’s run the start5() method of the HtmlWebView class, which plays the jb.mp3 file located in the resources folder:
Text txt1 = new Text("What a beautiful music!");Text txt2 =
new Text("If you don't hear music, turn up the volume.");ClassLoader classLoader =
Thread.currentThread().getContextClassLoader();
String file = classLoader.getResource("jb.mp3").getFile();File f = new File(file);
Media m = new Media(f.toURI().toString());
MediaPlayer mp = new MediaPlayer(m);
MediaView mv = new MediaView(mp);
VBox vb = new VBox(txt1, txt2, mv);
vb.setSpacing(20);
vb.setAlignment(Pos.CENTER);
vb.setPadding(new Insets(10, 10, 10, 10));
Scene scene = new Scene(vb, 350, 100);
primaryStage.setScene(scene);
primaryStage.setTitle("JavaFX with embedded media player");primaryStage.onCloseRequestProperty()
.setValue(e -> System.out.println("Bye! See you later!"));primaryStage.show();
mp.play();
Notice how a Media object is constructed based on the source file. The MediaPlayer object is constructed based on the Media object and then set as a property of the MediaView class constructor. The MediaView object is set on the scene along with two Text objects. We use the VBox object to provide the layout. Finally, after the scene is set on the stage and the stage becomes visible (after the show() method completes), the play() method is invoked on the MediaPlayer object. By default, the media is played once.
If we execute this code, the following window will appear and the jb.m3 file will be played:

We could add controls to stop, pause, and adjust the volume, but it would require much more code, and that would go beyond the scope of this book. You can find a guide on how to do it in the Oracle online documentation (https://docs.oracle.com/javafx/2/media/jfxpub-media.htm).
A sea.mp4 movie file can be played similarly (the start6() method of the HtmlWebView class):
Text txt = new Text("What a beautiful movie!");ClassLoader classLoader =
Thread.currentThread().getContextClassLoader();
String file = classLoader.getResource("sea.mp4").getFile(); File f = new File(file);
Media m = new Media(f.toURI().toString());
MediaPlayer mp = new MediaPlayer(m);
MediaView mv = new MediaView(mp);
VBox vb = new VBox(txt, mv);
vb.setSpacing(20);
vb.setAlignment(Pos.CENTER);
vb.setPadding(new Insets(10, 10, 10, 10));
Scene scene = new Scene(vb, 650, 400);
primaryStage.setScene(scene);
primaryStage.setTitle("JavaFX with embedded media player");primaryStage.onCloseRequestProperty()
.setValue(e -> System.out.println("Bye! See you later!"));primaryStage.show();
mp.play();
The only difference is the different sizes of the scene needed to show the full frame of this particular clip. We figured out the necessary size after several trial-and-error adjustments. Alternatively, we could use the MediaView methods (autosize(), preserveRatioProperty(), setFitHeight(), setFitWidth(), fitWidthProperty(), fitHeightProperty(), and similar) to adjust the size of the embedded window and to match the size of the scene automatically. If we execute the preceding example, the following window will pop up and play the clip:

We can even combine playing both audio and video files in parallel, and thus provide a movie with a soundtrack (the start7() method of the HtmlWebView class):
Text txt1 = new Text("What a beautiful movie and sound!");Text txt2 = new Text("If you don't hear music, turn up the volume.");ClassLoader classLoader =
Thread.currentThread().getContextClassLoader();
String file = classLoader.getResource("jb.mp3").getFile(); File fs = new File(file);
Media ms = new Media(fs.toURI().toString());
MediaPlayer mps = new MediaPlayer(ms);
MediaView mvs = new MediaView(mps);
File fv =
new File(classLoader.getResource("sea.mp4").getFile());Media mv = new Media(fv.toURI().toString());
MediaPlayer mpv = new MediaPlayer(mv);
MediaView mvv = new MediaView(mpv);
VBox vb = new VBox(txt1, txt2, mvs, mvv);
vb.setSpacing(20);
vb.setAlignment(Pos.CENTER);
vb.setPadding(new Insets(10, 10, 10, 10));
Scene scene = new Scene(vb, 650, 500);
primaryStage.setScene(scene);
primaryStage.setTitle("JavaFX with embedded media player");primaryStage.onCloseRequestProperty()
.setValue(e -> System.out.println("Bye! See you later!"));primaryStage.show();
mpv.play();
mps.play();
It is possible to do this because each of the players is executed by its own thread.
For more information about the javafx.scene.media package, read the API and the developer guide online, links to which are provided here:
- https://openjfx.io/javadoc/11/javafx.media/javafx/scene/media/package-summary.html for the API of the javafx.scene.media package
- https://docs.oracle.com/javafx/2/media/jfxpub-media.htm for a tutorial on the usage of the javafx.scene.media package
Adding effects
The javafx.scene.effects package contains many classes that allow the adding of various effects to the nodes:
- Blend: Combines pixels from two sources (typically images) using one of the pre-defined BlendModes
- Bloom: Makes the input image brighter, so that it appears to glow
- BoxBlur: Adds blur to an image
- ColorAdjust: Allows adjustments of hue, saturation, brightness, and contrast to an image
- ColorInput: Renders a rectangular region that is filled with the given paint
- DisplacementMap: Shifts each pixel by a specified distance
- DropShadow: Renders a shadow of the given content behind the content
- GaussianBlur: Adds blur using a particular (Gaussian) method
- Glow: Makes the input image appear to glow
- InnerShadow: Creates a shadow inside the frame
- Lighting: Simulates a light source shining on the content and makes flat objects look more realistic
- MotionBlur: Simulates the given content seen in motion
- PerspectiveTransform: Transforms the content as seen in a perspective
- Reflection: Renders a reflected version of the input below the actual input content
- SepiaTone: Produces a sepia tone effect, similar to the appearance of antique photographs
- Shadow: Creates a monochrome duplicate of the content with blurry edges
All effects share a parent, the Effect abstract class. The Node class has the setEffect(Effect e) method, which means that any of the effects can be added to any node. That is the main way of applying effects to the nodes—the actors that produce a scene on a stage (if we recall our analogy introduced at the beginning of this chapter).
The only exception is the Blend effect, which makes its usage more complicated than the use of other effects. In addition to using the setEffect(Effect e) method, some of the Node class children also have the setBlendMode(BlendMode bm) method, which allows regulating how the images blend into one another when they overlap. So, it is possible to set different blend effects in different ways that override one another and produce an unexpected result that may be difficult to debug. That is what makes the Blend effect usage more complicated, and that is why we are going to start the overview with how the Blend effect can be used.
Three aspects regulate the appearance of the area where two images overlap (we use two images in our examples to make it simpler, but, in practice, many images can overlap):
- The value of the opacity property: This defines how much can be seen through the image; the opacity value 0.0 means the image is fully transparent, while the opacity value 1.0 means nothing behind it can be seen.
- The alpha value and strength of each color: This defines the transparency of the color as a double value in the range 0.0-1.0 or 0-255.
- The blending mode, defined by the BlendMode enum value: Depending on the mode, opacity, and alpha value of each color, the result might also depend on the sequence in which the images were added to the scene; the first added image is called a bottom input, while the second of the overlapping images is called a top input. If the top input is completely opaque, the bottom input is hidden by the top input.
The resulting appearance of the overlapping area is calculated based on the opacity, the alpha values of the colors, the numeric values (strength) of the colors, and the blending mode, which can be one of the following:
- ADD: The color and alpha components from the top input are added to those from the bottom input.
- BLUE: The blue component of the bottom input is replaced with the blue component of the top input; the other color components are unaffected.
- COLOR_BURN: The inverse of the bottom input color components is divided by the top input color components, all of which is then inverted to produce the resulting color.
- COLOR_DODGE: The bottom input color components are divided by the inverse of the top input color components to produce the resulting color.
- DARKEN: The darker of the color components from the two inputs is selected to produce the resulting color.
- DIFFERENCE: The darker of the color components from the two inputs is subtracted from the lighter one to produce the resulting color.
- EXCLUSION: The color components from the two inputs are multiplied and doubled, and then subtracted from the sum of the bottom input color components, to produce the resulting color.
- GREEN: The green component of the bottom input is replaced with the green component of the top input; the other color components are unaffected.
- HARD_LIGHT: The input color components are either multiplied or screened, depending on the top input color.
- LIGHTEN: The lighter of the color components from the two inputs is selected to produce the resulting color.
- MULTIPLY: The color components from the first input are multiplied by those from the second input.
- OVERLAY: The input color components are either multiplied or screened, depending on the bottom input color.
- RED: The red component of the bottom input is replaced with the red component of the top input; the other color components are unaffected.
- SCREEN: The color components from both of the inputs are inverted, multiplied with each other, and that result is again inverted to produce the resulting color.
- SOFT_LIGHT: The input color components are either darkened or lightened, depending on the top input color.
- SRC_ATOP: The part of the top input lying inside the bottom input is blended with the bottom input.
- SRC_OVER: The top input is blended over the bottom input.
To demonstrate the Blend effect, let’s create another application, called BlendEffect. It does not require the com.sun.* packages, so the --add-export VM options are not needed. Only the --module-path and --add-modules options, described in the JavaFX fundamentals section, have to be set for compilation and execution.
The scope of this book does not allow us to demonstrate all possible combinations, so we will create a red circle and a blue square (see the BlendEffect class):
Circle createCircle(){Circle c = new Circle();
c.setFill(Color.rgb(255, 0, 0, 0.5));
c.setRadius(25);
return c;
}
Rectangle createSquare(){Rectangle r = new Rectangle();
r.setFill(Color.rgb(0, 0, 255, 1.0));
r.setWidth(50);
r.setHeight(50);
return r;
}
We used the Color.rgb(int red, int green, int blue, double alpha) method to define the colors of each of the figures, but there are many more ways to do it. Read the Color class API documentation for more details (https://openjfx.io/javadoc/11/javafx.graphics/javafx/scene/paint/Color.html).
To overlap the created circle and square, we will use the Group node:
Node c = createCircle();
Node s = createSquare();
Node g = new Group(s, c);
In the preceding code, the square is a bottom input. We will also create a group where the square is a top input:
Node c = createCircle();
Node s = createSquare();
Node g = new Group(c, s);
The distinction is important because we defined the circle as half-opaque, while the square was completely opaque. We will use the same settings throughout all our examples.
Let’s compare the two modes, MULTIPLY and SRC_OVER. We will set them on the groups, using the setEffect() method, as follows:
Blend blnd = new Blend();
blnd.setMode(BlendMode.MULTIPLY);
Node c = createCircle();
Node s = createSquare();
Node g = new Group(s, c);
g.setEffect(blnd);
In the start() method of the called BlendEffect class, for each mode, we create two groups, one with the input where the circle is on top of the square, and another with the input where the square is on top of the circle, and we put the four created groups in a GridPane layout (see the source code for details). If we run the BlendEffect application, the result will be as follows:
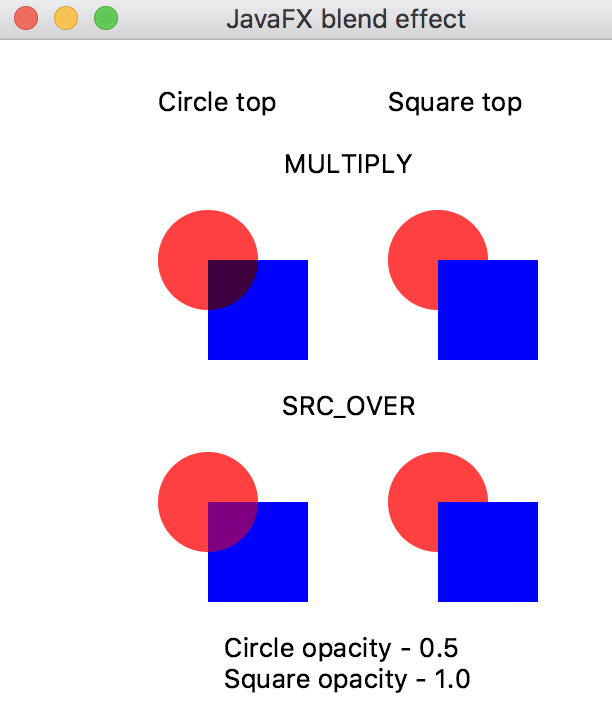
As was expected, when the square is on the top (the two images on the right), the overlapping area is completely taken by the opaque square. But, when the circle is a top input (the two images on the left), the overlapped area is somewhat visible and calculated based on the blend effect.
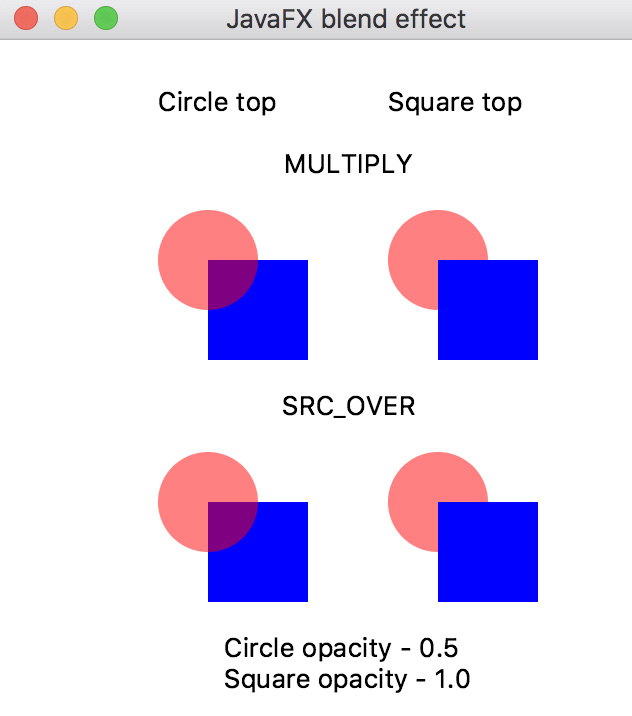
However, if we set the same mode directly on the group, the result will be slightly different. Let’s run the same code but with the mode set on the group:
Node c = createCircle();
Node s = createSquare();
Node g = new Group(c, s);
g.setBlendMode(BlendMode.MULTIPLY);
Locate the following code in the start() method:
Node[] node = setEffectOnGroup(bm1, bm2);
//Node[] node = setModeOnGroup(bm1, bm2);
And change it to the following:
//Node[] node = setEffectOnGroup(bm1, bm2);
Node[] node = setModeOnGroup(bm1, bm2);
If we run the BlendEffect class again, the result will look as follows:

As you can see, the red color of the circle has slightly changed and there is no difference between the MULTIPLY and SRC_OVER modes. That is the issue with the sequence of adding the nodes to the scene we mentioned at the beginning of the section.
The result also changes depending on which node the effect is set on. For example, instead of setting the effect on the group, let’s set the effect on the circle only:
Blend blnd = new Blend();
blnd.setMode(BlendMode.MULTIPLY);
Node c = createCircle();
Node s = createSquare();
c.setEffect(blnd);
Node g = new Group(s, c);
Locate the following code in the start() method:
Node[] node = setModeOnGroup(bm1, bm2);
//Node[] node = setEffectOnCircle(bm1, bm2);
And change it to the following:
//Node[] node = setModeOnGroup(bm1, bm2);
Node[] node = setEffectOnCircle(bm1, bm2);
We run the application and see the following:

The two images on the right remain the same as in all the previous examples, but the two images on the left show the new colors of the overlapping area. Now, let’s set the same effect on the square instead of the circle, as follows:
Blend blnd = new Blend();
blnd.setMode(BlendMode.MULTIPLY);
Node c = createCircle();
Node s = createSquare();
s.setEffect(blnd);
Node g = new Group(s, c);
Locate the following code in the start() method:
Node[] node = setEffectOnCircle(bm1, bm2);
//Node[] node = setEffectOnSquare(bm1, bm2);
And change it to the following:
//Node[] node = setEffectOnCircle(bm1, bm2);
Node[] node = setEffectOnSquare(bm1, bm2);
The result will slightly change again and will look as presented in the following screenshot:
There is no difference between the MULTIPLY and SRC_OVER modes, but the red color is different than it was when we set the effect on the circle.
We can change the approach again and set the blend mode directly on the circle only, using the following code:
Node c = createCircle();
Node s = createSquare();
c.setBlendMode(BlendMode.MULTIPLY);
Locate the following code in the start() method:
Node[] node = setEffectOnSquare(bm1, bm2);
//Node[] node = setModeOnCircle(bm1, bm2);
And change it to this:
//Node[] node = setEffectOnSquare(bm1, bm2);
Node[] node = setModeOnCircle(bm1, bm2);
The result changes again:

Setting the blend mode on the square only removes the difference between the MULTIPLY and SRC_OVER modes again.
Locate the following code in the start() method:
Node[] node = setModeOnCircle(bm1, bm2);
//Node[] node = setModeOnSquare(bm1, bm2);
And change it to the following:
//Node[] node = setModeOnCircle(bm1, bm2);
Node[] node = setModeOnSquare(bm1, bm2);
The result is as follows:

To avoid confusion and make the results of the blending more predictable, you have to watch the sequence in which the nodes are added to the scene and the consistency of the way the blend effect is applied.
In the source code provided with this book, you will find examples for all effects included in the javafx.scene.effects package. They are all demonstrated by running side-by-side comparisons. Here is one example:

For your convenience, there are Pause and Continue buttons provided that allow you to pause the demonstration and review the result for different values of opacity set on the blend effect.
To demonstrate all other effects, we have created yet another application, called OtherEffects, which also doesn’t require the com.sun.* packages, so the --add-export VM options are not needed. The effects demonstrated include Bloom, BoxBlur, ColorAdjust, DisplacementMap, DropShadow, Glow, InnerShadow, Lighting, MotionBlur, PerspectiveTransform, Reflection, ShadowTone, and SepiaTone. We have used two images to present the result of applying each of the effects (the Packt logo and a mountain lake view):
ClassLoader classLoader =
Thread.currentThread().getContextClassLoader();
String file = classLoader.getResource("packt.png").getFile(); FileInputStream inputP = new FileInputStream(file);Image imageP = new Image(inputP);
ImageView ivP = new ImageView(imageP);
String file2 = classLoader.getResource("mount.jpeg").getFile(); FileInputStream inputM = new FileInputStream(file2);Image imageM = new Image(inputM);
ImageView ivM = new ImageView(imageM);
ivM.setPreserveRatio(true);
ivM.setFitWidth(300);
We also have added two buttons that allow you to pause and continue the demonstration (it iterates over the effect and the values of their parameters):
Button btnP = new Button("Pause");btnP.setOnAction(e1 -> et.pause());
btnP.setStyle("-fx-background-color: lightpink;");Button btnC = new Button("Continue");btnC.setOnAction(e2 -> et.cont());
btnC.setStyle("-fx-background-color: lightgreen;");The et object is the object of the EffectsThread thread:
EffectsThread et = new EffectsThread(txt, ivM, ivP);
The thread goes through the list of the effects, creates a corresponding effect 10 times (with 10 different effects’ parameter values), and, every time, sets the created Effect object on each of the images, then sleeps for 1 second to give you an opportunity to review the result:
public void run(){ try { for(String effect: effects){ for(int i = 0; i < 11; i++){double d = Math.round(i * 0.1 * 10.0) / 10.0;
Effect e = createEffect(effect, d, txt);
ivM.setEffect(e);
ivP.setEffect(e);
TimeUnit.SECONDS.sleep(1);
if(pause){ while(true){TimeUnit.SECONDS.sleep(1);
if(!pause){break;
}
}
}
}
}
Platform.exit();
} catch (Exception ex){ex.printStackTrace();
}
}
We will show how each effect is created next, under the screenshot with the effect’s result. To present the result, we have used the GridPane layout:
GridPane grid = new GridPane();
grid.setAlignment(Pos.CENTER);
grid.setVgap(25);
grid.setPadding(new Insets(10, 10, 10, 10));
int i = 0;
grid.add(txt, 0, i++, 2, 1);
GridPane.setHalignment(txt, HPos.CENTER);
grid.add(ivP, 0, i++, 2, 1);
GridPane.setHalignment(ivP, HPos.CENTER);
grid.add(ivM, 0, i++, 2, 1);
GridPane.setHalignment(ivM, HPos.CENTER);
grid.addRow(i++, new Text());
HBox hb = new HBox(btnP, btnC);
hb.setAlignment(Pos.CENTER);
hb.setSpacing(25);
grid.add(hb, 0, i++, 2, 1);
GridPane.setHalignment(hb, HPos.CENTER);
And, finally, the created GridPane object was passed to the scene, which in turn was placed on a stage familiar to you from our earlier examples:
Scene scene = new Scene(grid, 450, 500);
primaryStage.setScene(scene);
primaryStage.setTitle("JavaFX effect demo");primaryStage.onCloseRequestProperty()
.setValue(e3 -> System.out.println("Bye! See you later!"));primaryStage.show();
The following screenshots depict examples of the effects of each of the 13 parameter values. Under each screenshot, we present the code snippet from the createEffect(String effect, double d, Text txt) method that created this effect:
- Effect of parameter value 1:

//double d = 0.9;
txt.setText(effect + ".threshold: " + d);
Bloom b = new Bloom();
b.setThreshold(d);

// double d = 0.3;
int i = (int) d * 10;
int it = i / 3;
txt.setText(effect + ".iterations: " + it);
BoxBlur bb = new BoxBlur();
bb.setIterations(i);

double c = Math.round((-1.0 + d * 2) * 10.0) / 10.0; // 0.6
txt.setText(effect + ": " + c);
ColorAdjust ca = new ColorAdjust();
ca.setContrast(c);

double h = Math.round((-1.0 + d * 2) * 10.0) / 10.0; // 0.6
txt.setText(effect + ": " + h);
ColorAdjust ca1 = new ColorAdjust();
ca1.setHue(h);

double st = Math.round((-1.0 + d * 2) * 10.0) / 10.0; // 0.6
txt.setText(effect + ": " + st);
ColorAdjust ca3 = new ColorAdjust();
ca3.setSaturation(st);

int w = (int)Math.round(4096 * d); //819
int h1 = (int)Math.round(4096 * d); //819
txt.setText(effect + ": " + ": width: " + w + ", height: " +
h1);
DisplacementMap dm = new DisplacementMap();
FloatMap floatMap = new FloatMap();
floatMap.setWidth(w);
floatMap.setHeight(h1);
for (int k = 0; k < w; k++) {double v = (Math.sin(k / 20.0 * Math.PI) - 0.5) / 40.0;
for (int j = 0; j < h1; j++) {floatMap.setSamples(k, j, 0.0f, (float) v);
}
}
dm.setMapData(floatMap);
- Effect of parameter value 7:

double rd = Math.round((127.0 * d) * 10.0) / 10.0; // 127.0
System.out.println(effect + ": " + rd);
txt.setText(effect + ": " + rd);
DropShadow sh = new DropShadow();
sh.setRadius(rd);

double rad = Math.round(12.1 * d *10.0)/10.0; // 9.7
double off = Math.round(15.0 * d *10.0)/10.0; // 12.0
txt.setText("InnerShadow: radius: " + rad + ", offset:" + off);InnerShadow is = new InnerShadow();
is.setColor(Color.web("0x3b596d"));is.setOffsetX(off);
is.setOffsetY(off);
is.setRadius(rad);

double sS = Math.round((d * 4)*10.0)/10.0; // 0.4
txt.setText(effect + ": " + sS);
Light.Spot lightSs = new Light.Spot();
lightSs.setX(150);
lightSs.setY(100);
lightSs.setZ(80);
lightSs.setPointsAtX(0);
lightSs.setPointsAtY(0);
lightSs.setPointsAtZ(-50);
lightSs.setSpecularExponent(sS);
Lighting lSs = new Lighting();
lSs.setLight(lightSs);
lSs.setSurfaceScale(5.0);

double r = Math.round((63.0 * d)*10.0) / 10.0; // 31.5
txt.setText(effect + ": " + r);
MotionBlur mb1 = new MotionBlur();
mb1.setRadius(r);
mb1.setAngle(-15);

// double d = 0.9;
txt.setText(effect + ": " + d);
PerspectiveTransform pt =
new PerspectiveTransform(0., 1. + 50.*d, 310., 50. -
50.*d, 310., 50. + 50.*d + 1., 0., 100. - 50. * d + 2.);

// double d = 0.6;
txt.setText(effect + ": " + d);
Reflection ref = new Reflection();
ref.setFraction(d);

// double d = 1.0;
txt.setText(effect + ": " + d);
SepiaTone sep = new SepiaTone();
sep.setLevel(d);
The full source code of this demonstration is provided with the book and is available on GitHub.
Summary
In this chapter, you were introduced to the JavaFX kit, its main features, and how it can be used to create a GUI application. The topics covered included an overview of Java GUI technologies, the JavaFX control elements, charts, using CSS, FXML, embedding HTML, playing media, and adding effects.
Now, you can create a user interface using Java GUI technologies, as well as creating and using a user interface project as a standalone application.
The next chapter is dedicated to functional programming. It provides an overview of functional interfaces that come with JDK, explains what a Lambda expression is, and how to use a functional interface in a Lambda expression. It also explains and demonstrates how to use method references.
Quiz
- What is the top-level content container in JavaFX?
- What is the base class of all the scene participants in JavaFX?
- Name the base class of a JavaFX application.
- What is one method of the JavaFX application that has to be implemented?
- Which Application method has to be called by the main method to execute a JavaFX application?
- Which two VM options are required to execute a JavaFX application?
- Which Application method is called when the JavaFX application window is closed using the x button in the upper corner?
- Which class has to be used to embed HTML?
- Name three classes that have to be used to play media.
- What is the VM option required to be added in order to play media?
- Name five JavaFX effects.