
1
GETTING UP AND RUNNING
THIS BOOK WILL TEACH YOU HOW TO BUILD YOUR VERY OWN ROBOTS. THIS EXCITING ADVENTURE WILL INVOLVE ALL SORTS OF ELECTRONICS, MAKING, AND PROGRAMMING.
Over the following chapters I’ll guide you through everything you need to know how to do, from connecting LEDs, buttons, batteries, and motors to getting your robot to follow lines, giving it sensors to see the world, and more! You’ll use a Raspberry Pi in all the projects to come, so now that you know what one is, let’s get your Pi set up.
GET YOUR HANDS ON A RASPBERRY PI
Before you can proceed, you’ll need a Raspberry Pi, of course! The Raspberry Pi is available worldwide, so it should be easy to buy one, no matter where you live.
At the time of writing, there are several different Raspberry Pi models available. The two most up-to-date ones are the Raspberry Pi 3 Model B+ and the Raspberry Pi Zero. The former is the updated classic $35 Raspberry Pi, shown in Figure 1-1. This is the board I’ll be using throughout this book, as it’s the best option for development: it has more full-size connectors. This saves you from fiddling around with the adapters and USB hubs that you’d need for the Pi Zero.
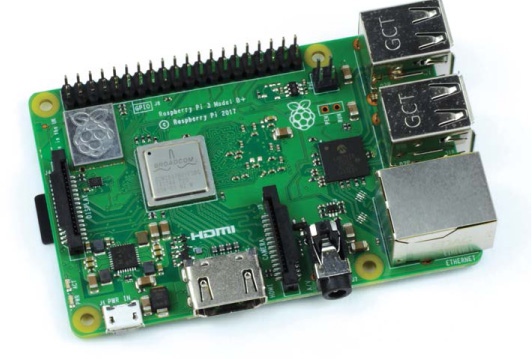
FIGURE 1-1 The Raspberry Pi 3 Model B+
The Raspberry Pi Zero is a stripped-down, smaller board that retails for just $5. The Pi Zero W is identical except that it’s the wireless version, meaning it’s equipped with Wi-Fi and Bluetooth capabilities, and retails for $10. The Zero and Zero W are shown in Figure 1-2.
You might be wondering why we’re not using the smaller, more compact Pi Zero. After all, a smaller board would take up less space so you could make a robot smaller or have space for more hardware. But if you’re using the Pi Zero, you’ll need USB and HDMI adapters for the miniature ports to plug in USB devices or a monitor, which is more challenging. These adapters have to be purchased separately too. When you have some more experience in the field of robotics, you may decide that it’s worth using a Pi Zero for one of your later projects; when that time comes, go for it!

FIGURE 1-2 The Raspberry Pi Zero (left) and Raspberry Pi Zero W (right)
If you already have an older model of the Pi, don’t worry. The version of Raspberry Pi you have doesn’t really matter, since all of them are cross compatible, and you can use any of them to build the robots in this book. The only difference is that you’ll need adapters for things like your wireless internet connection. Table 1-1 gives the different specs for each model.
TABLE 1-1 Main Raspberry Pi Model Specification Comparison
MODEL |
Raspberry Pi 3 Model B+ |
Raspberry Pi Zero |
Raspberry Pi Zero W |
RAM |
1GB |
512MB |
512MB |
PROCESSOR |
64-bit quad-core 1.4GHz |
32-bit single-core 1GHz |
32-bit single-core 1GHz |
PORTS |
HDMI, 4x USB 2.0, Micro-USB power |
Mini-HDMI, Micro-USB (data), Micro-USB power |
Mini-HDMI, Micro-USB (data), Micro-USB power |
CONNECTIVITY |
Wi-Fi, Bluetooth, Ethernet |
None |
Wi-Fi, Bluetooth |
PRICE |
$35 |
$5 |
$10 |
If you don’t have a Raspberry Pi yet, I recommend buying a Raspberry Pi 3 Model B+. There are sometimes new versions of the Pi, but great care is taken to ensure that they are all backward compatible (meaning they work with earlier versions), so you’ll be able to follow along with this book even if a later version has been released.
NOTE
Raspberry Pi is not the only platform or computer you can build robots with, but it is one of the easiest and most accessible ways of doing so!
You can find a distributor for your country on the Raspberry Pi Foundation website (https://www.raspberrypi.org/products/).
Your First Taste of Pi
When you see your Raspberry Pi for the first time, you might find yourself bewildered. You probably associate a normal “computer” with a screen, keyboard, mouse, and storage—but the Raspberry Pi is a little different.
Unbox it, and you’ll find a bare-looking board with all sorts of components sticking out of it. If you have a Pi 3 B+, it should look exactly like Figure 1-3. Later versions might look slightly different, but they all have the same basic features.
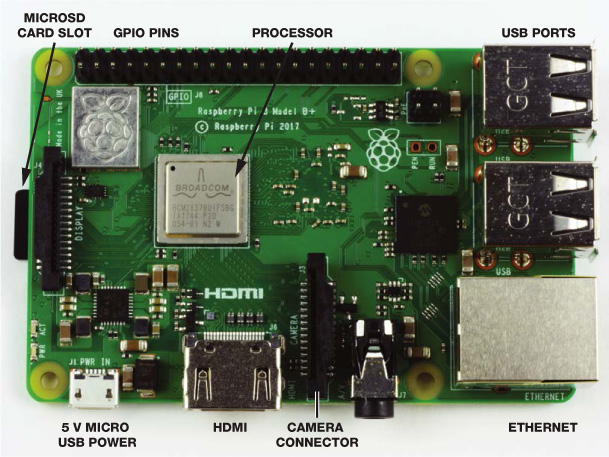
FIGURE 1-3 A top view of the Raspberry Pi 3 Model B+
Let’s walk through what all these components do:
USB ports There are four USB ports you can use to plug in USB keyboards, mice, USB sticks, and other devices.
Ethernet network port This is for a wired internet connection.
HDMI port HDMI stands for High-Definition Multimedia Interface, and this port is what you’ll use to connect your Pi to a screen like a TV or a computer monitor.
Micro USB power jack This is where you’ll plug in the 5 V of power that every Raspberry Pi requires to work; this is the same sort of power input as many mobile phones. It’s also worth noting that there is no power button! Your Pi will be on for as long as you keep the power cable connected.
MicroSD card slot While most computers have some form of built-in storage—your laptop often has a hard drive, for example—a Raspberry Pi has no “onboard” storage. Instead, the software your computer runs on, known as the operating system (OS), and all of your files are stored on a microSD card, much like you might find in a digital camera. As part of the setup process, I’ll show you how to configure a microSD card and install the OS you need for your Pi.
Quad-Core 1.4GHz processor In the middle of your Pi you’ll see the brain of your computer. You may be wondering just how powerful your new purchase is: is it as fast as a laptop or a desktop computer? The processor, coupled with the Pi’s 1GB of RAM, gives the Raspberry Pi power that’s roughly equivalent to some smartphones. As you’ll find out later, you can do a serious amount of computing with this processor.
Camera connector Next to the HDMI port is a clip-like connector labeled camera. It’s the input for the official Raspberry Pi Camera Module—something you’ll use in this book to give your robot the ability to see!
GPIO pins One of the most alien features of a Raspberry Pi are the 40 shiny metal pins found on the top edge of the board, shown in Figure 1-4. These are called GPIO pins, which stands for General-Purpose Input/Output. You can program these pins to control a huge variety of electronics, components, and other parts including LEDs, sensors, and motors (see Figure 1-5).

FIGURE 1-4 The GPIO pins
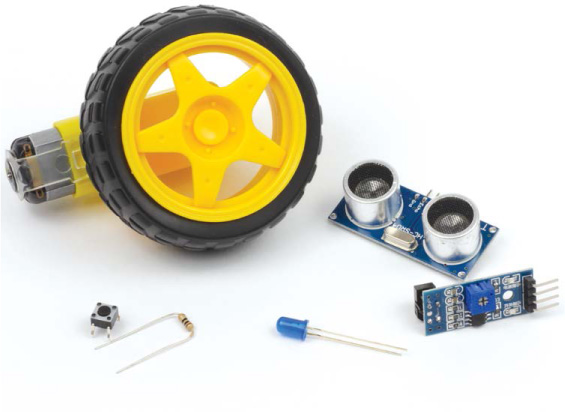
FIGURE 1-5 A selection of hardware that you can connect to your Raspberry Pi using the GPIO pins
NOTE
The original Raspberry Pi 1 has only 26 GPIO pins. They still do exactly the same thing, but in later Raspberry Pi models, the Foundation was able to squeeze on an extra 14 pins onto the board! If you have the original model, you can still follow the instructions in this book, as the first 26 pins of the newer 40-pin Raspberry Pis are exactly the same and backward compatible.
These GPIO pins are the gateway to a world of physical computing. You’ll be using them to wire up the electronic elements of your robot (motors, line-following sensors, and more). I’ll then guide you through programming this new hardware so that it does your bidding!
What You’ll Need
As you’ve noticed, your new computer is lacking in some fundamental features, like a screen and a keyboard. You’ll need some extra hardware to get it set up and running. Fortunately, you’ll likely have most of these lying around already.
A 5 V Micro-USB power adapter This is used to power the Raspberry Pi. Any old Android smartphone charger should be fine. Most power adapters will list their output voltage and current, so you just need to ensure the output voltage of the charger is 5 V and the output current is at least 2.5 A. There are a lot of power adapters around that don’t meet this specification. It is quite common to encounter mysterious faults because of one of these supplies. If you don’t have a spare power adapter lying around, grab an official one here: https://www.raspberrypi.org/products/raspberry-pi-universal-power-supply/.
A USB keyboard and mouse By default the Raspberry Pi has no form of input, so you’ll need both a USB keyboard and mouse in order to interface with it in the beginning. If you have a desktop PC at home, just yank out the existing USB keyboard and mouse and use those. If not, you can pick them up online or at any computer store.
An 8GB+ microSD card As mentioned, the Raspberry Pi has no onboard storage, so you’ll need a microSD card (or a normal SD card if you have a first-generation Raspberry Pi) to store the OS. These can also be picked up online or in a computer store. You’ll need at least an 8GB card—the more space, the better!
An HDMI cable This will be used to connect your Raspberry Pi to an HDMI TV or monitor. This is a standard cable that you can pick up online or in your local store.
A monitor or TV You will need some sort of display output for your Raspberry Pi. Anything with an HDMI port will do, whether it’s a computer monitor, TV, or another type of screen. Many computer monitors have a DVI input, and you can pick up an HDMI-to-DVI adapter or even cable.
It would also be incredibly helpful if you have access to a desktop computer or laptop. This isn’t a necessity, but it will be an advantage in a variety of ways. First, you’ll need to prepare an SD card with the software your Raspberry Pi will run on, which needs to be done on another machine. Second, you’ll be wirelessly connecting to your Pi and controlling it over your local area network. This saves you from having to keep plugging and unplugging your Pi to your monitor, and you’ll need a separate computer for that too. By using your Pi over your local area network, you’ll only need a monitor or TV for the initial setup process in this chapter. This shouldn’t take more than half an hour!
If you aren’t able to access another computer, don’t fret. You can work around this and still follow along just fine.
In later chapters of this book we’ll be using more hardware, components, and electronics, but you don’t have to worry about that just yet. I’ll be sure to tell you everything you need before we launch into each project.
SETTING UP YOUR RASPBERRY PI
Now that you’ve gathered all the tech, it’s time to set up your Raspberry Pi. This can seem like a daunting task for a beginner, but I’ll walk you through it. All you have to do is set up your microSD card, hook up your hardware, and then boot up your Pi and configure a few settings.
If you don’t have access to another computer to follow these next steps, you can purchase microSD cards that are preloaded with the OS already set up. You can find these online by searching for “preinstalled NOOBS Raspberry Pi microSD cards.”
If you do have another computer available, though, I would recommend installing the OS yourself, as it’s a handy skill to know. That way, if anything goes wrong and you need to start afresh, you’ll know what to do. Preinstalled microSD cards are also expensive!
Installing Your Pi’s Operating System on Windows/macOS
The operating system is the software that every modern computer runs on, and while different operating systems can look quite similar, they’re not all the same. You’ll likely be most familiar with Windows or macOS, but your Raspberry Pi runs Linux operating systems.
Linux is a family of free and open source operating systems with different distributions, meaning that there are different variations of Linux for different purposes. For Raspberry Pi, most people use the Raspbian distribution, the operating system officially supported by the Raspberry Pi Foundation (see Figure 1-6). Raspbian was developed and refined to run smooth as butter on your Pi, and you’ll find it has many features in common with the OS you normally use.
WHAT DOES OPEN SOURCE MEAN?
When we say software is open source, we mean that the source code—the code that the software is built from—is available for anyone to look at, change, and distribute. This means that programmers around the world can contribute to the open source project and work for the collective good of the end user. It also means Raspbian is free to download and use. Some operating systems, like Windows, are proprietary and require you to purchase a license key before you can use them on your computer.
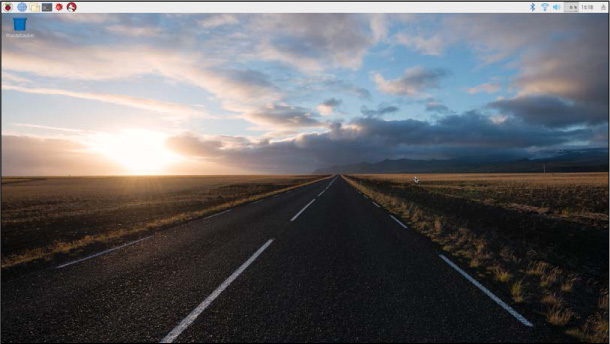
FIGURE 1-6 The Raspbian desktop environment
WARNING
During the formatting process, the storage device you have selected will be entirely and irreversibly erased. Make sure you double-check that you have selected the right drive name so you don’t accidentally delete everything from another device and lose your data.
Preparing Your SD Card
Before you can install Raspbian on your microSD card, you first have to clear out anything that might already be stored on it. Even if your card is brand new, I recommend doing this, because it can sometimes come with stuff already on it. This process is called formatting your microSD card. Be sure to read the warning in the sidebar before you format your microSD card!
- Insert your microSD card into your normal computer. Some computers have SD card or microSD card ports, but many don’t. If your computer doesn’t have a place you can plug in your SD card, you’ll need to use a USB SD card adapter, like the one shown in Figure 1-7. This small device lets you plug your card into one of the USB slots on your PC. You can find this easily and cheaply online (just search “SD card USB adapter”) or in your local computer store.
- Once you have your SD card plugged in, you should be able to navigate to it in your file explorer. If you’re using Windows, look under Devices and Drives; if you’re using a Mac, locate it using Finder. Make a note of the drive name of your microSD card. This is the letter that your computer assigns to it when it’s plugged in (like D: or H:).
- The best way to ensure your SD card is completely wiped and formatted correctly is to use the official formatting software SD Card Formatter. To install this software, visit https://www.sdcard.org/downloads/, click SD Memory Card Formatter in the menu, and find the formatter for your operating system. It will ask you to accept the conditions, so scroll to the bottom and click Accept to continue, and the latest version of the software should download. After this download has finished, run the installation setup, which looks like Figure 1-8. Make sure to follow the instructions and accept the terms and conditions.
- Once this installation process has finished, find and run the SD Card Formatter. A window like the one in Figure 1-9 will open. The process from here is very simple: select your card from the drop-down menu (remember the drive name you noted earlier), keep the option Quick Format selected, and then click Format. Watch the progress bar as your card is successfully formatted!

FIGURE 1-7 My USB adapter setup plugged into my laptop, ready for formatting

FIGURE 1-8 The SD Card Formatter installation process

FIGURE 1-9 SD Card Formatter running and formatting my 8GB microSD card (drive D:)
Installing NOOBS
Now you have a blank, formatted microSD card, so it’s time to install the Raspbian OS onto it. This process has been made super simple with NOOBS—New Out Of the Box Software—from the Raspberry Pi Foundation. Just follow these instructions:
- With your microSD card plugged into your computer, navigate to the Raspberry Pi website at https://www.raspberrypi.org/. Click Downloads at the top of the page, and from there click the NOOBS link. Make sure you download the latest full version of NOOBS—don’t install the Lite version, as it won’t allow you to set up your Raspberry Pi unless it’s connected to the internet. Find the button labeled Download ZIP and click it. Wait for your operating system to download. This may take anywhere from a few minutes to a few hours, depending on internet speed.
- Once NOOBS has finished downloading, find it in your Downloads folder and extract the compressed file. In Windows, right-click the file and select Extract All, choose a place on your computer to store your extracted operating system files, and click Extract. On Mac, downloading through Safari will result in a NOOBS file that is automatically extracted for you.
- Finally, navigate to your newly downloaded NOOBS files and copy and paste them onto your microSD card. You can do this by highlighting them all with your mouse, copying them, and then pasting them onto your formatted card, as shown in Figure 1-10.
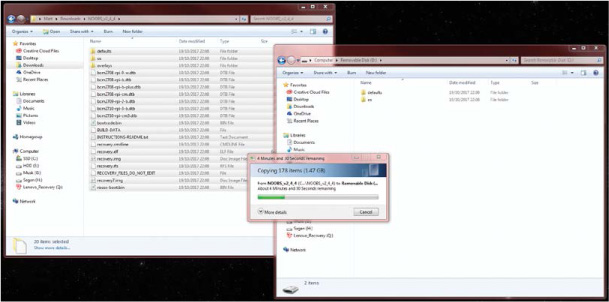
FIGURE 1-10 Transferring all of the extracted files to the microSD card
Huzzah! You have successfully set up your SD card and can safely remove it from your computer. Make sure to right-click on the device and then eject the card before you remove it.
Plugging In and Wiring Up Your Raspberry Pi
The next stage is physically setting up your Raspberry Pi. You’ll want to do this in an area that has some space, access to a Wi-Fi network, and access to your monitor, whether that’s a TV or computer screen.
- Unbox your Raspberry Pi and plug your microSD card into the slot at the bottom of the board (see Figure 1-3 for a reminder of where this is). Make sure it’s pushed all the way in. Some models of Pi (the 1 B+ and 2 B) make a “click” sound when the card is inserted properly, but the later 3 B/B+ does not.
- Connect your USB keyboard and mouse to the USB ports on your Raspberry Pi.
- Plug your HDMI cable into the HDMI port on your Pi. Insert the other end into your TV or monitor.
- Now, to start up your Raspberry Pi, connect your 5 V Micro-USB power cable to the power input next to the HDMI port (see Figure 1-11). You should see a flurry of LEDs and some activity on your screen. Congratulations! You have brought your Pi to life!
If nothing has come up on your screen, try flicking between the HDMI inputs with your remote to find the right one—most screens have multiple inputs. As a general rule of thumb, you should turn your monitor on before you plug in power to your Pi; some screens fail to pick up the HDMI signal if this is done the other way around! So try turning the screen off, plugging in your HDMI cable, turning the screen on, and then plugging the 5 V micro USB power cable into your Raspberry Pi.
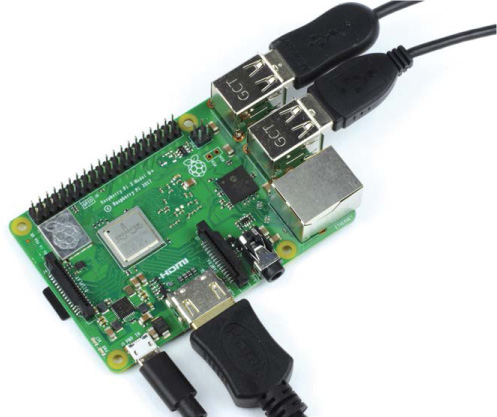
FIGURE 1-11 A happily working Raspberry Pi
If you want a wired internet connection and you’re near your internet router, you could hook the Pi up to the internet by plugging an Ethernet cable from your router into the Ethernet port next to the USB ports. However, I’ll be using a wireless internet connection throughout this book and I recommend you do so too, to free you up in terms of movement.
If you see a lightning bolt symbol at the top right of the screen, this is the Pi warning you that the power supply isn’t providing enough power and the system may be unreliable. In this case you should use a better power supply, ideally the official one.
Installing Raspbian
On the screen connected to your Raspberry Pi, you should see a NOOBS interface like that displayed in Figure 1-12. Now all you need to do is install and configure Raspbian OS. This is super-easy and you’ll be up and running in no time!
To install the OS, simply click the box next to the Raspbian option and then click Install at the top of the NOOBS box. Raspbian should extract itself and set up your SD card for you. Sit back, relax, and watch the progress!
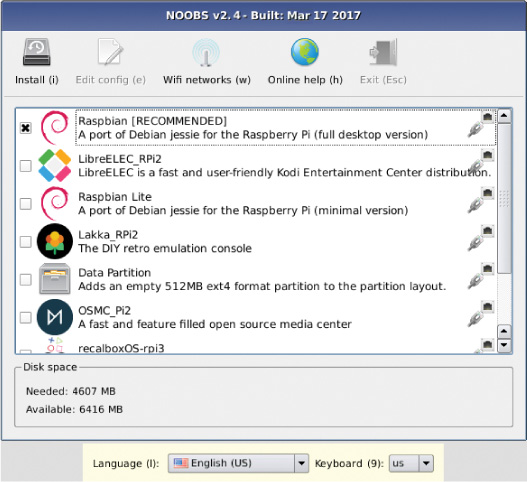
FIGURE 1-12 The NOOBs installation interface
Once the installation process has finished, your Pi should reboot into the Raspbian desktop environment, as shown earlier in Figure 1-6.
OTHER PI OPERATING SYSTEMS
If you connect the NOOBS interface to the internet, you’ll be able to download and access many other Raspberry Pi operating systems. There are lots of other flavors of Linux that you can install, all with their own pros and cons. For example, OSMC (Open Source Media Center) is a video-playing distribution for plugging into a TV as a media center. We’ll be sticking to the official Raspbian OS throughout this book. You can return to the NOOBS setup interface at any time by rebooting your Pi and holding the SHIFT key if you want to try out other systems.
You will find that a “Welcome to Raspberry Pi” setup wizard starts automatically. As we will be manually configuring your Raspberry Pi’s preferences in more detail later, dismiss this wizard by clicking on the Cancel option.
You will notice that the Raspbian environment is quite similar to other operating systems you may have used. You will find the menu bar on the top of the screen, as shown in Figure 1-13, with applications on the left side and utilities, such as volume and Wi-Fi, on the right side. Take some time to explore!

FIGURE 1-13 The Raspberry Pi menu
Configuring Raspbian
Before you progress any further, there are two things you should do now to configure Raspbian that will save you time later: change some preferences and set up Wi-Fi.
Changing Raspbian Preferences
When Raspbian is installed, a few important features are turned off by default. This is for security and efficiency reasons, and because lots of people don’t need them. You will need some of them, however, so we’ll enable these now so you don’t have to do it later.
In the top-left corner of the screen, click the Pi logo, and from the menu click Preferences ▸ Raspberry Pi Configuration. You should see a dialog box like Figure 1-14.

FIGURE 1-14 The Raspberry Pi Configuration dialog, open to the System tab
When the application first opens, you’ll be greeted by the System tab. Here you can change your account password, screen resolution, and other settings.
By default, your Raspberry Pi will automatically log in. The standard user profile has the username pi and the password raspberry. I recommend changing the password to something of your choosing, to improve the security of your Raspberry Pi. Make a mental note of the password, as you will need it in the future to log in.
Before you can set up Wi-Fi in the next section, you’ll need to tell your Raspberry Pi what country you are operating in. To do this, click the Localization tab, then click Set WiFi Country. From the drop-down menu, select your current country.
Once you’ve changed your password, navigate to the next tab, Interfaces. From here, change the following options from Disabled to Enabled:
- Camera
- SSH
- VNC
- SPI
- I2C
Enabling Camera will allow you to connect the official Raspberry Pi Camera Module, which we’ll do in the last chapter of this book. Enabling SSH and VNC will allow you to remotely access your Pi over your local network, which I’ll show you how to do in a second. The other two—SPI and I2C—all relate to functions on the GPIO pins, and we’ll come across those later in the book.
With these settings enabled, click OK and then reboot your Raspberry Pi when prompted.
Connecting Your Raspberry Pi to the Internet
Connecting your Raspberry Pi to a Wi-Fi network should take only a few minutes. As mentioned, you can connect your Pi to the internet using a physical Ethernet cable—this does not require any configuration. When it comes to building robots, however, you want everything to be as wireless as possible, so I recommend using Wi-Fi.
Also note that to download the software and code we will be using throughout this book, your Pi will need to be connected to the internet.
Both the Raspberry Pi 3 B+ and Pi Zero W have Wi-Fi and Bluetooth built onto the board. If you are using an older model, you’ll need to buy a USB Wi-Fi dongle and plug it into one of your Pi’s USB ports to connect to the internet. Some Wi-Fi dongles have problems connecting with the Pi, so I recommend using the official model, which you can buy at https://www.raspberrypi.org/products/raspberry-pi-usb-wifi-dongle/.
To connect to a Wi-Fi network from the desktop, simply click the Wi-Fi symbol in the top right of the screen and a drop-down list of local networks should appear, as shown in Figure 1-15. Select your network, enter your password, and press OK.
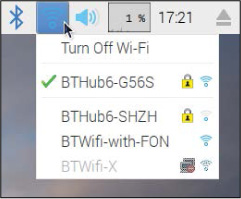
FIGURE 1-15 The Wi-Fi drop-down menu
The menu bar icon should then change to show your Wi-Fi strength, indicating your Pi is now connected to the internet.
THE TERRIFIC WORLD OF THE TERMINAL
The terminal (or shell) is a way for you to give instructions directly for your computer. Specifically, it is an interface in which you can type and execute text-based commands. This is in contrast to the graphical user interface (or GUI, pronounced “gooey”) used by modern operating systems, which you probably know as a desktop. The GUI allows you to use a computer to do many advanced things in simple and visual ways. If you haven’t used a Raspberry Pi or a Linux machine before, you most likely will have only ever used a computer through its GUI.
Before computers had the processing power to use complicated graphics, a user operated a computer solely through a terminal using a command line interface. This is a purely text-based way of interacting with a computer: you enter text commands to tell the computer what to do, and it responds by simply outputting text.
This may sound like an old-fashioned, not-very-useful way of interacting with computers, but it’s still immensely powerful. Using the terminal allows you to perform exact commands efficiently, with only a few characters. The Raspberry Pi terminal is the primary way we will be interacting with our robots.
Touring the Terminal
You’ll become more familiar and confident with using the terminal as you work through this book. For now, to acquaint you with it, I’ll give you a quick tour and introduce you to how it works.
To open a terminal window from the desktop, click the Raspberry Pi menu in the top left and then click Accessories ▸ Terminal. A black box, as shown in Figure 1-16, should appear. You’re now using the terminal!
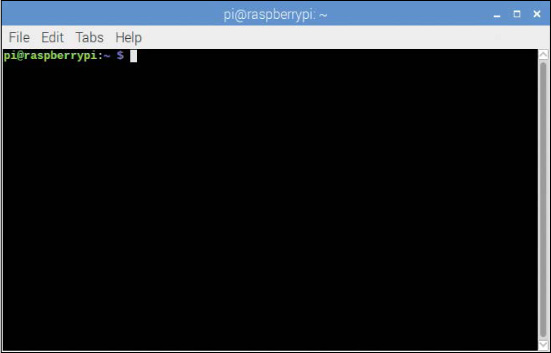
FIGURE 1-16 The Raspberry Pi terminal
The terminal presents you with a prompt that looks something like this:
pi@raspberrypi:~ $
NOTE
In your Raspberry Pi and Linux adventures, if you’re ever unsure about a command or want to know how to use the terminal to do a certain thing, the best way to learn is to look it up online. There’s plenty of help and command line manuals to guide you through the process—no matter what you want to do with the terminal!
In this situation, a prompt is simply your Raspberry Pi waiting for you to enter a text command; it is prompting you to do something. Unfortunately, the terminal doesn’t understand plain English (or any other language, for that matter). Instead, you communicate using specific commands. These are predefined phrases and character sequences that tell the terminal how to behave. There are thousands of commands in existence, but don’t worry. I’ll introduce you to some simple ones now.
You can access files in different folders (known as directories) with the terminal the same way you do in your regular OS. The difference is that the terminal interface is like a text-based file manager. At any time you are “inside” a directory, and you can change your location when you want. To explore this, let’s practice a few commands.
When you open a terminal, you start out in the Pi’s home directory. You can use the first command, ls, to find out what files and folders are in the directory you’re currently in. In other words, ls lists the contents of your current directory. With your keyboard, enter this command into the terminal:
pi@raspberrypi:~ $ ls
Press ENTER. You should see a list of the directories and files stored inside your current directory, as shown in Figure 1-17. Now open the same folder in the desktop by going to Accessories ▸ File Manager, and it should match what you see in the terminal.

FIGURE 1-17 The Raspberry Pi terminal side by side with the graphical file manager, displaying the same thing in different ways
You’ll notice that the text is coded in different colors. This helps you quickly identify items. Blue items are directories. That bright green text is your username—in this case, the default user, pi.
You navigate in and out of these folders in text, like you do in a file manager, using the command cd, which stands for change directory. Pick a directory that was just listed by ls and then enter the following:
pi@raspberrypi:~ $ cd that_directory
Replace that_directory with the name of your directory. So, for example, I’ll change into the Documents directory with the following command:
pi@raspberrypi:~ $ cd Documents
This moves me into my Documents folder. It’s important to know that the terminal is case-sensitive, meaning that the terminal recognizes upper- and lowercase letters as different things; for example, d is not the same as D. If I hadn’t capitalized the D at the start of Documents and entered documents instead, my Pi wouldn’t understand where I wanted to go, and would return an error.
When you move folders, you should notice that the blue text before the $ prompt changes as well, to look something like this:
pi@raspberrypi:~/Documents $
The terminal will let you know where you are in the filesystem by listing your location before the prompt. This will turn out to be very useful.
In your new folder, enter ls again to see what files and folders are inside it. When I do this in Documents, I get the output in Listing 1-1.
pi@raspberrypi:~/Documents $ ls
BlueJ Projects Greenfoot Projects Scratch Projects
LISTING 1-1 Looking into my Documents folder from the terminal
As you can see, a different set of contents has been listed for your new directory. The command cd .. takes you back to the folder you just came from. You can think of it as moving you back “up” the directory path. So running cd .. in the Documents folder would take you back to the home directory, for example.
NOTE
Typing out long directory names can be both annoying and tricky to get right. It’s not uncommon for commands to go wrong, have typos, or return errors. So, here are two quick tips! First, when you’re using the cd command or any other file command, after the first few letters of the directory or filename, press the TAB key. This will autocomplete the name of the directory. Try it out now. Second, if a command goes wrong or you want to execute it again or edit it, use the up and down arrow keys to scroll through your command history.
One final (and important) command that you should know is shutdown. The Raspberry Pi has no power switch, and you disconnect power to it by pulling out the power cord. Every time before you do this, you need to safely shut down the operating system. Whenever you want to turn off your Pi, run this command:
pi@raspberrypi:~ $ sudo shutdown now
After this, wait for a few moments and then feel free to remove the power cord.
And with that, I have introduced you to the mechanics of the two most useful Linux terminal commands: ls and cd. You’ll use these a lot in your Raspberry Pi adventures. We’ll use many other terminal commands over the course of this book, too, and I’ll introduce them to you as we go along.
Accessing Your Raspberry Pi from Another Computer
Setting up a Raspberry Pi is easy, but having it always connected to a monitor can be a hindrance. You don’t want a long wire trailing from your robot as it scurries around the floor, so now I’ll show you how to access your Raspberry Pi from another computer so you can send your robot instructions wirelessly.
You can access the terminal of a Raspberry Pi remotely from another computer that’s on the same network using SSH, an internet protocol that stands for Secure Shell. You can then input commands to a command line of that computer and see their responses, exactly like you did in the previous section, and send them to your robot.
First, your Raspberry Pi must be connected to your local network, either over Wi-Fi or Ethernet, and the other device must also be connected to that same network.
Next, you’ll need your Pi’s IP address in order to connect to it later. This is an Internet Protocol address, a numerical label given to every device connected to a network that’s unique to that device. Think of it like your house address, but for your computer.
To find out your Raspberry Pi’s IP address, simply open a terminal and enter the following command:
pi@raspberrypi:~ $ ifconfig
This will generate a large amount of output text. It might look confusing, but your IP address is in there.
If you’re connected to your network over Wi-Fi, scroll down to the wlan0 entry, and the number after inet is your IP address; see Figure 1-18 for mine. If you’re connected over Ethernet, you can find your IP address under the eth0 entry. In any case, just look for the magic sequence following the form inet 192.168.1.221 (or something similar) within the output.

FIGURE 1-18 The output of the ifconfig command. I have highlighted my IP address—this is where you should find yours if you are connected over Wi-Fi.
As you can see, my IP address is 192.168.1.221. Make a note of yours (it will probably be quite similar), as you will use this information to connect to your Pi from your other device.
Next, you need to set up an SSH connection on your other computer. SSH is built into Linux distributions and macOS, but for Windows you’ll need some third-party software. I’ll cover the process of connecting to your Pi from both Windows and Mac next; you only need to read the section relevant to you and your machine.
Using SSH on Windows
The free software required for Windows is called PuTTY. The installation process is easy and takes only a few minutes:
- On your Windows PC, open a web browser and navigate to http://www.putty.org/, then follow the link to the download page. Select the 32-bit or 64-bit option, depending on your machine. This will download the installer.
- Open the installer and follow the instructions to install the PuTTY software.
- Once the installer has completed, open the PuTTY application. You’ll find a shortcut to PuTTY in the Start menu. Every time you open the application, you’ll be presented with a box like the one in Figure 1-19.
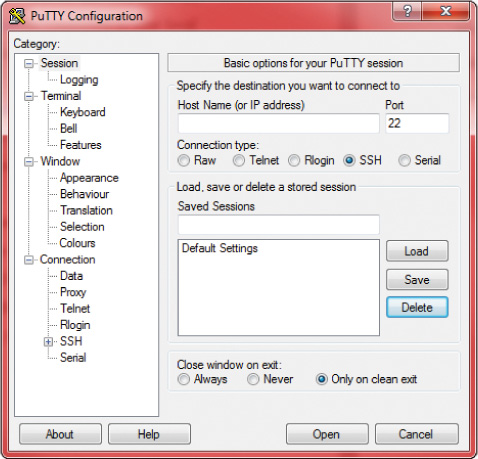
FIGURE 1-19 The PuTTY application and configuration dialog box
- To connect to your Raspberry Pi, enter your Pi’s IP address into the box labeled “Host Name (or IP address).” Below that, ensure that SSH is selected and, unless you know otherwise, keep the Port option set at 22. Click Open to start the connection.
- If this is your first time connecting to a new Pi, you’ll probably see a security warning; simply click Yes and agree. After this, a password prompt will appear. Type in your Pi’s password and press ENTER; if you didn’t change it earlier, your password will be the default raspberry.
You now have a full Raspberry Pi terminal available for you to use, as shown in Figure 1-20. Why not try out some of the commands you learned in the previous section?

FIGURE 1-20 The PuTTY shell
Using SSH on macOS
No extra software is required to use SSH on any Mac computer. Instead, you can use the Mac’s very own Terminal program!
- From anywhere on your Mac, hold the COMMAND key and spacebar to open up a Spotlight Search. Type in terminal and press ENTER. A command line box should open up.
- To connect to your Raspberry Pi, enter the following command into Terminal, replacing the text your_ip_address with your actual IP address you found earlier:
$ ssh pi@your_ip_address
As you can see in Figure 1-21, the command I entered was:
$ ssh [email protected]
- If this is the first time you’ve connected to a new Pi, you’ll probably see a security warning; simply enter yes to agree to it. You will then have to enter your Raspberry Pi’s password and press ENTER; if you didn’t change it earlier, then your password will be the default raspberry.

FIGURE 1-21 The Mac Terminal SSH connection process
You should now have a full Raspberry Pi terminal available for you to use! Try out some of the commands you learned in the previous section!
WHAT IS PROGRAMMING?
You’re almost ready to move on and start building robots! The last thing I want to do in this chapter is introduce you to a few programming concepts.
Programming is the process of writing a set of instructions that tell a computer how to perform a task. You can program video games, apps, or even, in our case, robots. The only thing that limits what you can do with computers and programming is your imagination!
Over the course of this book, I’ll show you how to wire up electronic components and then program them to do exactly what you want. If you have never done any programming before, don’t worry. I will explain everything as we progress through the book. You can also download all the code you’ll need from https://nostarch.com/raspirobots/ if you ever get stuck.
Introducing Python
There are many different programming languages, each with its pros and cons. The language we’ll use throughout this book is called Python. Python is a high-level programming language, which means that it’s more similar to human language than many other programming languages, so it’s both easy to understand and powerful.
You’ll be writing Python programs and then executing them from the terminal. This means that you’ll be able to use SSH to program your Raspberry Pi from another computer without ever needing to plug it in to a monitor.
Writing Your First Python Program
For your first program, it is geek tradition to create a computer program that outputs, or displays, “Hello, world!” to the user. This is a simple task that will help you get the hang of how to write and run Python programs.
- From the terminal, enter the following line:
pi@raspberrypi:~ $ mkdir robot
- This command will create a new directory called robot for you to store your own Python programs. We’ll store all our programs in this directory from now on. Change into your new directory with this command:
pi@raspberrypi:~ $ cd robot
- Next, from your new robot directory, enter this line:
pi@raspberrypi:~/robot $ nano hello_world.py
- Nano is a text editor. Text editors are simple software that allow you to make, review, and change files with text in them. Nano lets you create and edit programs directly in the terminal, without opening any other windows. This command uses Nano to create a new file called hello_world.py—the file extension .py tells Nano that this is a Python program. From this command an empty hello_world.py file has been created and saved in our robot directory. This file is now open in your terminal.
- With Nano open in your terminal, you enter instructions to save into hello_world.py. Enter the following single line of Python code:
print("Hello, world!")
- The command print() is a Python function. In programming, a function is an instruction that performs a task. All print() does is output to the terminal whatever text you give it! In our case we have given it the text " Hello, world!". In programming, any series of characters between two quote marks is known as a string.
- With your one-line program now complete, you need to exit and save your work. To do this in Nano, press CTRL-X. You will then be asked whether you want to save the changes you have made. Press Y to say yes. Nano will then ask you what filename you want to save these instructions to, which in our case is hello_world.py. Press ENTER to confirm this. You should now be back at the command line.
- You’ve created your program, so now you need to run it. To run a Python program from the terminal, simply enter python3 followed by the name of the file to run. Enter the following to execute your program:
pi@raspberrypi:~/robot $ python3 hello_world.py
You’ll see the string " Hello, world!" displayed in your terminal window, as in Figure 1-22.
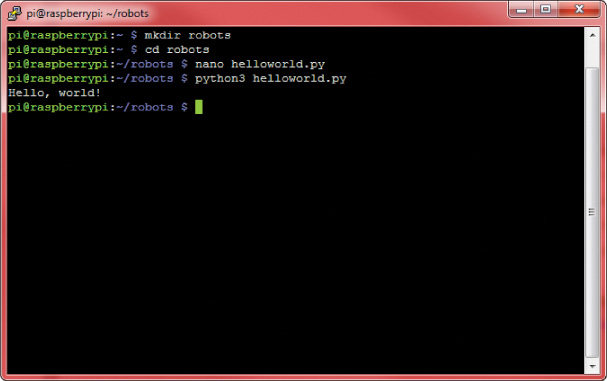
FIGURE 1-22 The output of your first Python program
You may have noticed the 3 in the command python3 helloworld.py. This is telling your Pi to execute the file using Python 3, rather than Python 2. Python 3 is the newest version of Python, and while version 2 is still used a lot, using Python 3 is the preferred option. There’s not a lot of difference, but there are some syntax and feature differences between them. All of the projects in this book will use Python 3.
SUMMARY
We’ve covered a lot in this chapter! You’ve gotten to know your new Raspberry Pi, set it up, and had your first taste of both the terminal and Python programming. You’re now able to access and use your Pi remotely and understand how to do things like change preferences and set up an SD card.
In the next chapter I’ll cover the basics of electronics and electricity, and you’ll start doing some simple building in the form of mini-projects, like flashing LEDs, and more. This will give you the foundation of knowledge that you’ll need before we move on to making robots!