
25 Data compression
When troubleshooting SQL Server performance issues, I/O-related issues are often at the top of the suspect list. If your workload is I/O intensive—meaning it reads and writes a lot of data—you’ll often discover bottlenecks that lead to poor performance. The easy fix is to improve the hardware by either adding more resources or getting faster disks. If this isn’t an option, then data compression could be just the tool you need in your toolbox.
Data compression has been around since SQL Server 2008, and, barring a few enhancements to add compression for additional datatypes, no major changes to how the technology works have been made. However, the most impactful change came with SQL Server 2016 SP1 when the feature was made available in all editions of SQL Server. Previously, it was an Enterprise-only feature. This change opened the door for a greater audience to take advantage of data compression. Data compression also isn’t going anywhere anytime soon. It’s supported in Azure for both Azure SQL Databases and Azure SQL Managed Instances.
25.1 Types of compression
Three types of compression are available within SQL Server: rowstore compression, columnstore compression, and backup compression.
This chapter will focus on rowstore data compression because dbatools has some commands that help make managing this easy. Rowstore compression is a great option for storing our transactional (OLTP)-type relational data in a way that saves space and improves I/O performance. However, it’s worth quickly mentioning the other two options because they also can provide benefits when managing SQL Server.
The second option for applying compression to your data is using columnstore technology, which was introduced in SQL Server 2012. This method is more appropriate for large data-warehouse-type relational datasets. Data stored in a columnstore index is physically stored in columns, instead of pages, which greatly increases the compression rate. This is partly because columns are more likely to store the same value, making the compression process we’ll talk about shortly even more effective.
All columnstore tables and indexes, by default, are stored using columnstore compression. If you have certain columnstore objects that are not accessed often, you can also further compress these by applying columnstore archive compression. Applying and managing columnstore compression is currently out of scope for dbatools, but keep your eyes open because new features are being added all the time.
The final type of compression available to us in SQL Server is backup compression. With the previous two options, the target of compression has been data within our database; here we’re applying compression to a backup of our data. Backup compression also came out in SQL Server 2008, so it has been around for a while. Backup compression is useful when we’re taking backups. Not only does it significantly reduce the footprint of our backup on disk; it can actually improve backup performance because of the reduction in I/O. Backup compression is impressive; in our lab, backing up a 3 GB WideWorldImporters database without compression averaged 14 seconds. With compression, that average fell to 6 seconds.
25.2 How does rowstore data compression work?
Before we get into the dbatools magic that makes managing data compression so easy, it’s worth understanding a bit more about this technology and why it might be useful to us. For tables and indexes, we have three options when it comes to data compression. The first one, the default, is to do nothing—don’t apply any compression to the data, and it’ll just be stored on 8 Kb pages on our disk as it always has been.
The second option is to apply row compression. This option actually changes the physical storage format of the data, allowing fixed-length datatypes to use variable-length storage. For example, if you have a column that is defined as a bigint and you aren’t using compression, it will take 8 bytes of storage per row, no matter whether you’re storing 1 or 9,223,372,036,854,775,807, the max value for a bigint. However, by applying row compression, the value in the field uses only the bytes it needs. 9,223,372,036,854,775,807 still needs 8 bytes, but 1 now requires only 1 byte of storage. This doesn’t sound like much, but over millions of rows with multiple columns that could benefit from row compression, the GBs of savings add up quickly.
The next step, and final option available to us, is to use page compression. This further compresses our data, first applying row compression and then adding on two more layers (prefix and dictionary compression) where, to put it simply, common patterns are removed from the pages and stored instead at the beginning of the page and then replaced by pointers within the pages. For example, if the city field in your address table contains Akron for the majority of your customers, you store that value only once, and all the rows on that page point back to it.
Note If you are interested in a deeper dive into the internals of compression, and to further understand how the data changes on the data pages, check out Jess’s blog: dbatools.io/jesscompression.
25.3 Why use data compression?
Ultimately, the key here is that using data compression makes storing data in SQL Server more efficient (for most data types). More data can be stored per page, which takes up less space on disk, and also in memory when that data is read into SQL Server to be used. Increasing the amount of data per page means that our database will need fewer total pages to store the same amount of data.
We can clearly see this by reviewing the number of pages required to store the Person data when using different levels of compression. You can see in figure 25.1 that, as we move down the results, we increase the compression levels and decrease the number of pages needed to store the same data.

Figure 25.1 The same data uses fewer pages as you change from no compression, to row, and then to page compression.
25.4 It can’t all be rainbows and unicorns: Compression drawbacks
Using data compression offers a lot of benefits, but we do need to weigh these against the downsides. When our data is compressed, it takes a little more CPU to decompress that data to use. When data is needed to filter, join, sort, or be returned for a query, the engine must reconstitute the data before it can be used.
With row compression, the first level of compression, we get some space savings while incurring only a small amount of CPU cost. Applying page compression greatly increases the space savings—but with that comes an increase in CPU costs.
In our experience, more SQL Servers have performance bottlenecks from I/O-related issues than because they are CPU bound. Therefore, most of the time, data compression has a positive impact on SQL Server performance.
As with everything, it’s important to test these changes within your own environments to determine how to best use data compression. We’ll look at how dbatools can help with this decision a little later on.
25.5 What’s compressed?
When we think about data compression in our environment, the first questions are probably going to be these: What is the current state of our environment? Are we using data compression? What kind of data compression? How much space is it taking to store our data? We can answer all four of these questions with Get-DbaDbCompression, as shown in the next listing.
Listing 25.1 Getting compression and size information for a database
In listing 25.1, we get results returned for each partition of every index (clustered and nonclustered) and heap in the AdventureWorks database. These results tell us the current compression applied to each partition as well as information on the size and number of rows. The next listing contains a sample result.
Listing 25.2 Example output of Get-DbaDbCompression
PS> Get-DbaDbCompression -SqlInstance mssql1 -Database AdventureWorks

ComputerName    : mssql1                                      ①
InstanceName    : MSSQLSERVER                                 ②
SqlInstance     : mssql1                                      ③
Database        : AdventureWorks                              ④
Schema          : dbo                                         ⑤
TableName       : AWBuildVersion                              ⑥
IndexName       : PK_AWBuildVersion_SystemInformationID       ⑦
Partition       : 1                                           ⑧
IndexID         : 1                                           ⑨
IndexType       : ClusteredIndex                              ⑩
DataCompression : None                                        ⑪
SizeCurrent     : 8.00 KB                                     ⑫
RowCount        : 1                                           ⑬
① The Windows name of the machine
② The SQL Server instance—MSSQLSERVER is a default instance.
③ The machine name returned from SQL
⑦ The index name; this will be empty if it’s a heap.
⑧ The partition number; if the index is partitioned, there will be a result per partition because they can be compressed separately.
⑩ The type of index: ClusteredIndex, NonClusteredIndex, or Heap
⑪ The current level of compression
⑫ The current size of the partition
⑬ The number of rows in the partition
When we plan to make changes to our current data compression levels, it’s a good starting point to take a look at the output of the Get-DbaDbCompression command and perhaps even export it so you can compare back against that initial state.
25.6 What should we compress?
We now understand what data compression is and the benefits of using it. We’ve also discovered the current state of our environment, so we know what is already compressed. It’s now time to think about what we could and what we should compress.
Data compression can be applied to most of the data stored in our databases. Entire tables, either stored as heaps or with a clustered index, can be compressed, as well as nonclustered indexes. If our tables are partitioned, we can even compress individual partitions—this means that we could use page compression on partitions that are accessed less frequently, while leaving more active partitions with either row or no compression. This allows us to balance costs against benefits to get the best performance we can.
There are some exceptions: we can’t compress memory-optimized tables or tables with sparse columns. Also, the maximum row size in SQL Server is 8060 bytes. If applying compression puts us over that limit (from the metadata associated with how to decompress the data again), we also can’t apply compression to that object.
So far we’ve talked only about what we could compress. How do we decide what we should compress and whether we should use row or page compression? We’ve already mentioned the CPU cost involved in decompressing the data for use. How do we balance the disk space and I/O savings we want to enjoy with the CPU cost to use that data?
25.7 What makes a good candidate for compression?
As you can probably already guess, this is a complicated subject, and we could easily write a book just about this one question. When we plan out our strategy for what we should compress, we should consider two main aspects: first, the structure and type of data we have, and second, how that data is used.
If we remember, row compression works well for fixed-length data types. Therefore, if we have a lot of these in our tables, it’ll be more effective than if we had only variable-length data types. Page compression works by removing duplicates from our data pages, so if we have a lot of repeating data values, we’re likely to see more benefits than if every field in every row had unique data in it.
Then we need to think about workload. If we don’t update our data often, but we do a lot of scans (meaning every page for that object has to be read from disk into memory), then page compression will be really effective. It makes sense: if we have to read every page, it sure is nice if there are a lot fewer of them because we’ve compressed all that data onto fewer pages.
If this seems complicated, and a lot of work, don’t panic—the SQL Server Tiger Team has written an amazing T-SQL script that takes all of these things into consideration. What’s even better is that dbatools is able to execute that code for us and suggest where we should apply compression that would see benefits that outweigh the costs.
25.8 dbatools, what should I compress?
So far we’ve learned enough about data compression to know it’s going to save us disk space and improve I/O performance. We now just need to realize those benefits without causing CPU contention on our SQL Servers. We also know that to do this, we need to really understand our data and workload to get this as close to right as possible. Luckily for us, dbatools has a Test-DbaDbCompression command, shown in the next listing, that does all that for us.
Listing 25.3 Evaluating the best compression to apply per object
By running the code in listing 25.3, dbatools will evaluate both the structure and workload of our database. A built-in stored procedure in SQL Server called sp_estimate _data_compression_savings looks at how well our data will compress and predicts the space savings we should expect from applying row or page compression. The Tiger Team script that dbatools uses combines the output of running this against every object, plus workload information from looking at index usage stats.
A sample result is shown in the following code sample. You can see the clustered index of the Customer table is recommended to be page compressed. By applying page compression, we’ll see an almost 18% savings in size, and due to the workload (high number of scans, low number of updates), the benefits of page compression will not be outweighed by the costs. You can see that the PercentScan is 100%, meaning that looking at the index usage of this table, all of the times it has been accessed have been to scan the table, making it a perfect candidate for page compression.
Listing 25.4 Example output of Test-DbaDbCompression
ComputerName                  : mssql1                    ①
InstanceName                  : MSSQLSERVER               ②
SqlInstance                   : mssql1                    ③
Database                      : AdventureWorks            ④
Schema                        : Sales                     ⑤
TableName                     : Customer                  ⑥
IndexName                     : PK_Customer_CustomerID    ⑦
Partition                     : 1                         ⑧
IndexID                       : 1                         ⑨
IndexType                     : CLUSTERED                 ⑩
PercentScan                   : 100                       ⑪
PercentUpdate                 : 0                         ⑫
RowEstimatePercentOriginal    : 82                        ⑬
PageEstimatePercentOriginal   : 68                        ⑭
CompressionTypeRecommendation : PAGE                      ⑮
SizeCurrent                   : 984.00 KB                 ⑯
SizeRequested                 : 808.00 KB                 ⑰
PercentCompression            : 17.89                     ⑱
① The Windows name of the machine
② The SQL Server instance; MSSQLSERVER is a default instance.
③ The machine name returned from SQL
⑦ The index name; this will be empty if it’s a heap.
⑧ The partition number; if the index is partitioned, there will be a result per partition because they can be compressed separately.
⑩ The type of index: CLUSTERED, NONCLUSTERED, or HEAP
⑪ The percentage of scan operations relative to the total operations on that object
⑫ The percentage of update operations relative to the total operations on that object
⑬ If using row compression, the estimated size of the object as a percentage of current size
⑭ If using page compression, the estimated size of the object as a percentage of current size
⑮ The recommended compression type to apply. This could be 'PAGE', 'ROW', 'NO_GAIN' or '?'.
⑯ The current size of the object
⑰ The estimated size of the object if the recommended compression is applied, in this case, page level
⑱ The percent in space savings from compressing this object to the recommended level
dbatools has done all of the heavy lifting now, working out how best to compress each object in your database. All you have to do is apply that compression. Let’s take a quick look at how we do that without dbatools, before tying this chapter all together and letting dbatools compress everything to the recommended level.
25.9 Compressing objects the old-fashioned way
Data compression is applied to objects by rewriting the data on the pages. To accomplish this, you have to rebuild the object. In the next listing, you can see this using the ALTER INDEX statement, with an option to set the DATA_COMPRESSION level.
Listing 25.5 Using T-SQL to apply page compression to a table
USE [AdventureWorks]
GO
ALTER INDEX [PK_Customer_CustomerID]
ON [Sales].[Customer]
REBUILD PARTITION = ALL
WITH (DATA_COMPRESSION = PAGE)
GO
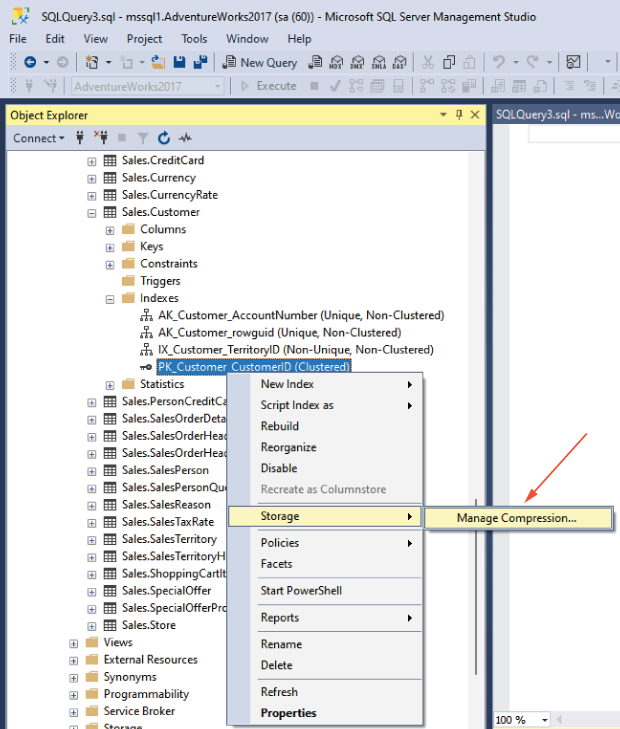
This can also be accomplished through the SQL Server Management Studio (SSMS) GUI by right-clicking on the index, choosing Storage, and then Manage Compression from the menu options, as shown in figure 25.2.
This will pop up an SSMS wizard that will walk you through setting the compression level for the index. In figure 25.3, you can see we have first selected Page compression as the type, and after we press the Calculate button, the wizard displays the estimated cost savings.

The Next button on this page allows you to either script out the ALTER INDEX statement, very similar to what we saw in listing 25.5, or kick off the rebuild from the GUI.
This is pretty straightforward compared to the work we’ve had to do to figure out which type of compression to use. We could now go through each index, working through this process of applying the recommended level of compression we got from Test-DbaDbCompression. Wouldn’t it be easier if we could just apply the results we got from dbatools in one go?
25.10 dbatools to the rescue!
As you hopefully know by now, dbatools is like a command-line SSMS that makes dealing in multiples a piece of cake. Applying data compression is no different. Using Set-DbaDbCompression, we can roll through our databases, applying data compression in one swoop. Why stop there? We could even apply compression to all databases on a SQL Server, or even all databases on multiple SQL Servers!
As we’ve learned by this point, it’s not been easy to determine the best compression to use per index, or even per partition across our database. Luckily for us, dbatools did the heavy lifting and determined the optimal compression level for each object.
By running the code in the following code snippet, dbatools will go through each object one by one, applying the recommended compression level based on the same Tiger Team algorithm discussed previously in the Test-DbaDbCompression command.
Listing 25.6 Applying compression to every object in the database
dbatools has to redo a lot of the work we’ve already done. If we’re going to run Test-DbaDbCompression to review the changes we’re about to make anyway and we save these results to a variable, the changes can then be passed into the Set command, and dbatools will skip the effort of recalculating the recommended compression levels. As shown in the next code listing, this is our preferred workflow when applying compression.
Listing 25.7 Passing the results from Test-DbaDbCompression to apply
PS> $splatTestCompression = @{
    SqlInstance = "mssql1"
    Database = "AdventureWorks"
}
PS> $compressObjects = Test-DbaDbCompression @splatTestCompression

PS> ## Review the results in $compressObjects
PS> $splatSetCompression = @{
    SqlInstance = "mssql1"
    InputObject = $compressObjects
}
PS> Set-DbaDbCompression @splatSetCompression
25.11 Specifying the compression level
So far we’ve been compressing objects in our databases based on the recommended compression levels using calculations from the Tiger Team script. You can also use dbatools if you want to apply a certain level of compression to the whole database or if you want to target specific tables. Being able to target the whole database is useful if you have no concerns with performance and want to get maximum space savings. We usually see this in nonproduction environments where performance is less of a concern.
On the other hand, if you are looking for more control, you can use the -Table parameter to apply compression only to specific tables. The Set-DbaDbCompression command has a -CompressionType parameter to control this behavior. The default value is Recommended, which will use the Tiger Team algorithm, but you can also pass in either Row or Page to apply the specified compression level to the whole database. The following listing shows us compressing the whole database using page compression and applying row compression to just the Employees table.
Listing 25.8 Applying page compression to all objects in the database
PS> $splatSetCompressionPage = @{
    SqlInstance = "mssql1"
    Database = "AdventureWorks"
    CompressionType = "PAGE"
}
PS> Set-DbaDbCompression @splatSetCompressionPage

PS> $splatSetCompressionRow = @{
    SqlInstance = "mssql1"
    Database = "AdventureWorks"
    Table = "Employee"
    CompressionType = "ROW"
}
PS> Set-DbaDbCompression @splatSetCompressionRow
25.12 Advanced settings
Applying data compression requires rebuilding indexes, so this can be a pretty intensive operation and can take a while if you have a large database to compress. Therefore, it’s best to apply compression during your maintenance windows to ensure no performance impacts are felt during the work. The Set-DbaDbCompression command has a couple of useful parameters to control this maintenance, so we can be sure we don’t cause any slowdowns for our users.
First, we can specify a -MaxRunTime, which allows us to specify a number of minutes for dbatools to work on compressing our indexes before it stops. This means that index rebuild commands will be kicked off, one after another, until we reach that maximum runtime setting. At that point, no more will be executed. It’s worth noting, however, that the currently running index rebuild will not be canceled when the time limit is reached. Therefore, it’s important to anticipate that we could run over the specified -MaxRunTime if a large index is kicked off just before the time runs out.
The second useful parameter to mention is -PercentCompression, which allows you more control over when the benefits of data compression outweigh the costs. The default is 0, meaning any space saving is worth having (as long as the algorithm hasn’t ruled it out based on workload!). You could increase this percentage to compress fewer objects.
In the next listing, we combine these two parameters, so we apply compression only if the estimated space savings is higher than 25%, and after 60 minutes, no more objects will be compressed.
Listing 25.9 Applying compression with some more advanced parameters
PS> Set-DbaDbCompression -SqlInstance mssql1 -Database AdventureWorks
➥ -MaxRunTime 60 -PercentCompression 25
As you can see, data compression is quite a tricky subject, but using dbatools can make this easier. Hopefully this chapter has provided enough detail around data compression to understand how beneficial it could be in your environment. The good news is that dbatools will do the heavy lifting for you, making you look like a superstar for saving space and increasing SQL Server performance.
25.13 Hands-on lab
-
Collect and store the current compression levels of your database using
Get-DbaDbCompression. -
Review the compression suggestions from
Test-DbaDbCompression. Remember, if your lab hasn’t had much activity, the workload information will be limited. -
Compress a single table with page compression using the
-Tableparameter ofSet-DbaDbCompression. -
Apply the recommended compression suggestion to your entire database with
Set-DbaDbCompression. -
Rerun
Get-DbaDbCompression, and compare your results to your earlier levels. Review your space savings and compression changes.