Chapter 12. Video
Encoding
Components
Full-Screen Video
Captions
Writing Your Own Player
What’s Next?
These days, you have to live under a rock not to repeatedly hear how prevalent Flash Platform video solutions are. Video playback is largely responsible for dramatic increases in Flash Player use over the past several years, and Flash Player is now the first choice for the world’s largest video delivery site, Google’s YouTube. Flash is estimated to drive more than 75 percent of all Internet video playback, in part because Flash Player is installed on more than 99 percent of computers in the world market, and in part because it’s among the most reliable and easy to use cross-platform video technologies.
At the time of this writing, Flash video has also been the subject of much debate as it faces challenges from emerging interest in the next phase of HTML development, HTML5. Although HTML5 is not expected to be ratified as an official standard for some time (many theorize that wide browser adoption may not happen until 2011 or 2012, but that ratification could happen as late as 2022), the allure of video playback without reliance on a browser plug-in is already attracting attention.
In this debate much has been made of replacing the proprietary Flash video format, FLV, with other open video formats. However, although support for video playback within HTML5 is improving, no video file format is currently part of the HTML5 specification. At present, which codec (the software algorithm used to compress and decompress video) to support is decided by the makers of software that renders HTML5, such as the developers of today’s web browsers. This potential incompatibility risks continuing some of the decidedly nonstandard ways of creating rich media that have plagued developers for years and, some believe, make the consistency of ActionScript development even more compelling.
Furthermore, in addition to the FLV format, Flash Player can play one of today’s most widely used video standards, H.264—the codec most commonly used in the MP4 video format popularized by personal video players. This flexibility makes the Flash Platform even more enticing as a playback technology independent of the available video format used.
In this chapter, we’ll leave the fortune telling and politics for another forum and focus instead on using ActionScript to play both FLV- and H.264-encoded videos. We’ll discuss:
Encoding. Encoding is the process of converting video assets to a format compatible with your delivery system, in this case Flash Player, and typically involves compressing the video to reduce its file size. The scope of this book doesn’t allow us to delve extensively into video encoding, but a little background will be enough to get you started.
Components. It’s easy to get going with Flash video by using the FLVPlayback component. Components combine user interface assets with ActionScript to create ready-to-use widgets for specific tasks. The FLVPlayback component contains everything you need for basic video playback.
Full-Screen Video. We’ll discuss the steps required to present your video in a true full-screen environment, where your video fills the screen entirely—rather than just filling a browser window.
Captions. Adding captions to your video becomes a basic task with another component and a basic XML file. The FLVPlaybackCaptioning component simplifies accessibility efforts by supporting external caption files that can be loaded at runtime. We’ll introduce the Timed Text caption file format and show you how to use it to easily add captions to videos controlled by the FLVPlayback component.
Writing Your Own Player. Although components are valuable tools, we also want to show you how to create simple video playback functionality strictly with code. Eliminating the use of components means you can make use of video content without any internal assets and reduce your SWF file size in the process.
Encoding
Note
The correct terminology is to say that the title element is nested within the head element. We’ll talk about nesting more in later chapters.
Before you can control video with ActionScript, you need to encode video source material into a format that’s compatible with Flash Player. Encoding is a big topic that entails finding a sometimes complex balance between quality, video dimensions, and file size. As we are focusing on ActionScript, any in-depth discussion of encoding subtleties is beyond the scope of this book, but we’ll show you how to create a video that’s compatible with Flash Player.
Three popular encoding applications are Adobe Media Encoder (AME), Wildform Flix Pro, and Sorenson Media Squeeze. In this text, we’ll focus on Media Encoder, as it is installed free with the purchase of Adobe Flash Platform tools. However, the commercial products from Wildform and Sorenson Media offer additional features, and the book’s companion website contains information about both products.
Note
For comprehensive discussions about encoding and all things Flash video, consult the excellent Video with Adobe Flash CS4 Professional Studio Techniques (Adobe Press), by Robert Reinhart.
Let’s start with the basics of Media Encoder. The application’s interface is quite simple, opening to little more than a field that holds a list of files for encoding and a single active Add button. Media Encoder supports batch encoding, allowing you to add several files to a queue for processing. You can add to the queue by dragging the source into the field or using the Add button to browse for your file.
Once you’ve added a file to the queue, you can immediately choose an output file format from the Format menu, one of many encoding presets from the Preset menu, and the location of the output file by clicking on the link in the Output File column. Figure 12-1 shows a detail of the initial interface, including a single file in the encoding queue.

Formats
Media Encoder supports encoding to a wide array of video file types for use with other applications as well as Flash Player. The two file types optimized for Flash Player are FLV and F4V. Supported by Flash Player for several years, FLV is a proprietary video format (also sometimes called a container or wrapper). Two codecs can be used within an FLV container, Spark and VP6, but we’ll focus on VP6-encoded FLVs in our discussions. F4V is the file format for H.264-encoded video in an MP4 container. This format is an adaptation of MPEG-4, based on Apple’s QuickTime container (see http://en.wikipedia.org/wiki/MPEG-4_Part_14 for more information), and was introduced with Flash Player 9 Update 3 (version 9,0,115,0) in December 2007.
Note
Although it’s possible to use the Spark codec to encode FLV files that are compatible from Flash Player 6 onward, the VP6 codec, introduced with Flash Player 8, is superior in nearly every way. Furthermore, as this is an ActionScript 3.0 text, we are focusing on Flash Player 9 and later, so we’ll assume that FLV files are encoded using the VP6 codec for these discussions.
The first consideration when choosing a video format is which Flash Player you wish to target. If you must target a Flash Player version prior to 9,0,115,0, you will need to use FLV. If you plan to publish for later Flash Player versions, you have the freedom to choose FLV or F4V.
Note
There are no statistics available for the installed user base of interim Flash Player releases but, as of June 2010, collective versions of Flash Player 9 have a 99.2 percent market penetration, and collective versions of Flash Player 10 have a 97.5 percent market penetration. (Both statistics apply to mature world markets, and you can find more information at http://www.adobe.com/products/player_census/flashplayer/version_penetration.html.) Therefore, it’s safe to say that Flash Player 9 Update 3, the first version capable of playing H.264-encoded video, has a market penetration higher than 97.5 percent.
Another deciding factor is whether or not you need cue points. Embedded within the video during encoding or assigned with ActionScript, cue points are markers that can trigger events when reached during playback. Although both video formats now support cue points, this again comes down to which version of Flash Player you want to target. Cue points have been supported in FLV files since Flash Player 8, but were added to F4V files in Flash Player 10.
Beyond the constraints of Flash Player compatibility, each file format has its strengths. FLV supports alpha channels for transparency in your video and performs better on weaker computers. The H.264 codec and MP4 container used when encoding F4V files are very widely implemented making it easier to reuse videos with non-Flash projects. This latter point is especially important if you work with a large library of existing MP4 video assets, as they most likely won’t need to be reencoded to be compatible with Flash Player.
Note
An H.264-encoded video need not have an .f4v extension to work in Flash Player. Extensions such as .mp4, .m4v, and .mov will work as long as the video is encoded correctly. It’s a good idea to test your videos for compatibility as early as you can because it’s possible to use the H.264 codec without encoding into a compatible MP4 container. This is particularly important when you haven’t encoded the video files yourself.
For maximum compatibility with Flash Professional CS3 through CS5 and support for all versions of Flash Player 9, we’ll work with FLV files in this chapter, but feel free experiment with whichever one you choose. You can make that decision in a moment, when we get to encoding presets. For now, after adding your source video to the interface, select FLV | F4V from the Format menu, as shown in Figure 12-2.

Note
Robert Reinhart has created a very useful bitrate calculator for compressing FLV files. You can enter concrete data like dimensions, audio sample rate, and whether you’re using stereo or mono sound, as well as qualifying information like how much motion is in the video, and it will give you a recommended bitrate to use when encoding. The calculator can be found at http://blogs.flashsupport.com/robert/?p=138.
Presets
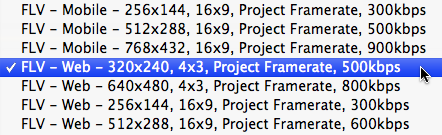
The next step is to pick an encoding preset. There are almost 50 presets that apply to FLV or F4V files, configured to suit multiple quality settings, resolutions, frame dimensions, and even playback mediums (web or mobile, for example). Figure 12-3 shows a detail of the Preset menu, and selecting a preset that will encode the video to dimensions of 320 × 240, maintain a 4 × 3 aspect ratio, use the source material’s frame rate, and compress to a data bitrate (the recommended minimum amount of data used when encoding the video) of 500 kilobits per second. This is a pretty good starting point for your first encoding test. It’s also a good idea to compare your results with output encoded with other presets if you require a smaller file size or better quality.
Customizing Settings
If you’re not content with a preset, or if you have additional needs (such as resizing the source), you can click on the Settings button to customize the settings. (You can even save your customizations as a preset of your own.) Figure 12-4 shows the Settings interface. The upper left quadrant allows you to see various sizes of the source material, as well as crop the source prior to encoding. The bottom left quadrant allows you to create cue points that will be embedded in the video during encoding. Between those areas is the video timeline, which you can use to preview the video and set in and out points if you wish to compress only a portion of the video.
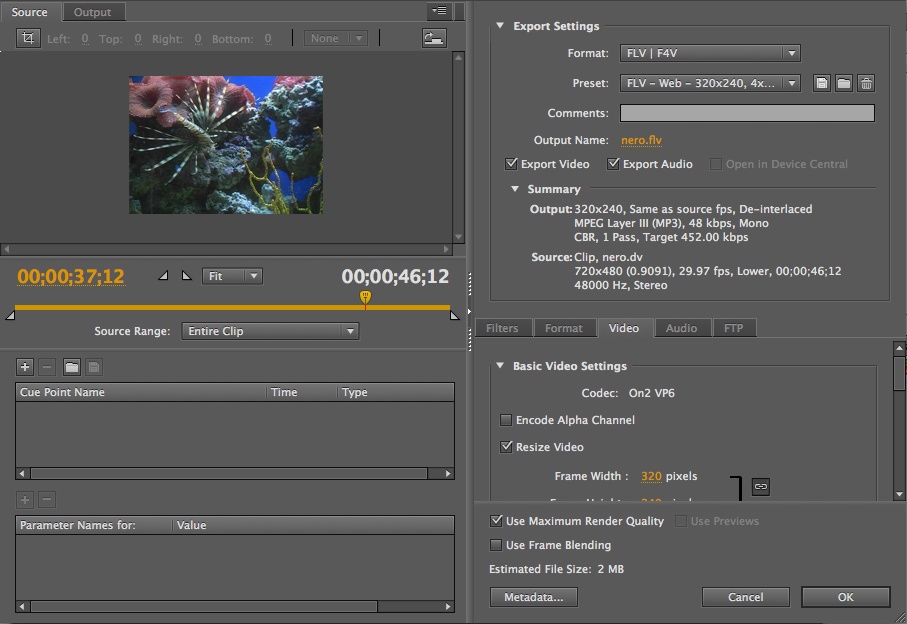
The upper right quadrant is a general settings area that allows you to choose the file format, encoding preset, and output directory, as well as show a summary of the settings applied by the chosen preset. The lower right quadrant contains more specific settings including video and audio encoding options, and the ability to apply a blur during encoding.
For more information about Adobe Media Encoder, see the Using Adobe Media Encoder CS5 resource at http://help.adobe.com/en_US/mediaencoder/cs/using/index.html. Information about embedding cue points during encoding can be found in the “Encoding and exporting” section of this resource. The companion website has additional information about creating cue points—both during encoding and at runtime through ActionScript when using the FLVPlayback component.
Starting the Queue
Once a preset is selected, all you need to do is press the Start Queue button. Adobe Media Encoder will encode the file and save it in the location specified in the Output File column. (The default location for the output is the same directory in which the source file resides.)
Note
By default, Adobe Media Encoder will start processing the assets in the encoding queue after two minutes of idle time. This behavior can be adjusted in the application preferences.
Components
Components offer designers and coders alike a chance to speed up the development process by using precreated widgets. Components usually combine ActionScript and assets to make it easier to achieve a specific goal. Components can be dropped onto the stage like a movie clip or button symbol and often function with little or no intervention. When effort is required, most components can be configured using the Flash Professional CS5 Properties panel or Flash Professional CS3 or CS4 Components Inspector panel.
Most components can also be manipulated with ActionScript, which is what we’ll focus on in this section. Before working with any component, however, Flash Professional users must place the component in the library of the FLA file that will compile to SWF. Simply drag any component from the Components panel to the Library panel, or drag it to the stage and delete it immediately. In this chapter, we’ll work with three different components. First, we’ll add the FLVPlayback component as a prefabricated video player. Next, we’ll add captioning support to the player with the FLVPlaybackCaptioning component. Finally, we’ll add a Button component to satisfy a simple user interface need.
Working with the FLVPlayback Component
The fastest way to add video to your ActionScript application is by using the FLVPlayback component (Figure 12-5). The component is available in two flavors. FLVPlayback is available to Flash Professional users of version CS3 and later, and FLVPlayback 2.5 was introduced with version Flash Professional CS4 and is also available for Flex.
In addition to Flex compatibility, FLVPlayback 2.5 was designed to take advantage of features introduced in version 3.5 of Flash Media Interactive Server—Adobe’s streaming media and real-time communication server software. It improves performance for video on demand and live streaming and supports live DVR functionality (pausing, rewinding, and recording live streams) introduced in FMS 3.5.
Note
You may notice in further research that Flash Media Interactive Server is typically abbreviated as FMS. This is because “interactive” was added to the product’s name only in recent versions.
If you prefer to avoid components—perhaps because you want to design your own player interface, or because components increase the size of your SWF (the FLVPlayback component contributes between 50k and 65k)—we’ll show you how to play video entirely with ActionScript shortly. If you’re open to the use of components, however, FLVPlayback has a few useful benefits.
First, you can pick from several preconfigured controllers, or skins, or you can use the component without a skin and create your own custom controller. This lets the component handle all the heavy lifting in the video display area, but allows you to control playback with your own code and your own design. (We’ll show you a very simple implementation of this approach later in the chapter.)
More importantly, the code in the FLVPlayback component takes care of some important behind-the-scenes tasks that you would have to recreate. For example, the component will automatically determine if you’re using a streaming server by parsing the URL of the video source. If so, it will then handle the necessary initial communication with the streaming server for you so you don’t have to script those connections yourself.
We advise starting out with the FLVPlayback component, even if you choose to create your own controller. Then you can move on to coding your own player to replace the component after you’re comfortable with the relevant classes.
Scripting the component
The following example, found in the video_comp.fla source file, demonstrates the minimum code necessary to play a video.
1import fl.video.FLVPlayback; 2 3varvid:FLVPlayback=new FLVPlayback(); 4 vid.source="nero.flv"; 5addChild(vid);
Note in line 1 that the FLVPlayback class must be imported even in the timeline because it’s not part of the flash package. (Most component classes are found in the fl package and are not automatically part of the Flash Player to keep the player size small.) Line 3 types the instance variable and instantiates the component. Line 4 populates the source property (telling the component which video to play), and line 5 adds the instance to the display list.
Note
If you test the video_comp.fla file, you may wonder how it can play without any instruction to do so. The component has an autoplay property that’s set to true by default.
Skinning the component
To add controls simply, we can use a skin that ships with the component. FLVPlayback skins are external SWFs that are loaded at runtime. Therefore, to add a skin with ActionScript, you must know the path to the skin.
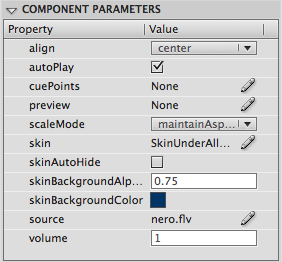
Fortunately, Flash Professional users can take advantage of the fact that Flash will move your chosen skin to the same directory as your SWF when you test your file. To choose a skin, save your FLA, or create a new temporary file and save that, to the directory you’re using for your project. Temporarily drag the component from your file’s library to the stage and select it. Flash Professional CS5 users can then look in the Component Parameters section of the Properties panel (shown in Figure 12-6) to customize the component. Flash Professional CS3 and CS4 users will need to open the Component Inspector panel to see the same content.
Note
Users of Flex Framework authoring tools can download the component, skins, sample files, component source, and several additional related tools at http://www.adobe.com/products/flashmediaserver/tool_downloads/.
Next, click on the UI element next to the skin option. (In Flash Professional CS5 there’s a pencil button, while other versions show a magnifying glass button after clicking on the field.) This will open a dialog box that allows you to preview all the available skins, collected into groups that display the controller under your video or over your video. Flash Professional CS5 users will also see an additional grouping of new skins called Minima. You can choose which functionality to include in your controller by looking at the name of the skin and previewing its appearance when displayed in the dialog box.
For the following exercise, found in the video_comp_skin.fla source file, choose the SkinUnderAllNoFullNoCaption skin and test your movie. Don’t worry about the fact that it won’t work. After all, you didn’t select a video source. All that matters is that Flash copies the skin to the same directory in which you published your SWF. You should see SkinUnderAllNoFullNoCaption.swf in that directory. (If not, be sure you save the FLA you were using for this task and retest.) Once you have your skin in place, you can remove the FLVPlayback component from the stage, or discard any temporary file you created.
Once the skin is in place, all that remains is to add one or more of the following three lines to your existing script. Line 6 specifies your skin choice, and the optional lines 7 and 8 specify the color and alpha of the skin. Now, when you test your movie, you’ll see a skin that you can use to control video playback.
6 vid.skin="SkinUnderAllNoFullNoCaption.swf"; 7 vid.skinBackgroundColor= 0x003366; 8 vid.skinBackgroundAlpha= 0.75;
If you don’t want to store the skin file in the same directory as your main SWF (for example, if you want to store multiple skins in a directory), you can specify another path for the skin property. Also, remember that the skin you see is an external SWF that’s loaded at runtime. Therefore, just like the video file, the skin must be deployed with your main SWF and HTML files.
Full-Screen Video
One of the most entertaining Flash video features is true full-screen video—video that occupies the entire screen, rather than a maximized browser or player window, hiding other computer operating system interface elements for a fully immersive experience. Both the FLVPlayback component and pure ActionScript can launch into full-screen mode, both of which we’ll cover. Before we get to implementation, however, we need to cover two preliminary steps.
The first step is to start with optimal source material for final assets. This includes the highest quality source, the largest size your interface will allow, and careful attention during encoding. Beyond those common sense suggestions, you’ll probably want to experiment with such encoding options as different bitrates and deinterlacing your content if you’re using a DV source. Deinterlacing is the process of converting the two fields of a DV source (which are like video frames but each contain half the horizontal lines and are displayed twice as fast) into the frames used by the FLV format. One common artifact that is more pronounced when working with interlaced source material is jagged lines visible along sharp edges in your videos. Deinterlacing the source during encoding significantly reduces this effect.
The second step is to instruct Flash Player to allow the switch to full-screen display. If you think about it for a moment, you certainly don’t want the decision to switch to full-screen mode left in the hands of content creators. If that were the case, every Flash advertisement would take over your screen, leaving you no control. Instead, the developer must make the feature possible, and the user must be responsible for switching back and forth between normal and full-screen modes.
To enable the feature, you must add the allowFullScreen parameter, with a value of true, to the file’s host HTML file. One way to do this is to add this parameter manually to the object and embed tags, as seen in the following excerpt.
<object>
    ...
    <param name="allowFullScreen" value="true" />
    <embed ... allowfullscreen="true" />
</object>
Flash Professional users can also use the quick and easy solution (particularly handy during testing) of choosing the “Flash Only − Allow Full Screen” publishing template in the Publish Settings dialog (File✓Publish Settings✓HTML✓Template).
After adding support for full-screen video in your HTML host file, you’re ready to enable the full-screen button in the FLVPlayback component. To do so, choose any skin that supports full screen, such as SkinUnderAll or SkinOverPlayFullscreen, to cite two examples. These and other skins add the Full Screen button shown in Figure 12-7.

The following change to line 6 of the previous example, found in the video_comp_skin_full.fla source file, changes the skin to one that supports full screen mode.
6 vid.skin="SkinUnderAllNoCaption.swf";
Once you have a video and have supported full screen mode in your host HTML file and skin, you can test your file in a browser. Full screen mode will not work when testing within Flash Professional, so Flash users can select the default Publish Preview command, File✓Publish Preview✓HTML. Pressing the Full Screen button in the skin will switch to full-screen mode, and you can press the Escape key to return to normal mode. Later in this chapter, we’ll show you how to add full-screen playback using your own ActionScript.
Note
If HTML is not available for Flash Professional users, go to the File✓Publish Settings menu dialog and add HTML as a publishable format.
Captions
Captions, also referred to in some contexts as subtitles, consist of text that is displayed synchronously during video playback. Captions are useful for providing alternate language tracks to bring your video to a wider audience. Captions are also appreciated by the deaf and hearing impaired, as they provide a much needed accessible alternative for audio tracks when it comes to dialog and descriptive audio services.
Captions help satisfy requirements imposed by the United States Rehabilitation Act of 1973, Section 508, which establishes accessibility mandates for content developed for government use, or financed by federal funds. Many private entities, particularly those serving the educational markets, also require accessible content. As the demand for this requirement increases, captions will play an increasingly more important role in digital video.
Using the FLVPlaybackCaptioning Component
Flash supports captioning via the FLVPlaybackCaptioning component, when used in conjunction with the FLVPlayback component. Adding the FLVPlaybackCaptioning component to the stage at authoring time, or dynamically at runtime with ActionScript, opens the door for caption use.
The simplest way to display captions is to use the FLVPlayback component. In fact, with only one FLVPlayback instance on the stage the captioning component will automatically detect the playback component, and use its internal text element for caption display. You can also manually specify any FLVPlayback component as the target for the captions (in case you require more than one at any given time), or even your own target for the captions (in the event that you want to use another text element—perhaps integrated into your interface, rather than the video).
To use the FLVPlayback, you’ll need to choose any skin that supports captions, such as SkinUnderAll or SkinOverPlayCaption, among others. These skins feature the Captions button shown in Figure 12-8.

The following edit to line 6 of the previous example, found in the video_comp_skin_full_captions.fla source file, uses a skin that supports all skinned features, including captions.
6 vid.skin="SkinUnderAll.swf";
Once the FLVPlayback component is configured to display captions, we must add the FLVPlaybackCaptioning component to the stage.
Note
As with the FLVPlayback component, Flash Professional users must have the component in the library of their FLA to instantiate it with ActionScript. See the Working with the FLVPlayback Component section of this chapter for more information.
The following code continues the example first by importing the component class in line 10, and instantiating the component in line 11. Line 12 assigns the caption file for loading at runtime (which we’ll discuss in a moment), and line 13 adds the component to the display list.
10import fl.video.FLVPlaybackCaptioning; 11varcap:FLVPlaybackCaptioning=new FLVPlaybackCaptioning(); 12 cap.source="nero_timed_text.xml"; 13addChild(cap);
Note that we’re not placing the component at a particular location on the stage. Although it appears as a small rectangle when dragged to the stage in authoring mode, this is merely to simplify selecting the component. At runtime, it will be invisible, so its position is irrelevant.
Now both components are ready to display captions, so we need to create the caption file. You can create a captioned video in two ways. You can embed the caption data in the video using cue points. Embedding means they’ll always be with the video, but it also means that you have to reencode the video just to edit the text. A far more flexible option is to load a caption file at runtime. This approach also allows you to switch caption files dynamically—ideal for offering subtitles in multiple languages, a task we’ll look at later in the chapter. First, however, we need to know how to format the captions.
Creating Captions with Timed Text
To create a caption file to load at runtime, you need to write an XML (Extensible Markup Langauge, discussed in Chapter 14) file using the World Wide Web Consortium (W3C) Timed Text Markup Language (TTML or, familiarly, TT)—also sometimes referred to by its format name, Distribution Format Exchange Profile (DFXP). We’ll cover a portion of Timed Text features here, but you can learn more about the language by visiting the W3C page at http://www.w3.org/AudioVideo/TT/. More importantly, you can learn about the subset of features supported by the FLVPlaybackCaptioning component from Adobe’s ActionScript 3.0 Language and Components Reference at http://www.adobe.com/livedocs/flash/9.0/ActionScriptLangRefV3/TimedTextTags.html.
Several tools can create Timed Text files, including the pair listed in the adjacent note. However, you can also write your own Timed Text files. The example XML that follows is an edited excerpt of the nero_timed_text.xml source file provided in this chapter’s source archive. (For brevity, two captions are shown and minor edits have been made to use all features from the source file.)
Note
MAGpie is a free captioning tool developed by accessibility leaders at the National Center for Accessible Media (NCAM). For more information, see http://ncam.wgbh.org/invent_build/web_multimedia/tools-guidelines/magpie. You can find the Manitu Group’s Captionate at http://www.captionate.com, and Adobe’s Flash Developer Center features a tutorial on using Captionate with the FLVPlayback and FLVPlaybackCaptioning components (http://www.adobe.com/devnet/flash/articles/video_captionate.html).
1    <?xml version="1.0" encoding="UTF-8"?>
2    <tt xmlns="http://www.w3.org/2006/04/ttaf1"
3      xmlns:tts="http://www.w3.org/2006/04/ttaf1#styling">
4      <head>
5        <styling>
6          <style id="1"
7             tts:textAlign="center"
8             tts:fontFamily="_sans"
9             tts:fontSize="18"
10             tts:fontWeight="bold"
11             tts:color="#FFFF00FF" />
12          <style id="2" tts:backgroundColor="#00000000" />
13          <style id="3" tts:backgroundColor="#000000FF" />
14          <style id="trans" style="1 2" />
15          <style id="opaq" style="1 3" />
16        </styling>
17     </head>
18     <body>
19        <div>
20           <p begin="00:00:05.00" dur="00:00:04.00" style="opaq">
21           Nero is a Lionfish<br /> (<span tts:fontStyle="italic">
22           Pterois volitans</span>),
23         </p>
24         <p begin="00:00:09.00" dur="00:00:02.00" style="trans">
25            in his reef aquarium.
26          </p>
27        </div>
28      </body>
29    </tt>
We’ll discuss custom XML solutions in Chapter 14, but Timed Text is a predefined format so conforming to its specification is pretty straightforward. We’ll occasionally point out things that we’ll cover in greater detail in Chapter 14, but you should feel comfortable simply editing an existing Timed Text file until you gain a little experience with XML.
Lines 1 through 3 include two default tags used to validate the file. The first tag (also called a node) is <?xml... ?> and is the XML declaration tag. We’ll discuss this in Chapter 14 but, essentially, it declares the version of XML in use and the character encoding used when writing the document.
Note
Character encoding just maps text characters to specific codes (usually numeric), so that software responsible for parsing the text know which character to use based on a given code. It’s a way of bringing platform, hardware, and software neutrality to the process of rendering text. We recommend using UTF-8, which includes a wide range of characters, such as those used in different languages around the world.
For more information about character encoding, see http://en.wikipedia.org/wiki/Character_encoding. For more information about UTF-8, see http://en.wikipedia.org/wiki/UTF-8.
The second tag, <tt>, is the document’s root node. All XML documents must have a root node that encloses all other nodes, and we’ll discuss this further in Chapter 14, as well. Be sure to see the accompanying note describing the use of attributes in this tag.
Note
The ActionScript 3.0 Language and Components Reference entry “Timed Text Tags”, found at http://www.adobe.com/livedocs/flash/9.0/ActionScriptLangRefV3/TimedTextTags.html, specifies that all attributes of the <tt> tag are ignored. However, this is not the case if you style your captions. If you omit the xmlns attribute, your captions will not be styled, and if you omit the xmlns:tts attribute, the use of the tts namespace in styles will result in errors. When using styles, consider both of these attributes required.
A <head> tag (spanning lines 4 through 17) is optional, but we recommend its use because it makes styling your captions much easier. Within it, a <styling> tag (spanning lines 5 through 16) is also optional but necessary if you intend to create styles. Styles are Cascading Style Sheet (CSS) entities for the Timed Text document and are itemized in lines 6 through 15. You can have as many styles as you like, but each must have a unique id attribute. The style attributes that are actually responsible for the formatting are very similar to CSS properties, but are preceded by the tts: prefix.
Note
Be sure to consult the “Timed Text Tags” ActionScript 3.0 Language and Components Reference resource, mentioned earlier in this section, for a complete list of supported and unsupported properties. Here are a few noteworthy mentions:
fontFamily supports device fonts, as seen in our example.
fontSize supports only the first size found; supports absolute and relative sizes but not percentages.
lineHeight, padding, and overflow, although potentially useful for captions, are among several options that are not supported.
It’s possible to assign multiple styles directly by their alphanumeric id, but it’s also possible to manage formatting efficiently by creating new styles consisting of other styles. Take a look at the styles in our example. We wanted to achieve two looks for our captions: one with a black background, for use over light areas of video, and one with a transparent background, to allow more of the video to show through the text.
Style 1 consists of all styling attributes common to both treatments, which means that the background alpha information appears in other styles. Styles 2 and 3 itemize only the background color and specify transparent and opaque, respectively. The Timed Text format uses #RRGGBBAA color notation, where AA is alpha. However, the ActionScript components support only opaque and transparent settings. All zeros will be seen as transparent, but any value other than zero will be opaque. We’ve used the opposite of zero for alpha, FF, to remind us that this is opaque. The resulting value of #000000FF is, therefore, an opaque black background.
Note
If you’ve spent some time with Chapter 9 in this book, you may recall that the color notation that included alpha was specified as 0xAARRGGBB. The difference between this BitmapData color notation, and the #RRGGBBAA used with Timed Text, can lead to confusion. If you see an unpredictable color behind your caption text, check to see if you’ve used the wrong format.
Once you’ve created these individual styles, you can then apply more than one style at a time. It’s possible to do so at the caption level by using syntax like id="1 2", but it’s also possible to create a new style the same way. For example, you can create a new style combining styles 1 and 2 and, because the style names can be alphanumeric, you can give it a descriptive name. We’ve done this in lines 14 and 15, specifying that trans is centered, sans-serif, 18-point, bold, yellow text on a transparent (because it uses styles 1 and 2), and opaq shares the same font attributes but is atop an opaque background because it uses styles 1 and 3.
A <body> tag (lines 18 through 28) is required and is used to hold all the caption data. Within the body tag, one <div> tag (lines 19 through 27) is required, and paragraph tags <p> are required for each line of caption (lines 20 through 26).
The ActionScript documentation doesn’t say that <div> is required but neither <p> nor <span> tags can appear in the <body> tag. Similarly, the documentation says zero or more paragraph tags are supported, but we didn’t find a logical way of applying time or style attributes to individual captions without them. For example, <span> tags (lines 21 and 22) are supported, but not in the <body> or <div> tags. Therefore, we suggest you consider <div> and <p> tags required.
For each caption (in our case, in each <p> tag), a begin attribute is required to set the time of the caption. The attributes dur (duration) and end (the time at which the caption should end) are optional. If omitted, the caption will remain onscreen until the next caption appears. Time can be specified in full clock format (HH:MM:SS.m, where m is milliseconds), partial clock format (MM:SS.m or SS.m), or offset time (with units, such as “1s” for one second). Frames are not supported as a measure of time.
Note
In our main Timed Text example, we used full clock format for clarity and consistency, even when the duration matched the time at which the next caption appeared. However, you can simplify this by using partial clock format, and omitting any duration or end attributes when the caption is to remain on screen until replaced. As an illustration, we have formatted our Spanish-language example this way, which we’ll discuss shortly.
Now that you know how to create a Timed Text file, you can run the previous source file, video_comp_skin_full_captions.fla, (discussed in the Captions section of this chapter) which makes use of the nero_timed_text.xml caption source file.
Providing Captions in Multiple Languages
Feature-rich DVD titles frequently have multiple caption programs available, each in a different language. This broadens the reach of the title across cultures and supports a wider audience with accessibility needs. It’s possible to achieve the same thing using the FLVPlaybackCaptioning component.
All you need to do is prepare multiple Timed Text files, one for each language, and switch among them when needed. Off the shelf, however, the FLVPlaybackCaptioning component does a couple of things that make this an odd experience.
First, if you change the caption content between times specified in a Timed Text document, the component will overwrite the caption field only if the current caption is empty or contains only white space (tab, return, or space). If that’s not the case (such as when switching captions from one language to another at any moment), it adds the new text to the existing caption. Only when the next Timed Text caption time comes along will the field contents be replaced correctly. Second, the method it uses to determine whether or not the Timed Text file has already been loaded results in no immediate change. Therefore, you must wait for the next caption to come along to see a language update.
Fortunately, there’s an easy workaround. All you have to do is turn off caption display before making the caption source switch, and then turn the display back on again. The example file, video_comp_skin_full_captions_multilingual.fla, demonstrates this using the Button component to toggle the caption source files.
Note
As with the FLVPlayback and FLVPlaybackCaptioning components, you must have this component, found in the User Interface category of the Components panel, in your library.
15import fl.controls.Button; 16varcapsLangBtn:Button=new Button(); 17 capsLangBtn.label="English/Spanish"; 18 capsLangBtn.x= vid.x+ vid.width+ 20; 19 capsLangBtn.y= vid.y+ vid.height; 20addChild(capsLangBtn); 21 capsLangBtn.addEventListener(MouseEvent.CLICK, switchTTCaps, 22false, 0,true); 23 24functionswitchTTCaps(evt:MouseEvent):void{ 25 cap.showCaptions=false; 26if(cap.source=="nero_timed_text.xml") { 27 cap.source="nero_timed_text_sp.xml"; 28 }else{ 29 cap.source="nero_timed_text.xml"; 30 } 31 cap.showCaptions=true; 32 }
Line 15 imports the Button class so we can instantiate the Button in line 16. Lines 17 through 20 set the buttons label, position it next to the lower-right corner of the FLVPlayback component, and add it to the display list. Lines 21 and 22 add an event listener to call the switchTTCaps() function upon each mouse click event. Finally, the switchTTCaps() function (lines 24 through 32) turns off caption display, checks to see which caption source is in use and switches to the other file, and then turns caption display back on again.
Writing Your Own Player
Wrapping up the chapter, we want to introduce you to some of the ActionScript required to create a customized player. We’ll start with coding your own controls for the FLVPlayback component, to give you freedom to design your own controller bar. Then we’ll show you how to write your own player to eliminate reliance on the FLVPlayback component altogether.
In both cases, we’ll create play, pause, and stop buttons using the RoundRectButton class discussed in Chapter 8. While not a fully functional controller, this will give you the foundation necessary to set properties and call methods in the FLVPlayback and NetStream classes. You can then decide which features you want to implement in your custom controllers.
Scripting Buttons to Control the FLVPlayback Component
This exercise, found in the video_comp_custom_buttons.fla source file, builds on the first example in the chapter. That example showed that you can use the FLVPlayback component without having to use a skin. This exercise will add custom buttons to the file to control video playback.
Lines 1 and 2 import the FLVPlayback and RoundRectButton classes. Lines 4 through 7 initialize the FLVPlayback component, as previously discussed. In this exercise, however, we’ve added line 6 to set the autoPlay property to false. This will prevent the video from playing automatically and let the user choose when to play it.
Lines 9 through 24 create three buttons using the RoundRectButton class. The class was introduced in Chapter 8, and we’ve used this technique in several chapters. Briefly, a function is used to create an instance of the class, as well as position the button and assign a function to the event listener. This approach is designed to minimize the number of lines required to create the buttons, and it can be customized to fit your needs. We’ll discuss the functions that control the video after the code.
1import fl.video.FLVPlayback; 2importcom.learningactionscript3.ui.RoundRectButton; 3 4varvid:FLVPlayback=new FLVPlayback(); 5 vid.source="nero.flv"; 6 vid.autoPlay=false; 7addChild(vid); 8 9 createButton(50,"Play", playVideo); 10 createButton(130,"Pause", pauseVideo); 11 createButton(210,"Stop", stopVideo); 12 createButton(240,"Full Screen", fullScreenVideo); 13 14functioncreateButton(xLoc:Number, labl:String, 15 func:Function):void{ 16varbtn:RoundRectButton = 17newRoundRectButton(60, 20, 10, 2, 0x000099, 18 labl, 0xFFFFFF); 19 btn.x= xLoc; 20 btn.y= 240; 21 btn.addEventListener(MouseEvent.CLICK, func, 22false, 0,true); 23addChild(btn); 24 } 25 26functionplayVideo(evt:MouseEvent):void{ 27 vid.play(); 28 } 29 30functionpauseVideo(evt:MouseEvent):void{ 31 vid.pause(); 32 } 33 34functionstopVideo(evt:MouseEvent):void{ 35 vid.stop(); 36 vid.seek(0); 37 } 38 39functionfullScreenVideo(evt:MouseEvent):void{ 40stage.displayState=StageDisplayState.FULL_SCREEN; 41 }
Lines 26 through 41 contain the functions used to control the video. The functions and methods used are self-explanatory, with two exceptions. First, in addition to stopping the video in the stopVideo() function, we also use the seek() method to seek through the video to a specific point in time. Seeking to 0 returns the video to its starting point. This is a user-experience consideration that differentiates the functionality of the pause and stop buttons. Second, to switch to full screen, you set the displayState property of the stage to StageDisplayState.FULL_SCREEN.
By default, changing the stage’s display state to full screen mode when an FLVPlayback component is in use mimics the behavior of the component. The video will fill the screen and show only the video regardless of any other user interface elements. In this case, however, we’re not using a skin that’s designed to show the controller on top of the video. As a result, the control buttons disappear. To show the control buttons, you can prevent the video from taking over the stage after resizing by setting the fullScreenTakeOver property of the FVLPlayback instance to false.
One side effect of this is that you can then see the Full Screen button and it won’t do anything because the display state will already be in full screen mode. So, you can write a simple if statement that will toggle between the display states as needed. The script below replaces the fullScreenVideo() function in the previous example and appears in the video_comp_custom_buttons_full.fla source file.
39 vid.fullScreenTakeOver=false; 40functionfullScreenVideo(evt:MouseEvent):void{ 41if(stage.displayState==StageDisplayState.NORMAL) { 42stage.displayState=StageDisplayState.FULL_SCREEN; 43 }else{ 44stage.displayState=StageDisplayState.NORMAL; 45 } 46 }
Finally, you can even control how much of the stage is visible in full screen mode by setting the stage’s fullScreenSourceRect property to a rectangular area. The following line is included in the video_comp_custom_buttons_full.fla source file, and specifies a rectangle that encloses the video and buttons.
stage.fullScreenSourceRect=new Rectangle(0, 0, 320, 270);
This line is initially commented out in the source file, so you publish to HTML multiple times and comment this line in and out to see its effect.
A Code-Only Solution
Up to this point, we’ve relied on components for video display. Creating your own player exclusively with ActionScript can reduce file size and allow you to customize functionality. In this exercise, you’ll write a class called BasicVideo to create a simple video player that does not use the FLVPlayback component. As a result, the generated SWF file is less than 4K.
If you want to preview this exercise before going over the code, it uses a document class called BasicVideo_UI in the main directory of the chapter source archive. Flash Professional users can open the code_only_player.fla source file, which already makes use of this class. BasicVideo is in the com.learningactionscript3.video package. We’ll discuss BasicVideo first, and then talk about the document class that creates the user interface.
The main video class
Line 1 declares the package, and lines 3 through 9 import the required classes. Line 11 declares the class and extends MovieClip so we can use its accessible properties, methods, and events of that class. Lines 13 through 17 declare private class properties—available throughout the class.
1packagecom.learningactionscript3.video { 2 3import flash.display.MovieClip; 4import flash.events.AsyncErrorEvent; 5import flash.events.MouseEvent; 6import flash.events.NetStatusEvent; 7import flash.net.NetConnection; 8import flash.net.NetStream; 9import flash.media.Video; 10 11public classBasicVideoextends MovieClip{ 12 13private var_conn:NetConnection; 14private var_stream:NetStream; 15private var_vid:Video; 16private var_vidPlaying:Boolean; 17private var_source:String;
Lines 19 through 36 contain the class constructor. It accepts one string parameter for the video path to allow you to select a video when instantiating the class. Later, we’ll add a getter and setter to let you to do this by setting a property instead.
Lines 22 through 24 use the two main classes required to play videos with ActionScript. Line 22 creates an instance of the NetConnection class, which establishes a bi-directional connection between the user’s player and a server delivering data, such as a video streaming server. It’s a bit like the cable running between your house and the cable television company. You connect to the server using the connect() method in line 23. In this example, however, we’re not using a server, so we’ll pass null into this method. In this case, the class is designed to connect to a local file.
Line 24 creates an instance of the NetStream class and is associated with the NetConnection instance by passing the latter into the former’s constructor. A NetStream instance is a channel of a NetConnection instance, a little like a single cable channel, and transmits data in one direction. For example, a server can send data and a client can receive data.
Line 26 creates an instance of the Video class, which is the display object used to show the video. This is a bit like a television set. The NetStream instance is then attached to the video in line 27, a little like picking the cable channel you want to watch. Line 28 adds the video instance to the main class instance so it can become part of the display list.
Lines 30 through 33 create a custom object that will serve as a data client for the class. Select data will automatically be sent out when playing the video and if this object (or a similar object like a custom class created for the same purpose) does not exist, errors will occur. For example, any metadata that exists in the video, either by default or that was added during encoding, will be sent soon after the video begins loading. Similarly, any cue points that were embedded in the video will be sent when encountered. Lines 31 and 32 assign the onMetaData() and onCuePoint() methods to their corresponding properties so Flash Player knows where to send the appropriate information. This association is formalized when the object is assigned to the client property of the NetStream instance in line 33. Finally, event listeners are added to the class in line 35, which we will talk about after the code block.
18//constructor19public functionBasicVideo(path:String="") { 20 _source = path; 21 22 _conn =new NetConnection(); 23 _conn.connect(null); 24 _stream =new NetStream(_conn); 25 26 _vid =new Video(); 27 _vid.attachNetStream(_stream); 28addChild(_vid); 29 30var_infoClient:Object=new Object(); 31 _infoClient.onMetaData= this.onMetaData; 32 _infoClient.onCuePoint= this.onCuePoint; 33 _stream.client= _infoClient; 34 35 addEventListeners(); 36 }
Lines 38 through 47 add two event listeners each to the NetConnection and NetStream instances. The NET_STATUS event is dispatched when status updates become available from either instance. Similarly, the ASYNC_ERROR event is dispatched when an asynchronous error occurs in either instance. An asynchronous error is an error that’s not dependent on a specific (synchronized) order of execution. That is, it need not be the sequential result of another task performed by the class. This event is typically dispatched when a server calls a method that’s not defined in the client.
When either event is received, the methods in lines 49 through 60 are called. Both trace information so you can see what’s going on, but onNetStatus() also toggles the value of the _vidPlaying property. When a status update indicates that the video has started, the _vidPlaying property is set to true. When the status indicates that the video has stopped it sets the property to false.
37//event listeners38private functionaddEventListeners():void{ 39_conn.addEventListener(NetStatusEvent.NET_STATUS, 40 onNetStatus,false,0,true); 41 _conn.addEventListener(AsyncErrorEvent.ASYNC_ERROR, 42 onAsyncError,false,0,true); 43 _stream.addEventListener(NetStatusEvent.NET_STATUS, 44 onNetStatus,false,0,true); 45 _stream.addEventListener(AsyncErrorEvent.ASYNC_ERROR, 46 onAsyncError,false,0,true); 47 } 48 49private functiononAsyncError(evt:AsyncErrorEvent):void{ 50trace(evt.text); 51 } 52 53private functiononNetStatus(evt:NetStatusEvent):void{ 54trace(evt.info.level+": "+ evt.info.code); 55if(evt.info.code=="NetStream.Play.Start") { 56 _vidPlaying =true; 57 }else if(evt.info.code=="NetStream.Play.Stop") { 58 _vidPlaying =false; 59 } 60 }
Lines 62 through 74 contain the methods triggered by the metadata and cue points received during video playback. Line 63 traces the duration metadata field to demonstrate reacting to incoming information. You can add metadata during the encoding process, and encoding software can also automatically create metadata for you. Available metadata fields range from such basic items as duration, creation and modified date, width, height, and so on, to the highly specialized, like the DICOM collection of medical fields, depending on the encoder. Adobe Media Encoder supports an impressive array of available metadata.
Lines 67 through 69 trace the time, name, and type properties of any cue point received, and lines 70 through 73 trace any parameters added to that cue point when it was created.
61//client methods62private functiononMetaData(info:Object):void{ 63trace("MetaData duration:", info.duration); 64 } 65 66private functiononCuePoint(info:Object):void{ 67trace("CuePoint time:", info.time); 68trace("CuePoint type:", info.type); 69trace("CuePoint name:", info.name); 70for(varpropininfo.parameters) { 71trace("Cue point parameter "+ prop +": "+ 72 info.parameters[prop]); 73 } 74 }
Finally, lines 76 through 101 contain the public methods, getters, and setters available outside the class. Lines 76 through 93 contain methods to play, pause, and stop the video, all of which are configured to receive mouse events. However, they also all include default values for the event, making it possible to call the methods directly, rather than as a result of an event. We’ll see this demonstrated in the main document class.
The playVideo() method in lines 76 through 83 first checks to see if the _vidPlaying property is true. If so, it calls the resume() method of the NetStream instance. This is because the class changes this property value when a status event indicates that the stream has been started or stopped, but not paused. Therefore, if a play button is clicked and the property is true, the video has been paused and should be resumed. If the property is false, the play() method is called, using the path in the _source property to indicate which video to play. In either case, the _vidPlaying property is set to true to record the fact that the video is playing.
The pauseVideo() method in lines 85 through 87 calls the togglePause() method. This is a nice feature because it will automatically pause the video if it’s playing and play the video if it’s paused.
Lines 89 through 93 contain the stopVideo() method. This method closes the stream (which is a bit like turning off your cable set top box), clears the Video instance (which is akin to turning off your television), and sets the _vidPlaying property to false.
Finally, lines 95 through 101 provide a getter and setter to allow the retrieval and assignment of the _source property from outside the class.
Note
For more information about getters and setters, see the Encapsulation section of Chapter 6.
75//public player methods and getter/setter76public functionplayVideo(evt:MouseEvent=null):void{ 77if(_vidPlaying) { 78 _stream.resume(); 79 }else{ 80 _stream.play(_source); 81 } 82 _vidPlaying =true; 83 } 84 85public functionpauseVideo(evt:MouseEvent=null):void{ 86 _stream.togglePause(); 87 } 88 89public functionstopVideo(evt:MouseEvent=null):void{ 90 _stream.close(); 91 _vid.clear(); 92 _vidPlaying =false; 93 } 94 95public function setsource(path:String):void{ 96 _source = path; 97 } 98 99public function getsource():String{ 100return_source; 101 } 102 } 103 }
The document class
The BasicVideo_UI class is a document class that instantiates BasicVideo and creates a simple interface with a play, pause, and stop button. Lines 1 through 7 declare the package and import the required classes. Lines 9 through 12 declare the class (which extends MovieClip so it can easily function as a document class) and declare two private properties. The first is a movie clip container to hold the video and buttons, so you can easily position the video interface anywhere on the stage. The second stores a reference to the BasicVideo instance so it can be used throughout the class.
Lines 14 through 27 contain the class constructor. Lines 15 through 17 create a container to hold the video and buttons, but also use the drawBackground() method (lines 29 through 36) to draw a black background the size of the video into the container. This is so, when clearing the video object after stopping playback, the video doesn’t look like it’s disappearing. (The function simply creates a movie clip, draws a black rectangle into it, and returns it to the point in the script where the function was called.)
Lines 19 through 21 create an instance of the BasicVideo class, assign the source property of the instance to the appropriate video path, and add the BasicVideo instance to the container. Line 22 demonstrates how to call the BasicVideo public method playVideo() directly, rather than from an event. This means you can automatically start the video playing without requiring a mouse click from the user.
The remainder of the class creates three buttons and assigns a listener to each to control the video, just like we did in the Scripting Buttons to Control the FLVPlayback Component section of this chapter. The only difference between the two examples is that listeners in this class call the methods in the BasicVideo class, while the previously cited example called methods of the FLVPlayback component.
1package{ 2 3import flash.display.Graphics; 4import flash.display.MovieClip; 5import flash.events.MouseEvent; 6importcom.learningactionscript3.ui.RoundRectButton; 7importcom.learningactionscript3.video.BasicVideo; 8 9public classBasicVideo_UIextends MovieClip{ 10 11private var_container:MovieClip; 12private var_vidPlayer:BasicVideo; 13 14public functionBasicVideo_UI() { 15 _container = drawBackground(); 16 _container.x= _container.y= 20; 17addChild(_container); 18 19 _vidPlayer =newBasicVideo(); 20 _vidPlayer.source="nero.flv"; 21 _container.addChild(_vidPlayer); 22 _vidPlayer.playVideo(); 23 24 createButton(20,"Play", playVideo); 25 createButton(120,"Pause", pauseVideo); 26 createButton(220,"Stop", stopVideo); 27 } 28 29private functiondrawBackground():MovieClip{ 30varsp:MovieClip=new MovieClip(); 31varg:Graphics= sp.graphics; 32 g.beginFill(0x000000); 33 g.drawRect(0, 0, 320, 240); 34 g.endFill(); 35returnsp; 36 } 37 38private functioncreateButton(xLoc:Number, labl:String, 39 func:Function):void{ 40varbtn:RoundRectButton = 41newRoundRectButton(80, 20, 10, 2, 0x000099, 42 labl, 0xFFFFFF); 43 btn.x= xLoc; 44 btn.y= 250; 45 btn.addEventListener(MouseEvent.CLICK, func, 46false, 0,true); 47 _container.addChild(btn); 48 } 49 50private functionplayVideo(evt:MouseEvent=null):void{ 51 _vidPlayer.playVideo(); 52 } 53 54private functionpauseVideo(evt:MouseEvent=null):void{ 55 _vidPlayer.pauseVideo(); 56 } 57 58private functionstopVideo(evt:MouseEvent=null):void{ 59 _vidPlayer.stopVideo(); 60 } 61 } 62 }
Although this exercise doesn’t create a full-featured video controller, it demonstrates the basics required to create the remaining functionality on your own, with help from the ActionScript 3.0 Language and Component Reference. Having completed this exercise, try to build a progress bar or a seek option. Try to combine what you’ve learned here with what you learned in Chapter 11 and create a volume or mute button. How you design your controller is up to you.
What’s Next?
This chapter discussed a few ways to add video features to your projects. You can now decide, typically on a project-by-project basis, whether to use prebuilt components, or your own custom ActionScript player. You also have the ability to add full screen support and captions, if your project calls for these features.
In the next chapter, we’ll begin Part V of book, covering input and output. Chapter 13 discusses the basics of loading external assets, including:
Using the universal
URLRequestclassLoading visual assets, including graphics and other SWF files
Loading text and variables