
11
Specialized Collection Types and LINQ
In the last chapter, we revisited variables, types, and classes to see what they had to offer beyond the basic features introduced at the beginning of the book. In this chapter, we’ll take a closer look at new collection types and learn about their intermediate-level capabilities and how to filter, order, and transform data with LINQ queries.
Remember, being a good programmer isn’t about memorizing code; it’s about choosing the right tool for the right job. Each of the new collection types in this chapter has a specific purpose. For most scenarios where you need a collection of data, a list or array works just fine. However, when you need temporary storage or control over the order of collection elements, or more specifically, the order they are accessed, look to stacks and queues. When you need to perform operations that depend on every element in a collection to be unique, meaning not duplicated, look to HashSets. Before you start on the code in the following section, let’s lay out the topics you’ll be learning about:
- Introducing stacks
- Peeking and popping elements
- Working with queues
- Adding, removing, and peeking elements
- Using HashSets
- Performing operations
- Filtering data with LINQ queries
Introducing stacks
At its most basic level, a stack is a collection of elements of the same specified type. The length of a stack is variable, meaning it can change depending on how many elements it’s holding. The important difference between a stack and a list or array is how the elements are stored. While lists or arrays store elements by index, stacks follow the last-in-first-out (LIFO) model, meaning the last element in the stack is the first accessible element. This is useful when you want to access elements in reverse order. You should note that they can store null and duplicate values. A helpful analogy is a stack of plates—the last plate you put on the stack is the first one you can easily get to. Once it’s removed, the next-to-last plate you stacked is accessible, and so on.
All the collection types in this chapter are a part of the System.Collections.Generic namespace, meaning you need to add the following code to the top of any file that you want to use them in:
using System.Collections.Generic;
Now that you know what you’re about to work with, let’s look at the basic syntax for declaring stacks.
A stack variable declaration needs to meet the following requirements:
- The
Stackkeyword, its element type between left and right arrow characters, and a unique name - The
newkeyword to initialize the stack in memory, followed by theStackkeyword and element type between arrow characters - A pair of parentheses capped off by a semicolon
In blueprint form, it looks like this:
Stack<elementType> name = new Stack<elementType>();
Unlike the other collection types you’ve worked with, stacks can’t be initialized with elements when they’re created. Instead, all elements must be added after the stack is created.
C# supports a non-generic version of the stack type that doesn’t require you to define the type of element in the stack:
Stack myStack = new Stack();
However, this is less safe and more costly than using the preceding generic version, so the generic version above is recommended. You can read more about Microsoft’s recommendation at: https://github.com/dotnet/platform-compat/blob/master/docs/DE0006.md.
Your next task is to create a stack of your own and get hands-on experience working with its class methods. But before you do that, let’s create a loot struct to make things more interesting:
- In the Scripts folder, right-click > Create > C# Script and name the script
Loot. - Update
Loot.csto match the following code:using System.Collections; using System.Collections.Generic; using UnityEngine; // 1 public struct Loot { // 2 public string name; public int rarity; // 3 public Loot(string name, int rarity) { this.name = name; this.rarity = rarity; } }
Breaking the Loot struct down, it goes as follows:
- Declares a public struct
- Adds two public variables, one for the name and one for the rarity of type
stringandintrespectively - Adds a constructor that takes in a
stringandintand assigns those values to the struct properties
To test this out, you’re going to modify the existing item collection logic in Hero Born by using a stack to store possible loot that can be collected. A stack works nicely here because we won’t have to worry about supplying indexes to get loot items; we can just get the last one added every time:
- Open
GameBehavior.csand add in a new stack variable namedLootStack:// 1 public Stack<string> LootStack = new Stack<string>(); - Update the
Initializemethod with the following code to add new items to the stack:public void Initialize() { _state = "Game Manager initialized.."; _state.FancyDebug(); Debug.Log(_state); // 2 LootStack.Push(new Loot("Sword of Doom", 5)); LootStack.Push(new Loot("HP Boost", 1)); LootStack.Push(new Loot("Golden Key", 3)); LootStack.Push(new Loot("Pair of Winged Boots", 2)); LootStack.Push(new Loot("Mythril Bracer", 4)); } - Add a new method to the bottom of the script to print out the stack information:
// 3 public void PrintLootReport() { Debug.LogFormat("There are {0} random loot items waiting for you!", LootStack.Count); } - Open
ItemBehavior.csand callPrintLootReportfrom theGameManagerinstance:void OnCollisionEnter(Collision collision) { if(collision.gameObject.name == "Player") { Destroy(this.transform.parent.gameObject); Debug.Log("Item collected!"); GameManager.Items += 1; // 4 GameManager.PrintLootReport(); } }
Breaking this down, it does the following:
- Creates an empty stack with elements of type
stringto hold thelootitems we’ll add in next. - Uses the
Pushmethod to addLootobjects to the stack (which are initialized with item names and rarities), increasing its size each time. - Prints out the stack count whenever the
PrintLootReportmethod is called. - Calls
PrintLootReportinsideOnCollisionEnterevery time an item is collected by the player, which we set up in earlier chapters with colliders.
Hit Play in Unity, collect an item Prefab, and look at the new Loot report that’s printed out:
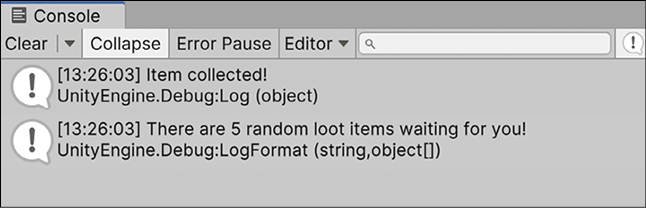
Figure 11.1: Output from using stacks
To provide a complete view of the Unity editor, all our screenshots are taken in full-screen mode. For color versions of all book images, use the link below: https://packt.link/7yy5V.
Since we haven’t actually subtracted the item from the stack when we collect the in-game item, the count will always be 5, but our next task will do just that with the Pop and Peek methods that already exist in the Stack class.
Popping and peeking
We’ve already talked about how stacks store elements using the LIFO method. Now, we need to look at how elements are accessed in a familiar but different collection type—by peeking and popping:
- The
Peekmethod returns the next item on the stack without removing it, letting you “peek” at it without changing anything - The
Popmethod returns and removes the next item on the stack, essentially “popping” it off and handing it to you
Both methods can be used by themselves or together depending on what you need. You’ll get hands-on experience with both methods in the following section.
Your next task is to grab the last item added to LootStack. In our example, the last element is determined programmatically in the Initialize method, but you could always programmatically randomize the order in which the loot items were added to the stack in Initialize. Either way, update PrintLootReport() in GameBehavior with the following code:
public void PrintLootReport()
{
    // 1
    var currentItem = LootStack.Pop();
    // 2
    var nextItem = LootStack.Peek();
    // 3
    Debug.LogFormat("You got a {0}! You've got a good chance of finding a {1} next!", currentItem.name, nextItem.name);
    Debug.LogFormat("There are {0} random loot items waiting for you!", LootStack.Count);
}
Here’s what’s going on:
- Calls
PoponLootStack, removes the next item on the stack, and stores it. Remember, stack elements are ordered by the LIFO model. - Calls
PeekonLootStackand stores the next item on the stack without removing it. - Adds a new debug log to print out the item that was popped off and the next item on the stack.
You can see from the console that a Mythril Bracer, the last item added to the stack, was popped off first, followed by a Pair of Winged Boots, which was peeked at but not removed. You can also see that LootStack has four remaining elements that can be accessed:
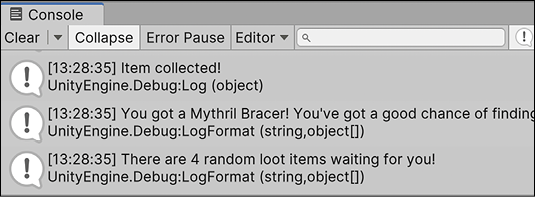
Figure 11.2: Output from popping and peeking on a stack
Our player can now pick up loot items in the reverse order that they were added to the stack. For instance, the first item picked up will always be a Mythril Bracer, followed by a Pair of Winged Boots, then a Golden Key, and so on.
Now that you know how to create, add, and query elements from a stack, we can move on to some common methods that you have access to through the stack class.
Common methods
Each of the methods in this section is for example purposes only; they are not included in our game as we don’t need the functionality:
- First, you can use the
Clearmethod to empty out or delete the entire contents of a stack:// Empty the stack and reverting the count to 0 LootStack.Clear(); - If you want to know whether an element exists in your stack, use the
Containsmethod and specify the element you’re looking for:// Returns true for "Golden Key" item var itemFound = LootStack.Contains("Golden Key"); - If you need to copy the elements of a stack to an array, the
CopyTomethod will let you specify the destination and the starting index for the copy operation. This feature is helpful when you need to insert stack elements at a specific place in an array. Note that the array you want to copy the stack elements to must already exist:// Creates a new array of the same length as LootStack string[] CopiedLoot = new string[5]; /* Copies the LootStack elements into the new CopiedLoot array at index 0. The index parameter can be set to any index where you want the copied elements to be stored */ LootStack.CopyTo(copiedLoot, 0); - If you need to convert a stack into an array, simply use the
ToArray()method. This conversion creates a new array out of your stack, which is different than theCopyTo()method, which copies the stack elements to an existing array:// Copies an existing stack to a new array LootStack.ToArray();
You can find the entire list of stack methods in the C# documentation at: https://docs.microsoft.com/dotnet/api/system.collections.generic.stack-1?view=netcore-3.1.
That wraps up our introduction to stacks, but we’re going to talk about its cousin, the queue, in the following section.
Working with queues
Like stacks, queues are collections of elements or objects of the same type. The length of any queue is variable just like a stack, meaning its size changes as elements are added or removed. However, queues follow the first-in-first-out (FIFO) model, meaning the first element in the queue is the first accessible element. You should note that queues can store null and duplicate values but can’t be initialized with elements when they’re created. The code in this section is for example purposes only and is not included in our game.
A queue variable declaration needs to have the following:
- The
Queuekeyword, its element type between left and right arrow characters, and a unique name - The
newkeyword to initialize the queue in memory, followed by theQueuekeyword and element type between arrow characters - A pair of parentheses capped off by a semicolon
In blueprint form, a queue looks as follows:
Queue<elementType> name = new Queue<elementType>();
C# supports a non-generic version of the queue type that doesn’t require you to define the type of element it stores:
Queue myQueue = new Queue();
However, this is less safe and more costly than using the preceding generic version. You can read more about Microsoft’s recommendation at: https://github.com/dotnet/platform-compat/blob/master/docs/DE0006.md.
An empty queue all by itself isn’t all that useful; you want to be able to add, remove, and peek at its elements whenever you need, which is the topic of the following section.
Adding, removing, and peeking
Since the LootStack variable in the previous sections could easily be a queue, we’ll keep the following code out of our game scripts for efficiency. However, feel free to explore the differences, or similarities, of these classes in your own code:
- To create a queue of string elements, use the following:
// Creates a new Queue of string values. Queue<string> activePlayers = new Queue<string>(); - To add elements to the queue, call the
Enqueuemethod with the element you want to add:// Adds string values to the end of the Queue. activePlayers.Enqueue("Harrison"); activePlayers.Enqueue("Alex"); activePlayers.Enqueue("Haley"); - To see the first element in the queue without removing it, use the
Peekmethod:// Returns the first element in the Queue without removing it. var firstPlayer = activePlayers.Peek(); - To return and remove the first element in the queue, use the
Dequeuemethod:// Returns and removes the first element in the Queue. var firstPlayer = activePlayers.Dequeue();
Now that you know how to work with the basic features of a queue, feel free to explore the more intermediate and advanced methods that the queue class offers.
Queues and stacks share almost the exact same features, so we won’t go over them a second time. You can find a complete list of methods and properties in the C# documentation at: https://docs.microsoft.com/dotnet/api/system.collections.generic.queue-1?view=netcore-3.1.
Before closing out the chapter, let’s look at the HashSet collection type and the mathematical operations it’s uniquely suited for.
Using HashSets
The last collection type we’ll get our hands on in this chapter is the HashSet. This collection is very different from any other collection type that we’ve come across: it cannot store duplicate values and is not sorted, meaning its elements are not ordered in any way. Think of HashSets as dictionaries with just keys, instead of key-value pairs.
They can perform set operations and element lookups extremely fast, which we’ll explore at the end of this section, and are best suited to situations where the element order and uniqueness are a top priority.
A HashSet variable declaration needs to meet the following requirements:
- The
HashSetkeyword, its element type between left and right arrow characters, and a unique name - The
newkeyword to initialize the HashSet in memory, followed by theHashSetkeyword and element type between arrow characters - A pair of parentheses capped off by a semicolon
In blueprint form, it looks as follows:
HashSet<elementType> name = new HashSet<elementType>();
Unlike stacks and queues, you can initialize a HashSet with default values when declaring the variable:
HashSet<string> people = new HashSet<string>();
// OR
HashSet<string> people = new HashSet<string>() { "Joe", "Joan", "Hank"};
To add elements, use the Add method and specify the new element:
people.Add("Walter");
people.Add("Evelyn");
To remove an element, call Remove and specify the element you want to delete from the HashSet:
people.Remove("Joe");
That’s it for the easy stuff, and this should start to feel pretty familiar at this point in your programming journey. Set operations are where the HashSet collection really shines, which is the topic of the following section.
Performing operations
Set operations need two things: a calling collection object and a passed-in collection object.
The calling collection object is the HashSet you want to modify based on which operation is used, while the passed-in collection object is used for comparison by the set operation. We’ll get into this in more detail in the following code, but first, let’s go over the three main set operations that crop up in programming scenarios the most often.
In the following definitions, currentSet refers to the HashSet calling an operation method and specifiedSet refers to the passed-in HashSet method parameter. The modified HashSet is always the current set:
currentSet.Operation(specifiedSet);
There are three main operations that we’ll be working with in the rest of this section:
UnionWithadds the elements of the current and specified sets togetherIntersectWithstores only the elements that are in both the current and specified setsExceptWithsubtracts the elements of the specified set from the current set
There are two more groups of set operations that deal with subset and superset computations, but these are targeted at specific use cases that are beyond the scope of this chapter. You can find all the relevant information for these methods at: https://docs.microsoft.com/dotnet/api/system.collections.generic.hashset-1?view=netcore-3.1.
Let’s say we have two sets of player names—one for active players and one for inactive players:
HashSet<string> activePlayers = new HashSet<string>() { "Harrison", "Alex", "Haley"};
HashSet<string> inactivePlayers = new HashSet<string>() { "Kelsey", "Basel"};
We would use the UnionWith() operation to modify a set to include all the elements in both sets:
activePlayers.UnionWith(inactivePlayers);
/* activePlayers now stores "Harrison", "Alex", "Haley", "Kelsey", "Basel"*/
Now, let’s say we have two different sets—one for active players and one for premium players:
HashSet<string> activePlayers = new HashSet<string>() { "Harrison", "Alex", "Haley"};
HashSet<string> premiumPlayers = new HashSet<string>() { "Haley", "Basel"};
We would use the IntersectWith() operation to find any active players that are also premium members:
activePlayers.IntersectWith(premiumPlayers);
// activePlayers now stores only "Haley"
What if we wanted to find all active players that are not premium members? We would do the opposite of what we did with the IntersectWith() operation by calling ExceptWith:
HashSet<string> activePlayers = new HashSet<string>() { "Harrison", "Alex", "Haley"};
HashSet<string> premiumPlayers = new HashSet<string>() { "Haley",
  "Basel"};
activePlayers.ExceptWith(premiumPlayers);
// activePlayers now stores "Harrison" and "Alex" but removed "Haley"
Notice that I’m using brand-new instances of the two example sets for each operation because the current set is modified after each operation is executed. If you keep using the same sets throughout, you will get different results.
Now that you’ve learned how to perform fast mathematical operations with HashSets, it’s time to drive home what we’ve learned.
Intermediate collections roundup
Before you move on, let’s drive home some key points from what we’ve just learned. Topics that don’t always have a 1-to-1 relationship with the actual game prototype we’re building need a little extra love sometimes. The one question I’m sure you’re asking yourself at this point is: why use any of these other collection types when I could just use lists for everything? And that’s a perfectly valid question. The easy answer is that stacks, queues, and HashSets offer better performance than lists when applied in the correct circumstances. For example, when you need to store items in a specific order, and access them in a specific order, a stack would be more efficient than a list.
The more complicated answer is that using different collection types enforces how your code is allowed to interact with them and their elements. This is a mark of good code design, as it removes any ambiguity on how you’re planning to use a collection. With lists everywhere, things get confusing when you don’t remember what functions you’re asking them to perform.
As with everything we’ve learned in this book, it’s always best to use the right tool for the job at hand. More importantly, you need to have different tools available for that to be an option.
Querying data with LINQ
We’ve covered a few different ways to store elements, or sequences of values, in this chapter—the one thing we haven’t talked about is how to get specific subsets of data back out. So far, our game’s loot is stored in a Stack variable, and we can always pop off the next loot element in the order they are stored, but that doesn’t help us when we want to filter down the stack (or any other collection type we’ve discussed in this book) to specific elements that fit predefined criteria.
For example, say we wanted to get a list of all the elements in the Loot stack with a rarity value of 3 or more. We could absolutely use a looping statement, but that leads to a lot of code and manual checks if we wanted to add more parameters to our filter. Instead, C# has a specific set of features for querying data called LINQ, which stands for Language Integrated Query. LINQ is fast, efficient, and, most importantly, customizable for complex data filtering, which is what we’ll explore for the rest of this chapter.
LINQ basics
The best way I’ve found to approach LINQ features is to think of what a query really is: a question. When you have a set of data you want to narrow down or filter, you’re essentially asking the data a question like: which elements meet criteria A and B while excluding criteria C? One of the great things about LINQ is that the questions already exist in the form of extension methods, which can be chained together to form even more complex queries.
LINQ extension methods work on any collection type that implements IEnumerable<T>, which includes Lists, Dictionaries, Queues, Stacks, and Arrays. You can find a complete list of extension methods at: https://learn.microsoft.com/dotnet/api/system.linq.enumerable.
This might sound confusing without concrete examples, so let’s take a look at the three-step process behind LINQ queries:
- First, you need a data source—the collection type holding all the data elements you’re trying to filter, order, or group.
- Second, you create a query—the rules you want to apply to the data source you’re working with. Continuing with our scores example, we’ll use the
Whereextension method to filter our scores values by setting a predicate. A predicate is a rule or criteria that evaluates a certain condition. - Third, you run the query—the data source needs to be iterated over with a looping statement for the query commands to execute. This is called deferred execution.
Since we already have a stack of loot in our game, let’s write a query that filters out the loot items based on their rarity level:
- Open
GameBehavior.csand add in a new using directive to the top of the script so we can access the LINQ extension methods:using System.Linq; - Add a new method after
PrintLootReportand create a new query variable using theWhereextensions method:public void FilterLoot() { var rareLoot = LootStack.Where(); } - When adding the first parentheses after the
Wheremethod, Visual Studio will let you know that the extension method is expecting a predicate argument in the form of adelegatewith a specific method signature (in this case,Func<Loot, bool>, - A
delegateis a C# type that holds references to methods—just like integers hold numbers and strings hold text characters. Methods stored in a delegate have input parameters and return types just like the regular methods we’ve seen so far. The real magic of delegates is that they can be used as arguments in other methods, which is the case with LINQ queries. We’ll talk about delegates in Chapter 13, Exploring Generics, Delegates, and Beyond, but for now, just think of them as containers for methods.If you want to get a jump on delegates, you can find the documentation at: https://learn.microsoft.com/dotnet/csharp/programming-guide/delegates.

Figure 11.3: Predicate signature for the Where extension method
- Since we need a delegate, or method, that matches the predicate argument for the
Whereextension method, let’s create a new method underneathFilterLootthat checks if a loot item’s rarity is greater than or equal to 3. - The predicate method signature we need to match is
Func<Loot, bool>, which means we need a method that takes in aLootitem as an argument and returns aboolean. Each time theWherequery iterates over a loot item, it’ll evaluate the predicate condition and returntrueorfalse.public bool LootPredicate(Loot loot) { return loot.rarity >= 3; } - Now that we have a method with the proper matching signature, we can pass
LootPredicateinto theWheremethod and loop through each item with a debug log. Remember, the query won’t take effect until you iterate through the data source:public void FilterLoot() { var rareLoot = LootStack.Where(LootPredicate); foreach (var item in rareLoot) { Debug.LogFormat("Rare item: {0}!", item.name); } } - Finally, call
FilterLootat the bottom of theInitializemethod and hit Play:public void Initialize() { _state = "Game Manager initialized.."; _state.FancyDebug(); Debug.Log(_state); LootStack.Push(new Loot("Sword of Doom", 5)); LootStack.Push(new Loot("HP Boost", 1)); LootStack.Push(new Loot("Golden Key", 3)); LootStack.Push(new Loot("Pair of Winged Boots", 2)); LootStack.Push(new Loot("Mythril Bracer", 4)); FilterLoot(); }
Let’s summarize what we’ve just put together:
- We added the
System.Linqnamespace to access LINQ extension methods. - We created a method to hold our LINQ query and used the
Whereextension method to filter out loot items that don’t meet our criteria. - We created a delegate method that takes in a
Lootitem and checks if itsraritylevel is greater than or equal to 3. - We used the delegate method as our LINQ predicate and looped through the loot stack to execute the query.
- When you run the game, you’ll see three items print out to the console instead of all five of our loot items, because only three have a rarity value of 3 or higher. Notice the order of the items matches the order they were added to the stack:
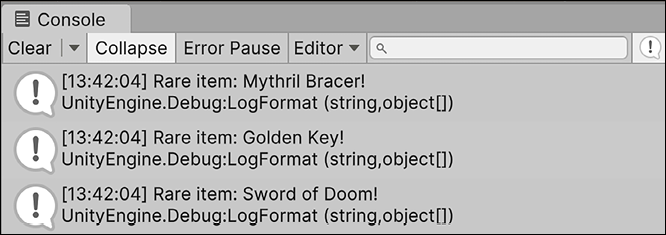
Figure 11.4: Console output of the LINQ filter query
That was a lot of new information and techniques to digest all at once, but there’s a light at the end of the tunnel. While you could create delegates for each criterion, C# has a handy syntax to make the entire process easier to manage and read—Lambda expressions.
Lambda expressions
- Lambda expressions are anonymous functions, meaning they don’t have or need a name but still have method arguments (inputs) and return types, which makes them perfect for LINQ queries.
- Lambda expression syntax can be broken down into the following template:
input => expression - Like a local variable, the input name is up to you and C# will infer the correct type from the LINQ extension method.
- The => symbols in the above template are shorthand for “go to the method expression.”
- For our example, we can translate the entire
LootPredicatemethod into one line of code by using a lambda expression. TheWheremethod is looking for aLootinput type and aboolreturn type, so replace the predicate inFilterLootwith a lambda:public void FilterLoot() { var rareLoot = LootStack.Where(item => item.rarity >= 3); foreach (var item in rareLoot) { Debug.LogFormat("Rare item: {0}!", item.name); } }
Breaking this down:
- We specified
itemas the name of the input, which represents eachLootelement inLootStack. - We used the
=>syntax to cut out the need for a whole new method declaration. - We wrote the predicate the exact same way as we did in
LootPredicate; it’s just all in one line with the lambda expression. - When you run the game again, you’ll see the exact same output in the console, but the code is much cleaner, making it easier to chain multiple LINQ operations together, which we’ll talk about next.
Chaining queries
In our game, filtering loot items using a single query is cool, but the real power of LINQ is in creating customized, complex queries by chaining extension methods together. Chaining queries is similar to writing a paragraph: each thought is separated by a period, but they are read in sequence.
Our next task is to add a second query onto our loot stack, this time specifying the order the rare items are in when they come out the other end of the LINQ statement. Update the rareLoot query as follows:
var rareLoot = LootStack
.Where(item => item.rarity >= 3)
.OrderBy(item => item.rarity);
Like our first query:
- We added a LINQ extension method to
LootStack, this time usingOrderBy. - We used a lambda expression to order the items by their rarity levels from lowest to highest.
For clarity, it’s best practice to move each LINQ query onto its own line, starting with the period character. This makes it much easier to read and understand what’s going on with more complex queries.
- Run the game again and you’ll see the order of our rare items has changed, now showing the Golden Key first because it has the lowest rarity we allowed in our filter, and moving up from there:
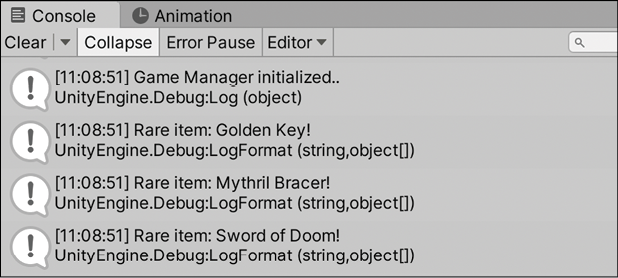
Figure 11.5: Console output of the LINQ order query
- C# provides a huge variety of LINQ extension methods, so even though we’re sticking to a relatively simple example for our loot items this is the tip of the data management iceberg. There’s no limit to how many queries you can chain together, so these can be as complicated as you want!
In the next section, we’ll talk about one of the most powerful filtering options you have in your arsenal – transforming filtered data into new types right from LINQ queries.
Transforming data into new types
When your data gets more complicated, as it tends to do, there are scenarios where you may have a huge amount of information in each element that you’re trying to query. Let’s say you had a player database with player information stored in a list, you might not need every player property all the time, especially when the queried items have a massive amount of information in them. For example, after filtering out the players you don’t want, you may only need each player’s name, level, and high score, but not their email address or location. This is where the Select extension method comes in.
The Select method lets you transform the data from a LINQ query into a new type without stepping out of the LINQ query itself. You can not only execute your filtering and ordering criteria, but you can also specify exactly how the information comes out the other end.
In our example, each Loot item only has two properties—a name and a rarity. Let’s update the current LINQ query to leave out the rarity value once we’ve established which items are rare and which are not.
In GameBehavior.cs, update the rareLoot query by adding the Select extension method to create a new anonymous type:
var rareLoot = LootStack
.Where(item => item.rarity >= 3)
.OrderBy(item => item.rarity)
.Select(item => new
{
       item.name
});
Anonymous types let you encapsulate properties into an object without having to explicitly define the object type, like a shortcut to creating a new object without the added declaration syntax. This is perfect for LINQ queries, since we don’t need the extra headache of creating a new object class just to project our filtered data into a new containing type.
Let’s break this new code down:
- We added the
SelectLINQ extension method, which lets us specify whichLootproperties we want to carry over into a new type. - We named the input
itemand used the => syntax again, but for the expression, we used the same syntax for creating an object with thenewkeyword and two curly brackets {}. - Inside the expression brackets we added the property we want to keep,
item.name, which will leave out therarityproperty in this new anonymous type we created. - The resulting anonymous type from our LINQ query will be
Lootitems that only have theirnameproperty.
When you run the game again, you won’t see any difference in the console output, but if you try and access the rarity property on any of the items in the debug log, you’ll get an error because the new anonymous type doesn’t contain that property.
Again, transforming your queried elements into new paired-down anonymous types makes dealing with large amounts of data much easier, less cumbersome, and, most importantly, faster, especially when your scenario doesn’t need all the items’ data.
Now before we end the chapter, there’s one more piece of LINQ that comes in handy depending on your preference for clean code—LINQ query comprehension syntax.
Simplifying with optional syntax
The C# language is always trying to make things more efficient and readable for its developers, and LINQ is no different. The LINQ query comprehension syntax was available back in C# 3.0, so it’s been around for a while but it’s completely optional. Essentially, it’s an even more shorthand option for writing LINQ queries without the need for lambda expressions. In my experience, this is the easiest to write and read when it comes to LINQ queries.
Our next task is to translate our rare loot query from the method and lambda code we wrote into the query comprehension syntax. In GameBehavior.cs, update the rareLoot query as follows:
// 1
var rareLoot = from item in LootStack
               // 2
               where item.rarity >= 3
               // 3
               orderby item.rarity
               // 4
               select item;
The query flow should look familiar, but let’s break down the syntax differences:
- First, we grab each input item from the
LootStackdata source. This syntax means we don’t need to expressly write out an input in subsequent queries as we did with lambda expressions. - Second, we used the
wherequery (lowercase) without the dot notation and just went straight for the expression predicate. - Third, we added another
orderbyquery (lowercase again) without the dot notation and used the same expression from the previous example. - Finally, the
selectquery (lowercase) must be added, followed by the resulting input at the end of all queries when you’re using the LINQ query comprehension syntax.
If you’re wondering how to mimic the transformation into an anonymous type on the last line, you can still do that with the following code update:
select new { item.name };
But there’s a catch with this optional shorthand—only the most commonly used extension methods have counterparts in query comprehension syntax. However, you can use the optional shorthand and the lambda expression method together; they just require a little added syntax.
For example, if we wanted to skip the first rare item in our query (which doesn’t have a comprehension syntax equivalent), we would add parentheses around our optional syntax and then continue as normal by adding dot notation extension methods:
var rareLoot = (from item in LootStack
               where item.rarity >= 3
               orderby item.rarity
               select new { item.name })
                 .Skip(1);
Play the game one last time and you’ll see that Golden Key was removed from our filtered rare loot, while everything still works the same:
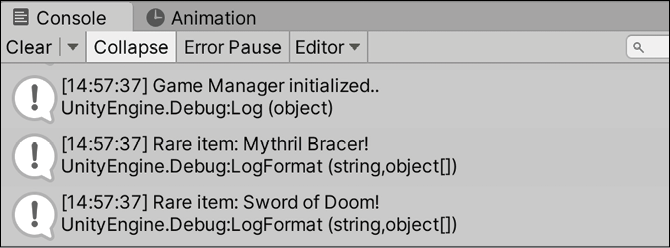
Figure 11.6: Console output from optional syntax query
LINQ is a powerful tool when you’re managing information in games and applications, but it’s a big area of possibility. Don’t stop here in your exploration of data queries—take these basics and expand them to get the most out of your data!
Summary
Congratulations, you’re almost at the finish line! In this chapter, you learned about three new collection types, and how they can be used in different situations.
Stacks are great if you want to access your collection elements in the reverse order that they were added, queues are your ticket if you want to access your elements in sequential order, and both are ideal for temporary storage. The important difference between these collection types and lists or arrays is how they can be accessed with popping and peeking operations. Lastly, you learned about the almighty HashSet and its performance-based mathematical set operations. In situations where you need to work with unique values and perform additions, comparisons, or subtractions on large collections, these are key.
In the next chapter, you’ll be taken a little deeper into the intermediate world of C# with delegates, generics, and more as you approach the end of this book. Even after all you’ve learned, the last page is still just the beginning of another journey.
Pop quiz—intermediate collections
- Which collection type stores its elements using the LIFO model?
- Which method lets you query the next element in a stack without removing it?
- Can stacks and queues store
nullvalues? - How would you subtract one HashSet from another?
Don’t forget to check your answers against mine in the Pop Quiz Answers appendix to see how you did!
Join us on discord!
Read this book alongside other users, Unity game development experts and the author himself.
Ask questions, provide solutions to other readers, chat with the author via. Ask Me Anything sessions and much more.
Scan the QR code or visit the link to join the community.