
Chapter 6. Error Handling and Logging
Java has its roots in embedded systems—software that runs inside specialized devices, such as handheld computers, cellular phones, and fancy toasters that we might consider part of the Internet of Things these days. In those kinds of applications, it’s especially important that software errors be handled robustly. Most users would agree that it’s unacceptable for their phone to simply crash or for their toast (and perhaps their house) to burn because their software failed. Given that we can’t eliminate the possibility of software errors, it’s a step in the right direction to recognize and deal with anticipated application-level errors methodically.
Dealing with errors in some languages is entirely the responsibility of the programmer. The language itself provides no help in identifying error types and no tools for dealing with them easily. In the C language, a routine generally indicates a failure by returning an “unreasonable” value (e.g., the idiomatic -1 or null). As the programmer, you must know what constitutes a bad result and what it means. It’s often awkward to work around the limitations of passing error values in the normal path of data flow.1 An even worse problem is that certain types of errors can legitimately occur almost anywhere, and it’s prohibitive and unreasonable to explicitly test for them at every point in the software.
In this chapter we’ll consider how Java tackles the problem of, well, problems. We’ll go over the notion of exceptions to look at how and why they occur as well as how and where to handle them. We’ll also be looking at errors and assertions. Errors represent more serious problems that often cannot be fixed at runtime but can still be logged for debugging. Assertions are a popular way of innoculating your code against exceptions or errors by verifying that safe conditions exist ahead of time.
Exceptions
Java offers an elegant solution to aid the programmer in addressing common coding and runtime problems through exceptions. (Java exception handling is similar to, but not quite the same as, exception handling in C++.) An exception indicates an unusual condition or an error condition. Program control becomes unconditionally transferred or “thrown” to a specially designated section of code where that condition is caught and handled. In this way, error handling is independent of the normal flow of the program. We don’t need special return values for all of our methods; errors are handled by a separate mechanism. Control can be passed a long distance from a deeply nested routine and handled in a single location when that is desirable, or an error can be handled immediately at its source. A few standard Java API methods still return -1 as a special value, but these are generally limited to situations where we are expecting a special value and the situation is not really out of bounds.2
A Java method is required to specify the checked exceptions it can throw and the compiler makes sure that callers of the method handle them. In this way, the information about what errors a method can produce is promoted to the same level of importance as its argument and return types. You may still decide to punt and ignore obvious errors, but in Java you must do so explicitly. (We’ll discuss runtime exceptions and errors, which are not required to be declared or handled by the method, in a moment.)
Exceptions and Error Classes
Exceptions are represented by instances of the class java.lang.Exception and its subclasses. Subclasses of Exception can hold specialized information (and possibly behavior) for different kinds of exceptional conditions. However, more often they are simply “logical” subclasses that serve only to identify a new exception type. Figure 6-1 shows the subclasses of Exception in the java.lang package. It should give you a feel for how exceptions are organized and we’ll go into more details on class organization in the next chapter. Most other packages define their own exception types, which usually are subclasses of Exception itself or of its important subclass RuntimeException, which we’ll get to in a moment.
For example, another important exception class is IOException in the package java.io. The IOException class extends Exception and has many subclasses for typical I/O problems (such as a FileNotFoundException) and networking problems (such as a MalformedURLException). Network exceptions belong to the java.net package.

Figure 6-1. The java.lang.Exception subclasses
An Exception object is created by the code at the point where the error condition arises. It can be designed to hold any information that is necessary to describe the exceptional condition and also includes a full stack trace for debugging. A stack trace is the (occasionally unwieldy) list of all the methods called and the order in which they were called up to the point where the exception was thrown. We’ll look at these useful lists in more detail in “Stack Traces”. The Exception object is passed as an argument to the handling block of code, along with the flow of control. This is where the terms throw and catch come from: the Exception object is thrown from one point in the code and caught by the other, where execution resumes.
The Java API also defines the java.lang.Error class for unrecoverable errors. The subclasses of Error in the java.lang package are shown in Figure 6-2. A notable Error type is AssertionError, which is used by the Java assert statement to indicate a failure (assertions are discussed later in this chapter). A few other packages define their own subclasses of Error, but subclasses of Error are much less common (and less useful) than subclasses of Exception. You generally needn’t worry about these errors in your code (i.e., you do not have to catch them); they are intended to indicate fatal problems or virtual machine errors. An error of this kind usually causes the Java interpreter to display a message and exit. You are actively discouraged from trying to catch or recover from them because they are supposed to indicate a fatal program bug, not a routine condition.

Figure 6-2. The java.lang.Error subclasses
Both Exception and Error are subclasses of Throwable. The Throwable class is the base class for objects that can be “thrown” with the throw statement. In general, you should extend only Exception, Error, or one of their subclasses.
Exception Handling
The try/catch guarding statements wrap a block of code and catch designated types of exceptions that occur within it:
try{readFromFile("foo");...}catch(Exceptione){// Handle errorSystem.out.println("Exception while reading file: "+e);...}
In this example, exceptions that occur within the body of the try portion of the statement are directed to the catch clause for possible handling. The catch clause acts like a method; it specifies as an argument the type of exception it wants to handle and if it’s invoked, it receives the Exception object as an argument. Here, we receive the object in the variable e and print it along with a message.
We can try this ourselves. Recall the simple program to calculate the greatest common denominator using Euclid algorithm back in Chapter 4. We could augment that program to allow the user to pass in the two numbers a and b as command line arguments via that args[] array in the main() method. However, that array is of type String. If we cheat a little bit and jump forward a couple chapters, we can use a parsing method we cover in “Parsing Primitive Numbers” to turn those arguments into int values. However, that parsing method can throw an exception if we don’t pass a valid number. Here’s a look at our new Euclid2 class:
publicclassEuclid2{publicstaticvoidmain(Stringargs[]){inta=2701;intb=222;// Only try to parse arguments if we have exactly 2if(args.length==2){try{a=Integer.parseInt(args[0]);b=Integer.parseInt(args[1]);}catch(NumberFormatExceptionnfe){System.err.println("Arguments were not both numbers. Using defaults.");}}else{System.err.println("Wrong number of arguments (expected 2). Using defaults.");}System.out.("The GCD of "+a+" and "+b+" is ");while(b!=0){if(a>b){a=a-b;}else{b=b-a;}}System.out.println(a);}}
If we run this program from a terminal window or use the command line arguments option in our IDE like we did in Figure 2-9, we can try several numbers without recompiling:
$ javac ch06/Euclid2.java

$ java ch06.Euclid2 18 6
The GCD of 18 and 6 is 6

$ java ch06.Euclid2 547832 2798
The GCD of 547832 and 2798 is 2
But if we pass in arguments that are not numeric, we’ll get that NumberFormatException and see our error message. Note, however, that we recover gracefully and still provide some output. This is the essence of error handling. You will always encounter errors in the real world. How you handle them helps show the quality of your code.
$ java ch06.Euclid2 apples oranges
Arguments were not both numbers. Using defaults.
The GCD of 2701 and 222 is 37
A try statement can have multiple catch clauses that specify different types (subclasses) of Exception:
try{readFromFile("foo");...}catch(FileNotFoundExceptione){// Handle file not found...}catch(IOExceptione){// Handle read error...}catch(Exceptione){// Handle all other errors...}
The catch clauses are evaluated in order, and the first assignable match is taken. At most, one catch clause is executed, which means that the exceptions should be listed from most to least specific. In the previous example, we anticipate that the hypothetical readFromFile() can throw two different kinds of exceptions: one for a file not found and another for a more general read error. In the preceding example, FileNotFoundException is a subclass of IOException, so if the first catch clause were not there, the exception would be caught by the second in this case. Similarly, any subclass of Exception is assignable to the parent type Exception, so the third catch clause would catch anything passed by the first two. It acts here like the default clause in a switch statement and handles any remaining possibilities. We’ve shown it here for completeness, but in general you want to be as specific as possible in the exception types you catch.
One beauty of the try/catch scheme is that any statement in the try block can assume that all previous statements in the block succeeded. A problem won’t arise suddenly because a programmer forgot to check the return value from a method. If an earlier statement fails, execution jumps immediately to the catch clause; later statements are never executed.
Starting with Java 7, there is an alternative to using multiple catch clauses, and that is to handle multiple discrete exception types in a single catch clause using the “|” or syntax:
try{// read from network...// write to file..catch(ZipException|SSLExceptione){logException(e);}
Using this “|” or syntax, we receive both types of exception in the same catch clause. So, what is the actual type of the e variable that we are passing to our log method? (What can we do with it?) In this case, it will be neither ZipException nor SSLException but IOException, which is the two exceptions’ nearest common ancestor (the closest parent class type to which they are both assignable). In many cases, the nearest common type among the two or more argument exception types may simply be Exception, the parent of all exception types. The difference between catching these discrete exception types with a multiple-type catch clause and simply catching the common parent exception type is that we are limiting our catch to only these specifically enumerated exception types and we will not catch all the other IOException types, as would be the alternative in this case. The combination of multiple-type catch and ordering your catch clauses from most specific to most broad (“narrow” to “wide”) types gives you great flexibility to structure your catch clauses. You can consolidate error handling logic where it is appropriate and to not repeat code. There are more nuances to this feature, and we will return to it after we have discussed “throwing” and “rethrowing” exceptions.
Bubbling Up
What if we hadn’t caught the exception? Where would it have gone? Well, if there is no enclosing try/catch statement, the exception pops up from the method in which it originated and is thrown from that method up to its caller. If that point in the calling method is within a try clause, control passes to the corresponding catch clause. Otherwise, the exception continues propagating up the call stack, from one method to its caller. In this way, the exception bubbles up until it’s caught, or until it pops out of the top of the program, terminating it with a runtime error message. There’s a bit more to it than that because in this case, the compiler might have forced us to deal with it along the way. “Checked and Unchecked Exceptions” talks about this distinction in more detail.
Let’s look at another example. In Figure 6-3, the method getContent() invokes the method openConnection() from within a try/catch statement. In turn, openConnection() invokes the method sendRequest(), which calls the method write() to send some data.
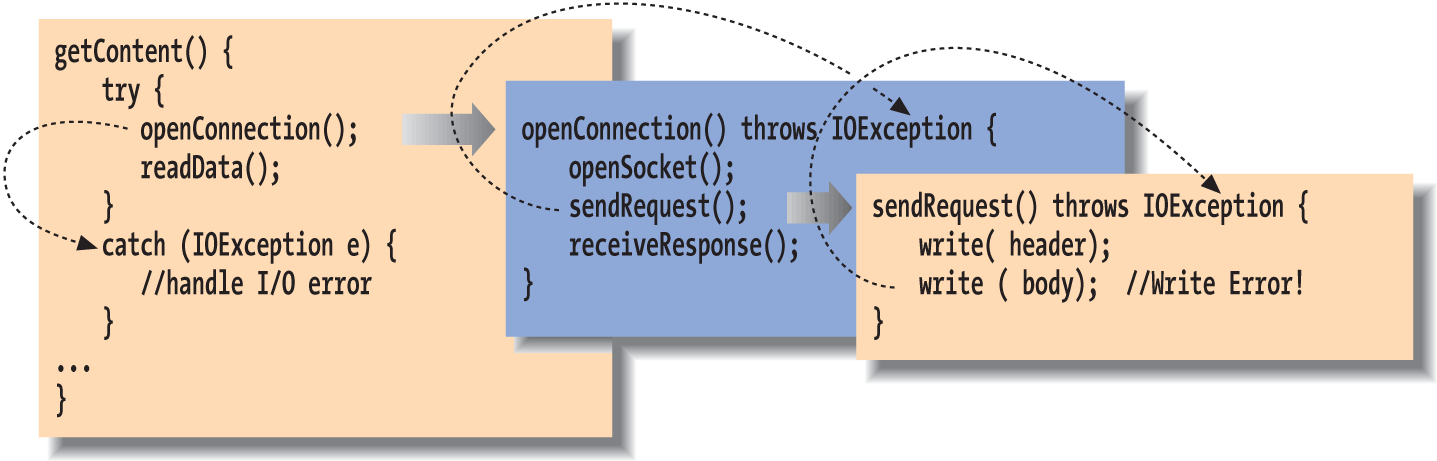
Figure 6-3. Exception propagation
In this figure, the second call to write() throws an IOException. Since sendRequest() doesn’t contain a try/catch statement to handle the exception, it’s thrown again from the point where it was called in the method openConnection(). Since openConnection() doesn’t catch the exception either, it’s thrown once more. Finally, it’s caught by the try statement in getContent() and handled by its catch clause. Notice that each throwing method must declare with a “throws” clause that it can throw the particular type of exception. We’ll discuss this below in “Checked and Unchecked Exceptions”.
Adding a high-level try statement early in your code can also help handle errors that might bubble up from background threads. We’ll discuss threads in much more detail in Chapter 9 but it is worth noting here that uncaught exceptions can lead to debugging headaches in larger, more complex programs.
Stack Traces
Because an exception can bubble up quite a distance before it is caught and handled, we may need a way to determine exactly where it was thrown. It’s also very important to know the context of how the point of the exception was reached; that is, which methods called which methods to get to that point. For these kinds of debugging and logging purposes, all exceptions can dump a stack trace that lists their method of origin and all the nested method calls it took to arrive there. Most commonly, the user sees a stack trace when it is printed using the printStackTrace() method.
try{// complex, deeply nested task}catch(Exceptione){// dump information about exactly where the exception occurrede.printStackTrace(System.err);...}
For example, the stack trace for an exception might look like this:
java.io.FileNotFoundException:myfile.xmlatjava.io.FileInputStream.<init>(FileInputStream.java)atjava.io.FileInputStream.<init>(FileInputStream.java)atMyApplication.loadFile(MyApplication.java:137)atMyApplication.main(MyApplication.java:5)
This stack trace indicates that the main() method of the class MyApplication called the method loadFile(). The loadFile() method then tried to construct a FileInputStream, which threw the FileNotFoundException. Note that once the stack trace reaches Java system classes (like FileInputStream), the line numbers may be lost. This can also happen when the code is optimized by some virtual machines. Usually, there is a way to disable the optimization temporarily to find the exact line numbers. However, in tricky situations, changing the timing of the application can affect the problem you’re trying to debug, and other debugging techniques may be required.
Methods on the exception allow you to retrieve the stack trace information programmatically as well by using the Throwable getStackTrace() method. (Throwable is the base class of Exception and Error.) This method returns an array of StackTraceElement objects, each of which represents a method call on the stack. You can ask a StackTraceElement for details about that method’s location using the methods getFileName(), getClassName(), getMethodName(), and getLineNumber(). Element zero of the array is the top of the stack, the final line of code that caused the exception; subsequent elements step back one method call each until the original main() method is reached.
Checked and Unchecked Exceptions
We mentioned earlier that Java forces us to be explicit about our error handling, but it’s not necessary to require that every conceivable type of error be handled explicitly in every situation. Java exceptions are therefore divided into two categories: checked and unchecked. Most application-level exceptions are checked, which means that any method that throws one, either by generating it itself (as we’ll discuss in “Throwing Exceptions”) or by ignoring one that occurs within it, must declare that it can throw that type of exception in a special throws clause in its method declaration. For now, all you need to know is that methods have to declare the checked exceptions they can throw or allow to be thrown.
Again in Figure 6-3, notice that the methods openConnection() and sendRequest() both specify that they can throw an IOException. If we had to throw multiple types of exceptions, we could declare them separated by commas:
voidreadFile(Strings)throwsIOException,InterruptedException{...}
The throws clause tells the compiler that a method is a possible source of that type of checked exception and that anyone calling that method must be prepared to deal with it. The caller must then either use a try/catch block to handle it, or it must, in turn, declare that it can throw the exception from itself.
In contrast, exceptions that are subclasses of either the class java.lang.RuntimeException or the class java.lang.Error are unchecked. See Figure 6-1 for the subclasses of RuntimeException. (Subclasses of Error are generally reserved for serious class loading or runtime system problems.) It’s not a compile-time error to ignore the possibility of these exceptions; methods also don’t have to declare they can throw them. In all other respects, unchecked exceptions behave the same as other exceptions. We are free to catch them if we wish, but in this case we aren’t required to.
Checked exceptions are intended to cover application-level problems, such as missing files and unavailable hosts. As good programmers (and upstanding citizens), we should design software to recover gracefully from these kinds of conditions. Unchecked exceptions are intended for system-level problems, such as “out of memory” and “array index out of bounds.” While these may indicate application-level programming errors, they can occur almost anywhere and usually aren’t possible to recover from. Fortunately, because they are unchecked exceptions, you don’t have to wrap every one of your array-index operations in a try/catch statement (or declare all of the calling methods as a potential source of them).
To sum up, checked exceptions are problems that a reasonable application should try to handle gracefully; unchecked exceptions (runtime exceptions or errors) are problems from which we would not normally expect our software to recover. Error types are those explicitly intended to be conditions that we should not normally try to handle or recover from.
Throwing Exceptions
We can throw our own exceptions—either instances of Exception, one of its existing subclasses, or our own specialized exception classes. All we have to do is create an instance of the Exception and throw it with the throw statement:
thrownewIOException();
Execution stops and is transferred to the nearest enclosing try/catch statement that can handle the exception type. (There is little point in keeping a reference to the Exception object we’ve created here.) An alternative constructor lets us specify a string with an error message:
thrownewIOException("Sunspots!");
You can retrieve this string by using the Exception object’s getMessage() method. Often, though, you can just print (or toString()) the exception object itself to get the message and stack trace.
By convention, all types of Exception have a String constructor like this. The preceding String message is not very useful. Normally, it will throw a more specific subclass Exception, which captures details or at least a more specific string explanation. Here’s another example:
publicvoidcheckRead(Strings){if(newFile(s).isAbsolute()||(s.indexOf("..")!=-1))thrownewSecurityException("Access to file : "+s+" denied.");}
In this code, we partially implement a method to check for an illegal path. If we find one, we throw a SecurityException with some information about the transgression.
Of course, we could include any other information that is useful in our own specialized subclasses of Exception. Often, though, just having a new type of exception is good enough because it’s sufficient to help direct the flow of control. For example, if we are building a parser, we might want to make our own kind of exception to indicate a particular kind of failure:
classParseExceptionextendsException{privateintlineNumber;ParseException(){super();this.lineNumber=-1;}ParseException(Stringdesc,intlineNumber){super(desc);this.lineNumber=lineNumber;}publicintgetLineNumber(){returnlineNumber;}}
See “Constructors” for a full description of classes and class constructors. The body of our Exception class here simply allows a ParseException to be created in the conventional ways we’ve created exceptions previously (either generically or with a little extra information). Now that we have our new exception type, we can guard like this:
// Somewhere in our code...try{parseStream(input);}catch(ParseExceptionpe){// Bad input...// We can even tell them which line was bad!}catch(IOExceptionioe){// Low-level communications problem}
As you can see, even without the special information like the line number where our input caused a problem, our custom exception lets us distinguish a parse error from an arbitrary I/O error in the same chunk of code.
Chaining and rethrowing exceptions
Sometimes you’ll want to take some action based on an exception and then turn around and throw a new exception in its place. This is common when building frameworks where low-level detailed exceptions are handled and represented by higher-level exceptions that can be managed more easily. For example, you might want to catch an IOException in a communications package, possibly perform some cleanup, and ultimately throw a higher-level exception of your own, maybe something like LostServerConnection.
You can do this in the obvious way by simply catching the exception and then throwing a new one, but then you lose important information, including the stack trace of the original “causal” exception. To deal with this, you can use the technique of exception chaining. This means that you include the causal exception in the new exception that you throw. Java has explicit support for exception chaining. The base Exception class can be constructed with an exception as an argument or the standard String message and an exception:
thrownewException("Here's the story...",causalException);
You can get access to the wrapped exception later with the getCause() method. More importantly, Java automatically prints both exceptions and their respective stack traces if you print the exception or if it is shown to the user.
You can add this kind of constructor to your own exception subclasses (delegating to the parent constructor) or you can take advantage of this pattern by using the Throwable method initCause() to set the causal exception explicitly after constructing your exception and before throwing it:
try{// ...}catch(IOExceptioncause){Exceptione=newIOException("What we have here is a failure to communicate...");e.initCause(cause);throwe;}
Sometimes it’s enough to simply do some logging or take some action and then rethrow the original exception:
try{// ...}catch(IOExceptioncause){log(cause);// Log itthrowcause;// rethrow it}
Narrowed rethrow
Prior to Java 7 if you wanted to handle a bunch of exception types in a single catch clause and then rethrow the original exception, you would inevitably end up widening the declared exception type to what was required to catch them all or having to do a lot of work to avoid that. In Java 7, the compiler has become smarter and can now do most of the work for us by allowing us to narrow the type of exceptions thrown back to the original types in most cases. This is best explained by example:
voidmyMethod()throwsZipException,SSLException{try{// Possible cause of ZipException or SSLException}catch(Exceptione){log(e);throwe;}}
In this example, we are exceedingly lazy and simply catch all exceptions with a broad catch Exception clause in order to log them prior to rethrowing. Prior to Java 7, the compiler would have insisted that the throws clause of our method declare that it throws the broad Exception type as well. However, the Java compiler is now smart enough in most cases to analyze the actual types of exceptions that may be thrown and allow us to prescribe the precise set of types. The same would be true if we had used the mutiple-type catch clause in this example, as you might have guessed. The preceding is a bit less intuitive, but very useful in shoring up the specificity of exception handling of code, including code written prior to Java 7, without requiring potentially tricky reworking of catch clauses.
try Creep
The try statement imposes a condition on the statements that it guards. It says that if an exception occurs within it, the remaining statements are abandoned. This has consequences for local variable initialization. If the compiler can’t determine whether a local variable assignment placed inside a try/catch block will happen, it won’t let us use the variable. For example:
voidmyMethod(){intfoo;try{foo=getResults();}catch(Exceptione){...}intbar=foo;// Compile-time error: foo may not have been initialized
In this example, we can’t use foo in the indicated place because there’s a chance it was never assigned a value. One obvious option is to move the assignment inside the try statement:
try{foo=getResults();intbar=foo;// Okay because we get here only// if previous assignment succeeds}catch(Exceptione){...}
Sometimes this works just fine. However, now we have the same problem if we want to use bar later in myMethod(). If we’re not careful, we might end up pulling everything into the try statement. The situation changes, however, if we transfer control out of the method in the catch clause:
try{foo=getResults();}catch(Exceptione){...return;}intbar=foo;// Okay because we get here only// if previous assignment succeeds
The compiler is smart enough to know that if an error had occurred in the try clause, we wouldn’t have reached the bar assignment, so it allows us to refer to foo. Your code will dictate its own needs; you should just be aware of the options.
The finally Clause
What if we have something important to do before we exit our method from one of the catch clauses? To avoid duplicating the code in each catch branch and to make the cleanup more explicit, you can use the finally clause. A finally clause can be added after a try and any associated catch clauses. Any statements in the body of the finally clause are guaranteed to be executed no matter how control leaves the try body, whether an exception was thrown or not:
try{// Do something here}catch(FileNotFoundExceptione){...}catch(IOExceptione){...}catch(Exceptione){...}finally{// Cleanup here is always executed}
In this example, the statements at the cleanup point are executed eventually, no matter how control leaves the try. If control transfers to one of the catch clauses, the statements in finally are executed after the catch completes. If none of the catch clauses handles the exception, the finally statements are executed before the exception propagates to the next level.
If the statements in the try execute cleanly, or if we perform a return , break, or continue, the statements in the finally clause are still executed. To guarantee that some operations will run, we can even use try and finally without any catch clauses:
try{// Do something herereturn;}finally{System.out.println("Whoo-hoo!");}
Exceptions that occur in a catch or finally clause are handled normally; the search for an enclosing try/catch begins outside the offending try statement, after the finally has been executed.
Try with Resources
A common use of the ++finally++ clause is to ensure that resources used in a ++try++ clause are cleaned up, no matter how the code exits the block.
try{// Socket sock = new Socket(...);// work with sock}catch(IOExceptione){...}finally{if(sock!=null){sock.close();}}
What we mean by “clean up” here is to deallocate expensive resources or close connections such as files, sockets, or database connections. In some cases, these resources might get cleaned up on their own eventually as Java reclaimed the garbage, but that would at best be at an unknown time in the future and at worst may never happen or may not happen before you run out of resources. So it is always best to guard against these situations. There are two problems with this venerable approach: first, it requires extra work to carry out this pattern in all of your code, including important things like null checks as shown in our example, and second, if you are juggling multiple resources in a single finally block, you have the possibility of your cleanup code throwing an exception (e.g., on close()) and leaving the job unfinished.
In Java 7, things have been greatly simplified via the new “try with resources” form of the try clause. In this form, you may place one or more resource initialization statements within parentheses after a try keyword and those resources will automatically be “closed” for you when control leaves the try block.
try(Socketsock=newSocket("128.252.120.1",80);FileWriterfile=newFileWriter("foo");){// work with sock and file}catch(IOExceptione){...}
In this example, we initialize both a Socket object and a FileWriter object within the try-with-resources clause and use them within the body of the try statement. When control leaves the try statement, either after successful completion or via an exception, both resources are automatically closed by calling their close() method. Resources are closed in the reverse of the order in which they were constructed, so dependencies among them can be accommodated. This behavior is supported for any class that implements the AutoCloseable interface (which, at current count, over 100 different built-in classes do). The close() method of this interface is prescribed to release all resources associated with the object, and you can implement this easily in your own classes as well. When using try with resources, we don’t have to add any code specifically to close the file or socket; it is done for us automatically.
Another problem that try with resources solves is the pesky situation we alluded to where an exception may be thrown during a close operation. Looking back to the prior example in which we used a finally clause to do our cleanup, if an exception had been raised by the close() method, it would have been thrown at that point, completely abandoning the original exception from the body of the try clause. But in using try with resources, we preserve the original exception. If an exception occurs while within the body of the try and one or more exceptions is raised during the subsequent auto-closing operations, it is the original exception from the body of the try that is bubbled up to the caller. Let’s look at an example:
try(Socketsock=newSocket("128.252.120.1",80);// potential exception #3FileWriterfile=newFileWriter("foo");// potential exception #2){// work with sock and file // potential exception #1}
Once the try has begun, if an exception occurs as exception point #1, Java will attempt to close both resources in reverse order, leading to potential exceptions at locations #2 and #3. In this case, the calling code will still receive exception #1. Exceptions #2 and #3 are not lost, however; they are merely “suppressed” and can be retrieved via the Throwable getSuppressed() method of the exception thrown to the caller. This returns an array of all of the supressed exceptions.
Performance Issues
Because of the way the Java virtual machine is implemented, guarding against an exception being thrown (using a try) is free. It doesn’t add any overhead to the execution of your code. However, throwing an exception is not free. When an exception is thrown, Java has to locate the appropriate try/catch block and perform other time-consuming activities at runtime.
The result is that you should throw exceptions only in truly “exceptional” circumstances and avoid using them for expected conditions, especially when performance is an issue. For example, if you have a loop, it may be better to perform a small test on each pass and avoid throwing the exception rather than throwing it frequently. On the other hand, if the exception is thrown only once in a gazillion times, you may want to eliminate the overhead of the test code and not worry about the cost of throwing that exception. The general rule should be that exceptions are used for “out of bounds” or abnormal situations, not routine and expected conditions (such as the end of a file).
Assertions
An assertion is a simple pass/fail test of some condition, performed while your application is running. Assertions can be used to “sanity check” your code anywhere you believe certain conditions are guaranteed by correct program behavior. Assertions are distinct from other kinds of tests because they check conditions that should never be violated at a logical level: if the assertion fails, the application is to be considered broken and generally halts with an appropriate error message. Assertions are supported directly by the Java language and they can be turned on or off at runtime to remove any performance penalty of including them in your code.
Using assertions to test for the correct behavior of your application is a simple but powerful technique for ensuring software quality. It fills a gap between those aspects of software that can be checked automatically by the compiler and those more generally checked by “unit tests” and human testing. Assertions test assumptions about program behavior and make them guarantees (at least while they are activated).
If you have programmed before, you may have seen something like the following3:
if(!condition)thrownewAssertionError("fatal error: 42");
An assertion in Java is equivalent to this example, but is performed with the assert language keyword. It takes a Boolean condition and an optional expression value. If the assertion fails, an AssertionError is thrown, which usually causes Java to bail out of the application.
The optional expression may evaluate to either a primitive or object type. Either way, its sole purpose is to be turned into a string and shown to the user if the assertion fails; most often you’ll use a string message explicitly. Here are some examples:
assertfalse;assert(array.length>min);asserta>0:a// shows value of a to the userassertfoo!=null:"foo is null!"// shows message "foo is null!" to user
In the event of failure, the first two assertions print only a generic message, whereas the third prints the value of a and the last prints the foo is null! message.
Again, the important thing about assertions is not just that they are more terse than the equivalent if condition, but that they can be enabled or disabled when you run the application. Disabling assertions means that their test conditions are not even evaluated, so there is no performance penalty for including them in your code (other than, perhaps, space in the class files when they are loaded).
Enabling and Disabling Assertions
Assertions are turned on or off at runtime. When disabled, assertions still exist in the class files but are not executed and consume no time. You can enable and disable assertions for an entire application or on a package-by-package or even class-by-class basis. By default, assertions are turned off in Java. To enable them for your code, use the java command flag -ea or -enableassertions:
% java -ea MyApplication
To turn on assertions for a particular class, append the class name:
% java -ea:com.oreilly.examples.Myclass MyApplication
To turn on assertions just for particular packages, append the package name with trailing ellipses (. . .):
%java -ea:com.oreilly.examples...MyApplication
When you enable assertions for a package, Java also enables all subordinate package names (e.g., com.oreilly.examples.text). However, you can be more selective by using the corresponding -da or -disableassertions flag to negate individual packages or classes. You can combine all this to achieve arbitrary groupings like this:
   % java -ea:com.oreilly.examples...
   -da:com.oreilly.examples.text -ea:com.oreilly.examples.text.MonkeyTypewriters
   MyApplication
This example enables assertions for the com.oreilly.examples package as a whole, excludes the package com.oreilly.examples.text, and then turns exceptions on for just one class, MonkeyTypewriters, in that package.
Using Assertions
An assertion enforces a rule about something that should be unchanging in your code and would otherwise go unchecked. You can use an assertion for added safety anywhere you want to verify your assumptions about program behavior that can’t be checked by the compiler.
A common situation that cries out for an assertion is testing for multiple conditions or values where one should always be found. In this case, a failing assertion as the default or “fall through” behavior indicates the code is broken. For example, suppose we have a value called direction that should always contain either the constant value LEFT or RIGHT:
if(direction==LEFT)doLeft();elseif(direction==RIGHT)doRight()elseassertfalse:"bad direction";
The same applies to the default case of a switch:
switch(direction){caseLEFT:doLeft();break;caseRIGHT:doRight();break;default:assertfalse;}
In general, you should not use assertions for checking the validity of arguments to methods because you want that behavior to be part of your application, not just a test for quality control that can be turned off. The validity of input to a method is called its preconditions, and you should usually throw an exception if they are not met; this elevates the preconditions to part of the method’s “contract” with the user. However, checking the correctness of results of your methods with assertions before returning them is a good idea; these are called post-conditions.
Sometimes determining what is or is not a precondition depends on your point of view. For example, when a method is used internally within a class, preconditions may already be guaranteed by the methods that call it. Public methods of the class should probably throw exceptions when their preconditions are violated, but a private method might use assertions because its callers are always closely related code that should obey the correct behavior.
The Logging API
The java.util.logging package provides a highly flexible and easy-to-use logging framework for system information, error messages, and fine-grained tracing (debugging) output. With the logging package, you can apply filters to select log messages, direct their output to one or more destinations (including files and network services), and format the messages appropriately for their consumers.
Most importantly, much of this basic logging configuration can be set up externally at runtime through the use of a logging setup properties file or an external program. For example, by setting the right properties at runtime, you can specify that log messages are to be sent both to a designated file in XML format and also logged to the system console in a digested, human-readable form. Furthermore, for each of those destinations, you can specify the level or priority of messages to be logged, discarding those below a certain threshold of significance. By following the correct source conventions in your code, you can even make it possible to adjust the logging levels for specific parts of your application, allowing you to target individual packages and classes for detailed logging without being overwhelmed by too much output. The Logging API can even be controlled remotely via Java Management Extensions MBean APIs.
Overview
Any good logging API must have at least two guiding principles. First, performance should not inhibit the developer from using log messages freely. As with Java language assertions, when log messages are turned off, they should not consume any significant amount of processing time. This means that there’s no performance penalty for including logging statements as long as they’re turned off. Second, although some users may want advanced features and configuration, a logging API must have some simple mode of usage that is convenient enough for time-starved developers to use in lieu of the old standby System.out.println(). Java’s Logging API provides a simple model and many convenience methods that make it very tempting.4
Loggers
The heart of the logging framework is the logger, an instance of java.util.logging.Logger. In most cases, this is the only class your code will ever have to deal with. A logger is constructed from the static Logger.getLogger() method, with a logger name as its argument. Logger names place loggers into a hierarchy with a global, root logger at the top and a tree and children below. This hierarchy allows the configuration to be inherited by parts of the tree so that logging can be automatically configured for different parts of your application. The convention is to use a separate logger instance in each major class or package and to use the dot-separated package and/or class name as the logger name. For example:
packagecom.oreilly.learnjava;publicclassBook{staticLoggerlog=Logger.getLogger("com.oreilly.learnjava.Book");
The logger provides a wide range of methods to log messages; some take very detailed information, and some convenience methods take only a string for ease of use. For example:
log.warning("Disk 90% full.");log.info("New user joined chat room.");
We cover methods of the logger class in detail a bit later. The names warning and info are two examples of logging levels; there are seven levels ranging from SEVERE at the top to FINEST at the bottom. Distinguishing log messages in this way allows us to select the level of information that we want to see at runtime. Rather than simply logging everything and sorting through it later (with negative performance impact) we can tweak which messages are generated. We’ll talk more about logging levels in the next section.
We should also mention that for convenience in very simple applications or experiments, a logger for the name “global” is provided in the static field Logger.global. You can use it as an alternative to the old standby System.out.println() for those cases where that is still a temptation:
Logger.global.info("Doing foo...")
Handlers
Loggers represent the client interface to the logging system, but the actual work of publishing messages to destinations (such as files or the console) is done by handler objects. Each logger may have one or more Handler objects associated with it, which includes several predefined handlers supplied with the Logging API: ConsoleHandler, FileHandler, StreamHandler, and SocketHandler. Each handler knows how to deliver messages to its respective destination. ConsoleHandler is used by the default configuration to print messages on the command line or system console. FileHandler can direct output to files using a supplied naming convention and automatically rotate the files as they become full. The others send messages to streams and sockets, respectively. There is one additional handler, MemoryHandler, that can hold a number of log messages in memory. MemoryHandler has a circular buffer, which maintains a certain number of messages until it is triggered to publish them to another designated handler.
As we said, loggers can be set to use one or more handlers. Loggers also send messages up the tree to each of their parent logger’s handlers. In the simplest configuration, this means that all messages end up distributed by the root logger’s handlers. We’ll soon see how to set up output using the standard handlers for the console, files, etc.
Filters
Before a logger hands off a message to its handlers or its parent’s handlers, it first checks whether the logging level is sufficient to proceed. If the message doesn’t meet the required level, it is discarded at the source. In addition to level, you can implement arbitrary filtering of messages by creating Filter classes that examine the log message before it is processed. A Filter class can be applied to a logger externally at runtime in the same way that the logging level, handlers, and formatters, which are discussed next, can be. A Filter may also be attached to an individual Handler to filter records at the output stage (as opposed to the source).
Formatters
Internally, messages are carried in a neutral format, including all the source information provided. It is not until they are processed by a handler that they are formatted for output by an instance of a Formatter object. The logging package comes with two basic formatters: SimpleFormatter and XMLFormatter. The SimpleFormatter is the default used for console output. It produces short, human-readable summaries of log messages. XMLFormatter encodes all the log message details into an XML record format. The DTD for the format can be found at http://java.sun.com/dtd/.
Logging Levels
Table 6-1 lists the logging levels from most to least significant.
| Level | Meaning |
|---|---|
|
Application failure |
|
Notification of potential problem |
|
Messages of general interest to end users |
|
Detailed system configuration information for administrators |
|
Successively more detailed application tracing information for developers |
These levels fall into three camps: end user, administrator, and developer. Applications often default to logging only messages of the INFO level and above (INFO, WARNING, and SEVERE). These levels are generally seen by end users and messages logged to them should be suitable for general consumption. In other words, they should be written clearly so they make sense to an average user of the application. Often these kinds of messages are presented to the end user on a system console or in a pop-up message dialog.
The CONFIG level should be used for relatively static but detailed system information that could assist an administrator or installer. This might include information about the installed software modules, host system characteristics, and configuration parameters. These details are important, but probably not as meaningful to an end user.
The FINE, FINER, and FINEST levels are for developers or others with knowledge of the internals of the application. These should be used for tracing the application at successive levels of detail. You can define your own meanings for these. We’ll suggest a rough outline in our example, coming up next.
A Simple Example
In the following (admittedly very contrived) example, we use all the logging levels so that we can experiment with logging configuration. Although the sequence of messages is nonsensical, the text is representative of messages of that type.
importjava.util.logging.*;publicclassLogTest{publicstaticvoidmain(Stringargv[]){Loggerlogger=Logger.getLogger("com.oreilly.LogTest");logger.severe("Power lost - running on backup!");logger.warning("Database connection lost, retrying...");logger.info("Startup complete.");logger.config("Server configuration: standalone, JVM version 1.5");logger.fine("Loading graphing package.");logger.finer("Doing pie chart");logger.finest("Starting bubble sort: value ="+42);}}
There’s not much to this example. We ask for a logger instance for our class using the static Logger.getLogger() method, specifying a class name. The convention is to use the fully qualified class name, so we’ll pretend that our class is in a com.oreilly package.
Now, run LogTest. You should see output like the following on the system console:
Jan6,20193:24:36PMLogTestmainSEVERE:Powerlost-runningonbackup!Jan6,20193:24:37PMLogTestmainWARNING:Databaseconnectionlost,retrying...Jan6,20193:24:37PMLogTestmainINFO:Startupcomplete.
We see the INFO, WARNING, and SEVERE messages, each identified with a date and timestamp and the name of the class and method (LogTest main) from which they came. Notice that the lower-level messages did not appear. This is because the default logging level is normally set to INFO, meaning that only messages of severity INFO and above are logged. Also note that the output went to the system console and not to a logfile somewhere; that’s also the default. Now we’ll describe where these defaults are set and how to override them at runtime.
Logging Setup Properties
As we said in the introduction, probably the most important feature of the Logging API is the ability to configure so much of it at runtime through the use of external properties or applications. The default logging configuration is stored in the file jre/lib/logging.properties in the directory where Java is installed. It’s a standard Java properties file (of the kind we described earlier in this chapter).
The format of this file is simple. You can make changes to it, but you don’t have to. Instead, you can specify your own logging setup properties file on a case-by-case basis using a system property at runtime, as follows:
% java -Djava.util.logging.config.file=myfile.properties
In this command line, myfile is your properties file that contains the directive, which we’ll describe next. If you want to make this file designation more permanent, you can do so by setting the filename in the corresponding entry using the Java Preferences API described earlier in this chapter. You can go even further and instead of specifying a setup file, supply a class that is responsible for setting up all logging configuration, but we won’t get into that here.
A very simple logging properties file might look like this:
#Setthedefaultlogginglevel.level=FINEST#Directoutputtotheconsolehandlers=java.util.logging.ConsoleHandler
Here, we have set the default logging level for the entire application using the .level (that’s dot-level) property. We have also used the handlers property to specify that an instance of the ConsoleHandler should be used (just like the default setup) to show messages on the console. If you run our application again, specifying this properties file as the logging setup, you will now see all our log messages.
But we’re just getting warmed up. Next, let’s look at a more complex configuration:
#Setthedefaultlogginglevel.level=INFO#Ouputtofileandconsolehandlers=java.util.logging.FileHandler,java.util.logging.ConsoleHandler#Configurethefileoutputjava.util.logging.FileHandler.level=FINESTjava.util.logging.FileHandler.pattern=%h/Test.logjava.util.logging.FileHandler.limit=25000java.util.logging.FileHandler.count=4java.util.logging.FileHandler.formatter=java.util.logging.XMLFormatter#Configuretheconsoleoutputjava.util.logging.ConsoleHandler.level=WARNING#Levelsforspecificclassescom.oreilly.LogTest.level=FINEST
In this example, we have configured two log handlers: a ConsoleHandler with the logging level set to WARNING and also an instance of FileHandler that sends the output to an XML file. The file handler is configured to log messages at the FINEST level (all messages) and to rotate logfiles every 25,000 lines, keeping a maximum of four files.
The filename is controlled by the pattern property. Forward slashes in the filename are automatically localized to backslash () if necessary. The special symbol %h refers to the user home. You can use %t to refer to the system temporary directory. If filenames conflict, a number is appended automatically after a dot (starting at zero). Alternatively, you can use %u to indicate where a unique number should be inserted into the name. Similarly, when files rotate, a number is appended after a dot at the end. You can take control of where the rotation number is placed with the %g identifier.
In our example, we specified the XMLFormatter class. We could also have used the SimpleFormatter class to send the same kind of simple output to the console. The ConsoleHandler also allows us to specify any formatter we wish, using the formatter property.
Finally, we promised earlier that you could control logging levels for parts of your applications. To do this, set properties on your application loggers using their hierarchical names:
#Levelsforspecificlogger(class)namescom.oreilly.LogTest.level=FINEST
Here, we’ve set the logging level for just our test logger, by name. The log properties follow the hierarchy, so we could set the logging level for all classes in the oreilly package with:
com.oreilly.level=FINEST
Logging levels are set in the order in which they are read in the properties file, so set the general ones first. Also note that the levels set on the handlers allow the file handler to filter only the messages being supplied by the loggers. So setting the file handler to FINEST won’t revive messages squelched by a logger set to SEVERE (only the SEVERE messages will make it to the handler from that logger).
The Logger
In our example, we used the seven convenience methods named for the various logging levels. There are also three groups of general methods that can be used to provide more detailed information. The most general are:
log(Levellevel,Stringmsg)log(Levellevel,Stringmsg,Objectparam1)log(Levellevel,Stringmsg,Objectparams[])log(Levellevel,Stringmsg,Throwablethrown)
These methods accept as their first argument a static logging level identifier from the Level class, followed by a parameter, array, or exception type. The level identifier is one of Level.SEVERE, Level.WARNING, Level.INFO, and so on.
In addition to these four methods, there are convenience methods called entering(), exiting(), and throwing() that developers can use to log detailed trace information.
Performance
In the introduction, we said that performance is a priority of the Logging API. To that end we’ve described that log messages are filtered at the source, using logging levels to cut off processing of messages early. This saves much of the expense of handling them. However, it cannot prevent certain kinds of setup work that you might do before the logging call. Specifically, because we’re passing things into the log methods, it’s common to construct detailed messages or render objects to strings as arguments. Often this kind of operation is costly. To avoid unnecessary string construction, you should wrap expensive log operations in a conditional test using the Logger isLoggable() method to test whether you should carry out the operation:
if(log.isLoggable(Level.CONFIG)){log.config("Configuration: "+loadExpensiveConfigInfo());}
Real-world Exceptions
Java’s adoption of exceptions as an error-handling technique makes it much simpler for developers to write robust code. The compiler forces you to think about checked exceptions ahead of time. Unchecked exceptions will definitely pop up, but assertions can help you watch out for those runtime problems and hopefully prevent a crash.
The try-with-resources feature added in Java 7 makes it even simpler for developers to keep their code clean and “do the right thing” when interracting with limited system resources such as files and network connections. As we noted at the beginning of the chapter, other languages certainly have facilities or customs for dealing with these problems. Java, as a language, works hard to help you consider issues that can arise in your code thoughtfully. And the more you work through resolving those issues, the more stable your application will be, and thus the happier your users.
And even when the errors are subtle and don’t cause your application to crash, Java provides the java.util.logging package to help track down the root problem. You can adjust the details that are produced in the logs all while keeping your application performing well.
Many of our examples so far have been straightforward and have not really required any fancy error checking. Rest assured we’ll be exploring more interesting code with many, many things that merit exception handling. Later chapters will cover topics like multi-threaded programming and networking. Those topics are rife with situations that can go wrong at runtime such as a big calculation running amok or a wi-fi connection dropping. Pardon the pun, but you’ll be trying all of these new exception and error tricks soon enough!
1 The somewhat obscure setjmp() and longjmp() statements in C can save a point in the execution of code and later return to it unconditionally from a deeply buried location. In a limited sense, this is the functionality of exceptions in Java.
2 For example, the getHeight() method of the Image class returns -1 if the height isn’t known yet. No error has occurred; the height will be available in the future. In this situation, throwing an exception would be excessive and would impact performance.
3 If you have done some programming, hopefully you have not written such opaque error messages! The more helpful and explanatory your messages, the better.
4 For those who do grow beyond the features of the Java Logging API, check out Apache’s log4j 2 and the Simple Logging Facade for Java (slf4j) which makes it possible to further tailor your logging at deployment time.