
Chapter 2. A First Application
Before diving into our full discussion of the Java language, let’s get our feet wet by jumping into some working code and splashing around a bit. In this chapter, we’ll build a friendly little application that illustrates many of the concepts used throughout the book. We’ll take this opportunity to introduce general features of the Java language and applications.
This chapter also serves as a brief introduction to the object-oriented and multithreaded aspects of Java. If these concepts are new to you, we hope that encountering them here in Java for the first time will be a straightforward and pleasant experience. If you have worked with another object-oriented or multithreaded programming environment, you should especially appreciate Java’s simplicity and elegance. This chapter is intended only to give you a bird’s eye view of the Java language and a feel for how it is used. If you have trouble with any of the concepts introduced here, rest assured they will be covered in greater detail later in the book.
We can’t stress enough the importance of experimentation as you learn new concepts here and throughout the book. Don’t just read the examples—run them. Where we can, we’ll show you how to use jshell (more on that in “Trying Java”) to try things in realtime. The source code for these examples and all of the examples in this book can be found on GitHub. Compile the programs and try them. Then, turn our examples into your examples: play with them, change their behavior, break them, fix them, and hopefully have some fun along the way.
Java Tools and Environment
Although it’s possible to write, compile, and run Java applications with nothing more than Oracle’s open source Java Development Kit (OpenJDK) and a simple text editor (e.g., vi, Notepad, etc.), today the vast majority of Java code is written with the benefit of an Integrated Development Environment (IDE). The benefits of using an IDE include an all-in-one view of Java source code with syntax highlighting, navigation help, source control, integrated documentation, building, refactoring, and deployment all at your fingertips. Therefore, we are going to skip an academic command-line treatment and start with a popular, free IDE, IntelliJ IDEA CE (Community Edition). If you are adverse to using an IDE, feel free to use the command-line instructions javac HelloJava.java for compilation and java HelloJava to run the upcoming examples.
IntelliJ IDEA requires Java to be installed. This book covers Java 11 language features (with a few mentions of new things in 12 and 13), so although the examples in this chapter will work with older versions, it’s best to have JDK 11 installed to ensure that all examples in the book compile. The JDK includes several developer tools that we’ll discuss in Chapter 3. You can check to see which version, if any, you have installed by typing java -version at the command line. If Java isn’t present, or if it’s a version older than JDK 11, you will want to download the latest version from Oracle’s OpenJDK download page. All that is required for the examples in this book is the basic JDK, which is the first option in the upper-left corner of the download page.
IntelliJ IDEA is an IDE available at jetbrains.com. For the purposes of this book, and getting started with Java in general, the Community Edition is sufficient. The download is an executable installer or compressed archive: .exe for Windows, .dmg for macOS, and .tar.gz on Linux. Double-click to expand and run the installer. Appendix A contains more details on downloading and installing IDEA as well as information on loading the code examples for this book.
Installing the JDK
It should be said at the outset that you are still free to download and use the official, commercial JDK from Oracle for personal use. The versions available on Oracle’s download page include the latest version as well as the most recent long-term support version (13 and 11, respectively, at the time of this writing) with links to older versions if legacy compatibility is something you must contend with.
If you plan to use Java in any commercial or shared capacity however, the Oracle JDK now comes with strict (and paid) licensing terms. For this and other more philosophical reasons, we primarily use the OpenJDK mentioned previously in “Growing Up”. Regrettably, this open-source version does not include nice installers for the different platforms. If you want a simple setup and are happy with one of the long-term support versions such as Java 8 or Java 11, check out other OpenJDK distributions such as Amazon’s Corretto.
For those that want the latest release and don’t mind a little configuring work, let’s take a look at the typical steps required for installing the OpenJDK on each of the major platforms. Regardless of which operating system you use, if you are going to use the OpenJDK, you’ll head to Oracle’s OpenJDK download page.
Installing OpenJDK on Linux
The file you download for generic Linux systems is a compressed tar file (tar.gz) and can be unpacked in a shared directory of your choice. Using the terminal app, change to the directory where you downloaded the file and run the following commands to install and verify Java:
~$ cd Downloads

~/Downloads$ sudo tar tvf openjdk-13.0.1_linux-x64_bin.tar.gz --directory /usr/lib/jvm
...
jdk-13.0.1/lib/src.zip
jdk-13.0.1/lib/tzdb.dat
jdk-13.0.1/release

~/Downloads$ /usr/lib/jvm/jdk-13.0.1/bin/java -version
openjdk version "13.0.1" 2019-10-15
OpenJDK Runtime Environment (build 13.0.1+9)
OpenJDK 64-Bit Server VM (build 13.0.1+9, mixed mode, sharing)
With Java successfully unpacked, you can configure your terminal to use that environment by setting the JAVA_HOME and PATH variables. We’ll test that setup by checking the version of the Java compiler, javac:
~/Downloads$ cd

~$ export JAVA_HOME=/usr/lib/jvm/jdk-13.0.1

~$ export PATH=$PATH:$JAVA_HOME/bin

~$ javac -version
javac 13.0.1
You’ll want to make those JAVA_HOME and PATH changes permanent by updating the startup or rc scripts for your shell. For example, you could add both export lines just as we used in the terminal to your .bashrc file.
It’s also worth a quick note to point out that many Linux distributions make some versions of Java available through their particular package managers. You may wish to search online for things like “install java ubuntu” or “install java redhat” to see if there are alternative mechanisms to use that might fit in better with how you manage your Linux box overall.
Installing OpenJDK on Mac
For users on macOS systems, the OpenJDK installation is quite similar to the Linux process: download a tar.gz binary archive and unpack it in the right place. Unlike Linux, “the right place” is quite specific.1
Using the Terminal app (in the Applications → Utilities folder) you can unpack and relocate the OpenJDK folder like so:
~ $ cd Downloads

Downloads $ tar xf openjdk-13.0.1_osx-x64_bin.tar.gz

Downloads $ sudo mv jdk-13.0.1.jdk /Library/Java/JavaVirtualMachines/
The sudo command allows administrative users to perform special actions normally reserved for the “super user” (the “s” and “u” in sudo). You’ll be asked for your password. Once you have moved the JDK folder, set the JAVA_HOME environment variable. The java command included with macOS is a wrapper that should now be able to locate your install.
Downloads $ cd ~

~ $ export JAVA_HOME=/Library/Java/JavaVirtualMachines/jdk-13.0.1.jdk/Contents/Home

~ $ java -version
openjdk version "13.0.1" 2019-10-15
OpenJDK Runtime Environment (build 13.0.1+9)
OpenJDK 64-Bit Server VM (build 13.0.1+9, mixed mode, sharing)
As with Linux, you will want to add that JAVA_HOME line to an appropriate startup file (such as the .bash_profile file in your home directory) if you will be working with Java at the command line.
For users on macOS 10.15 (Catalina) and presumably later versions, you may run into a little extra friction when installing Java and testing it out. Owing to changes in macOS, Oracle has not yet certified Java for Catalina. You can, of course, still run Java on Catalina systems, but more advanced applications may hit bugs. Interested or affected users can read the Oracle tech note on using a JDK with Catalina for more details. The first portion of the tech note covers installation of the official JDK while the latter portion covers installing from a tar.gz archive as we showed above.
Installing OpenJDK on Windows
Windows systems share many of the same concepts as *nix systems even if the user interface for working with those concepts is different. Go ahead and download the OpenJDK archive for Windows—it should be a ZIP file rather than a tar.gz file. Unzip the download file and then move it to an appropriate folder. As with Linux, “appropriate” is really up to you. We created a Java folder in the C:Program Files folder to hold this (and future) versions as shown in Figure 2-1.

Figure 2-1. Java folder on Windows
Once the JDK folder is in place, you’ll need to set a few environment variables, just as with Mac and Linux. The quickest path to the variable settings is to search on “environment” and look for the Control Panel entry titled “Edit the system environment variables” as shown in Figure 2-2.
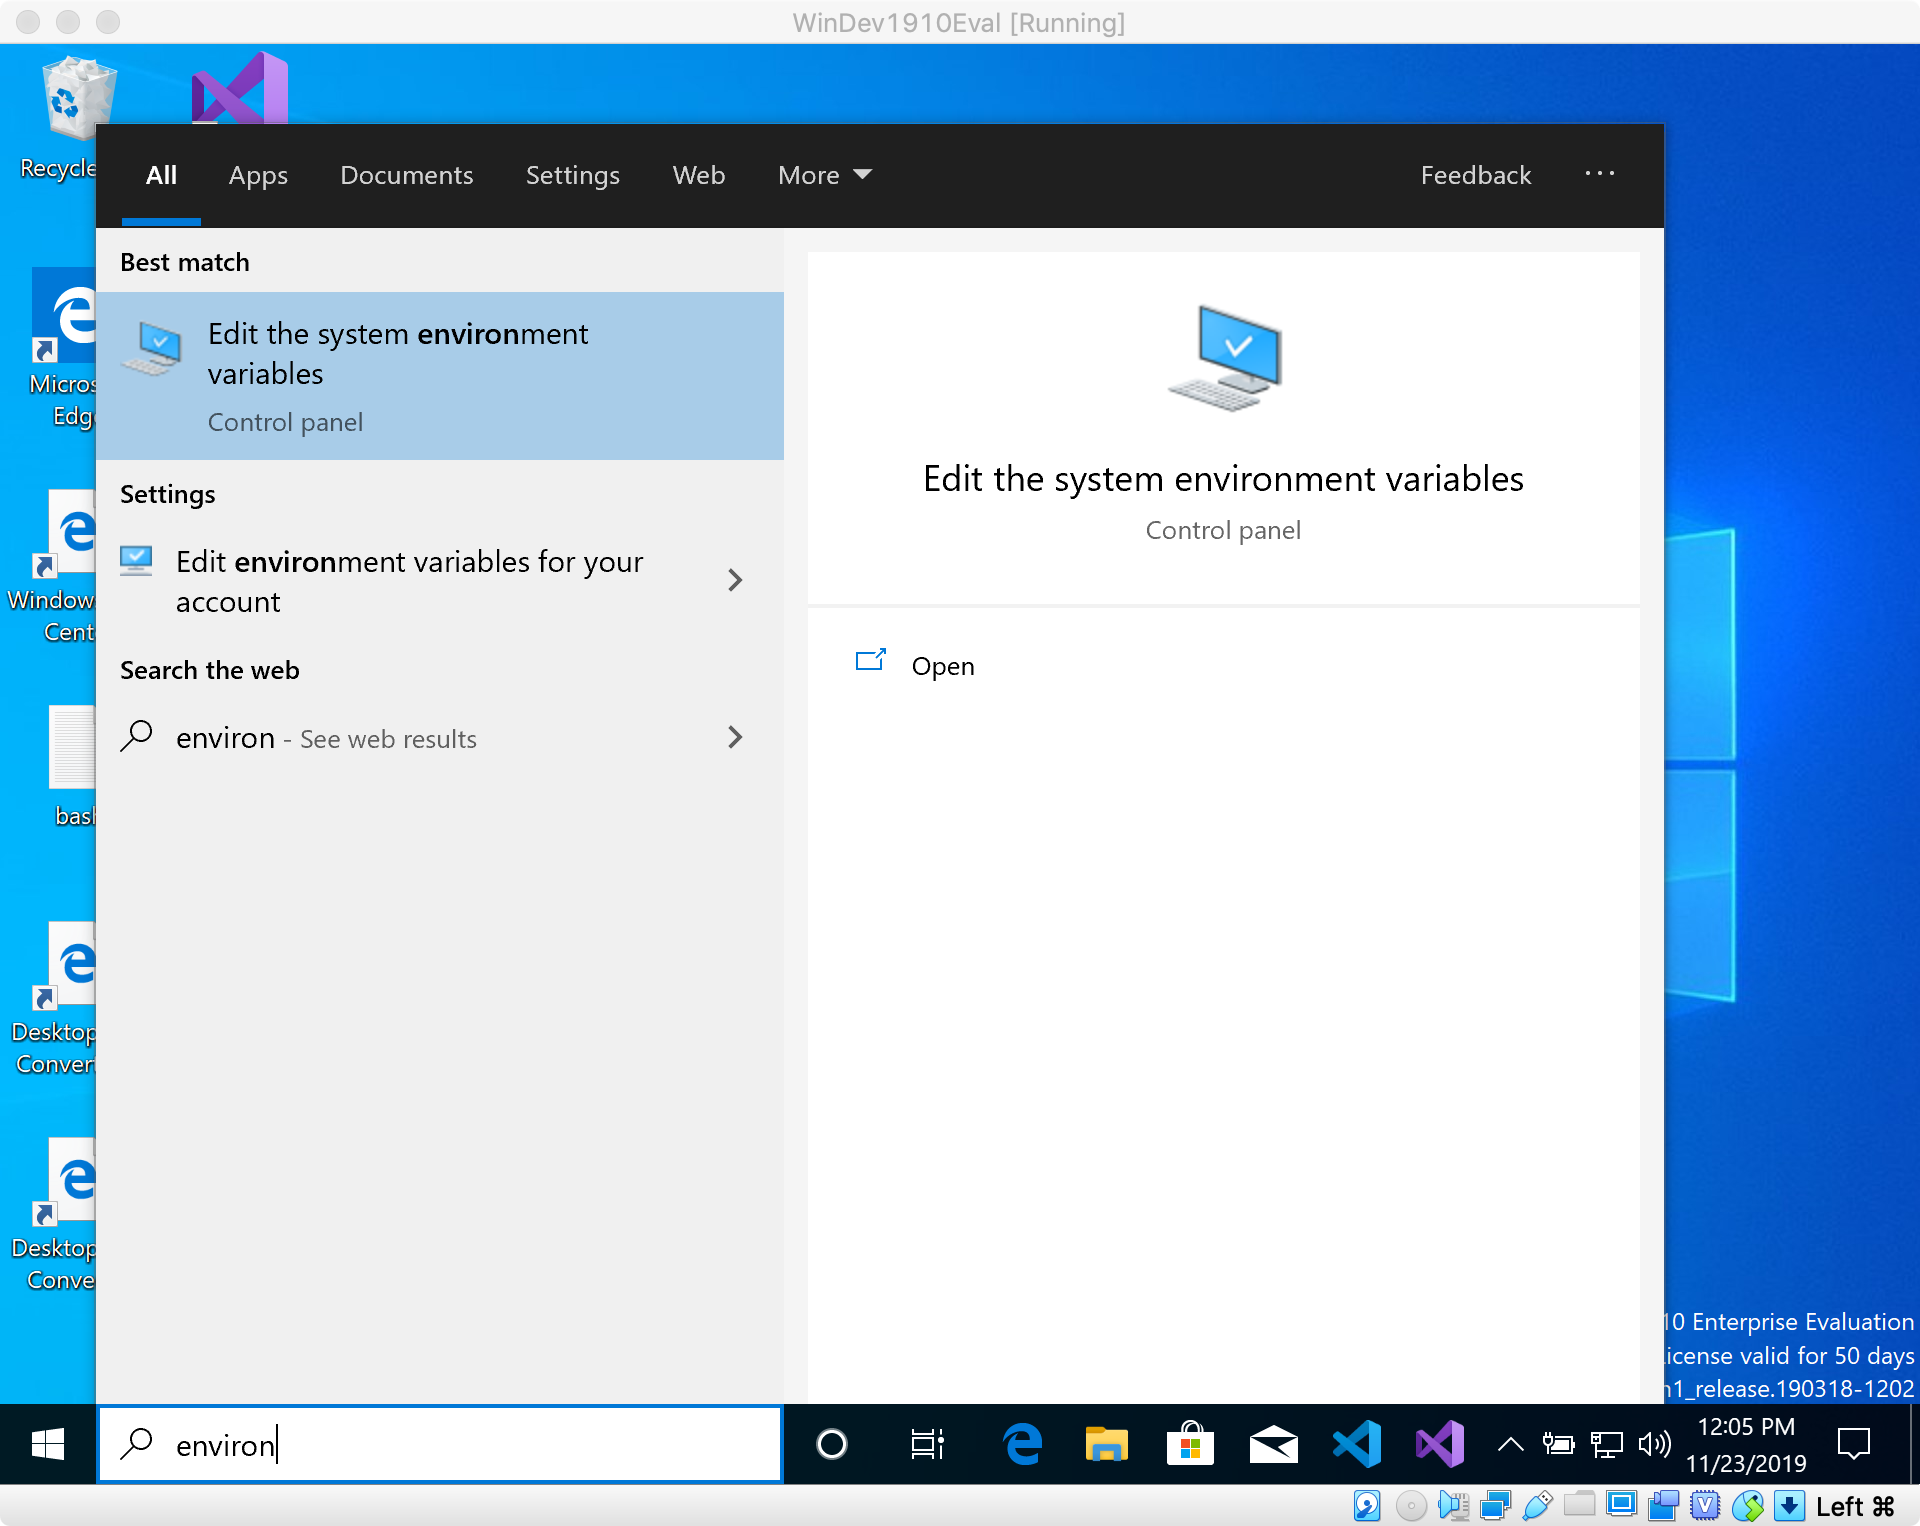
Figure 2-2. Finding the evironment variable editor in Windows
From here you can create a new entry for the JAVA_HOME variable and update the Path entry to know about Java. We chose to add these changes to the System portion, although if you are the only user on your Windows machine, you can also add them to your user account.
For JAVA_HOME, create a new variable and set it to the folder where you installed this particular JDK as shown in Figure 2-3.

Figure 2-3. Creating the JAVA_HOME evironment variable in Windows
With JAVA_HOME set, you can now add an entry to the Path variable so Windows knows where to look for the java and javac tools. You want to point this value to the bin folder where you installed Java. To use your JAVA_HOME value in the path, enclose it with percent signs (%JAVA_HOME%) as shown in Figure 2-4.
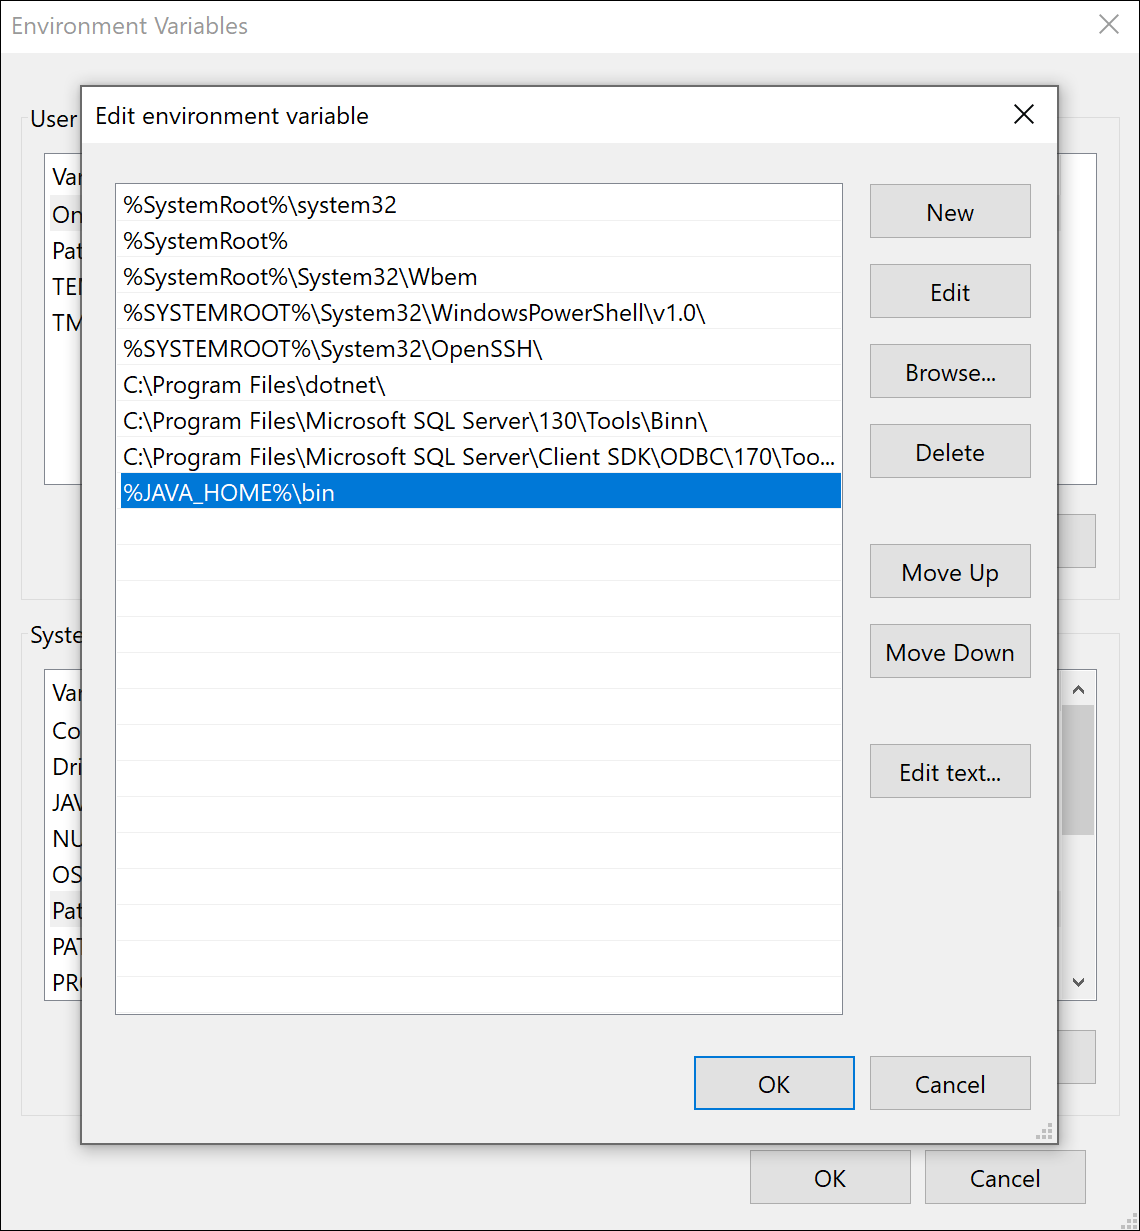
Figure 2-4. Editing the Path variable in Windows
You may not use a command line regularly in Windows, but the Command Prompt application serves the same purpose as terminal apps do in Mac or Linux. Pull up the Command Prompt program and check for the version of Java. You should see something similar to Figure 2-5.
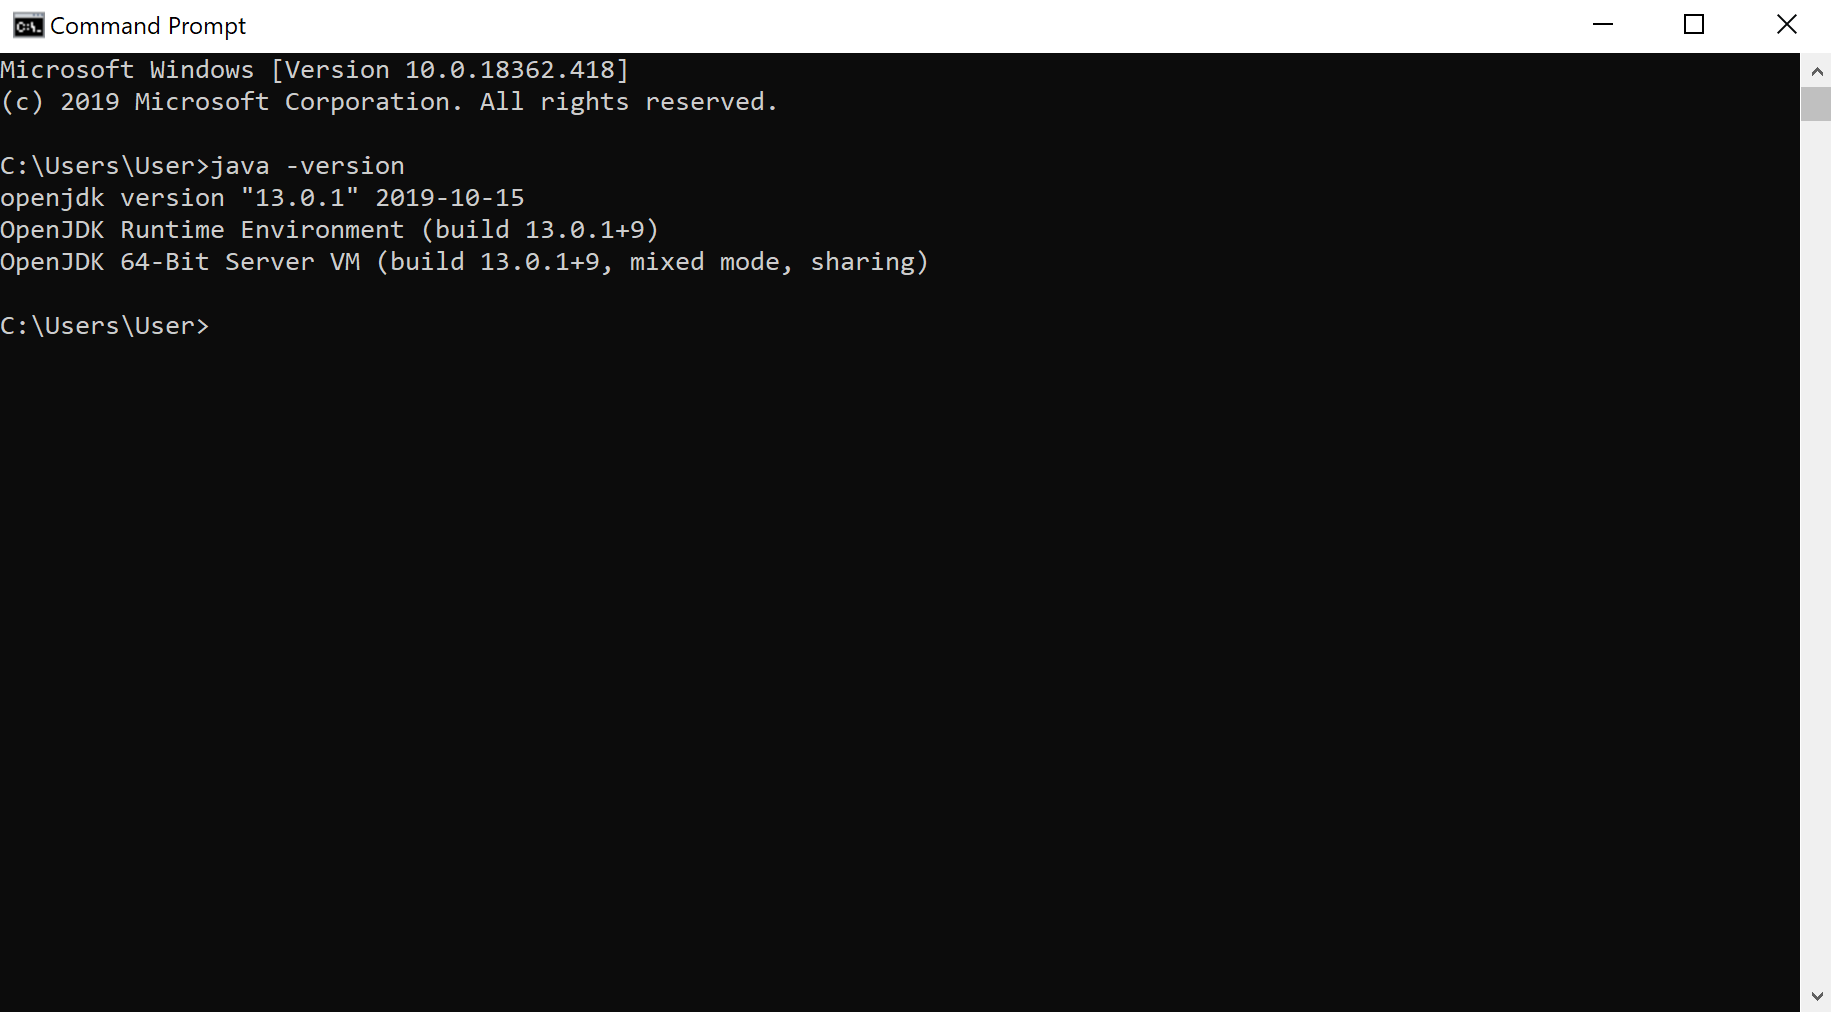
Figure 2-5. Verifying Java in Windows
You can continue using Command Prompt, of course, but now you are also free to point other applications such as IntelliJ IDEA at your installed JDK and simply work with those tools.
Configuring IntelliJ IDEA and Creating a Project
The first time you run IDEA, you’ll be prompted to select a workspace. This is a root or top-level directory to hold new projects that you create within IntelliJ IDEA. The default location varies depending on your platform. If the default seems fine, use it, otherwise feel free to choose an alternate location and click OK.
We are going to create a project to hold all our examples. Select File → New → Java Project from the application menu and type Learning Java in the “Project name” field at the top of the dialog, as seen in Figure 2-6. Make sure the JRE version is set to version 11 or later as seen in the figure and click Next at the bottom.

Figure 2-6. New Java Project dialog
Choose the Command Line App template. This includes a minimal Java class with a main() method that can be executed. The coming chapters will go into much more detail about the structure of Java programs and the commands and statements you can place in those programs. With the template selected as shown in Figure 2-7, click Next.

Figure 2-7. New Java Project template selection
Lastly you need to provide a name and location for your project. We chose the name HelloJava but that name is not special. IDEA will suggest a location based on your project name and the default IDEA projects folder, but you can use the ellipsis (“…”) button to pick an alternate anywhere on your computer. When those two fields are filled in, click Finish.

Figure 2-8. New Java Project name and location
Congratulations! You now have a Java program. Well, almost. You do need to add one line of code to print something to the screen. Inside the curly braces after the public static void main(String[] args) line, add this line:
System.out.println("Hello, World!");
Your completed program should resemble the one shown in the right-side panel of Figure 2-9.
We’ll run this example next and then expand on it to give it a little more flair. The coming chapters will be presenting more interesting examples piecing together more and more elements of Java. We’ll always build these examples in a similar setup, though. These starting steps are good ones to get under your belt.
Running the Project
Starting from the simple template provided by IDEA should leave you in good shape to run your first program. Notice that the Main class listed under the src folder in the project outline on the left has a tiny green “play” button on its class icon in Figure 2-9. That addition indicates IDEA understands how to run the main() method in this class. Try pressing the green triangle play button in the top toolbar. You will see your “Hello World!” message show up in the Run tab along the bottom of the editor. Congratulations are due again—you have now run your first Java program.
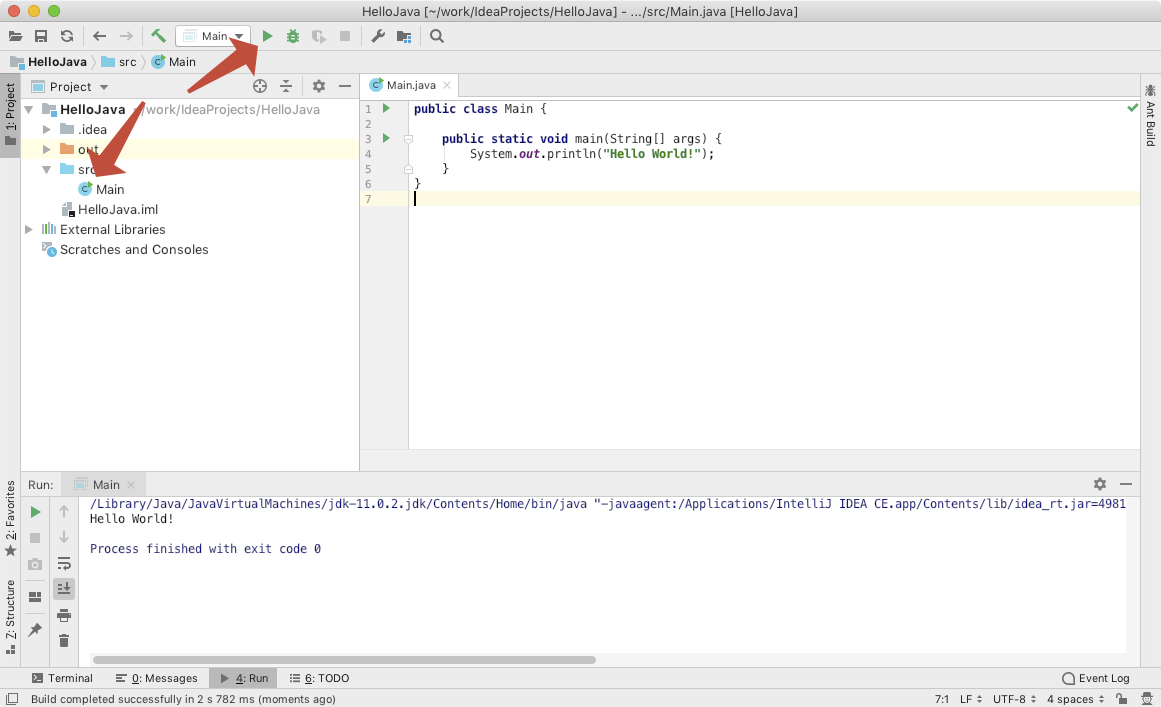
Figure 2-9. Running your Java project
Grabbing the Learning Java Examples
The examples from this book are available online at the GitHub site. GitHub has become the de facto cloud respository site for open-source projects available to the public as well as closed-source, enterprise projects. They have many helpful tools beyond simple source code storage and versioning. If you go on to develop an application or library that you want to share with other, it is worth setting up an account with GitHub and exploring it deeper. Happily you can also just grab ZIP files of public projects without logging in as shown in Figure 2-10.

Figure 2-10. Downloading a ZIP from GitHub
You should end up with a file called learnjava5e-master.zip (since you are grabbing an archive of the “master” branch of this repository).
If you’re familiar with GitHub from other projects, please feel free to clone the repository, but the static ZIP file contains everything you need to try the examples as you read through the rest of this book. When you unzip the download, you’ll find folders for all of the chapters that have examples as well as a completed game folder that contains a fun, light-hearted apple tossing game to help illustrate most of the programming concepts presented throughout the book in one cohesive application. We’ll go into more details on the examples and the game in coming chapters.
As mentioned previously, you can compile and run the examples from the ZIP file right from the command line. You can also import the code into your favorite IDE. Appendix A contains detailed information on how to best import these examples into IntelliJ IDEA.
HelloJava
In the tradition of introductory programming texts, we will begin with Java’s equivalent of the archetypal “Hello World” application, HelloJava.
We’ll end up taking a few passes at this example before we’re done (HelloJava, HelloJava2, etc.), adding features and introducing new concepts along the way. But let’s start with the minimalist version:
publicclassHelloJava{publicstaticvoidmain(String[]args){System.out.println("Hello, Java!");}}
This five-line program declares a class called HelloJava and a method called main() . It uses a predefined method called println() to write some text as output. This is a command-line program, which means that it runs in a shell or DOS window and prints its output there. If you used IDEA’s Hello World template, you might notice that they chose the name Main for their class. There’s nothing incorrect there, but more descriptive names will come in handy as you start building more complex programs. We’ll try to use good names in our examples going forward. Regardless of the name of the class, this approach is a bit old-school for our taste, so before we go any further, we’re going to give HelloJava a graphical user interface (GUI). Don’t worry about the code yet; just follow along with the progression here, and we’ll come back for explanations in a moment.
In place of the line containing the println() method, we’re going to use a JFrame object to put a window on the screen. We can start by replacing the println line with the following three lines:
JFrameframe=newJFrame("Hello, Java!");frame.setSize(300,300);frame.setVisible(true);
This snippet creates a JFrame object with the title “Hello, Java!” The JFrame is a graphical window. To display it, we simply configure its size on the screen using the setSize() method and make it visible by calling the setVisible() method.
If we stopped here, we would see an empty window on the screen with our “Hello, Java!” banner as its title. We’d like our message inside the window, not just scrawled at the top of it. To put something in the window, we need a couple more lines. The following complete example adds a JLabel object to display the text centered in our window. The additional import line at the top is necessary to tell Java where to find the JFrame and JLabel classes (the definitions of the JFrame and JLabel objects that we’re using).
importjavax.swing.*;publicclassHelloJava{publicstaticvoidmain(String[]args){JFrameframe=newJFrame("Hello, Java!");JLabellabel=newJLabel("Hello, Java!",JLabel.CENTER);frame.add(label);frame.setSize(300,300);frame.setVisible(true);}}
Now to compile and run this source, select the ch02/HelloJava.java class from the package explorer along the left and click the Run button in the toolbar along the top. The Run button is a green arrow pointing to the right. See Figure 2-11.
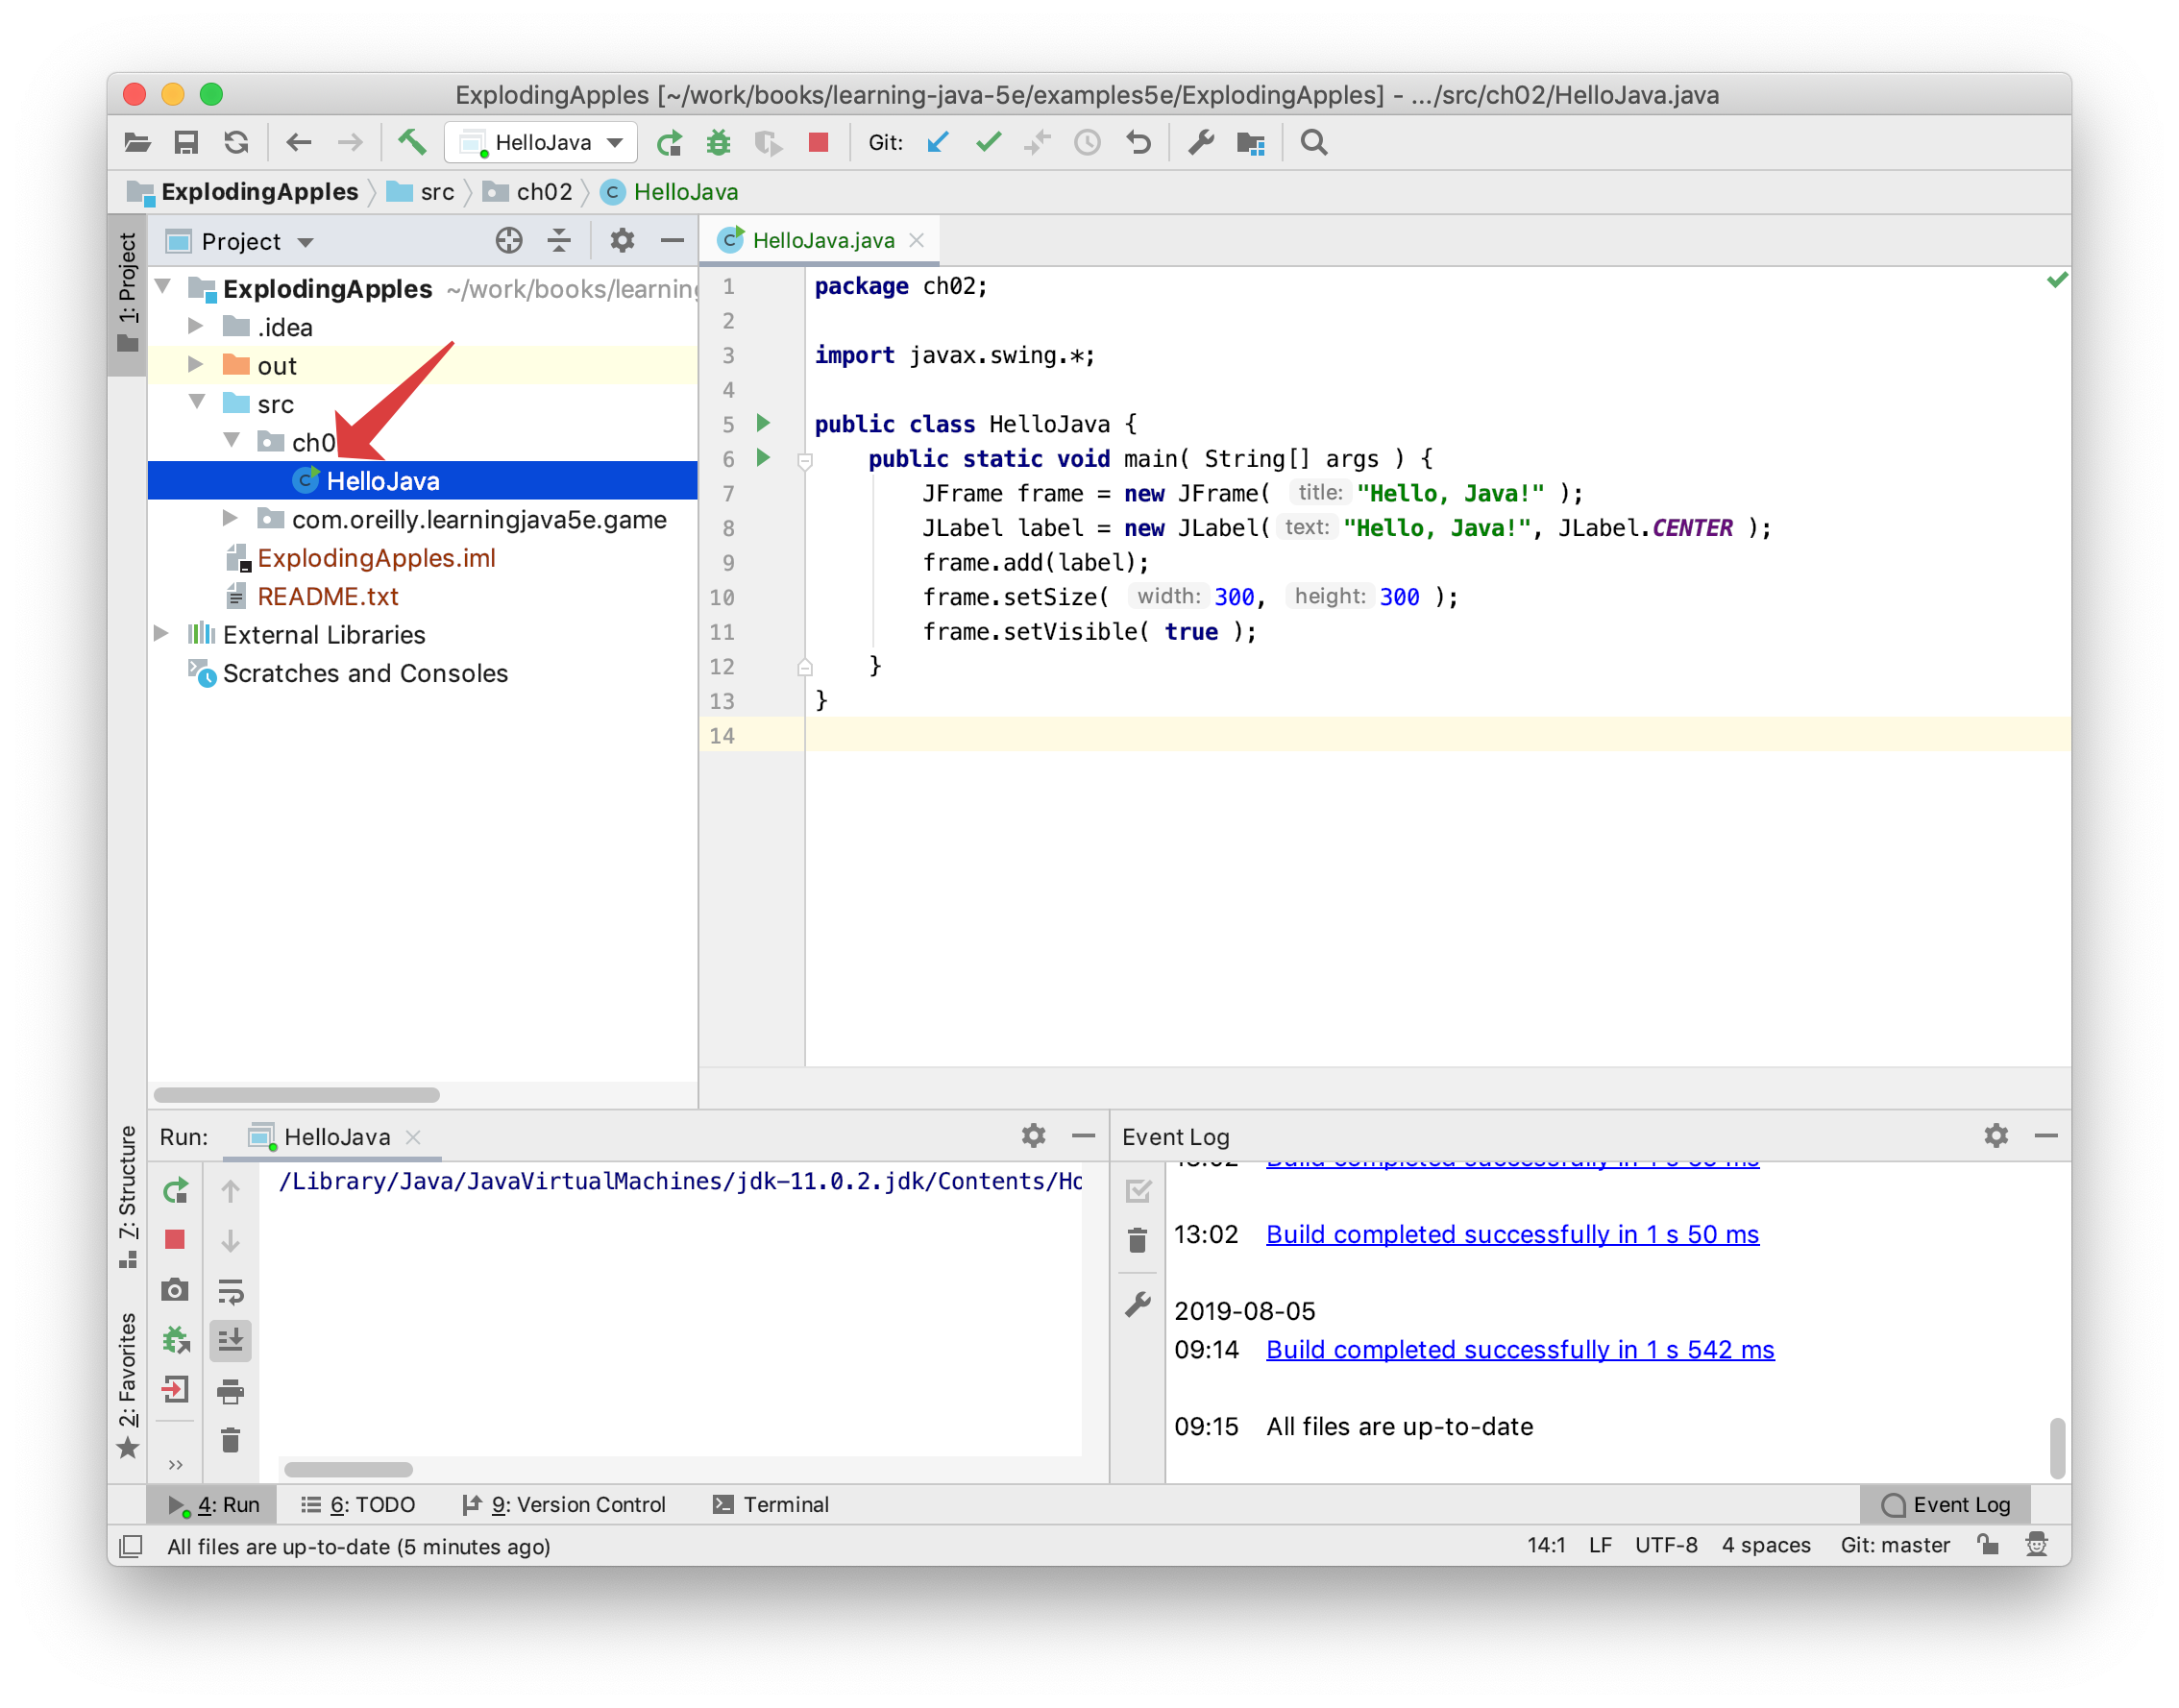
Figure 2-11. Running the HelloJava application
You should see the proclamation shown in Figure 2-12. Congratulations again, you have now run your second Java application! Take a moment to bask in the glow of your monitor.

Figure 2-12. The output of the HelloJava application
Be aware that when you click on the window’s close box, the window goes away, but your program is still running. (We’ll fix this shutdown behavior in a later version of the example.) To stop the Java application in IDEA, click the red square button to the right of the green play button we used to run the program. If you are running the example on the command line, type Ctrl-C. Note that nothing stops you from running more than one instance (copy) of the application at a time.
HelloJava may be a small program, but there is quite a bit going on behind the scenes. Those few lines represent the tip of an iceberg. What lies under the surface are the layers of functionality provided by the Java language and its Swing libraries. Remember that in this chapter, we’re going to cover a lot of ground quickly in an effort to show you the big picture. We’ll try to offer enough detail for a good understanding of what is happening in each example, but will defer detailed explanations until the appropriate chapters. This holds for both elements of the Java language and the object-oriented concepts that apply to them. With that said, let’s take a look now at what’s going on in our first example.
Classes
The first example defines a class named HelloJava.
publicclassHelloJava{...
Classes are the fundamental building blocks of most object-oriented languages. A class is a group of data items with associated functions that can perform operations on that data. The data items in a class are called variables, or sometimes fields; in Java, functions are called methods. The primary benefits of an object-oriented language are this association between data and functionality in class units and also the ability of classes to encapsulate or hide details, freeing the developer from worrying about low-level details.
In an application, a class might represent something concrete, such as a button on a screen or the information in a spreadsheet, or it could be something more abstract, such as a sorting algorithm or perhaps the sense of ennui in a video game character. A class representing a spreadsheet might, for example, have variables that represent the values of its individual cells and methods that perform operations on those cells, such as “clear a row” or “compute values.”
Our HelloJava class is an entire Java application in a single class. It defines just one method, main() , which holds the body of our program:
publicclassHelloJava{publicstaticvoidmain(String[]args){...
It is this main() method that is called first when the application is started. The bit labeled String [] args allows us to pass command-line arguments to the application. We’ll walk through the main() method in the next section. Finally, we’ll note that although this version of HelloJava does not define any variables as part of its class, it does use two variables, frame and label, inside its main() method. We’ll have more to say about variables soon as well.
The main() Method
As we saw when we ran our example, running a Java application means picking a particular class and passing its name as an argument to the Java virtual machine. When we did this, the java command looked in our HelloJava class to see if it contained the special method named main() of just the right form. It did, and so it was executed. If it had not been there, we would have received an error message. The main() method is the entry point for applications. Every standalone Java application includes at least one class with a main() method that performs the necessary actions to start the rest of the program.
Our main() method sets up a window (a JFrame) to hold the visual output of the HelloJava class. Right now, it’s doing all the work in the application. But in an object-oriented application, we normally delegate responsibilities to many different classes. In the next incarnation of our example, we’re going to perform just such a split—creating a second class—and we’ll see that as the example subsequently evolves, the main() method remains more or less the same, simply holding the startup procedure.
Let’s quickly walk through our main() method, just so we know what it does. First, main() creates a JFrame, the window that will hold our example:
JFrameframe=newJFrame("Hello, Java!");
The word new in this line of code is very important. JFrame is the name of a class that represents a window on the screen, but the class itself is just a template, like a building plan. The new keyword tells Java to allocate memory and actually create a particular JFrame object. In this case, the argument inside the parentheses tells the JFrame what to display in its title bar. We could have left out the “Hello, Java” text and used empty parentheses to create a JFrame with no title, but only because the JFrame specifically allows us to do that.
When frame windows are first created, they are very small. Before we show the JFrame, we set its size to something reasonable:
frame.setSize(300,300);
This is an example of invoking a method on a particular object. In this case, the setSize() method is defined by the JFrame class, and it affects the particular JFrame object we’ve placed in the variable frame. Like the frame, we also create an instance of JLabel to hold our text inside the window:
JLabellabel=newJLabel("Hello, Java!",JLabel.CENTER);
JLabel is much like a physical label. It holds some text at a particular position—in this case, on our frame. This is a very object-oriented concept: using an object to hold some text, instead of simply invoking a method to “draw” the text and moving on. The rationale for this will become clearer later.
Next, we have to place the label into the frame we created:
frame.add(label);
Here, we’re calling a method named add()to place our label inside the JFrame. The JFrame is a kind of container that can hold things. We’ll talk more about that later. main()’s final task is to show the frame window and its contents, which otherwise would be invisible. An invisible window makes for a pretty boring application.
frame.setVisible(true);
That’s the whole main() method. As we progress through the examples in this chapter, it will remain mostly unchanged as the HelloJava class evolves around it.
Classes and Objects
A class is a blueprint for a part of an application; it holds methods and variables that make up that component. Many individual working copies of a given class can exist while an application is active. These individual incarnations are called instances of the class, or objects. Two instances of a given class may contain different data, but they always have the same methods.
As an example, consider a Button class. There is only one Button class, but an application can create many different Button objects, each one an instance of the same class. Furthermore, two Button instances might contain different data, perhaps giving each a different appearance and performing a different action. In this sense, a class can be considered a mold for making the object it represents, something like a cookie cutter stamping out working instances of itself in the memory of the computer. As you’ll see later, there’s a bit more to it than that—a class can in fact share information among its instances—but this explanation suffices for now. Chapter 5 has the whole story on classes and objects.
The term object is very general and in some other contexts is used almost interchangeably with class. Objects are the abstract entities that all object-oriented languages refer to in one form or another. We will use object as a generic term for an instance of a class. We might, therefore, refer to an instance of the Button class as a button, a Button object, or, indiscriminately, as an object.
The main() method in the previous example creates a single instance of the JLabel class and shows it in an instance of the JFrame class. You could modify main() to create many instances of JLabel, perhaps each in a separate window.
Variables and Class Types
In Java, every class defines a new type (data type). A variable can be declared to be of this type and then hold instances of that class. A variable could, for example, be of type Button and hold an instance of the Button class, or of type SpreadSheetCell and hold a SpreadSheetCell object, just as it could be any of the simpler types, such as int or float, that represent numbers. The fact that variables have types and cannot simply hold any kind of object is another important feature of the language that ensures the safety and correctness of code.
Ignoring the variables used inside the main() method for the moment, only one other variable is declared in our simple HelloJava example. It’s found in the declaration of the main() method itself:
publicstaticvoidmain(String[]args){
Just like functions in other languages, a method in Java declares a list of parameters (variables) that it accepts as arguments, and it specifies the types of those parameters. In this case, the main method is requiring that when it is invoked, it be passed an array of String objects in the variable named args. The String is the fundamental object representing text in Java. As we hinted earlier, Java uses the args parameter to pass any command-line arguments supplied to the Java virtual machine (VM) into your application. (We don’t use them here.)
Up to this point, we have loosely referred to variables as holding objects. In reality, variables that have class types don’t so much contain objects as point to them. Class-type variables are references to objects. A reference is a pointer to or a handle for an object. If you declare a class-type variable without assigning it an object, it doesn’t point to anything. It’s assigned the default value of null, meaning “no value.” If you try to use a variable with a null value as if it were pointing to a real object, a runtime error, NullPointerException, occurs.
Of course, object references have to come from somewhere. In our example, we created two objects using the new operator. We’ll examine object creation in more detail a little later in the chapter.
HelloComponent
Thus far, our HelloJava example has contained itself in a single class. In fact, because of its simple nature, it has really just served as a single, large method. Although we have used a couple of objects to display our GUI message, our own code does not illustrate any object-oriented structure. Well, we’re going to correct that right now by adding a second class. To give us something to build on throughout this chapter, we’re going to take over the job of the JLabel class (bye bye, JLabel!) and replace it with our own graphical class: HelloComponent. Our HelloComponent class will start simple, just displaying our “Hello, Java!” message at a fixed position. We’ll add capabilities later.
The code for our new class is very simple; we added just a few more lines:
importjava.awt.*;classHelloComponentextendsJComponent{publicvoidpaintComponent(Graphicsg){g.drawString("Hello, Java!",125,95);}}
You can add this text to the HelloJava.java file, or you can place it in its own file called HelloComponent.java. If you put it in the same file, you must move the new import statement to the top of the file, along with the other one. To use our new class in place of the JLabel, simply replace the two lines referencing the label with:
frame.add(newHelloComponent());
This time when you compile HelloJava.java, you will see two binary class files: HelloJava.class and HelloComponent.class (regardless of how you arranged the source). Running the code should look much like the JLabel version, but if you resize the window, you’ll notice that our class does not automatically adjust to center the code.
So what have we done, and why have we gone to such lengths to insult the perfectly good JLabel component? We’ve created our new HelloComponent class, extending a generic graphical class called JComponent. To extend a class simply means to add functionality to an existing class, creating a new one. We’ll get into that in the next section. Here we have created a new kind of JComponent that contains a method called paintComponent(), which is responsible for drawing our message. Our paintComponent() method takes one argument named (somewhat tersely) g, which is of type Graphics. When the paintComponent() method is invoked, a Graphics object is assigned to g, which we use in the body of the method. We’ll say more about paintComponent() and the Graphics class in a moment. As for why, you’ll understand when we add all sorts of new features to our new component later on.
Inheritance
Java classes are arranged in a parent-child hierarchy in which the parent and child are known as the superclass and subclass, respectively. We’ll explore these concepts more in Chapter 5. In Java, every class has exactly one superclass (a single parent), but possibly many subclasses. The only exception to this rule is the Object class, which sits atop the entire class hierarchy; it has no superclass.
The declaration of our class in the previous example uses the keyword extends to specify that HelloComponent is a subclass of the JComponent class:
publicclassHelloComponentextendsJComponent{...}
A subclass may inherit some or all the variables and methods of its superclass. Through inheritance, the subclass can use those variables and methods as if it has declared them itself. A subclass can add variables and methods of its own, and it can also override or change the meaning of inherited methods. When we use a subclass, overridden methods are hidden (replaced) by the subclass’s own versions of them. In this way, inheritance provides a powerful mechanism whereby a subclass can refine or extend the functionality of its superclass.
For example, the hypothetical spreadsheet class might be subclassed to produce a new scientific spreadsheet class with extra mathematical functions and special built-in constants. In this case, the source code for the scientific spreadsheet might declare methods for the added mathematical functions and variables for the special constants, but the new class automatically has all the variables and methods that constitute the normal functionality of a spreadsheet; they are inherited from the parent spreadsheet class. This also means that the scientific spreadsheet maintains its identity as a spreadsheet, and we can use the extended version anywhere the simpler spreadsheet could be used. That last sentence has profound implications, which we’ll explore throughout the book. It means that specialized objects can be used in place of more generic objects, customizing their behavior without changing the underlying application. This is called polymorphism and is one of the foundations of object-oriented programming.
Our HelloComponent class is a subclass of the JComponent class and inherits many variables and methods not explicitly declared in our source code. This is what allows our tiny class to serve as a component in a JFrame, with just a few customizations.
The JComponent Class
The JComponent class provides the framework for building all kinds of user interface components. Particular components—such as buttons, labels, and list boxes—are implemented as subclasses of JComponent.
We override methods in such a subclass to implement the behavior of our particular component. This may sound restrictive, as if we are limited to some predefined set of routines, but that is not the case at all. Keep in mind that the methods we are talking about are ways to interact with the windowing system. We don’t have to squeeze our whole application in there. A realistic application might involve hundreds or thousands of classes, with legions of methods and variables and many threads of execution. The vast majority of these are related to the particulars of our job (these are called domain objects). The JComponent class and other predefined classes serve only as a framework on which to base code that handles certain types of user interface events and displays information to the user.
The paintComponent() method is an important method of the JComponent class; we override it to implement the way our particular component displays itself on the screen. The default behavior of paintComponent() doesn’t do any drawing at all. If we hadn’t overridden it in our subclass, our component would simply have been invisible. Here, we’re overriding paintComponent() to do something only slightly more interesting. We don’t override any of the other inherited members of JComponent because they provide basic functionality and reasonable defaults for this (trivial) example. As HelloJava grows, we’ll delve deeper into the inherited members and use additional methods. We will also add some application-specific methods and variables specifically for the needs of HelloComponent.
JComponent is really the tip of another iceberg called Swing. Swing is Java’s user interface toolkit, represented in our example by the import statement at the top; we’ll discuss it in some detail in Chapter Chapter 10.
Relationships and Finger Pointing
We can correctly refer to HelloComponent as a JComponent because subclassing can be thought of as creating an “is a” relationship, in which the subclass “is a” kind of its superclass. HelloComponent is therefore a kind of JComponent. When we refer to a kind of object, we mean any instance of that object’s class or any of its subclasses. Later, we will look more closely at the Java class hierarchy and see that JComponent is itself a subclass of the Container class, which is further derived from a class called Component, and so on, as shown in Figure 2-13.
In this sense, a HelloComponent object is a kind of JComponent, which is a kind of Container, and each of these can ultimately be considered to be a kind of Component. It’s from these classes that HelloComponent inherits its basic GUI functionality and (as we’ll discuss later) the ability to have other graphical components embedded within it as well.
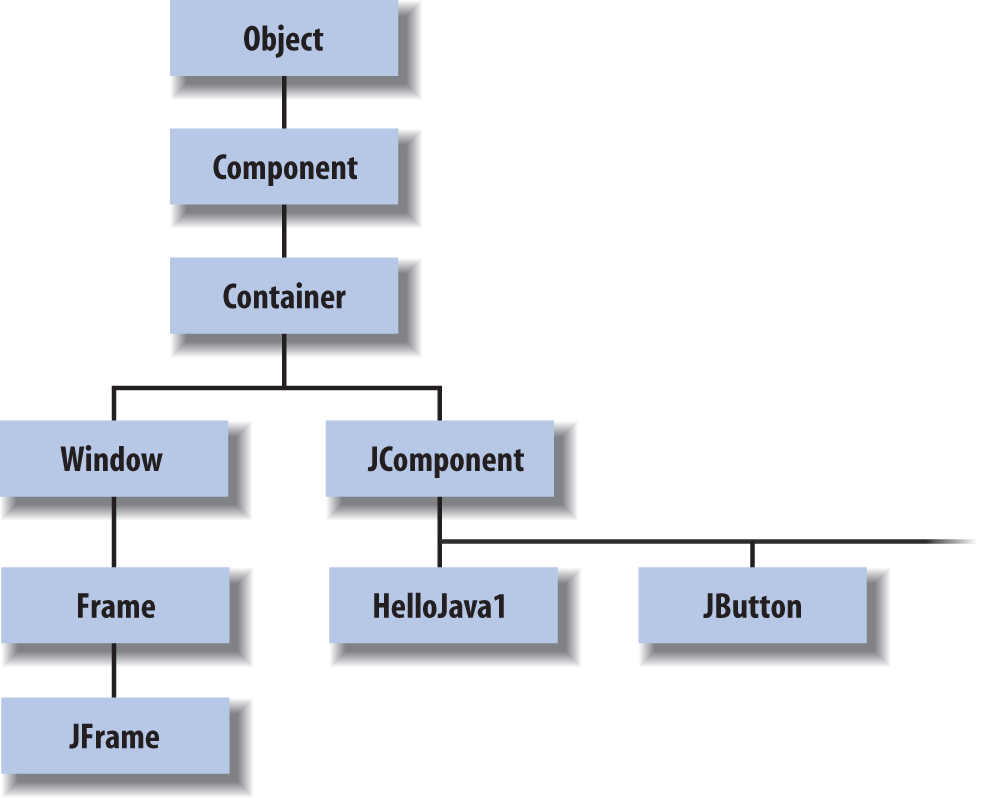
Figure 2-13. Part of the Java class hierarchy
Component is a subclass of the top-level Object class, so all these classes are types of Object. Every other class in the Java API inherits behavior from Object, which defines a few basic methods, as you’ll see in Chapter 5. We’ll continue to use the word object (lowercase o) in a generic way to refer to an instance of any class; we’ll use Object to refer specifically to the type of that class.
Package and Imports
We mentioned earlier that the first line of our example tells Java where to find some of the classes that we’ve been using:
importjavax.swing.*;
Specifically, it tells the compiler that we are going to be using classes from the Swing GUI toolkit (in this case, JFrame, JLabel, and JComponent). These classes are organized into a Java package called javax.swing. A Java package is a group of classes that are related by purpose or by application. Classes in the same package have special access privileges with respect to one another and may be designed to work together closely.
Packages are named in a hierarchical fashion with dot-separated components, such as java.util and java.util.zip. Classes in a package must follow conventions about where they are located in the classpath. They also take on the name of the package as part of their “full name” or, to use the proper terminology, their fully qualified name. For example, the fully qualified name of the JComponent class is javax.swing.JComponent. We could have referred to it by that name directly, in lieu of using the import statement:
publicclassHelloComponentextendsjavax.swing.JComponent{...}
The statement import javax.swing.* enables us to refer to all the classes in the javax.swing package by their simple names. So we don’t have to use fully qualified names to refer to the JComponent, JLabel, and JFrame classes.
As we saw when we added our second example class, there may be one or more import statements in a given Java source file. The imports effectively create a “search path” that tells Java where to look for classes that we refer to by their simple, unqualified names. (It’s not really a path, but it avoids ambiguous names that can create errors.) The imports we’ve seen use the dot star (.*) notation to indicate that the entire package should be imported. But you can also specify just a single class. For example, our current example uses only the Graphics class from the java.awt package. So we could have used import java.awt.Graphics instead of using the wildcard * to import all the Abstract Window Toolkit (AWT) package’s classes. However, we are anticipating using several more classes from this package later.
The java. and javax. package hierarchies are special. Any package that begins with java. is part of the core Java API and is available on any platform that supports Java. The javax. package normally denotes a standard extension to the core platform, which may or may not be installed. However, in recent years, many standard extensions have been added to the core Java API without renaming them. The javax.swing package is an example; it is part of the core API in spite of its name. Figure 2-14 illustrates some of the core Java packages, showing a representative class or two from each.

Figure 2-14. Some core Java packages
java.lang contains fundamental classes needed by the Java language itself; this package is imported automatically and that is why we didn’t need an import statement to use class names such as String or System in our examples. The java.awt package contains classes of the older, graphical Abstract Window Toolkit; java.net contains the networking classes; and so on.
As you gain more experience with Java, you will come to realize that having a command of the packages available to you, what they do, when to use them, and how to use them is a critical part of becoming a successful Java developer.
The paintComponent() Method
The source for our HelloComponent class defines a method, paintComponent(), that overrides the paintComponent() method of the JComponent class:
publicvoidpaintComponent(Graphicsg){g.drawString("Hello, Java!",125,95);}
The paintComponent() method is called when it’s time for our example to draw itself on the screen. It takes a single argument, a Graphics object, and doesn’t return any type of value (void) to its caller.
Modifiers are keywords placed before classes, variables, and methods to alter their accessibility, behavior, or semantics. paintComponent() is declared as public, which means it can be invoked (called) by methods in classes other than HelloComponent. In this case, it’s the Java windowing environment that is calling our paintComponent() method. A method or variable declared as private is accessible only from its own class.
The Graphics object, an instance of the Graphics class, represents a particular graphical drawing area. (It is also called a graphics context.) It contains methods that can be used to draw in this area, and variables that represent characteristics such as clipping or drawing modes. The particular Graphics object we are passed in the paintComponent() method corresponds to our HelloComponent’s area of the screen, inside our frame.
The Graphics class provides methods for rendering shapes, images, and text. In HelloComponent, we invoke the drawString() method of our Graphics object to scrawl our message at the specified coordinates.
As we’ve seen earlier, we access a method of an object by appending a dot (.) and its name to the object that holds it. We invoked the drawString() method of the Graphics object (referenced by our g variable) in this way:
g.drawString("Hello, Java!",125,95);
It may be difficult to get used to the idea that our application is drawn by a method that is called by an outside agent at arbitrary times. How can we do anything useful with this? How do we control what gets done and when? These answers are forthcoming. For now, just think about how you would begin to structure applications that respond on command instead of by their own initiative.
HelloJava2: The Sequel
Now that we’ve got some basics down, let’s make our application a little more interactive. The following minor upgrade allows us to drag the message text around with the mouse. If you’re new to programming, though, the upgrade may not seem so minor. Fear not! We will look closely at all of the topics covered in this example in later chapters. For now, enjoy playing with the example and use it as an opportunity to get more comfortable creating and running Java programs even if you don’t feel as comfortable with the code inside.
We’ll call this example HelloJava2 rather than cause confusion by continuing to expand the old one, but the primary changes here and further on lie in adding capabilities to the HelloComponent class and simply making the corresponding changes to the names to keep them straight (e.g., HelloComponent2, HelloComponent3, and so on). Having just seen inheritance at work, you might wonder why we aren’t creating a subclass of HelloComponent and exploiting inheritance to build upon our previous example and extend its functionality. Well, in this case, that would not provide much advantage, and for clarity we simply start over.
Here is HelloJava2:
//file: HelloJava2.javaimportjava.awt.*;importjava.awt.event.*;importjavax.swing.*;publicclassHelloJava2{publicstaticvoidmain(String[]args){JFrameframe=newJFrame("HelloJava2");frame.add(newHelloComponent2("Hello, Java!"));frame.setDefaultCloseOperation(JFrame.EXIT_ON_CLOSE);frame.setSize(300,300);frame.setVisible(true);}}classHelloComponent2extendsJComponentimplementsMouseMotionListener{StringtheMessage;intmessageX=125,messageY=95;// Coordinates of the messagepublicHelloComponent2(Stringmessage){theMessage=message;addMouseMotionListener(this);}publicvoidpaintComponent(Graphicsg){g.drawString(theMessage,messageX,messageY);}publicvoidmouseDragged(MouseEvente){// Save the mouse coordinates and paint the message.messageX=e.getX();messageY=e.getY();repaint();}publicvoidmouseMoved(MouseEvente){}}
Two slashes in a row indicate that the rest of the line is a comment. We’ve added a few comments to HelloJava2 to help you keep track of everything.
Place the text of this example in a file called HelloJava2.java and compile it as before. You should get new class files, HelloJava2.class and HelloComponent2.class, as a result.
Run the example using the following command:
C:> java HelloJava2
Or, if you are following in IDEA, click the Run button. Feel free to substitute your own salacious comment for the “Hello, Java!” message and enjoy many hours of fun, dragging the text around with your mouse. Notice that now when you click the window’s close button, the application exits; we’ll explain that later when we talk about events. Now let’s see what’s changed.
Instance Variables
We have added some variables to the HelloComponent2 class in our example:
intmessageX=125,messageY=95;StringtheMessage;
messageX and messageY are integers that hold the current coordinates of our movable message. We have crudely initialized them to default values that should place the message somewhere near the center of the window. Java integers are 32-bit signed numbers, so they can easily hold our coordinate values. The variable theMessage is of type String and can hold instances of the String class.
You should note that these three variables are declared inside the braces of the class definition, but not inside any particular method in that class. These variables are called instance variables, and they belong to the object as a whole. Specifically, copies of them appear in each separate instance of the class. Instance variables are always visible to (and usable by) all the methods inside their class. Depending on their modifiers, they may also be accessible from outside the class.
Unless otherwise initialized, instance variables are set to a default value of 0, false, or null, depending on their type. Numeric types are set to 0, Boolean variables are set to false, and class type variables always have their value set to null, which means “no value.” Attempting to use an object with a null value results in a runtime error.
Instance variables differ from method arguments and other variables that are declared inside the scope of a particular method. The latter are called local variables. They are effectively private variables that can be seen only by code inside a method or other code block. Java doesn’t initialize local variables, so you must assign values yourself. If you try to use a local variable that has not yet been assigned a value, your code generates a compile-time error. Local variables live only as long as the method is executing and then disappear, unless something else saves their value. Each time the method is invoked, its local variables are recreated and must be assigned values.
We have used the new variables to make our previously stodgy paintComponent() method more dynamic. Now all the arguments in the call to drawString() are determined by these variables.
Constructors
The HelloComponent2 class includes a special kind of a method called a constructor. A constructor is called to set up a new instance of a class. When a new object is created, Java allocates storage for it, sets instance variables to their default values, and calls the constructor method for the class to do whatever application-level setup is required.
A constructor always has the same name as its class. For example, the constructor for the HelloComponent2 class is called HelloComponent2(). Constructors don’t have a return type, but you can think of them as creating an object of their class’s type. Like other methods, constructors can take arguments. Their sole mission in life is to configure and initialize newly born class instances, possibly using information passed to them in these parameters.
An object is created with the new operator specifying the constructor for the class and any necessary arguments. The resulting object instance is returned as a value. In our example, a new HelloComponent2 instance is created in the main() method by this line:
frame.add(newHelloComponent2("Hello, Java!"));
This line actually does two things. We could write them as two separate lines that are a little easier to understand:
HelloComponent2newObject=newHelloComponent2("Hello, Java!");frame.add(newObject);
The first line is the important one, where a new HelloComponent2 object is created. The HelloComponent2 constructor takes a String as an argument and, as we have arranged it, uses it to set the message that is displayed in the window. With a little magic from the Java compiler, quoted text in Java source code is turned into a String object. (See Chapter 8 for a discussion of the String class.) The second line simply adds our new component to the frame to make it visible, as we did in the previous examples.
While we’re on the topic, if you’d like to make our message configurable, you can change the constructor line to the following:
HelloComponent2newobj=newHelloComponent2(args[0]);
Now you can pass the text on the command line when you run the application using the following command:
C:> java HelloJava2 "Hello, Java!"
args[0] refers to the first command-line parameter. Its meaning will become clearer when we discuss arrays in Chapter 4. If you are using an IDE, you will need to configure it to accept your parameters before running it as shown for IntelliJ IDEA in Figure 2-15.
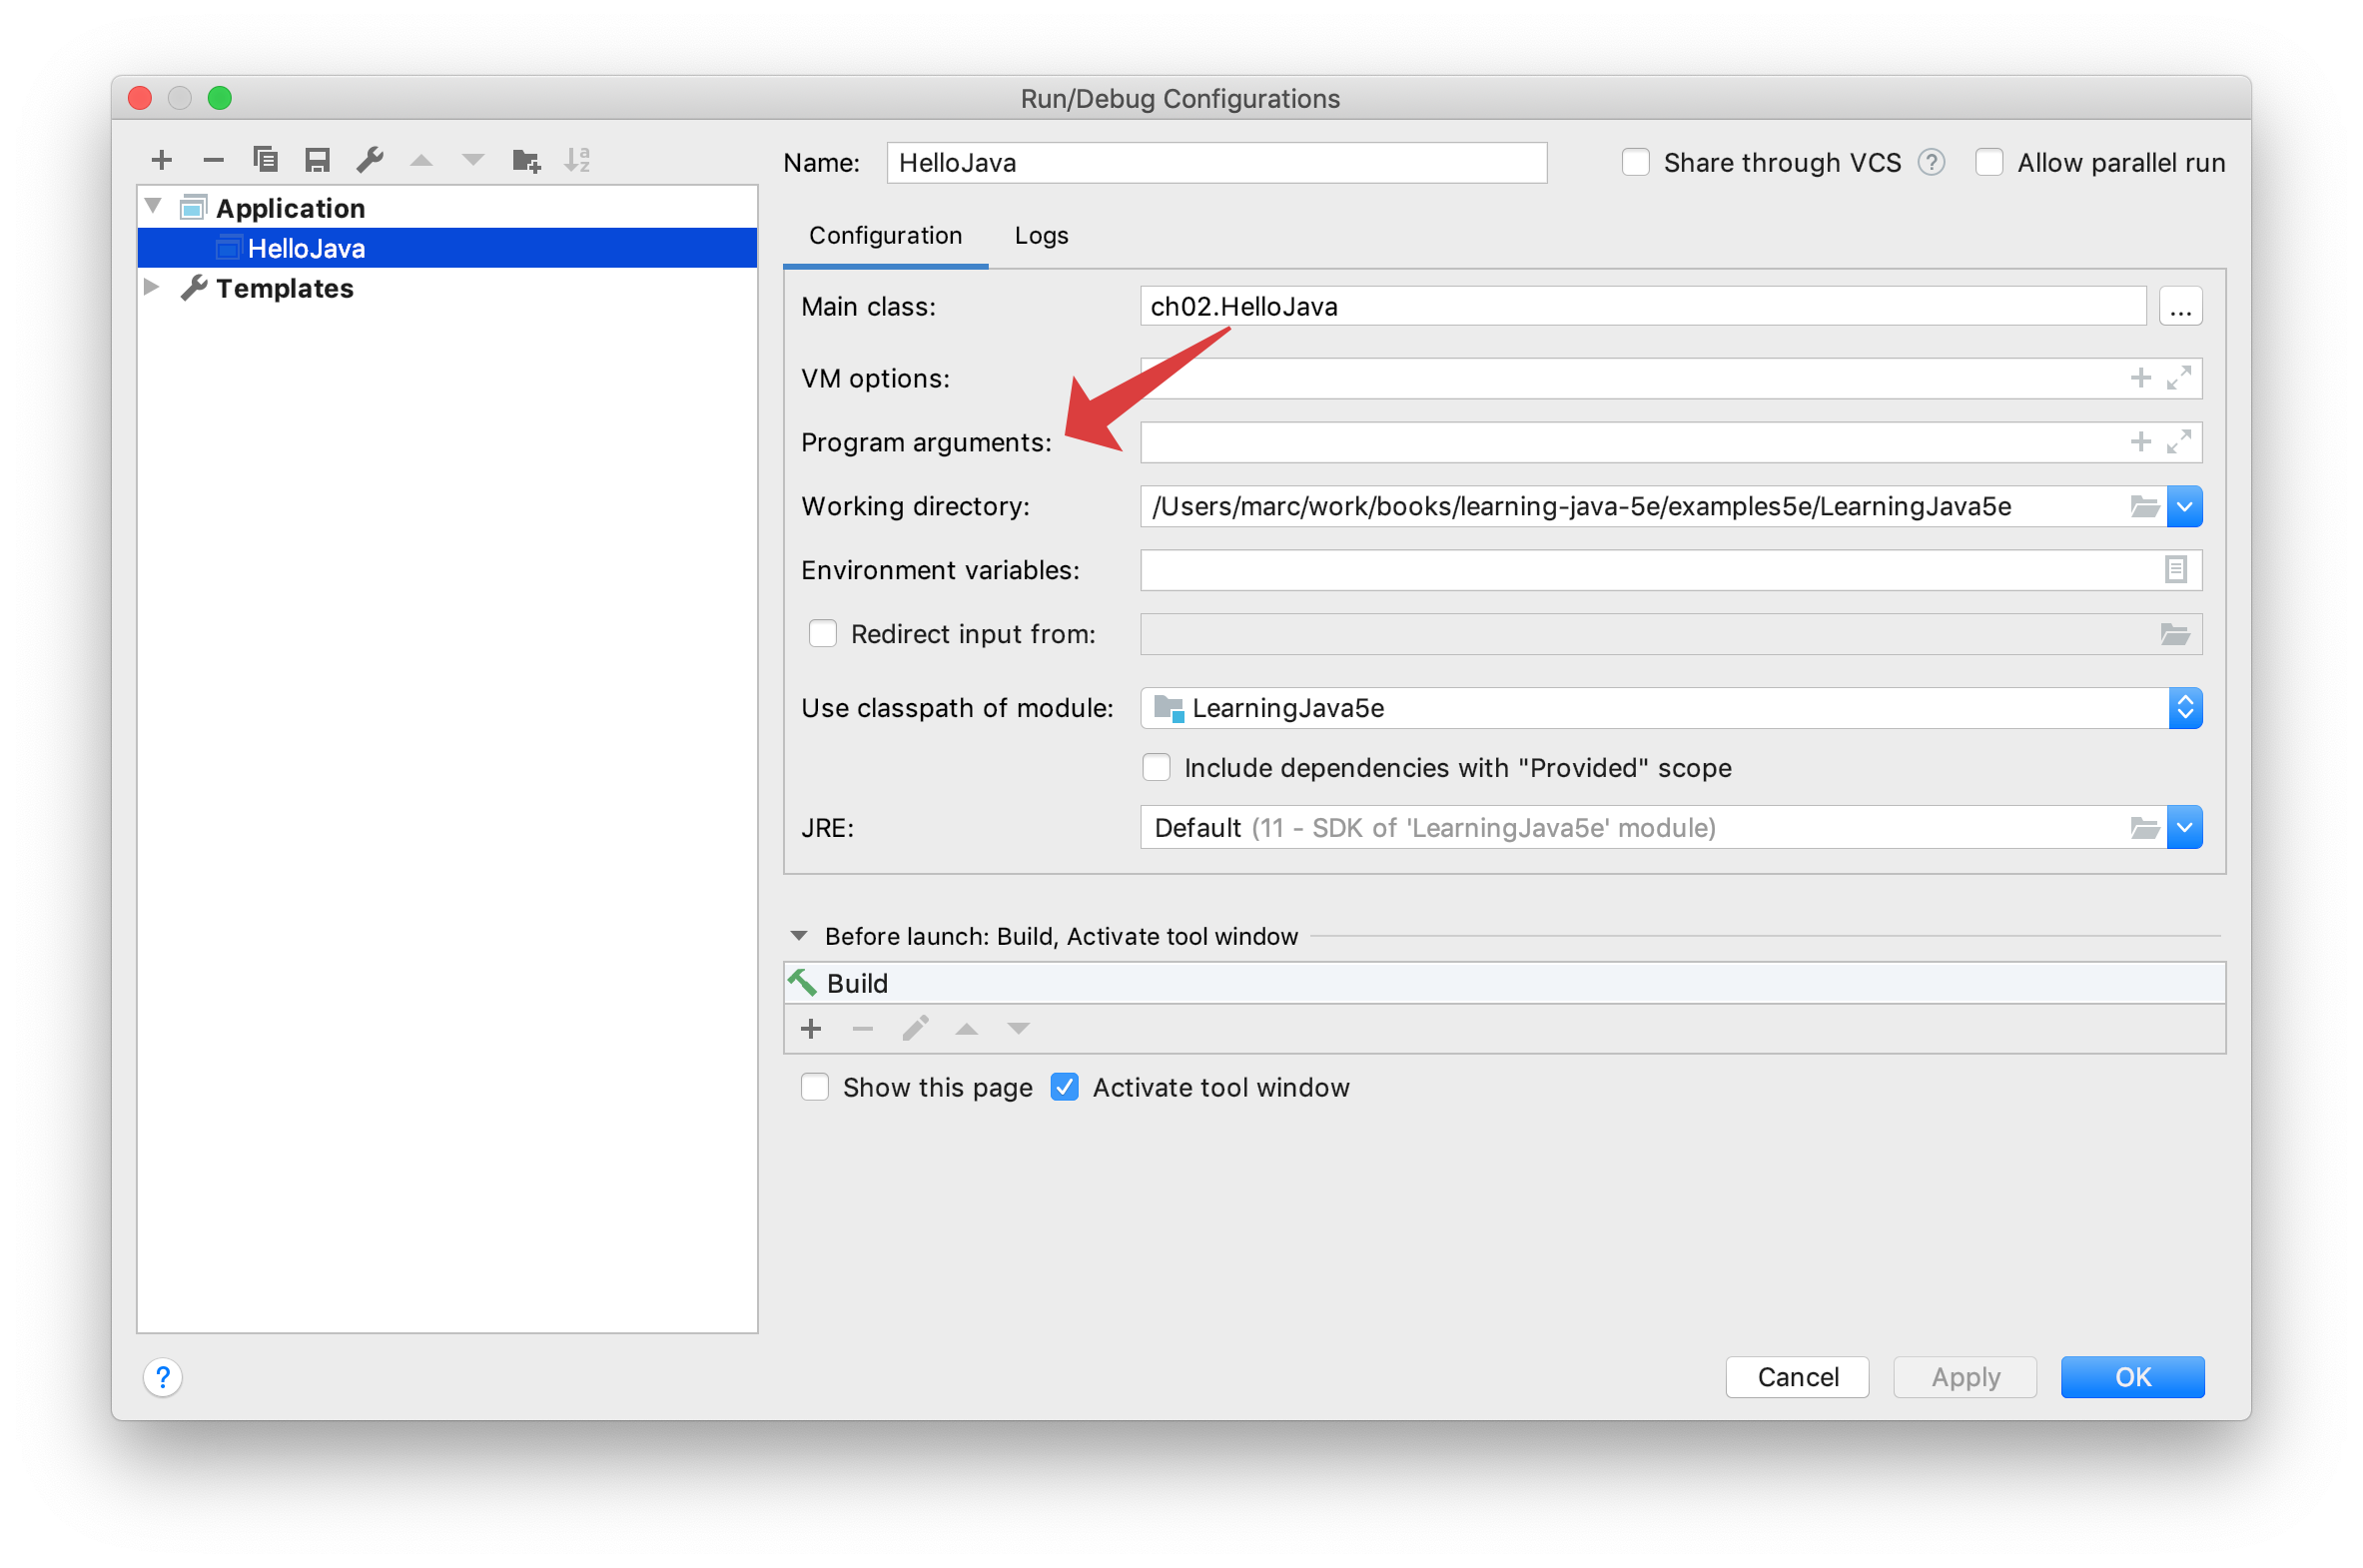
Figure 2-15. IDEA dialog for giving command-line parameters
HelloComponent2’s constructor then does two things: it sets the text of theMessage instance variable and calls addMouseMotionListener(). This method is part of the event mechanism, which we discuss next. It tells the system, “Hey, I’m interested in anything that happens involving the mouse.”
publicHelloComponent2(Stringmessage){theMessage=message;addMouseMotionListener(this);}
The special, read-only variable called this is used to explicitly refer to our object (the “current” object context) in the call to addMouseMotionListener(). A method can use this to refer to the instance of the object that holds it. The following two statements are therefore equivalent ways of assigning the value to theMessage instance variable:
theMessage=message;
or:
this.theMessage=message;
We’ll normally use the shorter, implicit form to refer to instance variables, but we’ll need this when we have to explicitly pass a reference to our object to a method in another class. We often do this so that methods in other classes can invoke our public methods or use our public variables.
Events
The last two methods of HelloComponent2, mouseDragged() and mouseMoved(), let us get information from the mouse. Each time the user performs an action, such as pressing a key on the keyboard, moving the mouse, or perhaps banging his or her head against a touch screen, Java generates an event. An event represents an action that has occurred; it contains information about the action, such as its time and location. Most events are associated with a particular GUI component in an application. A keystroke, for instance, can correspond to a character being typed into a particular text entry field. Pressing a mouse button can activate a particular button on the screen. Even just moving the mouse within a certain area of the screen can trigger effects such as highlighting or changing the cursor’s shape.
To work with these events, we’ve imported a new package, java.awt.event, which provides specific Event objects that we use to get information from the user. (Notice that importing java.awt.* doesn’t automatically import the event package. Imports are not recursive. Packages don’t really contain other packages, even if the hierarchical naming scheme would imply that they do.)
There are many different event classes, including MouseEvent, KeyEvent, and ActionEvent. For the most part, the meaning of these events is fairly intuitive. A MouseEvent occurs when the user does something with the mouse, a KeyEvent occurs when the user presses a key, and so on. ActionEvent is a little special; we’ll see it at work in Chapter 10. For now, we’ll focus on dealing with MouseEvents.
GUI components in Java generate events for specific kinds of user actions. For example, if you click the mouse inside a component, the component generates a mouse event. Objects can ask to receive the events from one or more components by registering a listener with the event source. For example, to declare that a listener wants to receive a component’s mouse-motion events, you invoke that component’s addMouseMotionListener() method, specifying the listener object as an argument. That’s what our example is doing in its constructor. In this case, the component is calling its own addMouseMotionListener() method, with the argument this, meaning “I want to receive my own mouse-motion events.”
That’s how we register to receive events. But how do we actually get them? That’s what the two mouse-related methods in our class are for. The mouseDragged() method is called automatically on a listener to receive the events generated when the user drags the mouse—that is, moves the mouse with any button pressed. The mouseMoved() method is called whenever the user moves the mouse over the area without pressing a button. In this case, we’ve placed these methods in our HelloComponent2 class and had it register itself as the listener. This is entirely appropriate for our new text-dragging component. More generally, good design usually dictates that event listeners be implemented as adapter classes that provide better separation of GUI and “business logic.” We’ll discuss that in detail in Chapter 10.
Our mouseMoved() method is boring: it doesn’t do anything. We ignore simple mouse motions and reserve our attention for dragging. mouseDragged() has a bit more meat to it. This method is called repeatedly by the windowing system to give us updates on the position of the mouse. Here it is:
publicvoidmouseDragged(MouseEvente){messageX=e.getX();messageY=e.getY();repaint();}
The first argument to mouseDragged() is a MouseEvent object, e, that contains all the information we need to know about this event. We ask the MouseEvent to tell us the x and y coordinates of the mouse’s current position by calling its getX() and getY() methods. We save these in the messageX and messageY instance variables for use elsewhere.
The beauty of the event model is that you have to handle only the kinds of events you want. If you don’t care about keyboard events, you just don’t register a listener for them; the user can type all she wants and you won’t be bothered. If there are no listeners for a particular kind of event, Java won’t even generate it. The result is that event handling is quite efficient.2
While we’re discussing events, we should mention another small addition we slipped into HelloJava2:
frame.setDefaultCloseOperation(JFrame.EXIT_ON_CLOSE);
This line tells the frame to exit the application when its close button is pressed. It’s called the “default” close operation because this operation, like almost every other GUI interaction, is governed by events. We could register a window listener to get notification of when the user pushes the close button and take whatever action we like, but this convenience method handles the common cases.
Finally, we’ve danced around a couple of questions here: how does the system know that our class contains the necessary mouseDragged() and mouseMoved() methods (where do these names come from)? And why do we have to supply a mouseMoved() method that doesn’t do anything? The answer to these questions has to do with interfaces. We’ll discuss interfaces after clearing up some unfinished business with repaint().
The repaint() Method
Because we changed the coordinates for the message (when we dragged the mouse), we would like HelloComponent2 to redraw itself. We do this by calling repaint(), which asks the system to redraw the screen at a later time. We can’t call paintComponent() directly, even if we wanted to, because we don’t have a graphics context to pass to it.
We can use the repaint() method of the JComponent class to request that our component be redrawn. repaint() causes the Java windowing system to schedule a call to our paintComponent() method at the next possible time; Java supplies the necessary Graphics object, as shown in Figure 2-16.
This mode of operation isn’t just an inconvenience brought about by not having the right graphics context handy. The foremost advantage to this mode of operation is that the repainting behavior is handled by someone else while we are free to go about our business. The Java system has a separate, dedicated thread of execution that handles all repaint() requests. It can schedule and consolidate repaint() requests as necessary, which helps to prevent the windowing system from being overwhelmed during painting-intensive situations like scrolling. Another advantage is that all the painting functionality must be encapsulated through our paintComponent() method; we aren’t tempted to spread it throughout the application.

Figure 2-16. Invoking the repaint() method
Interfaces
Now it’s time to face the question we avoided earlier: how does the system know to call mouseDragged() when a mouse event occurs? Is it simply a matter of knowing that mouseDragged() is some magic name that our event-handling method must have? Not quite; the answer to the question touches on the discussion of interfaces, which are one of the most important features of the Java language.
The first sign of an interface comes on the line of code that introduces the HelloComponent2 class: we say that the class implements the MouseMotionListener interface.
classHelloComponent2extendsJComponentimplementsMouseMotionListener{
Essentially, an interface is a list of methods that the class must have; this particular interface requires our class to have methods called mouseDragged() and mouseMoved(). The interface doesn’t say what these methods have to do; indeed, mouseMoved() doesn’t do anything. It does say that the methods must take a MouseEvent as an argument and return no value (that’s what void means).
An interface is a contract between you, the code developer, and the compiler. By saying that your class implements the MouseMotionListener interface, you’re saying that these methods will be available for other parts of the system to call. If you don’t provide them, a compilation error will occur.
That’s not the only way interfaces impact this program. An interface also acts like a class. For example, a method could return a MouseMotionListener or take a MouseMotionListener as an argument. When you refer to an object by an interface name in this way, it means that you don’t care about the object’s actual class; the only requirement is that the class implements that interface. addMouseMotionListener() is such a method: its argument must be an object that implements the MouseMotionListener interface. The argument we pass is this, the HelloComponent2 object itself. The fact that it’s an instance of JComponent is irrelevant; it could be a Cookie, an Aardvark, or any other class we dream up. What’s important is that it implements MouseMotionListener and, thus, declares that it will have the two named methods. That’s why we need a mouseMoved() method, even though the one we supplied doesn’t do anything: the MouseMotionListener interface says we must have one.
The Java distribution comes with many interfaces that define what classes have to do. This idea of a contract between the compiler and a class is very important. There are many situations like the one we just saw where you don’t care what class something is, you just care that it has some capability, such as listening for mouse events. Interfaces give us a way of acting on objects based on their capabilities without knowing or caring about their actual type. They are a tremendously important concept in how we use Java as an object-oriented language, and we’ll talk about them in detail in Chapter 5.
Chapter 5 also discusses how interfaces provide a sort of escape clause to the Java rule that any new class can extend only a single class (“single inheritance”). A class in Java can extend only one class, but can implement as many interfaces as it wants. Interfaces can be used as data types, can extend other interfaces (but not classes), and can be inherited by classes (if class A implements interface B, subclasses of A also implement B). The crucial difference is that classes don’t actually inherit methods from interfaces; the interfaces merely specify the methods the class must have.
Goodbye and hello again
Well, it’s time to say goodbye to HelloJava. We hope that you have developed a feel for some of the features of the Java language and the basics of writing and running a Java program. This brief introduction should help you as you explore the details of programming with Java. If you are a bit bewildered by some of the material presented here, take heart. We’ll be covering all the major topics presented here again in their own chapters throughout the book. This tutorial was meant to be something of a “trial by fire” to get the important concepts and terminology into your brain so that the next time you hear them you’ll have a head start.
While we are leaving HelloJava aside for the moment, we will be getting to know the tools of the Java world better in the next chapter. We’ll see details on the commands you have already seen such as javac as well as go over other important utilities. Read on to say hello to several of your new best friends as a Java developer!
1 Unless you are a more advanced *nix user and know how to manipulate your environment variables and paths. In that case you can certainly unpack the archive wherever you like. You may need to teach other applications that use Java where you stored it, however, as many apps will only search “well known” directories.
2 Event handling in Java 1.0 was a very different story. Early on, Java did not have a notion of event listeners and all event handling happened by overriding methods in base GUI classes. This was both inefficient and led to poor design with a proliferation of highly specialized components.