
In the past few chapters we have learned what JavaScriptMVC is, how to install it, and we went through its components.
Now is the time for the most exciting chapter for any developer. We are going to build a real-world application. Due to the book's scope limitation we are not going to write backend API set-up servers, and so on, instead of we will use browser storage.
Thanks to layer separation in JavaScriptMVC this is easily done by changing the code in the model to switch the application persistent layer from browser storage option to any backend language, framework, or system such as Sinatra, Ruby on Rails, Django, and Node.js.
This chapter's goal is to show how to build a real-word application from concept through design, implementation, documentation, and testing. We will develop an application that actually does something, is useful for readers, and can be easily customized to the reader's needs.
The app we are going to build in this chapter is called Time tracking and invoicing for freelancers; let's call it TTI in short.
Application development will only start here. We are not going to write the complete code base, it will be simply too big to fit it here. It's like a homework exercise, when students start their writing application at university and finish them at home. Be creative!
Okay, so we are going to write an application. Now it's time to answer the most important question: What problem is our application is about to solve?
We can clearly identify two main application areas:
- Tracking time we spend on a task
- Making an invoice
Let's break down our application's main areas into a features list as follows:
- Clients list
- Time tracker
- Track time
- Fixed cost task
- Reports
- Daily
- Weekly
- Statistics
- Monthly
- Yearly
- Invoicing
- Export and import data
A features list will help us make a development plan. Now we can think about how much time we need to accomplish for each of them. We can use just a calendar to write down our estimates or use one of many the free issue-tracking tools such as https://trello.com/ or http://trac.edgewall.org/.
The ideal solution would be to use a methodology such as Scrum—http://en.wikipedia.org/wiki/Scrum_(development) or one of the best issue-tracking tools in the business, JIRA—http://en.wikipedia.org/wiki/JIRA.
The next step is preparing application wireframes. This is a very important step in the application development cycle. It allows us to quickly sketch the application interface for different pages as well as very fast redesign pages and saves time in future development. Once we start writing the code, any changes will be harder and less cost efficient than changing wireframes.
The next steps are creating mockups and prototypes. However, we do not have a graphic designer here and no client to show business logic and finally it's out of this book's scope, so we are going straight to the next step.
Wireframes are generally basic sketches of components used in the application to show user interface and application features.
Mockups are the next level of wireframes, basically containing all we can find on wireframes but were in the actual design.
Prototypes are semi-functional applications to present business logic.
We can create wireframes by using just a piece of paper and pencil; a lot of people prefer this way. There is a bunch of different software that can help us in this step. I'll use Balsamiq Mockups but really any tool will be good here.
To give us a better overview on TTI application let's have a look at wireframes:
Since this book orientation is portrait and web browsers orientation are landscape, the reader is asked to have a look at following the wireframes from a different perspective.
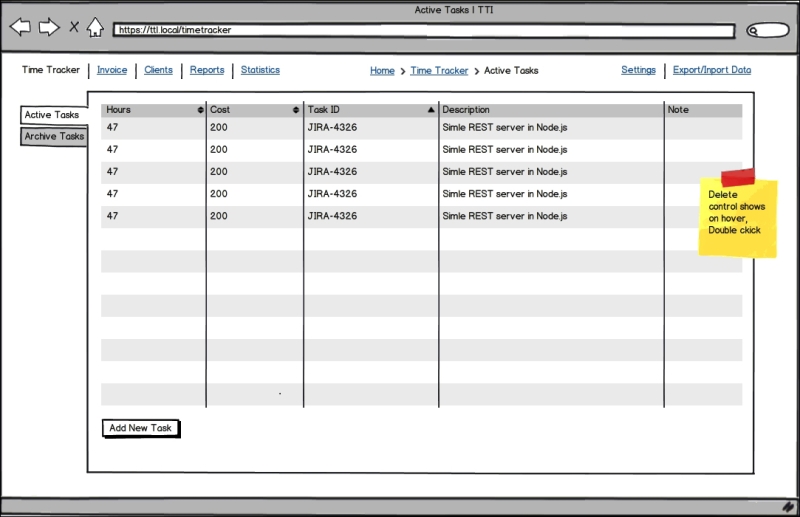
The following wireframe shows the time tracker main page.
The main menu is located at the top-left corner and allows us to switch between the main application functionalities.
Breadcrumb is located at the top center and allows us to easily indicate which part of the appllication we are currently in.
Settings and Export/Import Data tabs go on the top-right corner.
Time Tracker is located in the center with two main tabs: Active Tasks and Archive Tasks. Each task has fields: Hours, Cost, Task ID, Description, and Notes. The Add New Task button is located at the bottom that allows us to add a new task. Archive button is visible when task is hovered. To edit a task double-click on it. The URL for the time tracker page is /timetracker.
The following wireframe shows the invoice main page. The URL is /invoice:

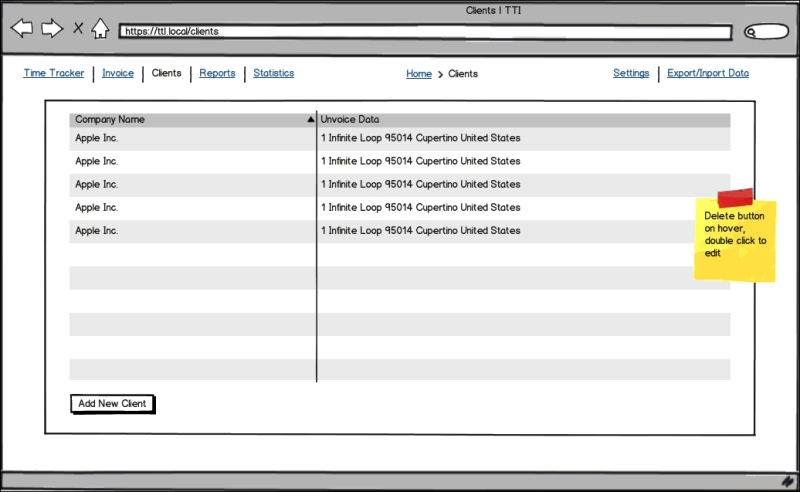
The following wireframe shows the clients main page. The URL is /clients.
We are assuming that the reader has installed a web server, such as Apache or Nginx. In the server-working directory we need to create the TTI folder. Another option is to use the Vagrant-powered environment created especially for this book available at https://github.com/wbednarski/JavaScriptMVC_kick-starter.
In this folder we will initialize the Git repository to track all changes, install JavaScriptMVC, and create the application structure.
It's a good idea from the very beginning to keep all the project files under the version control system. The reason for that is very simple and beneficial for future development—we can easily revert any changes and track them.
Using decentralized VCS has an invaluable benefit over centralized VCS, because we can commit changes without push, so we can commit often even after a small change in the codebase. Another good practice is to use one branch per feature.
In this book we are going to use Git, but actually any Distributed Version Control Systems (DVCS) is good. Mercurial is another popular DVCS.
The following steps should be performed to create a new Git repository, add all the files, and commit them:
- Inside the
TTIdirectory, type to install JavaScriptMVC:$ git init $ git submodule add git://github.com/jupiterjs/steal.git $ git submodule add git://github.com/jupiterjs/documentjs.git $ git submodule add git://github.com/jupiterjs/funcunit.git $ git submodule add git://github.com/jupiterjs/jquerymx.git jquery
- Install and update JavaScriptMVC submodules using the following commands:
$ git submodule init
$ git submodule update
- Install Syn using the following commands:
$ cd funcunit
$ git submodule init
$ git submodule update
- Move the
jscommand to the project's root directory (run from root directory):$ ./steal/js steal/make.jsBy default all the repositories are on a master branch. Let's switch to the latest version of JavaScriptMVC, which is 3.2.2 at the time this book was written.
- In all the submodules directories, type the following command:
$ git checkout v3.2.2 - In the
TTIdirectory create our application directoryttiand add it under Git.$ mkdir tti $ git add . $ git commit -m "initial commit"
Note
If the reader wants to keep the codebase copy on the server, they can do this using the free code hosting solutions available at https://github.com or https://bitbucket.org.
All the code we are going to develop will be placed in the tti folder.
Our application structure will look similar to the following hierarchy:
TTI/
   |
   |tti/
   |   |controllers/
   |   |
   |   |docs/
   |   |
   |   |models/
   |   |
   |   |tests/
   |   |     |unit/
   |   |     |    |models/
   |   |     |
   |   |     |functional/
   |   |
   |   |views/
   |         |styles/
   |         |      |css/
   |         |      |
   |         |      |sass/
   |         |
   |         |templates/
   |                   |tasks
   |                   |
   |                   |clients
   |
   |vendors/
           |jquery_ui/
           |
|pouchdb/Since local storage is too simple for our application and Web SQL database is deprecated the natural choice is IndexedDB.
In the root level create vendors directory to store all third part code, plugins, and so on.
Download and copy PouchDB to the vendors directory library, which provides good cross-browser API for IndexedDB. You can download PouchDB from the following location:
Let's create a task.js file under the models directory. In the Task model we will keep all task-related CRUD methods that operate on a local database.
steal(
    'jquery/model',
    'vendors/pouchdb.js',

    function ($) {
        'use strict'

        // local variable to keep reference to time-tracker database
        var db;

        /**
         * @class TTI.Models.Task
         * @parent index
         * @constructor
         * @author Wojciech Bednarski
         */
        $.Model('TTI.Models.Task', {

                /**
                 * @function init
                 * @hide
                 * Creates database time-tracker or get it if exists
                 */
                init: function () {
                    Pouch('idb://time-tracker', function (err, timeTracker) {
                        db = timeTracker;

                        console.log('TTI.Models.Task.init() | idb://time-tracker | err:', err, 'db:', db);
                    })
                },
The init method is responsible for creating a time-tracker database or getting reference to it if it exists. The idb:// protocol is telling PouchDB to use IndexedDB as a storage option.
                /**
                 * @function findAll
                 * Get all tasks
                 * @return {Object} an object contains objects with all tasks
                 *
                 * ### Example:
                 * @codestart
                 * TTI.Models.Task.findAll(function (tasks) {
                 *      // do something with tasks
                 * },
                 * function (error) {
                 *      // handle error here
                 * });
                 * task.save(function (task) {
                 *     console.log(task);
                 * });
                 * @codeend
                 */
                findAll: function (success, error) {
                    return db.allDocs(
                        {
                            include_docs: true // this is needed to return not only task ID but task it self
                        },
                        function (err, response) {
                            console.log('TTI.Models.Task.findAll() | GET | err:', err, 'client:', response);

                            if (response) {
                                success(response);
                            }
                            else if (err) {
                                error(err);
                            }
                        }
                    );
                },
The findAll method is responsible for retrieving an object with all the items from our database. Readers can have a look at the example usage in the comment on the preceding code listing.
                /**
                 * @function findOne
                 * Find task by given ID
                 * @param {String} task ID
                 * Task object
                 * @codestart
                 * String (UUID)
                 * @codeend
                 *
                 * @return {Object} an object contains requested task
                 * @codestart
                 * {
                 *     id: String (UUID),
                 *     hours: Number,
                 *     cost: {
                 *          rate: Number,
                 *          total: Number
                 *     },
                 *     taskID: String,
                 *     description: String,
                 *     note: String
                 * }
                 * @codeend
                 *
                 * ### Example:
                 * @codestart
                 * TTI.Models.Task.findOne('UUID', function (success, error) {
                 *      // code goes here
                 * });
                 * @codeend
                 */
                findOne: function (id, success, error) {
                    return db.get(id, function (err, doc) {

                        if (doc) {
                            success(doc);
                        }
                        else if (err) {
                            error(err);
                        }

                    });
                },
The findOne method is responsible for retrieving an object with a particular item from our database. Readers can have a look at the example usage in the comment on the preceding code listing.
                /**
                 * @function create
                 * Create new task
                 * @param {Object} task
                 * Task object
                 * @codestart
                 * {
                 *     hours: Number,
                 *     cost: {
                 *          rate: Number,
                 *          total: Number
                 *     },
                 *     taskID: String,
                 *     description: String,
                 *     note: String
                 * }
                 *
                 * {
                 *      hours: 7,
                 *      cost: {
                 *          rate: 100,
                 *          total: 700
                 *      },
                 *      taskID: 'JIRA-2789',
                 *      description: 'Implement new awesome feature!',
                 *      note: ''
                 *  }
                 * @codeend
                 *
                 * @return {Object} an object contains newly created task UUID
                 * @codestart
                 * {
                 *      id: "8D812FF6-4B96-4D73-8D18-01FACEF33531"
                 *      ok: true
                 *      rev: "1-c5a4055b6c3edac099083cc0b485d4e3"
                 * }
                 * @codeend
                 *
                 * ### Example:
                 * @codestart
                 * var task = new TTI.Models.Task({ task object goes here });
                 * task.save(function (task) {
                 *     console.log(task);
                 * });
                 * @codeend
                 */
                create: function (task, success, error) {
                    return db.post(task, function (err, response) {
                        console.log('TTI.Models.Task.create() | POST | err:', err, 'client:', response);

                        if (response) {
                            success(response);
                        }
                        else if (err) {
                            error(err);
                        }
                    });
                },
The create method is responsible for creating a new item in our database. Readers can have a look at the example usage in the comment on the preceding code listing.
                /**
                 * @function update
                 * Update task by given ID
                 * @param {Object} task
                 * Task object
                 * @codestart
                 * {
                 *      _id: String (UUID),
                 *      hours: Number,
                 *      cost: {
                 *          rate: Number,
                 *          total: Number
                 *      },
                 *      taskID: String,
                 *      description: String,
                 *      note: String
                 * }
                 * @codeend
                 *
                 * @return {Object} an object contains updated task UUID
                 * @codestart
                 * {
                 *      id: "8D812FF6-4B96-4D73-8D18-01FACEF33531"
                 *      ok: true
                 *      rev: "1-c5a4055b6c3edac099083cc0b485d4e3"
                 * }
                 * @codeend
                 *
                 * ### Example:
                 * @codestart
                 * TTI.Models.Task.update({ task object goes here });
                 * @codeend
                 */
                update: function (task, success, error) {
                    return db.put(task, function (err, response) {
                        console.log('TTI.Models.Task.update() | POST | err:', err, 'client:', response);

                        if (response) {
                            success(response);
                        }
                        else if (err) {
                            error(err);
                        }
                    });
                },
The update method is responsible for updating a particular item in our database. Readers can have a look at the example usage in the comment on the preceding code listing.
                /**
                 * @function destroy
                 * Destroy task by given ID
                 * @param {Object} task
                 * Task object
                 * @codestart
                 * String (UUID)
                 * @codeend
                 *
                 * @return {Object} an object contains destroyed task UUID
                 * @codestart
                 * {
                 *      id: "8D812FF6-4B96-4D73-8D18-01FACEF33531"
                 *      ok: true
                 *      rev: "1-c5a4055b6c3edac099083cc0b485d4e3"
                 * }
                 * @codeend
                 *
                 * ### Example:
                 * @codestart
                 * TTI.Models.Task.destroy('UUID', function (success, getError, removeError) {
                 *      // handle errors here
                 * });
                 * @codeend
                 */
                destroy: function (id, success, getError, removeError) {
                    return db.get(id, function (getErr, doc) {

                        if (getErr) {
                            getError(getErr);
                        }

                        db.remove(doc, function (removeErr, response) {

                            if (response) {
                                success(response);
                            }
                            else if (removeErr) {
                                removeError(removeErr);
                            }

                        });
                    });
                }
            },
            {

            }
        );

    }
);
This destroy method is responsible for destroying a particular item in our database. Readers can have a look at the example usage in the comment on the preceding code listing.
Let's create a client.js file under models directory. In Client model we will keep all the task-related CRUD methods that operate on a local database. Create a bootstrap file:
steal(
    'jquery/model',

    function ($) {
        'use strict';

        $.Model('TTI.Models.Client', {
                init: function () {
                    // create database clients or get it if exists.


                    console.log('TTI.Models.Client.init() | idb://clients | err:'),

                },

                findAll: function () {

                },

                findOne: function () {

                },

                create: function () {


                },

                update: function () {

                },

                destroy: function () {

                }
            },
            {

            }
        );
    }
);Let's create a tasks.js file under the controllers directory where we can handle all the application actions.
steal(
    'jquery/view/ejs',
    'jquery/controller',
    'tti/models/task.js'
).then(
    function ($) {
        'use strict';

        console.log('TTI.Controllers.Tasks'),

        /**
         * @class TTI.Controllers.Tasks
         * Creates a new Tasks controller
         * @parent index
         * @constructor
         * @param {String} DOMElement DOM element
         * @return {Object}
         */
        $.Controller('TTI.Controllers.Tasks', {
            'init': function (element, options) {
                var self = this;

                $('title').text('Time Tracker | TTI'),

                TTI.Models.Task.findAll(function (data) {
                    if (!data.rows.length) {
                        data.rows = [
                            {
                                doc: {
                                    hours: '',
                                    cost: {
                                        total: ''
                                    },
                                    taskID: '',
                                    description: 'No tasks so far!',
                                    note: ''

                                }
                            }
                        ];
                    }

                    self.element.html('tti/views/templates/tasks/tasks.ejs', data.rows);

                });

            },

            '{TTI.Models.Task} created': function (Task, e, task) {
                console.log('task', task);
                console.log('this.element', this.element);
                $('tbody tr:last', this.element).after('tti/views/templates/tasks/task.ejs', task);
                $('tbody tr:last', this.element).effect('highlight', {}, 3000);
            },

            '{TTI.Models.Task} destroyed': function (Task, e, task) {
                task.elements(this.element).remove();
            },

            '.add-task click': function () {
                this.element.append('tti/views/templates/tasks/add_task.ejs', {}).find('.create-new-task-dialog-form').dialog({
                    autoOpen: false,
                    modal:    true,
                    buttons:  {
                        'Create New Task': function () {
                            var self = this;

                            window.task = new TTI.Models.Task({
                                hours: $('input[name="hours"]', this).val(),
                                taskID: $('input[name="task-id"]', this).val(),
                                cost: {
                                    rate: 0,
                                    total: 0
                                },
                                description: $('input[name="description"]', this).val(),
                                note: $('input[name="note"]', this).val()
                            });

                            window.task.save(function () {
                                $(self).dialog('destroy').remove();
                            });

                        },
                        Cancel: function () {
                            $(this).dialog('destroy').remove();
                        }
                    },
                    close: function () {
                        $(this).dialog('destroy').remove();
                    }
                }).dialog('open'),

            }

        });

    }
);
Let's create the clients.js file under the controllers directory.
steal(
    'jquery/view/ejs',
    'jquery/controller'
).then(
    function ($) {
        'use strict';

        console.log('TTI.Controllers.Client'),

        /**
         * @class TTI.Controllers.Client
         * Creates a new Tasks controller
         * @parent index
         * @constructor
         * @param {String} DOMElement DOM element
         * @return {Object}
         */
        $.Controller('TTI.Controllers.Client', {
            'init': function () {

                $('title').text('Clients | TTI'),

                var testData = [
                    {
                        name: 'The First Awesome Client!'
                    },
                    {
                        name: 'The Second Awesome Client!'
                    }
                ];

                this.element.html('tti/views/templates/clients.ejs', testData);

            }

        });

    }
);
Let's create the router.js file under the controllers directory.
steal(
    'tti/controllers/navigation.js',
    'tti/controllers/client.js',
    'tti/controllers/tasks.js',
    'jquery/controller',
    'jquery/controller/route'
).then(
    function ($) {
        'use strict';

        /**
        * @class TTI.Controllers.Router
        * Creates application router
        * @parent index
        * @constructor
        * @param {String} DOMElement DOM element
        * @return {Object}
        */
        $.Controller('TTI.Controllers.Router', {
            init: function () {
                console.log('r init'),
            },

            // the index page
            'route': function (e) {
                console.log('default route', e);
            },

            ':page route': function (data) {
                $('#content').empty().append('<div>'),

                if (data.page === 'time-tracker') {
                    new TTI.Controllers.Tasks('#content div'),
                }
                else if (data.page === 'clients') {
                    new TTI.Controllers.Client('#content div'),
                }
            }

        });

        // create new Router controller instance
        $('body').bind('TTI/db-ready', function () {
            new TTI.Controllers.Router(document.body);
        });
    }
);
Let's create the navigation.js file under the controllers directory.
steal(
    'jquery/view/ejs',
    'jquery/controller',
    'jquery/dom/route'
).then(
    function ($) {
        'use strict';

        /**
         * @class TTI.Controllers.Navigation
         * Creates application main navigation controller
         * @parent index
         * @constructor
         * @param {String} DOMElement DOM element
         * @return {Object}
         */
        $.Controller('TTI.Controllers.Navigation', {
            init: function () {
                var navItems = [
                    {
                        name: 'Time Tracker',
                        className: 'time-tracker'
                    },
                    {
                        name: 'Invoice',
                        className: 'invoice'
                    },
                    {
                        name:      'Clients',
                        className: 'clients'
                    },
                    {
                        name: 'Reports',
                        className: 'reports'
                    },
                    {
                        name: 'Statistics',
                        className: 'statistics'
                    }
                    ];

                this.element.html('tti/views/templates/navigation.ejs', navItems);
            },

            '.time-tracker click': function (e) {
                $.route.attr('page', 'time-tracker'),
            },

            '.clients click': function (e) {
                $.route.attr('page', 'clients'),
            }

        });

    }
);Let's create the views folder under the tti directory and inside it, two directories: styles and templates.
In the templates directory create client.ejs file with the following content:
<h2>Clients List</h2>

<ol>
    <% $.each(this, function(i, client) { %>

        <li <%= ($el) -> $el.model(client) %>>
            <strong><%= client.name %></strong>
        </li>

    <% }) %>
</ol>
In the templates directory create the navigation.ejs file with the following content:
<% $.each(this, function(i, item) { %>

    <li class="<%= item.className %>">
        <%= item.name %>
    </li>

<% }) %>
In the templates directory create the tasks directory. Create the tasks.ejs file with the following content:
<table summary="Time Tracker list of tasks.">
    <thead>
        <tr>
            <th scope="col">Hours</th>
            <th scope="col">Cost</th>
            <th scope="col">Task ID</th>
            <th scope="col">Description</th>
            <th scope="col">Note</th>
        </tr>
    </thead>
    <tbody>
        <% $.each(this, function(i, task) { %>
            <tr <%= ($el) -> $el.model(task) %>>
                <td>
                    <%= task.doc.hours %>
                </td>
                <td>
                    <%= task.doc.cost.total %>
                </td>
                <td>
                    <%= task.doc.taskID %>
                </td>
                <td>
                    <%= task.doc.description %>
                </td>
                <td>
                    <%= task.doc.note %>
                </td>
            </tr>
        <% }) %>
    </tbody>
</table>

<span class="add-task">Add Task</span>
In the tasks directory create the task.ejs file with the following content:
<tr <%= ($el) -> $el.model(task) %>>
    <td>
        <%= task.hours %>
    </td>
    <td>
        <%= task.cost.total %>
    </td>
    <td>
        <%= task.taskID %>
    </td>
    <td>
        <%= task.description %>
    </td>
    <td>
        <%= task.note %>
    </td>
</tr>
In the tasks directory create the add_task.ejs file with the following content:
<div class="create-new-task-dialog-form" title="Create New Task">
    <form>
        <fieldset>
            <label><span>Hours</span> <input type="text" name="hours" /></label>
            <label><span>Task ID</span> <input type="text" name="task-id" /></label>
            <label><span>Description</span> <input type="text" name="description" /></label>
            <label><span>Note</span> <input type="text" name="note" /></label>
        </fieldset>
    </form>
</div>
In the styles directory create two directories: css and sass.
In the sass directory create the tti.scss file with the following content:
@import 'reset';
@import 'static';
@import 'mixins';
@import 'skelton';
In the sass directory create the _static.scss file with the following content:
$blue: #5C94BF;
$black: #3E4246;
$white: #F6F6F7;
$vlGreen: #B7D190;
$lGreen: #9CBA6E;
$dGreen: #424A38;
$mGrey: #5B5B5B;
$yellow: #F8AE03;
$lBlue: #167BBE;
$dBlue: #0E69B3;
$gBlue: #7489A1;
In the sass directory create the _mixins.scss file with the following content:
@mixin link {
    color: $lGreen;
    cursor: pointer;
    text-decoration: none;

    &:hover {
        text-decoration: underline;
    }
}

@mixin borderRadius($topLeft, $topRight, $bottomRight, $bottomLeft) {
    -moz-border-radius-topleft: $topLeft;
    -moz-border-radius-topright: $topRight;
    -moz-border-radius-bottomright: $bottomRight;
    -moz-border-radius-bottomleft: $bottomLeft;
    -webkit-border-radius: $topLeft $topRight $bottomRight $bottomLeft;
    border-radius: $topLeft $topRight $bottomRight $bottomLeft;
}

@mixin button {
    @include borderRadius(5px, 5px, 5px, 5px);
    display: inline-block;
    padding: 0 7px;
    line-height: 20px;
    height: 20px;
    cursor: pointer;
}
In the sass directory create the _reset.scss file with the following content:
//   http://meyerweb.com/eric/tools/css/reset/
//   v2.0 | 20110126
//   License: none (public domain)

html, body, div, span, applet, object, iframe,
h1, h2, h3, h4, h5, h6, p, blockquote, pre,
a, abbr, acronym, address, big, cite, code,
del, dfn, em, img, ins, kbd, q, s, samp,
small, strike, strong, sub, sup, tt, var,
b, u, i, center,
dl, dt, dd, ol, ul, li,
fieldset, form, label, legend,
table, caption, tbody, tfoot, thead, tr, th, td,
article, aside, canvas, details, embed,
figure, figcaption, footer, header, hgroup,
menu, nav, output, ruby, section, summary,
time, mark, audio, video {
    margin: 0;
    padding: 0;
    border: 0;
    font-size: 100%;
    font: inherit;
    vertical-align: baseline;
}
// HTML5 display-role reset for older browsers
article, aside, details, figcaption, figure,
footer, header, hgroup, menu, nav, section {
    display: block;
}

body {
    line-height: 1;
}

ol, ul {
    list-style: none;
}

blockquote, q {
    quotes: none;
}

blockquote:before, blockquote:after,
q:before, q:after {
    content: '';
    content: none;
}

table {
    border-collapse: collapse;
    border-spacing: 0;
}

textarea {
    min-height: 100px;
}
In the sass directory create the skelton.scss file with the following content:
html,
body {
    color: $black;
    background: $white;
    font: 11px/18px "Helvetica Neue", Helvetica, Verdana, sans-serif;
}

input,
select,
textarea {
    font: 12px/18px "Helvetica Neue", Helvetica, Verdana, sans-serif;
}

table {
    width: 100%;
    border: 1px solid $gBlue;

    thead {
        color: $white;
        background: $blue;

        tr {

            &:last-child {
                @include borderRadius(5px, 5px, 5px, 5px);
            }

            th {
                padding: 7px 0;
            }
        }
    }

    tbody {

        tr {

            td {
                padding: 3px 0;
                border-bottom: 1px solid $gBlue;
                text-align: center;
            }
        }
    }

}

#container {
    width: 1100px;
    margin: 0 auto;

    #header {
        padding: 10px;
        height: 50px;

        #main-navigation {

            li {
                @include link;
                margin-right: 7px;
                display: inline-block;
            }
        }
    }

    h2 {
        font-size: 14px;
    }

    ol {
        margin: 7px;
        list-style-type: decimal;
        list-style-position: inside;
    }

    .add-task {
        @include button;
        margin-top: 20px;
        color: $white;
        background: $lGreen;

        &:hover {
            background: $yellow;
        }
    }
}In the root directory let's create the index.html file with the following code. Bootstrap is responsible for loading all the files needed by the application to run.
<!doctype html>

<html>
    <head>
        <title>TTI</title>
        <meta charset="UTF-8" />
    </head>
    <body>
        <div id="container">
            <header id="header">
                <nav id="main-navigation">
                    <ul></ul>
                </nav>
                <div id="breadcrumb"></div>
                <nav id="secondary-navigation"></nav>
            </header>

            <div id="content">
                <div><p>Loading...</p></div>
            </div>

            <footer id="footer">

            </footer>

        </div>

        <script src="steal/steal.js?tti"></script>

    </body>
</html>
In the tti directory create the tti.js file with the following code:
steal(
    function ($) {
        console.log('tti.js'),
    },
    'vendors/jquery_ui/css/smoothness/jquery.ui.core.css',
    'vendors/jquery_ui/css/smoothness/jquery.ui.dialog.css',
    'vendors/jquery_ui/css/smoothness/jquery.ui.theme.css',
    'tti/views/styles/css/tti.css',
    'tti/models/task.js',
    'tti/models/client.js',
    'tti/controllers/tasks.js',
    'tti/controllers/router.js',
    'tti/controllers/navigation.js'
).then(
    'vendors/jquery_ui/jquery.ui.core.js'
).then(
    'vendors/jquery_ui/jquery.effects.core.js'
).then(
    'vendors/jquery_ui/jquery.effects.highlight.js'
).then(
    'vendors/jquery_ui/jquery.ui.widget.js'
).then(
    'vendors/jquery_ui/jquery.ui.position.js',
    'vendors/jquery_ui/jquery.ui.dialog.js'
).then(
    function ($) {
        new TTI.Controllers.Navigation('#main-navigation ul'),
    }
);In order to run our application we convert the SASS files into the CSS file which can be read by web browsers.
We used SASS instead of plain CSS to split code into many small files for better readability and better code re-use. This aspect is very important, especially in big applications.
SASS can be installed by executing
$ gem install sass command or downloading it from the Git repository at http://sass-lang.com/download.html.
To compile SASS code into CSS code, go to views folder and type:
$ sass --watch sass:css
Then run the web server and navigate to index.html.