There is another package of widgets, called ipywidgets, that has all of the standard controls that you might want to use, with many optional parameters available to customize your display.
One of the widgets available in this package displays a progress bar to the user. Take the following script:
import ipywidgets as widgets
widgets.FloatProgress(
    value=45,
    min=0,
    max=100,
    step=5,
    description='Percent:',
)
This would display our progress bar as shown here:

We could also use the list box widget, called as Dropdown, in this script:
import ipywidgets as widgets
from IPython.display import display
w = widgets.Dropdown(
    options={'Pen': 7732, 'Pencil': 102, 'Pad': 33331},
    description='Item:',
)
display(w)
w.value
This script will display a list box to the user with the displayed values of Pen, Pencil, and Pad. When the user selects one of the values, the associated value is returned to the w variable, which we display:

The text widget gathers a text string from the user for reuse elsewhere in your script. A text widget has a description (label) and a value (entered by the user, or preset in your script).
In this example we will just gather a text string and display it on screen as part of the output for the script. We will use the following script:
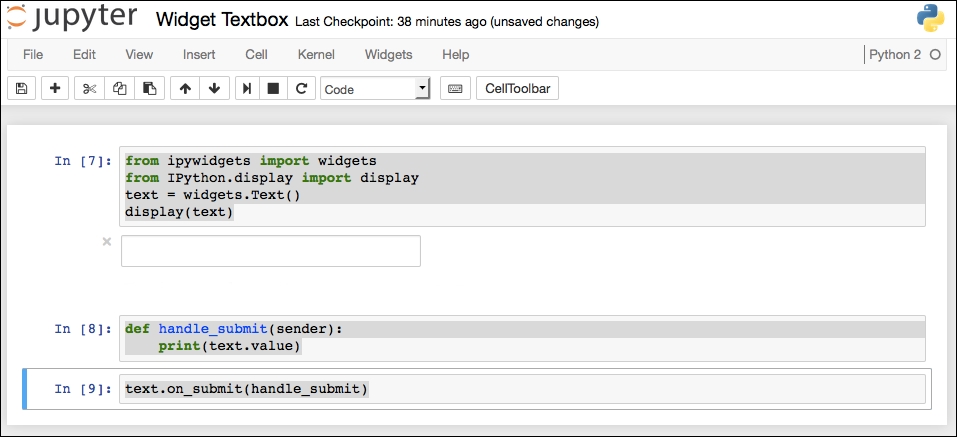
from ipywidgets import widgets
from IPython.display import display
text.on_submit(handle_submit)
display(text)
def handle_submit(sender):
    print(text.value)
text.on_submit(handle_submit)
The Python package that contains the basic widgets is ipywidgets, so we need to reference that. We define a handler for the text field that will be called when the user clicks on Submit (after entering their text value). We are using the Text widget:
We should point out some of the highlights of this page:
- The ordering of the elements of the page is not important. The page is driven by the
text = ...statements near the top of the page, where they might appear. - When invoking a widget, the widget automatically looks for any handlers that might be associated in the script. In this case, we have a
submithandler. There are many other handlers available. Thetext.on_submitassigns the handler to the widget. - If no handlers are available, we have a standard Python notebook.
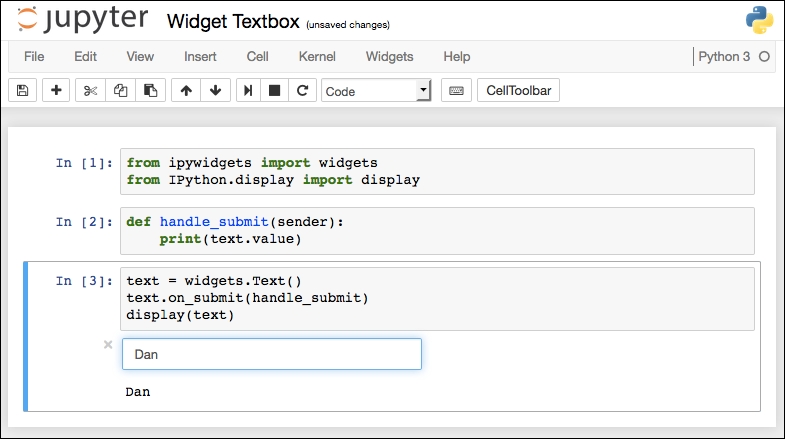
If we run the script (Cell | Run All) we get the following screen (waiting for us to enter a value in the textbox):
Once we enter a value and hit the Enter key, the script progresses and we have the following output:
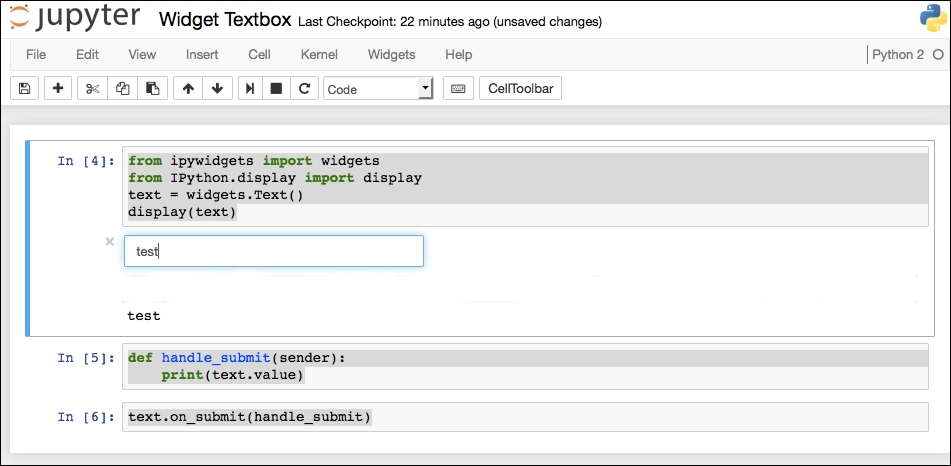
So, our script has set up a widget for gathering input from the user and then, later, has done something with that value (we are just displaying here, but we could use the input for further processing). In the example, I entered the word test into the widget and hit Enter. This caused the script to invoke the on_submit handler which printed out the value typed into the field.
Similarly, we can use a button widget in our script. For example, take the following script:
from ipywidgets import widgets
from IPython.display import display
button = widgets.Button(description="Submit");
display(button)
def on_button_clicked(widget):
    print("Clicked Button:" + widget.description);
button.on_click(on_button_clicked);
This script does the following:
- References the features we want to use from the widgets packages.
- Creates our
button. - Defines a handler for the click event on a button. The handler receives the
buttonobject that was clicked upon (widget). - In the handler, we display information about the button clicked on (you can imagine that if we had several buttons in a display, we would want to determine which button was clicked).
- Lastly, it assigns the defined handler to the button object we created.
If we run this script in a notebook, we get a display like the following:
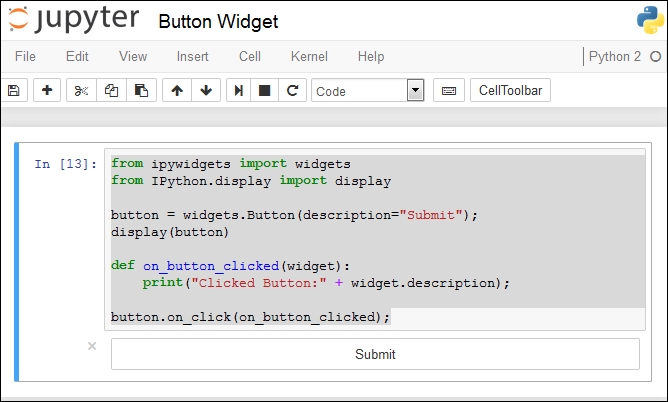
Note the Submit button at the bottom of the screenshot. You could change other attributes of the button, such as its position, size, color, and so on.
If we then click on the Submit button, we get a display like the following:

Our message about the button clicked is now displayed.
All of the widgets' controls have a set of properties that can be adjusted as needed for your display. You can see the list of properties by taking an instance of a control and running the control.keys command in a notebook. For example, look at the following script:
from ipywidgets import *
w = IntSlider()
w.keys
This script pulls in a blanket reference to all of the controls available in widgets. We then create an IntSlider instance and display the possible list of properties that we can adjust:

As you can see, the list is extensive. The following table shows the list in more detail:
|
Property |
Description |
|
|
Whether left-aligned, right-aligned, or justified |
|
|
Color of font |
|
|
Height of control |
|
|
Whether control is disabled or not |
|
|
Is the control displayed? |
|
|
Style of font, for example, italics |
|
|
Minimum value (used in range list) |
|
|
Background color of control |
|
|
Width of control |
|
|
Font family to be used for text in control |
|
|
The description field is used for documentation purposes |
|
|
Maximum value (of range) |
|
|
Padding applied (to edges of control) |
|
|
Weight of font used in control, for example, bold |
|
|
Size of font used for text in control |
|
|
Selected, entered value for control |
|
|
Margin to use when displaying control |
We could adjust any of these in our scripts using something like the following sample script where we disable a text box (the text box will display, but the user cannot enter a value into the text box):
from ipywidgets import *
Text(value='You can not change this text!', disabled=True)

When a field is disabled, the textbox is grayed out, and when the user hovers the cursor over the field they get a red circle with a slash through it, meaning it cannot be changed.
All of the properties shown previously are accessible to read and write. We can show this transition with a small script:
from ipywidgets import *
w = IntSlider()
original = w.value
w.value = 5
original, w.value
The script creates a slider, retrieves its current value, changes the value to 5, and then displays the original and current value of the control.
If we were to run this script in a notebook, we would see the following results:

All of the controls work by reacting to user actions, either with a mouse or keyboard. The default actions for controls are built into the software, but you can add your own handling of events (user actions).
We have seen this kind of event handling earlier-for example, in the section on the slider, a function is called whenever the slider value is changed by the user–but let's explore it in a little more depth. We could have the following script:
from ipywidgets import widgets
from IPython.display import display
button = widgets.Button(description="Click Me!")
display(button)
def on_button_clicked(b):
    print("Button clicked.")
button.on_click(on_button_clicked)
This script does the following:
- Creates a button.
- Displays the button (to the user).
- Defines handler click events. It prints a message that you clicked on screen. You can have any Python statements in the handler.
- Lastly, it associates the click handler with the button we created. So, now, when the user clicks on our button, the handler is called and the
Button clickedmessage is displayed on screen (as shown in the following screenshot).
If we run this script in a notebook and click on the button a few times, we get the following display:

You can also assemble containers of widgets directly using Python syntax by passing the child elements in the constructor. For example, we could have the following script:
from ipywidgets import *
from IPython.display import display
slider = widgets.FloatSlider()
message = widgets.Text(value='Hello World')
container = widgets.Box(children=[slider, message])
container.layout.border = '1px black solid'
display(container)
Here, we are creating a container (which is a box widget) where we are specifying the children contained controls. The call to display the container will iteratively display the child elements as well. So, we end up with a display like the following:
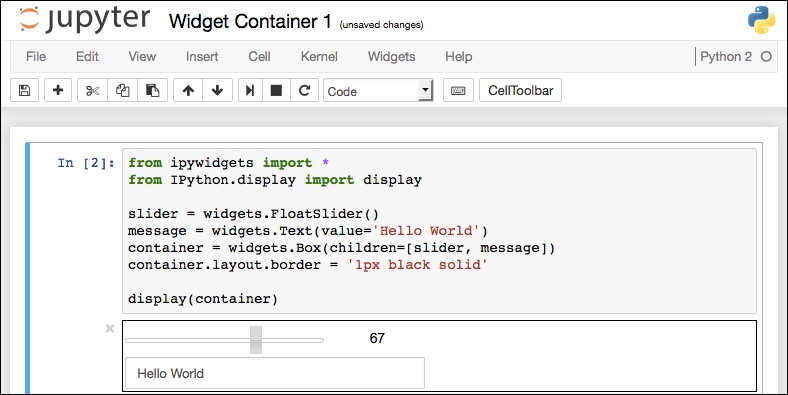
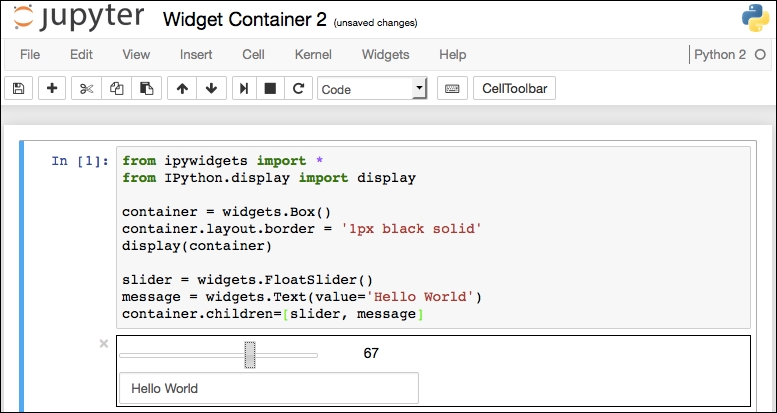
You can see the border around the box and the two controls in the box.
Similarly, we could have added the children to the container after the container was displayed by using syntax like this:
from ipywidgets import *
from IPython.display import display
container = widgets.Box()
container.layout.border = '1px black solid'
display(container)
slider = widgets.FloatSlider()
message = widgets.Text(value='Hello World')
container.children=[slider, message]
When we add the child to the container, the container repaints, which will cause a repaint of any children.
If we run this script in another notebook, we get a very similar result to the previous example: