The navigation stack needs to know the position of the sensors, wheels, and joints.
To do that, we use the tf (Transform Frames) software library. It manages a transform tree. You could do this with mathematics, but if you have a lot of frames to calculate, it will be a bit complicated and messy.
Thanks to the tf, we can add more sensors and parts to the robot, and tf will handle all the relations for us.
If we put the laser 10 cm backwards and 20 cm above with reference to the origin of the base_link coordinates, we would need to add a new frame to the transformation tree with these offsets.
Once inserted and created, we could easily know the position of the laser with reference to the base_link value or the wheels. The only thing we need to do is call the tf library and get the transformation.
Let's test this with a simple code. Create a new file in chapter8_tutorials/src with the name tf_broadcaster.cpp, and put the following code inside it:
#include <ros/ros.h>
#include <tf/transform_broadcaster.h>

int main(int argc, char** argv){
  ros::init(argc, argv, "robot_tf_publisher");
  ros::NodeHandle n;

  ros::Rate r(100);

  tf::TransformBroadcaster broadcaster;

  while(n.ok()){
    broadcaster.sendTransform(
      tf::StampedTransform(
        tf::Transform(tf::Quaternion(0, 0, 0, 1), tf::Vector3(0.1, 0.0, 0.2)),
        ros::Time::now(),"base_link", "base_laser"));
    r.sleep();
  }
}
Tip
Downloading the example code
You can download the example code files from your account at http://www.packtpub.com for all the Packt Publishing books you have purchased. If you purchased this book elsewhere, you can visit http://www.packtpub.com/support and register to have the files e-mailed directly to you. You can also download these code files from https://github.com/AaronMR/ROS_Book_Hydro.
Remember to add the following line in your CMakelist.txt file to create the new executable:
add_executable(tf_broadcaster src/tf_broadcaster.cpp)
target_link_libraries(tf_broadcaster ${catkin_LIBRARIES})
We also create another node that will use the transform, and which will give us the position of a point on the sensor with reference to the center of base_link (our robot).
Create a new file in chapter8_tutorials/src with the name tf_listener.cpp and input the following code:
#include <ros/ros.h>
#include <geometry_msgs/PointStamped.h>
#include <tf/transform_listener.h>

void transformPoint(const tf::TransformListener& listener){
  //we'll create a point in the base_laser frame that we'd like to transform to the base_link frame
  geometry_msgs::PointStamped laser_point;
  laser_point.header.frame_id = "base_laser";

  //we'll just use the most recent transform available for our simple example
  laser_point.header.stamp = ros::Time();

  //just an arbitrary point in space
  laser_point.point.x = 1.0;
  laser_point.point.y = 2.0;
  laser_point.point.z = 0.0;

    geometry_msgs::PointStamped base_point;
    listener.transformPoint("base_link", laser_point, base_point);

    ROS_INFO("base_laser: (%.2f, %.2f. %.2f) -----> base_link: (%.2f, %.2f, %.2f) at time %.2f",
        laser_point.point.x, laser_point.point.y, laser_point.point.z,
        base_point.point.x, base_point.point.y, base_point.point.z, base_point.header.stamp.toSec());

    ROS_ERROR("Received an exception trying to transform a point from "base_laser" to "base_link": %s", ex.what());

}

int main(int argc, char** argv){
  ros::init(argc, argv, "robot_tf_listener");
  ros::NodeHandle n;

  tf::TransformListener listener(ros::Duration(10));

  //we'll transform a point once every second
  ros::Timer timer = n.createTimer(ros::Duration(1.0), boost::bind(&transformPoint, boost::ref(listener)));

  ros::spin();
}
Remember to add the line in the CMakeList.txt file to create the executable. Compile the package and run both the nodes using the following commands in each terminal:
$ catkin_make
$ rosrun chapter8_tutorials tf_broadcaster
$ rosrun chapter8_tutorials tf_listener
Remember, always run roscore before starting with the examples. You will see the following message:
[ INFO] [1368521854.336910465]: base_laser: (1.00, 2.00. 0.00) -----> base_link: (1.10, 2.00, 0.20) at time 1368521854.33
[ INFO] [1368521855.336347545]: base_laser: (1.00, 2.00. 0.00) -----> base_link: (1.10, 2.00, 0.20) at time 1368521855.33
This means that the point that you published on the node, with the position (1.00, 2.00, 0.00) relative to base_laser, has the position (1.10, 2.00, 0.20) relative to base_link.
As you can see, the tf library performs all the mathematics for you to get the coordinates of a point or the position of a joint relative to another point.
A transform tree defines offsets in terms of both translation and rotation between different coordinate frames. Let us see an example to help you understand this.
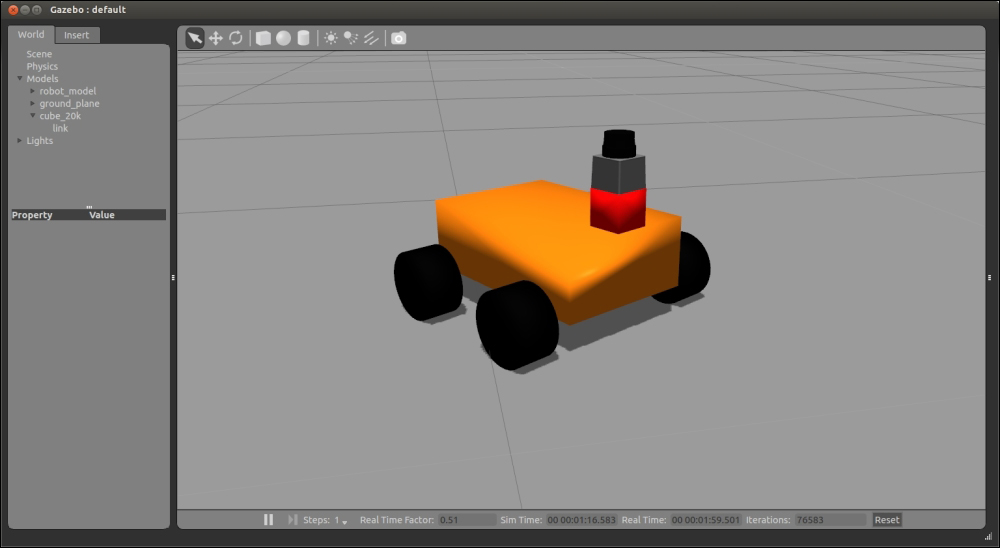
In our robot model used in Chapter 7, 3D Modeling and Simulation, we are going to add another laser, say, on the back of the robot (base_link):
The system in our robot had to know the position of the new laser to detect collisions, such as the one between the wheels and walls. With the tf tree, this is very simple to do and maintain, apart from being scalable. Thanks to tf, we can add more sensors and parts, and the tf library will handle all the relations for us. All the sensors and joints must be correctly configured on tf to permit the navigation stack to move the robot without problems, and to know exactly where each one of their components is.
Before starting to write the code to configure each component, keep in mind that you have the geometry of the robot specified in the URDF file. So, for this reason, it is not necessary to configure the robot again. Perhaps you do not know it, but you have been using the robot_state_publisher package to publish the transform tree of your robot. In Chapter 7, 3D Modeling and Simulation, we used it for the first time; therefore, you do have the robot configured to be used with the navigation stack.
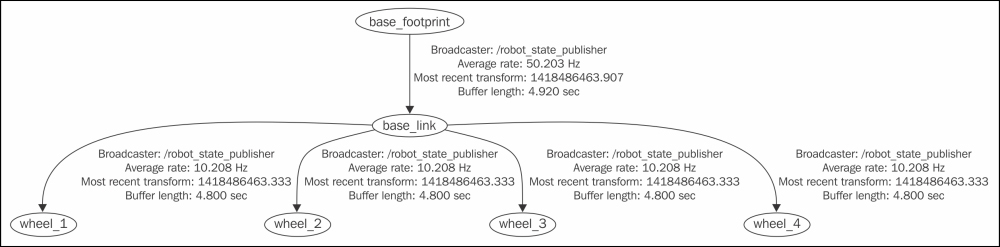
If you want to see the transformation tree of your robot, use the following command:
$ roslaunch chapter8_tutorials gazebo_map_robot.launch model:="`rospack find chapter8_tutorials`/urdf/robot1_base_01.xacro"
$ rosrun tf view_frames
The resultant frame is depicted as follows:
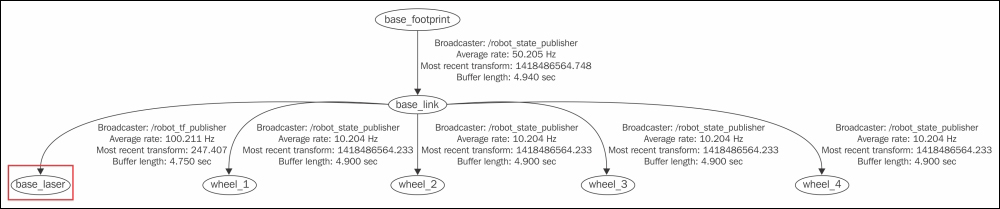
And now, if you run tf_broadcaster and run the rosrun tf view_frames command again, you will see the frame that you have created using code:
$ rosrun chapter8_tutorials tf_broadcaster
$ rosrun tf view_frames
The resultant frame is depicted as follows: