
We have already set ChefBot ROS packages in Intel's NUC PC and uploaded the embedded code to the LaunchPad board. The next step is to put the NUC PC on the robot, configure the remote connection from the laptop to the robot, test each node, and work with ChefBot's launch files to perform autonomous navigation.
The main device we should have before working with ChefBot is a good wireless router. The robot and the remote laptop have to connect across the same network. If the robot PC and remote laptop are on the same network, the user can connect from the remote laptop to the robot PC through SSH using its IP. Before putting the robot PC in the robot, we should connect the robot PC to the wireless network so that once it's connected to the wireless network, it will remember the connection details. When the robot powers up, the PC should automatically connect to the wireless network. Once the robot PC is connected to a wireless network, we can put it in the actual robot. The following diagram shows the connection diagram of the robot and remote PC:

The preceding diagram assumes that the ChefBot's IP is 192.168.1.106 and the remote PC's IP is 192.168.1.101.
We can remotely access the ChefBot terminal using SSH. We can use the following command to log in to ChefBot, where robot is the username of the ChefBot PC:
$ ssh [email protected]
When you log in to the ChefBot PC, it will ask for the robot PC password. After entering the password of the robot PC, we can access the robot PC terminal. After logging in to the robot PC, we can start testing ChefBot's ROS nodes and test whether we receive the serial values from the LaunchPad board inside ChefBot. Note that you should log in to the ChefBot PC again through SSH if you are using a new terminal.
If the ChefBot_bringup package is properly installed on the PC, and if the LaunchPad board is connected, then before running the ROS driver node, we can run the miniterm.py tool to check whether the serial values come to the PC properly via USB. We can find the serial device name using the dmesg command. We can run miniterm.py using the following command:
$ miniterm.py /dev/ttyACM0 115200
If it shows the permission denied message, set the permission of the USB device by writing rules on the udev folder, which we did in Chapter 6, Interfacing Actuators and Sensors to the Robot Controller, or we can temporarily change the permission using the following command. Here, we are assuming that ttyACM0 is the device name of LaunchPad. If the device name is different in your PC, then you have to use that name instead of ttyACM0:
$ sudo chmod 777 /dev/ttyACM0
If everything works fine, we will get values such as those shown in the following screenshot:

The letter b is used to indicate the battery reading of the robot; currently, it's not implemented. The value is set to zero now. These values are coming from the Tiva C Launchpad. There are different approaches to sense the voltage using a microcontroller board. One of the approaches is given below (http://www.instructables.com/id/Arduino-Battery-Voltage-Indicator/). The letter t indicates the total time elapsed (in microseconds) after the robot starts running the embedded code. The second value is the time taken to complete one entire operation in LaunchPad (measured in seconds). We can use this value if we are performing real-time calculations of the parameters of the robot. At the moment, we are not using this value, but we may use it in the future. The letter e indicates the values of the left and right encoder respectively. Both the values are zero here because the robot is not moving. The letter u indicates the values from the ultrasonic distance sensor. The distance value we get is in centimeters. The letter s indicates the current wheel speed of the robot. This value is used for inspection purposes. Actually, speed is a control output from the PC itself.
To convert this serial data to ROS topics, we have to run the drive node called launchpad_node.py. The following code shows how to execute this node.
First, we have to run roscore before starting any nodes:
$ roscore
Run launchpad_node.py using the following command:
$ rosrun ChefBot_bringup launchpad_node.py
If everything works fine, we will get the following output in node in the running terminal:

After running launchpad_node.py, we will see the following topics generated, as shown in the following screenshot:
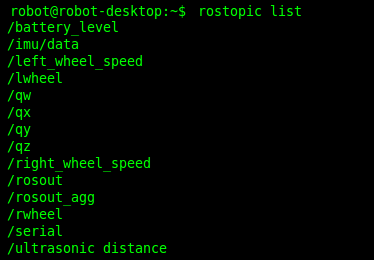
We can view the serial data received by the driver node by subscribing to the /serial topic. We can use it for debugging purposes. If the serial topic shows the same data that we saw in miniterm.py, then we can confirm that the nodes are working fine. The following screenshot is the output of the /serial topic:

After setting the ChefBot_bringup package, we can start working with the autonomous navigation of ChefBot. Currently, we are accessing only the ChefBot PC's terminal. To visualize the robot's model, sensor data, maps, and so on, we have to use RViz in the user's PC. We have to do some configuration in the robot and user PC to perform this operation. It should be noted that the user's PC should have the same software setup as the ChefBot PC.
The first thing we have to do is to set the ChefBot PC as a ROS master. We can set the ChefBot PC as the ROS master by setting the ROS_MASTER_URI value. The ROS_MASTER_URI setting is a required setting; it informs the nodes about the uniform resource identifier (URI) of the ROS master. When you set the same ROS_MASTER_URI for the ChefBot PC and the remote PC, we can access the topics of the ChefBot PC in the remote PC. So, if we run RViz locally, then it will visualize the topics generated in the ChefBot PC.
Assume that the ChefBot PC IP is 192.168.1.106 and the remote PC IP is 192.168.1.10. You can set a static IP for Chefbot PC and remote PC so that the IP will always be the same all test otherwise if it is automatic, you may get different IP in each test. To set ROS_MASTER_URI in each system, the following command should be included in the .bashrc file in the home folder. The following diagram shows the setup needed to include the .bashrc file in each system:

Add these lines at the bottom of .bashrc on each PC and change the IP address according to your network.
After we establish these settings, we can just start roscore on the ChefBot PC terminal and execute the rostopic list command on the remote PC.
If you see any topics, you are done with the settings. We can first run the robot using the keyboard teleoperation to check the robot's functioning and confirm whether we get the sensor values.
We can start the robot driver and other nodes using the following command. Note that this should execute in the ChefBot terminal after logging in using SSH:
$ roslaunch ChefBot_bringup robot_standalone.launch
After launching the robot driver and nodes, start the keyboard teleoperation using the following command. This also has to be done on the new terminal of the ChefBot PC:
$ roslaunch ChefBot_bringup keyboard_teleop.launch
To activate Kinect, execute the following command. This command is also executed on the ChefBot terminal:
$roslaunch ChefBot_bringup 3dsensor_kinect.launch
If you are using Orbecc Astra, use the following launch file to start the sensor:
$ roslaunch ChefBot_bringup 3d_sensor_astra.launch
To view the sensor data, we can execute the following command. This will view the robot model in RViz and should be executed in the remote PC. If we set up the ChefBot_bringup package in the remote PC, we can access the following command and visualize the robot model and sensor data from the ChefBot PC:
$ roslaunch ChefBot_bringup view_robot.launch
The following screenshot is the output of RViz. We can see the LaserScan and PointCloud mapped data in the screenshots:

The preceding screenshot shows LaserScan in RViz. We need to tick the LaserScan topic from the left-hand side section of RViz to show the laser scan data. The laser scan data is marked on the viewport. If you want to watch the point cloud data from Kinect/Astra, click on the Add button on the left-hand side of RViz and select PointCloud2 from the pop-up window. Select Topic |/camera/depth_registered from the list and you will see an image similar to the one shown in the following screenshot:

After working with sensors, we can perform SLAM to map the room. The following procedure helps us to start SLAM on this robot.