Chapter 3. Creating, Populating, Altering, and Deleting Tables
In the SQL Server 2005 database, data is stored in tables (also known as relations in relational database theory). In Chapter 2, we discussed how to write queries to retrieve data from existing tables by using the SELECT statement. In this chapter, we will discuss how to create tables and insert data into them, and how to alter, update, and delete tables and their data using SQL. We start the chapter with a discussion of data types
. You need to know the different data types before you can use the CREATE TABLE command to create tables. In the CREATE TABLE command, in addition to the column names, the data types and sizes of the columns have to be included.
Data Types in SQL Server 2005
Every column in a table has a data type. The data type of a column specifies what kind of information or values can be stored in the column, and what kind of operations can be performed on those values. It is a matter of mapping the domain values you need to store to the corresponding data type. In selecting a data type, you should avoid wasting storage space, while allowing enough space for a sufficient range of possible values over the life of your application. SQL Server 2005 supports 30 different data types. We will discuss the most commonly used data types by dividing the data types into four major categories: numeric, character, date and time, and miscellaneous.
Tip
Domain values are the set of all possible values that a column can have. For example, the domain values for a GPA column may be 0 to 4.
Several of the primary data types also have valid synonyms that can be used instead of the regular data types. The synonyms are external names that are intended to make one SQL product compatible with another.
The more specific you are when selecting a data type for a column, the more accurate the information in your database will be. The following sections briefly describe each data type and its valid synonyms.
Numeric Data Types
Numeric data types should be used for storing numeric data, for data on which you want to perform numeric comparisons or arithmetic operations. Numeric data types can be divided into two groups: integers and decimals.
Integer data types
Integer data types have no digits after the decimal point, and range in size from 1 to 8 bytes of internal storage. Integer data types in SQL Server 2005 include:
BIGINT, which uses 8 bytes of storage and can be used to store numbers from -263 to 263 -1. Avoid using theBIGINTdata type unless you really need its additional storage capacity.INT, which uses 4 bytes of storage and can be used to store numbers from -231 to 231 -1.SMALLINT, which uses 2 bytes of storage and can be used to store numbers from -215 to 215 -1.TINYINT, which uses 1 byte of storage and can be used to store numbers from 0 to 255.MONEY, which uses 8 bytes of storage.SMALLMONEY, which uses 4 bytes of storage.
MONEY and SMALLMONEY are included among integer types because they are internally stored the same way as integers.
Decimal data types
Decimal data types allow a larger range of values as well as a higher degree of accuracy than integer data types . For decimal data types, you can specify a precision and a scale. Precision is the total number of digits stored, and scale is the maximum number of digits to the right of the decimal point. The storage space of decimal data varies according to the precision. Decimals with a precision of 1 to 9 would take up 5 bytes of storage space; decimals with a precision of 10 to 19 would take up 9 bytes of storage, and so on.
Decimal data types include:
REAL, which uses 4 bytes for storage and has a precision of 7 digits. The synonym forREALisFLOAT[(n)]forn= 1 to 7.FLOAT, which uses 8 bytes for storage and has a precision of 15 digits. The synonym forFLOATisDOUBLE PRECISIONandFLOAT[(n)]forn= 8 to 15.DECIMAL, whose storage size varies based on the specified precision and uses 2–17 bytes for storage. The synonyms forDECIMALareDECandNUMERIC.
Rounding errors can occur when using the FLOAT or REAL data types. NUMERIC or DECIMAL are better in such cases, because they give the precision and scale, without the problems of FLOAT or REAL.
When you are trying to select the numeric data type to use, your decision should be based on the maximum range of possible values that you want to store, and the precision and scale that you need. But, at the same time, you have to realize that data types that can store a greater range of values take up more space.
Character Data Types
Character data types are used to store any combination of letters, numbers and symbols. Single quotes have to be used when entering character data. SQL Server 2005 has five types of character data types: CHAR, VARCHAR, TEXT, NCHAR, NVARCHAR.
The CHAR data type
CHAR(
n
)s are fixed-length single-byte character strings that can be used to store up to 8,000 bytes of data. CHAR data is used when the column length is known and unvarying; for example, a Social Security number could be of CHAR(9) data type. Because CHARs use a fixed storage length, CHARs are accessed faster than VARCHARs (varying length character strings). You can and should specify the maximum byte length of a CHAR(
n
) data type with a value for n; otherwise, the default size will be used and the default size may be set to a size much higher than what you need. The synonym for CHAR is CHARACTER.
VARCHAR(
n
)s are variable length single-byte character strings that can also be used to store up to 8000 bytes of data. You can and should also specify the maximum byte length of VARCHARs with n, too; otherwise, as with the CHAR data type, the default size will be used, and the default size may be set to a size much higher than what you need. Variable length means that if less data than the specified n bytes is used, the storage size will be the actual length of the data entered. The synonym for VARCHAR is CHAR VARYING. VARCHAR is the most commonly used character (string) type.
The TEXT data type
TEXTs are also variable-length single-byte character strings, but may be used to store more than 8,000 bytes. The TEXT data type, in SQL Server 2005, is a large object data type, better used if you need to store large strings of data. TEXT has extra overhead that drags down performance. Therefore, the use of the TEXT data type is not encouraged.
The NCHAR data type
NCHARs are fixed-length Unicode character strings
. You can also specify the maximum byte length of NCHAR with n. The synonym for NCHAR is NATIONAL CHAR.
NVARCHARs are variable-length Unicode character strings. You can specify the maximum byte of NVARCHAR length with n. The synonym for NVARCHAR is NATIONAL CHARACTER VARYING.
Unicode character strings
Unicode character strings need two bytes for each stored character. Most English and European alphabets can, however, be stored in single-byte characters. Single-byte character strings can store up to 8,000 characters, and Unicode character strings can store up to 4,000 characters.
Selecting the character data types
Some general rules that you can follow to determine which character data type to use:
Use the variable-length data types (
VARCHAR) over fixed-length data types (CHAR) when you expect a lot of null values or a lot of variation in the size of data.If a column’s data does not vary widely in number of characters, consider using
CHARinstead ofVARCHAR.NVARCHARorNCHARdata types should not be used unless you need to store 16-bit character (Unicode) data.NVARCHARs andNCHARs take up twice as much space asVARCHARorCHARdata types, reducing I/O performance.
Date and Time Data Types
SQL Server 2005 has two data types for storing date and time information: DATETIME and SMALLDATETIME. DATETIME uses 8 bytes. SMALLDATETIME uses 4 bytes of storage. Internally, the DATETIME and SMALLDATETIME values are stored completely differently from how you enter them or how they are displayed. They are stored as two separate components, a date component and a time component.
When creating primary keys, do not consider using the DATETIME and SMALLDATETIME data types. From a performance standpoint, it is better to use a data type that uses less space for a primary key. The less the space used for a primary key, the smaller the table and index, and the less I/O overhead will be required to access the primary key.
Tip
Creation of primary keys will be discussed in Chapter 11.
Miscellaneous Data Types
Among other data types available in SQL Server 2005 are BINARY, IMAGE, BIT, TABLE, SQL_VARIANT, UNIQUEIDENTIFIER, and the XML data type (one of SQL Server 2005’s newest enhancements).
The BINARY data types are BINARY and VARBINARY.
BINARY data types are used to store strings of bits, and values are entered and displayed using their hexadecimal (hex) representation. The maximum length of the BINARY data type is 8,000 bytes. You can specify the maximum byte length of BINARY data with n.
The VARBINARY data type can store up to 8,000 bytes of variable-length binary data. Once again, you can also specify the maximum byte length with n. The VARBINARY data type should be used (instead of the BINARY data type) when you expect to have null values or a variation in data size.
The IMAGE data type is a large object binary data type that stores more than 8000 bytes. The IMAGE data type is used to store binary values and is also used to store pictures.
The BIT data type
The BIT data type is actually an integer data type that can store only a 0 or a 1 and can consume only a single bit of storage space. However, if there is only a one bit column in a table, it will actually take up a whole byte. Up to 8-bit columns are stored in a single byte. The BIT data type is usually used for true/false or yes/no types of data. BIT columns cannot be NULL and cannot have indexes on them.
Monetary data types are generally used to store monetary values. SQL Server 2005 has two monetary data types:
MONEY, which uses 8 bytes of storageSMALLMONEY, which uses 4 bytes of storage
The TABLE data type can be used to store the result of a function and can be used as the data type of local variables. Columns in tables, however, cannot be of type TABLE. Table variables are sometimes preferable to temporary tables, because table variables are cleaned up automatically at the end of a function or stored procedure.
Tip
Temporary tables are covered in Chapter 6. Discussing functions and stored procedures is beyond the scope of this book.
Values stored in a SQL_VARIANT column can be any data type except TEXT or IMAGE. The usage of the SQL_VARIANT data type should be avoided for several reasons: (a) a SQL_VARIANT column cannot be part of a primary or foreign key; (b) a SQL_VARIANT column cannot be part of a computed column; (c) a SQL_VARIANT column can be used in indexes or as other unique keys only if they are shorter than 900 bytes; (d) a SQL_VARIANT column must convert the data to another data type when moving data to objects with other data types.
Tip
Foreign keys are discussed in Chapter 11.
The UNIQUEIDENTIFIER data type, also referred to as globally unique identifier (GUID) or universal unique identifier (UUID), is a 128-bit generated value that guarantees uniqueness worldwide, even among unconnected computers.
The XML data type
The XML data type is a new data type that has been added to SQL Server 2005 to handle XML data. XML can model complex data. The XML column can be typed or untyped. Like other data types, the XML data type must meet specific formatting criteria. It must conform to well-formatted XML criteria (which is untyped) and you can optionally add additional conformance criteria by specifying a Schema collection (typed). SQL Server will also allow you to store XML documents associated with multiple schema definitions. The XML data type will allow you to store complete XML documents or fragments of XML documents. XML documents are limited to two gigabytes of data.
Selecting Data Types
Here we present some general rules that you can follow to determine which data type to use to define a column:
Use the smallest possible column sizes. The smaller the column size, the lesser the amount of data that SQL Server has to store and process, and the faster SQL Server will be able to read and write the data. In addition, the narrower the column, the faster a sort will be performed on a column.
Use the smallest possible data type for a column that will hold your data. For example, if you are going to be storing numbers from 1 to 99 in a column, you would be better off selecting the
TINYINTdata type instead of theINTdata type.For numeric data, it is better to use a numeric data type such as
INTEGER, instead of usingVARCHARorCHAR, because numeric data types generally require less space to hold numeric values then character data types. This saves space, and smaller columns can improve performance when the columns are searched, joined with other columns, or sorted.
Tip
Joins are discussed in Chapter 4.
FLOATs orREALs should not be used to define primary keys. Integer data types can be used for primary keys.Avoid selecting the fixed length columns--
CHARorNCHAR--if your column will have a lot of nulls. TheNULLin aCHARorNCHARfield will take up the entire fixed length of 255 characters. This wastes much space and reduces SQL Server’s overall performance.If you are going to be using a column for frequent sorts, consider an integer-based column rather than a character-based column. SQL Server sorts integer data faster than character data. [1]
Creating a Table
In SQL Server 2005, a relational database, data is loaded into tables that are created in a database. In Chapter 1, we showed you how to create a database. In this section we will concentrate on creating a table within an existing database.
In SQL, the CREATE TABLE
command is used to create a table. In SQL Server 2005, the CREATE TABLE command has to be typed in the query editor screen.
The general syntax of the CREATE TABLE statement is:
CREATE TABLE Tablename
 (column_name type,  column_name, type, .....)
To demonstrate how this CREATE TABLE command works, we provide two examples.
For the first example, we will create a table called Employee that has four columns (attributes). First, type the following in the query editor screen (make sure that you have selected the Student_course database before typing this; if you do not remember how to select the Student_Course database, refer to Figure 1-16 of Chapter 1):
CREATE TABLE  Employee (names            VARCHAR(20),
                        address          VARCHAR(20),
                        employee_number  INT,
                        salary           SMALLMONEY)
Execute the query.
You will get:
Command(s) completed successfully.
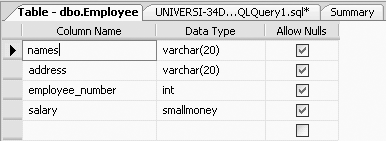
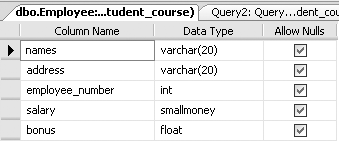
This CREATE TABLE query created a table called Employee with four columns (in the Student_course database): names, address, employee_number, and salary. The data type of names is VARCHAR (variable-length character), with a maximum length of 20 characters. The data type of address is VARCHAR, with a maximum length of 20 characters. The data type of employee_number is INT and the data type of salary is SMALLMONEY.
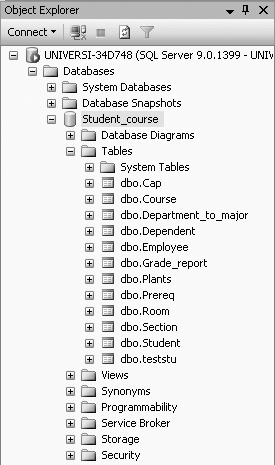
To view the Employee table in the Student_course database, expand the Student_course node (under the Object Explorer) and the Tables node, and you should be able to see the Employee table, as shown in Figure 3-1.
To look at the table definition of the table you just created, right-click on the table, Employee, and select Modify. Figure 3-2 shows the table definition of the Employee table.
For the second example to demonstrate the use of the CREATE TABLE command, we will create a table called Names (type the following query):
CREATE TABLE Names
   (fullname VARCHAR(20))
This table has only one column, fullname. Its data type is VARCHAR and the maximum length of a name in this table is 20 characters.
Inserting Values into a Table
There are several ways to insert values into a table using SQL in SQL Server 2005. We will illustrate the two most commonly used ways: using INSERT INTO .. VALUES and using INSERT INTO .. SELECT.
Using INSERT INTO .. VALUES
One way to insert values into one row of a table is to use the INSERT INTO command with the VALUES option. The INSERT INTO .. VALUES option needs the column list and all the columns in the correct order.
The general syntax for the INSERT INTO .. VALUES option is:
INSERT INTO TableName
VALUES ('character_attribute_value', numeric_attribute_value, ...)
We will first illustrate inserting data with the INSERT INTO .. VALUES option using the Names table we created in the preceding section. So, type the following in the query editor:
INSERT INTO Names
VALUES ('Joe Smith')
where:
INSERTis the SQL command to insert dataINTOis a necessary keywordNamesis the name of an existing tableVALUESis another necessary keyword'Joe Smith'is a string of letters corresponding to theVARCHARdata type
Then click the Execute button. You will get a message that will tell you how many rows were inserted by the query:
(1 row(s) affected)
Now, if you type the following SQL query:
SELECT *
FROM    Names
You will get:
fullname
--------------------
Joe Smith

(1 row(s) affected)
The INSERT INTO .. VALUES option appends rows to a table (that is, rows are added to the end of the table). So, if you use the INSERT INTO .. VALUES option again as follows:
INSERT INTO Names
VALUES ('Sudip Kumar')
And then type:
SELECT *
FROM    Names
You get this result:
fullname
--------------------
Joe Smith
Sudip Kumar

(2 row(s) affected)
If you created a table with n attributes (columns), you usually would have n values in the INSERT INTO .. VALUES statement, in the order of the definition of the columns in the table. For example, to insert into the Employee table that you created earlier, the INSERT INTO .. VALUES statement to insert a row would have to match column for column and would look like this:
INSERT INTO Employee
VALUES ('Joe Smith', '123 4th St.', 101, 2500)
Note that character data is entered with single quotes around it. Numeric data does not use quotes (as shown by 101 and 2500).
Now if you type:
SELECT *
FROM    Employee
You get the following:
names                address              employee_number salary
-------------------- -------------------- --------------- ------------
Joe Smith            123 4th St.          101             2500.00

(1 row(s) affected)
An INSERT that looks like the following is incorrect, because it does not include all four columns of the Employee table:
INSERT INTO Employee
VALUES ('Joe Smith', '123 4th St.')
You may INSERT a row with less than all the columns by naming the columns you want to insert into, like this:
INSERT INTO Employee (names, address)
VALUES ('Joe Smith', '123 4th St.')
In this case, the row will contain nulls or default values for the values left out, which you will see if you type:
SELECT *
FROM Employee
This will give:
names                address              employee_number salary
-------------------- -------------------- --------------- ------------
Joe Smith            123 4th St.          101             2500.00
Joe Smith            123 4th St.          NULL            NULL

(2 row(s) affected)
An INSERT that looks like the following is incorrect, because it does not have the values in the same order as the definition of the table:
INSERT INTO Employee
VALUES (2500, 'Joe Smith', 101, '123 4th St.')
If for some reason the data had to be entered in this order, the previous statement could be corrected by specifying the column names, as shown here:
INSERT INTO Employee (salary, names, employee_number, address)
VALUES (2500, 'Joe Smith', 101, '123 4th St.')
At this point, typing:
SELECT *
FROM Employee
would give us the following output:
names                address              employee_number salary
-------------------- -------------------- --------------- ------------
Joe Smith            123 4th St.          101             2500.00
Joe Smith            123 4th St.          NULL            NULL
Joe Smith            123 4th St.          101             2500.00

(3 row(s) affected)
You may actually include the keyword, null, if the address and the salary were unknown:
INSERT INTO Employee
VALUES ('Joe Smith', null, 101, null)
Now having added four rows to our table, type:
SELECT *
FROM Employee
This query will give the following output:
names                address              employee_number salary
-------------------- -------------------- --------------- ------------
Joe Smith            123 4th St.          101             2500.00
Joe Smith            123 4th St.          NULL            NULL
Joe Smith            123 4th St.          101             2500.00
Joe Smith            NULL                 101             NULL

(4 row(s) affected)
To delete all the rows in the Employee table as well as in the Names table, type:
DELETE FROM Employee
Then:
DELETE FROM Names
We will revisit the DELETE command later in the chapter.
For the rest of this chapter, we will set up our Employee table with more meaningful data. Suppose we deleted all the test rows from the previous examples with a DELETE statement and then suppose we used the INSERT INTO .. VALUES option to insert valid data into the Employee table, making it look like this:
names                address              employee_number salary
-------------------- -------------------- --------------- ------------
Joe Smith            123 4th St.          101             2500.00
Pradeep Saha         27 Shillingford      103             3300.00
Sumit Kumar          95 Oxford Rd         105             1200.00
Joya Das             23 Pesterfield Cr    114             2290.00
Terry Livingstone    465 Easter Ave       95              3309.00

(5 row(s) affected)
Using INSERT INTO .. SELECT
With the INSERT INTO .. VALUES option, you insert only one row at a time into a table. With the INSERT INTO .. SELECT option, you may (and usually do) insert many rows into a table at one time.
The general syntax for the INSERT INTO .. SELECT option is:
INSERT INTO target_table(column1, column2, column3, ...)
 "SELECT clause"
We will first illustrate inserting with the INSERT INTO .. SELECT by populating the Names table (the one that you created earlier in this chapter and then removed all rows from with a DELETE FROM Names). To copy all the names from the Employee table into the Names table, type the following:
INSERT INTO Names(fullname)
  SELECT  names
  FROM    Employee
And now if you type:
SELECT *
FROM   Names
you will get the following five rows of output:
fullname
--------------------
Joe Smith
Pradeep Saha
Sumit Kumar
Joya Das
Terry Livingstone

(5 row(s) affected)
We do not have to copy all the names from the Employee table to the Names table. For example, we could restrict the INSERT .. SELECT like this:
INSERT INTO Names(fullname)
  SELECT names
  FROM   Employee
  WHERE  salary > 2600
This would give us only the following two rows in Names:
fullname
--------------------
Pradeep Saha
Terry Livingstone

(2 row(s) affected)
As with the INSERT INTO .. VALUES option, if you create a table with n columns, you usually would have n values in the INSERT INTO .. SELECT option in the order of the table definition, or you would have to name the columns you are inserting. For example, suppose we have a table called Emp1, created with three columns:
Emp1 (addr, sal, empno)
The columns, addr, sal, empno, stand for address, salary, and employee number, respectively.
Now suppose that we want to load the existing empty table called Emp1 from the Employee table with the appropriate columns.
Tip
As with the INSERT INTO .. VALUES option, the INSERT INTO .. SELECT option has to match column for column.
An INSERT INTO .. SELECT statement would look like this:
INSERT INTO Emp1(addr, sal, empno)
  SELECT address, salary, employee_number
  FROM   Employee
The Emp1 table would now have the following five rows:
addr                 sal          empno
-------------------- ------------ -----------
123 4th St.          2500.00        101
27 Shillingford      3300.00        103
95 Oxford Rd         1200.00        105
23 Pesterfield Cr    2290.00        114
465 Easter Ave       3309.00        95

(5 row(s) affected)
If we created a table, Emp2, with identical columns (or attributes) as Emp1, we could use the following INSERT to load data from table Emp1 to Emp2:
INSERT INTO Emp2
   SELECT *
      FROM Emp1
The Emp2 table would now have the same data as the Emp1 table. This is one way of creating a backup table.
Again, note that the Emp2 table has to exist (be created with the same columns and types) before loading it with the INSERT INTO .. SELECT option.
One caution must be pointed out, however. An erroneous INSERT INTO .. SELECT could succeed if the data types of the SELECT match the data types of the columns in the table to which we are inserting. For example, say we execute the following statement (remember that both sal and empno are numeric types):
INSERT INTO Emp1 (addr, sal, empno)
  SELECT address, employee_number, salary
  FROM   Employee
This INSERT will succeed because the data types match. The following output results after executing the previous INSERT statement:
addr                 sal          empno
-------------------- ------------ -----------
123 4th St.          101.00        2500
27 Shillingford      103.00        3300
95 Oxford Rd         105.00        1200
23 Pesterfield Cr    114.00        2290
465 Easter Ave       95.00         3309

(5 row(s) affected)
The wrong information has been inserted in Emp1’s columns. The employee_number from Employee has been inserted into the sal column in Emp1, and the salary of Employee has been inserted into the empno column of Emp1. So, be careful and line up or match up the columns (attributes) in the INSERT INTO and SELECT statements when using an INSERT INTO .. SELECT.
As you might have already guessed from the INSERT INTO .. VALUES section, you do not have to insert the whole row with an INSERT INTO..SELECT. You may load fewer columns than a whole row of Employee with INSERT .. SELECT. Once again, if we delete all rows from Emp1, and then execute a statement like this:
INSERT INTO Emp1 (addr, sal)
  SELECT  address, salary
  FROM    Employee
This INSERT would leave the other column, empno (of the Emp1 table), with nulls as shown here:
SELECT *
FROM   Emp1
This query produces the following output:
addr                 sal          empno
-------------------- ------------ -----------
123 4th St.          2500.00      NULL
27 Shillingford      3300.00      NULL
95 Oxford Rd         1200.00      NULL
23 Pesterfield Cr    2290.00      NULL
465 Easter Ave       3309.00      NULL

(5 row(s) affected)
In conclusion, you must be careful with the INSERT INTO .. SELECT option, because, unlike the INSERT INTO .. VALUES option (which inserts one row at a time), you almost always insert multiple rows, and if types match, the insert will take place whether it makes sense or not.
The UPDATE Command
Another common command used for setting/changing data values in a table is the UPDATE command. As with INSERT INTO .. SELECT, you often UPDATE more than one row. To examine how the UPDATE command works, we will use the tables we created in the previous section.
The general format for the UPDATE command is:
UPDATE TableName
SET fieldname...
For example, if you want to set all salaries in the table Emp2 to zero, you may do so with one UPDATE command:
UPDATE Emp2
SET sal = 0
Now, if you type:
SELECT *
FROM Emp2
You will get:
addr                 sal          empno
-------------------- ------------ -----------
123 4th St.          0.00         101
27 Shillingford      0.00         103
95 Oxford Rd         0.00         105
23 Pesterfield Cr    0.00         114
465 Easter Ave       0.00          95

(5 row(s) affected)
This UPDATE command sets all salaries in all rows of the Emp2 table to zero, regardless of previous values. As with any statement that affects all rows, this may be viewed as a dangerous command and caution should be observed.
It is often useful to include a WHERE clause in the UPDATE command so that values are set selectively. For example, if we assume that employee numbers are unique, we can UPDATE a specific employee from the Employee table with the following statement:
UPDATE Employee
SET    salary = 0
WHERE  employee_number=101
This query produces the following output:
names                address              employee_number salary
-------------------- -------------------- --------------- ------------
Joe Smith            123 4th St.          101                0.00
Pradeep Saha         27 Shillingford      103             3300.00
Sumit Kumar          95 Oxford Rd         105             1200.00
Joya Das             23 Pesterfield Cr    114             2290.00
Terry Livingstone    465 Easter Ave       95              3390.00

(5 row(s) affected)
Only employee number 101’s row is updated. Once again, note that we do not use the quotes around 101, since employee_number is defined as an INT column (a numeric column). Quotes would have to be used around any character or string columns.
The ALTER TABLE Command
In the last few sections we looked at how to add, change, and update rows in a table with the INSERT and UPDATE commands. In this section, we discuss how you can add, change (modify), and delete columns in a table’s definition by using SQL’s ALTER TABLE command. ALTER TABLE commands are known as data definition (DDL) commands, because they change the definition of a table.
Adding a Column to a Table
You may add columns to a table with little difficulty. The general syntax for adding a column to a table is:
ALTER TABLE
 Tablename
ADD column-name type
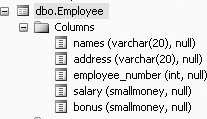
For example, to add a column called bonus (a SMALLMONEY column) to the Employee table, you type in the following:
ALTER TABLE Employee
ADD bonus SMALLMONEY
This command alters the table definition of the Employee table, as shown in Figure 3-3 (to get Figure 3-3, click on the + beside the Employee table and then click on the + beside Columns--in the Object Explorer on the left side of your screen):
When columns are added to existing tables, they will initially contain null values. Data may be added to the new column using an UPDATE command.
Changing a Column’s Data Type in a Table
In SQL Server 2005, you can change a column’s data type with existing data in it, provided that the new column data type will accommodate the existing data. The general syntax for changing a column’s data type in a table is:
ALTER TABLE Tablename
ALTER COLUMN column-name new_type
For example, to change the data type of the bonus column from SMALLMONEY to FLOAT, you would type the following:
ALTER TABLE EMPLOYEE
ALTER COLUMN bonus FLOAT
This query would produce the table definition of the Employee table shown in Figure 3-4.
Tip
You may have to refresh the Employee table before you can see this change made to the table definition. To refresh the Employee table, right click on the Employee table and then select Refresh. Then, select the Employee table and select Modify.
Changing a column’s length in a table
You may want to change the size of a column in a table. You typically make a column larger, and SQL Server 2005 will not have a problem with that, because larger columns will accommodate existing data. But, if you want to make a column smaller (which is unusual), sometimes SQL Server 2005 will let you do it and other times it will not.
When will SQL Server 2005 allow you to reduce the length of your column without any problems?
When you do not have any data in that column yet (it’s all NULL).
When all the data in that column is still less than the size you are changing the column to.
If you try to reduce the column size to a size where you would be cutting off some of the data, SQL Server 2005 will give you an error and will not let you do it.
For example, if you type in the following ALTER TABLE command, trying to change the names column of the Employee table to a size of 5 (where you would be losing some data):
ALTER TABLE Employee
ALTER COLUMN names VARCHAR(5)
You will get the following error message:
Msg 8152, Level 16, State 14, Line 1
String or binary data would be truncated.
The statement has been terminated.
And, upon viewing the table definition of the Employee table, you will find that the column size of the names column was not altered.
If, however, you type:
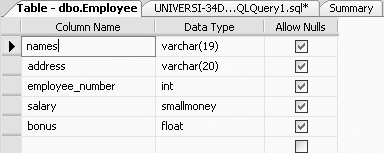
ALTER TABLE
 Employee
ALTER COLUMN names VARCHAR(19)
You will get the message:
Command(s) completed successfully.
Now if you look at the table definition of the Employee table, you will see that the names column has been changed to a size of 19 characters, as shown in Figure 3-5.
But before you can view this change, you may have to refresh the Employee table.
SQL Server 2005 allowed this reduction in column size, as all the data in the names column was less than 19 characters in length.
Before you proceed to the following section, please change the size of the names column back to 20.
Deleting a Column from a Table
The following is the general syntax for deleting a column from a table:
ALTER TABLE Tablename
DROP column column-name
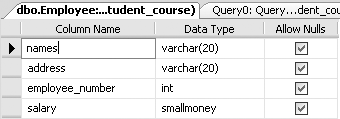
For example, to delete the column called bonus from the Employee table, type the following:
ALTER TABLE Employee
DROP column bonus
This query produces the definition of the Employee table shown in Figure 3-6, which matches the original design for the table shown in Figure 3-2.
Warning
The DROP column command will also delete a column even if there is data in it, so you have to be very careful when using it. This is another one of the commands that affects multiple rows and caution must be observed.
We will discuss a few other uses of the ALTER TABLE command in subsequent chapters. For example, you can use it to define or change a default column value, enable or disable an integrity constraint, manage internal space, and so on.
The DELETE Command
Earlier in the chapter, we saw that the DELETE command can be used to remove all rows of a table. In this section we revisit the powerful DELETE. Keep in mind as you read this that the DELETE statement can affect multiple rows as we have seen and hence, one must be careful when using it. Following is the general syntax of the DELETE command used to delete rows from a table:
DELETE FROM Table
WHERE (condition)
(condition) determines which rows of the table will be deleted. As you saw earlier, if no WHERE condition is used, all the rows of the table will be deleted.
Here is an example of using the DELETE command on our original Employee table:
DELETE FROM Employee
WHERE salary < 1500
Now if you type:
SELECT *
FROM EMPLOYEE
You will get the following four rows of output:
names                address              employee_number salary
-------------------- -------------------- --------------- ------------
Joe Smith            123 4th St.          101             2500.00
Pradeep Saha         27 Shillingford      103             3300.00
Joya Das             23 Pesterfield Cr    114             2290.00
Terry Livingstone    465 Easter Ave       95              3390.00

(4 row(s) affected)
Deleting a Table
The general syntax to delete or remove an entire table and its contents is:
DROP TABLE Tablename
For example, to delete the table called Names from your database, you would type the following:
DROP TABLE Names
There are times when it is appropriate to delete all the data in a table and there are times when the entire table should be eradicated. When a table is dropped, it no longer exists; its definition is removed from the database. But, when data is deleted from a table with a DELETE
statement (maybe with a WHERE condition), the table may be repopulated, because only the data from the table was removed, but the definition is intact.
Summary
In this chapter, we dealt with basic table manipulations. We showed you how to create tables, insert data into tables, update data in tables, add and delete columns from tables, alter column types and sizes, and delete entire tables. We also discussed the basic data types available in SQL Server 2005.
Review Questions
The
INSERT INTO .. VALUESoption will insert rows into the _________ of a table.While you are inserting values into a table with the
INSERT INTO .. VALUESoption, does the order of the columns in theINSERTstatement have to be the same as the order of the columns in the table?While you are inserting values into a table with the
INSERT INTO .. SELECToption, does the order of the columns in theINSERTstatement have to be the same as the order of the columns in the table?When would you use an
INSERT INTO .. SELECToption versus anINSERT INTO .. VALUESoption? Give an example of each.What does the
UPDATEcommand do?Can you change the data type of a column in a table after the table has been created? If so, which command would you use?
Will SQL Server 2005 allow you to reduce the size of a column?
What integer data types are available in SQL Server 2005?
What is the default value of an integer data type in SQL Server 2005?
What decimal data types are available in SQL Server 2005?
What is the difference between a
CHARand aVARCHARdatatype?Does Server SQL treat
CHARas a variable-length or fixed-length column? Do other SQL implementations treat it in the same way?If you are going to have too many nulls in a column, what would be the best data type to use?
When columns are added to existing tables, what do they initially contain?
What command would you use to add a column to a table in SQL Server?
In SQL Server, which data type is used to store large object data types?
If I do not need to store decimal places, what would be a good numeric data type to use?
If I need to store decimal places, but am not worried about rounding errors, what would be a good data type to use?
Should a column be defined as a
FLOATif it is going to be used as a primary key?
Exercises
Unless specified otherwise, use the Student_course database to answer the following questions. Also, use appropriate column headings when displaying your output.
Create a table called
Custwith a customer number as a fixed-length character string of 3, an address with a variable-length character string of up to 20, and a numeric balance.Insert values into the table with
INSERT INTO .. VALUESoption. Use the form ofINSERT INTO .. VALUESoption that requires you to have a value for each column; therefore, if you have a customer number, address, and balance, you must insert three values withINSERT INTO .. VALUESoption.Create at least five tuples (rows in the table) with customer numbers 101 to 105 and balances between 200 to 2000.
Display the table with a simple
SELECT.Show the balances for customers with customer numbers 103 and 104.
Add a customer number 90 to your
Custtable.Show a listing of the customers in balance order (high to low), using
ORDER BYin yourSELECT. (Result: Five tuples, or however many you created.)
From the
Studenttable (from ourStudent_coursedatabase), display the student names, classes, and majors for freshmen or sophomores (class <= 2) in descending order of class.From your
Custtable, show a listing of only the customer balances in ascending order where balance > 400. (You can choose some other constant or relation if you want, such as balance <= 600.) The results will depend on your data.Create another two tables with the same data types as
Custbut without the customer addresses. Call one tableCust1and the otherCust2. Use column namescnumfor customer number andbalfor balance. Load the table with the data you have in theCusttable with one less tuple. Use anINSERT INTO .. SELECTwith appropriate columns and an appropriateWHEREclause.Display the resulting tables.
Alter the
Cust1table by adding a date_opened column of typeDATETIME. View the table definition ofCust1.Add some more data to the
Cust1table by using theINSERT INTO .. VALUESoption.After each of the following, display the table.
Set the
date_openedvalue in all rows to ’01-JAN-06’.Set all balances to zero.
Set the
date_openedvalue of one of your rows to ’21-OCT-06’.Change the type of the
balancecolumn in theCust1table toFLOAT. Display the table definition. Set the balance for one row to 888.88 and display the table data.Try changing the type of balance to
INTEGER. Does this work in SQL Server?Delete the
date_openedcolumn of theCust1table.When you are finished with the exercise (but be sure you are finished), delete the tables
Cust,Cust1, andCust2.
References
[1] Data Type Performance Tuning Tips for Microsoft SQL Server: http://www.sql-server-performance.com/datatypes.asp