Chapter 2. Beginning SQL Commands in SQL Server
In this chapter, we discuss how to write (build) simple SQL query statements in SQL Server 2005 using the SELECT statement. We examine how to retrieve data from a table by the use of SELECT statements, how to SELECT fields (columns) and rows from tables, how to use the ORDER BY and WHERE clauses, and how to use the AND, OR, and BETWEEN operators. The concept of COUNT and null values is also to be established. Then, to make writing queries simpler, we discuss how to use table and column aliases, table qualifiers, synonyms, and finally we present a convention for writing SQL statements.
Displaying Data with the SELECT Statement
One of the very first things that you would usually want to do with a set of tables (or a database) is to see what information the tables contain. To display the information in a table using a query, you use a SELECT command on the table. SELECT is usually the first word in a SQL statement or query. The SELECT statement returns information from a table (or a set of tables, the database) as a set of records, or a result set. The result set is a tabular arrangement of data, composed of rows and columns. The SELECT statement shows the output on the computer screen (as shown in Figures 1-26 and 1-28 of Chapter 1). It does not save the results. The simplest and most commonly used form of the SELECT syntax is:
SELECT fields (a.k.a. columns or attributes)
FROM Table
Here, Table is the name of the table from which the data will be displayed, and fields are the columns (attributes) that you chose to display from the named table. If you did not know the name of the columns in the table, or you wanted to display all the columns in the table, you would use an asterisk (*) in place of fields; substituting an asterisk (*) in place of fields would list all the columns in the table.
So, the SELECT statement gives us a result set that is composed of the data from columns of a table.
Tip
SQL commands in SQL Server 2005 do not have to be terminated by a semicolon, as is true in several other SQL languages.
But, before we use the SELECT statement, we have to make sure that the right database is open. To open a database that you want to use, type the following in the query editor screen (the query editor screen is shown in Figure 1-12 of Chapter 1):
USE Student_course
and then click the Execute button.
Student_course is the name of the database that we would like to open. The Student_course database should now be active.
Once the Student_course database is active, to display all the data from a table called Dependent from our database (Student_course database), type the following in the query editor screen:
SELECT *
FROM      Dependent
The * means all columns of the Dependent table. Now click the Execute button to execute this query. Your results will display in the result pane.
SELECT without the FROM
Most SQL languages require a FROM in a query. But, SELECT statements in SQL Server do not need to be from a table. SQL Server allows us to write some special queries without FROM. For example, using a special function, GETDATE, we may type this:
SELECT GETDATE()
and the query will return the date and time as defined by the host computer:
-----------------------
2006-01-12 21:55:30.107

(1 row(s) affected)
Note that these columns do not have any headings.
In SQL Server 2005, a SELECT statement can also be used to make an assignment. For example, the following example assigns 100 to col1, and 200 to col2:
SELECT col1=100, col2=200
with the results:
col1        col2
----------- -----------
100         200

(1 row(s) affected)
Tip
“col1” and “col2” are column aliases. Column aliases are discussed in detail later in this chapter.
SELECT 'A', 'B'
produces:
---- ----
A    B

(1 row(s) affected)
Note that this output has no headings either.
SELECT 4+3, 4-3, 4*3, 4/3
produces:
----------- ----------- ----------- -----------
7           1           12          1

(1 row(s) affected)
To include meaningful column headings here, we can type:
SELECT Additions=4+3, Subtractions=4-3, Multiplications=4*3, Divisions=4/3
which results in:
Additions   Subtractions Multiplications Divisions
----------- ------------ --------------- -----------
7           1            12              1

(1 row(s) affected)
Displaying or Selecting Columns from a Table
Using a SELECT statement, you do not have to display or return all the columns from a table. You may choose to display only certain relevant columns from a table, provided you know the names of the columns in the table. In this section, we show you how to display or return one column from a table, more than one column from a table, and then how to display or return all columns from a table. Then we introduce the ORDER BY clause and also show you how to order the output in ascending or descending order by adding the ASC or DESC commands, respectively, to the ORDER BY clause.
Displaying or SELECTing One Column from a Table
To be able to display or return particular fields or columns from a table, you need to know the column names in the table. To view the column names that a table contains, you will have to go to the Table Definition of a table. Chapter 1 (Figure 1-20) shows you how to view the table definitions of tables.
You may find it odd that a someone working with a database might not know the column names. However, when creating a table, one has great latitude with naming columns. If you knew, for example, that a table called Customer contained a name and address, you’d have to know the exact name of the column. If the table creator called the customer’s name CustName, then to retrieve the data from that column, you’d have to use CustName and not any variation of it (like CustomerName or Name or anything else).
Select the table for which you want to see the definition by right clickingon the table from the Object Explorer, and then clicking on Columns. Now, right-click on the Dependent table and click Columns, and you will see the table definition of the Dependent table.
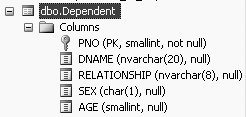
Figure 2-1 shows the definition of the Dependent table. The table definition provides the exact column names, the data types of the columns, the field sizes and information on whether the fields can hold nulls. The data type allows you to enter only a particular kind of data in the columns. The field sizes allow you to enter only up to a certain number of characters in a field. null or not null tells you whether the field will allow for nulls.
The Dependent table in Figure 2-1 has columns PNO (short for parent_number) of data type SMALLINT (small integers), DNAME (short for dependent name) of data type NVARCHAR (a varying number of characters), RELATIONSHIP (for relationship to parent or Student) of data type NVARCHAR, SEX of data type CHAR (one character), and AGE of data type SMALLINT. The only field in the Dependent table that cannot be null is STNO.
Once you know what columns a table contains, you may choose to view or display particular columns of the table. Following is the general syntax to display or SELECT the data from one field or column of a table:
SELECT field_name
FROM table
For example, to display or SELECT data for a column called dname from the Dependent table, you type the following query in the query editor:
SELECT dname
FROM   Dependent
This query returns a result set containing 39 records or rows (of which the first 10 rows are shown):
dname
--------------------
Matt
Mary
Beena
Amit
Shantu
Raju
Rani
Susan
Sam
Donald II
.
.
.
(39 row(s) affected)
Displaying or SELECTing More than One Column from a Table
To display or SELECT (or return) data for more than one column of the table, the column names have to be separated by commas. For example, to display the data from the dname and relationship columns in the Dependent table, type the following query:
SELECT dname, relationship
FROM   Dependent
This query also produces 39 rows of output (we show the first 12 rows here):
dname                relationship
-------------------- ------------
Matt                 Son
Mary                 Daughter
Beena                Spouse
Amit                 Son
Shantu               Daughter
Raju                 Son
Rani
Susan                Daughter
Sam                  Son
Donald II            Son
Chris                Son
Susan                Daughter
.
.
.

(39 row(s) affected)
In this example, we see a row where dname (dependent name) is Rani, but no relationship has been assigned or entered. This is a very typical problem in any database—data is missing or unknown, also known as NULL. Therefore, preferably, when data is entered into a table, all columns should be valued. In this case probably an empty string was entered, otherwise SQL Server 2005 assigns a NULL value.
Displaying or SELECTing All Columns of a Table
There are times when you will want to display or select all the columns of a table. To do so, as illustrated previously, you use a * in place of the column names. For example, the following produces an output of 39 rows and all the columns in the Dependent table:
SELECT *
FROM   Dependent
This query also produces 39 rows of output (of which we show the first 15 rows here):
PNO    DNAME                RELATIONSHIP SEX  AGE
------ -------------------- ------------ ---- ------
2      Matt                 Son          M    8
2      Mary                 Daughter     F    9
2      Beena                Spouse       F    31
10     Amit                 Son          M    3
10     Shantu               Daughter     F    5
14     Raju                 Son          M    1
14     Rani                              F    3
17     Susan                Daughter     F    4
17     Sam                  Son          M    1
20     Donald II            Son          M    NULL
20     Chris                Son          M    6
34     Susan                Daughter     F    5
34     Monica               Daughter     F    1
62     Tom                  Husband      M    45
62     James                Son          M    14
.
.
.

(39 row(s) affected)
ORDER BY
A table maintains the data in the order that the system stores it in, which is unpredictable. Remember that a relational database contains sets of rows of data and sets are not ordered. If you wish to display the contents of a table in a predictable manner, you may use the ORDER BY clause
in the SELECT statement. For example, to order the Dependent table by field age, you would type the following:
SELECT dname, age
FROM   Dependent
ORDER  BY age
This produces the following 39 rows of output, ordered by age (of which the first 20 rows are shown below):
dname                age
-------------------- ------
Donald II            NULL
Mita                 NULL
Losmith              NULL
Prakash              1
Mithu                1
Raju                 1
Sam                  1
Monica               1
Jon                  2
Rakhi                2
Jake                 2
Nita                 2
Mahesh               2
Rani                 3
Amit                 3
Susan                4
Sebastian            4
Mamta                4
Madhu                5
Shantu               5
.
.
.

(39 row(s) affected)
The ORDER BY does not actually change the order of the data in the table. It only displays or returns the data (output) in a particular order.
When using an ORDER BY in a SELECT statement, you do not have to have the column that you are ordering by in the SELECT statement. For example, you may display only the dependent name and age while ordering by sex, as follows:
SELECT dname, age
FROM   Dependent
ORDER  BY sex
This would produce 39 rows of output, of which we are showing the first 5 rows (the females are shown first, because it is ordered alphabetically):
dname                age
-------------------- ------
Mary                 9
Beena                31
Shantu               5
Rani                 3
Susan                4
.
.
.

(39 row(s) affected)
Although the previous output is not wrong, it is may appear to be randomly ordered by someone who does not know what was used in the ORDER BY statement. Therefore, it is generally better to display the column that you are ordering by also, as follows:
SELECT dname, age, sex
FROM   Dependent
ORDER  BY sex
This query would once again produce 39 rows, of which we are showing the first 5 rows:
dname                age    sex
-------------------- ------ ----
Mary                 9      F
Beena                31     F
Shantu               5      F
Rani                 3      F
Susan                4      F
.
.
.

(39 row(s) affected)
ORDER BY and NULLs
When data has not been entered for a particular column of a particular row, this cell gets a NULL value. Null means that data is missing or unavailable, so the cell has no value.
If the field that you choose to ORDER BY contains nulls, the fields that have null values assigned to them are placed at the top of the displayed list of output. This is because of the way SQL Server stores null values internally. Look at the output of the following query:
SELECT dname, age
FROM    Dependent
ORDER  BY age
which produces 39 rows of output, of which we are showing the first 16 rows:
dname                age
-------------------- ------
Donald II            NULL
Mita                 NULL
Losmith              NULL
Prakash              1
Mithu                1
Raju                 1
Sam                  1
Monica               1
Jon                  2
Rakhi                2
Jake                 2
Nita                 2
Mahesh               2
Rani                 3
Amit                 3
Susan                4
.
.
.

(39 row(s) affected)
If nothing was entered in a column (an empty string was entered), the column behaves just like a NULL field when using the ORDER BY clause. For example, if we type in the following query:
SELECT dname, relationship
FROM   Dependent
ORDER  BY relationship
we get 39 rows of output, of which we are showing the first 8 rows:
dname                relationship
-------------------- ------------
Rani
Susan                Daughter
Mary                 Daughter
Susan                Daughter
Monica               Daughter
Hillary              Daughter
Phoebe               Daughter
Shantu               Daughter
.
.
.

(39 row(s) affected)
In this table, nothing (an empty string) was entered in the relationship column for the dependent Rani.
Ascending and Descending Order
In SQL Server, the default order of an ORDER BY is ascending. To display or order output in descending order, the keyword DESC has to be appended to the ORDER BY clause. And, in order to display or order output in ascending order, the keyword ASC can be appended to the ORDER BY clause.
So, unless you specify otherwise, the following two queries will give you the same output:
SELECT dname, age
FROM   Dependent
ORDER  BY age
and:
SELECT dname, age
FROM   Dependent
ORDER  BY age ASC
The top query returns a result set ordered in ascending order by age by default. The second query has the keyword ASC appended to the ORDER BY clause, so it also orders in ascending order by age (the output for these queries has been shown previously).
In order to display or order output in descending order, the keyword DESC can be appended to the ORDER BY clause, as follows:
SELECT dname, age
FROM   Dependent
ORDER  BY age DESC
This produces 39 rows of output in descending order of age (of which the first 10 rows are shown here):
dname                age
-------------------- ------
Tom                  45
Beena                31
Barbara              26
Barbara              23
Susan                22
Susie                22
Xi du                22
Sally                22
Hillary              16
James                14
.
.
.

(39 row(s) affected)
Ordering Within an Order
There will be times when you will want to sort groups within an order by another order. SQL Server syntax allows you to do this. For example, using the Dependent table, if you want to order all the dependents by sex, and within sex you want to order by age in descending order, would you type the following query:
SELECT dname, sex, age
FROM   Dependent
ORDER  BY sex, age DESC
This query would produce the following 39 rows of output:
dname                sex  age
-------------------- ---- ------
Beena                F    31
Barbara              F    26
Barbara              F    23
Susan                F    22
Susie                F    22
Xi du                F    22
Sally                F    22
Hillary              F    16
Phoebe               F    12
Mary                 F    9
Mona                 F    7
Rekha                F    6
Madhu                F    5
Shantu               F    5
Susan                F    5
Susan                F    4
Mamta                F    4
Rani                 F    3
Rakhi                F    2
Nita                 F    2
Monica               F    1
Mita                 F    NULL
Tom                  M    45
James                M    14
Matt                 M    8
Chris                M    6
Om                   M    6
James                M    5
Sebastian            M    4
Amit                 M    3
Jon                  M    2
Jake                 M    2
Mahesh               M    2
Prakash              M    1
Mithu                M    1
Sam                  M    1
Raju                 M    1
Donald II            M    NULL
Losmith              M    NULL

(39 row(s) affected)
You could also order by descending order of sex, and descending order of age, as follows:
SELECT dname, sex, age
FROM   Dependent
ORDER  BY sex DESC, age DESC
This query would give the following 39 rows of output:
dname                sex  age
-------------------- ---- ------
Tom                  M    45
James                M    14
Matt                 M    8
Chris                M    6
Om                   M    6
James                M    5
Sebastian            M    4
Amit                 M    3
Jake                 M    2
Jon                  M    2
Mahesh               M    2
Prakash              M    1
Mithu                M    1
Raju                 M    1
Sam                  M    1
Donald II            M    NULL
Losmith              M    NULL
Beena                F    31
Barbara              F    26
Barbara              F    23
Sally                F    22
Susan                F    22
Susie                F    22
Xi du                F    22
Hillary              F    16
Phoebe               F    12
Mary                 F    9
Mona                 F    7
Rekha                F    6
Madhu                F    5
Shantu               F    5
Susan                F    5
Susan                F    4
Mamta                F    4
Rani                 F    3
Nita                 F    2
Rakhi                F    2
Monica               F    1
Mita                 F    NULL

(39 row(s) affected)
Displaying or SELECTing Rows or Tuples from a Table
In relational database terminology, a table is called a relation, and is denoted by the name of the relation followed by the columns (or attributes), as shown here:
Dependent(pno, dname, relationship, sex, age)
An instance of a relation is a row of a relation (table) with values. We will use the term “row” to refer to a line of output. Although database literature also uses the term “tuple” or “record” in place of row, we will most often use the word “row,” because “row” is more commonly used in relational databases (and SQL Server 2005 is a relational database).
In the previous section, we showed you how to select or display particular columns from a table, but we did not explain how to select or display specific rows. Usually you would want to select or display only particular rows from a table. For example, you may want to list all the dependents who are older than five, or list all the dependents who are female. In such a case, you want only the rows WHERE the dependents are older than five, or, only the rows WHERE the dependents are female. That is, you want to display only the rows that meet a certain condition or criteria.
By using a WHERE clause in a SELECT statement, you can selectively choose rows that you wish to display based on a criterion. For additional filtering, the WHERE clause can be used with logical operators like AND and OR, and the BETWEEN operator and its negation, NOT BETWEEN.
Filtering with WHERE
The WHERE clause is a row filter that is used to restrict the output of rows (or tuples
) in a result set. When the WHERE clause is used, the SQL Server database engine selects the rows from the table for the result set that meet the conditions listed in the WHERE clause. So, as we have previously illustrated, if no WHERE clause is used in a query, the query will return all rows from the table.
Following is the general syntax of a SELECT statement with a WHERE clause:
SELECT column-names
FROM   Table
WHERE  criteria
For example, consider the following query:
SELECT *
FROM   Dependent
WHERE  sex = 'F'
This query produces 22 rows of output (of which we show the first 10 rows):
PNO    DNAME                RELATIONSHIP SEX  AGE
------ -------------------- ------------ ---- ------
2      Mary                 Daughter     F    9
2      Beena                Spouse       F    31
10     Shantu               Daughter     F    5
14     Rani                              F    3
17     Susan                Daughter     F    4
34     Susan                Daughter     F    5
34     Monica               Daughter     F    1
62     Hillary              Daughter     F    16
62     Phoebe               Daughter     F    12
128    Mita                 Daughter     F    NULL
.
.
.

(22 row(s) affected)
The output for this query lists all the columns of the Dependent table, but only the rows WHERE the sex attribute has been assigned a value of F.
The WHERE clause can be used with several comparison operators:
> (greater than)
<> not equal
= equal
>= greater than or equal to
<= less than or equal to
WHERE may be used in a query in addition to ORDER BY. Following is an example of a query that displays the dname and age from the Dependent table where the age of the dependent is less than or equal to 5, ordered by age:
SELECT   dname, age
FROM     Dependent
WHERE    age <= 5
ORDER BY age
This query produces 19 rows of output (of which we show the first 11 rows):
dname                age
-------------------- ------
Raju                 1
Sam                  1
Monica               1
Prakash              1
Mithu                1
Nita                 2
Rakhi                2
Jake                 2
Jon                  2
Mahesh               2
Rani                 3
.
.
.

(19 row(s) affected)
So far we have shown you how to include only one condition in your WHERE clause. If you want to include multiple conditions in your WHERE clause, you can use logical operators like AND and OR, and other operators like BETWEEN and its negation, NOT BETWEEN. The following sections discuss and illustrate the use of the AND, OR, and BETWEEN operators, and also the NOT BETWEEN in the WHERE clause.
The AND Operator
The AND is a way of combining conditions in a WHERE clause. An AND operator is used in a WHERE clause if more that one condition is required. Using the AND further restricts the output of rows (tuples) in the result set. For example, consider the following query:
SELECT *
FROM   Dependent
WHERE  age <= 5
AND    sex = 'F'
which produces the following nine rows of output:
PNO    DNAME                RELATIONSHIP SEX  AGE
------ -------------------- ------------ ---- ------
10     Shantu               Daughter     F    5
14     Rani                              F    3
17     Susan                Daughter     F    4
34     Susan                Daughter     F    5
34     Monica               Daughter     F    1
128    Nita                 Daughter     F    2
142    Rakhi                Daughter     F    2
153    Madhu                Daughter     F    5
153    Mamta                Daughter     F    4

(9 row(s) affected)
The output for this query lists all the columns of the Dependent table, but only the rows WHERE the value of the age attribute is less than or equal to 5
and the sex is female. The AND means that both the criteria, age <= 5 and sex = 'F', have to be met for the row to be included in the result set. 'F' is in single quotes in this query because sex was defined as character data (CHAR) when the table was created. Text or character data has to be in single quotes in SQL Server 2005. Double quotes would not be acceptable in SQL Server 2005. Numeric data (e.g., age <= 5) should not be in quotes.
The OR Operator
The OR operator is another way of combining conditions in a WHERE clause. Unlike the AND operator, the OR operator allows the database engine to select the row to be included in the result set if either of the conditions in the WHERE clause are met. So, although you could also use the OR operator with your WHERE clause if you wanted to include more that one condition in your WHERE clause, either of the conditions in the WHERE clause can be met for a row to be included in the result set.
Consider the following query:
SELECT *
FROM   Dependent
WHERE  age >20
OR     sex = 'F'
which produces 23 rows of output (of which we are showing the first 10):
PNO    DNAME                RELATIONSHIP SEX  AGE
------ -------------------- ------------ ---- ------
2      Mary                 Daughter     F    9
2      Beena                Spouse       F    31
10     Shantu               Daughter     F    5
14     Rani                              F    3
17     Susan                Daughter     F    4
34     Susan                Daughter     F    5
34     Monica               Daughter     F    1
62     Tom                  Husband      M    45
62     Hillary              Daughter     F    16
62     Phoebe               Daughter     F    12
.
.
.

(23 row(s) affected)
This output lists of all dependents who are either greater than 20 years of age or are female. The OR means that either of the criteria, age > 20 or sex = 'F', has to be met for the row to be included in the output.
The BETWEEN Operator
The BETWEEN operator is yet another way of combining filtering conditions in a WHERE clause. In SQL Server 2005, the BETWEEN operator allows you to determine whether a value falls within a given range of values (inclusive). The general syntax of the BETWEEN operator is:
SELECT...
FROM
WHERE
BETWEEN value1 AND value2
For example, if we want to find all the dependents between the ages of 3 and 5, we would type the following:
SELECT  dname, age
FROM    Dependent
WHERE   age
BETWEEN 3 AND 5
This query produces the following nine rows of output:
dname                age
-------------------- ------
Amit                 3
Shantu               5
Rani                 3
Susan                4
Susan                5
James                5
Sebastian            4
Madhu                5
Mamta                4

(9 row(s) affected)
Tip
In SQL Server 2005, value1 in the BETWEEN clause has to be less than value2. In some SQL languages (for example, in Access SQL), value1 does not have to be less than value2.
Because the operator is inclusive, the end points of the comparison have been included in the output; that is, the BETWEEN clause takes the values from value1 and value2.
As we will often point out, SQL statements may be written in several ways. For example, the BETWEEN that we illustrated earlier may also be written as follows:
SELECT dname, age
FROM   Dependent
WHERE  age >=3
AND    age <=5
This query produces the same output as the previous query. So, BETWEEN can be considered shorthand for “greater-than-or-equal-to AND less-than-or-equal-to some value.”
Negating the BETWEEN Operator
The BETWEEN operator can be negated by using the keyword NOT before the BETWEEN operator. NOT BETWEEN allows you to determine whether a value does not occur within a given range of values. The general syntax of the NOT BETWEEN is:
SELECT...
FROM
WHERE
NOT BETWEEN value1 AND value2
For example, if we want to find all the dependents who are not between the ages of 3 and 15, we would type the following:
SELECT dname, age
FROM   Dependent
WHERE  age
NOT BETWEEN 3 AND 15
which would give us the following 19 rows:
dname                age
-------------------- ------
Beena                31
Raju                 1
Sam                  1
Monica               1
Tom                  45
Hillary              16
Jon                  2
Prakash              1
Mithu                1
Nita                 2
Barbara              26
Rakhi                2
Susan                22
Susie                22
Xi du                22
Barbara              23
Jake                 2
Mahesh               2
Sally                22

(19 row(s) affected)
Here the end points of the comparison are not included in the result set. The previous NOT BETWEEN query could also be written as follows:
SELECT sname, class
FROM   Student
WHERE  class <1
OR     class >3
NOT BETWEEN could be considered shorthand for “less-than OR greater-than some value.”
The COUNT Function
The COUNT function is used to return a count of the number of rows that the output will produce, without actually displaying all of the output (rows) themselves. This function often comes in handy when you have large tables, or you expect a large output. In such situations, it is desirable to determine the number of rows of output that you will be getting before actually displaying the output. In this section, we introduce the COUNT function and we also take another look at the concept of null values.
If you type the following command:
SELECT *
FROM   Dependent
you will get an output that includes all the rows of the Dependent table plus all the values for all columns in those rows. If you want to know only the number of rows in the output (rather than view the actual rows themselves), type the following:
SELECT COUNT(*)
FROM   Dependent
This query produces the following output:
-----------
39

(1 row(s) affected)
This output says that there are 39 rows in the Dependent table. Note that the actual rows themselves are not displayed.
It is often useful to count the occurrence of column values that have a value. For example, suppose we want to find how many nonnull rows are in a particular column. With this query:
SELECT COUNT(age)
FROM   Dependent
we get:
-----------
36

Warning: Null value is eliminated by an aggregate or other SET operation.

(1 row(s) affected)
COUNT(age) counts only the rows in which age is not null, meaning that it counts only the rows that have a defined value. Therefore, the preceding output is 36 rows rather than 39 rows because the age column in the Dependent table includes 3 null values. If you want COUNT to count rows and include rows that have fields with null values, you would use COUNT(*). In the next section, we discuss null values in more detail.
IS NULL
Null values are used to designate missing data in columns. The IS NULL condition is the only condition that directly tests for nulls. Null values are unmatched by all other conditions in WHERE clauses. Rows with null values cannot be retrieved by using = NULL in a WHERE clause, because NULL signifies a missing value. No value is considered to be equal to, greater than, or less than NULL. Even a space is not considered to be a NULL, and a null is not considered to be a space. Nulls are not considered like any other value in a table either, since nulls do not have data types. Also, because nulls do not have data types, there is no distinction between nulls in numeric columns and nulls in text columns or date columns.
The following query provides dependent names and the ages of dependents (from the Dependent table) that have null values for their age columns:
SELECT dname, age
FROM   Dependent
WHERE  age IS NULL
This produces the following three rows of output:
dname                age
-------------------- ------
Donald II            NULL
Mita                 NULL
Losmith              NULL

(3 row(s) affected)
IS NOT NULL
To retrieve all rows that are not nulls, IS NOT NULL can be used. The following query will give all the rows that are not nulls—the remaining 36 rows of the table (of which we show the first 10 rows):
SELECT dname, age
FROM   Dependent
WHERE  age IS NOT NULL
which produces 36 rows of output (of which the first 10 rows are shown):
dname                age
-------------------- ------
Matt                 8
Mary                 9
Beena                31
Amit                 3
Shantu               5
Raju                 1
Rani                 3
Susan                4
Sam                  1
Chris                6
.
.
.

(36 row(s) affected)
The ROWCOUNT Function
In an earlier section, we discussed how to limit the number of rows that are returned by a SELECT statement with the use of a WHERE clause and logical operators. In this section, we introduce the ROWCOUNT function, another way of limiting the number of rows that can be the returned by a SELECT statement.
The WHERE clause assumes that you have knowledge of the actual data values present in a data set. But what if you want to see only a sample of a result set, and you have no idea which range of values are present in the table? In this case, the ROWCOUNT function can come in handy.
For example, to see the first 10 rows of the Dependent table, you can type:
SET ROWCOUNT 10
SELECT *
FROM   Dependent
This query returns the following 10 rows of output:
PNO    DNAME                RELATIONSHIP SEX  AGE
------ -------------------- ------------ ---- ------
2      Matt                 Son          M    8
2      Mary                 Daughter     F    9
2      Beena                Spouse       F    31
10     Amit                 Son          M    3
10     Shantu               Daughter     F    5
14     Raju                 Son          M    1
14     Rani                              F    3
17     Susan                Daughter     F    4
17     Sam                  Son          M    1
20     Donald II            Son          M    NULL

(10 row(s) affected)
After using ROWCOUNT, you should reset the ROWCOUNT property by:
SET ROWCOUNT 0
Tip
If you do not reset the ROWCOUNT property, you will keep getting whatever you set your ROWCOUNT to for the remainder of this session (that is, until you log off).
If you set ROWCOUNT and issue multiple queries in the same batch, the rows are limited for all queries within the batch.
Other important functions are discussed in Chapter 5.
Using Aliases
Column aliases and table aliases are temporary names assigned within a query to columns and tables respectively. They are created on the fly in a query, and do not exist after the query is run. In this section, we discuss column aliases and table aliases.
Column Aliases
Column aliases are used to improve the readability of a query and its output. In SQL Server 2005, a column alias can be declared either before or after the column designation in the SELECT statement.
We will first display a query without a column alias:
SELECT dname, age, sex
FROM   Dependent
WHERE  age > 5
This query produces 17 rows of output (of which we show the first 10 rows):
dname                age    sex
-------------------- ------ ----
Matt                 8      M
Mary                 9      F
Beena                31     F
Chris                6      M
Tom                  45     M
James                14     M
Hillary              16     F
Phoebe               12     F
Om                   6      M
Barbara              26     F
.
.
.

(17 row(s) affected)
Notice that SQL Server 2005 (by default) uses the column names from the Dependent table for the column headings. These column names may not be so explicit or descriptive. For example, what is dname? We would probably assume it’s a name of something, but what does the “d” in front of name stand for? Using more descriptive headings in the output would considerably increase readability. To use more descriptive column headings, you can include column aliases just before or after the column name by using AS in the SELECT statement, as shown next (in the first few examples, we place the descriptive column headings after the column names):
SELECT dname AS Dependent_name, age AS Dependent_age, sex AS Dependent_sex
FROM   Dependent
WHERE  age > 5
This query produces 17 rows of output (of which we show the first 10 rows):
Dependent_name       Dependent_age Dependent_sex
-------------------- ------------- -------------
Matt                 8             M
Mary                 9             F
Beena                31            F
Chris                6             M
Tom                  45            M
James                14            M
Hillary              16            F
Phoebe               12            F
Om                   6             M
Barbara              26            F
.
.
.

(17 row(s) affected)
That output has more descriptive headings.
To embed a blank in the column alias, you have to put the column alias in single or double quotes, as shown in the following example:
SELECT dname AS "Dependent Name", age AS "Dependent Age", sex AS "Dependent Sex"
FROM   Dependent
WHERE  age > 5
This query produces 17 rows of output (of which we show the first 10 rows):
Dependent Name       Dependent Age Dependent Sex
-------------------- ------------- -------------
Matt                 8             M
Mary                 9             F
Beena                31            F
Chris                6             M
Tom                  45            M
James                14            M
Hillary              16            F
Phoebe               12            F
Om                   6             M
Barbara              26            F
.
.
.

(17 row(s) affected)
In fact, if you use single quotes in the previous query, you can also omit the AS. That is, typing in the following query gives you the same output as does the previous query:
SELECT dname 'Dependent Name', age 'Dependent Age', sex 'Dependent Sex'
FROM   Dependent
WHERE  age > 5
Column aliases can also be placed in square brackets, as shown in the following query:
SELECT dname AS [Dependent Name], age AS [Dependent Age], sex AS [Dependent Sex]
FROM   Dependent
WHERE  age > 5
Finally, column aliases can be placed in square brackets before = column name, as shown here:
SELECT [Dependent Name] = dname, [Dependent Age] = age, [Dependent Sex] = sex
FROM   Dependent
WHERE  age > 5
These previous two queries produce the same output (and headings) as the query before them.
If we wish to eliminate the brackets in the previous query, we can use only a one-word alias before the = column name, as shown:
SELECT Name = dname, Age = age, Sex = sex
FROM   Dependent
WHERE  age > 5
This query produces 17 rows of output (of which we show the first 10 rows):
Name                 Age    Sex
-------------------- ------ ----
Matt                 8      M
Mary                 9      F
Beena                31     F
Chris                6      M
Tom                  45     M
James                14     M
Hillary              16     F
Phoebe               12     F
Om                   6      M
Barbara              26     F
.
.
.

(17 row(s) affected)
Table Aliases
A table alias, usually used in multi-table queries (we discuss multi-table queries in Chapter 4 onwards), allows us to use a shorter name for a table when we reference the table in the query. A table alias is temporary, and does not exist after the query is run. We will explore multi-table queries in future chapters. Following is an example of the previous query written with a one-letter table alias:
SELECT d.dname
FROM   Dependent d
WHERE  d.age > 5
This query produces 17 rows of output (of which we show the first 10 rows):
dname
--------------------
Matt
Mary
Beena
Chris
Tom
James
Hillary
Phoebe
Om
Barbara
.
.
.

(17 row(s) affected)
In this query, the table alias is the letter d after the table name, Dependent. A table alias can also be defined by a short, meaningful word or expression after the table name, rather than a one-letter table alias, but the one-letter table alias is commonly used by SQL programmers. Once a table alias has been defined in a query, it can be used in place of the table name. So, d could be used in place of Dependent if the table name needed to be used again in this particular query, but it is not reusable in multiple queries within the same batch. Again note that the table alias is not valid outside this query (or, after this query is executed). That is, if you type SELECT * from d, you will get an error message. There is no such table as d (d was locally defined as the table alias for that particular query, and is valid only in that particular query).
Table Aliases Used as Table Qualifiers
In the previous example, the construction d.dname contains a table qualifier (the d. part). Table qualifiers are needed when the same column name has been used in more than one table. Table qualifiers before the column names determine which table the column is from. For example, if TableA has a column called Field1 and TableB also has a column Field1, if we do not use a table qualifier in a multi-table query, there is no way that the query engine can know which Field1 the query is referring to. To correctly handle this situation, we would have to use a table qualifier in the form Table1.FieldA, where Table1 is the table qualifier (this is also an alias, in a way).
Tip
Once again, multi-table queries will be discussed from Chapter 4 onward.
Following is an example of a query with a table qualifier used for the age column:
SELECT *
FROM   Dependent
WHERE  Dependent.age > 5
This query produces 17 rows of output (of which we show the first 10 rows):
PNO    DNAME                RELATIONSHIP SEX  AGE
------ -------------------- ------------ ---- ------
2      Matt                 Son          M    8
2      Mary                 Daughter     F    9
2      Beena                Spouse       F    31
20     Chris                Son          M    6
62     Tom                  Husband      M    45
62     James                Son          M    14
62     Hillary              Daughter     F    16
62     Phoebe               Daughter     F    12
126    Om                   Son          M    6
128    Barbara              Wife         F    26
.
.
.

(17 row(s) affected)
It is also very common in SQL to alias a table and then also use the table alias as a table qualifier, as illustrated here:
SELECT *
FROM   Dependent d
WHERE  d.age > 5
The output of this query will be the same as the output of the previous query.
In this query, d (the table alias) is also the table qualifier. Not only is a construction like this very common, but it also helps to circumvent typing errors when writing commands.
The advantages of using table qualifiers and table aliases may not be so apparent in the examples presented in this chapter, because we are working only with single tables here. As we start working with multiple tables (from Chapter 4 onwards), their advantages will become more obvious.
Synonyms
In the last section, we discussed one way of referring to a table—through the use of table aliases. Table aliases are not permanent, in the sense that they do not exist after the query has been executed. In this section, we show you another way of referring to a table--synonyms . Synonyms are more permanent; they are available for use until they are deleted. In this section, we show you how to create, use, and delete synonyms.
SQL Server 2005 allows you to create synonyms for your tables. Synonyms are usually shorter names that can be used in place of the table name. If a change is made in the original table or its data, this change will be reflected when the synonym is used. And, if a change is made in the data of the table using a synonym, this change will be reflected in the original table. But, you cannot alter the table’s definition using the synonym. Alter table commands (covered in Chapter 3) can be used only on the actual tables.
The general syntax to create a synonym is:
CREATE SYNONYMsynonym_nameFORTable_name
For example, to create a synonym for the Student table called s1, type:
CREATE SYNONYM s1
FOR Student
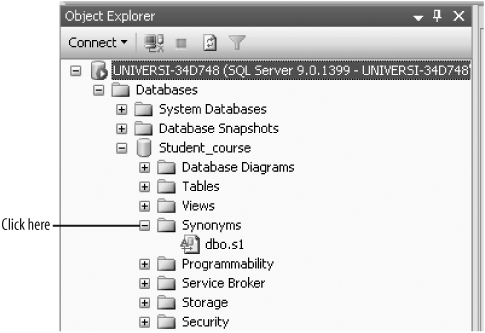
To view the synonym that you just created, from the Object Explorer, expand Student_course database and then Synonyms (as shown in Figure 2-2), and you will see the synonym, s1.
You can now type:
SELECT *
FROM s1
And you will get the same output as if you typed:
SELECT *
FROM Student
A synonym will exist until you delete it. The general syntax to delete a synonym is:
DROP SYNONYM synonym_nameSo, if you want to delete the synonym s1, type:
DROP SYNONYM s1
You can also delete the synonym by right-clickingon the synonym and selecting Delete.
If you forget which synonym has been created for which table, right-clickon the synonym and select Properties.
Adding Comments to SQL Statements
Comments are nonexecutable words or phrases included in SQL queries to make the queries easier to understand (particularly by other people). Comments are ignored by the SQL engine, but they are very useful to programmers in determining what the statement does, when it was written, who wrote it, and so on. There are two ways of including comments in SQL Server 2005. The first way is by the use of dashes, as shown here:
SELECT *            -- displays "all" attributes
FROM   Dependent d  -- of the Dependent table
WHERE  d.age > 5    -- where the age of the dependent is greater than 5.
The second way of including comments in Server SQL 2005 is by the use of /*...*/ construction. Following is an example of a commented statement that uses this format:
SELECT dname, age            /* displays the dependent name and age  */
FROM   Dependent d          /* from the Dependent table     */
WHERE  d.age > 5              /* where the age of the dependent is greater than 5 */
Tip
SQL Server 2005 allows you to include comments even before the first line in a query and after the last line in a query.
We wish to encourage the use of comments in writing SQL queries, particularly for complex queries, and when queries will be debugged or enhanced by others.
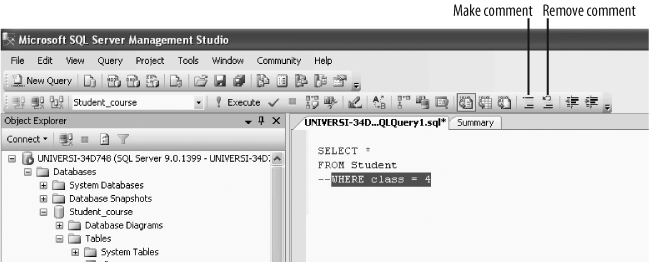
SQL Server 2005 also has icons to turn lines into comment lines. For example, if you type in the query as shown in Figure 2-3, and then you wish to make the last line a comment line, highlight the last line and clickthe Make Comment button and the last line will become a comment line. If you wish to remove the comment, clickthe button beside it, the Remove Comment button, and the comment will be removed, turning the line into a regular line.
Some Conventions for Writing SQL Statements
Although SQL statements often contain multiple commands and multiple lines, there are no fixed rules for writing SQL statements; SQL is a “free-form” language. We suggest that you use the following conventions to increase the readability of your queries, especially as your statements or queries become more complex:
Use uppercase letters for the keywords, which inclues
SELECT,FROM, andWHERE. Use lowercase letters for the user-supplied words (SQL Server 2005 is not case-sensitive for commands).Align the keywords
SELECT,FROM, andWHEREon separate lines, like this:
SELECT *
FROM   Dependent
WHERE  age > 5
A Few Notes About SQL Server 2005 Syntax
A few things that you need to know about syntax in SQL Server 2005:
SQL Server 2005 allows blank lines in the SQL window.
Queries in SQL Server 2005 do not have to end in a semicolon.
SQL Server 2005 allows you to include comments anywhere in a SQL script or query. Many other SQL languages will not let you include a comment as the first line of a script or query (other SQL languages will look for a SQL statement beginning with a command like SELECT on the first line of a script or query), but SQL Server 2005 will allow you to include a comment on the first line of a script or query. SQL Server 2005 also allows comments after the semi-colon (which may have been used to end a query). Many SQL languages will not accept anything typed after the semi-colon.
SQL Server 2005 will allow you to type in multiple queries on the query editor screen at one time, and you may only execute the ones that you wish to execute. For example, if you type in the following three queries on the query editor screen:
SELECT *
FROM   Dependent

SELECT *
FROM   Student

SELECT *
FROM   Course
To first execute the middle query, SELECT * FROM Student, you may highlight this query and clickthe Execute button. If you then wish to execute the first query, SELECT * FROM Dependent, you may highlightthis query and clickon the Execute button. You can, of course, do this as many times as you wish, and in any combination that you wish.
Summary
In this chapter, we have shown you how to use the basic SELECT statement and how to extract columns and rows using SELECT. We introduced the COUNT and ROWCOUNT functions, the AND, OR, and BETWEEN operators, table and column aliases, and synonyms. We also touched on the concept of nulls and have shown you how to include comments. Towards the end of the chapter, we presented some conventions for writing SQL statements and a few notes about SQL Server syntax. You will need this basic knowledge and understanding to work the forthcoming chapters.
Review Questions
What is usually the first word in a SQL query?
Does a SQL Server 2005
SELECTstatement require aFROM?Can a
SELECTstatement in SQL Server 2005 be used to make an assignment? Explain with examples.What is the
ORDER BYused for?Does
ORDER BYactually change the order of the data in the tables or does it just change the output?What is the default order of an
ORDER BYclause?What kind of comparison operators can be used in a
WHEREclause?What are four major operators that can be used to combine conditions on a
WHEREclause? Explain the operators with examples.What are the logical operators?
In a
WHEREclause, do you need to enclose a text column in quotes? Do you need to enclose a numeric column in quotes?Is a null value equal to anything? Can a space in a column be considered a null value? Why or why not?
Will
COUNT(column)include columns with null values in its count?What are column aliases? Why would you want to use column aliases? How can you embed blanks in column aliases?
What are table aliases?
What are table qualifiers? When should table qualifiers be used?
Are semicolons required at the end of SQL statements in SQL Server 2005?
Do comments need to go in a special place in SQL Server 2005?
When would you use the
ROWCOUNTfunction versus using theWHEREclause?Is SQL case-sensitive? Is SQL Server 2005 case-sensitive?
What is a synonym? Why would you want to create a synonym?
Can a synonym name of a table be used instead of a table name in a
SELECTstatement?Can a synonym of a table be used when you are trying to alter the definition of a table?
Can you type more than one query in the query editor screen at the same time?
Exercises
Unless specified otherwise, use the Student_course database to answer the following questions.
In writing out all the following queries, use table and column aliases wherever you feel that it would improve the readability of your output. Follow the conventions for writing SQL statements. Also, for future reference, you may want to get into the practice of saving your queries by question number. For example, save the query you write for Question 2-2a as query2-2a. Print the query and your results.
Tip
Refer to Appendix A for a complete listing of all tables (and their columns) available in the Student_course database.
The
Student_coursedatabase used in this book has the following tables:Student,Dependent,Course,Section,Prereq(for prerequisite),Grade_report,Department_to_major, andRoom.Display the data from each of these tables by using the simple form of the
SELECT *statement.Display the first five rows from each of these tables.
Display the student name and student number of all students who are juniors (hint: class = 3).
Display the student names and numbers (from question 2) in descending order by name.
Display the course name and number of all courses that are three credit hours.
Display all the course names and course numbers (from question 3) in ascending order by course name.
Display the building number, room number, and room capacity of all rooms in descending order by room capacity. Use appropriate column aliases to make your output more readable.
Display the course number, instructor, and building number of all courses that were offered in the Fall semester of 1998. Use appropriate column aliases to make your output more readable.
List the student number of all students who have grades of C or D.
List the
offering_deptof all courses that are more than three credit hours.Display the student name of all students who have a major of COSC.
Find the capacity of room 120 in Bldg 36.
Display a list of all student names ordered by major.
Display a list of all student names ordered by major, and by class within major. Use appropriate table and column aliases.
Count the number of departments in the
Department_to_majortable.Count the number of buildings in the
Roomtable.What output will the following query produce?
SELECT COUNT(class)
FROM Student
WHERE class IS NULL
Why do you get this output?
Use the
BETWEENoperator to list all the sophomores, juniors, and seniors from theStudenttable.Use the
NOT BETWEENoperator to list all the sophomores and juniors from theStudenttable.Create synonyms for each of the tables available in the
Student_coursedatabase. View your synonyms in the Object Explorer.